1. Pros Verification
1. props node of object type
Each prop can be checked for data type using props nodes of object type.
Disadvantages of using props nodes of array type: you cannot specify a specific data type for each prop.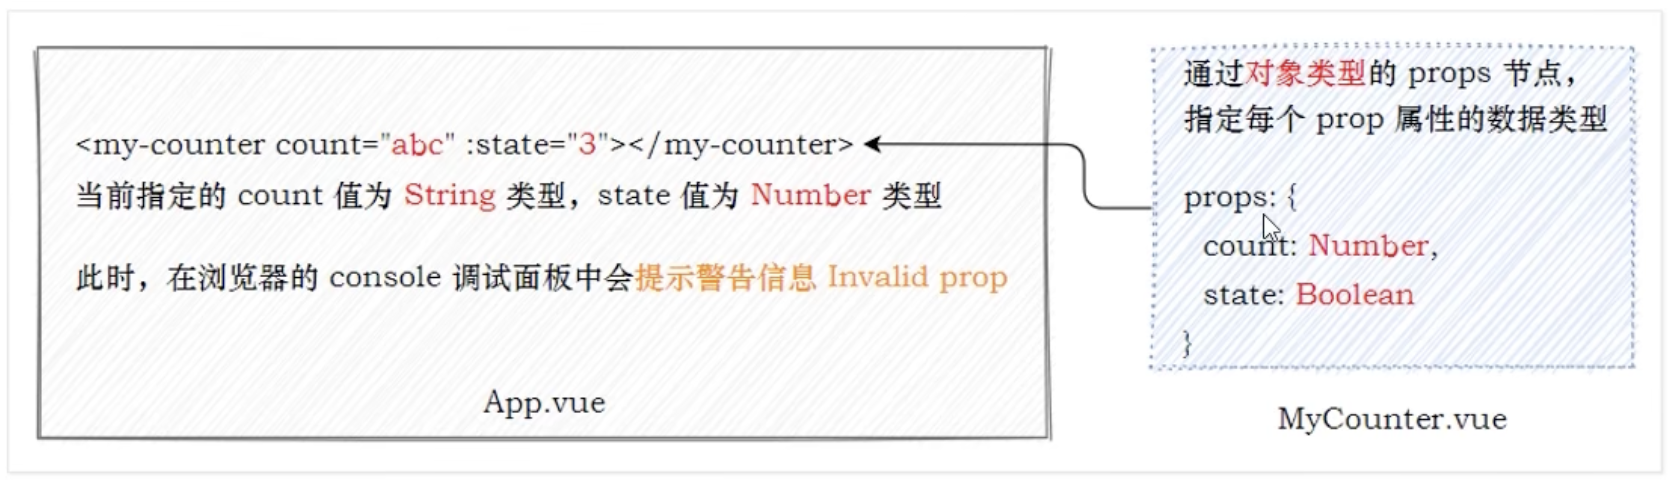
2. props authentication scheme
2.1 Basic Type Check
Specify the underlying check type directly for the prop property of the component.
More than 2.2 possible types
Specify multiple possible types through an array
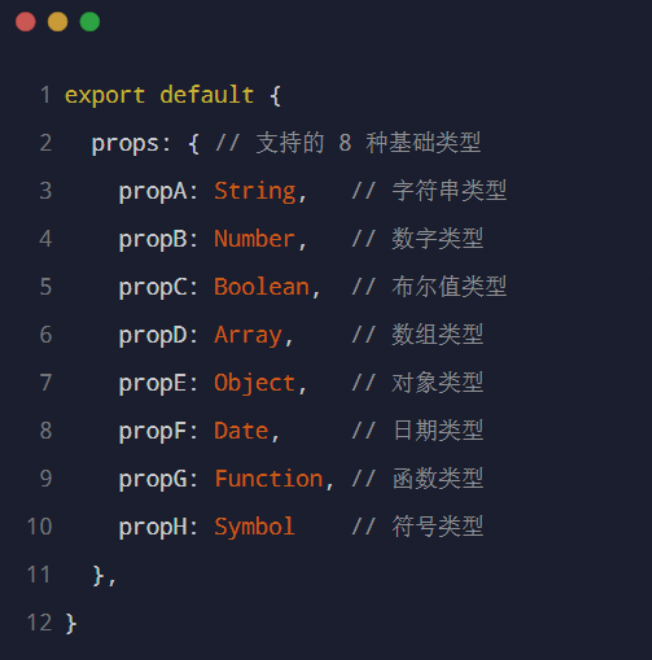
export default{
    props:{
        propA:[String,Number],//The value of the propA property can be a string or a number
    },
}
2.3 Mandatory Checks
If a prop property of a component is required, it must have a value for the passed property.
export default{
    props:{
        propB:{
            type:String,   //The current property value must be of type String
            required:true   //Current property value is required
        }
    }
}
2.4 Attribute defaults
export default{
    props: {
        propC: {
            type: Number,
            default:100
        }
    }
}
2.5 Custom Validation Functions
export default{
    props:{
        propD:{
            validator(value){
                //The value of the propD attribute must match one of the following strings
                //The validator function returns a value of true to indicate that the validation passed, and false to indicate that the validation failed.
                return ['success', 'warning','danger'].indexOf(value) !== -1
            }
        }
    }
}
2. Computing attributes
1. What are computational properties
Essentially, it is a function function that monitors changes in data in real time and return s a new computed value for use by components when rendering DOM
2. How to declare computed properties
Declared as a function function in the component's computed.
Note: The return value must be in the calculated property!
<template>
  <div>
    <input type="text" v-model.number="count" />
    <p>{{ count }} The value multiplied by 2 is:{{ plus }}</p>
  </div>
</template>

<script>
export default {
  name: 'MyCounter',
  data() {
    return {count: 1}
  },
  computed: {
    plus() {
      return this.count * 2
    },
  },
}
</script>
3. Use caution
- Computed properties must be defined in the computed node
- The calculated property must be a function function function
- Calculated property must have a return value
- Calculated attributes must be used as generic attributes
4. Compute Attribute vs Method
Computed attributes cache the results of the calculation, and only when the dependencies of the computed attributes change will the operation be re-performed, with good performance.
The calculation results of the method can not be cached and have poor performance.
  computed: {
    plus() {
      console.log('Calculated property is executed')
      return this.count * 2
    },
  },
  methods: {
     plus() {
      console.log('Method was executed')
      return this.count * 2
    }
  }
3. Custom Events
1. What is a custom event
Allows consumers of components to monitor changes in state within components
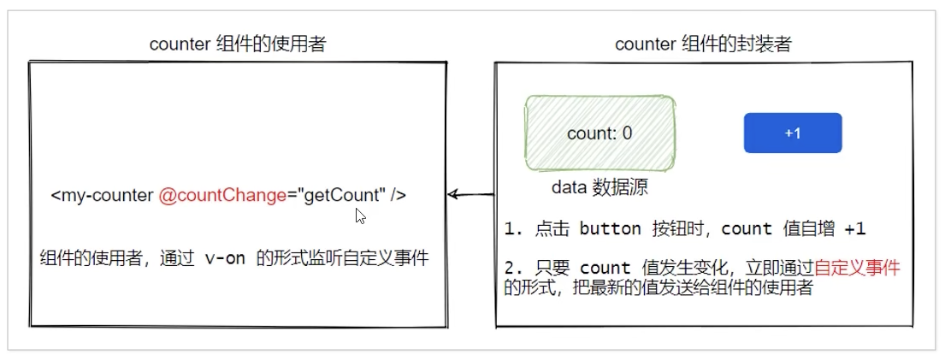
2. Three steps to use custom events
When encapsulating components:
- Declare custom events
- Trigger Custom Event
When using components:
- Listen for custom events
<template>
  <div>
    <p>count The value is:{{ count }}</p>
    <button @click="add">+1</button>
  </div>
</template>

<script>
export default {
  name: 'MyCounter',
  // 1. Declare custom events
  emits: ['countChange'],
  data() {
    return {
      count: 0,
    }
  },
  methods: {
    add() {
      this.count++
      // 2. this.$emit() triggers a custom event
      this.$emit('countChange', this.count)
    },
  },
}
</script>- Custom events must be declared in advance in the emits node.
- Custom events declared under the emits node, via this. $ The emit ('name of custom event') method fires.
- When using custom components, listen for custom events in the form of v-on.
-
Calling this. $ When the emit() method triggers a custom event, the custom event parameter is passed through the second parameter.
IV. v-model on components
1. Why do I need to use v-model on components
v-model is a two-way data binding instruction that can be used on components when synchronization of data inside and outside the component needs to be maintained
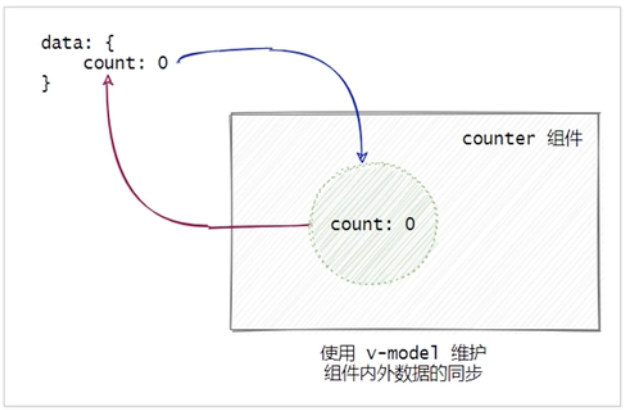
- Changes in external data are automatically synchronized into the counter component
- Changes in data in counter components are also automatically synchronized to the outside world
2. Steps to use v-model on components
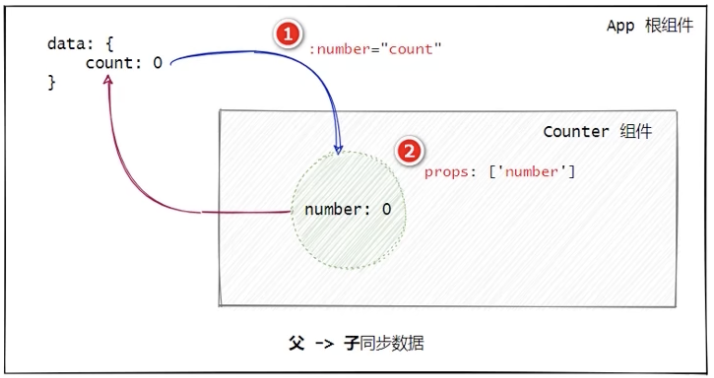
1. The parent component passes data to the child component via v-bind: attribute binding
(2) In sub-components, receive data from parent components through props

(1) Add v-model Directive before v-bind:directive
(2) Declare emits custom events in subcomponents in the format update:xxx
(3) Call $emit() to trigger a custom event to update data in the parent component
<template>
  <div>
    <!--active Control the style changes of the buttons by activeBtnIndex Decision Status-->
    <todo-button v-model:active="activeBtnIndex"></todo-button>
  </div>
</template>
<script>
// Import TodoButton Component
import TodoButton from './components/todo-button/TodoButton.vue'
export default{
  name: 'MyApp',
  data() {
    return {
      activeBtnIndex: 0,
    }
  },
  computed: {
    tasklist() {
      switch(this.activeBtnIndex) {
        case 0:
          return this.todolist
        case 1:
          return this.todolist.filter(x => x.done === true)
        case 2:
          return this.todolist.filter(x => x.done !== true)
      }
    }
  },
},
</script>