I Environment: NodeJs(npm)
- There are no special operations for Mac. Next - > next - > install - > finished
- windows startup installation is the same as Mac terminal / cmd
- Node - V - > 14.16.2 indicates that the installation is successful
- NPM - V - > 14.16.2 indicates that the installation is successful
- windows needs to modify the download and cache paths and configure environment variables
- Modify download and cache path
- Create new directories node global and node under the nodejs installation directory_ cache
Execute command:
😈 npm config set prefix "D:\nodejs\node_global
😈 npm config set cache "D:\nodejs\node_cache
2. Configure environment variables
💀 (1) The user variable - > Path - > modifies the npm configuration to D:\nodejs\node_global
💀 (2) User variable - > New - > node_ PATH-> D:\nodejs\node_ mudules\
Modify Taobao image (npm downloads dependent packages from github. Changing Taobao image can improve download speed)
Execute command: 😈 npm config set registry https://registry.npm.taobao.org
II Download and install Vue cli (Vue scaffold)
Execute the command: NPM install Vue cli - G
- npm install indicates the download command, where install can be abbreviated as i
- Vue cli indicates the name of the download dependent package. If the version is not written, the latest version will be downloaded by default
- -g means global download. If there is no global download, the installation will automatically download and install to the current directory, and it is only available in the current directory
- Execute the command vue-v - > 2.9.6 to indicate that the installation is complete
III Build project
😈 Execute the command: vue init webpack projectname
Project initialization configuration
- You can use the default value if you need to enter it
- Download and install dependencies according to your project requirements
- If you choose more than one, select the first enter
IV Run project
Execute command
😈 cd projectname
😈 npm run dev
Project in http://localhost:8080 Run (Port occupancy will attempt to run on the next port)
V Project directory
- Build directory: the project build directory, which is generally not modified
- config Directory: project configuration directory, project configuration file
- node_modules Directory: Project dependency directory. All project dependency packages and plug-ins are downloaded and installed in this directory
- Static Directory: it stores static resources and requires absolute path access
- src Directory: the main operation directory of the project
->Assets: store some resources and need relative path access
->Components: component directory, where all required components in the project are stored
->App.vue: all vue files are separate components App.vue is the root component of the project
->main. JS: the logical entry file of the project, entering the global configuration and the initialization of the root Vue instance
index.html: page entry file for the project
package.json: configuration list file of the project - Complete document 😆 npm i
Vi VUE routing
1. Route installation and use
Routing mechanism: the router monitors the changes of the path in the address bar, configures the path in the routing configuration, and successfully mounts the mapped component
-
😈 npm i vue-router --save
-
Create a new folder in src path, such as router, and create index JS file contents are as follows:
//Routing configuration module //1. Introduce related dependencies //Introducing Vue import Vue from "vue"; //Introduce Vue router dependency import VueRouter from "vue-router"; //2. Global import declaration. Not all dependencies can be declared through Vue The use method implements the global reference declaration, which can only be used by Vue built-in modules Vue.use(VueRouter); //Introducing routing mapping components //@Indicates the directory path src import Material from "@/components/Material"; import Shop from "@/components/Shop"; import Video from "@/components/Video"; // console.log(1111); //3. Instantiate vueroter and set configuration parameters export default new VueRouter({ //routes, an array is required as the value to represent the route configuration list routes: [ //Each object is a route configuration { // '/' indicates the root path path: "/", //Route redirection redirect:'/material', children:[ { name:"Hero", // "/" indicates that the root path is not written, and the slash indicates that the path spliced under the current parent routing path is a routing path // path:"hero"/ //Configure dynamic parameters for the target route: Add '/: parameter name' after the route path. The parameter name is used to read data in the target route // path:"hero/:hero", path:"hero", component:Hero }, }, { //Current route name name: "Material", //Routing path path: "/material", //The component to which the route is mapped component: Material }, { name: "Shop", path: "/shop", component: Shop }, { name: "video", path: "/video", component: Video }, { //The "*" path indicates a generic path, which can match any path. It must be written at the end of the routes list. It is usually used to redirect non-existent paths (or map custom 404 components) path:'*', redirect:'/' } ] }); -
In main Register router component in JS
// The Vue build version to load with the `import` command // (runtime-only or standalone) has been set in webpack.base.conf with an alias. import Vue from 'vue' import App from './App' //Introduce the configured routing module import router from "./router" Vue.config.productionTip = false /* eslint-disable no-new */ new Vue({ el: '#app', components: { App }, template: '<App/>', //Configure router for the root Vue instance. You can access the routing instance through the $router property of the Vue instance in any global component router }) -
Application of router
<template>
  <div id="app">
    <!--
      Routing mechanism:router Firm the change of address bar path,And in routing configuration path Configured,Match the component whose mapping will be mounted successfully
    -->
    <!--
     router Supplied components:
     1.router-link :Used to change the routing path
      attribute:
      (1)to:Specify routing destination
        1.Directly set as routing path
        2.Set to object,Object pass name Specify route name
        3.Set to object Object pass path Directive specifies the routing path

      (2)tag:appoint router-link final render  dom The default type is 'a' label
      Can pass
      router-link-exact-active
      router-link-active
       To specify the selected style of the route
   -->
    <nav>
      <router-link to="/material" tag="h3">data</router-link>
      <router-link :to="{name:'Shop'}" tag="h3">Shopping Mall</router-link>
      <router-link :to="{path:'/video'}" tag="h3">video</router-link>
    </nav>

     <!--
    router Supplied components
    2.router-view:As the exit of the component mapped by the routing connection(carrier)
  -->

     <router-view></router-view>
  </div>
</template>
<script>
export default {
  name: "App",
  components: {}
};
</script>

<style>
</style>
2. Value transfer between routes
Routing parameters:
-
Dynamic parameter value transfer requires setting dynamic parameters for the target route in the route configuration
//Sub routing configuration { path: '/child/:id', component: Child } //Parent route programmatic parameter transfer (usually triggered by events) this.$router.push({ path:'/child/${id}', }) -
The data is stored in params parameters through name. By default, dynamic parameters are not required to transfer parameters through name, and the data will not be reflected in the address bar. Therefore, after refreshing the page and reloading the components, the data will be lost. If you do not want to lose data, you need to configure dynamic parameters
<router-link :to="{name:'Child',params:{id:123}}">get into Child route</router-link> -
When you pass values through path, you cannot configure dynamic parameters. If you use path router, you will automatically ignore params and replace it with query After the data is spliced in the path in the form of training parameters, the value is obtained through query in the target routing component
//Sub routing configuration
{
  path: '/child,
  name: 'Child',
  component: Child
}
//Parent route programmatic parameter transfer (usually triggered by events)
this.$router.push({
    name:'Child',
    params:{
    	id:123
    }
})

this.$router.push({
    name:'Child',
    query:{
    	id:123
    }
})
Value
In the target routing component, through $route To read the data carried by dynamic parameters, and the data is stored in $route Object params Properties:
	<div>{{this.$router.params.id}}<div>
adopt path The data cannot pass through the path after being spliced in the form of query parameters params Value, required query Value
    <div>{{this.$router.query.id}}<div>
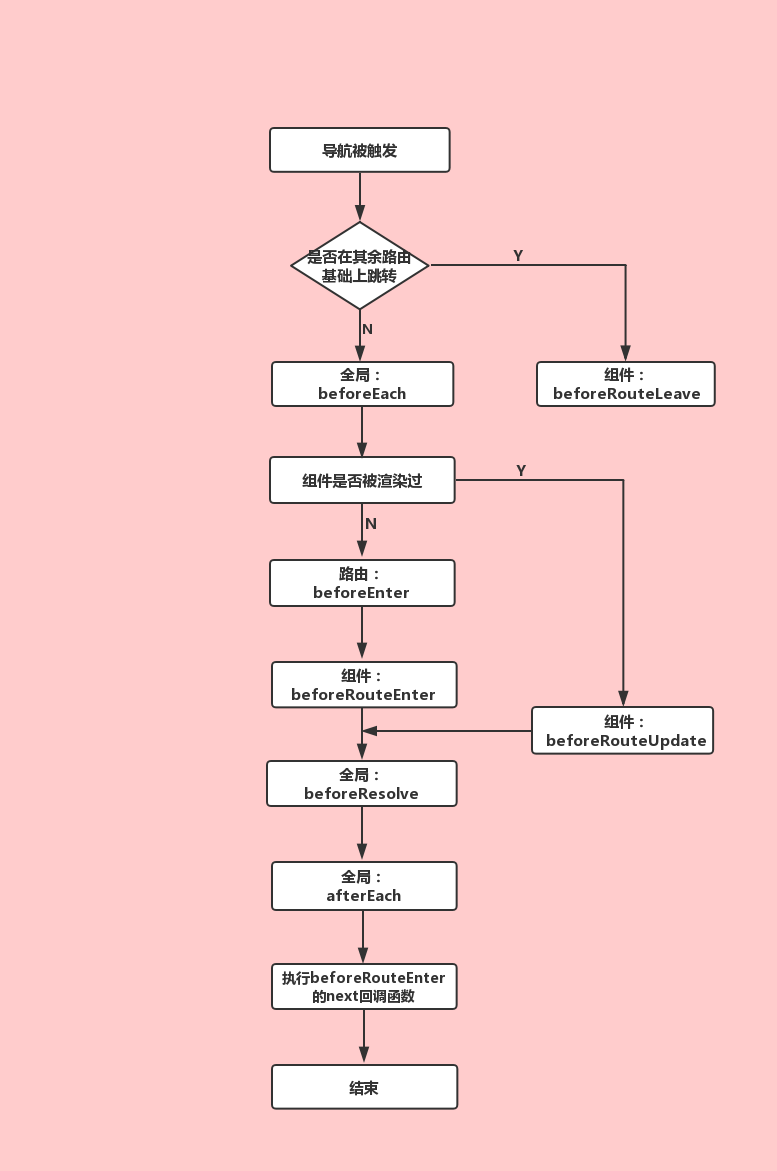
3. Route guard
-
Global guard
Global front guard: any route jump will trigger global front guard
router.beforeEach((to, from, next) => { // to: Destination Routing object // from: source routing object (the routing object that triggers the routing) // Next: is a function. You must call the next() method to continue routing, otherwise the routing will be terminated in the guard // In addition to calling the next() method directly, you can also pass in the routing path to retarget the route // You can specify other routing settings by passing an object to the next() method // (1) replace: true, no record will be generated // (2) Carry parameters through query if (to.name == 'Mine' && !sessionStorage.getItem('LOGIN')) { next({ path: '/login', // replace: true query: { id: '001' } }); } else { next(); } }); -
Global post guard: triggered when any route jump is completed, and there is no next
router.afterEach((to, from, next) => {
 console.log('afterEach');
 console.log(to);
console.log(from);
 });
- Route exclusive guard: triggered only when the current route is triggered
 beforeEnter(to, from, next) {
           if (sessionStorage.getItem('LOGIN')) {
               next();
           } else {
               next('/login');
           }
       }
- Component and route guard: triggered when the route mapping the component is triggered
 // Component and route guard: triggered when the route mapping the component is triggered
    beforeRouteEnter (to, from, next) {
        if(sessionStorage.getItem("LOGIN")){
            next()
        }else{
            alert("View after login")
        }
        console.log('beforeRouteEnter');
        next();
        // console.log(this); // undefined
        // You can set the callback function through the next() method to access the Vue instance through the callback function
        next(vm => console.log(vm.$el))
    },
-
Triggered when the route leaves the current component
beforeRouteLeave(to,from,next){
        console.log('beforeRouteLeave');
  },
4. Route lazy loading
The components are imported, but the components will be rendered only after route triggering. If there are many components, the initial loading speed of the project will be very slow. Therefore, it is not recommended to load all route meaning mapping components in advance. Only a small number of necessary components should be loaded, and the other components should be loaded on demand (route lazy loading) to optimize the initial loading speed of vue project
 {
      name: "Root",
      path: "/root",
      //component: Root
      component: () => import("@/components/Root")
    },
4. Programming navigation
    // 1. push(): the parameter value is the same as the to attribute value of the router link component
       this.$router.push('/material');
       this.$router.push({name: 'Material'});
       this.$router.push({path: '/material'});
	// Named route
		router.push({ name: 'user', params: { userId: '123' }})
	// With query parameters, it becomes / register?plan=private
		router.push({ path: 'register', query: { plan: 'private' }})

    // 2. replace(): the usage is exactly the same as that of push(). The only difference is that history records will not be generated
       this.$router.replace('/material');

    // 3. go(): the value of number is required. Positive numbers advance and negative numbers retreat
      this.$router.go(-1);
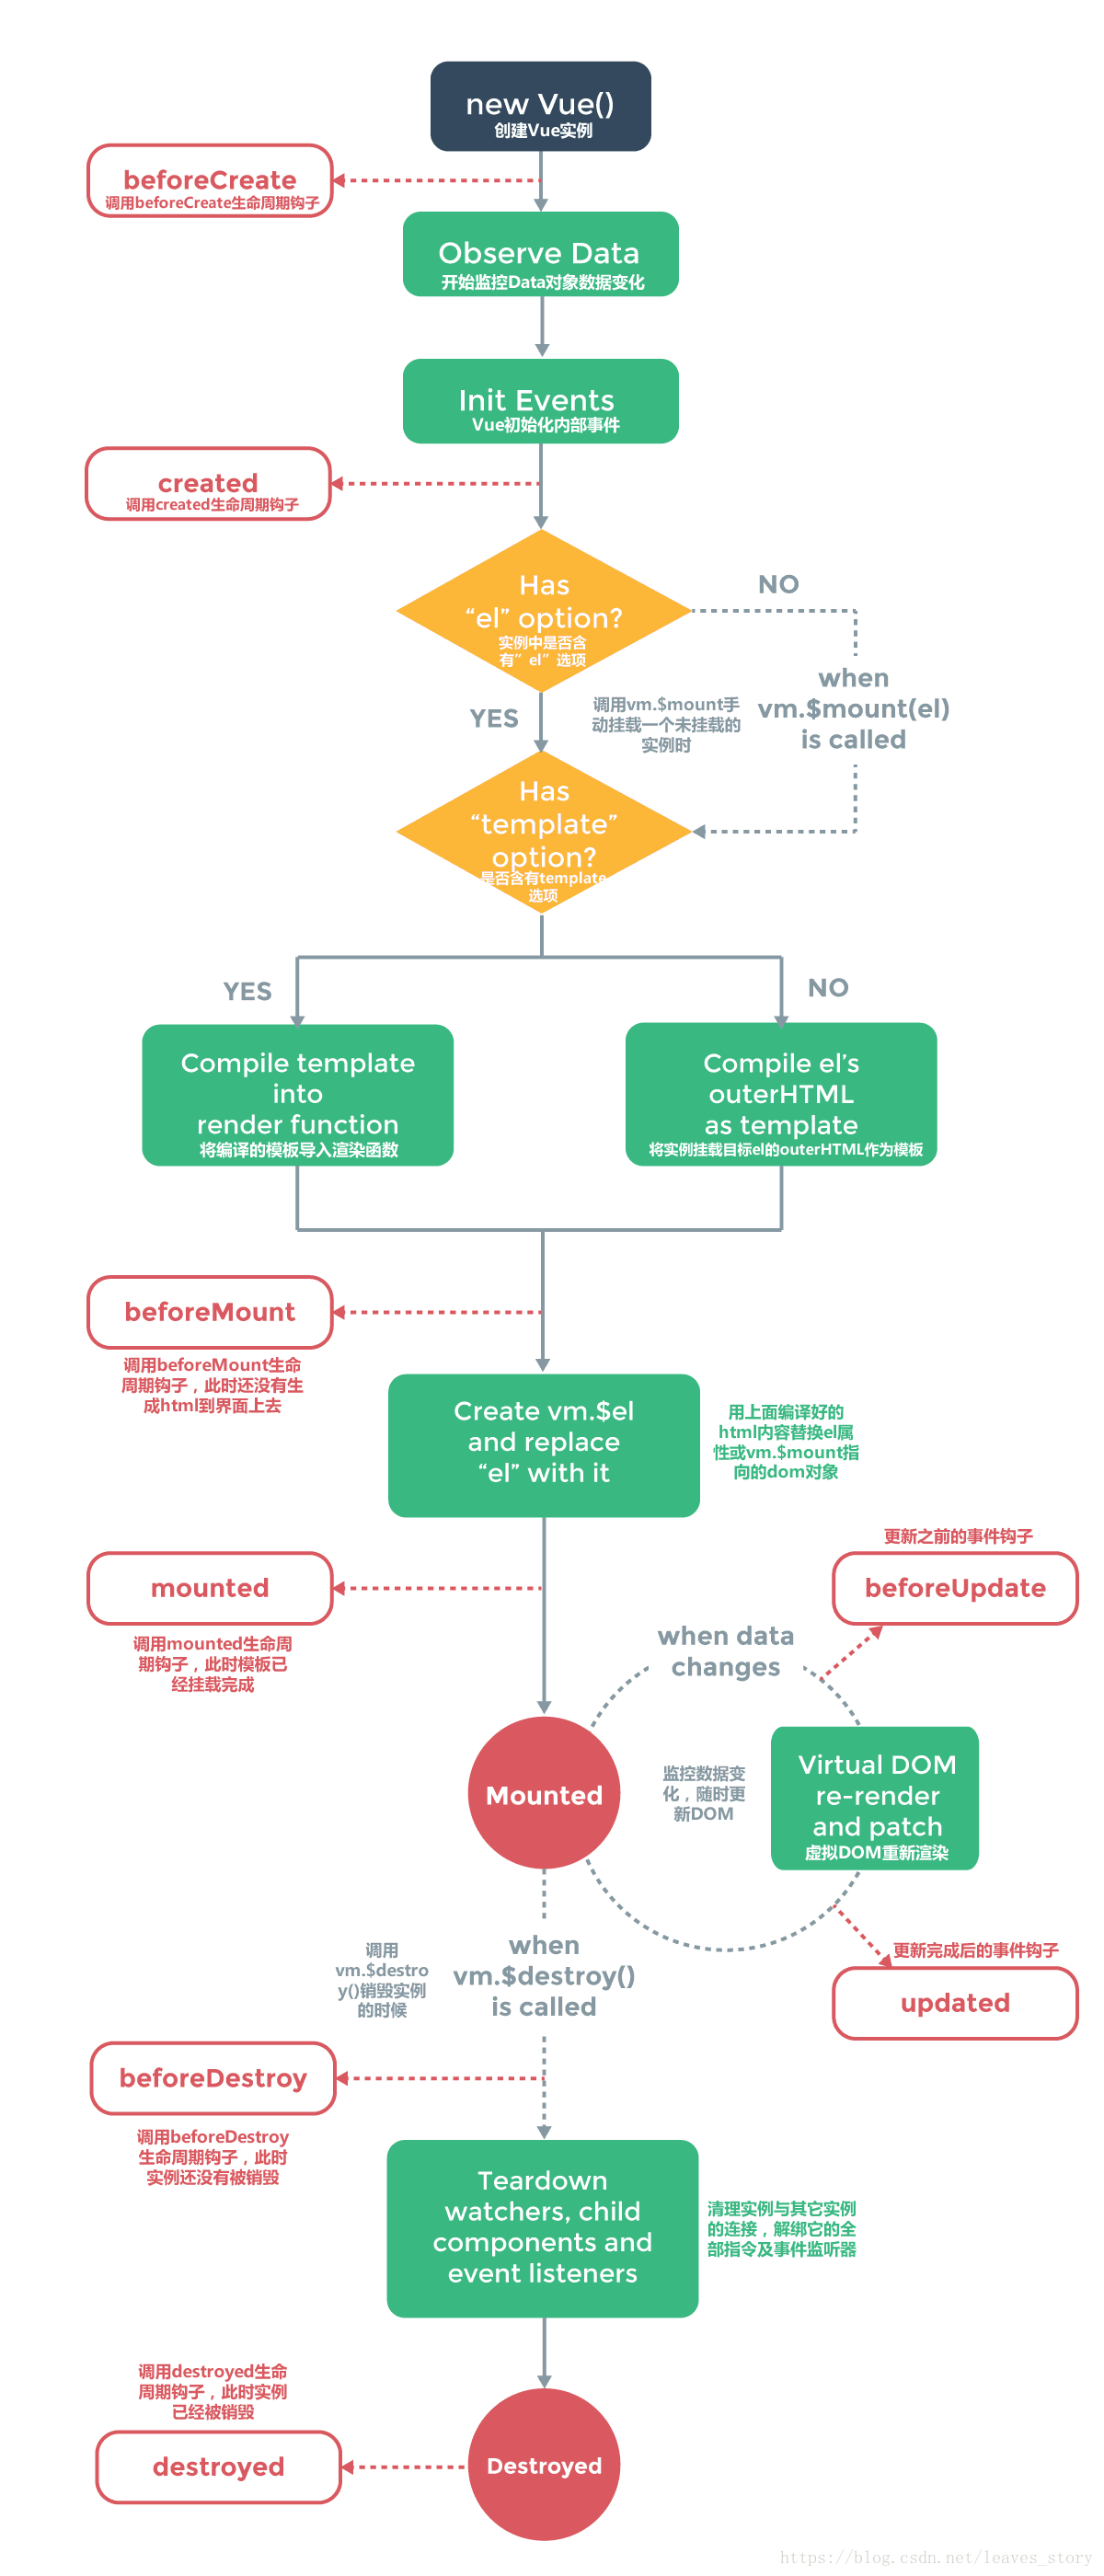
VII Vue lifecycle
1. Life cycle diagram
2. Code process
<script>
// Introducing TitleBar component
import TitleBar from "./components/TitleBar";
import NavBar from "./components/NavBar";

export default {
  name: "App",
  data() {
    return {
      title: "Library management system",
      navList: ["Book list", "Borrow", "history", "blacklist"],
      selIndex: 0
    };
  },
  components: {
    // The list of subcomponents of the current component. After all subcomponents are imported, they need to be registered and configured here before they can be used in the component template
    TitleBar, // Register the TitleBar component in the current component
    NavBar
  },
  methods: {
    navFn(i) {
      // console.log('user defined event 'navselect' triggers execution method navFn ');
      // console.log('data received by navFn method in parent component App: ${i} ');
      this.selIndex = i;
    }
  },
  computed: {
    selVal() {
      return this.navList[this.selIndex];
    }
  },
  //Each component corresponds to a Vue instance and can share the properties and methods of the Vue instance in min.js. The Vue instance in min.js is the root Vue instance of the whole project
  //Each Vue instance has a lifecycle hook function
  //The life cycle hook function is bound to the current Vue instance, and the internal this points to the current component Vue instance. Therefore, the properties and methods bound on the Vue instance are accessed in the declaration cycle dog sub function
  beforeCreate() {
    //The instantiation of vue has been completed, but the binding of data and methods has not been completed
    console.log("beforeCreate");
    console.log(this.$el);//undefined
    console.log(this.title);//undefined
    console.log("----");
  },
  created() {/*a key*/
    //The binding of Vue instance data and methods has been completed, and DOM mounting has not been started
    console.log("created");
    console.log(this.$el);//undefined
    console.log(this.title);//Library management system
    console.log("----");
  },
  beforeMount() {
    //Triggered before creating a virtual DOM based on the template and data
    console.log("beforeMount");
    console.log(this.$el);//undefined
    console.log(this.title);//Library management system
    console.log("----");
  },//mount
  mounted() {/*a key*/
    //The creation of the virtual DOM structure has been completed, and the mounting of the formal DOM structure according to the virtual DOM has been completed
    console.log("mounted");
    console.log(this.$el);//<div id="App"></div>
    console.log(this.title);//Library management system
    console.log("----");
  },
  beforeUptate() {
    //Triggered when the data in the Vue instance changes, but the DOM is not updated according to the data changes
    console.log("beforeUpdata");
    console.log(this.$el);
    console.log(this.title);
    console.log("----");
  },
  updated() {/*a key*/
    //The DOM update based on data changes has been completed
    console.log("updated");
    console.log(this.$el);
    console.log(this.title);
    console.log("----");
  },
  beforeDestroy() {
    //Before destruction
    console.log("beforeDestroy");
    console.log(this.$el);
    console.log(this.title);
    console.log("----");
  },
  destroyed() {
    console.log("destoyed");
    console.log(this.$el);
    console.log(this.title);
    console.log("----");
  }
};
</script>
3. Life cycle concept
The life cycle of Vue is divided into 8 stages: before / after creation, before / after loading, before / after updating, and before / after destruction.
-
beforeCreate (before creation)
Indicates that before the instance is completely created, the mount element $el and data object data of the vue instance are undefined and have not been initialized.
-
created (after creation)
The data object data already exists. You can call the methods in methods to operate the data in data, but dom is not generated and $el does not exist.
-
beforeMount (before mounting)
Both $el and data of vue instance have been initialized. Before mounting, it is a virtual dom node. The template has been edited in memory, but the template has not been rendered to the page. data.message is not replaced.
-
mounted (after mounting)
vue instance mounting is completed, data Message successfully rendered. The template in memory has been actually mounted on the page, and the user can see the rendered page. The last life cycle function during instance creation. When mounted is executed, it means that the instance has been completely created and DOM rendering has been completed in mounted.
-
beforeUpdate (before update)
When the data changes, the beforeUpdate method is triggered. The data has not been synchronized with the latest data.
-
updated
When the data changes, the updated method is triggered. The page and data have been synchronized.
-
Before destruction
Before the component is destroyed, the instance is still fully available at this step.
-
Destroyed (after destruction)
After the component is destroyed, the change of data will not trigger the periodic function again. The vue instance has removed event listener and dom binding, but the dom structure still exists.
VIII VUE component value transmission
Parent component passing value to child component: (props passing value)
-
In parent component: assign a value to the custom attribute of the child component (the attribute name is the variable name of the variable declared by the props attribute in the child component)
-
In child components: receive parent component data through variables declared by props attribute.
In child components: receive parent component data through variables declared by props attribute.
-
In the parent component: listen to the user-defined events submitted in the child component through v-on, and receive data through parameters in the event handling function
-
In the subcomponent: pass this. In the event handler function$ The emit () method submits custom events and passes data; The first parameter of the method is the custom event name, and the second parameter is the parameter to be passed to the parent component.
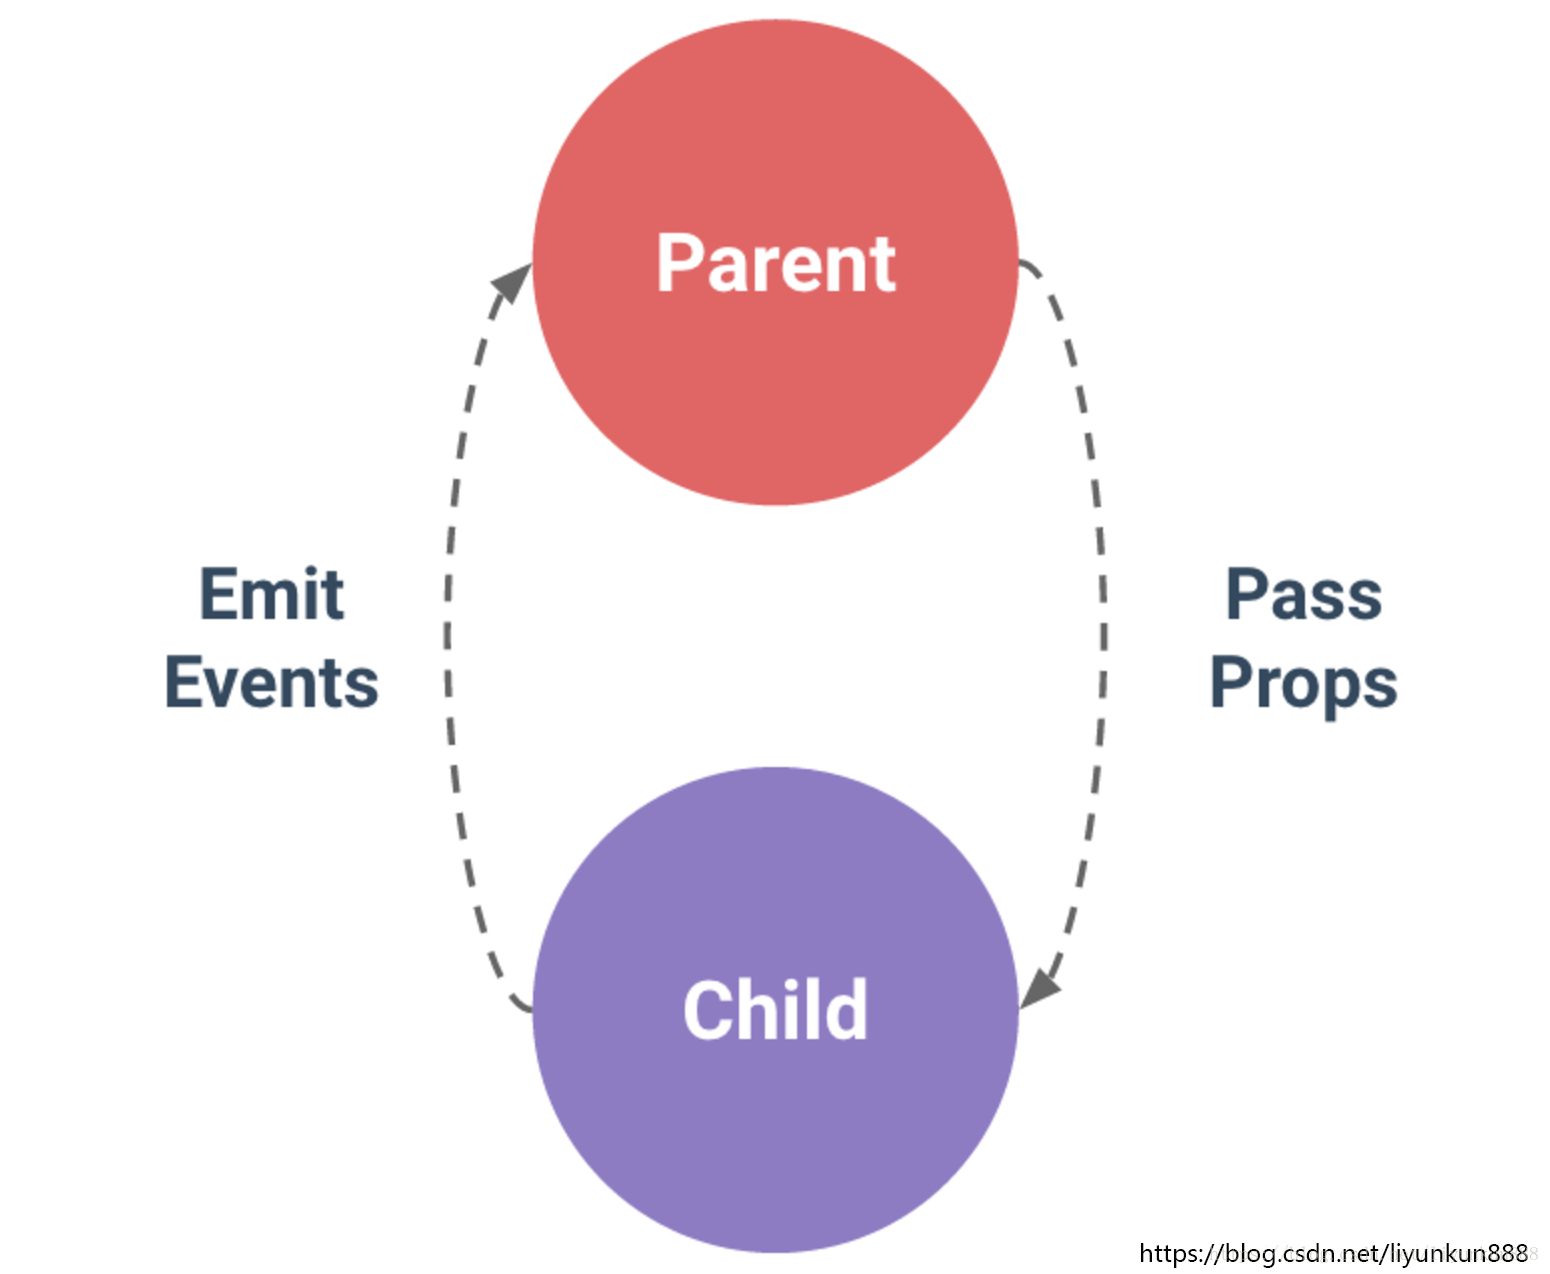
vue component value transfer can be divided into three ways: parent to child, child to parent, and non parent-child component value transfer
Quote a sentence from the official website: the relationship between parent and child components can be summarized as prop passing down and event passing up
The parent component sends data to the child component through prop, and the child component sends messages to the parent component through events, as shown in the following figure
1. Father to son
Sub component code:
<template>
    <div id="container">
        {{msg}}
    </div>
</template>
<script>
export default {
  data() {
    return {};
  },
  props:{//Can be ['attribute name '] {' key '}
    msg: String
  }
};
</script>
<style scoped>
#container{
    color: red;
    margin-top: 50px;
}
</style>
Code of parent component:
<template>
    <div id="container">
        <input type="text" v-model="text" @change="dataChange">
        <Child :msg="text"></Child>  <!--To sub assembly props Attribute assignment in-->
    </div>
</template>
<script>
import Child from "@/components/Child";
export default {
  data() {
    return {
      text: "Value of parent component"
    };
  },
  methods: {
    dataChange(data){
        this.msg = data
    }
  },
  components: {
    Child
  }
};
</script>
<style scoped>
</style>
2. Son to father
Sub component code:
<template>
    <div id="container">
        <input type="text" v-model="msg">
        <button @click="setData">Pass to parent component</button>
    </div>
</template>
<script>
export default {
  data() {
    return {
      msg: "Value passed to parent component"
    };
  },
  methods: {
    setData() {
      this.$emit("getData", this.msg);//Triggered by events
    }
  }
};
</script>
<style scoped>
#container {
  color: red;
  margin-top: 50px;
}
</style>
Parent component code:
<template>
    <div id="container">
        <Child @getData="getData"></Child>
        <p>{{msg}}</p>
    </div>
</template>
<script>
import Child from "@/components/Child";
export default {
  data() {
    return {
      msg: "Parent component defaults"
    };
  },
  methods: {
    getData(data) {
      this.msg = data;
    }
  },
  components: {
    Child
  }
};
</script>
<style scoped>
</style>
The way to pass from son to father is to use this e m i t come Times calendar g e t D a t a matter piece , first before use Press button come touch hair s e t D a t a matter piece , stay s e t D a t a in use t h i s . emit to traverse the getData event. First, use the button to trigger the setData event. In setData, use this emit to traverse the getData event. First, use the button to trigger the setData event. In setData, use this emit to traverse the getData event, and finally return this msg
- Custom attributes in parent-child props
- The son passed on to the father through this$ emit(“event name”, value);// Trigger custom events through events
Summary:
- In the subcomponent, you need to trigger a custom event in some way, such as clicking the event
- Take the value to be passed as the second parameter of $emit, which will be passed as an argument to the method responding to the custom event
- Register the child component in the parent component and bind the listener for custom events on the child component tag
IX VUE custom method
The customization files are as follows:
//Encapsulation of cookie operation methods

//Increase, change (day)
function setCookie(name, value, time) {
  //Whether the expiration time is set. If the expiration time is set, the expiration time will be used. Otherwise, it defaults to aging
  if (time) {
    var date = new Date();
    date.setDate(date.getDate() + time);
  } else {
    document.cookie = name + "=" + value + ";expires=" + date;
  }
}

// check
function getCookie(name) {
  var cookie = document.cookie;
  var cookies = cookie.split("; ");
  for (var i = 0; i < cookies.length; i++) {
    if (cookies[i].indexOf(name) == 0) {
      return cookies[i].substr(name.length + 1);
    }
  }
  return null;
}

//Delete: set the expiration time of the cookie to a past event

function removeCookie(name) {
  setCookie(name, "", -1);
}

export { setCookie, getCookie, removeCookie };
-
In vue s that need to use custom methods, the import methods are as follows: (import on demand)
import {setCookie} from '@....' -
Global registration (introduced in main.js as follows)
import cookie {setCookie} from '@....'
vue.use(cookie)
X VUE network request
1. Use of Axios
-
Download and install axios and qs plug-ins axios official website
🍐 npm i axios -S
🍑 npm i qs -S (for post request format parameters)
Vue.prototype.$axios=axios;//Add axios method to vue
Vue.prototype.$qs=qs;//Add qs method to vue
-
Use of axios
//get request
this.$axios
        .get("http://localhost/XAH201106/project/server/info.php", {
          params: {
            gid: "1619571805045bXFPV"
          }
        })
        .then(res => {
          console.log(res);
        });
//post request VUEX
(1)adopt qs Format parameters
 let params = this.$qs.stringify({  //Parameters need to be converted through the qs plug-in
        uname: 222,
        pword: 111
      });
 this.$axios
        .post("http://localhost/XAH201106/project/server/login.php", params)
        .then(res => {
          console.log(res);
        });
(2)utilize js Self contained FromData Object to wrap data
 let fd = new FormData();
      fd.append("uname", "222"), fd.append("pword", "111");
axios.post("http://localhost/XAH201106/project/server/login.php", fd.then(res=>{
             console.log(res);
         });
2.jQuery send request
-
Download and install jQuery
🍐 npm i query -S
-
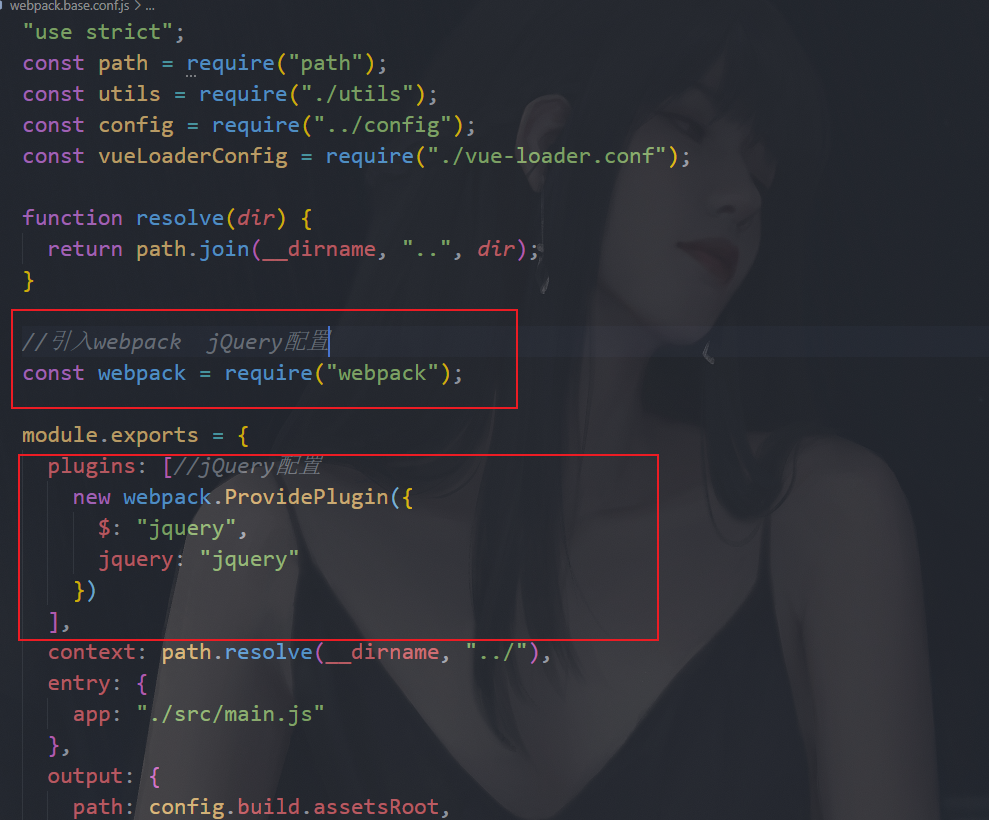
Configure jQuery
In build \ webpack base. Add the following configuration to conf.js
-
Introducing webpack jQuery configuration
const webpack = require("webpack"); -
In module Exports add the following configuration
plugins: [*//jQuery configuration*

  new webpack.ProvidePlugin({

   $: "jquery",

   jquery: "jquery"

  })

 ],
-
Use in vue
$.ajax({
        type: "get",
        url: "http://localhost/XAH201106/project/server/info.php",
        data: { gid: "1619571805045bXFPV" },
        success: res => {
          this.type = "get";
          this.url = "http://localhost/XAH201106/project/server/info.php";
          this.opts = "gid:1619571805045bXFPV";
          this.res = res;
        }
      });
3.Vue-resource
-
Vue resource installation and application Vue resource installation and Application
Install Vue resource into the project and find the current project🍎 Input: NPM install Vue resource -- save
After installation, in main JS, as shown below:
🍎import VueResource from 'vue-resource'
🍎 Vue.use(VueResource)
-
Use in vue
get request
var params = {params: {id: id}}
this.$http.get(url, params).then(function(res){
    // Response successful callback
    var data = res.body;
    //The data is in res.body
}, function(res){
    // Response error callback
});

post request
 Enable{emulateJSON : true}When selected, the request is application/x-www-form-urlencoded As content-type,image HTML Same as the form.
var params = {params: {id: id}}
this.$http.post(url, params,{emulateJSON : true}).then(function(res){
    // Response successful callback
    var data = res.body;
    //The data is in res.body
}, function(res){
    // Response error callback
});

JSONP request
var JSONparams ={
    params: {id: id}
    jsonp: 'callback' // Set a name of the parameter of the callback function. By default, it is callback,
}
 this.$http.jsonp(url, JSONparams).then( (res) => {
    console.log(res);
}, (err) => {
    console.log(err);
})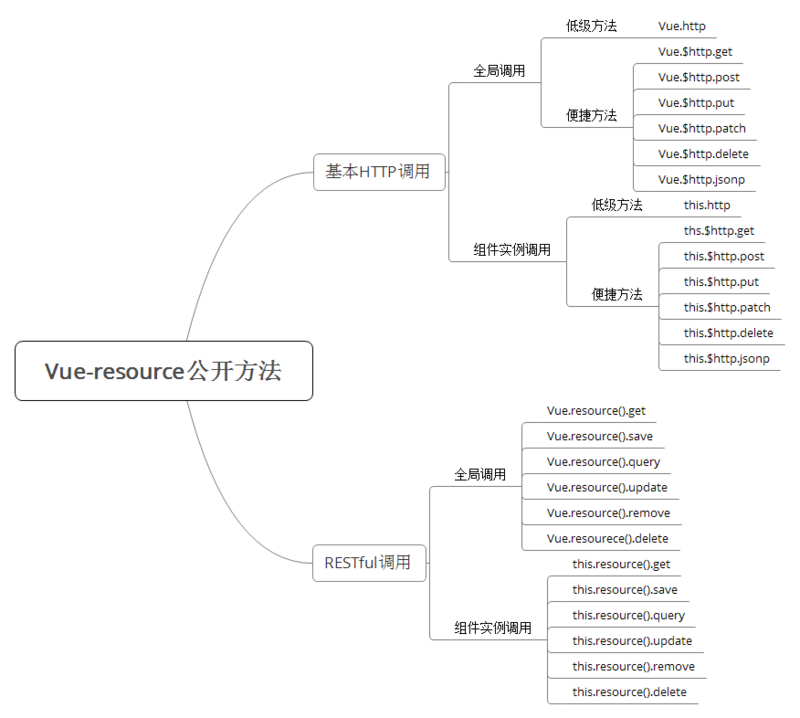
Xi VUEX
1. Installation configuration vuex
🍎 npm i vuex -S
Create a new folder store and a new file index. In the src path js
❓ (note) auxiliary functions cannot be used when vuex is introduced locally, and can only be used when it is used globally
//Configure vuex
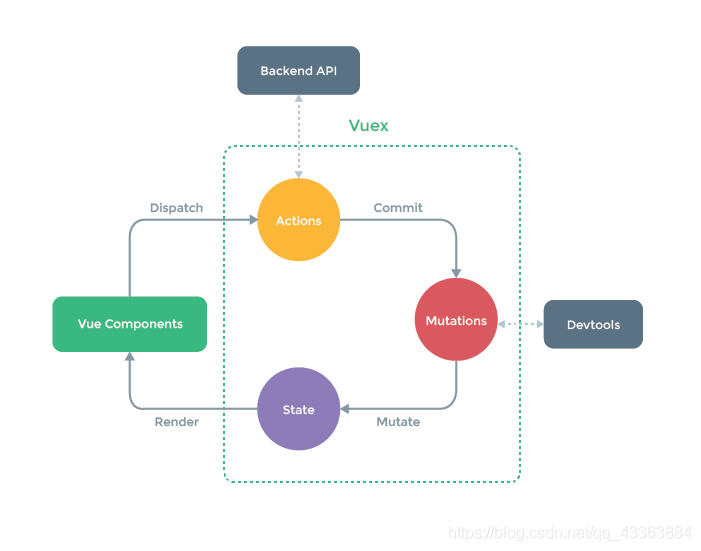
//Vuex is the global state management provided by vue. In essence, it stores the globally shared data in the project through js objects. The shared data to be managed in vuex becomes a state or (state value)
//Vuex is more suitable for large-scale projects and can only be used for state management. For small projects or when there are few global states, using vuex is cumbersome
//The status of vuex management will lead to data loss after page refresh because the module will be overloaded
//If you do not want the data to be lost with the refresh, you can back up the data in the locationStorage and read the backup update status each time you refresh
//Introduce vue
import Vue from "vue";
import Vuex from "vuex";
//Global declaration
Vue.use(Vuex);
//Export vuex instance
export default new Vuex.Store({
//state vuex manages the state list, state declaration, and initialization
state: {
count: 0
},
//Similar to menthods in the component, vuex stipulates that the modification of the state in the state should not be assigned directly, but should be carried out by submitting the method in the changes through commit(),
//Note that only synchronous modification can be performed in mutations
mutations: {
//The state parameter exists in all the methods in changes. You can directly access the state transition in state
//The optional parameter options, called payload, is used to receive the data carried by the commit() method in the component
addCount(state, options) {
state.count += options;
},
subCount(state) {
state.count--;
}
},
//This is similar to the calculated and state calculation properties in the component
getters: {
//Integer result of calculating the cube root of count
cbrtCount(state) {
return Number.parseInt(Math.cbrt(state.count));
},
mean(state) {
return (state.count ** 2 + state.count ** 3) / 2;
},
exchange(state) {
// let count=state.count.toString();
// if(count.length==2){
// count=count.split('').reverse().join('');
// return count*1
// }
if (state.count < 100 && state.count > 9) {
return Number.parseInt(state.count / 10) + (state.count % 10) * 10;
}
return state.count;
}
},//Actions: asynchronous changes. If the state needs to be modified by asynchronous operations, you need to write the asynchronous process in actions with asynchronous operation lodging, and commit to submit mutationos in actions
actions:{
//All asynchronous methods in actions have a parameter context, which contains the methods and properties of the store instance
//actions supports loads like mutataions
addCountAsync(context,options){
setTimeout(()=>{
let n= Math.round(Math.random())
console.log(n);
if(n){
context.commit('addCount',options);
}
},3000)
}
}
});
Configure in min.js
// The Vue build version to load with the `import` command
// (runtime-only or standalone) has been set in webpack.base.conf with an alias.
import Vue from 'vue'
import App from './App'
import router from './router'
//Import the configured vuex module
import store from './store'

Vue.config.productionTip = false

/* eslint-disable no-new */
new Vue({
  el: '#app',
  router,
  store,
  components: { App },
  template: '<App/>'
})
2. Use in vue
//vuex provides the auxiliary function mapstate mapgetters mapvariables, which can quickly write states or methods in components
import {mapState,mapGetters,mapMutations,mapActions} from 'vuex'


//When the calculated property name in the component is the same as the state name, you can directly fill in the array
 computed:mapState([
'count'
 ]),
//Use with extension operator
computed:{
    ...mapState(['count']),
    ...mapGetters(['cbrtCount']),
},
   methods:{
       add(){
           //Submit the addCount() method of changes to modify the count status in state
          this.$store.commit('addCount',1);
       },
        sub(){
           this.$store.commit('subCount')
       }
  },
methods:{
    ...mapMutations({
        add:'addCount',
        sub:'subCount'
    }),
}
XII Vue UI framework
1.Swiper
- 🍎 Download: NPM I wiper - S swiper China site
- Installation: swiper: add import swiper from 'swiper / swiper bundle. In the vue file that needs to use the swiper component Min.js' in main JS, and import 'wiper / wiper bundle min.css
- When the data is a network request, because the data request is asynchronous behavior; Therefore, the initialization of the swiper should be written in the updataed declaration cycle
2.Element-ui
-
🍎 Download: NPM I element UI - S Element UI official website
-
Install element UI in main JS to write the following:
import ElementUI from 'element-ui';

import 'element-ui/lib/theme-chalk/index.css';
3.Echarts
-
🍎 Download: NPM I element UI - S Echarts official website
-
Use in components
import * as echarts from 'echarts';

    export default{
        name:'C',
        mounted(){
            initialization echarts
            let myEcharts=echarts.init(document.querySelector('.bar'));
            //Configure the parameters of ecarts
            myEcharts.setOption({
                title:{text:'XAH201106 Gender ratio of class'},
                tooltip:{},Set prompt information
                //Configuration of x-axis
                // xAxis:{
                //     type:'category', / / the current axis is the category axis
                //     data: ['male', 'female'] / / classified to
                // },
                //Configuration of y-axis
                // yAxis:{
                //     type:'value' / / indicates that the current axis is a data axis (value axis)
                // },
                series:[{
                    type:'pie',//Data table type
                    data:[
                        {value:4,name:'excellent'},
                        {value:3,name:'pass'},
                        {value:6,name:'good'},
                        {value:4,name:'fail,'}
                    ]
                }]
            })
        }
    }
XIII Vue packaging
-
🍎 Execute the command npm run build
-
After packaging, the dist directory will be generated in the project directory, and the dist can be deployed on the server
common problem
-
The page is blank css js file import path 404
Reason: the default packaging configuration uses absolute path to import files, and the path in the packaging configuration needs to be changed to relative path
Solution: under config file - > index JS - > bulid configuration - > assetspublicpath - > '. /': Repackage
// Paths assetsRoot: path.resolve(__dirname, '../dist'), assetsSubDirectory: 'static', assetsPublicPath: './',(Modify here) -
Background image path 404 picture loading failed
Reason: after packaging, the background images in css become external, and the path location of css file changes
(1) the background pictures used in the style code should be stored in the assets directory and introduced in a relative path
(2) in the template code, static picture paths should be stored in the assets directory, and military service relative paths should be imported
(3) the dynamic pictures in the template code should be stored in the static directory and introduced in the absolute path. Note that the absolute path should be written as * *'static / 'instead of' / static / '**
(4) under the build folder - > utils js ->vue. Add - > publicpath after style loader: '... /... /'
if (options.extract) { return ExtractTextPlugin.extract({ use: loaders, fallback: 'vue-style-loader', publicPath:'../../' (Add here) }) -
Font file exception
In the bulid Directory - > build \ webpack base. Conf.js found
{
        test: /\.(woff2?|eot|ttf|otf)(\?.*)?$/,
        loader: 'url-loader',
        options: {
          limit: 10000,Modify its size
          name: utils.assetsPath('fonts/[name].[hash:7].[ext]')
        }
      }
-
XIV Vue install less
npm install less@3.12.2 less-loader@4.1.0 --save-dev
In build \ webpack base. Configure module: - > Rules: {1} in conf.js{
test: /.less$/,
loader: "style-loader!css-loader!less-loader"
} }