title: Vue study notes
date: 2020-7-1
tags: [vue2.0]
categories: front end technology
toc: true
cover: https://gitee.com/hyj12704338...
Vue 2.0 Preface
Vue's official documents may be the best development documents I've ever seen, so if you want to learn from Vue, you'd better read the official documents. Here is only based on my own understanding of vue2 0 sorting of knowledge is convenient to sort out the knowledge structure
1. Website interaction mode
1.1 single page application SPA
Multi page
- Click jump refresh, the user experience is poor
- Conducive to SEO Search Engine Search
Single Page Application (SPA)
Good development mode, separation of front and rear ends, high development efficiency and good maintainability
- The server does not care about the page, only about data processing
- The client does not care about database operation, but only interacts with the server through the interface
- Good user experience, just like native client software
- You only need to load the rendered detail view, and you don't need to refresh the whole page
Single page application development technology is complex, so a lot of development frameworks were born
AngularJS
- google development
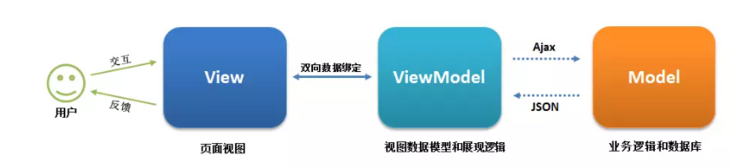
- MVVM development mode is brought to the front end
- MVVM (model view view model): data driven view
ReactJS
- Propose componentization
VueJS
- Vue draws lessons from the first two, learning from each other
- Single page technology is very mature, but most of them are not compatible with low version browsers
- Because the data of single page applications are loaded asynchronously, it is not conducive to SEO (now there is a Vue based server-side rendering framework nuxt)
1.2 realization principle of single page application SPA
Front end separation + front end routing
The backend Nodejs uses Express to monitor the corresponding requests
app=express()
app.get("/",function(request,response){
    //handle
    //Then add the result to the response
    response.json()
})
The front end works (the following example uses the native js implementation, but it is used in the Vue framework vue-router Plug ins (simpler)
The foreground requests data and renders the page
<!--Introduce resources-->
<script  src="Template engine location"> </script>
<script  src="jquer position"> </script>
<!--page-->
<script is="tp1" type="text/template">
      {{each student_front}}
      <li> {{value.name}}</li>
      {{/each}}
</script>
<!--Request data and render to page-->
<script>
      $.get("Interface, such as http://127.0.0.1:3000/student",function(data){
          template("tp1,{
                   student_front:data
                   }")
  })
      <!-- $("#id name ") to get dom elements -- >
  </script>
The front end routes different URLs to load different pages
Find music, my music and friend multiple pages, take data from the server on their pages for rendering, and then put them into the index container < div id = "container" > for display
Note: Download jQuery; sublime installs sublimeServer to start the local server (if you don't install it, you can directly open the local file, and cross domain search for the downloaded jquery.js file is not supported)
<!--index.html-->
<!DOCTYPE html>
<html>
<head>
    <title>music</title>
    <mata charset="utf-8">
</head>
<body>
    <div class="top">head</div>
    <div class="aside">
        <ul>
            <!--a The label will jump and refresh, and the anchor will not refresh,Click friends, url Change browser display:"website#/friend ". With window.onhashchange, the same a tag is clicked multiple times, and only the first trigger -- >
            <!--adopt #/friend changes, rendering -- >

            <li><a href="#/"> discover music</a></li>
            <li><a href="#/My music "> My Music</a></li>
            <li><a href="#/Friend "> friend</a></li>
        </ul>
        <div id="container">
            <!--Render other pages in-->
        </div>
        <script>
            window.onhashchange=function(){
                //The hash field in location contains the anchor ID # / friend
                //substr(1) ID is intercepted backward from the 1 position of the string
                var hash=window.location.hash.substr(1)


                if(hash==="/"){
                    $.get("./find-music.html",function(data){
                        $("#container").html(data)
                    })

                }else if(hash==="/my-music"){

                    $.get("./my-music.html",function(data){
                        console.log(data)
                        $("#container").html(data)
                    })

                }else if(hash==="/friend"){
                    $.get("./friend.html",function(data){
                        $("#container").html(data)
                    })
                }
            }
        </script>
    </div>
    <!--install jquery command npm install jquery-->
    <script src="node_modules/jquery/dist/jquery.js"></script>
</body>
</html>
<!--find-music.html--> <div>Find music</div> <!--my-music--> <div>My music</div> <!--friend--> <div>friend</div>
- Building a single page application in the above way is too complex, so there are frameworks such as Vue
2. Getting to know Vue
Official website: https://cn.vuejs.org/
Installation: npm install vue
What is Vue?
- Excellent front-end js development framework
- You can easily build SPA single page applications
- Html is extended through instructions and data is bound to HTML through expressions
- Greatly liberating DOM operations
2.1 characteristics of Vue
Vue is designed to overcome the shortcomings of HTML in building applications. Its core features:
- MVVM
- Bidirectional data binding
- Componentization
- Progressive
2.2 HelloWorld
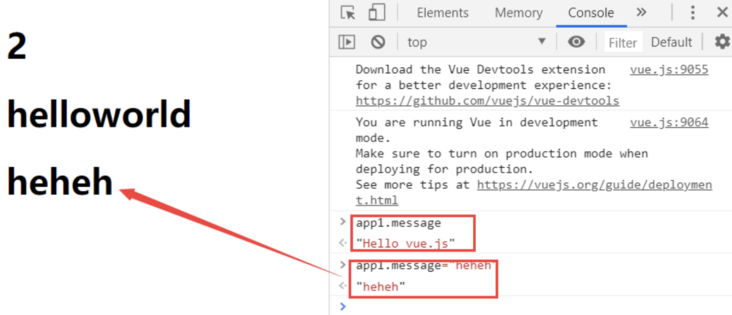
- Similar to the template engine, it has {{variable name}} syntax
Unlike the template engine, you can directly manipulate DOM elements through the variable app1. You don't have to use $(#id name) to get DOM elements
<!DOCTYPE html>
<html>
<head>
<title></title>
</head>
<body>
<div id="app">
<h1>{{1+1}}</h1>
<h1>{{"hello"+"world"}}</h1>
<h1>{{message}}</h1>
</div>
<script src="node_modules/vue/dist/vue.js"></script>
<script>
const app1=new Vue({
el:"#app",//el tells vue to manage the entry of the template. The template syntax of {{}} in div will be rendered. el cannot be body or html
data:{//Bound member data, which is called responsive data.
//What is responsive data? Data driven view. When the data changes, all the DOM bound to the data will change
message:"Hello vue.js"
}
})
</script>
</body>
</html>
<!--result:
2
helloworld
Hello vue.js
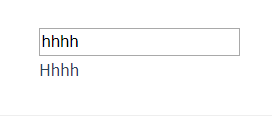
-->2.3 bidirectional data binding
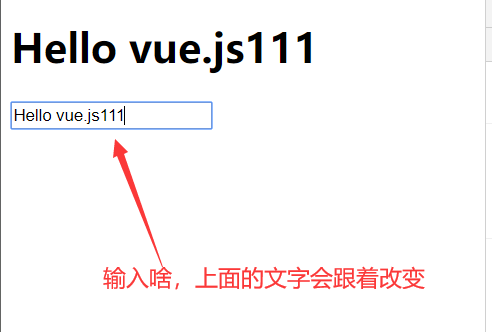
What is bidirectional data binding?
When the data changes, the DOM element automatically updates the data
When the form changes, the data will be updated automatically
v-model instruction
<!DOCTYPE html>
<html>
<head>
    <title></title>
</head>
<body>
    <div id="app">
        <h1>{{message}}</h1>
        <input type="text" v-model="message">
        <!--v-model yes Vue A special property provided in Vue It is called instruction in
            Its function is to bind form controls in both directions
        -->
    </div>

    <script src="node_modules/vue/dist/vue.js"></script>
    <script>
        const app1=new Vue({
            el:"#app",
            data:{
                message:"Hello vue.js"
            }
        })
    </script>
</body>
</html>
3. Basic knowledge of Vue
On the HTML page, vue.html is imported by script js
<!DOCTYPE html>
<html>
<head>
    <title></title>
</head>


<body>
    <!--Vue Controlled div-->
    <div id="app"></div>

    <!--adopt CDN introduce vue.js-->
    <script src="https://cdn.jsdelivr.net/npm/vue/dist/vue.js"></script>
    <!--adopt npm download vue.js To local, according to vue.js Import from directory-->
    <script src="node_modules/vue/dist/vue.js"></script>
    <script>
        new Vue({
          el: '#app',
          data: {
            selected: ''
          }
        })
    </script>

</body>
</html>
use Vue cli tool , build more complex vue projects that can be used in projects vue single file to write vue code (this method is used in large projects)
<template>
    <!--be careful template There can only be one root label under the label-->
      <div id="app">
        <span>1</span>
        <span>2</span>
    </div>
</template>

<script>
    //In the current vue page, introduce other js packages or customized components of other vue pages
    import XX from "XXX.js"
    import YY from "YY.vue"


    //
    export default {
        //Bound data
        data(){
            return{
                msg1:"xx",
                msg2:"yy"
            }
        },
        //Introduce YYY in this way Vue component
        componemts:{
            YY
        }
        //Life cycle function
        created(){

        },
        methods:{
            fun1(){},
            fun2(){}
        }
        //watch,computed, etc
    }
</script>

<!--lang Specify the precompiled language, scoped appoint style Styles in can only be used in the current.vue Function in file-->
<style lang="less" scoped>
</style>
3.1 Vue instance
The Vue instance is regarded as a function Vue(). The parameter of this function is an object Vue({}), and El, data, created, methods, computed and watch are regarded as the properties of the object
new Vue({
    //el tells vue to manage the entry of the template. The template syntax of {}} in div will be rendered. el cannot be body or html
    el: '#app',

    //Bound member data, which is called responsive data. (what is responsive data? Data driven view. When the data changes, all DOM bound to the data will change)
    data: {
        msg: ''
    },
   //Life cycle function, which will be introduced later. Originally, it should be the attribute form of the object created:function() {}, but it is generally abbreviated to the following form
   created(){

    },

   //All the methods in the vue instance are written in it, and the method is bound to the Dom element through v-on to trigger
   methods: {
       fun1(){
            //vue can be accessed through this MSG get the value of the variable in data
              //You can also use this Fun2 () accesses the function in methods
        }
    },

    //Unlike binding functions, calculated attributes are loaded from the cache first. A is the name of the variable and is not declared in data. It is directly used in {{a}}
    computed: {
       a:function(){
           //There must be a return. Put the value of return into a and use it through {a}}
       }
    },
    //Listening attribute, which is used to listen for changes in variables in data
    watch:{
        msg:function(newMessage,oldMessage){
            //The default parameters are: the value before change and the value after change
        }
    }
})
Attribute data
The value of data is an object. As long as the variables in the object change, the view will respond immediately, and the data in the view will become a new value.
be careful:
- Only variables in data are responsive
Use object Free (), which prevents the modification of variables of object types in data, also means that the response system can no longer track changes.
var obj = {
  name:"Zhang San",
  age:18
}

Object.freeze(obj)

new Vue({
  el: '#app',
  data:{
      stu:obj
  }
})
Life cycle function (to be further analyzed)
<template>
  <div>

  </div>
</template>

<script>
import OtherComponent from '@/components/OtherComponent'

export default {
  name: 'MyName',
  components: {
    OtherComponent
  },
  directives: {},
  filters: {},
  extends: {},
  mixins: {},
  props: {},
  data () {
    return {

    }
  },
  computed: {},
  watch: {},
  beforeCreate () {
    // Life cycle hook: just after the component instance is created, before the component attribute is calculated, such as data attribute
  },
  created () {
    // Life cycle hook: the component instance is created, the attribute has been bound, but the DOM has not been generated, and the el attribute does not exist
    // Initialize rendered page
  },
  beforeMount () {
    // Lifecycle hook: before template compilation / mounting
  },
  mounted () {
    // Life cycle hook: after the template is compiled and mounted (it is not guaranteed to be in the document at this time)
  },
  beforeUpdate () {
    // Lifecycle hook: before component update
  },
  updated () {
    // Lifecycle hook: after component update
  },
  activated () {
    // Life cycle hook: called when a keep alive component is activated
  },
  deactivated () {
    // Life cycle hook: called when a keep alive component is deactivated
  },
  beforeDestroy () {
    // Lifecycle hook: call before instance destruction
  },
  destroyed () {
    // Lifecycle hook: call after instance destruction
  },
  errorCaptured (err, vm, info) {
    // Lifecycle hook: called when an error from a descendant component is caught. The hook receives three parameters: the error object, the component instance where the error occurred, and a string containing the error source information.
    console.log(err, vm, info)
  },
  methods: {}
}
</script>

<style lang="scss" scoped></style>
var vm=new Vue({
  data: {
    a: 1
  },

  ////Life cycle function

  //Attribute writing
  created: function () {
    // this points to the vm instance
    console.log('a is: ' + this.a)
  },

  //Abbreviated form
  mounted(){

  },

})
Note: do not use the arrow function on the properties of Vue instances, otherwise an error will be reported. Because the direction of this in the arrow function is context sensitive, it does not necessarily point to the instantiated object of Vue
//Will report an error
created: () => console.log(this.a),
vm.$watch('a', (oldValue,newValue) =>{ })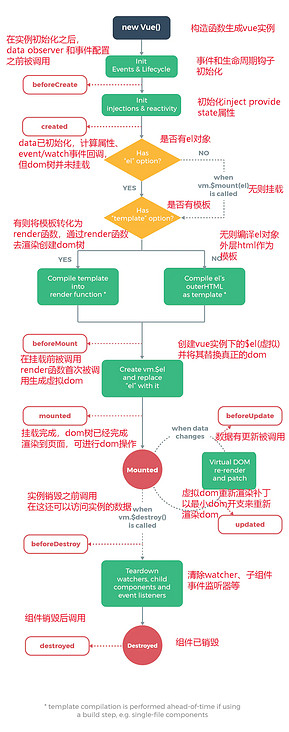
beforeCreate=>Create current page vue example
|
=>
|
created=>data,method,watch,computed available
|
=>call render Functions, generating virtual Dom
|
beforeMount=>fictitious Dom Creation complete
|
=>call patch Functions, creating realistic Dom
|
mounted =>real Dom The creation is complete and rendered to the page
If the data changes, the beforeUpdate and updated functions will not necessarily be triggered. Only the data changes bound to the view will be triggered
=>The data of the bound view changes according to the real Dom,Generate a virtual Dom,Will virtual Dom Make the same change to the data of the corresponding node on
|
beforeUpdate
|
=>call patch Functions (using diff Algorithm), will be virtual Dom Update changes to real Dom upper
|
updated
Responsive principle (how data changes trigger view updates)
diff algorithm
Calculated attribute computed
{{}} or v-bind bound data can be written in the calculation attribute when there are complex calculations in the.
We need data B, but data B depends on data A. once data A changes, B will also change ----- > data B is changed to calculation attribute
The calculation attribute perceives the change of data in the function body
The difference between the calculation attribute and the binding function is that the calculation attribute is added from the cache first. When the data A does not change, accessing the calculation attribute B will immediately return the previous calculation result without executing the function again. Only when the dependent data A changes will it be re evaluated.
B is the variable name, which is not declared in data and can be directly used in {}}
Calculate getter of property B:
computed: {
      B: function () {
          //In the function body, there must be a return. The value of return is put in B and used through {B}}
        return 'After change'+this.A

     //Abbreviation
      B(){
          //The function body must have a return. The value of return is put in B and used through {B}}
         return 'After change'+this.A
      }
}
By default, there is only getter for calculation properties, but you can also provide a setter when necessary:
computed: {
  fullName: {
    // getter
    get: function () {
      return this.firstName + ' ' + this.lastName
    },
    // setter
    set: function (newValue) {//newValue is the new value after fullName changes
      var names = newValue.split(' ')
      this.firstName = names[0]
      this.lastName = names[names.length - 1]
    }
  }
}
Mnemonic: getter is triggered by the change of internal variables of the function. fullName gets the value of return setter is triggered by fullName change and performs internal operations
Listener watch
When you need to perform asynchronous or expensive operations when data changes, you usually use watch
The monitored data is the value in data
The function corresponding to the watch listening variable cannot use the arrow function
<template>
  <div>

  </div>
</template>

<script>
export default {
  data () {
    return {
            question:null
    }
  },
  watch: {
    question: function (newValue, oldValue) {//Arrow functions cannot be used
      //It is detected that the question has changed and the operation has been carried out
    }
  }
}
</script>

<style lang="scss" scoped></style>
be careful:
If you are listening for an object
student: {
  name: "",
  score: {
    math: 32,
    english: 80,
  },
  selectedCourse: ["operating system", "data structure"],
}
The following method should be adopted. As long as any content in the student changes, it will be triggered
watch: {
     student: {
         handler: function() {
            //It is detected that the question has changed and the operation has been carried out
         },
         deep: true
     }
}
If you only listen for a key of the object, the above method wastes too much performance
watch: {
  "student.name": {
    handler:function () {
      console.log("Trigger execution");
    }
  }
},
perhaps
watch: {
  "student.name":function () {
      console.log("Trigger execution");
  }
},
Compute properties and listeners
be careful:
watch is used to monitor the data in data, change the data, and trigger the data in function
compute is the value returned to the outside when the internal data of function changes (the default getter or setter can also be set)
3.2 Vue instruction
1. Bind data in HTML
Use {}}
text
Using "Mustache" syntax (double braces), the value in double braces will be treated as a variable and the specific data in data will be rendered
<span>{{ msg }}</span>Simple js operations can also be performed between double curly braces (complex operations are usually placed in computed)
<span>{{ num++ }}</span>
<span>{{ arr.split('').reverse().join('') }}</span>
By using the v-once instruction, you can also perform one-time interpolation. When the data changes, the content of the interpolation will not be updated
<span v-once> {{ msg }}</span>v-text
<span v-text="msg"></span> <!-- Same as below --> <span>{{msg}}</span>- If v-html message is HTML code, the HTML code will be directly displayed as a string without this attribute
- v-pre skips the compilation of this element and its children. Show {{message}} directly
2. Bind data to tag attribute
Instead of {}}, write the variable name directly
Some parameters are required when specifying binding, which are placed after the colon after the instruction name
url is a variable in data
<a v-bind:href="url">...</a>
//Abbreviation
<a :href="url">...</a>
3. Attribute binding v-bind
Basic Usage
Binding properties
v-bind: controls the attribute value of html tags and binds attributes and variables.
//Binding property disabled
<button v-bind:disabled="isButtonDisabled">Button</button>
//Abbreviation
<button :disabled="isButtonDisabled">Button</button>
//Binding properties href
<a v-bind:href="url">...</a>
//Abbreviation
<a :href="url">...</a>
dynamic parameter
[] is the variable attributeName, which can dynamically specify the bound attribute, such as href
<a :[attributeName]="url"> ... </a>
be careful:
When an attribute value is Boolean, directly disable="true" is equivalent to assigning a string to the attribute. Using binding assignment will convert the string ture to a Boolean value
<button :disable="true"></button>//true is not clickable
The value of the bound property is an object
If the attribute value of the object is true, the attribute is retained; If the attribute value is false, the attribute is removed;
<div :class="obj"></div>
data: {
    obj:{
        active: true,
        text-danger: false
     }
}
The corresponding actual effect is
<div class="active"></div>
The value of the bound property is an array
<div :class="arr"></div>
data: {
    arr:['active','text-danger']
}
The corresponding actual effect is
<div class="active text-danger"></div>
Used to bind class
Object syntax: dynamically switch class. You can only switch whether the attribute exists. If the object attribute value is true, the attribute exists or does not exist
Object (the defined class name should be enclosed in quotation marks)
<div v-bind:class="{ "active": isActive }"></div>The above syntax indicates that the existence of the active class will depend on the data property isActive truthiness.
Object to dynamically switch multiple classes. In addition, the v-bind:class instruction can coexist with the normal class attribute
<div
  class="static"
  v-bind:class="{ "active": isActive, "text-danger": hasError }"
></div>
And the following data:
data: {
  isActive: true,
  hasError: false
}
The result is rendered as:
<div class="static active"></div>
The bound data object does not need to be defined inline in the template:
<div class="static" v-bind:class="classObject"></div>
data: {
  classObject: {
    active: true,
    'text-danger': false
  }
}
The rendering result is the same as above.
We can also bind a calculated property of the return object here. This is a common and powerful pattern:
<div v-bind:class="classObject"></div>
data: {
  isActive: true,
  error: null
},
computed: {
  classObject() {
    return {
      active: this.isActive && !this.error,
      'text-danger': this.error && this.error.type === 'fatal'
    }
  }
}
Array syntax: to switch class attributes, you can place ternary expressions and switch two different attributes. The object is to switch whether an attribute of class exists
Basic usage
<div v-bind:class="['active', 'text-danger']"></div>
Render as:
<div class="active text-danger"></div>
We can replace an array element with a variable
<div v-bind:class="[activeClass, errorClass]"></div>
data:{
  activeClass: 'active',
  errorClass: 'text-danger'
}
Render as:
<div class="active text-danger"></div>
If you also want to switch class es in the list according to conditions, you can use a ternary expression:
<div v-bind:class="[isActive ? activeClass : '', errorClass]"></div>
Writing this way will always add errorClass, but only add activeClass if isActive is true.
Ternary expressions are a little cumbersome. Therefore, object syntax can also be used in array syntax:
<div v-bind:class="[{ active: isActive }, errorClass]"></div>
For binding style s
Object syntax
The object syntax of v-bind:style is very intuitive -- it looks very much like CSS, but it's actually a JavaScript object. CSS attribute names can be named with camel case or kebab case (remember to enclose them in quotation marks):
<div v-bind:style="{ color: activeColor, fontSize: fontSize + 'px' }"></div>
data: {
  activeColor: 'red',
  fontSize: 30
}
It is usually better to bind directly to a style object, which makes the template clearer:
<div v-bind:style="styleObject"></div>
data: {
  styleObject: {
    color: 'red',
    fontSize: '13px'
  }
}
Similarly, object syntax is often used in conjunction with the calculated properties of the returned object.
Array syntax
The array syntax of v-bind:style can apply multiple style objects to the same element:
<div v-bind:style="[baseStyles, overridingStyles]"></div>
Auto prefix
When v-bind:style is used, it needs to be added Browser engine prefix CSS property, such as transform, Vue JS will automatically detect and add the corresponding prefix.
4. Event binding v-on
V-on: binding event = "handler", v-on: abbreviation@
Binding method
v-on: control the method of html tag and bind the method and function.
<button v-on:click="addNum"></button> //addNum is the method defined in methods

<!--Abbreviation-->
<button @click="addNum"></button>
dynamic parameter
[] is the variable attributeName, which can dynamically specify the binding method, such as click
<button @[attributeName]="url"> ... </buttom>
Bound methods can pass parameters
<!--binding click Method, trigger add()function,add()You can omit parentheses when you do not need to pass in parameters-->
<div id="example">
  <button v-on:click="add">Click{{count}}second</button>
</div>
<script> var example = new Vue({ el: '#example', data: { count: 0 }, methods: { add: function () { // `this ` points to the current Vue instance in the method this.count++; } } }) </script>You can also call the method example. Directly with JavaScript add()
Sometimes the bound function needs to access the original DOM event, which can be passed into the method as a parameter with the special variable $event
<button v-on:click="warn('warning', $event)">click</button>// ... methods: { warn: function (message, event) {//The second parameter receives a warning string, and the second parameter is $event // Now we can access the native event object if (event) { event.preventDefault() } alert(message) } }Calling event. in event handler Preventdefault() [prevent default behavior of DOM elements] or event Stoppropagation() is a very common requirement. Although we can easily implement this in methods, it is better that methods only have pure data logic, rather than dealing with DOM event details. To solve this problem, Vue JS provides event modifiers and key modifiers for v-on
Event modifier
- .stop
- .prevent
- .capture
- .self
- .once
- .passive
<!-- Prevent click event from continuing propagation -->
<a v-on:click.stop="doThis"></a>

<!-- Submitting events no longer reloads the page -->
<form v-on:submit.prevent="onSubmit"></form>

<!-- Modifiers can be concatenated -->
<a v-on:click.stop.prevent="doThat"></a>

<!-- Only modifiers -->
<form v-on:submit.prevent></form>

<!-- Use event capture mode when adding event listeners -->
<!-- That is, events triggered by internal elements are processed here first, and then handed over to internal elements for processing -->
<div v-on:click.capture="doThis">...</div>

<!-- Only when event.target Is the handler that is triggered when the current element itself -->
<!-- That is, the event is not triggered from an internal element -->
<div v-on:click.self="doThat">...</div>

<!-- The click event will only be triggered once -->
<a v-on:click.once="doThis"></a>

<!-- Default behavior for scrolling events (Rolling behavior) Will be triggered immediately -->
<!-- Without waiting `onScroll` complete  -->
<div v-on:scroll.passive="onScroll">...</div>
be careful:
- Modifiers can be concatenated, but when using modifiers, order is important; The corresponding code will be generated in the same order. Therefore, use v-on: click prevent. Self will block all clicks, and v-on: click self. Prevent only blocks clicks on the element itself.
- Don't take it passive and Use with prevent because Prevent will be ignored and the browser may show you a warning. Remember passive will tell the browser that you don't want to block the default behavior of the event.
Key modifier
<!-- Only the key pressed is `Enter` ,Called when the key is released `submit()`function -->
<input v-on:keyup.enter="submit">

<!-- Only the key pressed is `PageDown` ,Called when the key is released `onPageDown()`function -->
<input v-on:keyup.page-down="onPageDown">
Inline processing
<div id="example">
  <button v-on:click="count++">Click{{count}}second</button>
</div>
<script> var example= new Vue({ el: '#example', data: { count: 0 } }) </script>
5. Form binding v-model
The v-model instruction creates two-way data bindings on form < input >, < textarea > and < Select > elements.
v-model is essentially a combination of v-bind binding element attributes and v-on binding element events
- text and textarea elements use value attribute and input event;
- checkbox and radio use the checked attribute and change event;
- The select field takes value as a prop and change as an event.
give an example:
Text box
The input box displays the value of the message binding
<input v-model="message" placeholder="edit me">
Multiline text
<textarea v-model="message" placeholder="add multiple lines"></textarea>
Note: interpolation in the text area (< textarea > {text}} < / textarea >) does not take effect
check box
Single check box. The v-mode is a Boolean value. When the check box is selected, the checked variable is true, and vice versa
<input type="checkbox" id="checkbox" v-model="checked">
Multiple check boxes. The v-mode value is an empty array. When the check box is selected, the corresponding value value will be push ed into the empty array in the selected order; If unchecked, the corresponding value value in the array will be deleted directly
<div id='example'>

  <input type="checkbox" id="jack" value="Jack" v-model="checkedNames">
  <label for="jack">Jack</label>

  <input type="checkbox" id="john" value="John" v-model="checkedNames">
  <label for="john">John</label>

  <br>
  <span>Checked names: {{ checkedNames }}</span>
</div>
new Vue({ el: '#example', data: { checkedNames: [] //Because it is multiple selection, it is an array } })Radio button. The v-mode value here is the corresponding value value when selected
<div id="example">

  <input type="radio" id="one" value="One" v-model="picked">
  <label for="one">One</label>
  <br>
  <input type="radio" id="two" value="Two" v-model="picked">
  <label for="two">Two</label>
  <br>
  <span>Picked: {{ picked }}</span>
</div>
new Vue({ el: '#example', data: { picked: '' } })
Drop down selection box. When selected, the v-model value corresponds to the value in < option >. Adding the value attribute is the value in option
<div id="example">
  <select v-model="selected">
      //The first is the default option, which should be set to disable
    <option disabled value="">Please select</option>
    <option>A</option>
    <option>B</option>
    <option>C</option>
  </select>
  <span>Selected: {{ selected }}</span>
</div>
new Vue({ el: '#example', data: { selected: '' } })Use v-for to render the drop-down selection box. The value of v-model is the value of the selected option
<select v-model="selected">
  <option v-for="option in options" v-bind:value="option.value">
    {{ option.text }}
  </option>
</select>
<span>Selected: {{ selected }}</span>
new Vue({ el: '...', data: { selected: 'A', options: [ { text: 'One', value: 'A' }, { text: 'Two', value: 'B' }, { text: 'Three', value: 'C' } ] } })Modifier: lazy .number .trim
//The data is rendered only after the focus is lost after the input is completed. It is not always rendered again as long as the input changes
<input v-model.lazy="msg" >
//Convert to number
<input v-model.number="age" type="number">
//Remove white space characters
<input v-model.trim="msg">
6. Conditional rendering v-if
v-if and v-else
//You can control html elements and < template >
//Variables can only be Boolean values, which can control whether elements are visible
<h1 v-if="awesome">Vue is awesome!</h1>
<h1 v-else-if>1</h1>
<h1 v-else>2</h1>
The difference between v-show and v-if is that html is retained, but hidden.
<h1 v-show="ok">Hello!</h1>
Manage reusable elements with key
Vue renders elements as efficiently as possible, often reusing existing elements rather than rendering Dom elements from scratch. This makes Vue very fast
<template v-if="loginType">
  <label>user name</label>
  <input placeholder="enter one user name">
</template>

<template v-else>
  <label>mailbox</label>
  <input placeholder="Please enter email address">
</template>
Note: control which part is displayed by controlling the authenticity of loginType. Vue only replaces the contents of label and input and does not re render Dom elements. Therefore, once data is entered in the input box, even if the loginType value is switched, the data will not be cleared and will still be displayed in the input box For example, when the loginType is true, enter the user name A. when the loginType is false, enter the user name B, switch the loginType values to each other, and the input box will retain the corresponding data
The method of forcibly updating components (you can also change the key value so that the Dom element will be re rendered every time the key of the same component changes): by adding a unique key to the element, the element will be re rendered. In the following code, the label does not use a unique key, so it will not be re rendered Dom, but only replace the content
<template v-if="loginType">
  <label>user name</label>
  <input placeholder="enter one user name" key="username">
</template>

<template v-else>
  <label>mailbox</label>
  <input placeholder="Please enter email address" key="email">
</template>
When the order of nodes in old and new children is different, the best operation should be to update by moving the position of elements.
The mapping relationship needs to be saved in the old and new children's nodes so that reusable nodes can be found in the old children's nodes. key is the unique identifier of the node in children.
Note: key is a string or numeric type
7. List rendering v-for
Traversal array v-for="item in items"
<!--There is also a second parameter, the index item,v-for="(item, index) in items"-->
<ul id="example-1">
  <li v-for="item in items">
    {{ item.message }}
  </li>
</ul>
var example1 = new Vue({ el: '#example-1', data: { items: [ { message: 'Foo' }, { message: 'Bar' } ] } })You can also use of instead of in as the separator, because it is closer to the syntax of JavaScript iterators:
<div v-for="item of items"></div>
Traversal object
<!--There is also a second parameter, the in the object key Value, v-for="(value, name) in object-->
<!--There is also a third parameter, the index index,v-for="(value, name, index) in object"-->
<ul id="example2" class="demo">
  <li v-for="value in object">
    {{ value }}<!--Is the value of the object-->
  </li>
</ul>
new Vue({ el: '#v-for-object', data: { object: { title: 'How to do lists in Vue', author: 'Jane Doe', publishedAt: '2016-04-10' } } })When Vue is updating the element list rendered using v-for, it defaults to the "update in place" strategy, that is, when the rendering element changes, the DOM at the corresponding position is updated directly. Therefore, if the order of data items is changed, Vue will not move the order of DOM elements to match the change of the order of data items, but update each element in place and ensure that they are rendered correctly at each index position.
This default mode is efficient, but only applies to list rendered output that does not depend on subcomponent state or temporary DOM state (for example, form input value).
In order to give Vue a hint so that it can track the identity of each node and reuse and reorder existing elements, you need to provide a unique key for each item:
<div v-for="item in items" v-bind:key="item.id">
  <!-- content -->
</div>
Note: key is a string or numeric type
6. Custom instructions
Define custom directives
overall situation
// Register a global custom directive ` v-focus`
Vue.directive('focus', {//Do not add v to the defined instruction name-
  // When the bound element is inserted into the DOM
  inserted: function (el) {//el refers to the caller of the custom instruction, that is, the dom element to which the instruction is added (a bit like a formal parameter in a function)
    //Write specific function: focus on elements
    el.focus()
  }
})

new Vue()
Local definition
Effect: as soon as the page is loaded, input will automatically get the focus (by default, you need to click input to get the focus)
<template>
  <div id="app">
    <input v-focus>
  </div>
</template>

<script>

export default {
  name: 'App',
  data() {
    return {};
  },
  directives: {
    focus: {
      inserted(el) {//el is the element that adds the instruction
        el.focus(); //focus is the method of dom
      },
    },
  },
};
</script>
Use custom directives
<input type="text" v-focus>
3.3 filter
Vue2. Version x has no built-in filter
Used to format text
Filters can be used in two places: Double curly bracket interpolation and v-bind expressions (the latter is supported from 2.1.0 +). The filter should be added at the end of the JavaScript expression, indicated by the "pipe" symbol "|":
Define filter
Define a local filter in the Vue option
filters: {
  capitalize: function (value) {
    if (!value) return ''
    value = value.toString()
    return value.charAt(0).toUpperCase() + value.slice(1)
  }
}
Global filter (before new Vue)
Vue.filter('capitalize', function (value) {
  if (!value) return ''
  value = value.toString()
  return value.charAt(0).toUpperCase() + value.slice(1)
})

new Vue({
  // ...
})
Use of filters
<!-"|"The first is the variable name,"|"Followed by the filter name.
     The value of the variable binding is used as the first parameter of the filter
     ->
<!-- In double curly braces -->
{{ message | capitalize }}
{{ message | filterA | filterB }}<!--filterA of return As filterB A parameter of-->
{{ message | filterA('arg1', arg2) }}<!--filter The parameters are message And their own parameters arg1 arg2-->


<!-- stay `v-bind` in -->
<div v-bind:id="rawId | formatId"></div>
Result: capitalize the first character of the input value
3.4 Vue components
Component features
- A component is an encapsulation
- Is a special Vue instance
- Components can be reused. Each time a component is used, a new instance will be created without affecting each other
In actual development, third-party components are used
Define and use components
Note: it is recommended to use the form 'ABC XYZ' for naming component names (lowercase letters are connected with -)
Register global components (written before new Vue({}))
<!DOCTYPE html>
<html>
    <head>
        <title></title>
        <!--adopt CDN introduce vue.js-->
        <script src="https://cdn.jsdelivr.net/npm/vue/dist/vue.js"></script>
    </head>


    <body>
        <div id="app">
            <!--Use custom components-->
            <button-counter></button-counter>
        </div>
        <script>
            // Define a new component called button counter
            Vue.component('button-counter', {
                data() { //data must be a function
                    return {
                        count: 0
                    }
                },
                template: '<button v-on:click="changeCount">You clicked me {{ count }} times.</button>',
                methods: {
                    changeCount() {
                        this.count++;
                    }

                }
            })
            new Vue({
                el: "#app",
                data: {

                }
            })
        </script>

    </body>
</html>
Register local components (written in Vue options)
<!DOCTYPE html>
<html>
    <head>
        <title></title>
        <!--adopt CDN introduce vue.js-->
        <script src="https://cdn.jsdelivr.net/npm/vue/dist/vue.js"></script>
    </head>


    <body>
        <div id="app">
            <!--Use custom components-->
            <button-counter></button-counter>
        </div>
        <script>
            new Vue({
                el: '#app',
                data: {

                },
                //Local component
                components: {
                    "button-counter": { //Component name
                        data() { //data must be a function
                            return {
                                count: 0
                            }
                        },
                        template: '<button v-on:click="changeCount">You clicked me {{ count }} times.</button>',
                        methods: {
                            changeCount() {
                                this.count++;
                            }

                        }
                    }
                }
            })
        </script>

    </body>
</html>
Local registration in modular systems
Sometimes we put a common component in a separate package vue file can be imported into the current file in the following ways In the vue file, it is referenced in the components field of the vue instance
Definition of component template
That is, the component template defined in the template field
- In the html file, select the template field option in the component and write directly after the field
X-Template
In html files, this method is in a < script > element with the type text/x-template, and then the template is referenced by an id.
  <!DOCTYPE html>
  <html>
      <head>
          <title></title>
          <!--adopt CDN introduce vue.js-->
          <script src="https://cdn.jsdelivr.net/npm/vue/dist/vue.js"></script>
      </head>


      <body>
          <div id="app">
              <!--Use custom components-->
              <button-counter></button-counter>
          </div>
          <script type="text/x-template" id="hello-world-template">
                <p>Hello hello hello</p>
          </script>
          <script>
              new Vue({
                  el: '#app',
                  data: {

                  },
                  //Local component
                  components: {
                      "button-counter": { //Component name
                          data() { //data must be a function
                              return {
                                  count: 0
                              }
                          },
                          template: '#hello-world-template',
                          methods: {
                              changeCount() {
                                  this.count++;
                              }

                          }
                      }
                  }
              })
          </script>

      </body>
  </html>
- Yes A < template > element in the vue file to define the template.
Each component instance does not affect each other

Component nesting
Both global and local components can be nested directly, that is, other components can be written in the template field during definition
Component communication
Official documentation - access elements & components
Component communication summary + principle analysis
The parent component passes data to the child component
Props is a field when customizing a component. The parameter is an array. Each array element is a component attribute. Through props, you can register some custom attributes on the customized component. When using custom components, you can pass values to child components in the template through custom attributes. Note: for each instantiated component, the passed parameters do not affect each other
<!--Pass the parameter title Property, passed to the template Medium{{title}}-->
<div id="app">
    <blog-post title="Chapter I"></blog-post>
    <blog-post title="Chapter II"></blog-post>
</div>
<script>
Vue.component('blog-post', {
props: ['title'],
template: '<h3>{{ title }}</h3>'
})
new Vue({
el: '#app',
data: {
message:200
}
})
</script> The custom component is rendered circularly, and the value is passed to the template through the custom attribute title
<blog-post
  v-for="post in posts"
  v-bind:key="post.id"
  v-bind:title="post.title"
></blog-post>
<script>
    Vue.component('blog-post', {
                props: ['title'],
                template: '<h3>{{ title }}</h3>'
    })

    new Vue({
      el: '#app',
      data: {
        posts: [
          { id: 1, title: 'Chapter I' },
          { id: 2, title: 'Chapter II' },
          { id: 3, title: 'Chapter III' }
        ]
      }
    })
</script>
Note: the attribute name in html is case insensitive, so the browser will interpret all uppercase characters as lowercase characters. This means that when you use the template in DOM, use the prop name of hump naming method. When using this attribute, you need to use the equivalent kebab case (DASH delimited naming). [if you use a string template, this restriction does not exist. That is, for a single vue page, the HTML code is written in the < template > tag]
<blog-post post-title="hello!"></blog-post>
<!--props If the attribute in is named by hump, change it to kebab-case form-->
<script>
    Vue.component('blog-post', {
      props: ['postTitle'],//The hump nomenclature used here
      template: '<h3>{{ postTitle }}</h3>'
    })
</script>
Transfer data from child component to parent component < span id = "transfer data from child component to parent component" ></span>
<div id="app">
    <!--Of two subcomponents count Values are also independent and will not affect each other-->
    <button-counter @clicknow="clicknow"></button-counter>
    <button-counter @clicknow="clicknow"></button-counter>
</div>
<script>
//First sub assembly
Vue.component('button-counter', {
data(){
return {
count: 0
}
},
template: '<button v-on:click="add">Click {{ count }} second</button>',
methods:{
add(){
this.count++;
//add method triggered by subcomponent through this$ Emit, put the value of count into the clicknow function and call it in the parent component to transfer the data of the child component to the parent component
this.$emit('clicknow',this.count);
}
}
})
//Instantiate Vue objects
new Vue({
el:"#app",
data:{},
methods:{
clicknow(e){
//e here is the count of the sub component
console.log(e);
}
}
})
</script>Sibling component communication
Event Bus enables cross component communication Vue prototype.$ bus = new Vue
Vuex
Cross level component communication
Vuex
$attrs,$listeners
Provide,inject
slot
In the template field of the user-defined component, add < slot > < / slot >, and the contents between the opening and closing labels of the sub component will be filled into the location of < slot > < / slot > in the template when using the sub component
<!DOCTYPE html>
<html>
    <head>
        <title></title>
        <!--adopt CDN introduce vue.js-->
        <script src="https://cdn.jsdelivr.net/npm/vue/dist/vue.js"></script>
    </head>


    <body>
        <div id="app">
            <button-counter @clicknow="clicknow">Here is the slot</button-counter>
            <button-counter @clicknow="clicknow"></button-counter>
        </div>
        <script>
            //First sub assembly
            Vue.component('button-counter', {
                data() {
                    return {
                        count: 0
                    }
                },
                template: '<div style="border: solid red 1px; margin-bottom: 10px;"> <slot></slot> <button v-on:click="add">Click {{ count }} second</button></div>',
                methods: {
                    add() {
                        this.count++;
                        //add method triggered by subcomponent through this$ Emit, put the value of count into the clicknow function and call it in the parent component to transfer the data of the child component to the parent component
                        this.$emit('clicknow', this.count);
                    }

                }
            })

            //Instantiate Vue objects
            new Vue({
                el: "#app",
                data: {},
                methods: {
                    clicknow(e) {
                        //e here is the count of the sub component
                        console.log(e);
                    }
                }

            })
        </script>

    </body>
</html>

v-model is supported on components
In this way, you can support v-model
<script>
    Vue.component('custom-input', {
      props: ['value'],
      template: `
        <input
          v-bind:value="value"
          v-on:input="$emit('input', $event.target.value)"
        >
      `
    })
</script>
<custom-input v-model="searchText"></custom-input>
Dynamic component
Click different buttons to display different components

The above contents can be realized by adding a special is attribute to the < component > element of Vue:
That is, when you click different buttons and change the value of currentTabComponent to the corresponding component name, you can change the component label into the corresponding user-defined label
<component v-bind:is="currentTabComponent"></component>
Given on the official website Sample code
<!DOCTYPE html>
<html>
<head>
<title>Dynamic Components Example</title>
<script src="https://unpkg.com/vue"></script>
<style>
.tab-button {
padding: 6px 10px;
border-top-left-radius: 3px;
border-top-right-radius: 3px;
border: 1px solid #ccc;
cursor: pointer;
background: #f0f0f0;
margin-bottom: -1px;
margin-right: -1px;
}
.tab-button:hover {
background: #e0e0e0;
}
.tab-button.active {
background: #e0e0e0;
}
.tab {
border: 1px solid #ccc;
padding: 10px;
}
</style>
</head>
<body>
<div id="dynamic-component-demo" class="demo">
<button
v-for="tab in tabs"
v-bind:key="tab"
v-bind:class="['tab-button', { active: currentTab === tab }]"
v-on:click="currentTab = tab"
>
{{ tab }}
</button>
<component v-bind:is="currentTabComponent" class="tab"></component>
</div>
<script>
Vue.component("tab-home", {
template: "<div>Home component</div>"
});
Vue.component("tab-posts", {
template: "<div>Posts component</div>"
});
Vue.component("tab-archive", {
template: "<div>Archive component</div>"
});
new Vue({
el: "#dynamic-component-demo",
data: {
currentTab: "Home",
tabs: ["Home", "Posts", "Archive"]
},
//Triggered by the change of currentTab, it is returned to the is attribute of component element to render the corresponding component label
computed: {
currentTabComponent: function() {
return "tab-" + this.currentTab.toLowerCase();
}
}
});
</script>
</body>
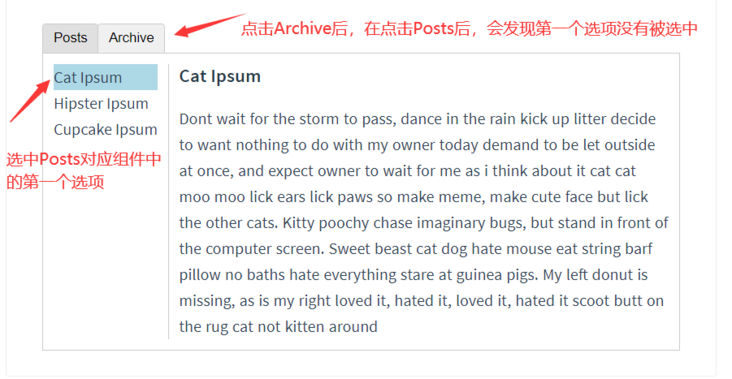
</html>Use keep alive on dynamic components
In the above example, when switching between these components, you sometimes want to maintain the state of these components to avoid performance problems caused by repeated re rendering. (for example, select a checkbox in one component, but switch to another component, and then switch back, the selected state will disappear, and keep alive can remain in the state)
<!-- Inactive components will be cached!-->
<keep-alive>
  <component v-bind:is="currentTabComponent"></component>
</keep-alive>
Asynchronous component (to be supplemented)
Document - asynchronous component
In large applications, we may need to divide the application into smaller code blocks and load a module from the server only when necessary. For simplicity, Vue allows you to define your component in the form of a factory function, which will asynchronously parse your component definition. Vue will trigger the factory function only when the component needs to be rendered, and will cache the results for future re rendering.
3.5 special characteristics
Vue instances expose some useful instance properties and methods. They are prefixed with $, to distinguish them from user-defined attributes.
var data = { a: 1 }
var vm = new Vue({
  el: '#example',
  data: data
})

vm.$data === data // => true
vm.$el === document.getElementById('example') // => true

// $watch is an instance method
vm.$watch('a', function (newValue, oldValue) {
  // This callback will be in ` VM A` calls after change
})
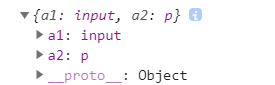
And $refs and $emit()
1. ref operation dom element
<div id="app">
        <input ref="a1"  v-model="message">
          <p ref="a2">We</p>
</div>
new Vue({
el: '#app',
data: {
message:''
},
mounted(){
//Life cycle function, loading completed
console.log(this.$refs)//You can get the dom element used by the pair according to the ref value
this.$refs.a1.focus()//Let the input of ref=a1 get the focus
}
}) 
2.emit definition event
emit usage view here
$emit defines an event. Parameters can also be passed through the event. It can be listened by v-on, but Vue instances also provide other methods in their event interface. We can (eventHandler is the processing function after listening to the event):
- Listen for an event through $on(eventName, eventHandler)
- Listen for one event at a time through $once(eventName, eventHandler)
- Stop listening for an event through $off(eventName, eventHandler)
You don't usually use these, but they come in handy when you need to manually listen for events on a component instance.
4. Transition and animation (to be supplemented)
Excessive list
Animation transition

After clicking the button, the text fades out and in slowly
<div id="demo">
  <button v-on:click="show = !show">
    Toggle
  </button>
  <transition name="fade">
    <p v-if="show">hello</p>
  </transition>
</div>
new Vue({
el: '#demo',
data: {
show: true
}
}).fade-enter-active, .fade-leave-active {
transition: opacity .5s;
}
.fade-enter, .fade-leave-to /* .fade-leave-active below version 2.1.8 */ {
opacity: 0;
}5.Vue sends network request
Interface server
Instead of building a server, we use json server, which can host json files into a WEB server. Features: Based on Express, it supports GET, POST, PUT and DELETE methods, and supports cross domain
- Official website: https://www.npmjs.com/package...
- Installation: NPM install - G JSON server (Global installation, cmd can be installed in any directory)
- Create dB JSON file
{
  "posts": [
    { "id": 1, "title": "json-server", "author": "typicode" },
    { "id": 2, "title": "json-server2", "author": "typicode2" }
    { "id": 3, "title": "json-server3", "author": "typicode3" }

  ],
  "comments": [
    { "id": 1, "body": "some comment", "postId": 1 }
  ],
  "profile": { "name": "typicode" }
}- Start the Json service: Json server -- watch dB Json (enter cmd in the directory where db.json is located, and change the port of Json server -- watch -- port 3000 Json server)
- visit http://localhost:3000/posts/1 , it will return {"Id": 1, "title": "JSON server", "author": "typicode"}
Specify what interface rules are
For the RESTful interface rule specification, see this article http://www.ruanyifeng.com/blo...
Features: you only need to care about the request method, and you don't need to care about using different URLs when adding, deleting, modifying and querying
The JSON server tool applies RESTful interface rules: (the following is the interface after JSON server runs, which has been implemented and can be used directly)
- Routes
GET Request page
POST Add data (upload data), and the data is in the request header
PUT Modify the data. The data is in the request body
DELETE Delete data
GET    /posts     Query all data
GET    /posts/1   query id Data of 1
POST   /posts
PUT    /posts/1   modify id Data of 1

DELETE /posts/1  delete id Data of 1
- Paging query
//10 items are returned by default
GET /posts?_page=7
//Return 20 pieces of data on one page
GET /posts?_page=7&_limit=20
- Fuzzy query
//Title is a field. Query records similar to server in title
GET /posts?title_like=server
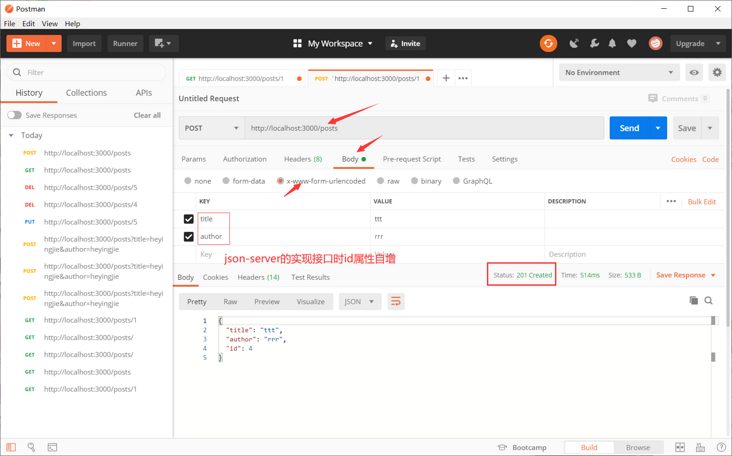
postman test interface
postman is an interface testing tool
- Official website: download
- Interface
- use
POST status code 201, the rest are 200
Send request
The essence of sending network requests using Ajax or axios is XMLHttpRequest. We can use plug-ins to facilitate operation
axios: it can be used to send requests anywhere. It is recommended
npm install axios to the corresponding directory
Basic usage rules
<script src="axios.js Location of"></script>
<script>
    //GET
    axios
        .get(url)//  /Posts checks all, and / posts/id checks the specified id
        .then((res)=>{
                res.data//Acquired data
        })
        .catch((error)=>{
            //Processing after error
        })


    //POST
    axios
        .post(url,{Submitted data})//  /posts
        .then((res)=>{
            res.data//Acquired data
            })
         .catch((error)=>{
                //Processing after error
         })


     //PUT
    axios
        .put(url,{Submitted data}) //  /put/id modifies the data of the specified id
        .then((res)=>{
            res.data//Acquired data
            })
         .catch((error)=>{
                //Processing after error
         })


    //DELETE
    axios
        .delete(url) //  /delete/id deletes the data of the specified id
        .then((res)=>{
            res.data//Acquired data
            })
         .catch((error)=>{
                //Processing after error
         })

</script>
Use in web pages
<script src="node_modules/axios/dist/axios.js"></script>
    <script>
        axios
            .get("http://localhost:3000/posts")
            .then((res)=>{
                const {status,data}=res
                if(status==200){
                    console.log(data)
                }
            })
            .catch((err)=>{

            })

        axios
            .post("http://localhost:3000/posts",{
                titlt:"hh",
                author:"hh"
            })
            .then((res)=>{
                const {status,data}=res
                if(status==201){
                    console.log(data)
                }
            })
            .catch((err)=>{

            })

        axios
            .put("http://localhost:3000/posts/5",{
                titlt:"hh2",
                author:"hh2"
            })
            .then((res)=>{
                const {status,data}=res
                if(status==200){
                    console.log(data)
                }
            })
            .catch((err)=>{

            })

        axios
            .delete("http://localhost:3000/posts/5")
            .then((res)=>{
                const {status,data}=res
                if(status==200){
                    console.log(data)
                }
            })
            .catch((err)=>{

            })
    </script>
Use in Vue projects
new Vue({
    el: '#app',
    data: {
        lists: [],
    },
    mounted() {
        this.getAll() //Query all data to be invoked after the web page is loaded, and use life cycle.
    },
    methods: {
        //Write the addition, deletion, modification and query functions in methods
        //After the web page is loaded, it will be called to mounted.
        //Add the v-on: instruction to the corresponding html element by triggering the time call
        getAll() {
            axios
                .get("http://localhost:3000/posts")
                .then((res) => {
                    const {
                        status,
                        data
                    } = res
                    if (status == 200) {
                        this.lists = data
                    }
                })
                .catch((err) => {

                })
        }
    }
})
other
import axios from 'axios'
//Add a fixed prefix to the API accessed by axios
axios.defaults.baseURL="http://8.131.105.244:3000"

//Add token authentication through axios interceptor
axios.interceptors.request.use(config=>{
    //Add a new field Authorization to the headers of config and add the token
    config.headers.Authorization=window.sessionStorage.getItem('token')
    return config
})
vue cli: generate a standard set of vue project directories
Vue CIL is called scaffold
Vue cli is a global command line tool
Vue cli supports hot update, deletes code, automatically updates and starts the server; If you modify the project configuration file, you need to re npm run dev
Launch UI interface: vue ui
Official website: https://cli.vuejs.org/zh/
Use steps
- Installation: nodejs is required to be installed
//Install vue-cli3
npm install -g @vue/cli
//Enables vue-cli3 to use the Vue init instruction of vue-cli2
npm install -g @vue/cli-init
- To create a project
Under the desired folder, execute the following instructions. The name shall be in English, and there shall be no keywords such as Vue webpack
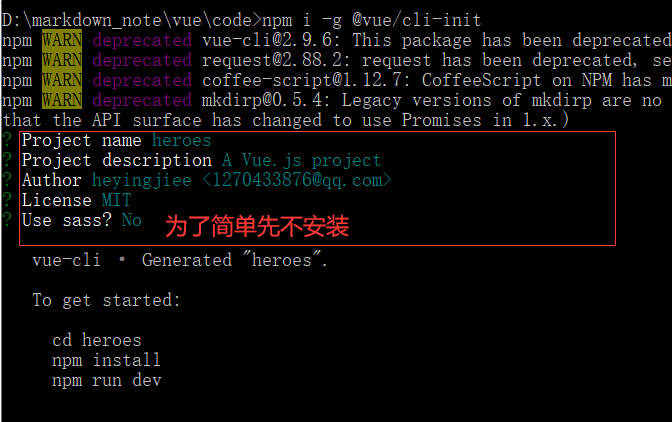
//vue init project template project name
vue init webpack-simple heroes
Select as needed. Select Default and press enter directly
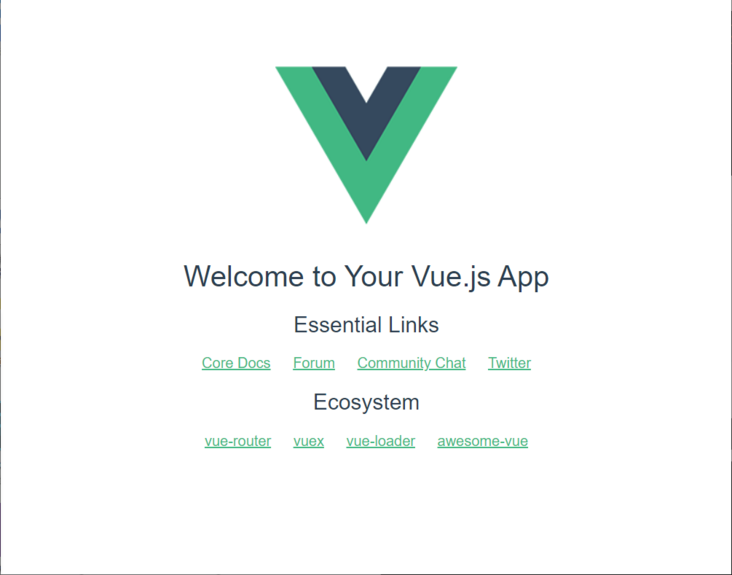
//Enter project directory
//Install the dependent package of the created project, and automatically find the package JSON file
npm install
//Run the built-in server and pop up the web page
npm run dev
Directory structure analysis

Under src
- assets: place static resources such as css, fonts, icons, etc
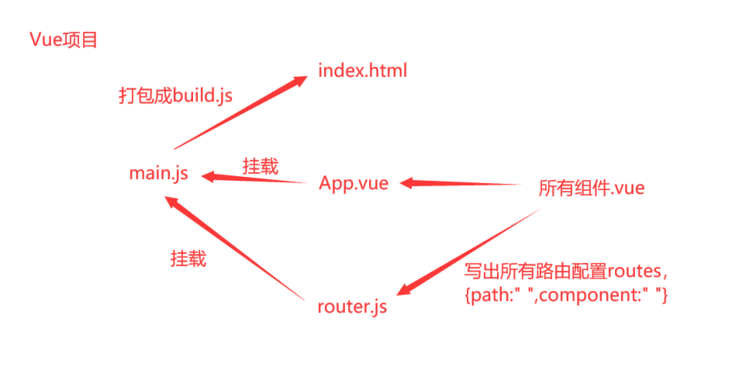
- App.vue : . Vue is a component file, consisting of tempolte script style. App.vue is equivalent to the root component of the whole project, and all other components should be placed in app Vue, and export it in main JS import
- main.js: the entry file of the program, importing various packages (App.vue component, routing router.js)
//ES6 use of modules
//export
export default{}
//Import, write your own import address, and write the package name directly
import App from './App.vue'
//In Nodejs
module.exports
require()
//The default is main js import App from './App.vue' new Vue({ el: '#app', render: h => h(App) })
- . babelrc: because some browsers do not support ES6, babel is used for conversion. This file is bable's configuration file
- Configuration file for the. editorconfig editor
- . gitignore: exclusion file of recorded git
- index. Build. Html is introduced into the code JS, Vue cli uses webpack, which puts the resource processing in build JS
- package.json records the package and other project information that the project depends on
//package. There is a field of scripts in JSON. key is the abbreviation of value command. When calling cmd, it is written as "npm run abbreviation"
"scripts": {
    "dev": "cross-env NODE_ENV=development webpack-dev-server --open --hot",
    "build": "cross-env NODE_ENV=production webpack --progress --hide-modules"
}- package-lock.json records the version and download address of the package that the project depends on
- webpack.config.js: configuration file of webpack. Webpack is used in Vue cli
. vue file structure
<template>
     <div>
         //Page template
    </div>
</template>

<script>
    //Import all packages on the page
    import echarts from "echarts"
    //
    export default{
        //Life cycle function
        created(){},
        mounted(){//At this time, the dom element of the page has been rendered},
        //data
        data(){
            return{
                a:"xx"
            }
        },
        //method
        methods:{

        }
    }
</script>

<style lang="less" scoped>
    //lang="less" supports less syntax
    //scoped indicates that the style style works only within the component
    //style
</style>
Routing basis
Vue router is the official plug-in of Vue. Its function is to realize front-end routing
- Install NPM install Vue router
Vue. Must be introduced before reference js
<script src="/path/to/vue.js"></script>
<script src="/path/to/vue-router.js"></script>
- use
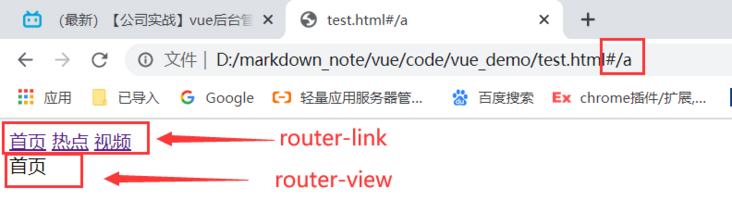
<div id="app" >
        <!--1.Set jump-->
        <!--      website url become'....#/a' .  The value of the to attribute can be omitted -- >
         <router-link to="/a">home page</router-link>
         <router-link to="/b">hotspot</router-link>
         <router-link to="/c">video</router-link>
        <!--2.container-->
        <router-view></router-view>
    </div>
<script src="node_modules/vue/dist/vue.js"></script>
    <script src="node_modules/vue-router/dist/vue-router.js"></script>
    <script>
        //3. Set up the rendering page
        var comA = { template: '<div>home page</div>' }
        var comB = { template: '<div>hotspot</div>' }
        var comC = { template: '<div>video</div>' }
        //4. Route configuration (set route matching rules)
        var routes = [
          { path: '/a', component: comA },
          { path: '/b', component: comB },
          { path: '/c', component: comC }

        ]
        //5. Instantiate routing
        const router = new VueRouter({
          routes // (abbreviation) equivalent to routes: routes
        })


        new Vue({
              el: '#app',
              //6. Mount routing. When vue router is introduced, one more option router is added to vue
               router // (abbreviation) equivalent to router: router
        })
</script>
Dynamic routing
It is suitable for rendering the same page with different identities (the part in # the url after), for example, the details page
<div id="app" >
        <!--1.Set jump-->
         <router-link to="/baskball">Basketball</router-link>
         <router-link to="/football">Football</router-link>
         <router-link to="/pp">Table Tennis</router-link>
        <!--2.container-->
        <router-view></router-view>
    </div>
    <script src="node_modules/vue/dist/vue.js"></script>
    <script src="node_modules/vue-router/dist/vue-router.js"></script>
    <script>
        //3. Set up the rendering page
            //$route is to get routes object
        var Ball= { template: '<div>Ball assembly{{$route.params.id}}</div>' }

        //4. Configure routing (set routing matching rules)
        var routes = [
            //Dynamic routing is written in such a way that id is a parameter
          { path: '/:id', component: Ball },

        ]
        //5. Instantiate routing
        const router = new VueRouter({
          routes // (abbreviation) equivalent to routes: routes
        })


        new Vue({
              el: '#app',
              //6. Mount routing
               router // (abbreviation) equivalent to router: router
        })
    </script>
Get url ID from data
The value of bound user in data is home, and the jump link is assigned by binding the to attribute with v-bind
<div id="app" >
        <!--1.Set jump-->
        <!--      website url become'....#/a'     -->
         <router-link v-bind:to="user">home</router-link>

        <!--2.container-->
        <router-view></router-view>
    </div>
<script src="node_modules/vue/dist/vue.js"></script>
<script src="node_modules/vue-router/dist/vue-router.js"></script>
<script>
//3. Set up the rendering page
var Ball= { template: '<div>Ball assembly</div>' }
//4. Configure routing (set routing matching rules)
var routes = [
{ path: '/home', component: Ball }
]
//5. Instantiate routing
const router = new VueRouter({
routes // (abbreviation) equivalent to routes: routes
})
new Vue({
el: '#app',
data:{
user:"home"
},
//6. Mount routing
router // (abbreviation) equivalent to router: router
})
</script> To sum up
//fixed
<router-link to="Fixed link"></router-link>

//Dynamic routing, click different links to load the same page, but the page data is different (suitable for details page)
<router-link to="/a"></router-link>
<router-link to="/b"></router-link>
var Ball= { template: '<div>Ball assembly{{$route.params.id}}</div>' }
var routes = [{ path: '/:id', component: Ball }]

//The value of user is determined by data
<router-link v-bind:to="uer Value of"></router-link>
//In the previous example, only the path and component fields can be configured for routing, and the name field can be added
<router-link v-bind:to="{path:'Specifies the in the configured route path field value'}"></router-link>

<router-link v-bind:to="{name:'Specifies the in the configured route name field value'}"></router-link>
redirect
//4. Configure routing (set routing matching rules)
        var routes = [
            //Method 1: specify path
            // {path:"/",redirect:{
            //     path:"/home"}
            // },
            //Method 2: only be name
            {path:"/",redirect:{
                name:"aa"}

            },
            { path: '/home',name:"aa", component: Ball },
            //Write it at the end. If the accessed address is not the above address, redirect it
            { path: '*',name:"aa", redirect:{
                path:"/home"}
            }

        ]
Programming navigation
If < router link > cannot be used for routing, you can use the v-bind binding method. In the method, get the routing object $router Push ({path: 'path'}) for routing, parameter {path '} {path:' path '} {Name:' name in routes'}
<div id="app" >
        <!--1.Set click jump-->
         <button @click="urlchange()">Click jump</button>
        <!--2.container-->
        <router-view></router-view>
    </div>
<script src="node_modules/vue/dist/vue.js"></script>
<script src="node_modules/vue-router/dist/vue-router.js"></script>
<script>
//3. Set up the rendering page
var Ball= { template: '<div>Ball assembly</div>' }
//4. Configure routing (set routing matching rules)
var routes = [
{ path: '/home',name:"aa", component: Ball },
]
//5. Instantiate routing
const router = new VueRouter({
routes // (abbreviation) equivalent to routes: routes
})
new Vue({
el: '#app',
data:{
user:"home"
},
//6. Mount routing
router:router,
//Jump method
methods:{
urlchange(){
this.$router.push({path:'/home'})
}
}
})
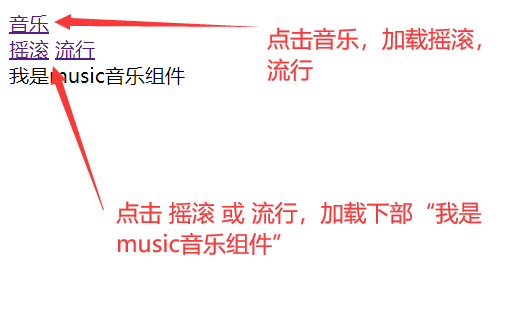
</script> Nested Route
<div id="app" >
        <!--1.Set jump-->
        <router-link to="/a">music</router-link>
        <!--2.container-->
        <router-view></router-view>
</div>
<script src="node_modules/vue/dist/vue.js"></script>
<script src="node_modules/vue-router/dist/vue-router.js"></script>
<script>
//3. Set up the rendering page
var music= { template: `<div>
<router-link to="/music/rock">Rock</router-link>
<router-link to="/music/pop">popular</router-link>
<router-view></router-view>
</div>`
}
//Secondary render page
var musicSub={template:`<div>
I am music Music component
</div>`
}
//4. Configure routing (set routing matching rules)
var routes = [
{ path: '/a',
component:music,
//The usage of secondary routing is the same as that of children and routes
children:[{
path:"/music/:id",
component:musicSub
}]
},
]
//5. Instantiate routing
const router = new VueRouter({
routes // (abbreviation) equivalent to routes: routes
})
new Vue({
el: '#app',
data:{
user:"home"
},
//6. Mount routing
router // (abbreviation) equivalent to router: router
})
</script> Routing guard
Before the route jump, we mainly use the hook function beforeEach() provided by Vue router to judge the route.
// Routing guard
router.beforeEach((to,from,next)=>{
        if(to.matched.some(res=>res.meta.isLogin)){//Determine whether login is required
            if (sessionStorage['username']) {
                next();
            }else{
                next({
                    path:"/login",
                    query:{
                        redirect:to.fullPath
                    }
                });
            }

        }else{
            next()
        }
    });

export default router;
To indicates the component to jump to (target component)
console.log(from); // (source component)
next();
next is a function
next() enters the hook function of the next component
next(false) prevent jump interrupt navigation
next("/login") enters the hook function of the specified component
supplement
let routeData = this.$router.resolve({path:'exteriorColourPicList',query:{albumId:albumId}});
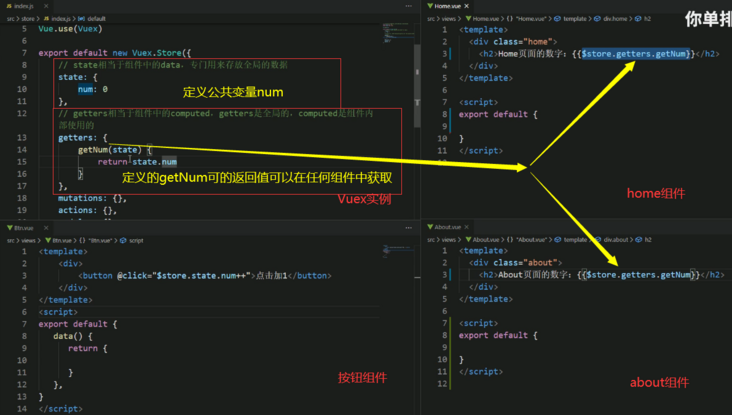
window.open(routeData.href);8.Vuex
Vuex is designed for Vue JS application development state management mode. It uses centralized storage to manage the state of all components of the application, and uses corresponding rules to ensure that the state changes in a predictable way.
Look at the following example

Usage of state and getters
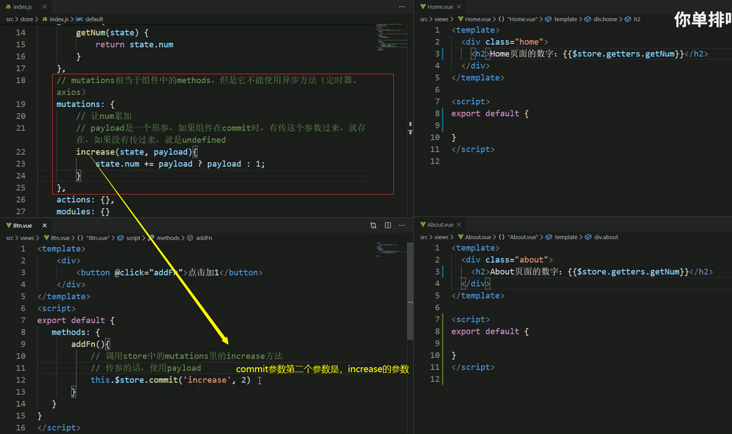
Usage of mutations:
The only way to change the state in Vuex's store is to submit the mutation. And cannot be an asynchronous method
Usage of action:
Action is used to handle asynchronous operations. Instead of directly changing the state, it submits a mutation
const store = new Vuex.Store({
  state: {
    count: 0
  },
  mutations: {
    increment (state) {
      state.count++
    }
  },
  actions: {
    incrementASync (context) {
      context.commit('increment')
    }
  }
})this.$store.dispatch('incrementASync')9. Cases
##Project start
Create a new project using Vue cli
Componentization
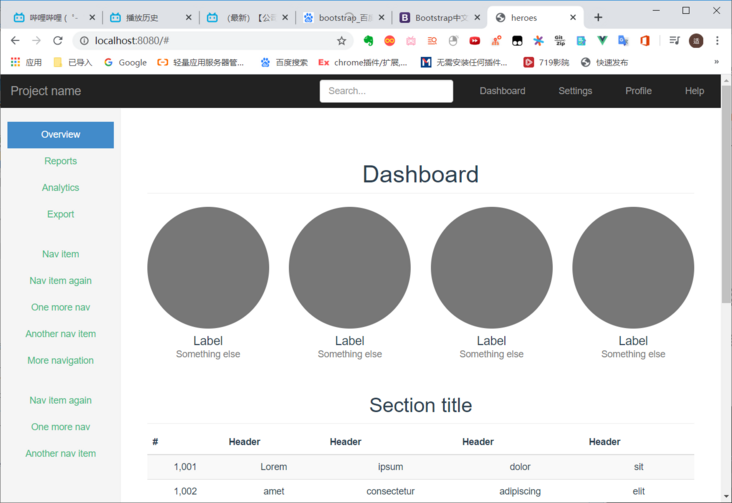
- Find the background template of bootstrap 3 on the official bootstrap website( https://v3.bootcss.com/exampl... ), right-click "check web page source code", copy the html code in the body and paste it into app Under template of vew file
- In main JS
npm install bootstrap@3//Download bootstrp
//style.css go to the web source code to find the link to introduce the style, enter, copy the source code, and create a new file style CSS is placed in the assets directory

//Import style file
import "../node_modules/bootstrap/dist/css/bootstrap.css"
import "./assets/style.css"
An error is reported. There are unrecognized files and the webpack needs to be modified config. js
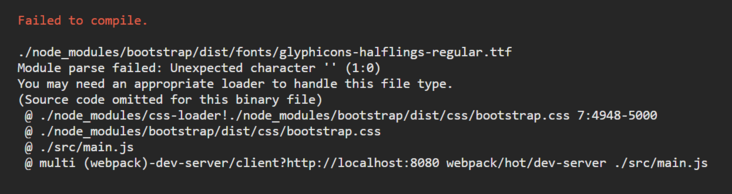
Add the following files (observe the document structure to know where to add them)
{
    test:/\.(ttf|woff2|woff|eot)$/,
        loader:'file-loader',
            options:{
                name:'[name].[ext]?[hash]'
            }
}
- npm run dev
- Create a new one based on the original one

- Paste the previously pasted into app The html in vue's template is divided into components and placed separately Template in vue file
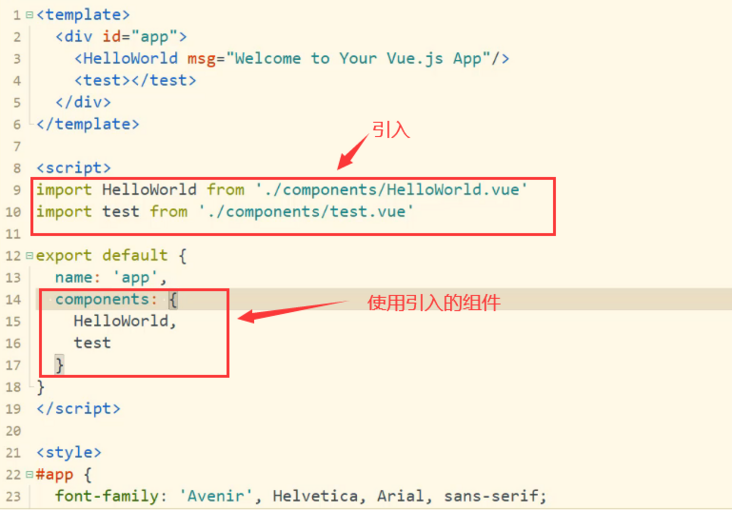
- [5] For specific steps, see app Extract nav header from template in Vue file and put it into appnav Vue's template (Note: the contents in the template must be under the same root div), and add export default {} in script to export. Next, on app The operation in Vue is as follows:
<!--App.vue file-->

<template>
  <div id="app">
    <!--Top bar-->
    <!-- 3.Through the component name, use the component name, which is the hump identification appNav ,have access to app-nav,If not, write directly-->
    <app-nav></app-nav>
    //The rest remains unchanged
<template>

<script>
      //On app Use appnav. In Vue Vue component
      //1. Lead in components
      import appNav from './components/common/appnav.vue'

    export default {
    name: 'app',
    //2. Register components through options
    components:{
      //appNav:appNav is abbreviated as appNav
      appNav
    },
    data() {
      return {
        msg: 'Welcome to Your Vue.js App'
      }
    }
  }
</script>

<style>
 //unchanged
</style>
Extract routing module
Create a router file under src, and create a router under it js
//router.js

//Module: routing, the use method given in the official document
import Vue from 'vue'
import VueRouter from 'vue-router'
Vue.use(VueRouter)
//Import components to render
import List from "../components/list/list.vue"
import Bar from "../components/bar/bar.vue"
import Foo from "../components/foo/foo.vue"

var routes=[
  {name:"heroes",path:"/heroes",component:List},
  {name:"bar",path:"/bar",component:Bar},
  {name:"foo",path:"/foo",component:Foo}
]

var router=new VueRouter({
  //Global setting the value added to the class attribute of the corresponding router link after activating the router link Click to add the active selection effect
  linkExactActiveClass:'active',
  routes
})

//Export router in main JS
export default router
//main.js

//1. Import route
import router from "./router/router.js"

new Vue({
  el: '#app',
  render: h => h(App),
  //2. Mount the imported object
  router
})
appslider.vue sidebar assembly
<template>
  <ul class="nav nav-sidebar">
      <!--tag="li"Is let router-link In rendering html Render page as<li>-->
    <router-link to="/heroes" tag="li"><a>Hero list</a></router-link>
    <router-link to="/bar" tag="li"><a>Weapon list</a></router-link>
    <router-link to="/foo" tag="li"><a>equipment</a></router-link>

  </ul>
</template>

<script>
  export default{

  }
</script>

<style>
</style>
Using interface server JSON
Create a server folder outside the heroes project and create a new DB json
{
    "heroes":[
        {"id":1,"name":"Zhang 1","gender":"male"},
        {"id":2,"name":"Zhang 2","gender":"male"},
        {"id":3,"name":"Zhang 3","gender":"female"},
        {"id":4,"name":"Zhang 4","gender":"male"},
        {"id":5,"name":"Zhang 5","gender":"male"},
        {"id":6,"name":"Zhang 6","gender":"female"},
        {"id":7,"name":"Wang 1","gender":"male"},
        {"id":8,"name":"Wang 2","gender":"female"}
    ]
}
Start JSON server (see [4] before installation)
json-server --watch db.json
list.vue display, take out data and delete data
Install axio in the project to send requests
npm install axios
On the list In Vue
<template>
   <div>
     <h2 class="sub-header">Section title</h2>
     <a class="btn btn-success">increase</a>
     <div class="table-responsive">

         <thead>
           <tr>
             <th>ID</th>
             <th>full name</th>
             <th>Gender</th>
             <th>operation</th>
           </tr>
         </thead>
         <tbody>
           <tr v-for="list in lists" v-bind:key="list.id">
             <td>{{list.id}}</td>
             <td>{{list.name}}</td>
             <td>{{list.gender}}</td>
             <td>
                <a v-on:click="deleteById(list.id)">delete</a>
             </td>
           </tr>
         </tbody>
       </table>
     </div>
   </div>
</template>

<script>
  //Write package name directly after from
  import axios from 'axios'

  export default{
    data(){
      return{
        lists:[]
      }
    },
    mounted(){
      this.getData()
    },
    methods:{
      //Query all
      getData(){
        axios
              .get("http://localhost:3000/heroes")
              .then(res=>{
                const {status,data}=res

                if(status==200){
                  this.lists=data
                }

              })
      },

      deleteById(id){
        axios
              .delete("http://localhost:3000/heroes/"+id)
              .then((res)=>{
                const {status,data}=res
                if(status==200){
                  console.log("Delete succeeded")
                  this.getData()
                }
              })

      }

    }
  }
</script>

<style>
</style>
optimization
//1. There is no need to introduce axios into each vue component requiring network requests
//2. Add, delete, modify and query the same api, but the request methods are different and the id value is not added. Extract the basic url and put it into the global

//The following codes are written in main JS
import axios from 'axios'
//Solve problem 1. Configure axios globally and use it directly in any vue component without import
Vue.prototype.axios=axios
//In each component file, it is not necessary to introduce Axios. Replace the place where Axios is used with this axios. Just get / post / put / delete

//Problem solving 2
axios.defaults.baseURL="api Medium foundation url,For example: http://localhost:3000/"
//this. axios. The get ("content to be spliced") function will automatically splice the baseURL
10. Comprehensive cases
Front end initialization
If Vue cli is installed
//Method 1: Command startup (under the directory of the project to be built)

vue init webpack Project name
//The content that appears to let you choose is only what you choose to focus on

//Select runtime+compiler
vue build

//Check the code specification and report an error if it is not standardized. Not enabled
use ESlint to lint you code? n

//Open unit test
set up unit tests? n
//Open end-to-end test
setup e2e tests with Nigtwatch? n

//Start project
npm run dev

/////////////////////////////////////////////////

//Method 2: start the interface (under the directory of the project to be built)
vue ui

initialization git Warehouse recommendations  init project

Player move

install Babel,Router,Use profile

The default can be saved or not

After creating the project, enter the project dashboard, find the plug-in and install it vue-cli-plugin-element. Select import on demand as the import method

Installation dependency,axios (Install to run (dependent)

Start project task->server->function
Project hosting
Add public key
Login code cloud www.gitee.com com
//After entering any local directory cmd, press enter 3 times
ssh-keygen -t rsa -C "xxxxx@xxxxx.com"

//For example, my input
ssh-keygen -t rsa -C "1270433876@qq.com"

//Find [user / computer name /. ssh folder] locally and open the ID in it_ ras. Pub, copy and paste the content into the code cloud - Settings - ssh public key - add public key, and add the public key
//Local arbitrary directory cmd
ssh -T git@gitee.com
choice yes,Add current host to trusted list
Hosting the project
Login code cloud - new warehouse
Open cmd in the project directory,
//Make global configuration at any location
git config --global user.name "user name"
git config --global user.email "mailbox"

//Under project directory
git status
git add .
git commit -m"First submission"

//In the project directory, upload the locally created vue project to the code cloud
git remote add origin https://gitee.com/hyj1270433876/test.git
git push -u origin master

//In the pop-up window, enter the email and password of the code cloud, and click OK to upload it successfully
////Submit locally to the specified remote branch

//If the local branch currently has the same name as the remote branch
git push Remote warehouse name remote branch name

//There is no need to establish a mapping between the local branch and the remote branch
git push Remote warehouse name local branch name:Remote branch name
Login component
Principle of token maintaining login status
http is stateless
- Log in status on the client through a cookie
- Log in to the server through the session and record the status
- Maintain login status through token (used when cross domain problems exist)
Because there is a cross domain problem between the front and back of the browser, token is used
The user clicks login to verify the password, the server returns the token, and the client receives and saves it in sessionStorage (exist during the session and end destruction)
The following is the schematic diagram of token:
Development login function
- git status: check whether there is any uncommitted content. If yes, git add and git commit -m "submit"
- Create a new branch git checkout -b branch name, and switch to this branch. git branch will view all branches, and the current branch is marked with *
- Enter vue ui to enter the vue panel, and the task - server - runs. After the compilation is completed, the vue project can run. Click "start app"
- Sort out the directory and clean up the original default project directory
- Create a new component login. In components vue.
- In the Vue cli panel, support less language, dependency - add dependency - search less loader, select development dependency - install, and install to development dependency in search less. Click stop in task - "server -" and then start
<!--login.vue-->
<template>
    <div>Login component</div>
</template>

<script>
    export default{}
</script>

<style lang="less" scoped>
    /*
    lang="less"Yes, make style support less language
    scoped Yes, the style takes effect within the component
    */

</style>
- In router Register login. JS Vue components. import and add routes
import VueRouter from 'vue-router'

import Login from './components/login.vue'


Vue.use(VueRouter)

const routes = [
    {path: '/',redirect:'/login'},
    {path: '/login',name: 'login',component: Login}


]

const router = new VueRouter({
  routes
})

export default router- Because the on-demand import is used when using element UI, it is in plugins / element JS to import and register
import Vue from 'vue'

//Since the on-demand import is used when using element UI, any component used should be imported
import { Button } from 'element-ui'
import { Form,FormItem } from 'element-ui'
import { Input } from 'element-ui'

//Register as a globally available label
Vue.use(Button)
Vue.use(Form)
Vue.use(FormItem)
Vue.use(Input)
- Further improve login Vue and element documents provide the method of from component. How to use it?
//Bind button v-on="d()" bind form component ref="a"

<script>
    //You can have a lifecycle function

    data(){//There must be a return function
        return{

        }
    },
      methods:{//object
          d(){
              //this is the current vue object
            this.$refs.a.Methods given in the document
          }
      }
</script>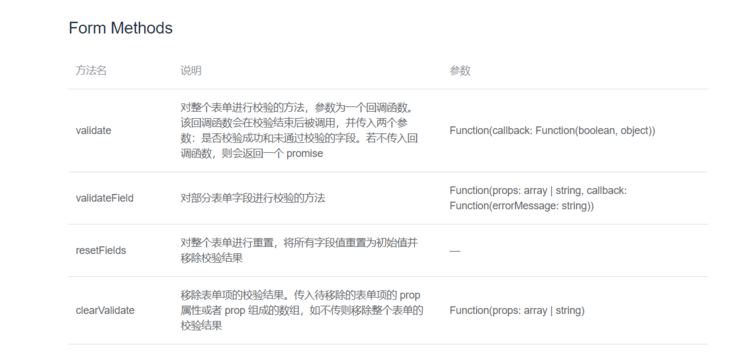
- Final login vue
<template>
    <div class="login_container">
        <div class="login_box">
            <!--head portrait-->
            <div class="avatar">
                <img src="../assets/logo.png"/>
            </div>
            <!--Form area-->
            <el-form ref="form"  :model="loginForm" :rules="loginFormRules" label-width="0px" class="login_form" >
              <!-- account number -->
              <el-form-item prop="manager_email" >
                <el-input v-model="loginForm.manager_email"  prefix-icon="czs-user"></el-input>
              </el-form-item>
              <!-- password -->
              <el-form-item  prop="manager_password">
                <el-input v-model="loginForm.manager_password"  prefix-icon="czs-lock" show-password></el-input>
              </el-form-item>
              <!-- Button -->
              <el-form-item  class="btns">
                 <el-button type="primary" @click="login()">Sign in</el-button>
                 <el-button type="info" disabled>Reset</el-button>
              </el-form-item>
            </el-form>
        </div>

    </div>
</template>

<script>
    export default{
        data(){
            return{
                //Data binding object for login form
                loginForm:{
                    manager_email:'',
                    manager_password:''
                },
                //Form validation rules
                loginFormRules:{
                    //email
                    manager_email:[//Trigger: trigger when blur loses focus
                        { required: true, message: 'Please enter login email', trigger: 'blur' }
                    ],
                    manager_password:[
                        { required: true, message: 'Please input a password', trigger: 'blur' }
                    ]

                }
            }
        },
        methods:{
            login(){
                this.$refs.form.validate(valid=>{
                    if(!valid){//Incorrect format validation, res is false
                        return
                    }
                    console.log("Form validation succeeded")
                    var res= this.$axios
                                        .post('/login',this.loginForm)
                                        .then((res)=>{
                                            //In particular, the contents returned by the background api interface are placed in the res.data field, res.date Only date has a manager_id,token and other fields
                                            // console.log(res.data.err_code)
                                            // console.log(res.data.message)
                                            // console.log(res.data.data.token)

                                            if(res.data.err_code==1){
                                                //Login failed
                                                this.$message.error(res.data.message)
                                            }else{
                                                //Login successful
                                                this.$message.success(res.data.message)
                                                //Save the token locally
                                                window.sessionStorage.setItem("token",res.data.data.token)
                                                //Programming navigation
                                                this.$router.push("/home")
                                            }


                                        })

                })
            }
        }

    }
</script>

<style lang="less" scoped>
.login_container{
    background-color:#274a6c;
    height: 100%;
}
.login_box{
    width: 450px;
    height: 300px;
    background-color: white;
    border-radius: 3px;
    position: absolute;
    left: 50%;
    top: 50%;
    transform: translate(-50%,-50%);
}
.avatar{
    height: 130px;
    width: 130px;
    border: 1px  solid #eee;
    border-radius: 50%;
    padding: 10px;
    box-shadow:  0 0 10px #ddd;
    position: absolute;
    left:50%;//Absolute positioning, the left edge of the element moves to 50% of the parent element
    transform: translate(-50%,-50%);//50% of the width and height of the element moving horizontally and vertically
    background-color: white;
    img{
        width: 100%;
        height: 100%;
        border-radius: 50%;
        background-color: #eee;
    }

}

.btns{
    display: flex;
    justify-content: flex-end;
}
.login_form{
    position: absolute;
    bottom: 0;
    width: 100%;
    padding: 0 30px;
    box-sizing: border-box;
}

</style>
- Route navigation guard
//Mount route navigation guard
router.beforeEach((to,from,next)=>{
    //To indicates the path to access
    //From indicates which path to jump from
    //next is a function that indicates release

    //If you visit the login page, release directly
    if(to.path=="/login") return next()
    //The login page is not accessed. Check whether there is a token. The login page is not returned
    const tokenStr=window.sessionStorage.getItem("token")
    if(!tokenStr){
        console.log("If you have not logged in, you will automatically jump back to the home page")
        return next('/login')
    }
    next()
})
To log out is actually to empty the locally stored token
At home In Vue component
<template>
    <el-button type="info" @click="logout">sign out</el-button>
</template>

<script>

    export default{
        methods:{

            logout(){
                window.sessionStorage.clear()
                this.$router.push("/login")
            }
        }
    }
</script>

<style lang="less" scoped>
</style>
git submit to remote warehouse
git status //View local branches
git add .  //If a file is displayed, use this to submit it to the temporary storage area
git commit -m"Complete login module" //Submit to local warehouse

git branch  //View the current branch. Because the login branch entered when the item was written before, a * sign will be displayed in front of login


/////////////////////////////////////////
//1. Switch to the master branch and merge the login branch from the master branch
git checkout master //Switch to main branch
git branch //Check whether the current branch is master
git merge login //Execute on the master to merge the login branch
git push //Submit to remote warehouse
/////////////////////////////////////////
//2. In the login branch. Since the login branch is submitted for the first time, use the following command
git push -u origin login//You can see the login branch on the website, and then submit git push directly

//If it is a clone, specify the branch git clone -b remote branch name code warehouse address
//If the project folder is not pulled down from the remote branch and written locally, first try to convert it into a git directory, git init, and it will be generated Git folder, you can automatically record changes.
Add a little episode. I made an error when using git, and all files were rolled back
git log //Check the records submitted by the commit to the local warehouse. I found a string of codes after the commit of the corresponding record, i.e. sha code, and use the following command to recover
git reset --hard sha code//Local file recovery after execution
Background home page component
Add token authentication through axios interceptor
//In main JS after import axios from 'axios'

//Every time axios requests, the header will bring the token to the server, and the server can determine the user identity by judging the token

axios.interceptors.request.use(config=>{
    //Add a new field Authorization to the headers of config and add the token
    config.headers.Authorization=window.sessionStorage.getItem('token')
    return config
})
home development
Note that some tag attributes in vue have Boolean or numeric values, but the attribute value can only be string. For example, the attribute value of unique opened is Boolean. One is to write unique opened directly; Another: v-bind: unique opened = "true", vue will convert the string true to a Boolean value. For numeric values, there is only one way: v-bind:XXXX="20",Vue will convert the string 20 into a number
<el-menu background-color="#333744" text-color="#fff" active-text-color="#4787d5" v-bind:default-active="active" unique-opened>
home.vue.
<template>
    <el-container>
        <!-- Head area -->
        <el-header>
            <div>
                <span>E-commerce background management system</span>
            </div>
            <el-button type="info" @click="logout">sign out</el-button>
        </el-header>
        <!-- Main area -->
        <el-container>
            <!-- sidebar  -->
            <el-aside width="200px">
                <el-menu background-color="#333744"  text-color="#fff" active-text-color="#4787d5" v-bind:default-active="active" unique-opened router>
                    <!-- First level menu  index Received is a string, so use a number+''-->
                    <el-submenu v-bind:index="menulist.id+''" v-for="menulist in menulists" v-bind:key="menulist.id">
                        <!-- Primary menu template area -->
                        <template slot="title">
                            <!-- Icon -->
                            <i v-bind:class="menulist.icon"></i>
                            <!--text-->
                            <span style="margin-left: 10px;">{{menulist.menuName}}</span>
                        </template>
                        <!-- Secondary menu -->
                        <el-menu-item v-on:click="saveActive(second_item.path)" v-bind:index="second_item.path+''" v-for="second_item in menulist.children" v-bind:key="second_item.id">
                            <template slot="title">
                                <!-- Icon -->
                                <i class="el-icon-menu"></i>
                                <!--text-->
                                <span>{{second_item.secondMenuName}}</span>
                            </template>

                        </el-menu-item>

                    </el-submenu>


                </el-menu>
            </el-aside>

            <!-- Right content -->
            <el-main>
                <router-view></router-view>
            </el-main>
        </el-container>
    </el-container>
</template>

<script>
    export default {

        created(){
            this.getMenuList()
            this.active=window.sessionStorage.getItem("active")
        },

        data(){
            return{
                //Left menu data
                menulists:[],
                active:''
            }
        },
        methods: {

            logout() {
                window.sessionStorage.clear()
                this.$router.push("/login")
            },
            getMenuList(){
                this.$axios
                            .get("/menus")
                            .then(backinfo=>{
                                //The data to be used is in backinfo In data, give this value to res. This is the ES6 deconstruction object.
                                const {data:res}=backinfo
                                if(res.err_code==0){
                                    console.log(res)
                                    this.menulists=res.data
                                    //return this.$message.success(res.message)
                                }
                            })

            },

            saveActive(active){
                //Because the selected item will not be highlighted as soon as it is refreshed, it is saved. Each time the created is executed, it is retrieved from sessionStorage
                window.sessionStorage.setItem("active",active)
                this.active=window.sessionStorage.getItem("active")
            }
        }
    }
</script>

<style lang="less" scoped>
    /*el The component name can be directly used as the class name*/
    .el-container {
        height: 100%;
    }

    .el-header {
        background-color: #373c41;
        display: flex;
        justify-content: space-between;
        align-items: center;
        /*Internal text*/
        color: white;
        font: 20px;

        >div {
            display: flex;
            align-items: center;

            span {
                margin-left: 15px;
            }
        }
    }

    .el-aside {
        background-color: #323744;
        .el-menu{
            border-right: none;
        }
    }


    .el-main {
        background-color: #f6f8fa;
    }
</style>
Create a new customer vue. To router Route is configured in routes of JS, and there is a router vive in home to configure sub routes
//Automatically load "user subcomponents" when accessing the background
    {path: '/home',name: 'home',component: Home, redirect:"/customer" ,children:[
        {path: '/customer',name: 'customer',component: Customer}
    ]}
Customer here Vue has written some contents, which we will write in detail later
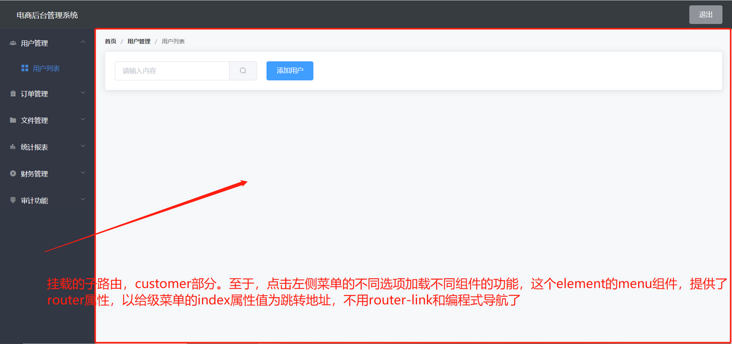
Instant messaging notification
Generation of tree structure
Following functions
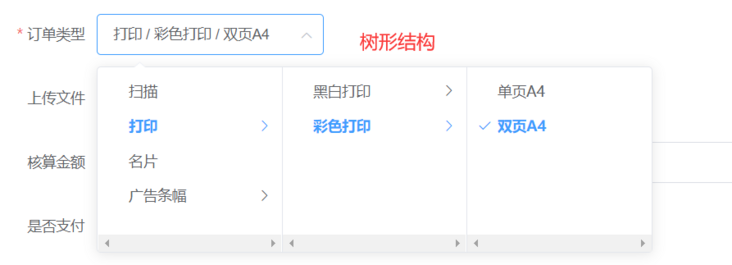
Sometimes we need to make a tree structure, but the number of layers of the tree is often uncertain. How to save it in a table? Use the following table structure, parent_id is the order of the parent level_ type_ id,is_ If endnode is 1, it is the final node
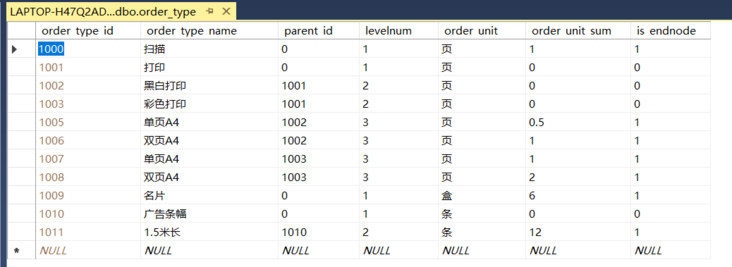
How to read out the form and turn it into a tree structure
exports.getAllOrderType=function(callback){
    function treeData(source){
          let cloneData = JSON.parse(JSON.stringify(source))    // Deep cloning of source data
          return cloneData.filter(father=>{
            let branchArr = cloneData.filter(child=>father.order_type_id == child.parent_id)    //Returns an array of children of each item
            branchArr.length>0 ? father.children = branchArr : ''   //If there are children, add a children attribute to the parent and assign a value
            return father.parent_id==0;      //Return to the first layer
          })
    }
    queryStr="select * from  order_type"
    sql.query(connectionString, queryStr, (err, rows) => {
        if(err){

        }else{
            var a=treeData(rows)
            callback({err_code:0,message:'Order type obtained successfully',data:a,affectedRows:0})
        }
    })
}
The following example is a scheme to flatten tree data
let res = []        // Used to store recursive results (flat data)
// Recursive function
const fn = (source)=>{
    source.forEach(el=>{
        res.push(el)
        el.children && el.children.length>0 ? fn(el.children) : ""        // Child recursion
    })
}

// Tree data
const arr = [
    { id: "1", rank: 1 },
    { id: "2", rank: 1,
        children:[
            { id: "2.1", rank: 2 },
            { id: "2.2", rank: 2 }
        ]
    },
    { id: "3", rank:1,
        children:[
            { id: "3.1", rank:2,
                children: [
                    { id:'3.1.1', rank:3,
                        children:[
                            { id: "3.1.1.1", rank: 4,
                                children:[
                                    { id: "3.1.1.1.1", rank: 5 }
                                ]
                            }
                        ]
                    }
                ]
            }
        ]
    }
]

fn(arr)             // Execute recursive functions
console.log(res)    // View results
File upload and download
Vue+element+Nodejs
Online preview and printing of pdf files
Directly click the straight chain of the file stored in the server, if it is pdf. chrome will directly open pdf. If it is doc, it will directly enter the download page
Statistical chart component
Open the graphical panel of vue [vue ui command entry] = > dependency = > Add dependency = > Run dependency = > search echart = > install
Echart's official website: https://echarts.apache.org/zh/tutorial.html#5%20%E5%88%86%E9%92%9F%E4%B8%8A%E6%89%8B%20ECharts
//Yes vue files cannot be imported in the way of < script SRC = "XX" > < / script > Add import xxx from "xxx" in the < script > tag of vue file [write in export default]
myChart.setOption(result); In, result is the configuration and data. Here, we write the configuration in data(). The data is returned by initiating a network request, using lodash JS to make a deep copy, merge it together and assign it to result.
Lodash.js official website: https://www.lodashjs.com/
<template>
    <!-- 2.by ECharts Prepare a with size (width and height) Dom -->
    <div id="main" style="width: 600px;height:400px;"></div>
</template>

<script>
    //1. Import echorts
    import echarts from "echarts"
    //Deep copy, create a new object, merge the two objects into one and put it in
    //lodash provides a merge (object 1, object 2) function that returns a new object
    import _ from "lodash"
    export default {
        mounted() { //The dom element has been rendered
            // 3. Initialize the ecarts instance based on the prepared dom
            var myChart = echarts.init(document.getElementById('main'));
            // 4. Specify [configuration item] and [data] of the chart
            const result = _.merge(this.option, res.data)
            // 5. Use the [configuration item] and [data] just specified to display the chart.
            myChart.setOption(result);

        },
        data() {
            return {
                //Figure configuration items
                option : {
                    title: {
                        text: 'ECharts Getting started example'
                    },
                    tooltip: {},
                    legend: {
                        data: ['sales volume']
                    },
                    xAxis: {
                        data: ["shirt", "cardigan", "Chiffon shirt", "trousers", "high-heeled shoes", "Socks"]
                    },
                    yAxis: {},
                    series: [{
                        name: 'sales volume',
                        type: 'bar',
                        data: [5, 20, 36, 10, 10, 20]
                    }]
                }

            }
        },
        method:{
            //Retrieve the data of the graph
        }
    }
</script>

<style>
</style>
vue structure design
https://www.processon.com/min...