Map an array to a set of elements with # v-for #
We can render a list based on an array with the {v-for} instruction. The v-for # instruction requires a special syntax in the form of # item in items # where items is the source data array and # item # is the alias of the array element being iterated.
<ul id="array-rendering">
  <li v-for="item in items">
    {{ item.message }}
  </li>
</ul>
Vue.createApp({
  data() {
    return {
      items: [{ message: 'Foo' }, { message: 'Bar' }]
    }
  }
}).mount('#array-rendering')
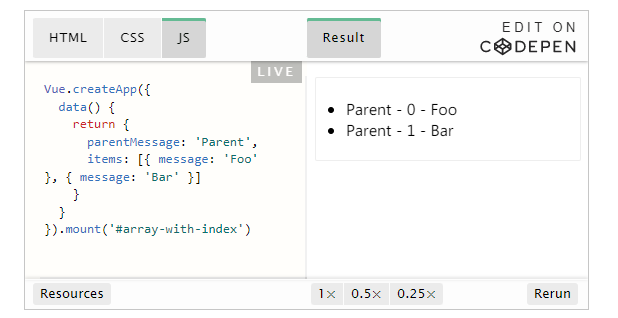
In the # v-for # block, we can access the properties of all parent scopes. v-for # also supports an optional second parameter, that is, the index of the current preceding item.
<ul id="array-with-index">
  <li v-for="(item, index) in items">
    {{ parentMessage }} - {{ index }} - {{ item.message }}
  </li>
</ul>
Vue.createApp({
  data() {
    return {
      parentMessage: 'Parent',
      items: [{ message: 'Foo' }, { message: 'Bar' }]
    }
  }
}).mount('#array-with-index')
You can also use # of # in stead of # as the separator, because it is closer to the syntax of JavaScript iterators:
<div v-for="item of items"></div>
Using objects in # v-for #
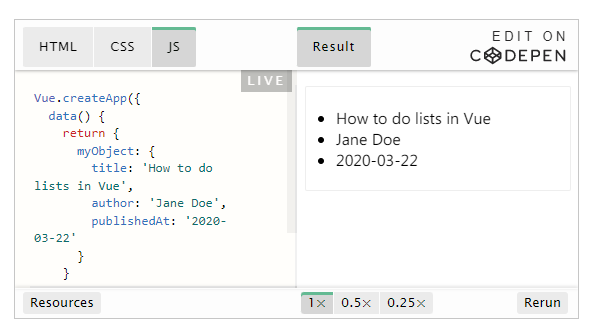
You can also use {v-for} to traverse the properties of an object.
<ul id="v-for-object" class="demo">
  <li v-for="value in myObject">
    {{ value }}
  </li>
</ul>
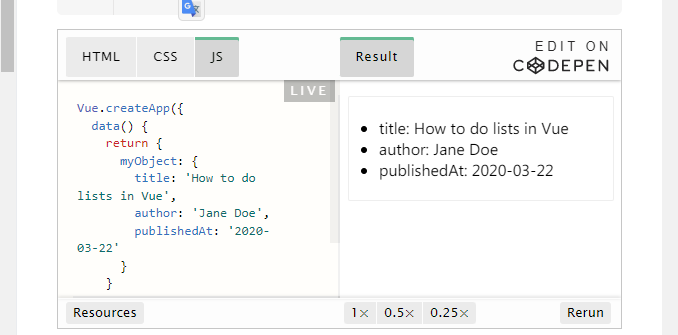
You can also provide the second parameter as property name (i.e. key name):
<li v-for="(value, name) in myObject">
  {{ name }}: {{ value }}
</li>
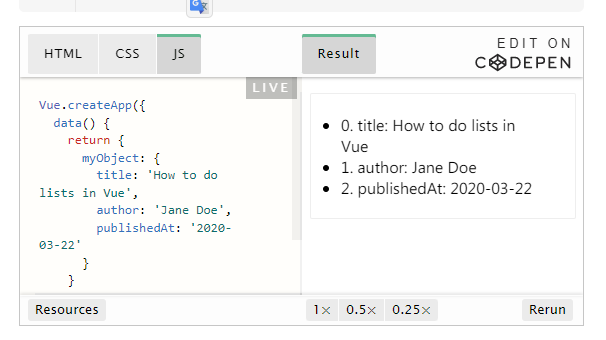
You can also use the third parameter as an index:
<li v-for="(value, name, index) in myObject">
  {{ index }}. {{ name }}: {{ value }}
</li>
When traversing an object, press object The results of keys () are traversed, but there is no guarantee that its results are consistent under different JavaScript engines.
When Vue is updating the list of elements rendered using v-for, it defaults to the update in place policy. If the order of data items is changed, Vue will not move DOM elements to match the order of data items, but update each element in place and ensure that they are rendered correctly at each index position.
This default mode is efficient, but only applies to list rendered output that does not depend on subcomponent state or temporary DOM state (for example, form input values).
In order to give Vue a hint so that it can track the identity of each node and reuse and reorder existing elements, you need to provide a unique key attribute for each item:
<div v-for="item in items" :key="item.id">
  <!-- content -->
</div>
proposal Provide # key # attribute when using # v-for # as far as possible, unless it is very simple to traverse the output DOM content, or deliberately rely on the default behavior to improve performance.
Because it is a general mechanism for Vue to identify nodes, key # is not particularly associated with # v-for #. As we will see later in the guide, it has other uses.
Do not use non basic type values such as objects or arrays as key s for {v-for}. Please use a value of string or numeric type.
Array update detection
# Change method
Vue wraps the change method of the array being listened on, so they will also trigger view updates. These wrapped methods include:
push()
pop()
shift()
unshift()
splice()
sort()
reverse()
You can open the console and try to call the change method on the "items" array in the previous example. For example, example1 items. push({ message: 'Baz' }).
# Replace array
Changing methods, as the name suggests, will change the original array that calls these methods. In contrast, there are also non change methods, such as , filter(), concat(), and , slice(). They do not change the original array, but always return a new array. When using the non change method, you can replace the old array with the new array:
example1.items = example1.items.filter(item => item.message.match(/Foo/))
You might think this will cause Vue to discard the existing Dom and re render the entire list. Fortunately, this is not the case. Vue implements some intelligent heuristic methods to maximize the reuse of DOM elements, so it is very efficient to replace the original array with an array containing the same elements.
Display filtered / sorted results
Sometimes we want to display the filtered or sorted version of an array without actually changing or resetting the original data. In this case, you can create a calculated property to return the filtered or sorted array.
For example:
<li v-for="n in evenNumbers" :key="n">{{ n }}</li>
<li v-for="n in evenNumbers" :key="n">{{ n }}</li>
data() {
  return {
    numbers: [ 1, 2, 3, 4, 5 ]
  }
},
computed: {
  evenNumbers() {
    return this.numbers.filter(number => number % 2 === 0)
  }
}
In cases where the calculated attribute is not applicable (for example, in a nested # v-for # loop), you can use one method:
<ul v-for="numbers in sets">
  <li v-for="n in even(numbers)" :key="n">{{ n }}</li>
</ul>
data() {
  return {
    sets: [[ 1, 2, 3, 4, 5 ], [6, 7, 8, 9, 10]]
  }
},
methods: {
  even(numbers) {
    return numbers.filter(number => number % 2 === 0)
  }
}
Range of values used in # v-for #
v-for # can also accept integers. In this case, it repeats the template the corresponding number of times.
<div id="range" class="demo">
  <span v-for="n in 10" :key="n">{{ n }} </span>
</div>
Use v-for in < template >
Similar to , v-if, you can also use < template > with , v-for , to loop render a piece of content containing multiple elements. For example:
<ul>
  <template v-for="item in items" :key="item.msg">
    <li>{{ item.msg }}</li>
    <li class="divider" role="presentation"></li>
  </template>
</ul>
v-for , used with v-if ,
When they are on the same node, the priority of v-if # is higher than v-for # which means that # v-if # will not have access to the variables in # v-for #:
<!-- This will throw an error because“ todo" property Not defined on instance -->

<li v-for="todo in todos" v-if="!todo.isComplete">
  {{ todo.name }}
</li>
You can move # v-for # to the < template > tag to correct:
<template v-for="todo in todos" :key="todo.name">
  <li v-if="!todo.isComplete">
    {{ todo.name }}
  </li>
</template>
Using v-for on components
On custom components, you can use v-for as on any common element:
<my-component v-for="item in items" :key="item.id"></my-component>
However, any data will not be automatically transferred to the component, because the component has its own independent scope. In order to transfer iterative data to components, we need to use props:
<my-component
  v-for="(item, index) in items"
  :item="item"
  :index="index"
  :key="item.id"
></my-component>
The reason why # item # is not automatically injected into the component is that it makes the component closely coupled with the operation of # v-for #. Clarifying the source of component data can enable components to be reused in other occasions.
Here is a complete example of a simple todo list:
<div id="todo-list-example">
  <form v-on:submit.prevent="addNewTodo">
    <label for="new-todo">Add a todo</label>
    <input
      v-model="newTodoText"
      id="new-todo"
      placeholder="E.g. Feed the cat"
    />
    <button>Add</button>
  </form>
  <ul>
    <todo-item
      v-for="(todo, index) in todos"
      :key="todo.id"
      :title="todo.title"
      @remove="todos.splice(index, 1)"
    ></todo-item>
  </ul>
</div>
const app = Vue.createApp({
  data() {
    return {
      newTodoText: '',
      todos: [
        {
          id: 1,
          title: 'Do the dishes'
        },
        {
          id: 2,
          title: 'Take out the trash'
        },
        {
          id: 3,
          title: 'Mow the lawn'
        }
      ],
      nextTodoId: 4
    }
  },
  methods: {
    addNewTodo() {
      this.todos.push({
        id: this.nextTodoId++,
        title: this.newTodoText
      })
      this.newTodoText = ''
    }
  }
})

app.component('todo-item', {
  template: `
    <li>
      {{ title }}
      <button @click="$emit('remove')">Remove</button>
    </li>
  `,
  props: ['title'],
  emits: ['remove']
})

app.mount('#todo-list-example')