Catalog
el: Determines which element to mount this Vue object on
Data: Stores data that can be defined directly by us or from the network
methods: This property is used to define a method in a Vue object.
computed: after data processing and returning
7.1. Usage 1: v-bind binding class
7.2. Usage 2: v-bind binding style
Parameter problems for 8.1.v-on
Combination of 9.2v-if and v-else
Combination of 9.3.v-if v-else-if v-else
12.2.v-model application in check box chenbox
Value binding for 12.4.v-model
1. Basic concepts of Vue
Vue (read as/vju/, similar to view)Vue is a progressive framework for building user interfaces. Unlike other monolithic frameworks, Vue has been designed to be used step by step from the start. Core libraries focus only on the view layer and are easy to obtain and integrate with other libraries or existing projects. On the other hand, when used in conjunction with Vue, it has full ability to support complex single-page applications. Modern Tools and Support Library Programs.
Vue is a progressive framework. What is progressive?
Incremental means that you can embed Vue as part of your application to provide a richer interactive experience. Or if you want to implement more business logic using Vue, then the core libraries of Vue and its ecosystems, such as Core+Vue-router+Vuex, can also meet your diverse needs.
Vue Features
Decoupling views and data
Reusable components
Front End Routing Technology
State Management
Virtual DOM
MVVM in Vue
View layer:
View Layer
In our front-end development, this is usually the DOM layer.
The primary role is to present users with a variety of information.
Model layer:
* Data Layer
The data may be our fixed dead data, more data coming from our servers and requesting it from the network.
ViewModel layer:
View Model Layer
The view model layer is the bridge between View and Model.
On the one hand, it implements Data Binding, which is data binding, to react to changes in the Model in real time in View
On the other hand, it implements DOM Listener, which is DOM listening. When something happens to the DOM (click, roll, touch, etc.), it can listen and change the corresponding Data if needed.
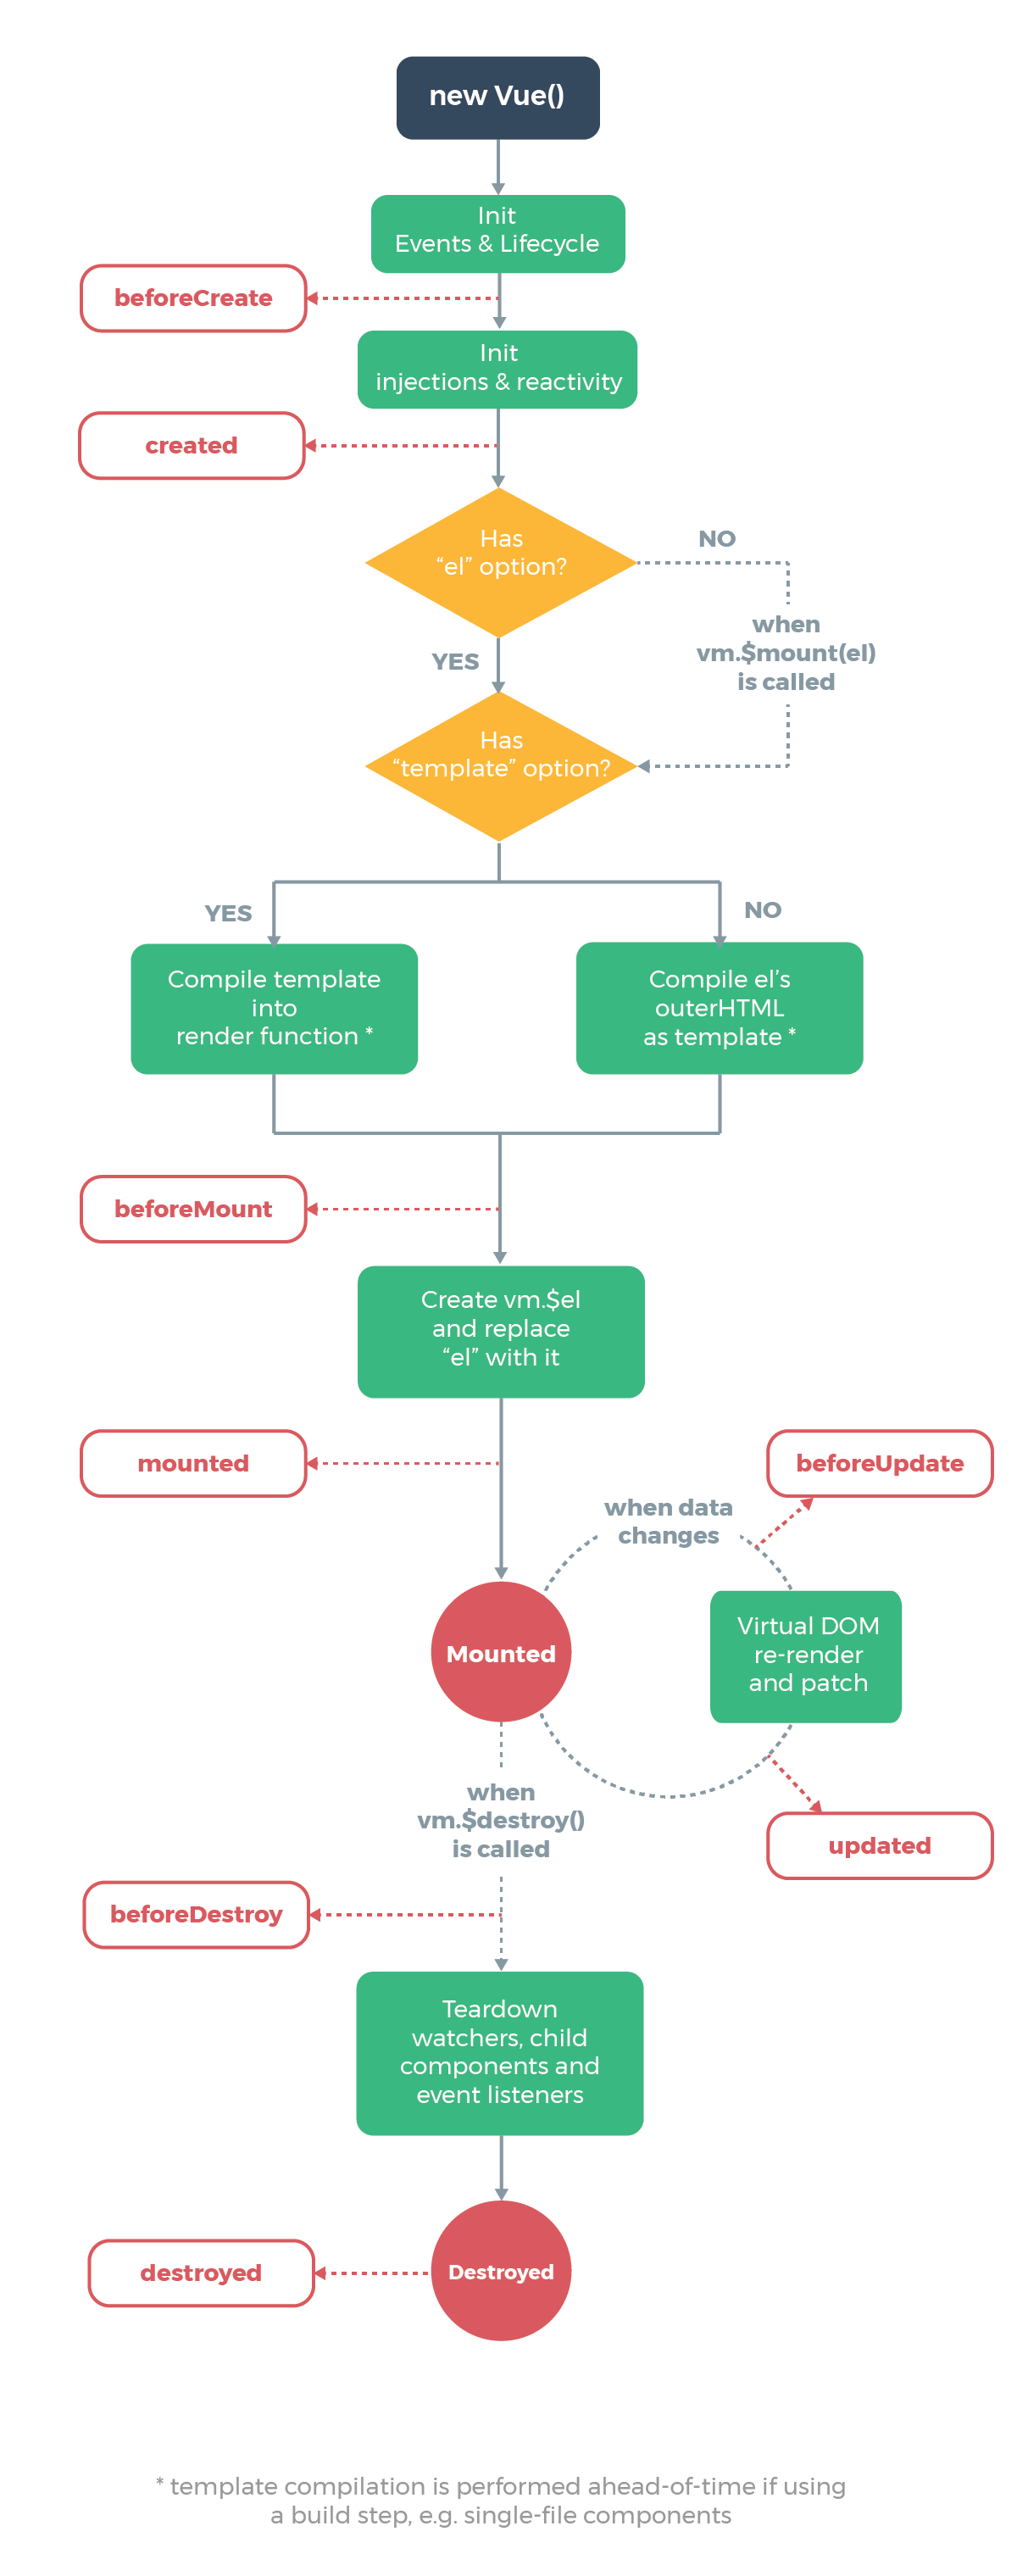
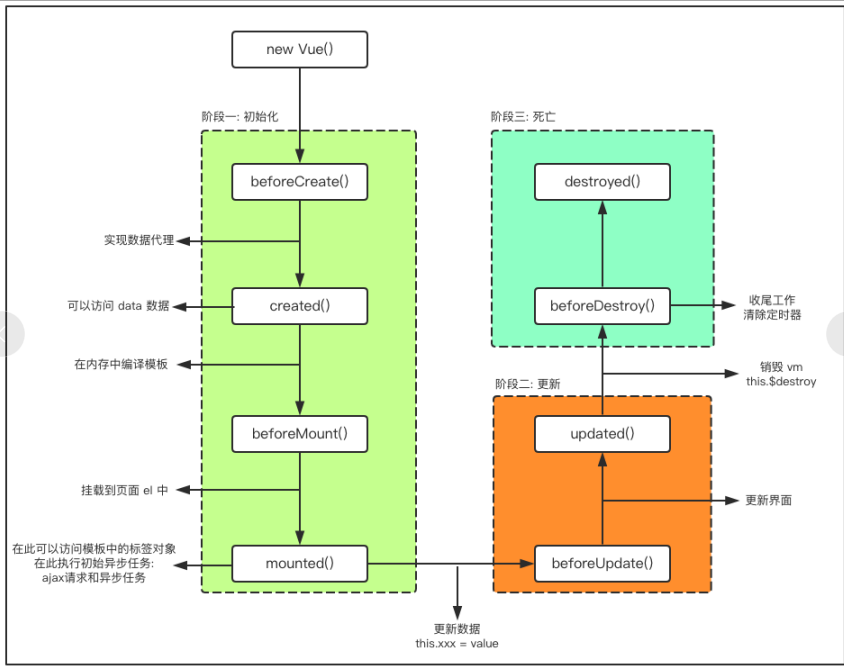
Vue's life cycle
/Pictures above taken from the web
beforeCreate: executed after initialization, before the Vue instance is created
Created: The Vue instance is created and then executed, where you can access the data data in our instance
BeforeMount: Once the Vue instance is created, it needs to be mounted, and the function is executed before being mounted
Mounted: The vue instance is mounted and executed. In this function, some initial asynchronous requests can be executed. It is worth noting that although we have finished mounting the vue instance at this time, it still takes time for our data to be rendered to the page. This is one of the things we need to be aware of
beforeUpdate: Executes before the data in the Vue instance is updated with changes
Updated: The Vue instance data is updated and rendered to the interface before execution
beforeDestroy: Executed before the Vue instance is destroyed, here are some operations such as clearing timers
Destroyed: executed after the Vue instance is destroyed
Active: Called when a component is activated. That is, this function is called when we first enter a component and the hook is not called during server-side rendering.
Deactivated: Called when a component is deactivated. That is, this function is called when we want to leave a component and the hook is not called during server-side rendering.
errorCaptured: Called when capturing an error from a descendant component. The hook receives three parameters: the error object, the component instance where the error occurred, and a string containing the source information of the error. The hook can return false to prevent the error from continuing to propagate upwards.
/////Here the life cycle function refers to Baidu and other knowledge sources and adds some self-understanding. If there are any errors, please correct them and I will change them.
2. Basic usage
const app = new Vue({
    el: "#app",
    data: {

    },
    methods: {

    }
})
Attributes:
el: Determines which element to mount this Vue object on
Type: string | HTMLElement
Role: Determine which DOM will be managed by subsequent Vue instances
Syntax: el:'Parameters'* Parameters are usually selectors
const app = new Vue({
    el: "#app"
})
Data: Stores data that can be defined directly by us or from the network
Type: objecy | Function (must be a function in a component)
Role: Data object corresponding to Vue instance
Syntax: data:{
Data 1 Name: Data 1,
Data 2 Name: Data 2
}
Note: Data 1 and 2 can be of type function, array, etc.
const app = new Vue({
    el: "#app",
    data: {
      firstName: 'Lebron',
      lastName: 'James'
    }
})
methods: This property is used to define a method in a Vue object.
Type: {[key:string]:Function}
Role: Define some Vue-specific methods that can be called elsewhere or used in instructions
Syntax: methods:{
Method name: function() {
Back Data Processing
}
}
const app = new Vue({
    el: "#app",
    data: {
      firstName: 'Lebron',
      lastName: 'James'
    },
    methods: {
      getFullName: function () {
        return this.firstName + ' ' + this.lastName
      }
    }
})
computed: after data processing and returning
When we need to make some changes to the data before displaying it, we can redefine an attribute in the calculated attribute and return the changed value
Note: Computed attributes are cached, that is, they are more efficient to use multiple times. Generally, we name them as attributes as possible when we name them
<div id="app">
  <h2>{{fullName}}</h2>
</div>
<script src="../vue.js"></script>
<script>
  const app = new Vue({
    el: "#app",
    data: {
      firstName: 'Lebron',
      lastName: 'James'
    },
    computed: {
      fullName: function () {
        return this.firstName + ' ' + this.lastName
      }
    },
  })
</script>
1. We can also compute attributes for more complex calculations
    data: {
      books: [
        {id: 110, name: 'unix Programming art', price: 119},
        {id: 111, name: 'Code Complete', price: 105},
        {id: 112, name: 'Deep understanding of Computer Principles', price: 98},
        {id: 113, name: 'Modern Operating System', price: 87},
      ]
    },
    computed: {
      totalPrice: function () {
        let result = 0
        for (let i = 0; i < this.books.length; i++) {
          result += this.books[i].price
        }
        return result
      }
    }
2. Compute get and set of attributes
In general, we don't want a set method for a calculated property. It's a read-only property. When we write a set method, we call the set method when we want to change the value of that property. In fact, the set method must have a parameter, which is the value we want to change the property.
When we set a set method on a computed property, we can not only call the computed property, but also assign a value to the computed property through the console, in which case the set method is used to make the code in the set method execute.
<script>
  const app = new Vue({
    el: "#app",
    data: {
      firstName: 'Kobe',
      lastName: 'Bryant'
    },
    computed: {
      fullName: {
        set: function (newValue) {
          const names = newValue.split(' ');
          this.firstName = names[0];
          this.lastName = names[1];
        },
        get: function () {
          return this.firstName + ' ' + this.lastName
        }
      }
    }
  })
</script>
Cache of computed attributes: comparison of computed attributes and methods
Computed properties, by contrast, are cached, and if used multiple times, are called only once. Instead of our methods, where each call is a call to a function, computed properties are not.
3. Basic Grammar
1. Template syntax: Mustache
<div id="app">
    <h2>{{message}}</h2>//Output as: Hello
    <h2>{{message}},Li Yinhe!</h2>//Output as: Hello, Li Yinhe!
    <h2>{{firstName + lastName}}</h2>//Output is: Kobejack
    <h2>{{firstName + " " + lastName}}</h2>//Expression, output is: Kobe jack
    <h2>{{firstName}} {{lastName}}</h2>//Use multiple {{}} grammars with the output: Kobe jack
    <h2>{{counter * 2}}</h2>//Add an expression with the following input:200
</div>
<script src="../vue.js"></script>
<script>
    const app = new Vue({
        el: "#app",
        data: {
            message: "How do you do",
            firstName: "kobe",
            lastName: "jack",
            counter: 100
        }
    })
</script>
* We can use our data data data data or compute attributes in HTML tags using this syntax
Note: You can use more than one {{}} grammar in a single tag, or you can add a simple arithmetic expression to a {{}} grammar Note that the grammar is responsive.
2.v-text
The v-text function is similar to Mustache in that it is used to display data in an interface
* v-text normally accepts a string type
My understanding is that v-text, although similar to the {{}} syntax, works more like replacing the parameter content accepted after v-text with the entire tag, thus causing the fourth line to be unsuccessfully stitched and the fifth line to be successful
<div id="app">
  <h2>{{message}}</h2>//How do you do
  <h2 v-text="message"></h2>//How do you do
  <h2>{{message}},Li Yinhe!</h2>//Hello, Li Galaxy!
  <h2 v-text="message">,Li Yinhe!</h2>//How do you do
  <h2 v-text="message + ',Li Yinhe!'"></h2>//Hello, Li Galaxy!
</div>
<script src="../vue.js"></script>
<script>
  const app = new Vue({
    el: "#app",
    data: {
      message: "How do you do",
    }
  })
</script>
3.v-once
In some cases, we don't want the interface to change at will, so we need to use our v-once command
Role: This directive means that elements and components will only be rendered once and will not change as the data changes, that is, when the data changes when the directive is added, the interface will not be re-rendered based on the new data.
Grammar: This directive does not need to be followed by any expressions
    <div id="app">
        <h2>{{message}}</h2>//Change with message change
        <h2 v-once>{{message}}</h2>//Here we're initially rendered as "Hello" and it won't change even if the message is modified in the console
    </div>
    <script src="../vue.js"></script>
    <script>
        const app = new Vue({
            el: "#app",
            data: {
                message: "How do you do"
            }
        })
    </script>
4.v-html
In some cases, the data we request from the server itself is an HTML code if we go directly through {{}}To output, the data will be returned with a tag that will display the html, so that the tag will also be displayed on the screen. But we may want to parse it in HTML format and display the corresponding content. At this point we need to use the v-html command.
Role: This directive causes the interface to parse and display the corresponding content in html format when displaying the data in {{}}.
In this example, the url we are asking to display has <a></a> but when we use v-html, it parses and displays the content in HTML format when displayed. This directive tends to follow a string type, parsing and rendering the HTML in the string
<div id="app">
    <h2>{{url}}</h2>//<a href='http://www.baidu.com'>Baidu once </a>
    <h2 v-html="url"></h2>//Use Baidu Search
</div>
<script src="../vue.js"></script>
<script>
    const app = new Vue({
        el: "#app",
        data: {
            url: "<a href='http://Www.baidu.com'>Baidu Baidu once</a>"
        }
    })
</script>
5.v-pre
Role: Adding a v-pre label will display the contents of the label as they are, without parsing them. That is, whatever is written in the label will output what is on the page.
It is worth noting that this tag is not the opposite of the v-html tag, that all tags are parsed, and that v-html parses only the HTML tags in the tag content and displays the results
<div id="app">
    <h2>{{message}}</h2>//How do you do
    <h2 v-pre>{{message}}</h2>//{{message}}
</div>
<script src="../vue.js"></script>
<script>
    const app = new Vue({
        el: "#app",
        data: {
            message: "How do you do",
        }
    })
</script>
6.v-cloak
In some cases, our browsers may be able to visualize uncompiled Mushache tags directly. In most cases, when our network is bad, it is possible to display a {{message}} before the correct content.
Analysis: Code parses from top to bottom, when the network is not good, parsing to {{message}} will not resolve to our vue quickly because of insufficient network speed, causing the page to display {{message}} before displaying the correct data
Solution: Use v-cloak cloak:
With this method, when you parse to {{message}}, you will find that it has the attribute v-cloak, instead of showing it on the page. Only when you parse to a vue, the Vue will cancel the attribute v-cloak and display it on the page. At this time, the Vue has also been parsed, so we will see normal data.
Prior to vue parsing, there was an attribute v-cloak in the div; after vue parsing, there was no attribute v-cloak in the div
Summary: All in all, turn the time that was originally displayed as {{message}} into a white page display
Note: When using v-cloak, you also need to set the display in <style>.
<style>
    [v-cloak] {
      display: none;
    }
</style>

<div id="app" v-cloak>
  <h2>{{message}}</h2>
</div>
<script src="../vue.js"></script>
<script>
  setTimeout(function () {
    const app = new Vue({
      el: "#app",
      data: {
        message: "How do you do",
      }
    })
  },1000)
</script>
7.v-bind
When we want certain attributes to be dynamically bound, such as the href attribute of a element to be dynamically bound, or the src attribute of an img element to be dynamically bound, we can use the v-bind directive at this point:.
Role: Dynamic binding properties
Abbreviations:
Expectation: any (with argument) | Object (without argument)
Parameter: attrOrProp (optional)
Usage: v-bind is used to bind one or more property values or pass props values to another component
Grammatical sugar, or abbreviation. In development, we usually use the form of grammatical sugar because it is simpler.
7.1. Usage 1: v-bind binding class
Object syntax: class is followed by an object.
*We can achieve richer style representations by dynamically adding classes, for example, when we click on something in many of the same style. Previously, when we clicked on that thing, we deleted the style represented by its original class and added a new class style. Now, we can use classes followed by values ofAn object so that key-value pairs can be stored in it. We can do this by simply changing the values behind the key-value pairs.
1. Bind a class directly through {}
<h2 :class="{'active': isActive}">{{message}}</h2> 2. Multiple values can also be passed in by judgment
<h2 :class="{'active': isActive , 'line': isLine}">{{message}}</h2> 3. Classes can coexist without conflict. Therefore, we usually bind some common styles or styles that will not change in the future as non-dynamically bound
<h2 class="title" :class="{'active': isActive , 'line': isLine}">{{message}}</h2> 4. If too many dynamic styles make your code too long and complex, you can put them all in one method or computer
Be careful:
1. At this point we need to put the class we are actually adding into one of the methods and use it as a return value.
2. In fact, when we call a function, we should use the function name (), sometimes not because it is omitted, but it is actually necessary to add
<h2 class="title" :class="getClasses()">{{message}}</h2>

getClasses: function (){
    return {
        'active': this.isActive , 'line': this.isLine
    }
}
Array syntax: class is followed by an array. This method can coexist with normal classes without conflict.
1. Bind a class directly through []
The bound class style name is passed to the class by integrating it into an array as a different element of the array.
<h2 class="title" v-bind:class="['active','line']">{{message}}</h2>2. In fact, this works the same way as directly specified because the data in the array is written to death. So we can write elements in the array as variables and store the class names we really need to add in the variables so that we can change their class names by changing their values
<h2 class="title" v-bind:class="[active,line]">{{message}}</h2>Note: If an element in an array has "", it means it is a string, passing a string instead of the variable we need.
3. We can also put the array into a method like object syntax, which returns the class name we need
<h2 class="title" v-bind:class="getClasses()">{{message}}</h2>

methods: {
    getClasses: function () {
        return [this.active, this.line]
    }
}
7.2. Usage 2: v-bind binding style
* We can use v-bind:style to bind some CSS inline styles. When writing CSS attribute names, such as font-size
We can use camelCase fontSize or kebab-case, remember to enclose in single quotes,'font-size'.
Object syntax: style is followed by an object type
The object's key is the CSS property name
Value of an object is a specific assigned value that can come from an attribute in the data
1. Bind a style directly through {}
<h2 :style="{key(Property Name): value(Attribute Value)}">{{message}}</h2>

<h2 :style="{fontSize: 50px}">{{message}}</h2>
2. Our data is still written to death at this time, so we can use variables to keep the value of style we add from writing to death
<h2 :style="{fontSize: finaSize}">{{message}}</h2>3. We need to be aware of variables that are consistent with the units of our style at this point, so we can let us assign variables the same time by writing units directly in the code
<h2 :style="{fontSize: finaSize + 'px', color: finaColor}">{{message}}</h2>4. We can also write classes to a method or a calculated property just like adding classes dynamically
<h2 :style="getStyles()">{{message}}</h2>

methods: {
    getStyles: function () {
        return {fontSize: this.finaSize + 'px', color: this.finaColor}
    }
}
Array syntax: style is followed by an array type. Multiple values are split
<h2 :style="[baseStyle, baseStyle1]">{{message}}</h2>

data: {
    message: "How do you do",
    baseStyle: {backgroundColor: 'red'},
    baseStyle1: {fontsize: '100px'}
}
8.v-on
In front-end development, we need to interact regularly and use it for interaction. At this point, we have to monitor when users occur, such as clicks, drags, keyboard events, etc.
How do I listen for events in Vue? Use the v-on command
Role: Bind event listeners
Abbreviation: @
Expectation: Function|Inline Statement|Object
Parameter:event
Usage: v-on: Event name = "Method or expression to be implemented by the event"
  <div id="app">
    <h2>{{counter}}</h2>
    <!--<button v-on:click="counter++">+</button>
    <!--<button v-on:click="increment()">+</button>
    <!--Use grammatical sugar@-->
    <button @click="increment()">+</button>
  </div>
  <script src="../vue.js"></script>
  <script>
    const app = new Vue({
      el: "#app",
      data: {
        counter: 0,
      },
      methods: {
        increment() {
          this.counter++;
        },
      },
    });
  </script>
Parameter problems for 8.1.v-on
1. If the method does not require additional parameters, the () after the method may not be added
2. If this method requires parameters, if we just omit the parameters but have (), then the parameter of the function becomes undefined
3. If this method requires parameters, but we omit (), the function passes in event as a parameter;
4. If you need to pass in a parameter at the same time, you can pass in an event through $event
<div id="app">
  <!--1.When the method invoked by the event has no parameters, the following()Can be omitted-->
  <button @click="btn1Click()">Button 1</button>
  <button @click="btn1Click">Button 1</button>

  <!--2.When defining an event, parentheses are omitted when writing a function, but the method itself requires a parameter-->
  <button @click="btn2Click(123)">Button 2</button>
  <!--Normally, we need parameters, but when no parameters are passed, the formal parameters of the function are undefined. -->
  <button @click="btn2Click()">Button 2</button>

  <!--3.At this point we not only omitted the parameter, but also omitted()Then the function will event Pass in as a parameter-->
  <button @click="btn2Click">Button 2</button>

  <!--4.When defining the method, we need event Object, while requiring other parameters-->
  <!--When we don't write parameters and omit them()When event Pass as a parameter to the first parameter, and the second parameter defaults to undefined-->
  <button @click="btn3Click">Button 3</button>
  <!--If we don't omit()But if we still don't have an actual parameter, then the values of our parameters are undefined-->
  <button @click="btn3Click()">Button 3</button>
  <!--When we fill in the parameter as follows, the second parameter we pass in event Will be treated as a variable or a method to find,
        When we can't find it, we make a mistake and go back undefined-->
  <button @click="btn3Click(123,event)">Button 3</button>
  <!--On invocation, manually get the browser parameters event Object, then use $event-->
  <button @click="btn3Click(123,$event)">Button 3</button>
</div>
<script src="../vue.js"></script>
<script>
  const app = new Vue({
    el: "#app",
    data: {
      message: "How do you do"
    },
    methods: {
      btn1Click() {
        console.log('btn1Click');
      },
      btn2Click(abc) {
        console.log('-----------', abc)
      },
      btn3Click(abc, event) {
        console.log('++++++++', abc, event)
      }
    }
  })
</script>
Modifier for 8.2.v-on
stop: Call event.stopPropagation().
Role: Prevent bubbles
When we don't write.stop, we click the button and trigger the div click event. This won't happen when we write.stop
<div @click="divClick">
    aaaaaaa
    <button @click.stop="btnClick">Button</button>
</div>
.prevent: Call event.preventDefault().
Role: Prevent default behavior such as automatic submission of input Tags
<form action="baidu">//Information is automatically submitted in the input. prevent cancels the automatic submission
    <input type="submit" value="Submit" @click.prevent="submitClick" />
</form>
. {keyCode | keyAlias}: Triggers a callback only if the event is triggered from a specific key.
Role:.Listen for a keyboard key point For example:.Enter only listens for an enter Click
<input type="text" @keyup.enter="keyUp" />// .enter is a click that only listens to the Enter key
.native: Listens for native events on the root element of a component.
Role: Listen for component events
<cpn @click.native="cpnClick"></cpn>//cpn is a component that can be thought of as a stand-alone vue component that needs to be added when listening for clicks on the entire component.
.once: Triggers a callback only once.
Role: Click callback only triggers once
<button @click.once="btn2Click">Button 2</button>//The click event btn2Click will only be triggered once
9.v-if v-else-if v-else
The conditional instructions of the vue can render or destroy elements or components in the DOM based on the value of the expression.
When the condition after v-if is false, the corresponding element and its subelements will not be rendered. That is, no corresponding tag will appear in the DOM at all.
Use of 9.1.v-if
v-if, controls the rendering of the content in the label, which can be written a lot. Here {{}} is used to represent it, and it will only be rendered if it meets certain conditions.
* We can write a condition as a variable, and when a condition is met, we only need to change the value of the variable to determine whether the label is rendered or not, which is more flexible
<div id="app">
  <!--Note that in h2 Added in Label v-if,Controlled by h2 The rendering of the content in the label, which can be written a lot, is used here{{}}To represent-->
  <!--By v-if Control it so that certain conditions are met before it is rendered on the page-->
  <h2 v-if="true">{{message}}</h2>
  <h2 v-if="false">{{message}}</h2>
  <!--You can also add v-if The value of is indicated by a variable, which makes it more flexible,You only need to change the value of a variable to determine whether it is displayed or not-->
  <h2 v-if="isShow">{{message}}</h2>

</div>
<script src="../vue.js"></script>
<script>
  const app = new Vue({
    el: "#app",
    data: {
      message: "How do you do",
      isShow: true
    }
  })
</script>
Combination of 9.2v-if and v-else
When v-if is used in combination with v-else, it means that when the value of v-if is false, the content with v-else is rendered to the page. Note that when there are multiple v-elses, only the one above is displayed, and the one below is not.
<div id="app">
  <!--v-if and v-else When used in combination, it means when v-if The value of false When v-else Render content to page-->

  <h2 v-if="isShow">{{message}}</h2>
  <h2 v-else>false Who will be shown?</h2>//Show me that I don't show the following
  <h1 v-else>isShow by false Show me when</h1>
</div>
Combination of 9.3.v-if v-else-if v-else
Display the label of v-if when the v-if condition is met, otherwise go to the next statement v-else-if to determine if the condition is met; execute v-else until all conditions above v-else are determined not to be met
*Note: The execution order of the code is from top to bottom of the first V-IF encountered. That is, if we place v-else below v-if, then if there is no v-else-if below, the line of code where v-else is located will be executed as long as the V-IF judgment is not met. Moreover, if our judgment between V-IF and v-else is not reasonable, we will get the final resultThe result may not be what we want;
  <h2 v-if="score >= 90">excellent</h2>
  <h2 v-else-if="score >= 80">good</h2>
  <h2 v-else-if="score >= 60">qualified</h2>
  <h2 v-else>Unqualified</h2>
10.v-show
Role: v-if and v-show work similarly and are used to determine whether an element is rendered or not.
Differences:
v-if: When our condition is false, the corresponding element containing the v-if directive does not exist in our DOM at all; when our condition is true, we re-create it.
V-show: When our condition is false, v-show just adds an inline style to our element, display:none; when our condition changes to true, v-show modifies the style, display:block
Select: Use v-show when you need to switch frequently between display and hide; use v-if when you only have one switch
<div id="app">
  <h2 v-if="isShow" id="aaa">{{message}}</h2>
  <h2 v-show="isShow" id="bbb">{{message}}</h2>
</div>
11.v-for traversal
* When we have a set of data to render, we can use v-for. The syntax of V-for is similar to for loops in JavaScript. The format is as follows: item in items.
* Traverse the array
Syntax: v-for="(item, index) in letters": key="index"
<li v-for="(item,index) in names" :key="index">{{index + 1}}---{{item}}</li>Array method
The Vue is responsive, so when data changes, the Vue automatically detects changes in the data and the view updates accordingly.
push():(You can add more than one element at a time)
pop(): Delete the last element in the array
shift(): Delete the first element in the array
unshift(): Add elements to the front of the array (you can add more than one element at a time)
splice(): deletes the specified element from the original array and returns the deleted element as a return value (at least two parameters);Elements can also be inserted and replaced
First parameter: index of start position;
Second parameter: Number of elements passed in to be deleted when deleting an element, deleted all if not passed in; number of elements passed in to be replaced when replacing an element; and 0 when inserting an element
Third and subsequent parameters: elements to be replaced are passed in when replacing elements; elements inserted sequentially at that location are passed in when inserting elements
sort(): Sort: You can pass parameters, that is, sort by a rule
reverse(): reverse
Note: When we modify data in an array using array subscripts, modifications are not responsive, so we can use splice() instead of this unresponsive way.
//1.push(): (You can add more than one element at a time)
//this.letters.push('aaa', 'bbb');
//2.pop(): Delete the last element in the array
//this.letters.pop();
//3.shift(): Delete the first element in the array
//this.letters.shift();
//4.unshift(): Add elements to the front of the array (you can add more than one element at a time)
//this.letters.unshift('aaa', 'bbb');
//5.Splice(): deletes the specified element from the original array and returns the deleted element as a return value (at least two parameters);Elements can also be inserted and replaced
// First parameter: index of start position;
// The second parameter is: the number of elements passed in to be deleted when an element is deleted, all deleted when no element is passed in; the number of elements to be replaced when an element is replaced; and 0 when an element is inserted
// The third and subsequent parameters are: elements to be replaced are passed in when replacing elements; elements inserted sequentially at that location are passed in when inserting elements
//this.letters.splice(3, 0, 'f');
//6.sort(): Sort: You can pass parameters, that is, sort by a rule
//this.letters.sort();
//7.reverse(): Reverse
//this.letters.reverse();
Traversing Objects
1. In traversing an object, if you only get a value, you get value
<li v-for="item in info">{{item}}</li>2. Get key and value: format is (value, key)
Note: First you get value, then you get value
<li v-for="(value, key) in info">{{value}}--{{key}}</li>3. Get value, key, index: format is (value, key, index)
<li v-for="(value, key, index) in info">{{value}}--{{key}}--{{index}}</li>12v-model form binding
Form controls are very common in practical development. Especially for submitting user information, a large number of forms are required.
Vue uses the v-model directive to bind form elements and data in both directions.
Binding:
First, when we use v-model to bind data, the bound data will be displayed directly in the text box when we render it
1. When we enter new data into the text box, the data of the elements bound to our text box will change as well.
2. When we modify the data itself in the console, it is also fed to the text box accordingly
<input type="text" v-model="message">
  {{message}}
Principle of v-model:
When we use V-model to bind data in the data, if we enter information, such as input, into the components bound by v-model, then the information we enter will be passed to the data in the data bound to us via v-model, and the data will change, then because the data in the data changes, our {{}}Syntax also changes the rendering of our final DOM due to changes in the data, so this is how we use V-model to achieve bidirectional binding.
Essentially, the v-model is a grammatical sugar, and its two-way binding can be achieved using the v-bind and v-on instructions.
First thing: Dynamically bind data to a text box (use v-bind to bind a value property)
<input type="text" :value="message">
Second thing: Dynamically bind the data displayed in the text box to the data so that it changes with the information you enter. Here the event that comes with input is the input text (similar to the event click that comes with button)
<input type="text" :value="message" @input="valueChange">//This method takes advantage of the omission () of v-on and passes in an event as a parameter
valueChange(event) {
    this.message = event.target.value;
}

<input type="text" :value="message" @input="message = $event.target.value">
12.1.v-model use in radio
Radio is actually one of the type types of the input tag. When we create a radio radio radio radio radio box, the name attribute in our input is mutually exclusive and only one can be selected
Note: v-model="sex" here sex is the name of the data stored in the data, not the sex inside the name. The sex in the name is to ensure that our radios are a radio box and can only select men or women. When we select men, the data in the data will become men because of the v-model, and so will the selection of women, and will be displayed in real time in the {} below
  <label for="male">
    <input type="radio" id="male" name="sex" value="male" v-model="sex">male
  </label>
  <label for="female">
    <input type="radio" id="female" name="sex" value="female" v-model="sex">female
  </label>
  <h2>The gender you choose is:{{sex}}</h2>
12.2.v-model application in check box chenbox
Checkbox checkbox is actually one of the type s of input tags. There are two situations: single check box and multiple check boxes
* Single checkbox
*A single check box is essentially a check box with only one option. When we bind two-way through the v-model, and when we check the consent button, the data bound by the V-model will also determine its own status with or without our selection, and we can implement different functions based on this different status, for example,The agreement protocol interface of each app can only proceed to the next step after agreeing to the agreement.
Note that the V-model is a Boolean value at this point. The value of the input does not affect the value of the v-model.
  <label for="agree">
    <input type="checkbox" id="agree" v-model="isAgree">Agree to Agreement
  </label>
  <h2>Your choice is:{{isAgree}}</h2>
  <button :disabled="!isAgree">Next step</button>
Multiple Checkboxes
When there are multiple check boxes, because multiple can be selected, the corresponding property in the data is an array. When one is selected, the value of input is added to the array.
  <input type="checkbox" value="Basketball" v-model="hobbies">Basketball
  <input type="checkbox" value="Football" v-model="hobbies">Football
  <input type="checkbox" value="Table Tennis" v-model="hobbies">Table Tennis
  <input type="checkbox" value="Badminton" v-model="hobbies">Badminton
  <h2>Your hobbies are:{{hobbies}}</h2>
Use of 12.3.v-model in select
selecct does the same thing as checkbox. The difference is that both the radio and the radio of select are in a drop-down list, while checkbox is an option. Moreover, the radio of select can choose one of many options, while checkbox is only one option.
The way v-model is used in select is the same as in checkbox and radios. The difference is that v-model is used in selet and only needs to be bound to the selectlabel, and no data need to be bound to each option option option option option option option option again. In checkbox and radios, the same data needs to be bound to each input label.
<!--1.Choose one: fruit Save one in""-->
  <select name="abc" v-model="fruit">
    <option value="Apple">Apple</option>
    <option value="Banana">Banana</option>
    <option value="Durian">Durian</option>
    <option value="Grape">Grape</option>
    <option value="A mandarin orange">A mandarin orange</option>
  </select>
  <h2>The fruit of your choice is:{{fruit}}</h2>
  <!--2.Select Multiple: fruits Save an array in-->
  <select name="abc" v-model="fruits" multiple>
    <option value="Apple">Apple</option>
    <option value="Banana">Banana</option>
    <option value="Durian">Durian</option>
    <option value="Grape">Grape</option>
    <option value="A mandarin orange">A mandarin orange</option>
  </select>
  <h2>The fruit of your choice is:{{fruits}}</h2>
Value binding for 12.4.v-model
In the use of these v-model s, we have already defined the value represented by this input when defining it, which is undoubtedly not flexible enough, so we can assign these inputs dynamically via v-bind, which will greatly increase the code reuse rate of our inputs.
<div id="app">
  <label v-for="item in originHobbies" :for="item">//For is a one-to-one correspondence between label and which inout connection for and id
    <input type="checkbox" :value="item" :id="item" v-model="hobbies">{{item}}
  </label>
</div>
<script>
  const app = new Vue({
    el: "#app",
    data: {
      originHobbies: ['Basketball', 'Football', 'Table Tennis', 'Badminton', 'Billiards', 'Golf', 'bowling']
    }
  })
</script>
Modifier for 12.5.v-model
lazy
By default, the v-model synchronizes data in the input box in an input event. That is, once the data changes, the data in the corresponding data changes automatically. The lazy modifier allows the data to be updated only when it loses focus or returns.
  <input type="text" v-model.lazy="message">
  <h2>{{message}}</h2>Update data when returning or losing focus
number
By default, both letters and numbers entered in the input box will be treated as string types, but if we are dealing with numeric types falsely, it is better to treat the content directly as a number. Number modifiers allow the content entered in the input box to be automatically loaded as a number type
*Note: The character we enter in the input text box has a default value of'', which means that when null, the data in our data defaults to a string type; when the default value is not null, it is initially a Number type when it is a number, but when we enter a number into the text box, it becomes a string type; when we add a number modifier, it consistently maintains a Number type.
It is worth noting that when we add the modifier number, when our text box is empty, the data type of the data it binds becomes a string type.
  <!--Situation One-->
  <input type="number" v-model="ageOne">
  <h2>{{typeof ageOne}}</h2>//Initially empty, string, input number still string
  <!--Situation 2-->
  <input type="number" v-model="ageTwo">
  <h2>{{typeof ageTwo}}</h2>//Initially not null, simply enter a number and change it to a string
  <!--Use modifiers-->
  <input type="number" v-model.number="ageThree">
  <h2>{{typeof ageThree}}</h2>//Is a null-time string with a number
trim
If there are many spaces at the top of the input, we usually want to remove them. The trim modifier filters the spaces on the left and right sides of the content
  <input type="text" v-model.trim.lazy="name">
  <h2>The name you entered is:{{name}}</h2>//When we type aaa in the input box, what we get is aaa