Click jump: Vue learning (I)
Click jump: Vue learning (II)
Click jump: Vue learning (III)
Click jump: Vue learning (IV)
4. Using Vue scaffolding
4.1. Initialize scaffold
1. Explain
1.Vue scaffold is a standardized development tool (development platform) officially provided by Vue
2. The latest version is 4 x.
3.file
2. Specific steps
It is recommended to configure the npm Taobao image below first
Step 1 (only for the first time): install @ vue/cli globally
npm install -g @vue/cli
Step 2: switch to the directory where you want to create the project (cd switch, or enter the folder, cmd enter in the path bar), and then use the command to create the project
vue create xxxx
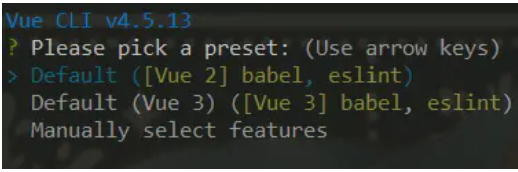
- vue2
- vue3
- custom
babel : ES6 ===>ES5
eslint: syntax check
Step 3: start the project
npm run serve
4. Remarks:
1. In case of slow download, please configure npm Taobao image:
npm config set registry https://registry.npm.taobao.org
2.Vue scaffolding hides all webpack related configurations. To view the specific webpakc configuration, please execute the following steps:
vue inspect > output.js
4.2 scaffold analysis
1. Scaffold file structure
├── node_modules:Various packages,library,plug-in unit
├── public
│   ├── favicon.ico: Tab Icon
│   └── index.html: Main page
├── src
│   ├── assets: Storing static resources
│   │   └── logo.png
│   │── component: Storage components
│   │   └── HelloWorld.vue
│   │── App.vue: Summarize all components
│   │── main.js: Entry file
├── .gitignore: git Configuration ignored by versioning
├── babel.config.js: babel Configuration file for
├── package.json: App package profile
├── README.md: Application description file
├── package-lock.json: Package version control file
main.js
/*
  This file is the entry file for the entire project
 */
// Introduce vue
import Vue from 'vue'
// Introduce app component, which is the parent component of all components
import App from './App.vue'
//Turn off vue's production prompt
Vue.config.productionTip = false

//Create vue instance object vm
new Vue({
  render: h => h(App),
}).$mount('#app')
2. About different versions of Vue
-
vue.js and Vue runtime. xxx. JS difference:
- vue.js is the full version of Vue, including: core functions + template parser.
- vue.runtime.xxx.js is a running version of Vue, which only contains: core functions; There is no template parser.
-
Because Vue runtime. xxx. JS has no template parser, so you can't use the configuration item template. You need to use the createElement function received by the render function to specify the specific content.
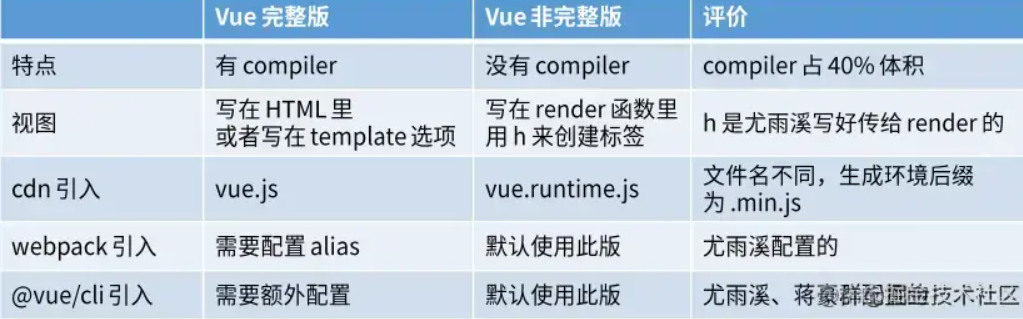
Practice: always use the incomplete version, and then cooperate with vue loader and vue files
- To ensure the user experience, the js file downloaded by the user is smaller, but only supports the h function
- To ensure the development experience, developers can write HTML tags directly in vue instead of h functions
- vue loader can convert HTML in vue file into h function
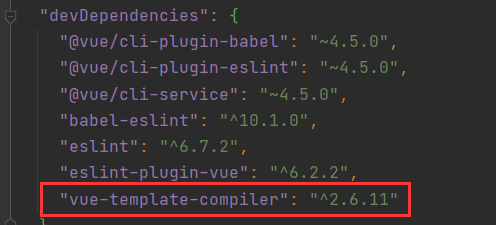
Thinking problems
Since the template cannot be resolved, who resolved the template in the vue component in the following figure?
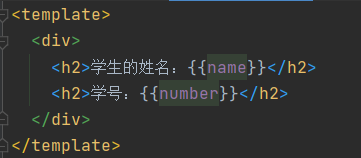
It's package The Vue template compiler configuration in JSON is parsed, but it does not manage the parsing in vm

3,vue.config.js configuration file
-
Use Vue inspect > output JS can view the default configuration of Vue scaffold, but cannot be changed. The file is marked red, and const a = {} is added on the outside, which is in output JS file

-
Create vue.com in the root directory config. JS file can customize the scaffold. For details, see:
VueCLI configuration reference
module.exports = {
  pages: {
    index: {
      // page entry
      entry: 'src/index/main.js'
    },
  },
  lintOnSave:false //Turn off syntax checking
}
4. Index built with scaffold HTML file
<!DOCTYPE html>
<html lang="">
  <head>
    <meta charset="utf-8">
    <!-- in the light of IE A special configuration of the browser, which means that IE The browser renders the page at the highest rendering level -->
    <meta http-equiv="X-UA-Compatible" content="IE=edge">
    <!-- Open the ideal viewport of the mobile terminal -->
    <meta name="viewport" content="width=device-width,initial-scale=1.0">
    <!-- Configuration tab Icon <%= BASE_URL %>replace./Is the icon in the current directory-->
    <link rel="icon" href="<%= BASE_URL %>favicon.ico">
    <!-- Configure page title -->
    <title><%= htmlWebpackPlugin.options.title %></title>
  </head>
  <body>
    <noscript>
      <!-- When the browser does not support js Time noscript The elements in the are rendered -->
      <strong>We're sorry but <%= htmlWebpackPlugin.options.title %> doesn't work properly without JavaScript enabled. Please enable it to continue.</strong>
    </noscript>
    <!-- container -->
    <div id="app"></div>
    <!-- built files will be auto injected -->
  </body>
</html>
5. Main built with scaffold JS file
/*
  This file is the entry file for the entire project
*/
//Introducing Vue
// import Vue from 'vue/dist/vue'
//Introduce full version
import Vue from 'vue'
// Import runtime version
//Introduce App component, which is the parent component of all components
import App from './App.vue'
//Turn off vue's production prompt
Vue.config.productionTip = false

/*
  About different versions of Vue:

    1.vue.js With Vue runtime. xxx. JS difference:
        (1).vue.js Is a full version of Vue, including: core functions + template parser.
        (2).vue.runtime.xxx.js It is a running version of Vue, which only contains: core functions; There is no template parser.

    2.Because Vue runtime. xxx. JS does not have a template parser, so you can't use the template configuration item. You need to use
      render The function receives the createElement function to specify the specific content.
*/

//Create Vue instance object -- vm
new Vue({
  el: '#app',
  /*
  render(createElement) {
    return createElement('h1', 'Hello ')
    // return console.log(typeof createElement);
    // The printed createElement is a function
  },
  Abbreviation:
    render:createElement=>createElement('h1', 'Hello '),
  Further simplification:
    render:q=> q('h1','Hello ')
  */

  //The render function completes this function: put the App component into the container
  render: h => h(App),

  // Template: ` < app > < / APP > `, run the version vue, main JS cannot write template
  // components: { App },
})
4.3 ref attribute
Used to register reference information (id substitutes) for elements or subcomponents
The application obtains the real DOM element on the html tag, and the application on the component tag is the component instance object (vc)
Usage:
- Marking: < H1 ref = "XXX" ></ H1 > or < school ref = "XXX" > < / School >
- Get: this$ refs. xxx
App.vue:
<template>
	<div>
		<h1 v-text="msg" ref="title"></h1>
		<button ref="btn" @click="showDOM">Click on the top of my output DOM element</button>
		<School ref="sch"/>
	</div>
</template>

<script>
	//Introducing School components
	import School from './components/School'

	export default {
		name:'App',
		components:{School},
		data() {
			return {
				msg:'Welcome to study Vue!'
			}
		},
		methods: {
			showDOM(){
				console.log(this.$refs.title) //Real DOM elements
				console.log(this.$refs.btn) //Real DOM elements
				console.log(this.$refs.sch) //Instance object of School component (vc)
			}
		},
	}
</script>

4.4 props configuration item
Function: let components receive external data
-
Transfer data:
<Demo name="xxx"/>
-
Receive data:
- The first method (receive only): props:['name ']
- The second method (restriction type): props:{name:String}
- The third method (restriction type, restriction necessity, specifying default value):
props:{
	name:{
	type:String, //type
	required:true, //necessity
	default:'Lao Wang' //Default value
	}
}
Note: props is read-only. Vue bottom layer will monitor your changes to props. If you make changes, you will be warned. If the business requirements really need to be modified, please copy the contents of props into data, and then modify the data in data.
The data received in props will be bound to the component instance object vc, and the priority is higher than the data in data. The data attribute name in data cannot be consistent with the received props attribute name
App.vue:
<template>
  <div>
    <Student name="Li Si" sex="female" :age="18" />
    <!-- Declare the incoming properties in the component tag
	:Namely v-bind Change string 18 to js Expression so that it can accept addition
	-->
  </div>
</template>
<script>
import Student from "./components/Student";
export default {
  name: "App",
  components: { Student },
};
</script>
Student.vue
<template>
  <div>
    <h1>{{ msg }}</h1>
    <h2>Student Name:{{ name }}</h2>
    <h2>Student gender:{{ sex }}</h2>
    <h2>Student age:{{ myAge + 1 }}</h2>
    <button @click="updateAge">Try to modify the age received</button>
  </div>
</template>

<script>
export default {
  name: "Student",
  data() {
    console.log(this);
    return {
      msg: "I am a student in Silicon Valley",
      myAge: this.age,
       //   props data cannot be modified. If you want to change the data of propo, put it into data
      //   Props has high priority, and this in data Age is the data received in props
    };
  },
  methods: {
    updateAge() {
      this.myAge++;
    },
  },
  //Method 1: simply declare the receipt and put it on the component instance object vc
  // props:['name','age','sex']

  //Method 2: limit the type of data while receiving. If the type does not meet the requirements, an error will be reported
  /* props:{
			name:String,
			age:Number,
			sex:String
		} */

  //Method 3: limit the type of data while receiving + specify the default value + limit the necessity
  props: {
    name: {
      type: String, //The type of name is a string
      required: true, //name is necessary. Generally, there is no need to add a default value for this attribute
    },
    age: {
      type: Number,
      default: 99, //Default value, that is, if this property is not passed, the default value will be used
    },
    sex: {
      type: String,
      required: true,
    },
  },
};
</script>
4.5 mixin (mixed)
-
Function: the configuration shared by multiple components can be extracted into a mixed object
-
Usage:
Step 1: define mixing:
{
    data(){....},
    methods:{....}
    ....
}
Step 2: use blending:
- import is required before use
- Global blending: Vue Mixin (xxx) is placed in main JS file, all VMS and VC can get the mixed attributes
- Local mixing: mixins:['xxx '] is placed in the required file, and the mixed attributes are obtained in this file
- If the mixed in attribute has the same name as itself, its own attribute has high priority and will overwrite the mixed in attribute
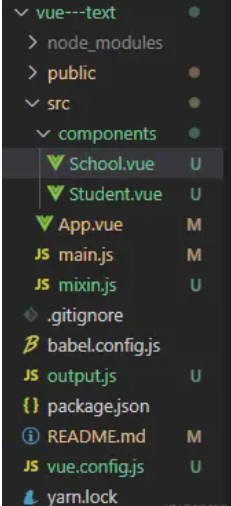
School.vue
<template>
  <div>
    <h2 @click="showName">School Name:{{ name }}</h2>
    <h2>School address:{{ address }}</h2>
  </div>
</template>

<script>
//Introduce a hunhe
// import {hunhe,hunhe2} from '../mixin'

export default {
  name: "School",
  data() {
    return {
      name: "Shang Silicon Valley",
      address: "Beijing",
      x: 666,
      // If the blend has an attribute with the same name as itself. Own attribute has high priority
    };
  },
  // mixins:[hunhe,hunhe2],
};
</script>
Student.vue
<template>
  <div>
    <h2 @click="showName">Student Name:{{ name }}</h2>
    <h2>Student gender:{{ sex }}</h2>
  </div>
</template>

<script>
//Local mixing:
// import {hunhe,hunhe2} from '../mixin'

export default {
  name: "Student",
  data() {
    return {
      name: "Zhang San",
      sex: "male",
    };
  },
  // mixins:[hunhe,hunhe2]
};
</script>
App.vue
<template>
	<div>
		<School/>
		<hr>
		<Student/>
	</div>
</template>
<script>
	import School from './components/School'
	import Student from './components/Student'

	export default {
		name:'App',
		components:{School,Student}
	}
</script>
main.js
//Introducing Vue
import Vue from 'vue'
//Introduce App
import App from './App.vue'

//Turn off Vue's production prompt
Vue.config.productionTip = false

// Global mixing, mixing for all VMS and vc
import { hunhe, hunhe2 } from './mixin'
Vue.mixin(hunhe)
Vue.mixin(hunhe2)

//Create vm
new Vue({
	el: '#app',
	render: h => h(App)
})
mixin.js
export const hunhe = {
	methods: {
		showName(){
			alert(this.name)
		}
	},
	mounted() {
		console.log('How do you do!')
	},
}
export const hunhe2 = {
	data() {
		return {
			x:100,
			y:200
		}
	},
}
4.6 plug in
- Features: for enhancing Vue
- Essence: an object containing the install method. The first parameter of install is Vue, and the second parameter is the data passed by the plug-in user.
- Define plug-ins:
object.install = function (Vue, options) {
    // 1. Add global filter
    Vue.filter(....)

    // 2. Add global instruction
    Vue.directive(....)

    // 3. Configure global mixing (integration)
    Vue.mixin(....)

    // 4. Add instance method
    Vue.prototype.$myMethod = function () {...}
    Vue.prototype.$myProperty = xxxx
}
- Using plug-ins: Vue use()
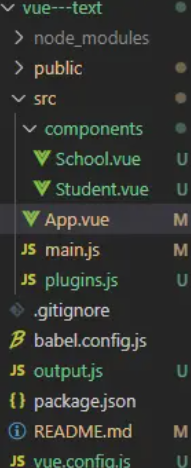
plugins.js
export default {
	install(Vue, x, y, z) {
		// Receive parameters
		console.log(x, y, z)
		//Global filter, starting from the first, find the first four
		Vue.filter('mySlice', function (value) {
			return value.slice(0, 4)
		})

		//Define global instructions to automatically obtain focus
		Vue.directive('fbind', {
			//When the instruction is successfully bound to the element (I)
			bind(element, binding) {
				element.value = binding.value
			},
			//When the element of the instruction is inserted into the page
			inserted(element, binding) {
				element.focus()
			},
			//When the template where the instruction is located is parsed again
			update(element, binding) {
				element.value = binding.value
			}
		})

		//Define blending
		Vue.mixin({
			data() {
				return {
					x: 100,
					y: 200
				}
			},
		})

		//Add a method to the Vue prototype (both vm and vc can be used)
		Vue.prototype.hello = () => { alert('How do you do') }
	}
}
main.js
//Introducing Vue
import Vue from 'vue'
//Introduce App
import App from './App.vue'
//Turn off Vue's production prompt
Vue.config.productionTip = false

//Introducing plug-ins
import plugins from './plugins'
//Application (use) plug-ins
Vue.use(plugins, 1, 2, 3)
// Incoming parameters

//Create vm
new Vue({
	el: '#app',
	render: h => h(App)
})
School.vue
<template>
	<div>
		<h2>School Name:{{name | mySlice}}</h2>
		<h2>School address:{{address}}</h2>
		<button @click="test">Let me test one hello method</button>
	</div>
</template>

<script>
	export default {
		name:'School',
		data() {
			return {
				name:'Shang Silicon Valley atguigu',
				address:'Beijing',
			}
		},
		methods: {
			test(){
				this.hello()
			}
		},
	}
</script>
Student.vue
<template>
	<div>
		<h2>Student Name:{{name}}</h2>
		<h2>Student gender:{{sex}}</h2>
		<input type="text" v-fbind:value="name">
	</div>
</template>

<script>
	export default {
		name:'Student',
		data() {
			return {
				name:'Zhang San',
				sex:'male'
			}
		},
	}
</script>
App.vue
<template>
	<div>
		<School/>
		<hr>
		<Student/>
	</div>
</template>

<script>
	import School from './components/School'
	import Student from './components/Student'

	export default {
		name:'App',
		components:{School,Student}
	}
</script>
4.7 scoped style
If different components have the same style name, it will cause style conflict. In app The component style imported after import in Vue will overwrite the style with the same name of the previous component, so use scoped to solve it. Better not app Scoped is added to Vue's style because it is a summary component, and the styles written in it are public styles.
-
Function: make styles take effect locally to prevent conflicts.
-
Writing method:
<style lang="less" scoped>
//lang = '' specifies what style to write. If not, css is the default
	.demo{
		background-color: pink;
	}
</style>