1. Life cycle introduction
First of all, let's take a look at the following two diagrams. One is the complete flow chart and the other is the eight method chart to introduce the four stages of vue

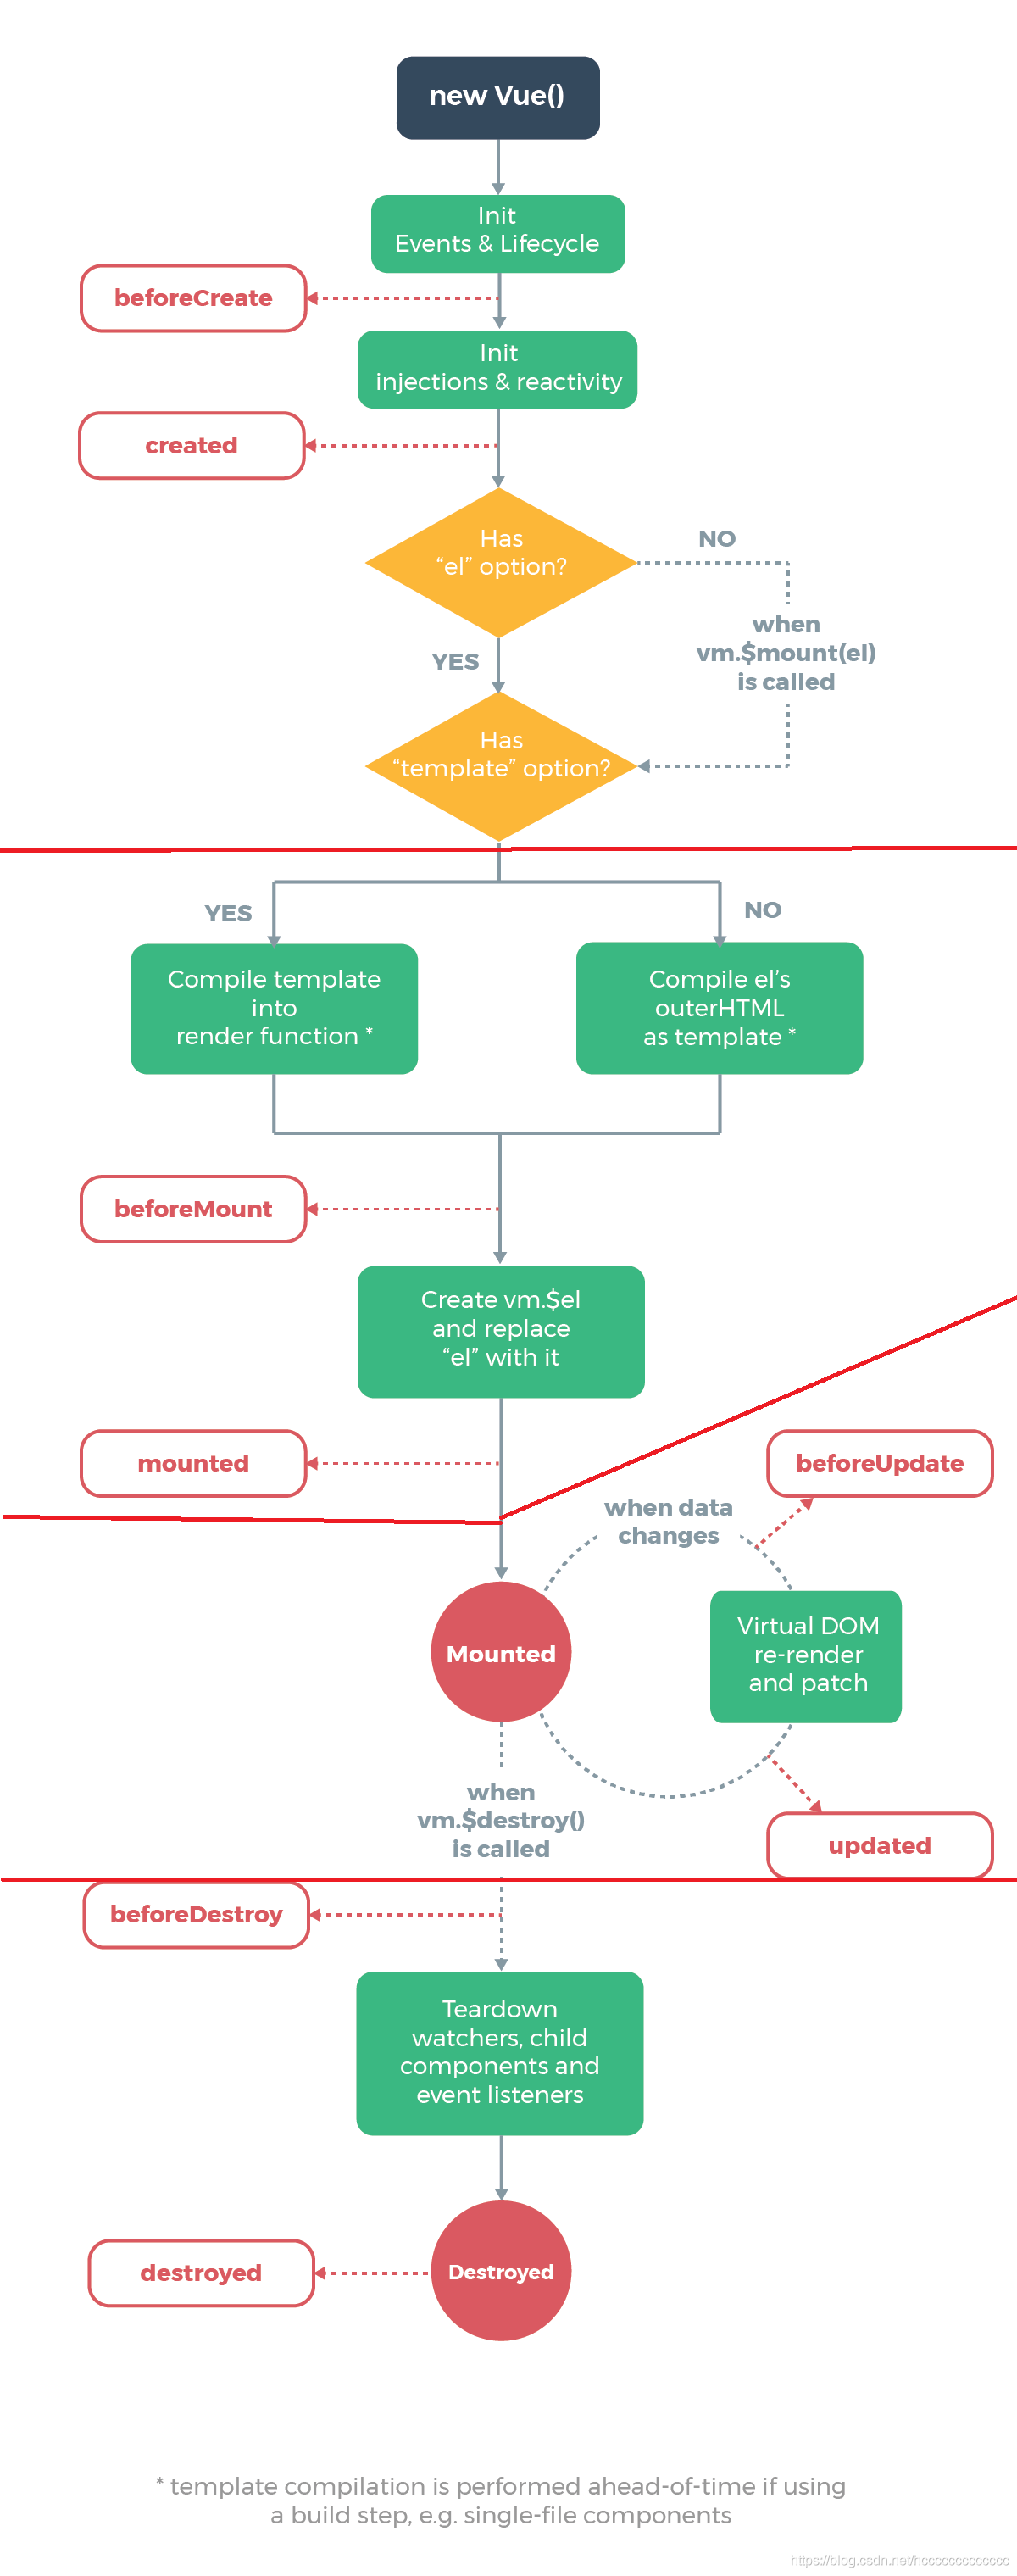
Its usage will be described in detail below.
The so-called life cycle is vue the whole process from creation to destruction. The above eight methods are called hook functions for short. They are used to perform specific operations at specific time points. For example, after the component is created, we can initiate Ajax requests in the created life cycle function to initialize data.
vue starts from create - > compile - > display - > Update - > destroy. Different methods are executed in each process. And in the figure above, I divided the whole life cycle into four stages.
- Creating - > compiling and executing beforecreate and created is called the initialization phase. The real data and method can be obtained in the created phase, so the Ajax request is initiated at this time
new Vue() -Vue instantiation
Init events & lifecycle initialization events and lifecycle functions
The beforeCreate lifecycle hook function is executed
Init injections & reactivity - Vue add data and methods internally
The created lifecycle hook function is executed and the instance is created
Next is the template compilation phase, Has el option? The purpose is to check that you want to mount to index Where in HTML. If not, call the $mount() method. If yes, continue to check the template option. This concludes the first phase.
- Compile - > display, execute beforemount and mounted, belonging to DOM mount phase.
First, check the template line selection. If necessary, compile the template and return the render rendering function. If not, compile the label corresponding to the el option as template.
Before the virtual DOM is mounted as a real dom.
beforeMount is executed.
Cretae vm and replace is to mount the virtual DOM and the rendered data to the real DOM
The real DOM is mounted
Mounted is executed, that is, the real DOM can be called only after mounted
- Display - > update. You can get the updated DOM in the updated function
When the data in data changes, before updating DOM
First, perform a loop and execute beforeUpdate
Virtual DOM re render, and then re render and patch the virtual dom.
Execute the updated function
When data changes, repeat the cycle
- Update - > destroy. Generally, timers, timers or global events are manually eliminated in the destroyed function
When destory is called, for example, the component DOM is removed
Execute beforeDestory
Remove the data monitor, subcomponents, and event listeners
After the instance is destroyed, a hook function is triggered at last
The destoryed lifecycle hook function is executed
2. Use of Axios
axios is a library dedicated to sending Ajax requests. Characterized by
- Support clients to send Ajax requests
- Support service store node JS send request
- Promise related syntax is supported
- Support requests and corresponding interceptor functions
- Automatically convert JSON data
- The bottom layer is the native JS implementation, which is encapsulated by Promise
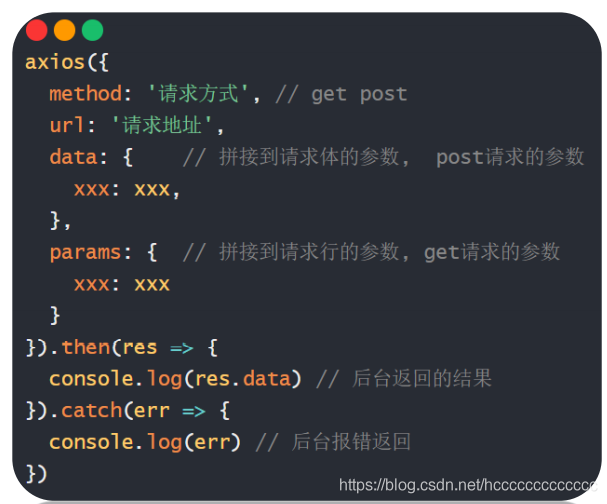
For GET requests, Ajax splices query strings at the URL, and axios will automatically write after the URL in the params configuration item.
For POST requests, data is passed in the request body. In axios, the data option can automatically load parameters into the request body. By default, the data format of the request body sent to the background is JSON string format.
The advantage of axios is that you can configure the basic address and manage axios uniformly default. baseURL
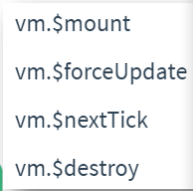
3. Use refs and nextTick
In the mounted life cycle, there are two ways to obtain the native DOM, through id or ref.
      <p>1. Get native DOM element</p>
      <h1 id="h" ref="myH">I am a lonely, poor and edible man h1</h1>
      mounted(){
        console.log(document.getElementById("h")); // h1
        console.log(this.$refs.myH); // h1
     }
If we define a component, we can call all methods in the component through this$ refs. Component name
      <p>2. Get component object - Everything in the callable component</p>
      <Demo ref="de"></Demo>
       components: {
        Demo
      },
      mounted(){
        let demoObj = this.$refs.de;
        demoObj.fn()
      }
Then we can call the methods and properties in the component.
      <p>3. vue to update DOM It's asynchronous</p>
      <p ref="myP">{{ count }}</p>
      <button @click="btn">click count+1, Extract now p Label content</button>
      methods: {
        btn(){
            this.count++; // vue monitors data updates and opens a DOM update queue (asynchronous task)
            console.log(this.$refs.myP.innerHTML); // 0
       }
      }
Because vue updating DOM is asynchronous, the update statement will be put into the task queue and executed at last.
            this.$nextTick(() => {
                console.log(this.$refs.myP.innerHTML); // 1
            })
Therefore, calling the nextTick method can access the updated DOM. Of course, we can also use the updated life cycle hook function. Note that $nextTick returns a promise object. The following is a simple input box focus case
<template>
  <div>
      <input ref="myInp" type="text" placeholder="This is an input box" v-if="isShow">
      <button v-else @click="btn">Click me to search</button>
  </div>
</template>

<script>
// Target: click the button (disappear) - the input box appears and focuses
// 1. Get input box
// 2. The input box calls the event method focus() to achieve the focus behavior
export default {
    data(){
        return {
            isShow: false
        }
    },
    methods: {
        async btn(){
            this.isShow = true;
            // this.$refs.myInp.focus()
            // Reason: updating DOM with data changes is asynchronous
            // The input box has not been mounted on the real DOM
            // solve:
            // this.$nextTick(() => {
            //     this.$refs.myInp.focus()
            // })
            // Extension: await replaces callback function
            // $nextTick() returns Promise object in place
            await this.$nextTick()
            this.$refs.myInp.focus()
        }
    }
}
</script>

<style>

</style>
4. Shopping cart case
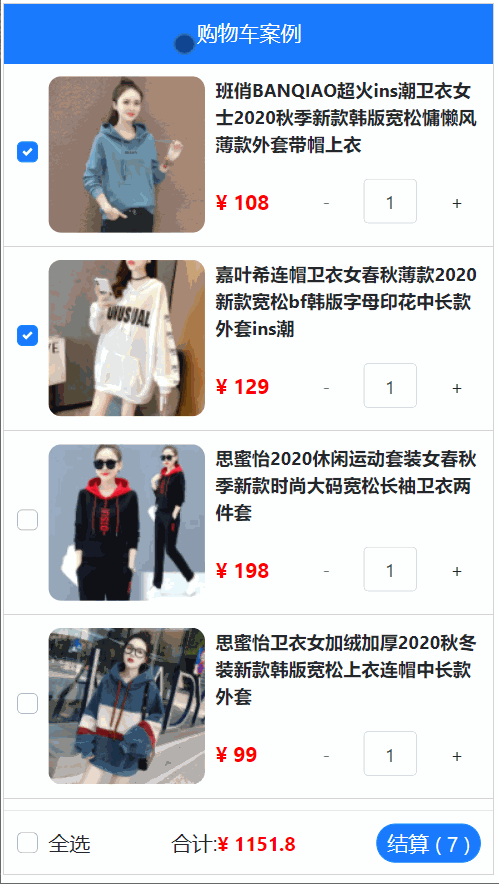
The above case is divided into four modules, the header module MyHeader, the bottom module MyFooter, the middle module MyGoods quantity module MyCount, of which the most complex part is the design and implementation of the all selection box.
- We need to get data from the background, so which page is the data placed on? Of course, it is placed in the component of the parent page (App.vue), and then the data is transferred to other components respectively. Therefore, it involves the transfer of parent to child. After we introduce the component, we need to transfer the data in the parent component by defining: arr=list or in the for loop in the form of: GBJ = obj
<template>
  <div>
    <MyHeader title="Shopping cart case"></MyHeader>
    <div class="main">
      <MyGoods v-for="obj in list" :key="obj.id"
      :gObj="obj"
      ></MyGoods>
    </div>
    <MyFooter @changeAll="allFn" :arr="list"></MyFooter>
  </div>
</template>
What we need to notice is that we need to call the axios function in the created method, introduce the background data and copy the data to the list empty array.
- In the header component MyHeader, in order to realize the reuse of components, we can't write the text and color. The values passed from the parent component can be accepted in the sub component, and certain constraint specifications can be carried out
<template>
  <div class="my-header" :style="{backgroundColor: background, color}">{{ title }}</div>
</template>
    props: {
        background: String, // The value of this variable inserted externally must be of string type, otherwise an error will be reported
        color: {
            type: String, // Constrains the type of color value
            default: "#FFF "/ / default value of color variable (the default value is used instead of the external value of color)
        },
        title: {
            type: String,
            required: true // The value of this variable must be passed in
        }
    }
- A MyGoods component can only render one item, so we do a for loop on the App page, and divide the things of the MyGoods component into the left half and the right half, with a check box and label on the left. The check box is a check box, and the check box is associated with an id attribute. In this way, the id of each commodity is different. Use v-model to bi directionally associate the commodity information with the check box. As long as the given values of label and input are the same, and the for attribute of label and the id attribute of input, two-way binding will be realized. That is, clicking label has the same effect as clicking input. The right part mainly designs the use of Mycount component.
<template>
  <div class="my-goods-item">
    <div class="left">
      <div class="custom-control custom-checkbox">
        <!-- *important:
          Each object and component is independent
          In the object goods_state Check boxes associated with their corresponding products
         -->
         <!-- bug:
          All of the loop label of for All input, id Both input - Only the first one takes effect by default
          solve: Every time in the object id value(1, 2), Give separately id and for Use to distinguish
          -->
        <input type="checkbox" class="custom-control-input" :id="gObj.id"
        v-model="gObj.goods_state"
        >
        <label class="custom-control-label" :for="gObj.id">
          <img :src="gObj.goods_img" alt="">
        </label>
      </div>
    </div>
    <div class="right">
      <div class="top">{{ gObj.goods_name }}</div>
      <div class="bottom">
        <span class="price">¥ {{ gObj.goods_price }}</span>
        <span>
            <MyCount :obj="gObj"></MyCount>
        </span>
      </div>
    </div>
  </div>
</template>
- In the Mycount component, it is used to count the quantity of goods. We need to pay attention to passing the background value obtained by the parent component to other components through the props attribute, and we can realize two-way binding by modifying the variable value. For two button elements and an input input box in the component, bind dynamic attributes for them respectively, In the quantity minus button, bind the prohibition event and specify that the commodity quantity is 1, so it can't be reduced any more. It also stipulates that the minus button can be operated only when the commodity quantity is greater than 1. In the add quantity button, if the upper limit is not set, the dynamic event will be bound directly. For the input box, you need to implement bidirectional data binding with v-model and set v-model to the number attribute. There is also a bug in this component, that is, I can manually enter the product quantity if the entered value is less than 1 So how to deal with it? At this time, we need to use watch to monitor the change of the value and monitor in depth. If the quantity of goods is less than 1, it will be forcibly modified to 1
> <template>
  <div class="my-counter">
    <button type="button" class="btn btn-light" :disabled="obj.goods_count === 1" @click="obj.goods_count > 1 && obj.goods_count--">-</button>
    <input type="number" class="form-control inp" v-model.number="obj.goods_count">
    <button type="button" class="btn btn-light" @click="obj.goods_count++">+</button>
  </div>
</template>
- To realize the function of all selection boxes in MyFooter, we should first understand that all selection boxes are in the MyFooter component, and the small selection boxes of each commodity are in the MyGoods component, but there is no relationship between the two components. Therefore, we can adopt cross component communication or directly report to app Vue is passed inside.
    <div class="custom-control custom-checkbox">
      <input type="checkbox" class="custom-control-input" id="footerCheck" v-model="isAll">
      <label class="custom-control-label" for="footerCheck">Select all</label>
    </div>
The above is the logic code of the all selection box, associated with label, and set v-model to isAll
And isAll is a calculated attribute
  computed: {
    isAll: {
      set(val){ // val is the value of the associated form (true/false)
        this.$emit('changeAll', val)
      },
      get(){
        // Find out whether the attribute associated with the small check box does not meet the check conditions
        // Direct in place false
        return this.arr.every(obj => obj.goods_state === true)
      }
    },
   }
The properties of the check box itself are passed to the main component through the set function
    <MyFooter @changeAll="allFn" :arr="list"></MyFooter>
    methods: {
    allFn(bool){
      this.list.forEach(obj => obj.goods_state = bool)
      // Synchronize the select all status true/false in MyFooter to the associated properties of all small boxes
    }
  }
The method is declared in the methods function. The logical code is that the selected state of the check box is consistent with that of all other small check boxes. We should also note that the status of the small selection box is obj goods_ State for bidirectional binding. The above is the business logic flow of the whole small project.