Necessary knowledge: http://github.crmeb.net/u/defu
Write the rotation page: HTML+CSS
Vue cli: create project
Vue Basics: template syntax, calculation attributes, listeners, rendering methods (conditional rendering, list rendering), components
Deep component: component registration, interaction mode between parent and child components, and custom events
vue transition: entry and exit transition
CSS Animation: CSS3 transfrom attribute
design sketch:

Component composition:
Write a basic picture rotation page using Html and CSS
This part is very simple. Conventional display pictures and rotating digital subscripts. CSS can be adjusted according to your favorite style. (the complete CSS style I wrote will be given at the end)
<!-- layout -->
<template>
<div class="slide-show">
<div class="slide-img" >
<a href="" >
<img src="" alt="">
</a>
</div>
<h3>{{ title }}</h3>
<ul class="slide-page" >
<li><</li>
<li>
<a href="">1</a>
<a href="">2</a>
<a href="">3</a>
</li>
<li>></li>
</ul>
</div>
</template>
Add responsive data-driven
(1) Import data:
I have rotated three pictures here. If more pictures need to be rotated, they will be directly added to the data. Put the three groups of data in the sildes array.
Data in our parent component:
Tips: the path to load pictures here must be introduced using require to facilitate webpack packaging.
  data(){
    return{
      slides:[
        {
          src:require('../assets/slide1.jpg'),
          title:"Characteristics of men's gang",
          href:'detail/****'
        },
        {
          src:require('../assets/slide2.jpg'),
          title:"Goddess cultivation program",
          href:'detail/###'
        },
        {
          src:require('../assets/slide3.jpg'),
          title:"A tonal taste",
          href:'detail/###'
        }
      ]
}
(2) Data driven
According to the slide array, render with v-for list, bind img src with v-bind, etc
With the dynamic change of nowIndex, different pictures are displayed, and the nowIndex is initialized to 0
(3) Add page turning and other events: click the left and right arrows to turn the page up and down, and click the number to switch to the corresponding picture
Define the jump method goto (index) in methods and jump to the index image page
 goto(index){
     this.nowIndex = index
    }
Therefore, to page up, you only need to modify the passed parameter to preIndex. The index of page up is determined according to the current index (the page up on the first page is the last page, considering the cycle). Therefore, the calculation attribute computed is used here; Similarly, turn the page down.
computed:{
    preIndex(){
      if(this.nowIndex == 0){
        return this.slides.length-1
      }else{
        return this.nowIndex - 1
      }
    },
    nextIndex(){
      if(this.nowIndex == this.slides.length-1){
        return 0
      }else{
        return this.nowIndex + 1
      }
    }
  }
(4) Automatic picture rotation
Use the setInterval method of javascript to realize the automatic rotation with an interval of 10ms. Execute the code repeatedly at the specified time interval. (when the mouse is placed on the picture, you need to stop the animation effect, so you need to use clearInterval() to clear the effect)
The event interval is specified in the parent component (v-bind binding), and props is used to receive data from the parent
runInv needs to be invoked after loading, and invoked by mounted in the life cycle.
mounted: is invoked after the template is rendered into html, usually after initialization of the page, and then some necessary operations on the dom node of html.
  props:{
    slides:{
      type:Array,
      default:[]//Initial value is null
    },
    inv:{//Parent pass
      type:Number,
      default:1000
    }
  },
methods:{
    //Slide auto switch
    runInv(){
      this.invId = setInterval(()=>{
        this.goto(this.nextIndex)
      },this.inv)
    },
    clearInv(){
      clearInterval(this.invId)
    }
  },
  mounted(){
    this.runInv()
  }
Define animation
The above rotation is a little stiff, so we add vue transition effect.
At one time, there are two photos at the same time (overflow: hidden is used in CSS to hide the overflow image), so there are two tags, and v-if conditional rendering is used to make only one image appear
<transition name="slide-trans">
  <img v-if="isShow" :src="slides[nowIndex].src" alt="slides[nowIndex].title">
</transition>
<transition name="slide-trans-old">
  <img v-if="!isShow" :src="slides[nowIndex].src" alt="slides[nowIndex].title">
</transition>
.slide-trans-enter-active{
  transition: all 1s;
}
.slide-trans-enter{
  transform: translateX(1200px);
}
.slide-trans-old-leave-active{
    transition: all 1s;
    transform: translateX(-1200px);
}
vue component complete code:
<!-- layout -->
<template>
<div class="slide-show" @mouseover="clearInv" @mouseout="runInv">
<!-- v-for="item in slides" -->
<div class="slide-img" >
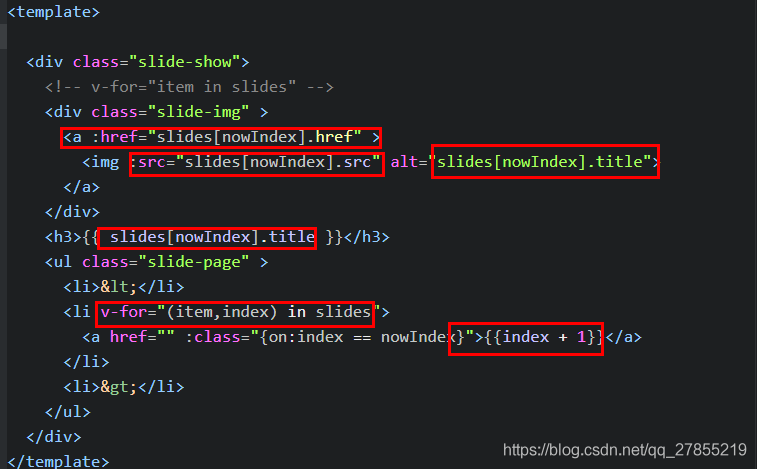
<a :href="slides[nowIndex].href" >
<!-- animation -->
<transition name="slide-trans">
<img v-if="isShow" :src="slides[nowIndex].src" alt="slides[nowIndex].title">
</transition>
<transition name="slide-trans-old">
<img v-if="!isShow" :src="slides[nowIndex].src" alt="slides[nowIndex].title">
</transition>
</a>
</div>
<h3>{{ slides[nowIndex].title }}</h3>
<ul class="slide-page" >
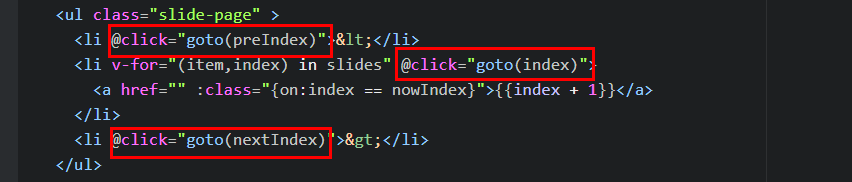
<li @click="goto(preIndex)"><</li>
<li v-for="(item,index) in slides" @click="goto(index)">
<a href="" :class="{on:index == nowIndex}">{{index + 1}}</a>
</li>
<li @click="goto(nextIndex)">></li>
</ul>
</div>
</template>
<script>
export default {
// props: what attributes do subcomponents accept
props:{
slides:{
type:Array,
default:[]//Initial value is null
},
inv:{//Parent pass
type:Number,
default:1000
}
},
data(){
return{
nowIndex:1,
isShow:true
}
},
computed:{
preIndex(){
if(this.nowIndex == 0){
return this.slides.length-1
}else{
return this.nowIndex - 1
}
},
nextIndex(){
if(this.nowIndex == this.slides.length-1){
return 0
}else{
return this.nowIndex + 1
}
}
},
methods:{
goto(index){
this.isShow = false
setTimeout(()=>{
this.isShow = true
this.nowIndex = index
//index is passed to the parent component to realize interaction
// this.$emit('onchange',index)
//
},10)
},
//Slide auto switch
runInv(){
this.invId = setInterval(()=>{
this.goto(this.nextIndex)
},this.inv)
},
clearInv(){
clearInterval(this.invId)
}
},
mounted(){
this.runInv()
}
}
</script>
<style scoped>
.slide-trans-enter-active{
transition: all 1s;
}
.slide-trans-enter{
transform: translateX(1200px);
}
.slide-trans-old-leave-active{
transition: all 1s;
transform: translateX(-1200px);
}
/* Taobao css initialization */
body, h1, h2, h3, h4, h5, h6, hr, p, blockquote, dl, dt, dd, ul, ol, li, pre, form, fieldset, legend, button,
input, textarea, th, td { margin:0; padding:0; }
body, button, input, select, textarea { font:12px/1.5tahoma, arial, \5b8b\4f53; }
h1, h2, h3, h4, h5, h6{ font-size:100%; }
address, cite, dfn, em, var { font-style:normal; }
code, kbd, pre, samp { font-family:couriernew, courier, monospace; }
small{ font-size:12px; }
ul, ol { list-style:none; }
a { text-decoration:none; }
a:hover { text-decoration:underline; }
sup { vertical-align:text-top; }
sub{ vertical-align:text-bottom; }
legend { color:#000; }
fieldset, img { border:0; }
button, input, select, textarea { font-size:100%; }
table { border-collapse:collapse; border-spacing:0; }
.slide-show{
height: 400px;
width: 1200px;
position: relative;
overflow: hidden;
}
.slide-show h3{
width: 100%;
position: absolute;
color: #fff;
background-color: #000;
opacity: 0.7;
bottom: 0px;
padding: 10px 0px;
text-indent: 20px;
font-weight: 500;
}
.slide-img img{
width: 1200px;
position: absolute;
top: 0;
}
.slide-page{
right: 15px;
bottom: 0px;
position: absolute;
}
.slide-page .on{
text-decoration: underline;
}
.slide-page li{
list-style: none;
float: left;
display: inline-block;
padding: 0 10px;
cursor: pointer;
color: #fff;
font-size: 14px;
height: 32px;
}
.slide-page li a{
display: block;
float:left;
color: #fff;
text-decoration: none;
}
.slide-page li:hover{
color: #1fdd88;
}
.slide-page a:hover{
color: #1fdd88;
}
</style>