Continued< 35. Permissions under editing role (II)>
In the previous article, we completed the effect of assigning new permissions to roles and saving them. In this article, we complete the function of assigning roles to users.
1, Complete the loading of the dialog box and the role to be assigned
When we open the user list page (User.vue component), we need to pop up the role assignment dialog box when clicking the Edit button: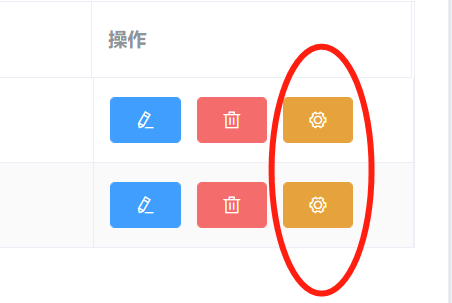
effect: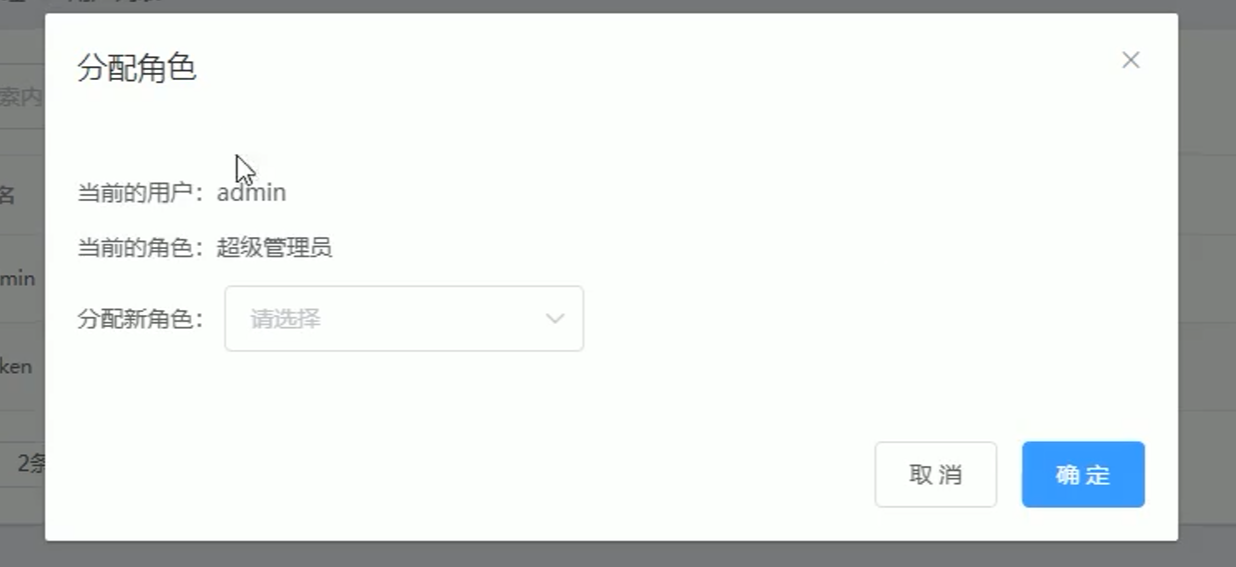
At this time, you need to specify a click display method at the Edit button, named "setRole", and the parameter is the current user object:
<el-table-column label="operation" width="200px">
    <template slot-scope="scope">
        <!-- Place modify, delete, and assign role buttons -->
        <el-tooltip effect="dark" content="modify" placement="top">
          <el-button type="primary" icon="el-icon-edit" size="mini" @click="showEditDialog(scope.row.id)"></el-button>
        </el-tooltip>
        <el-tooltip effect="dark" content="delete" placement="top">
          <el-button type="danger" icon="el-icon-delete" size="mini" @click="removeUserById(scope.row.id)"></el-button>
        </el-tooltip>
        <el-tooltip effect="dark" content="Assign roles" placement="top">
          <el-button type="warning" icon="el-icon-setting" size="mini" @click="setRole(scope.row)"></el-button>
        </el-tooltip>
    </template>
</el-table-column>
Then write a dialog area (placed at the bottom of div) to display the dialog box for assigning roles:
<!-- Dialog box for assigning roles -->
<el-dialog title="Assign roles" :visible.sync="setRoleDialogVisible" width="50%">
  <div>
    <p>Current user:{{userInfo.username}}</p>
    <p>Current role:{{userInfo.role_name}}</p>
    <p>
      Assign a new role:
      <el-select v-model="selectRoleId" placeholder="Please select">
          <el-option v-for="item in roleList" :key="item.id"
              :label="item.roleName" :value="item.id">
          </el-option>
      </el-select>
    </p>
  </div>
  <span slot="footer" class="dialog-footer">
      <el-button @click="setRoleDialogVisible = false">Cancel</el-button>
      <el-button type="primary" @click="">determine</el-button>
  </span>
</el-dialog>
setRoleDialogVisible is a parameter that controls whether the dialog box is displayed or not, then "userInfo" is the obtained user object that needs to be assigned a role, "roleList" is the list object of all roles to be selected by the user, and "selectRoleId" is the selected role ID value, which are predefined in the data area:
setRoleDialogVisible: false, //Controls the display and hiding of the user assignment role dialog box
//User information of the assigned role is required
userInfo: [],
//Data list for all roles
roleList: [],
//Selected role ID value
selectRoleId: ''
We also used the El Select component above, so remember in element JS.
Then write the "setRole" method to display the dialog box
//Displays the dialog box for assigning roles
async setRole(){
  //Before displaying the dialog box, load all roles (to be selected by the user)
  const {data: res} = await this.$http.get('roles');
  if(res.meta.status!==200){
      return this.$message.error('Failed to get role list!');
  }
  this.roleList = res.data;
  this.userInfo = user;//Get user information and display it on the page
  //display a dialog box
  this.setRoleDialogVisible = true;
}
effect:
2, Call the background API for role assignment
API for binding roles to users: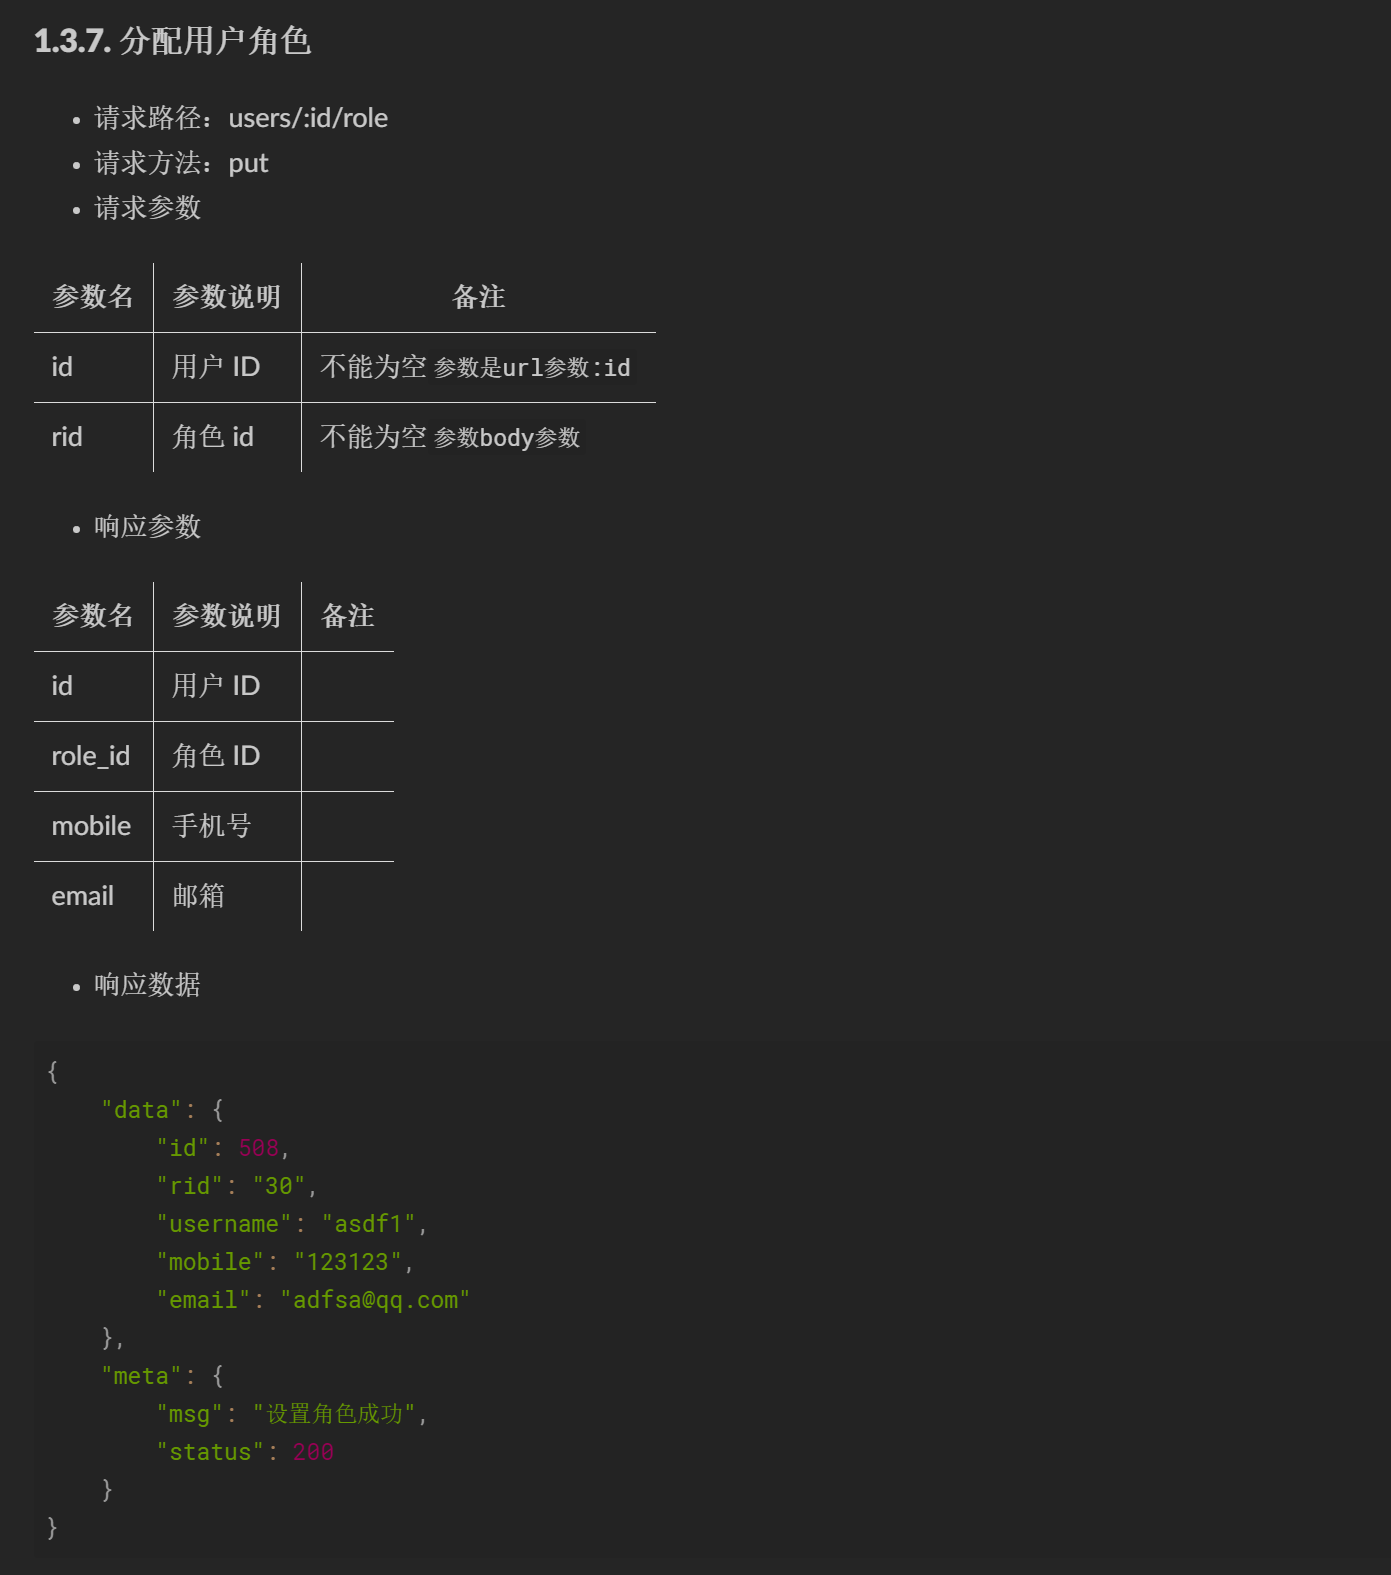
Where rid is the role id, which is in the put request method body.
We bind a function named "saveRoleInfo" to the OK button in the dialog box:
<span slot="footer" class="dialog-footer">
    <el-button @click="setRoleDialogVisible = false">Cancel</el-button>
    <el-button type="primary" @click="saveRoleInfo()">determine</el-button>
</span>
Write the "saveRoleInfo" function in the method area:
// Click the button to assign roles
async saveRoleInfo(){
  if(!this.selectRoleId){
      return this.$message.error('Please select the role to assign!');
  }
  const {data: res} = await this.$http.put('users/'+this.userInfo.id+'/role',{rid: this.selectRoleId});
  if(res.meta.status!==200){
      return this.$message.error('Failed to update user role!');
  }
  this.$message.success('Role updated successfully!');
  this.getUsersList();//Refresh user list
  this.selectRoleId = '';//Clear this selection to avoid affecting the next one
  this.setRoleDialogVisible = false;//close dialog boxes
}
effect: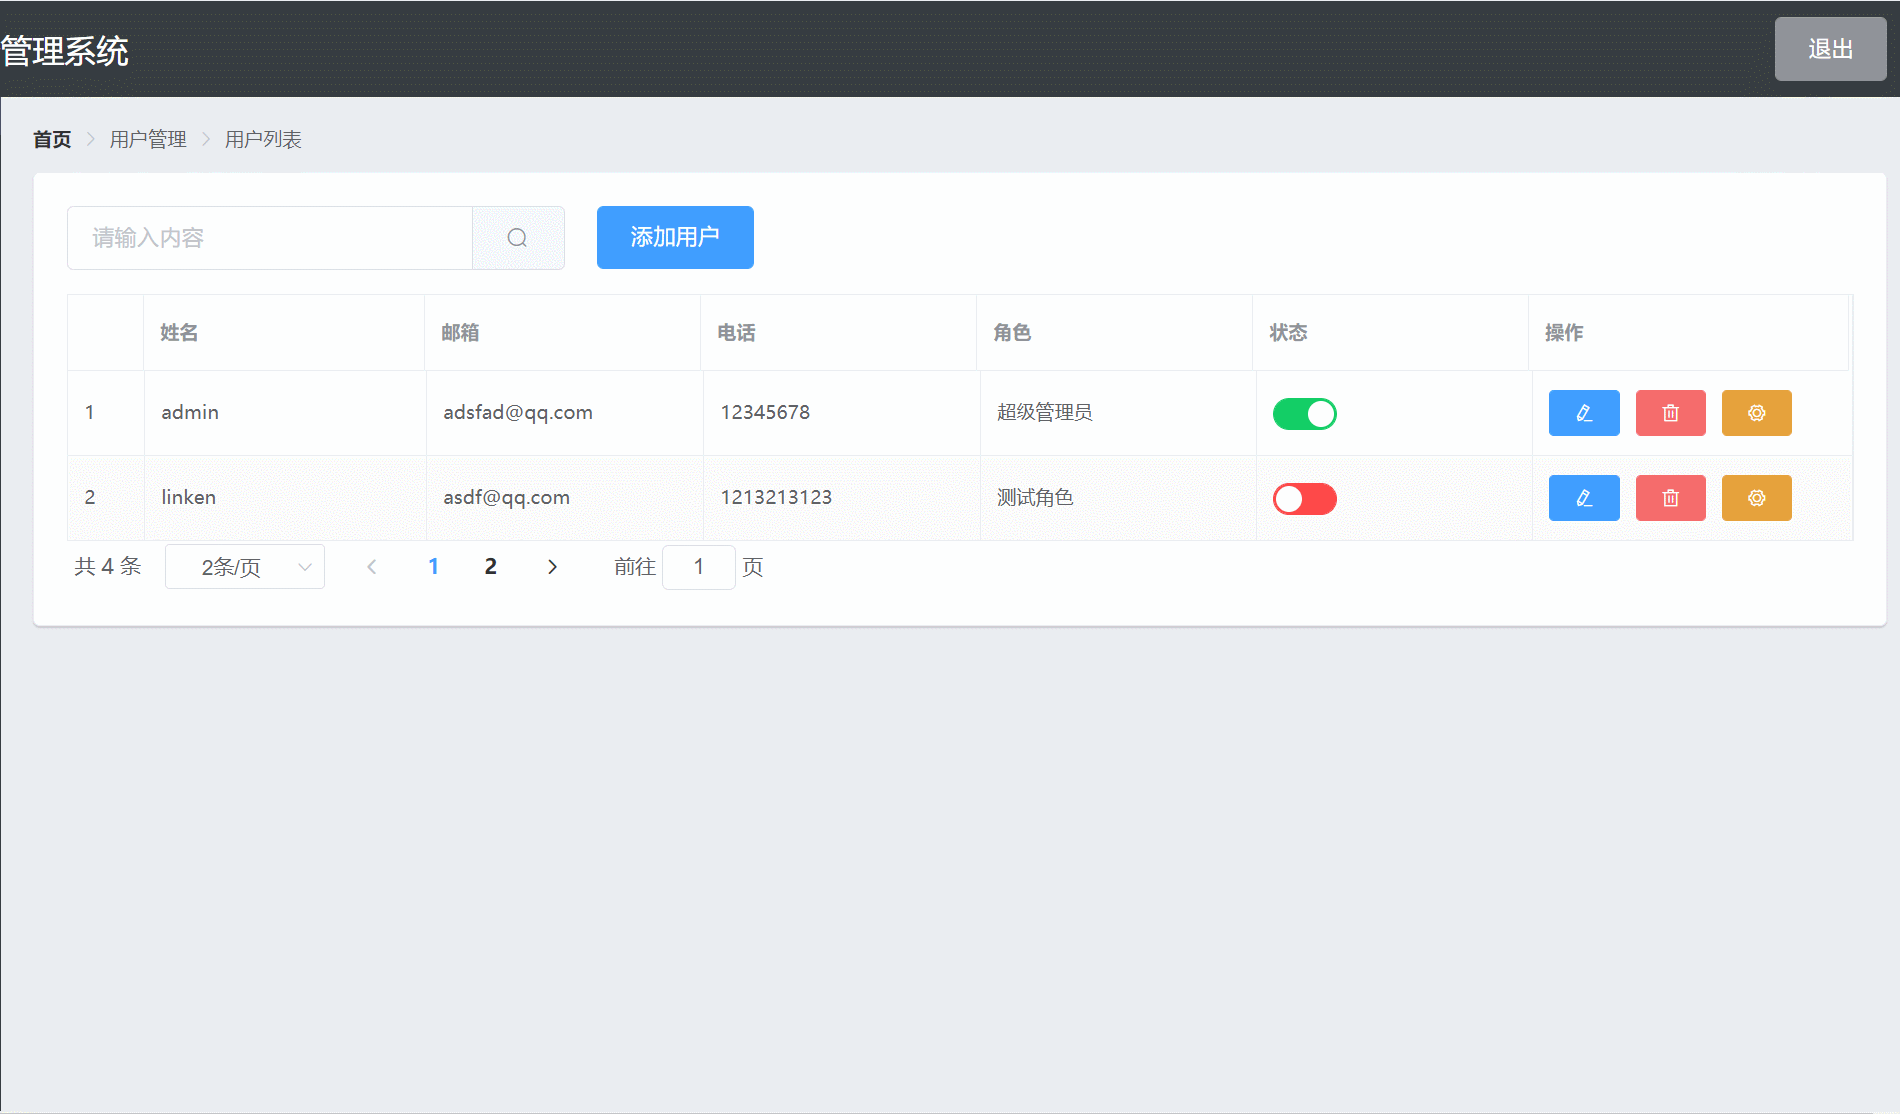
3, Merge branch
All the codes related to our permissions have been developed. At this time, we need to merge the codes of our rights branch into the main branch.
First, use "git branch" to check the current branch, which is the rights branch; Then use "git add." Add the modified content to the staging area, and then execute "git commit" to submit the modified content to the current local branch; Use "push" to branch git to the cloud; Finally, switch the branch to the master branch through "git checkout master", execute "git merge rights" to merge the contents of rights into the master main branch, and then push the local master branch to the cloud. At this time, the master is updated to the latest: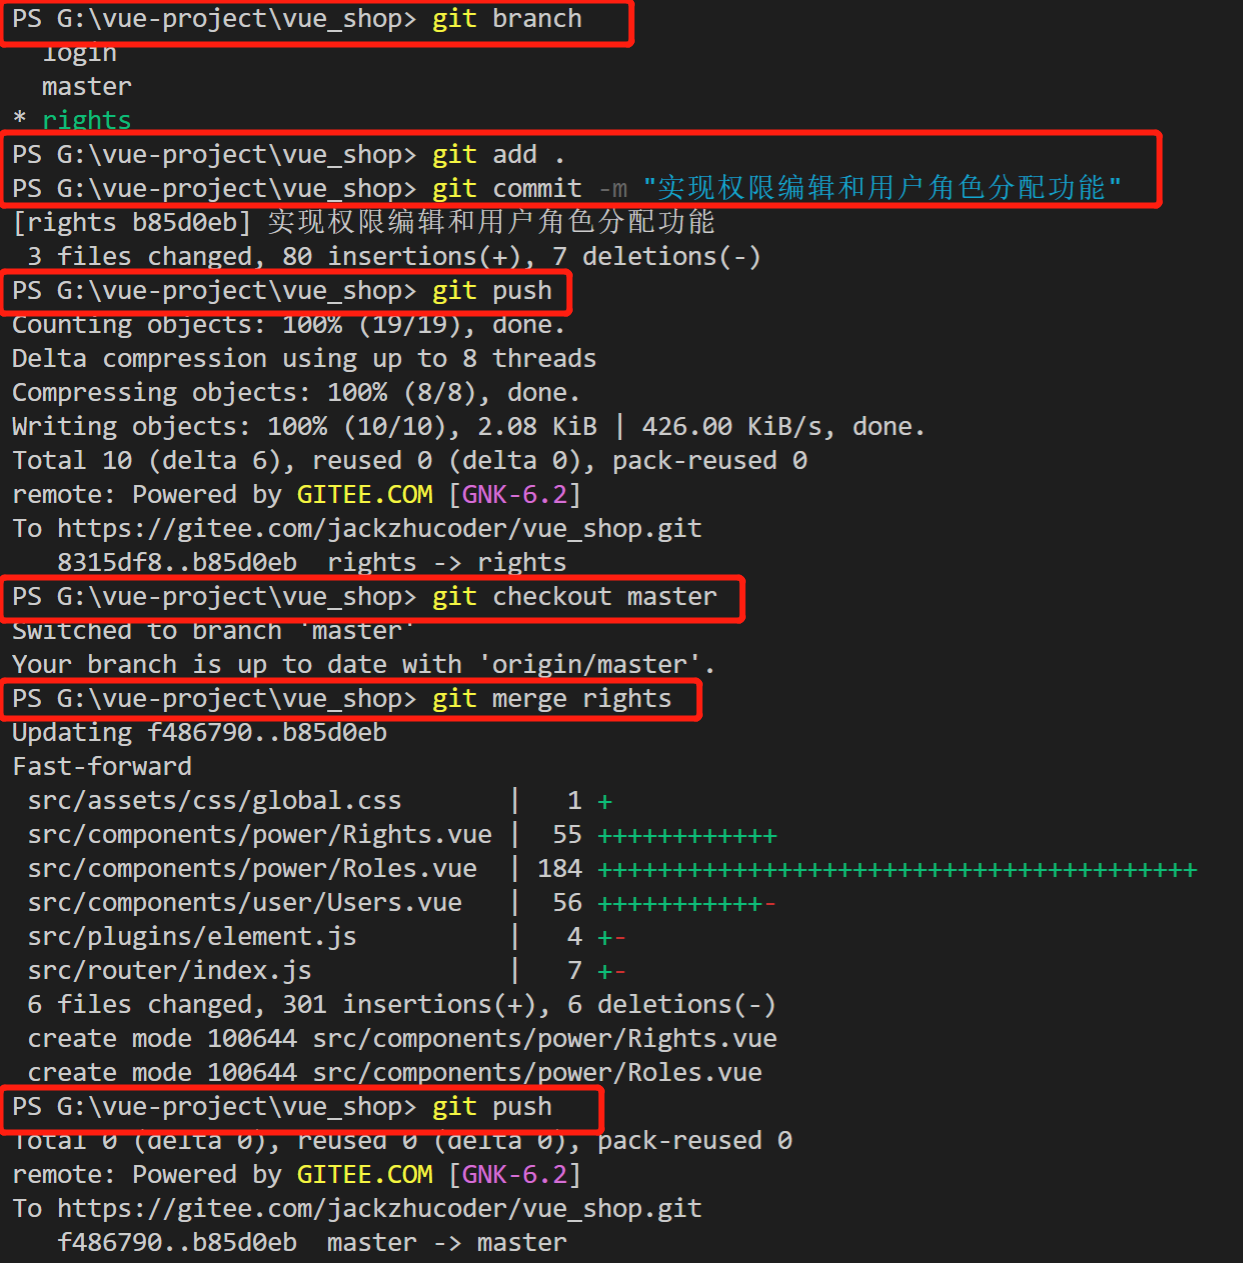
So far, the function of assigning roles to users has been fully realized.
In the next article, we will develop a new module - classification management.
Reference: dark horse programmer (www.itheima.com) Vue project practical teaching video
Please indicate the source of Reprint: https://blog.csdn.net/u013517797/article/details/122912755