es6 grammar supplement (you can see it from the beginning)
let and const are only available in es6, but not in es5
let and var
let is similar to var, both of which are variables
- var in es5 has no block level scope (if/for)
- let in es6 has block level scope (if/for)
- Using the var variable outside the anonymous function in the anonymous function is to use the external variable
- Using the let variable outside the anonymous function in the anonymous function is equivalent to passing a parameter to the anonymous function
const
const is equivalent to a constant in java.
- Note 1: when using const to define an identifier, it must be assigned
- Note 2: once the const modified identifier is assigned, it cannot be modified
- Note 3: constant means that the object pointed to cannot be modified, but the internal properties of the object can be changed
To sum up: when we define variables, all values that will not change are modified with const, and those that may change are modified with let instead of var.
Enhanced writing for creating objects
The former is equivalent to the latter, and the former is easier to write
const name = "Zhang San";
const age = 18;
const gender = true;
const obj = {
  name,
  age,
  gender,
  sayHello(){
    console.log("hello")
  }
}
const name = "Zhang San";
const age = 18;
const gender = true;
const obj = {
  name: name,
  age: age,
  gender: gender,
  sayHello: function (){
    console.log("hello")
  }
}
Some methods of array
- push() adds one or more elements at the end of the array
- pop() removes the last element of the array
- shift() removes the first element
- unshift() inserts one or more elements at the beginning of the array
- splice(index,num, element...)
-
According to different parameters, this function can delete, add, modify and insert the array
-
The process is: delete the index value of the array, delete num elements, and then add the third parameter, that is, the subsequent elements
- Here are several uses of splice
- array.splice(array.length,0, "a") is equivalent to push("a")
- array.splice(array.length-1,1) is equivalent to pop()
- array.splice(0,1) is equivalent to shift("a")
- array.splice(0,0, "a") is equivalent to unshift("a")
- array.splice(n,1) can delete the n+1 element in the array
- array.splice(n,0, "a") can insert "a" after the nth element of the array
-
- reverse() reverses all elements in the array
- sort() sorts the array by ASCII code
- filter()
Function: create a new array containing all elements of the test implemented by the provided function,
Parameter passing: (callback (current element, index, the array));
Return value: an array of elements that passed the test;
 //Standard usage
 let arr = array.filter(callback(currentValue, index, array){
     //do something
 }, this)
- map()
Function: create a new array. The result is the result returned after each element in the array calls a provided function.
Parameter passing: (callback (current element, index, the array));
Return value: a new array, and each element is the result of the callback function;
 //Standard usage
 let numbers = [1, 4, 9];
 let roots = numbers.map(Math.sqrt);
 // The values of roots are [1, 2, 3],
 //numbers still has a value of [1, 4, 9]
- reduce()
Function: apply a function to each element (from left to right) in the accumulator and array to reduce it to a single value;
Parameter passing: (callback (accumulator, current element, index, the array));
Return value: the cumulative processing result of the function;
//Standard usage
let total = [0, 1, 2, 3].reduce((sum, value) => {
    return sum + value;
}, 0);
// total is 6
let flattened = [[0, 1], [2, 3], [4, 5]];
flattened.reduce((a, b) => {
    return a.concat(b);
}, []);
// flattened is [0, 1, 2, 3, 4, 5]
start
install
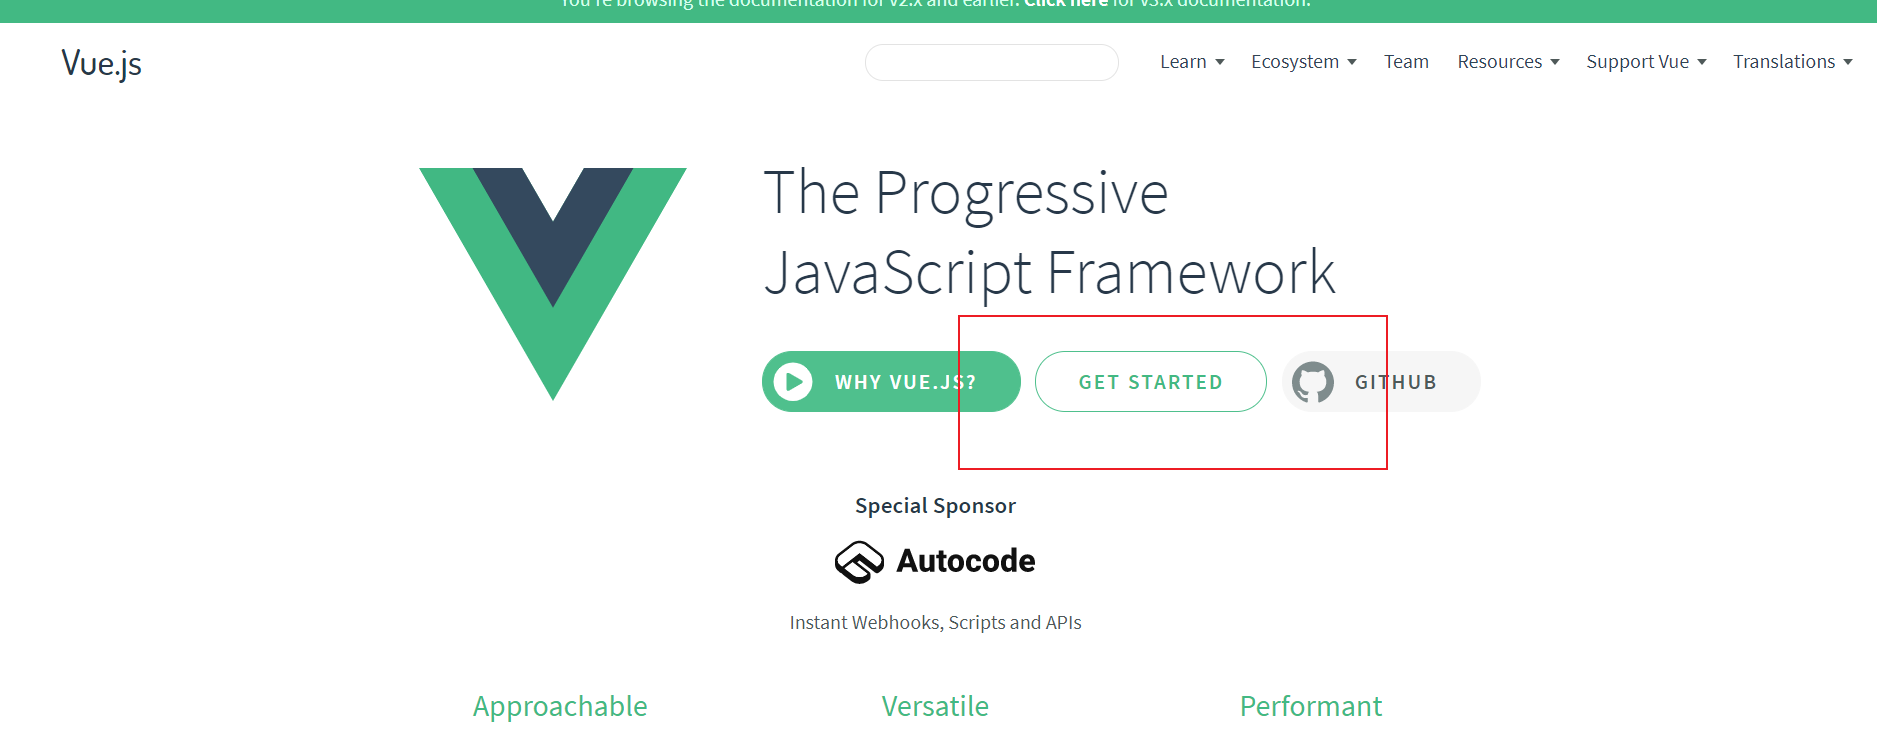
- Download Vue directly JS file: Official Website - > get started - > installation - > development version

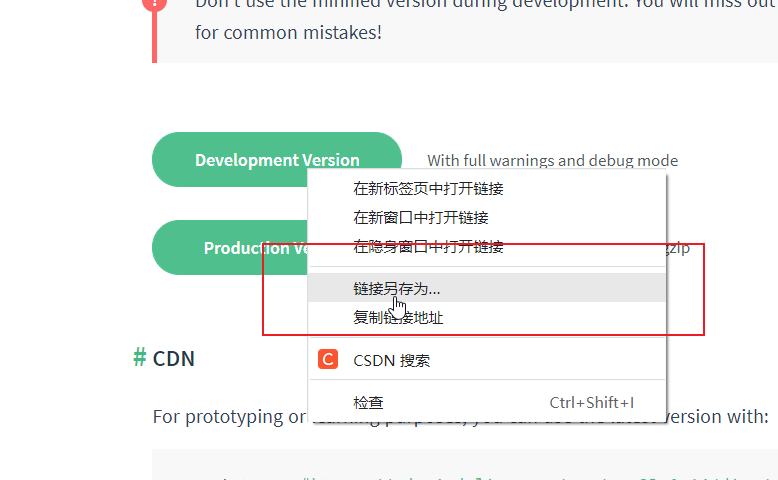
- CDN
<script src="https://cdn.jsdelivr.net/npm/vue@2.6.14/dist/vue.js"></script>
- npm
# latest stable
$ npm install vue
Initial experience - data presentation
vue, like wechat applet, is declarative programming, not imperative programming.
To use vue, first import vue
<script src="../js/vue.js"></script>
Then create the vue object. When creating the object, you can wear some parameters. el represents the labels and word labels that vue can control, and data represents the data stored by vue
const app = new Vue({
    el:"#app",
    data:{
        message: 'HelloWorld'
    }
})
The data in data can be displayed in the label controlled by vue
<div id="app">
    <div>{{message}}</div>
    <div>
        <h2>{{message}}</h2>
    </div>
</div>

You can also modify the data in data
app.mes sage="hello vue"
First experience - list display
Use v-for = "(name of each element of the array, subscript name) in array name"
<li v-for="(item,index) in movies">{{item}}</li>
Complete code
<div id="app">
    <ul>
        <li v-for="(item,index) in person">{{item}}</li>
    </ul>
</div>
<script src="../js/vue.js"></script>
<script>
    const app = new Vue({
        el:"#app",
        data:{
            message:"helloWorld",
            person:["dominant sea power","Water Ghost","Green Tea","flatterer"]
        }
    })
</script>

First experience - counter
Counter click + button: number plus one click - button: number minus one

Syntax: bind listening event v-on: event name = "method name"
<button v-on:click="add">+</button>
The methods of vue should be written to the methods attribute of vue
methods:{
    add(){
        console.log("add Executed");
        this.counter++;
    },
    sub(){
        console.log("sub Executed");
        this.counter--;
    }
}
Complete code
<div id="app">
    <div>Current count:{{counter}}</div>
    <button v-on:click="add">+</button>
    <button @click="sub">-</button>
</div>
<script src="../js/vue.js"></script>
<script>
    const app = new Vue({
        el:"#app",
        data:{
            counter:0
        },
        methods:{
            add(){
                console.log("add Executed");
                this.counter++;
            },
            sub(){
                console.log("sub Executed");
                this.counter--;
            }
        }
    })
</script>
Understand mvvm in vue
- graphic
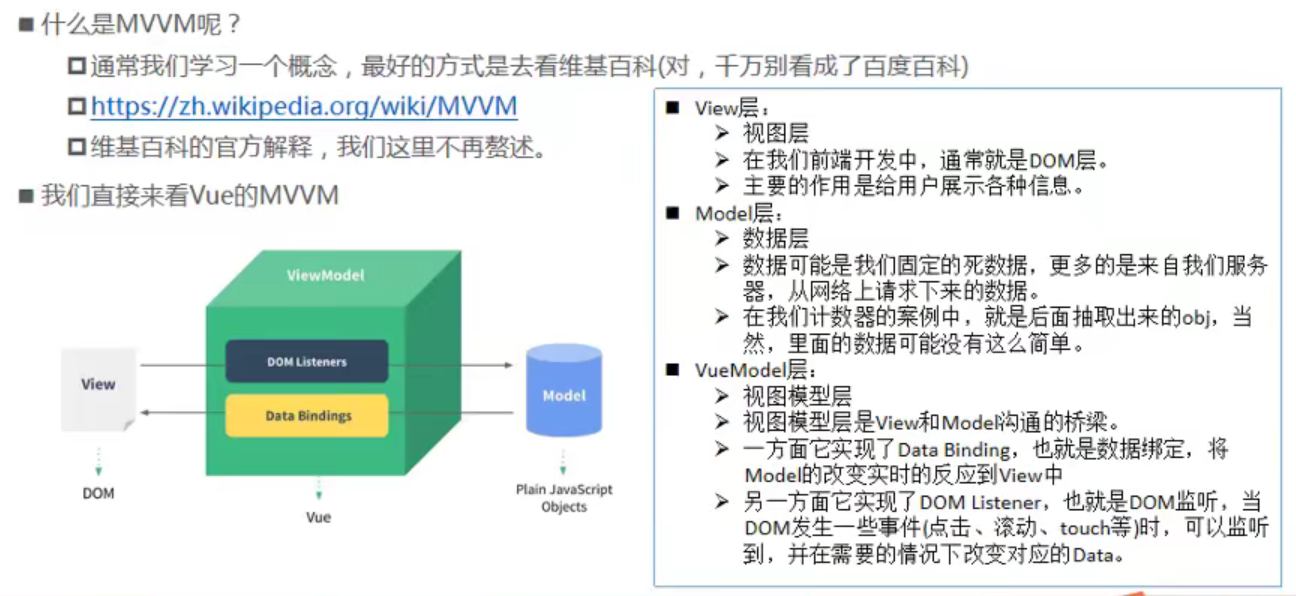
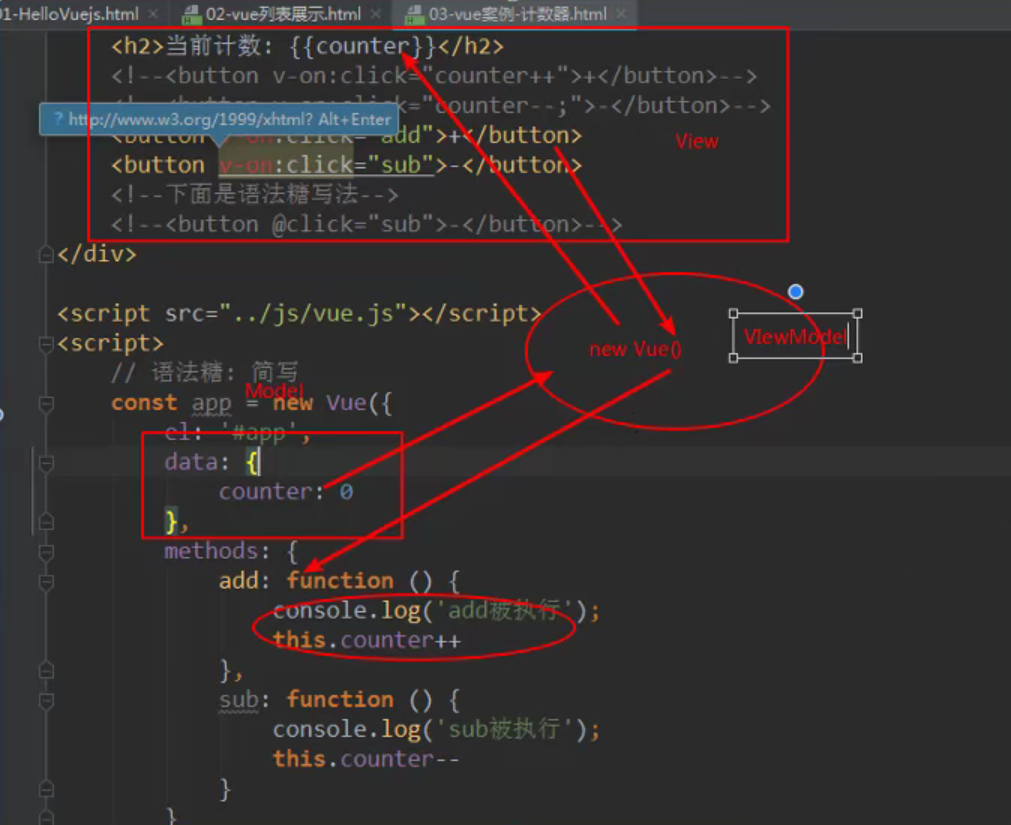
mvvm in counter case
options option (attribute of vue)
- el
- Type: string | HTMLElement
- Role: decide which DOM the Vue instance will manage
- data:
- Type: object|function (data in the component must be a function)
- Role: the data object corresponding to the Vue instance
- methods:
- Type: {[key:string]: Function}
- Function: define some methods belonging to Vue, which can be called in other places or used in instructions
Life cycle of vue
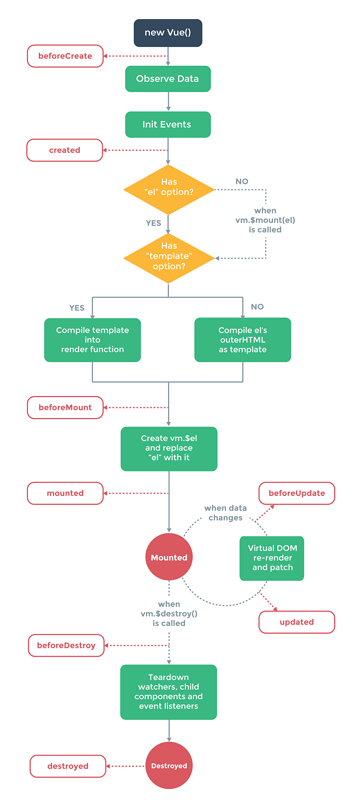
Life cycle: the process from birth to death.
The life cycle of vue is the process from creation to destruction. In this process, many time points, such as created and destroy, will call the methods we write. In these methods, we can specify js to do something at a certain time point of vue.
const app = new Vue({
        el:"#app",
        data:{
            counter:0
        },
        methods:{
            add(){
                console.log("add Executed");
                this.counter++;
            },
            sub(){
                console.log("sub Executed");
                this.counter--;
            }
        },
        created(){
            console.log("created");
        },
        mounted(){
            console.log("mounted");
        }
- vue life cycle diagram, each red box represents a writable method
Define templates for vue
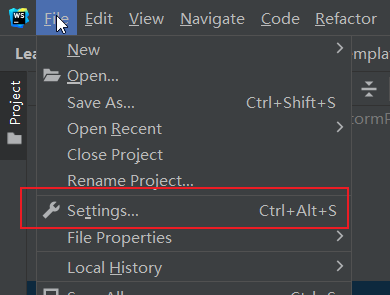
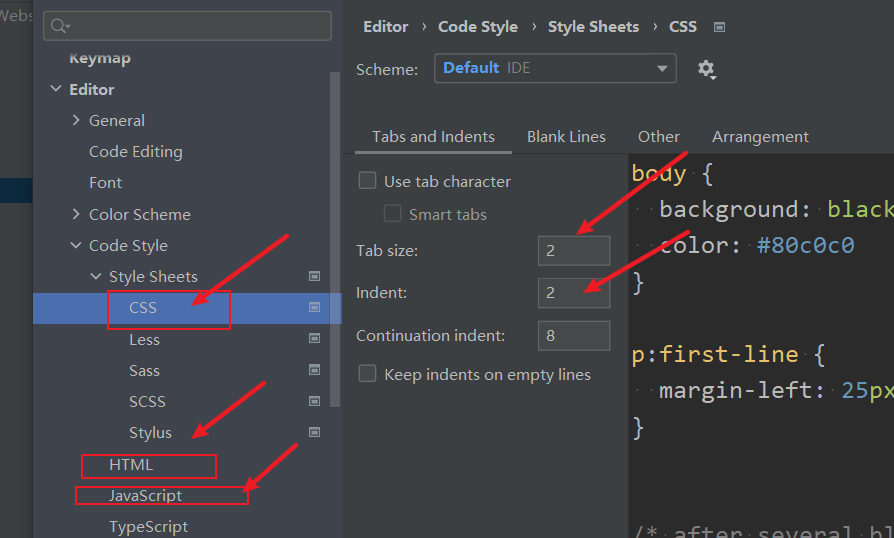
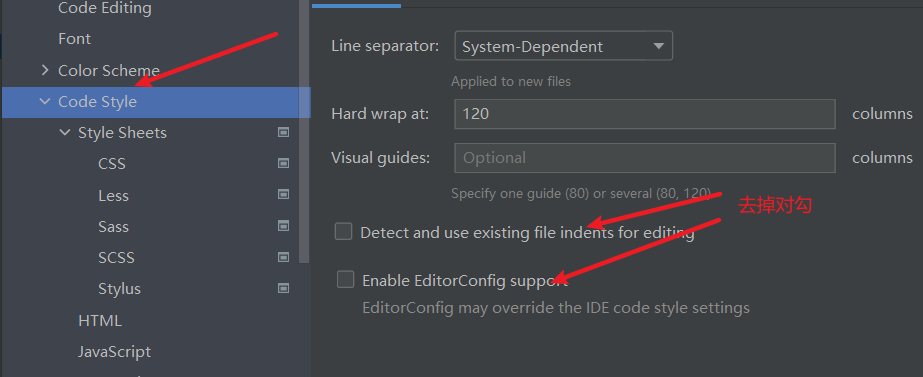
- Indented spaces
In front-end development, most programmers indent with 2 spaces, so we also use 2 spaces, but webStorm defaults to 4 spaces, which we can change
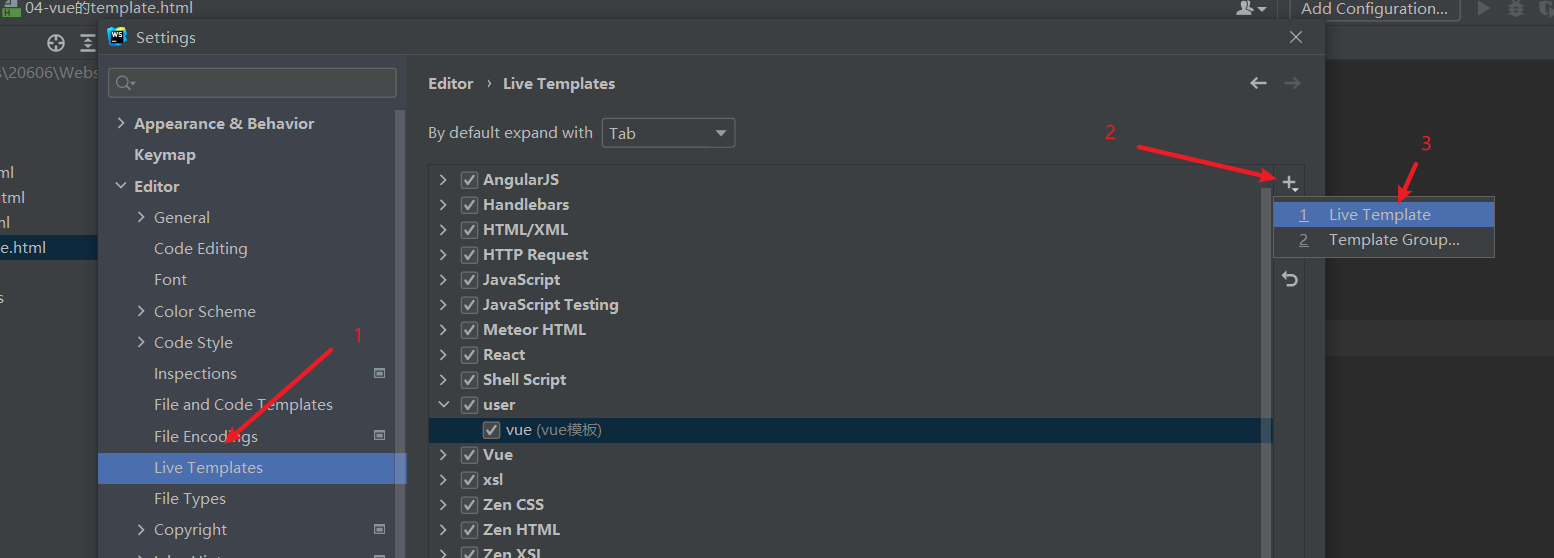
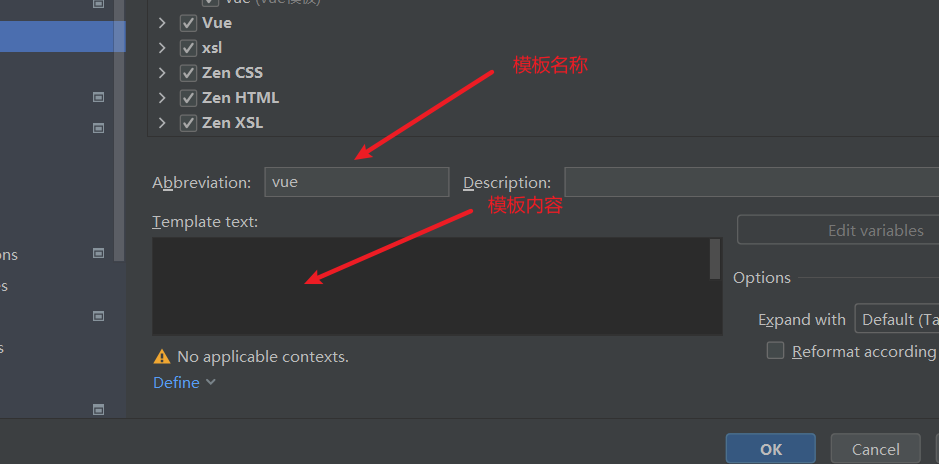
- There are some fixed formats when vue is written. We can set some templates
Here is my template
<div id="app">
  {{message}}
</div>

<script src="../js/vue.js"></script>
<script>
  const app = new Vue({
    el: "#app",
    data:{
      message: "How do you do"
    }
  })
</script>

Basic grammar
vue interpolation operation
mustache grammar
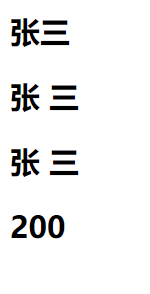
<div id="app">
  <h2>{{xing + ming}}</h2>
  <h2>{{xing + " " + ming}}</h2>
  <h2>{{xing}} {{ming}}</h2>
  <h2>{{counter * 2}}</h2>
</div>

<script src="../js/vue.js"></script>
<script>
  const app = new Vue({
    el: "#app",
    data:{
      xing: "Zhang",
      ming: "three",
      counter: 100
    }
  })
</script>
Influence of attributes on labels on interpolation
- v-once
When the message in {{message}} of the tag is changed, the value displayed in the changed tag remains unchanged - v-html
Processing rich text
<div id="app">
  <div v-html="message"></div>
</div>

<script src="../js/vue.js"></script>
<script>
  const app = new Vue({
    el: "#app",
    data:{
      message: "<a href='https://www.baidu. Com '> Baidu < / a >“
    }
  })
</script>

- v-text
Replace the label content with the value corresponding to the value of text. The following three are equivalent, message = "hello"
  <div v-text="message"></div>
  <div>{{message}}</div>
  <div v-text="message">Hello</div><!-- v-text Overwrites the original contents of the label -->

- v-pre
The contents of the label are displayed intact without vue rendering
<div v-pre >{{message}}</div>

- v-cloak
When vue is created, the attribute will disappear in the tag. It is often used to prevent vue from displaying data before rendering data, which is not friendly to users. The principle is that tags with changed attributes are hidden
<style>
  [v-cloak] {
    display: none;
  }
</style>
<div id="app">
  <div v-cloak>{{message}}</div>
</div>

<script src="../js/vue.js"></script>
<script>
  setTimeout(function (){
    const app = new Vue({
      el: "#app",
      data:{
        message: "Hello"
      }
    })
  },1000)
</script>
Dynamic binding attribute v-bind
Basic grammar
In vue, attribute binding is different from applet. You can't use mustache syntax directly. You need to use v-bind
Syntax: < tag v-bind: attribute name = "expression" > < / tag >
Syntax: < tag: attribute name = "expression" > < / tag > / / write colon only
In this way, the value returned in the write expression will be automatically bound to the property
<img v-bind:src="src" alt=""/>
<img :src="src" alt=""/>
    data:{
          src:'https://img.alicdn.com/imgextra/i1/1735000042/O1CN01gGDauN1CBHJnirwrz_!!0-saturn_solar.jpg_468x468q75.jpg_.webp',
      	url:'https://www.bilibili.com'
    }
Class attribute binding class / array
- The value bound to the class attribute can be not only a string, but also a class. The attribute of this class should be of boolean type. When the value of this attribute is true, vue will put the name of this attribute as the value on the value of class
<div :class="{active: true , line: true}"><h2>{{message}}</h2></div> - Of course, the value bound to the class attribute can also be an array, and vue will put all the values in the array on the class
<div :class="['active','line']"><h2>{{message}}</h2></div>
style property binding class / array
For the style attribute, you can also bind objects or arrays
- When binding an object, vue will treat the attribute name of the object as a css attribute, and the value corresponds to the value of the css attribute
< div: style = "{color: 'Red'}" > Hello < / div > - Bind array. The array is rarely used. The elements of the array must be objects. vue will bind each object in the array in the way of binding objects
< div: style = "[{color: 'Red'}, {fontsize: '50px'}]" > Hello < / div >

Calculation properties
Basic grammar
Sometimes the data we get can only be displayed on the front end after processing. For simple processing, such as addition and subtraction, we can solve it in mustache. It is more convenient to write a method for complex processing. This uses calculated attributes
vue object has a computed attribute. Its values are all methods. Write the method name in mustache to get its return value.
<div id="app">
  {{fullName}}
  Total price:{{allPrice}}
</div>

<script src="../js/vue.js"></script>
<script>
  const app = new Vue({
    el: "#app",
    data: {
      firstName: "Zhang",
      lastName: "three",
      fruits: [
        {name: "Peach", price: 30},
        {name: "Banana", price: 20},
        {name: "watermelon", price: 50},
        {name: "Golden Apple", price: 100},
      ]
    },
    computed: {
      fullName(){ //Splice string
        return this.firstName + this.lastName;
      },
      allPrice(){ //Sum
        return this.fruits.reduce((sum,item)=>{
          return sum + item.price;
        },0)
      }
    }
  })
</script>
principle
Take fullName as an example. In vue's computed, the following two codes are equivalent. The former is the abbreviation of the latter
fullName: function (){
 return this.firstName + this.lastName;
},
fullName: {
  get: function (){
    return this.firstName + this.lastName;
  }
}
In other words, fullName is essentially an object. When it is needed, it will call the get method to return the value.
Of course, it also has a set method, but it is rarely used. It will be called when the fullName value changes, and if there is no set method, the fullName value cannot be changed
fullName: {
  set: function (value){
    console.log(value);
  },
  get: function (){
    return this.firstName + this.lastName;
  }
}
Differences between methods and computed
You will find that writing a method in methods to process our data and return it can also achieve the effect of calculated. What's the difference between them?
Computed has a cache. When the data is called many times, methods will call the method many times, while using computed will only call it once, which greatly improves the efficiency. And when the data used in the method changes, vue will get the calculated value from the new value to the cache. It is recommended to use computed to process data
<div id="app">
  {{fullName}}
  {{fullName}}
  {{fullName}}
  {{fullName}}
  {{getFullName()}}
  {{getFullName()}}
  {{getFullName()}}
  {{getFullName()}}
</div>

<script src="../js/vue.js"></script>
<script>
  const app = new Vue({
    el: "#app",
    data: {
      firstName: "Zhang",
      lastName: "three",
    },
    methods: {
      getFullName: function (){
        const fullName = this.firstName + this.lastName;
        console.log("getFullName():"+fullName)
        return fullName;
      }
    },
    computed: {
      fullName: {
        set: function (value){
          console.log(value);
        },
        get: function (){
          const fullName = this.firstName + this.lastName;
          console.log("fullName:"+fullName)
          return fullName;
        }
      }
    }
  })
</script>
You can see that getFullName is called four times and fullName's get method is called once

v-on event binding
Basic grammar / grammar sugar / pass parameter problem
Basic syntax: the former click is the name of the listening event, and the latter is the name of the function to be called
<button v-on:click="click" v-text="message"></button>
Syntax sugar: v-on: equivalent to@
<button @click="click" v-text="message"></button>
How to pass parameters: $event represents the event object, and ordinary variables are from app Get from data
< button @ Click = "click2()" v-text = "message" > < / button > / / an error will be reported
< button @ Click = "click2" v-text = "message" > < / button > / / an event object is passed in. It can not be received
< button @ Click = "click2 (name)" v-text = "message" > < / button > / / pass in the specified variable
< button @ Click = "click3 ($event, name)" v-text = "message" > < / button > / / pass in the event object and the specified variable
- js code
<script src="../js/vue.js"></script>
<script>
  const app = new Vue({
    el: "#app",
    data: {
      message: "How do you do",
      name: "Zhang San"
    },
    methods: {
      click(){
        console.log("The button was clicked");
      },
      click2(name){
        console.log(name);
      },
      click3(event,name){
        console.log(name);
        console.log(event);
      }
    }
  })
</script>
Modifier
Syntax: @ event name Modifier = "call method"
- . stop preventing event bubbling is equivalent to event stopPropagation()
<button @click. Stop = "click2" > button < / button > - . prevent prevents native listening events, such as form submission, which is equivalent to calling event preventDefault
<form action="www.baidu.com">
  <input type="submit" value="Button" @click.prevent="click1"/>
</form>
- . The callback is triggered only when the {keyCode|keyAlias} event is triggered from a specific key
<input @keyup. Enter = "Keyup" / > / / press enter and lift it up before triggering - . Native listens for native events of the component root element
- . once indicates that a callback is issued
Conditional judgment
Judge whether a label is displayed by conditions
Syntax:
< tag name v-if = "Boolean expression" > < / tag name >
< tag name v-else-if = "Boolean expression" > < / tag name >
< tag name v-else > < / tag name >
   <div v-if="score >= 90">excellent</div>
  <div v-else-if="score >= 80">good</div>
  <div v-else-if="score >= 60">pass</div>
  <div v-else>fail,</div>
a minor question
vue caches the tags to be displayed during the underlying implementation. When v-if is true, it can be used after modifying the parameter values such as id and class. However, the value of the input tag will not be modified, which will cause the value of the input tag to not be empty when it is displayed.
Solution: add the key attribute to the tags that we don't need to cache. If the keys of the tags are different, they won't use each other.
<span v-if="isUser">
    <div>user name</div>
    <input type="text" placeholder="enter one user name" key="username" />
</span>
<span v-else>
    <div>mailbox</div>
    <input type="text" placeholder="Please enter email address" key="email" />
</span>
v-show and v-if
The function of v-show is similar to that of v-if. When the value of v-show is true, the tag will be displayed. Otherwise, it will not be displayed.
Difference: when v-show is false, vue will add display:none to the tag style, while when v-if is false, the tag will not exist in html at all
Suggestion: use v-show when the label content is frequently displayed and hidden, and use v-if when the label display switching is not frequent
Loop traversal
Traversal array
Syntax < tag name v-for = "(element variable, subscript variable) in array name" > < / tag name >
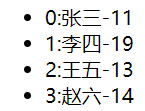
<ul>
  <li v-for="(item,index) in message" :key="item.name" >{{index + ":" + item.name + "-" + item.age}}</li>
</ul>
message: [
  {name: "Zhang San", age: 11},
  {name: "Li Si", age: 19},
  {name: "Wang Wu", age: 13},
  {name: "Zhao Liu", age: 14},
]
Note: item and index do not have to be written. You can write only one. When writing one, you can write it without parentheses
Note: it is recommended to add an attribute: key to specify the unique identification of array elements, so that the data will be updated faster when modifying the array.
Traversal object
Syntax < tag name v-for = "(value, variable name, subscript) in object name" > < / tag name >
<ul>
  <li v-for="(value,key,index) in person" >{{index + ":" + key + "-" + value}}</li>
</ul>
data: {
 person: {name: "Zhang San", age: 11, gender: "male"},
}
Rendering of arrays
When directly changing the value of an element in the array, the data in the array will indeed change, vue does not render the changed data to the interface. For example: this array[0]=3;
When you use methods in an array to manipulate elements, vue updates the data. For example: array push(3)
If the element of the array is an object, changing the attribute value of the object will vue render the modified data to the interface
If you want to add, modify, or delete elements in an array, you'd better use the method that comes with the array.
filter
When displaying a lot of data, we may modify the data format and then display it. We can use filtering to facilitate our implementation
Syntax: {{data to process | filter name}}
Filter is a method written in the filters attribute of vue. The parameter is the data you want to process, the return value is the parameter you processed, and the method name is the name of the filter
  const app = new Vue({
    el: "#app",
    data: {
    },
    filters: {
      getPrice (price) {
        return "¥" + price.toFixed(2);
      }
    }
  })
Note: the filter is different from the calculation attribute. The filter is a method for processing multiple data. Calculation attribute is to process the existing data to obtain a value, which can be regarded as a variable.
v-model
v-model is used to bind attributes in both directions. When the value of the input tag in the form is modified, the bound data in data is modified, the bound data is modified, and the value in the input tag is modified
Binding input box
Syntax: < input type = "text" V-model = "message" / > {{message}}
<div id="app">
  <input type="text" v-model="message"/>{{message}}
</div>

<script src="../js/vue.js"></script>
<script>
  const app = new Vue({
    el: "#app",
    data: {
      message: "How do you do"
    }
  })
</script>
Bind radio tag
When modifying the radio tag, write the value set by the radio and let different radios bind the same value with v-model. When a radio is selected, the bound value will change to the corresponding value of the radio. When the bound value changes, the radio corresponding to the value will be selected. When the binding value has a default value, the radio of the page will also be selected by default.
  <label>
    <input type="radio" value="male" v-model="value">
  </label>male
  <label>
    <input type="radio" value="female" v-model="value">
  </label>female
  <script src="../js/vue.js"></script>
<script>
  const app = new Vue({
    el: "#app",
    data: {
      message: "How do you do",
      value: "male"
    }
  })
</script>
Bind checkbox tag
Radio
When the type of the bound value is Boolean, the check box is selected to be true, and unchecked to be fasle
Note: as long as the bound value is Boolean, no matter how many checkbox es are bound and whether the value attribute has a value, it will be the above situation. The bound value is true, all check boxes are selected, and false, all check boxes are not selected
Syntax: < input type = "checkbox" V-model = "isselect" >
Checkbox
When the bound value is of array type, selecting a check box will add the value to the array, unchecking will remove the element, and modifying the bound array will also uncheck the corresponding check box
Syntax:
<input type="checkbox" value="sing" v-model="like">sing
<input type="checkbox" value="jump" v-model="like">jump
<input type="checkbox" value="rap" v-model="like">rap
<input type="checkbox" value="Basketball" v-model="like">Basketball
Bind select
Single choice
The binding value and the selected option will be bound in both directions. The binding value type should be the value type of option
Note: this binding value does not determine the binding method. What determines the binding method is whether the select tag has the multiple attribute
Syntax:
<label for="">
  <select name="like" id="" v-model="like">
    <option value="sing">sing</option>
    <option value="jump">jump</option>
    <option value="rap">rap</option>
    <option value="Basketball">Basketball</option>
  </select>
</label>
Multiple choice
The binding value and the selected option will be bound in both directions. The binding value type should be array
Note: the multiple attribute is added to the select tag
<label for="">
 <select name="like" v-model="like" multiple>
    <option value="sing">sing</option>
    <option value="jump">jump</option>
    <option value="rap">rap</option>
    <option value="Basketball">Basketball</option>
  </select>
</label>
Modifier
- lazy in the input box, the bound data will not be updated until you press enter or the cursor is removed from the input box
- Number when entering a number, the data type is automatically changed to the number type
- trim when there are spaces in the input text, the binding value will update the data without spaces
<input type="text"v-model.lazy="message">
<input type="number" v-model.number.lazy="age">
<input type="text" v-model.trim="name">
Component development (important)
Basic registration steps for components

- Create component constructor: use Vue's extend method to create, and the value of template is the content of the component
  // Create component constructor object
  const cpn = Vue.extend({
    template: `
      <div>
        <h2>I'm the title</h2>
        <p>I am the content,Ha ha ha ha</p>
        <p>I am the content,Hehe hehe</p>
      </div>`
  })
- Registered component: component name cannot be capitalized! No! No! The first parameter is the component name and the second is the component constructor object
// Register components
Vue.component("my-cpn", cpn);
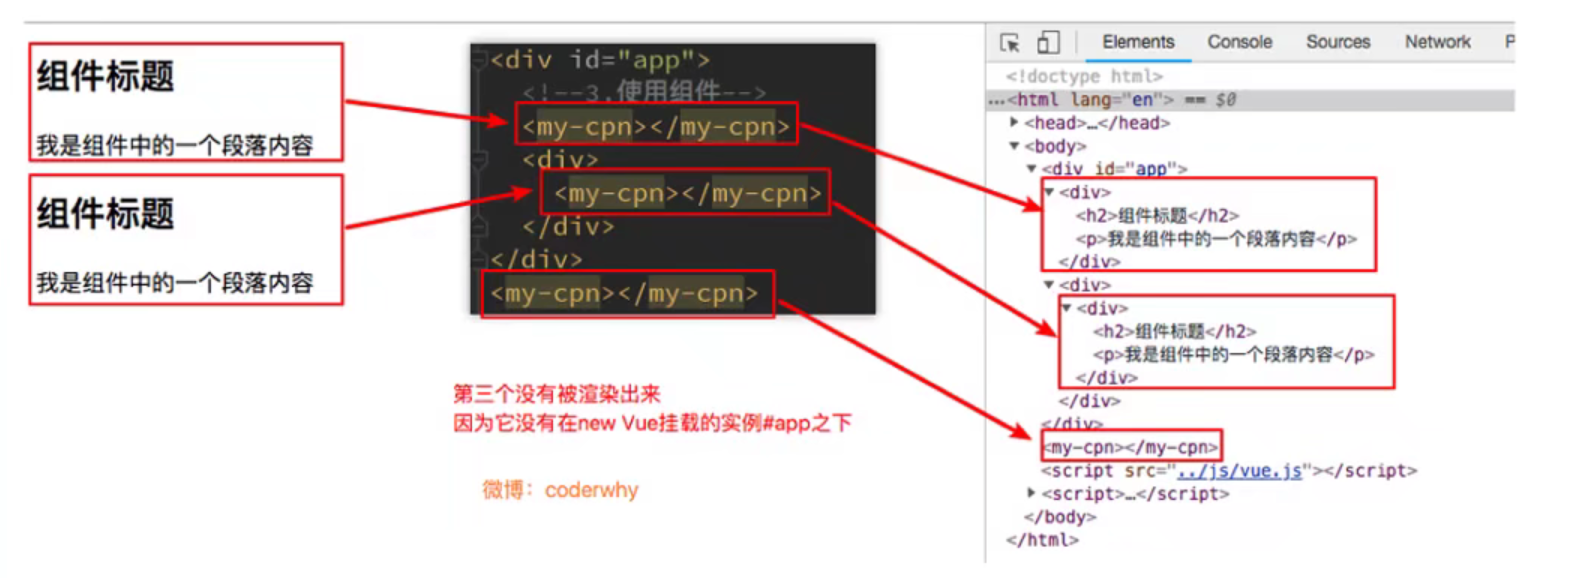
- Use component: the component name can be used as the tag name, and the component must be used in the tag controlled by vue
<my-cpn></my-cpn>
Global and local components
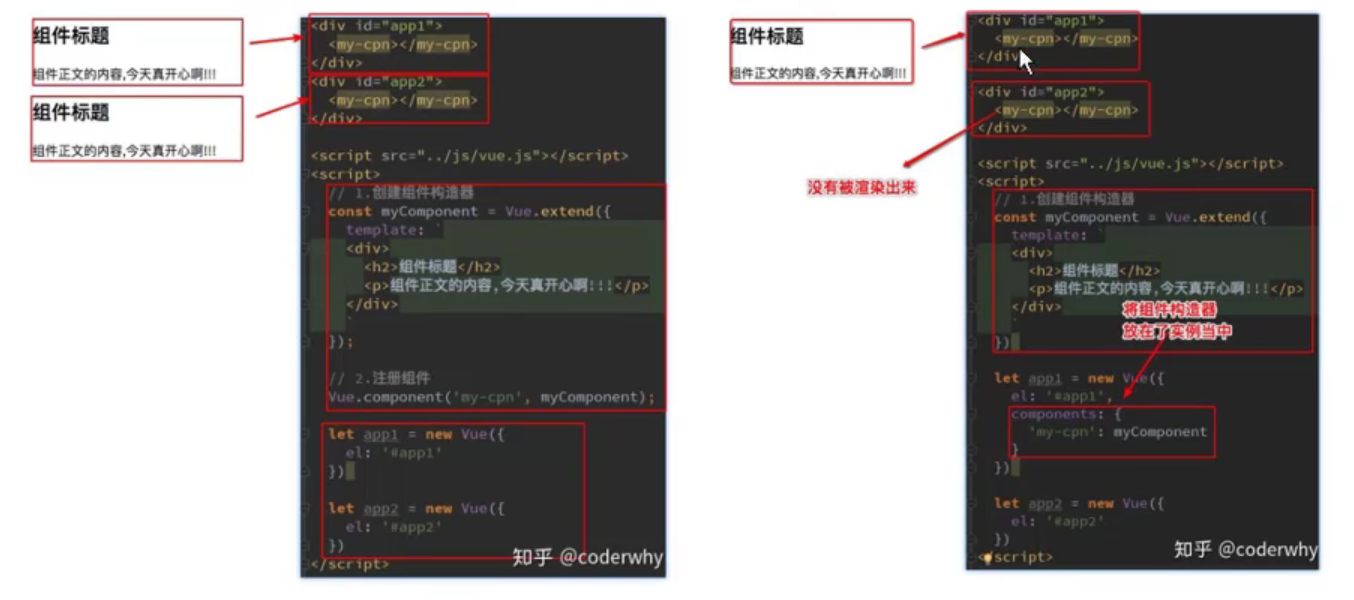
Global component: can be used in all vue mounted tags
Registration method: Vue component("cpn", cpn)
Local components can only be used in their corresponding Vue mounted tags
Registration method: when creating a vue instance, add a registered component in its components attribute. The attribute name is the component name and the value is the component object
const app = new Vue({
    el: "#app",
    data: {
    },
    // Local component registration
    components: {
      cpn: cpn
    }
  })
Parent child component
Components can also be used in components. The components of the components used are called parent components, and the components used are called child components.
You can use a component by registering it in the components property.
Note that when we use a component, we cannot use a child component registered with a child component unless we register the component
const cpn = Vue.extend({
  template: `
    <div>
      <h2>I'm the title</h2>
      <h4>I am the content</h4>
      <cpn2></cpn2>
    </div>
  `,
  components: {
    cpn2: cpn2
  }
})

Syntax for registering components
Global registration: do not write Vue extend
Vue.component("cpn", {
  template: `
	<div>
	  <h2>I'm the title</h2>
	  <h4>I am content 2</h4>
	</div>`
})
Partial registration:
components: {
 cpn: {
    template: `
	  <div>
	    <h2>I'm the title</h2>
	    <h4>I am content 2</h4>
	  </div>`
  }
}

Template separation
- The first way to write
<script type="text/x-template" id="cpn">
  <div>
    <h2>I'm the title</h2>
    <h4>I am content 1</h4>
  </div>
</script>
- The second way to write
<template id="cpn">
  <div>
    <h2>I'm the title</h2>
    <h4>I am content 1</h4>
  </div>
</template>
Note: the template is only separated here, not the whole component. The following is the reference method,
components: {
  cpn: {
    template: `#cpn`
  }
}

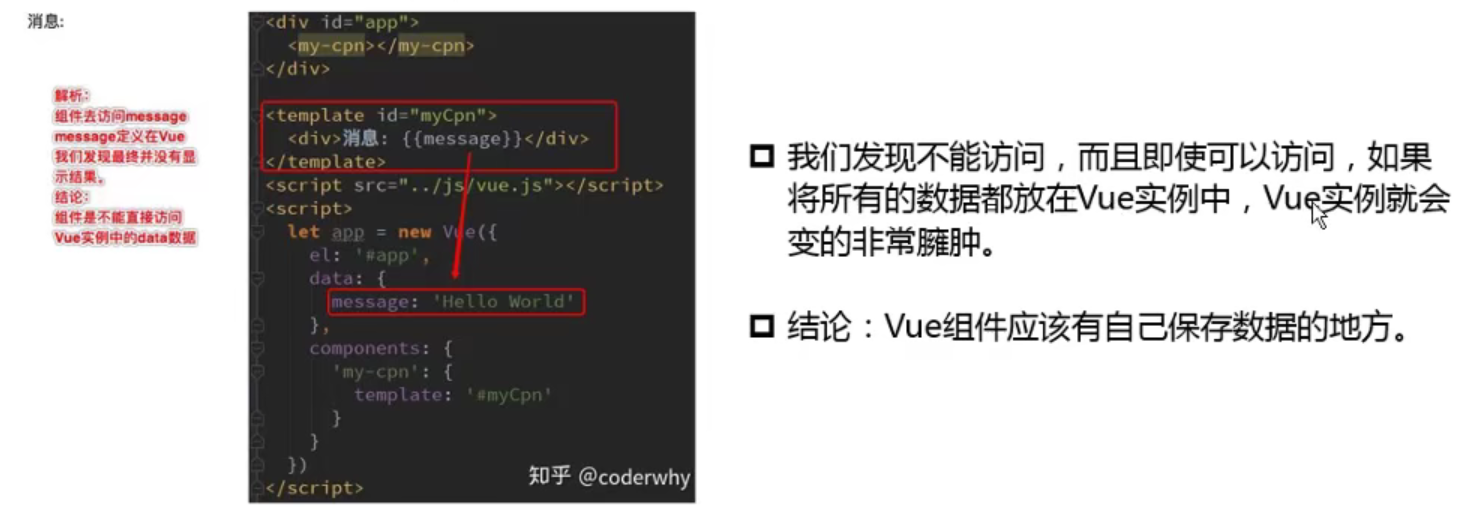
Component data storage
- Components can also bind data through data, but the component's data is a function, and the return value contains the data we want to bind. This is to prevent data synchronization when the component is used multiple times.
- Components can also have the methods attribute, and the usage is the same as before
- Note: when you need to bind data, the html of the component must be wrapped with a total div
The following is a small case of counter
<template id="cpn">
  <div>
    <div>Now the number is:{{number}}</div>
    <button @click="increment">+</button>
    <button @click="decrement">-</button>
  </div>
</template>
<script>
  Vue.component("cpn", {
    template: `#cpn`,
    data() {
      return {
        number: 0
      }
    },
    methods: {
      increment() {
        this.number++;
      },
      decrement() {
        this.number--;
      }
    }
  })
  const app = new Vue({
    el: "#app",
    data: {
    },
    components: {}
  })
</script>
Communication between parent and child components
Parent component communicates with child component
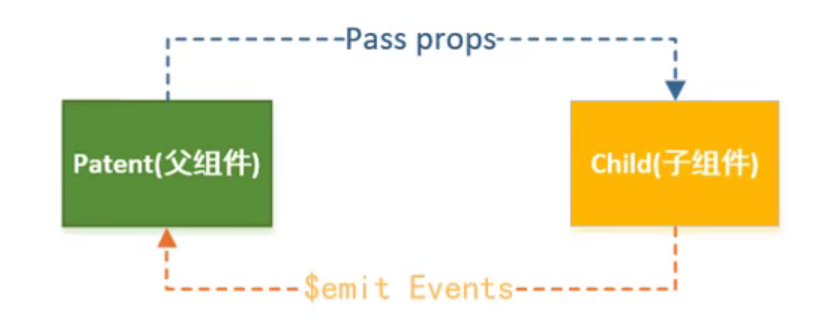
The parent component passes the value by adding attributes to the child component, and the child component receives the value through the props attribute, so that the child component can use the value passed by the parent component like using the data in data
- The subcomponent specifies the value to be passed
props: ["movies"] - This value is used by subcomponents
<template id="cpn">
  <div>
    <h2>{{movies}}</h2>
  </div>
</template>
- Parent component value transfer
<div id="app">
  <cpn  :movies="movies"></cpn>
</div>
The subcomponent can specify the type of the passed value and whether the default value is required, etc
props: {
  name: {
  	type: [String,Number],//Specify multiple types
  	default: 0 //Set defaults
  },
  movies: {
    type: Array,//Specify type
    default() { //Default value. The default value of an array or object must be the return value of a method
      return ["dominant sea power"]
    },
    required: true  //Whether the setting is required or not. In fact, it is not necessary to set this property after setting the default value
},
Note: the attribute name used by the parent component when transferring values cannot be capitalized. If the attribute name of props is capitalized, the parent component uses' - 'instead of my name < = > myname when transferring values
The child component communicates with the parent component
Subcomponents through this$ The emit method to trigger the custom event added by the parent component to the word label for communication
- The subcomponent invokes this. in the method. For the emit method, the first parameter is the user-defined event name, and the second parameter is the parameter of the method corresponding to the triggering event
click(item) {
  this.$emit("cpn-click", item);
}
- The parent component adds a custom event to the child component label, CPN click is the custom event, and cpnclick is the method triggered by the event
<cpn :movies="movies" @cpn-click="cpnClick"></cpn> - Perform the action to be performed in the method called by the event trigger
methods: {
  cpnClick(item) {
    console.log(item)
  }
},
Calculator case

Get parent and child component objects
Get child component object from parent component
The $children of the object in the parent component is an array of all direct child components of the component
console.log(this.$children);
When we want to obtain the specified sub component, when using the component, add ref = "sub component id", this$ refs. The sub component id is the component object
<cpn :msg="message" ref="mr3"></cpn>
console.log(this.$refs.mr3);
The child component gets the parent component object
It can be obtained through the $parent and $root attributes of the subcomponent
Note: This is not recommended in development, which will lead to high coupling between parent components. We use components to reduce the coupling between codes and improve the code reuse rate.
console.log(this.$parent);
console.log(this.$root);
slot usage
Basic grammar
At present, our components are not flexible enough. We can only import data. The parent component cannot specify what content it has. For some particularly similar but different modules, if we can only create multiple components, it is not flexible enough.
We can use the slot tag to solve this problem. Write this tag in the component. When the parent component uses the component, the content added in the component will replace the slot tag. Realize the control of component content.
<template id="cpn">
  <div>
    <h2>I'm the title</h2>
    <h4>I am the content</h4>
    <slot></slot>
  </div>
</template>
<cpn>I'm a slot</cpn>
Of course, components can also be set to add default values to slots. When using components, the default values will be used if there is no content in the component label.
<template id="cpn">
  <div>
    <h2>I'm the title</h2>
    <h4>I am the content</h4>
    <slot>I'm a slot/slot>
  </div>
</template>
<cpn></cpn>
If there are multiple labels in the component label, all contents will replace the slot label in the component
Named slot
Previously, a component had only one slot, and one slot was not flexible enough. We need to insert multiple slots. In order to specify what each slot should show, we need to have an identification, which means name. Add name to the slot. When using components, we can't add different values according to the name
<template id="cpn">
  <div>
    <slot name="left">left</slot>
    <slot name="center">middle</slot>
    <slot name="right">right</slot>
  </div>
</template>
<cpn>
  <div slot="left">I'm on the left</div>
  <div slot="center">I'm not on the right</div>
  <div slot="right">I am neither on the left nor in the middle</div>
</cpn>

Scope slot
When the parent component replaces the slot of the child component, the data of the child component is used
We can get the instance of the sub component (mentioned above). The # u data attribute is the data attribute of the sub component
There are other ways
<template id="cpn">
  <div>
    <slot :data="movies"></slot>
  </div>
</template>
<cpn ref="cpn">
   <div slot-scope="slot">
     <span>{{slot.data}}</span>
   </div>
</cpn>