vuex is a software developed specifically for Vue.js applications State management mode.
Centralized storage management is adopted to manage the state of all components of the application, and corresponding rules are used to ensure that the state changes in a predictable way.
Vue provides a unified management tool - VueX for these values frequently used by multiple components.
In a Vue project with VueX, we only need to define these values in VueX, which can be used in the components of the whole Vue project.
- Small projects (not applicable to vuex)
- Small and medium-sized projects (with store mode)
- Medium and large projects (vuex can be divided into modules)
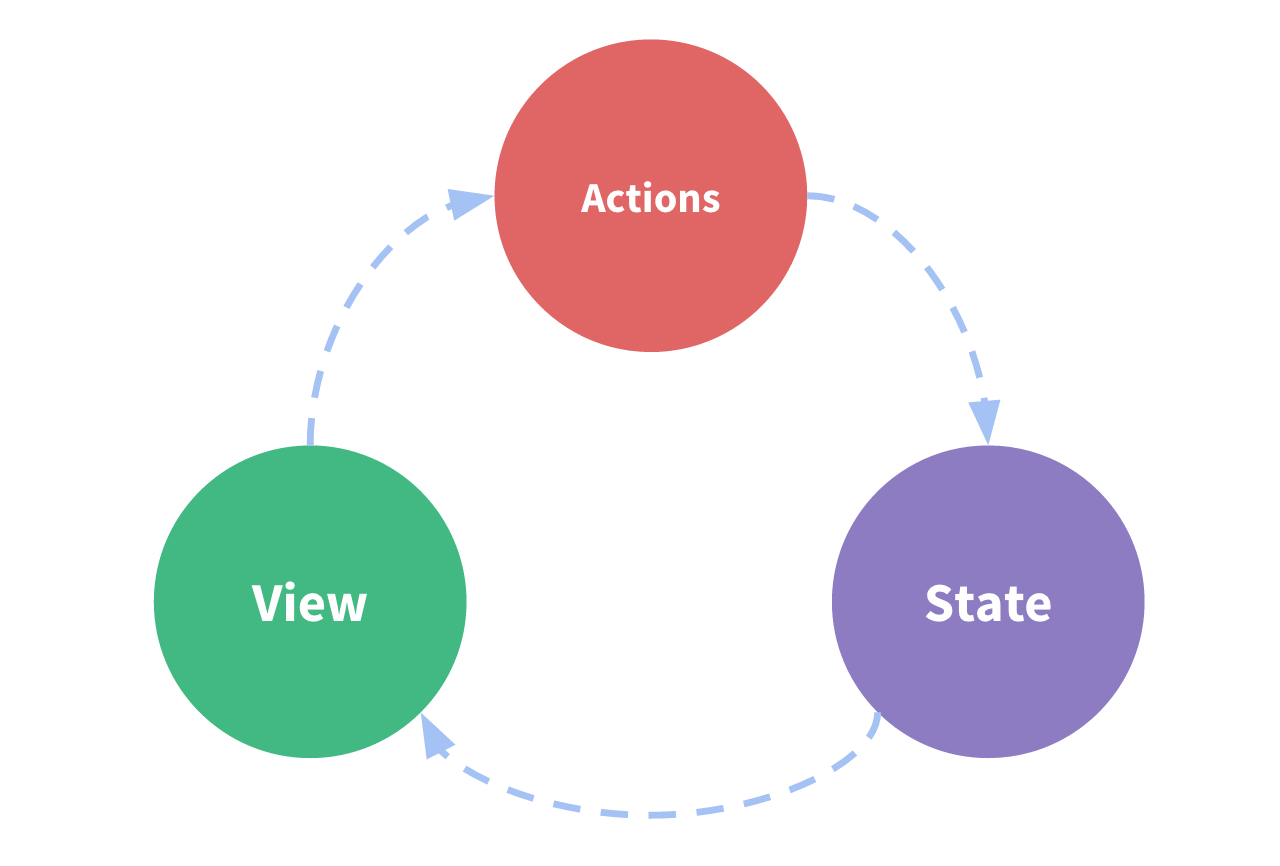
State management mode
The state management mode includes the following parts:
- Data source of state driven application
- View maps state to view declaratively
- actions responds to state changes caused by user input on the view
 We extract the shared state of components and manage it in a global singleton mode
In this mode, our component tree constitutes a huge "view". No matter where in the tree, any component can obtain status or trigger behavior.
Using vuex
Vuex can help manage shared state.
For small and medium-sized projects, which are not particularly large, vuex is relatively redundant, and the store mode can be used.
If you need to build a medium and large-scale single page application, you can use vuex to manage the external state of components.
Simple store mode
Create a new store.js as a temporary warehouse in the utils folder
export default{
    debug:true,
    state:{
        msg:"is store",
        name:'zhangsan'
    },
    actions:{
        getname(){
            console.log('zhangsan');
        }
    }
}
Get the data and methods in the store warehouse in the component
Home.vue
<template>
  <!-- {{state.msg}} -->
  <!-- <button @click="getname">click</button> -->
</template>
<script>
	import store from '../utils/store'
	export default {
	  data(){
	    return{
	      state:store.state
	    }
	  },
	  methods:{
	    ...store.actions
	  }
	}
</script>
Single state tree
vuex uses a single state tree, and one object contains all application level states.
Each application contains only one store instance.
The single state tree allows us to directly locate any specific state fragment, and easily obtain a snapshot of the current application state during debugging.
Installation and use of vuex
Installing vuex
npm i vuex -s
initialization
A new file index.js is added in the store folder
import { createStore } from 'vuex'
export default createStore({
  state: {
  	msg:'is store',
  },
  mutations: {
  },
  actions: {
  },
  modules: {
  }
})
Mount the store into the vue instance of the current project
main.js
import { createApp } from 'vue'
import App from './App.vue'
import router from './router'
import store from './store'

createApp(App).use(store).use(router).mount('#app')
Using vuex in components
State
Store data
state: {
	  	msg:'is store',
	  	...
},
Used in components
Home component
Method 1:
<template>
        {{$store.state.msg}} //Generally, it is not used in this way
</template>
Method 2: attribute calculation method
<template>
        {{msg}}; //Official recommended usage
</template>
<script>
 export default{
  computed:{
  	msg(){
  		return  this.$ store.state.msg; //Officially recommended
  	}
    }
  }
 </script>
Method 3: auxiliary function (common methods in the project)
<template>
        {{msg}};
</template>
<script>
import {{mapState}}  from 'vuex'  //auxiliary function
 export default{
   computed:{
  		...mapState(['msg']),
   },
  }
 </script>
getters
Vuex allows us to define "getter s" (which can be considered as the calculated attributes of the store) in the store.
Just like calculating attributes, the return value of getter will be cached according to its dependency, and will be recalculated only when its dependency value changes.
definition
  state: {
    books:['js01','js02','js03'],
  },
  getters:{
    GET_BOOK_NUM:(state,getters)=>{
      return state.books.length
    }
  },
use
Method 1: not recommended
<template>
{{$store.getters.GET_BOOK_NUM}}
</template>
Method 2: attribute calculation method
<template>
{{GET_BOOK_NUM}}
</template>
computed:{
    GET_BOOK_NUM(){
      return this.$store.getters.GET_BOOK_NUM
    }
}
Method 3: auxiliary function (commonly used in projects)
<template>
{{GET_BOOK_NUM}}
</template>
import {mapGetters} from 'vuex'
computed:{
      ...mapGetters(['GET_BOOK_NUM'])
}
mutations
The only way to change the state in Vuex's store is to submit the mutation.
The mutation in Vuex is very similar to events: each mutation has a string event type and a callback function (handler).
This callback function is where we actually change the state, and it will accept state as the first parameter
- No transmission parameter
definition
 state: {
	   num:0
	 },
mutations: {
    add(state){
      state.num++;
    }
 },
use
Method 1: traditional usage
<template>
{{num}}
<button @click="add">+</button>
</template>
methods:{
    add(){
      this.$store.commit('add')
    }
}
Method 2: auxiliary function
<template>
	{{num}}
	<button @click="add">+</button>
	</template>
	import {mapMutations} from 'vuex'  //auxiliary function
	methods:{
	    ...mapMutations(['add'])
	}
- Transmission parameter
definition
    state: {
	   num:0
	 },
	mutations: {
	    add(state,n){
	      state.num+=n;
	    }
     },
use
Method 1:
   <template>
	{{num}}
	<button @click="add(2)">+2</button>
   </template>
	add(){
      this.$store.commit('add',2)
     },
Method 2:
   <template>
	{{num}}
	<button @click="add(2)">+2</button>
   </template>
   //When passing parameters, you can pass them in a more readable way
	store.commit({type: 'add',num: 2})
In Vuex, mutation is a synchronous transaction
Action
Similar to mutation, except
- The Action submits the mutation instead of directly changing the status
- An Action can contain any asynchronous Action
definition
  actions: {
    async_add(context,n){
      setTimeout(() => {
        context.commit('add',2) //Here we can use the method in the mutation in the warehouse and it can be asynchronous!
      }, 2000); //Use asynchronous events in Action
    }
  },
use
Method 1: traditional usage
<template>
{{num}}
<button @click="async_add(2)">+2</button>
</template>
methods:{
	async_add(n){
      this.$store.dispatch('async_add',n)
    } //Traditional writing
 }
Method 2: auxiliary function
<template>
{{num}}
<button @click="async_add(2)">+2</button>  //Asynchronous. Add 2 in two seconds
</template>
import {mapActions}  from  'vuex'
methods:{
	...mapActions(['async_add']) //auxiliary function
 }
module
Due to the use of a single state tree, all the states of the application will be concentrated in a relatively large object. When the application becomes very complex, the store object may become quite bloated.
Vuex allows us to split the store into modules. Each module has its own state, mutation, action, getter, and even nested sub modules.
For the mutation and getter inside the module, the first parameter received is the local state object of the module.
For action s inside the module, the local state is exposed through context.state, and the root node state is context.rootState
In the store folder, create a new module subfolder as the sub module, and in the module module, create home.js as the sub warehouse home
Namespace
By default, the action, mutation and getter inside the module are registered in the global namespace -- this enables multiple modules to respond to the same mutation or action.
Make the sub module a module with namespace by adding named: true.
When a module is registered, all its getter s, action s and mutation s will be automatically named according to the path of module registration.
After the module is divided, the value taking method can be changed appropriately to facilitate our value taking:
Sub warehouse store/module/home.js
export default{
    namespaced:true,//Open namespace
    state(){
        return{
            name:'home'
        }
    }
}
Main warehouse / index.js
import { createStore } from 'vuex'
import home from './modules/home'  //Import sub warehouse into general warehouse
export default createStore({
  state: {
    name:app,
    msg:'is store',
    num:0
  },
 })
Use Home.vue in component
<template>
  {{msg}}
  {{num}}
  {{name}}
</template>
<script>
import {mapState} from 'vuex'
export default{
 computed:{
 	...mapState('home',['name']), //The name in the home warehouse is displayed as home
 	...mapState(['name']);Default to the primary warehouse name Value, is app ;The following will overwrite the above, which is displayed in the page name Value is app
 	...mapState(['msg','num']), //There are msg and num in the main warehouse, which are displayed directly
 	...mapState({
 		 home_name: (state)=>{state.home.name}, //Read the name value in the home warehouse, which is home
 		 name:(state)=>{state.name} //Read the name value in the main warehouse, which is app
 		 //Rename the name in different warehouses to make the name different
  }),
 }