Vue learning notes (II)
Personal blog (welcome): Vue learning notes (II) (red, blue and purple)
Single page application SPA means that there is only one HTML page in a Web site, and all functions and interactions are completed in this unique page.
1. vue-cli
Vue cli is Vue JS development standard tools.
1.1 installation
npm install -g @vue/cli
1.2 some file functions of Vue project
vue via main JS app vue render to index HTML in the specified area.
- App.vue is used to write the template structure to be rendered
- index.html needs to reserve an el area for rendering
- main.js app Vue render to index HTML reserved area
$(mount) usage:
import Vue from 'vue'
import MyCom from './components/myComponent'

Vue.config.productionTip = false

// new Vue({
//   el: '#app',
//   render: h => h(MyCom),
// })

new Vue({
  render: h => h(MyCom)
}).$mount('#app') //$(mount) is used in the same way as the el attribute above
2. Components
Component development: encapsulate the reusable UI structure on the page into components, so as to facilitate the development and maintenance of the project
Vue supports component-based development. The suffix of the component is * * vue**
Each vue components can be composed of three parts:
- Template: the template structure of the component (which must be included). There can only be one root node
- script: Javascript behavior of components
- Style: the style of the component
<template>
    <div>
        <h2>user name:{{ username }}</h2>
    </div>
</template>

<script>
export default {
    // data: {
    //     username: 'admin'
    // }        //. The data source in vue file cannot be in the form of object, but should be in the form of function

    data() {
        return {
            username: 'admin'
        }
    }
}
</script>

<style>
    div>h2 {
        color: red;
    }
</style>
Use less in vue:
<style lang="less">
    .box {
        background-color: pink;
        h2 {
            color: red;
        }
    }
</style>
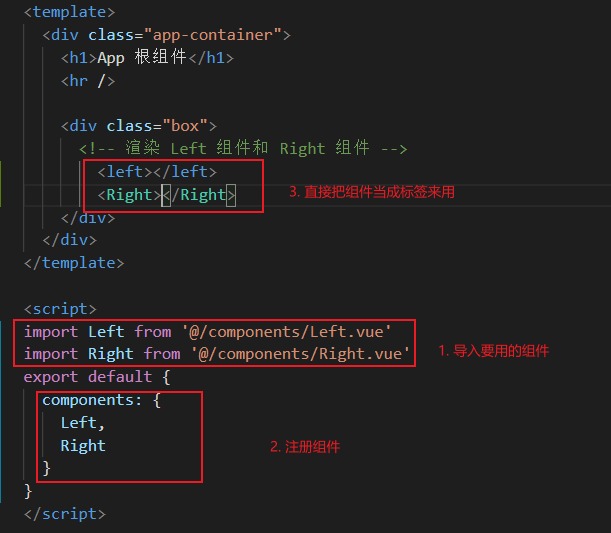
2.1 three steps for component use
- Use the import syntax to import the components to be used
- Register components in the components node
- Directly use the component as a label where you want to render
2.2 register global components
The above method of registering components is private registration, that is, every component that needs to be used frequently needs to be registered repeatedly. At this time, you can directly in main JS to register global components
import Vue from 'vue'
import App from './App.vue'
import Test from './components/Test.vue' //Import global components to register

Vue.config.productionTip = false

Vue.component("Mytest", Test) //Using Vue Component () to register global components. The first parameter is the name of the component to be registered, and the second parameter is the component to be registered

new Vue({
  render: h => h(App),
}).$mount('#app')
2.3 props of components
Props is a user-defined attribute of a component. When encapsulating a general component, the rational use of props can improve the reusability of the component and allow the user to specify the initial value for the current component through the user-defined attribute

props is read-only.
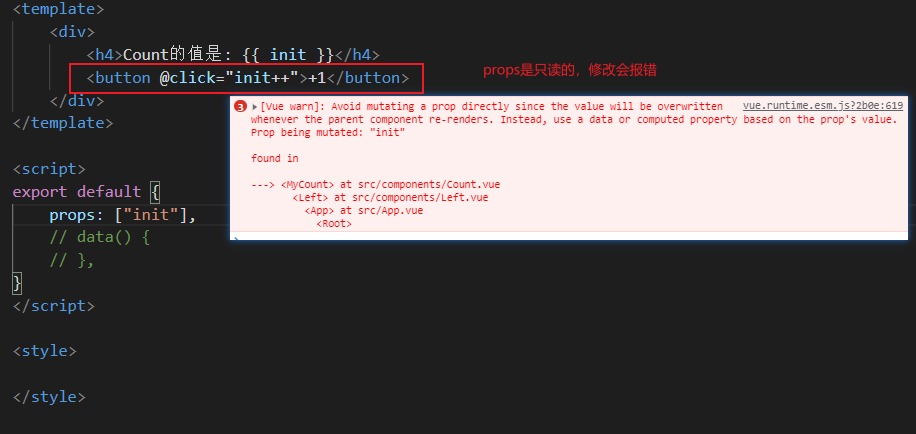
To modify, you can assign the obtained initial value to the attribute in data, and then modify it. The value of the attribute in props will always be the initial value

Default attribute, type attribute and required attribute: if the user does not pass the init attribute when using the component, the default value will take effect
Examples of usage syntax:
props: {
    init: {
        default: 0,  //Use the default attribute to define the default value of the attribute
        type: Number,  //Limit the type of the attribute passed. If it does not match, an error will be reported
        required: true,  //When set to true, parameters must be passed, otherwise an error will be reported even if there is a default value
    }
},
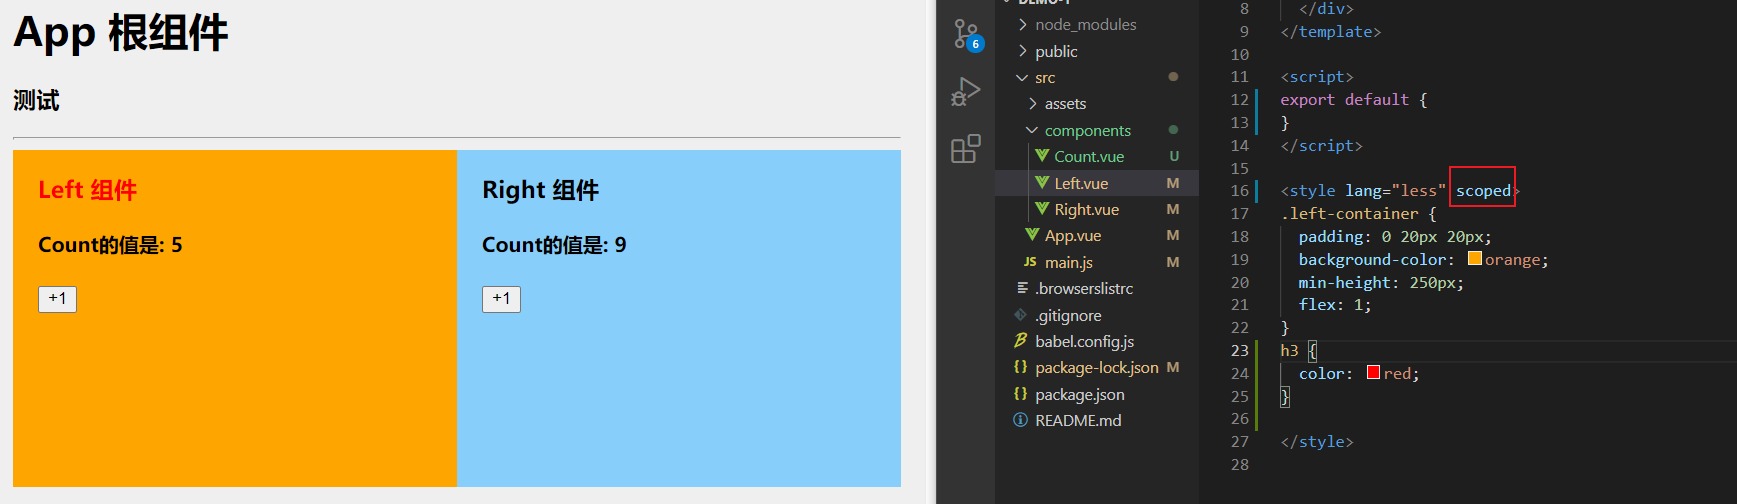
2.4 style conflicts between components
By default, it is written in * * The styles in vue components will take effect globally * *, so it is easy to cause style conflicts among multiple components
Causes of style conflicts between components:
- In a single page application, the DOM structure of all components is based on a unique index HTML page rendering
- The style in each component will affect the whole index All DOM elements in the HTML page

By adding the "scoped" attribute to the style tag of the component to be styled, you can achieve a style that does not affect other components
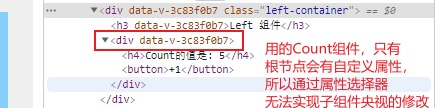
Principle: give a custom style to all labels in the component, and then implement the style through the attribute selector, which will only affect the component
The above code using "scoped" does not use the "scoped" attribute:
<template>
  <div class="left-container" data-d-001>
    <h3 data-d-001>Left assembly</h3>
    <MyCount :init="5" data-d-001></MyCount>
  </div>
</template>

<script>
export default {
}
</script>

<style lang="less">
.left-container {
  padding: 0 20px 20px;
  background-color: orange;
  min-height: 250px;
  flex: 1;
}
h3[data-d-001] {
  color: red;
}

</style>
If you only use "scoped", you cannot modify the style of other components used alone
If you want some styles to work on subcomponents, you can use * * / deep / depth selector**
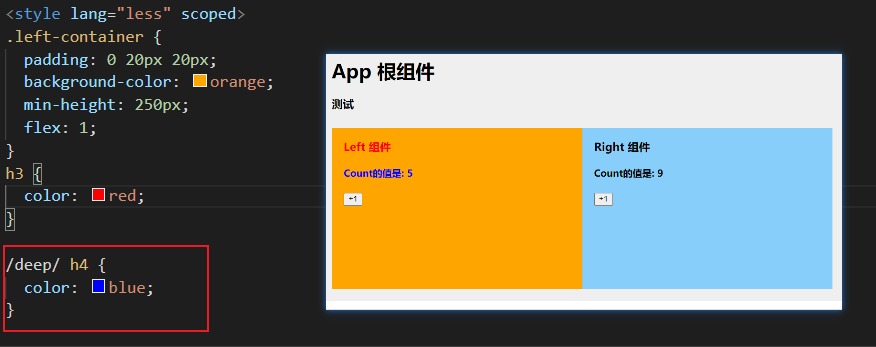
View the effective style through the browser:
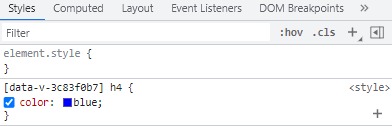
The use of attribute selectors does not necessarily depend on other selectors. Using them alone means that all elements with corresponding attributes are selected
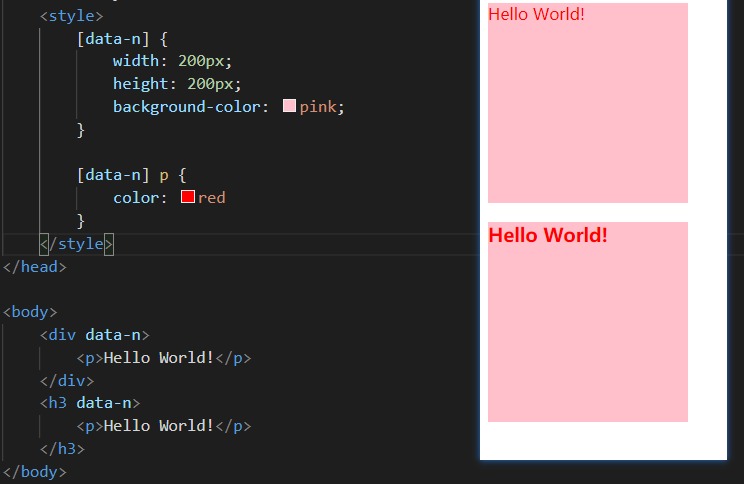
3. Component life cycle
Life cycle refers to the whole phase of a component from creation - > operation - > destruction, emphasizing a time period
Life cycle function: the built-in function provided by vue framework will be automatically executed in order along with the life cycle of components.
Life cycle emphasizes time period, and life cycle function emphasizes time point
Classification of component lifecycle functions:
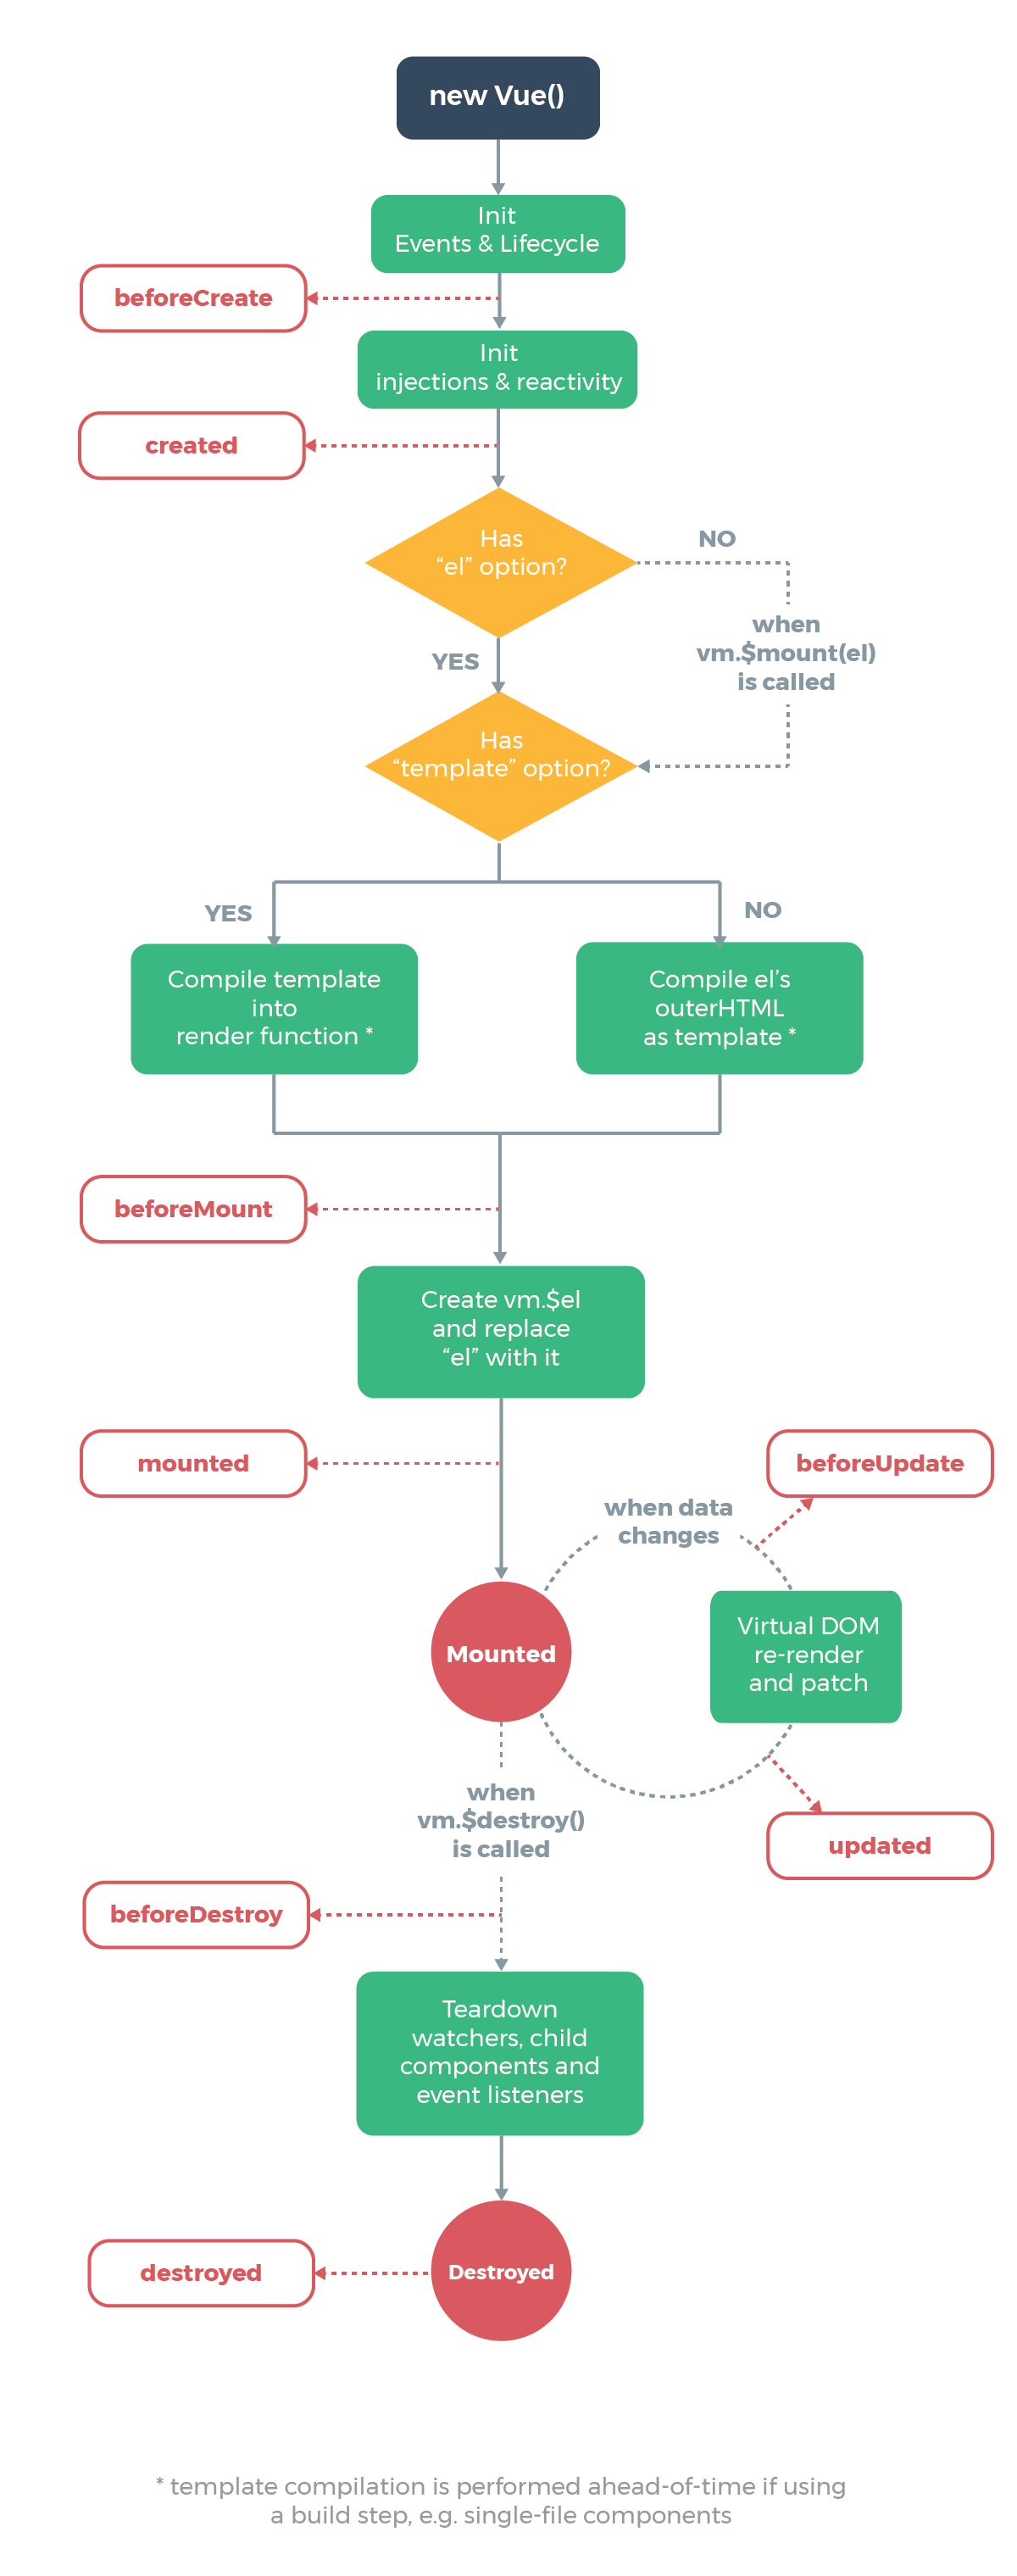
Life cycle diagram:
3.1 component creation phase
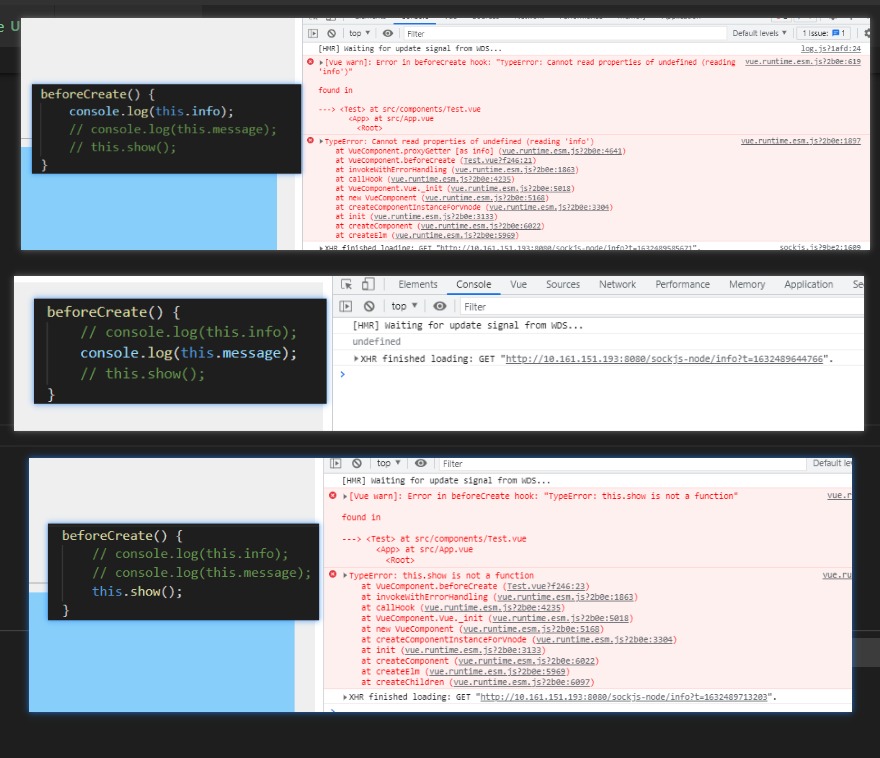
3.1.1 beforeCreate()
props, data and methods of the component have not been created and are unavailable
<template>
  <div>
      <h2>test assembly</h2>
  </div>
</template>

<script>
export default {
    props: ['info'],
    data() {
        return {
            message: 'message'
        }
    },
    methods: {
        show() {
            console.log('show');
        }
    },
    beforeCreate() {
        // console.log(this.info);
        // console.log(this.message);
        this.show();
    }

}
</script>

<style>

</style>
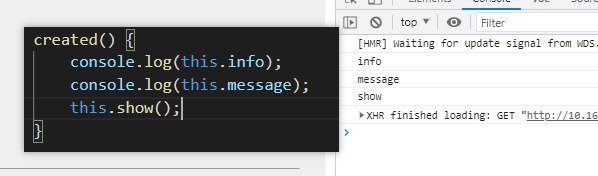
3.1.2 created()
props, data and methods of the component have been created and are available.
The created method is very important. It often calls the methods method inside to request the data of the server, and transfers the requested data to the data for rendering, because the data should be requested as early as possible.
<template>
<div>
<h2>share {{ books.length }} This book</h2>
</div>
</template>
<script>
export default {
props: ['info'],
data() {
return {
message: 'message',
books: [],
}
},
methods: {
show() {
console.log('show');
},
initBooklist() {
const xhr = new XMLHttpRequest();
xhr.open('get', 'http://www.liulongbin.top:3006/api/getbooks');
xhr.send(null);
xhr.addEventListener('load', () => {
const result = JSON.parse(xhr.responseText);
this.books = result.data;
}) //Example of using ajax to get book information
}
},
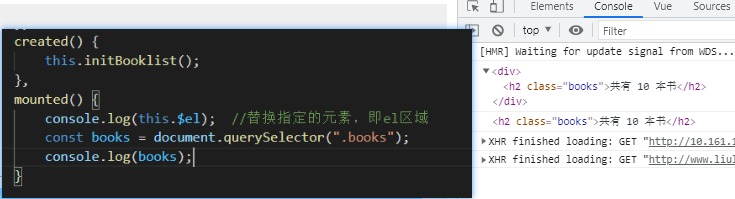
created() {
this.initBooklist();
}
}
</script>
<style>
</style>
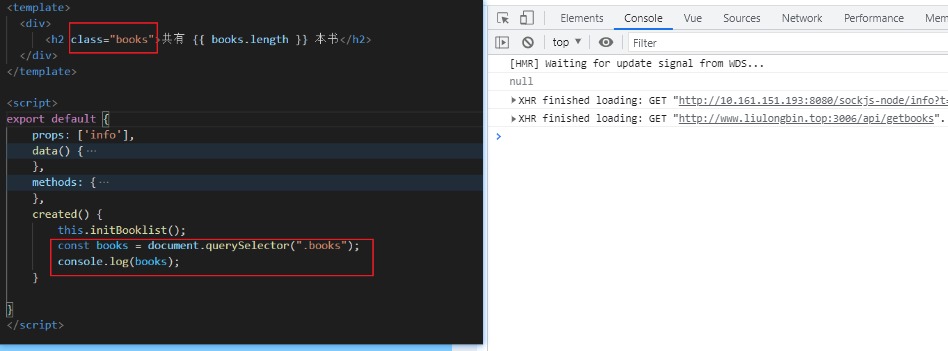
The template structure of the component has not been generated (DOM node cannot be operated now)
3.1.3 beforeMount()
The HTML structure compiled in memory will be rendered to the DOM structure of the current component

3.1.4 mounted()
Important, to operate the dom of the current component, you can only successfully render the HTML structure in memory to the browser in the mounted stage at the earliest. At this time, the DOM structure of the current component has been included
3.2 operation phase of components
3.2.1 beforeUpdate()
The template structure of the component will be re rendered according to the changed and latest data. (that is, the data in the data has changed, but the data in the DOM element has not changed in time)
<template>
  <div>
      <h3>
          For test run phase message:
          <span>{{ message }}</span>
      </h3>
      <button @click="datachange">change data</button>
  </div>
</template>

<script>
export default {
    props: ['info'],
    data() {
        return {
            message: 'Hello',
        }
    },
    methods: {
        datachange() {
            this.message += '!';
        }
    },
    beforeUpdate() {
        const span = document.querySelector('h3 span');

        console.log('data Data in:' + this.message);
        console.log('DOM Data in:' + span.innerHTML);
    }

}
</script>

<style>

</style>

3.2.2 updated()
The re rendering of the component DOM structure has been completed
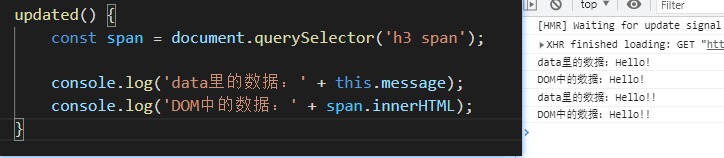
When the data changes, if you want to operate the re rendered DOM, you should execute it in updated()
3.3 component destruction phase
3.3.1 beforeDestroy()
The component will be destroyed, and the component is still in a normal working state
3.3.2 destroyed()
The DOM structure has been completely destroyed
4. Data sharing among components
4.1 data transfer from parent component to child component
Parent component
<template>
  <div class="app-container">
    <h1>Parent component data: {{ message }} <br>
       {{ present }}</h1>
    <Test :msg="message" :pst="present"></Test>
  </div>
</template>

<script>
import Test from '@/components/Test.vue'

export default {
  data() {
    return {
      message: 'Hello Son!',
      present: {
        fruit: 'apple',
        toy: 'car'
      }
    }
  },
  components: {
    Test
  }
}
</script>

<style lang="less">
</style>
Subcomponents
<template>
<div class="test">
<h3 class="de">
Subcomponents
</h3>
<p>Receive from parent component message: {{msg }}</p>
<p>Receive from parent component present: {{pst }}</p>
</div>
</template>
<script>
export default {
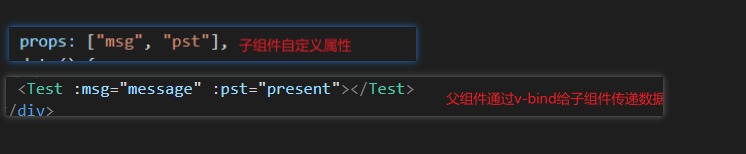
props: ["msg", "pst"],
data() {
return {
message: 'Hello',
}
},
methods: {
datachange() {
this.message += '!';
}
},
}
</script>
<style scope>
.de {
color: red
}
</style>
The implementation of data transfer from parent component to child component mainly depends on
- Customize properties in subcomponents
- User defined attributes that transfer data from parent component to child component through v-bind
Through the above method, the data passed to the sub component is read-only in the props attribute, so if it needs to be modified, the received data should be assigned to the elements in the sub component data
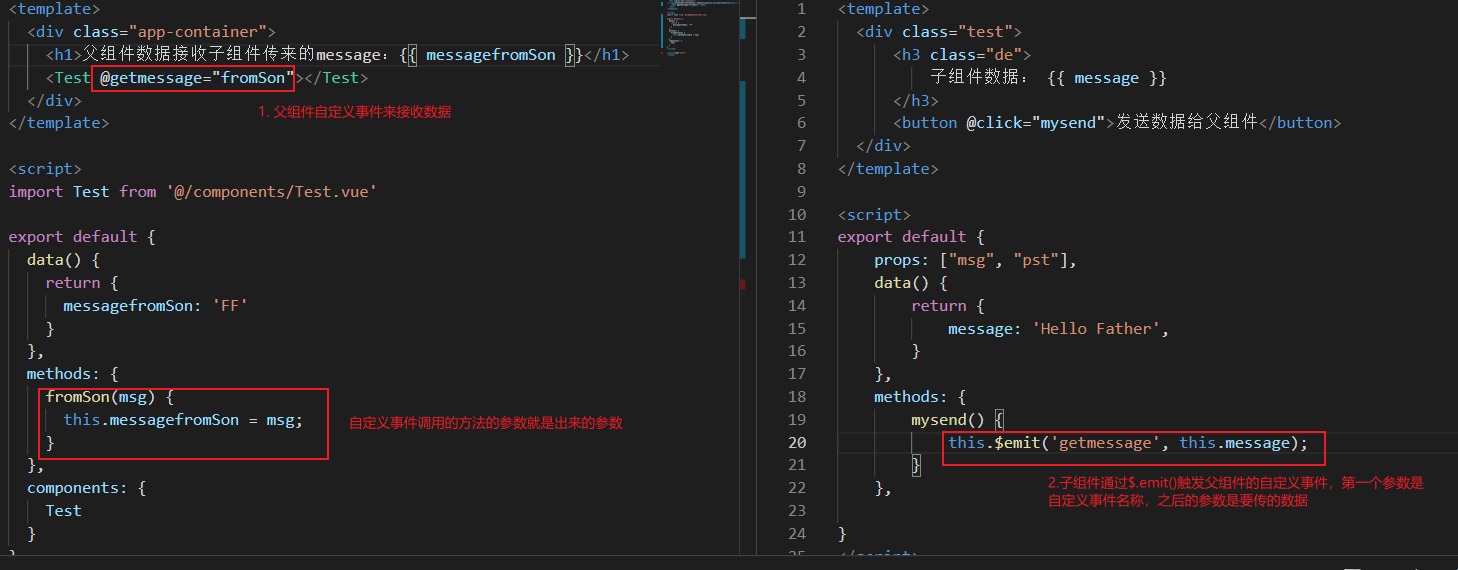
4.2 data transfer from child component to parent component
By customizing events at the parent component and $. At the child component The emit() method triggers a custom event to transfer data from the child component to the parent component
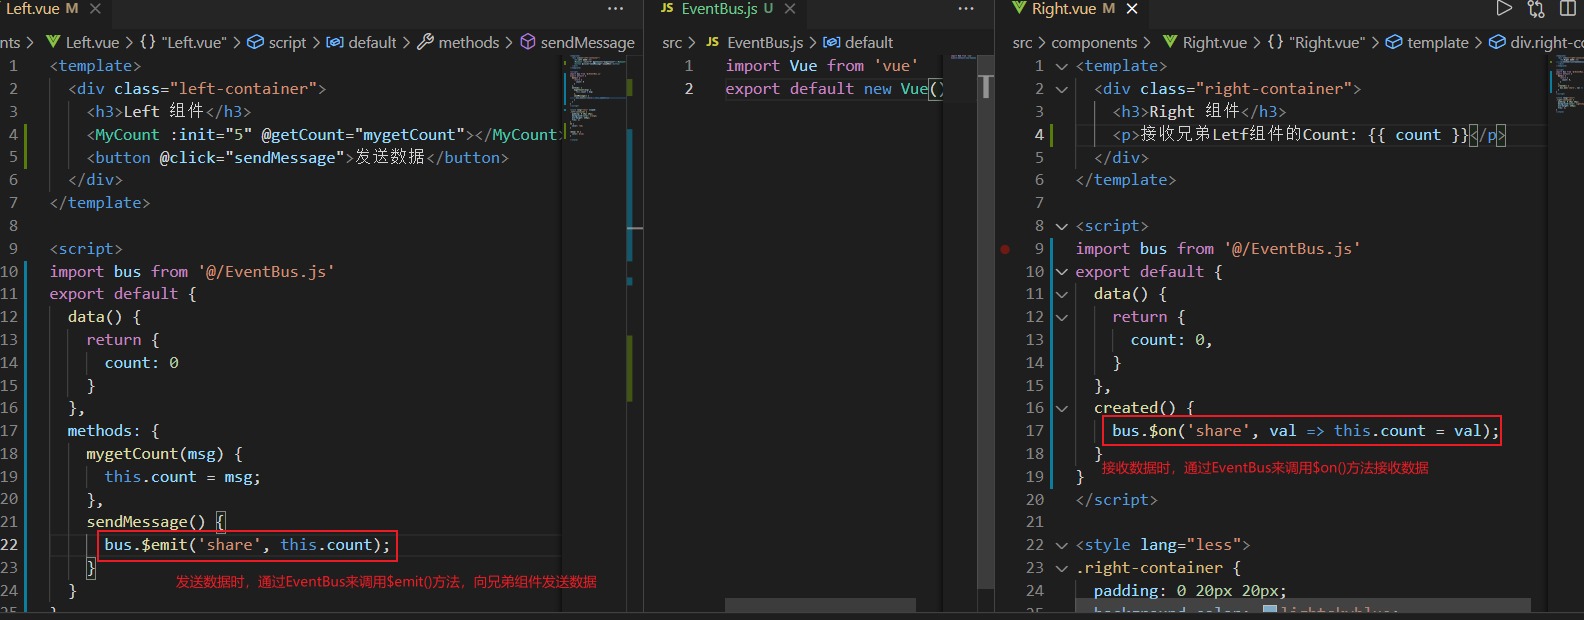
4.3 data sharing of brother components
The data sharing scheme between sibling components is EventBus
Steps:
- Create eventbus JS file to share an instance object of Vue (the usage is equivalent to the transfer station)
- At the data sender, call bus$ The emit ('event name ', data to be sent) method triggers a custom event
- At the data receiver, call bus$ The on ('event name', event handling function) method registers a user-defined event
5. ref reference
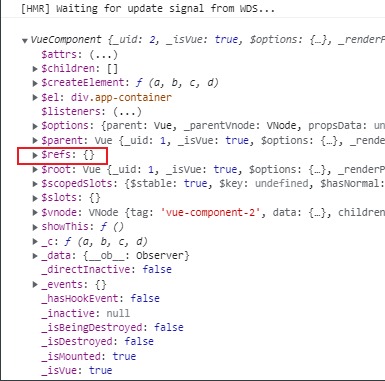
ref is used to help developers obtain references to DOM elements or components without relying on jQuery.
Each vue component instance contains a** r e f s yes as ∗ ∗ , in noodles Save Store means yes answer of D O M element element or group piece of lead use . Silence recognize feeling condition lower , ∗ ∗ group piece of refs object * *, which stores the reference of the corresponding DOM element or component. By default, * * component Refs object ∗ *, which stores the reference of the corresponding DOM element or component. By default, the refs of the * component points to an empty object * *.
Use ref to reference DOM elements:
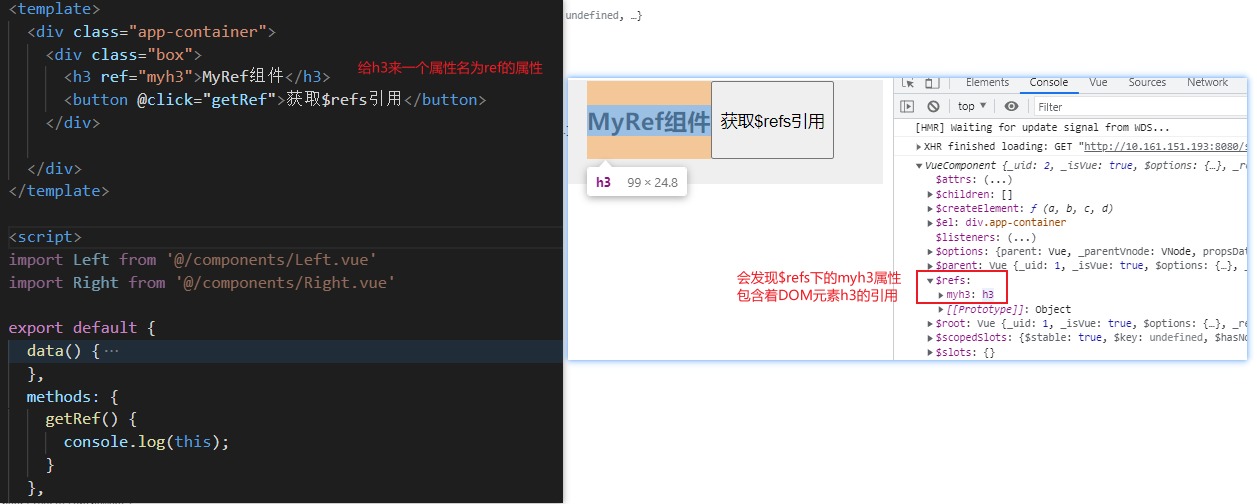
Therefore, the DOM elements to be operated above can be accessed through this$ refs. MYH3, such as:

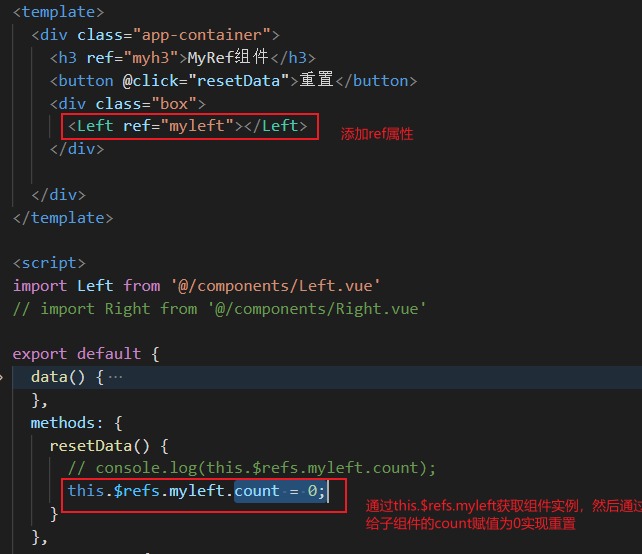
Use ref to reference component instances:
Control the on-demand switching between text box and button: (click the button, the button is hidden, and the text box is displayed; when the text box loses focus, the button is displayed, and the text box is hidden; when the text box is displayed, the focus is automatically obtained)
<template>
  <div class="app-container">
    <h3 ref="myh3">MyRef assembly</h3>
    <input type="text" v-if="inputVisible" ref="myipt" @blur="showButton">
    <button v-else @click="showInput">Display input box</button>

  </div>
</template>

<script>
// import Left from '@/components/Left.vue'
// import Right from '@/components/Right.vue'

export default {
  data() {
    return {
      inputVisible: false
    }
  },
  methods: {
    showInput() {
      this.inputVisible = true;
      console.log(this.$refs.myipt);   //When calling showInput, the data has just changed, and the time interval between this line and the previous line of code is too short,
                                      // As a result, the DOM structure is not finished rendering, so undefined appears at this time
      this.$nextTick(() => {           //The $nextTick() method of the component will postpone the callback function until after the next DOM update cycle
        console.log(this.$refs.myipt);
        this.$refs.myipt.focus();
      })
    },
    showButton() {
      this.inputVisible = false;
    }
  },
  // components: {
  //   Left,
  // }
}
</script>

<style lang="less">
.app-container {
  padding: 1px 20px 20px;
  background-color: #efefef;
}
.box {
  display: flex;
}
</style>
this.$nextTick(callback) method:
The * * $nextTick(callback) method of the component will delay the execution of the callback until the next DOM update cycle * *, that is, the callback function will be executed after the dom of the component is updated. This ensures that the callback function can operate on the latest DOM element.
The above example cannot use input in updated () in the lifecycle function Focus(), because as soon as the data in the data changes, updated() will be executed once, that is, when the input is hidden, it will also be executed. At this time, there is no input element at all, so why input What about focus.
6. Dynamic components
Dynamic component refers to dynamically switching the display and hiding of components
vue provides a built-in component, which is specially used to realize the rendering of dynamic components.
-
Three steps to use components:
- Introduction component
- Register components
- Using components with labels
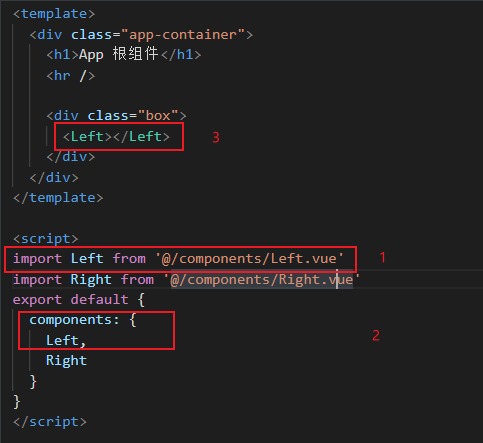
Third, you can use the built-in component component to dynamically specify the component to be rendered through the is attribute
That is, the above 3 can be replaced with < component: is = "'left '" > < / component >
Examples of dynamically specifying rendering components:
App components
<template>
  <div class="app-container">
    <h1>App Root component</h1>
    <button @click="comName='Left'">Exhibition Left assembly</button>
    <button @click="comName='Right'">Exhibition Right assembly</button>
    <hr />

    <div class="box">
      <component :is="comName"></component>
    </div>
  </div>
</template>

<script>
import Left from '@/components/Left.vue'
import Right from '@/components/Right.vue'
export default {
  data() {
    return {
      comName: 'Left'
    }
  },
  components: {
    Left,
    Right
  }
}
</script>

<style lang="less">
.app-container {
  padding: 1px 20px 20px;
  background-color: #efefef;
}
.box {
  display: flex;
}
</style>
Left component (the annotation code is only used in the later part)
<template>
  <div class="left-container">
    <h3>Left assembly</h3>
    <h4>count The value of is {{ count }}</h4>
    <button @click="count += 1">+1</button>
  </div>
</template>

<script>
export default {
  // name: 'MyLeft',
  data() {
    return {
      count: 0
    }
  },
  created() {
    console.log('The left side is created');
  },
  destroyed() {
    console.log('The left side was destroyed');
  },
  // activated() {
  //   console.log('the left side is activated ');
  // },
  // deactivated() {
  //   console. 'left side rest';
  // }
}
</script>

<style lang="less">
.left-container {
  padding: 0 20px 20px;
  background-color: orange;
  min-height: 250px;
  flex: 1;
}
</style>
Problem: in the above example, clicking the + 1 button of the Left component has changed the value. However, after clicking the display Right component and re displaying the Left component, you will find that the value returns to the initial state. From the output in the console, we can know that the reason is that when the Right component is dynamically specified to render, the Left component will be destroyed and then the Right component will be re created, so the data will be in the initial state.
You can maintain the state of dynamic components through the built-in < keep alive > components of vue.
Usage: just wrap the dynamic component with keep alive component.
<keep-alive>
   <component :is="comName"></component>
</keep-alive>
When a component is activated, the activated lifecycle function of the component will be triggered automatically.
When a component is dormant, the deactivated lifecycle function of the component is automatically triggered.
Enable the comment code of the Left component above. It can be found that when the Left component is activated (show Left), it will print "the Left is activated"; When Left sleeps (show Right), it will print "Left rest".
Include attribute: only components with matching names will be cached. That is to say, in the above example, there is data in the Left component and you want to save the Left state, but the Right component does not need to be cached. It is even possible that the Right component is used once. At this time, you can specify who will be cached through the include attribute. Multiple components are separated by commas * * in English.

There should be no space around the comma
Usage:
<keep-alive include="Left">
   <component :is="comName"></component>
</keep-alive>
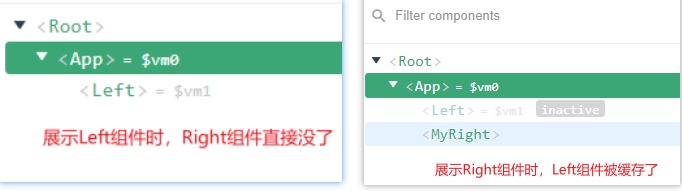
It can be found that the name of the above Right component displayed in the debugging tool is not Right, but the custom MyRight. This is modified through the name node of the component.
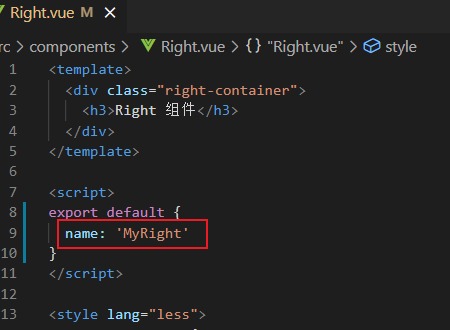
If the name of the component is modified, the name in the include attribute should be the modified name.
exclude attribute: indicates which components are not cached. It doesn't make sense to use it with the include attribute, or cancel the function of the include attribute. Or it's unnecessary. It also makes the code less readable.