1, What are instructions
The essence of instructions is HTML custom attributes.
HTML has two kinds of attributes, one is inherent attribute and the other is user-defined attribute. Inherent attributes refer to the attributes that support the functions of HTML, such as id, class and title. Custom attributes are usually used to store some data content related to the current element. The instruction is also a user-defined attribute, but the function of the instruction is not just to store data. After the user-defined attribute of the instruction is set to the element, when the current element is processed by the framework, the framework will know that the current element needs some special functions to execute. Therefore, the instruction itself is a mark to identify the framework. The form of this mark is called user-defined attribute, It can be used to quickly process the function of the current element to reduce DOM operations.
Vue. The instruction of JS is a custom attribute starting with v -.
2, Content processing
v-once instruction: used to set the interpolation expression in the content
The text-v instruction is used to set the content of the current text element
v-html instruction: used to set the HTML text content inside the current element
1. v-once instruction
Function of v-once instruction
Function: make the interpolation expression inside the element take effect only once.
We know that interpolation expressions can be used inside the element. If the data in the instance is used inside the interpolation expression, if the data changes, it will automatically trigger the data-driven view effect, which means that the data update will lead to the view update. If you only want the content inside the element to take effect only once and not change with the internal data, you can set it through the v-once instruction.
Example of v-once instruction
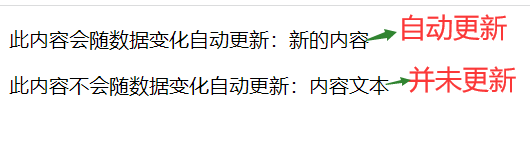
<body>
    <div id="app">
        <p>This content is automatically updated as the data changes:{{ content}}</p>
        <p v-once>This content is not automatically updated with data changes:{{ content }}</p>
    </div>

    <script src="https://cdn.jsdelivr.net/npm/vue"></script>
    <script>
        var vm = new Vue({
            el: '#app',
            data: {
               content: 'Content text'
            }
        });
    </script>
</body>
The content in the first p tag will be automatically updated with the change of data, while the content in the second P tag will only be read once during the first execution, and the content will not be automatically updated in the future.

2. v-text instruction
Function of v-text instruction
Function: replace the whole element content with the specified plain text data
Note the difference between v-text and interpolation expression: interpolation expression is used to set element dynamic content. Of course, this setting can be set locally, that is, interpolation expression can be involved in a part or whole of element content, or one or more interpolation expressions can be inserted to process a section of content. The function of v-text is to directly set the content of the current element to the specified data. If the content already exists in the current element, the new content of v-text will overwrite the content of the current element. In essence, the underlying call of v-text is actually the text content attribute of the element, so the original content of the element will be overwritten.
Note: the v-text instruction can only set plain text and cannot generate html structured text.
Example of v-text instruction
<body>
    <div id="app">
        <p v-text="100">This is p Original content of label</p>
        <!-- You can set user-defined text, but generally the following is more commonly used. Note: it can only be numbers, not Chinese characters or English symbols -->

        <p v-text="content">This is p Original content of label</p>
    </div>

    <script src="https://cdn.jsdelivr.net/npm/vue"></script>
    <script>
        var vm = new Vue({
            el: '#app',
            data: {
               content: 'Content text'
            }
        });
    </script>
</body>
3. v-html instruction
Function of v-html instruction
Function: replace the whole element content with the specified HTML text
The v-text instruction is similar to the v-html instruction, except that the v-text instruction can only set the plain text content, and the label text will not be generated; The v-html instruction can generate plain text or HTML text content composed of tag text. The similarity is that after the v-html instruction is set, the original content of the current tag will also be overwritten.
Example of v-html instruction
<body>
    <div id="app">
        <p v-html="content">This is p Original content of label</p>
    </div>

    <script src="https://cdn.jsdelivr.net/npm/vue"></script>
    <script>
        var vm = new Vue({
            el: '#app',
            data: {
            //    Content: 'new content text'
            //    Plain text can be set
                 content: '<span>span Label content</span>'
            }
        });
    </script>
</body>
3, Property binding
v-bind instruction: used to perform related processing operations of attribute binding
Class binding: there may be more than one class. v-bind has a special way to handle class binding
Style binding: style is used to set the style of rows. When binding through v-bind, you can also bind multiple values, Vue JS also provides special processing methods
1. v-bind instruction
Function of v-bind instruction
The previous v-once, v-text and v-html instructions can only be used to process the content of the current element. If you want to process attributes, you need to rely on the v-bind instruction.
Function: the v-bind instruction is used to dynamically bind HTML attributes.
Example of v-bind instruction
<body>
    <div id="app">
        <p :title="myTitle">This is p Label content</p>
    </div>

    <script src="https://cdn.jsdelivr.net/npm/vue"></script>
    <script>
        var vm = new Vue({
            el: '#app',
            data: {
                myTitle: 'This is title Attribute content'
            }
        });
    </script>
</body>
The v-bind colon is followed by the name of the attribute to be bound, and the value after the equal sign is the specific data to be bound. Here is the binding operation of the title attribute. The bound value is myTitle, which refers to the data declared in data.
Note: there should be no space before and after the colon in v-bind:title="title", otherwise it cannot be displayed normally
Running result: the page shows , this is the content of the p tag, and , this is the content of the title attribute when the mouse moves over
v-bind instruction abbreviation
<body>
    <div id="app">
        <p :title="myTitle">This is p Label content</p>
        <!-- ellipsis v-bind -->
    </div>

    <script src="https://cdn.jsdelivr.net/npm/vue"></script>
    <script>
        var vm = new Vue({
            el: '#app',
            data: {
                myTitle: 'This is title Attribute content'
            }
        });
    </script>
</body>
Use abbreviations later.
Expressions are allowed in v-bind
Similar to interpolation expressions, expressions are also allowed in v-bind.
<body>
    <div id="app">
        <p :title="myTitle">This is p Label content</p>
        <p :class="'num' + 1 + 2 + 3">String splicing 1</p>
        <p :class="prefix + num">String splicing 2</p>
    </div>

    <script src="https://cdn.jsdelivr.net/npm/vue"></script>
    <script>
        var vm = new Vue({
            el: '#app',
            data: {
                myTitle: 'This is title Attribute content',
                prefix: 'demo',
                num: 10
            }
        });
    </script>
</body>
Note: expressions can be used in v-bind, but statements cannot be used. For example, < p: class = "var a = 1" > is not allowed.
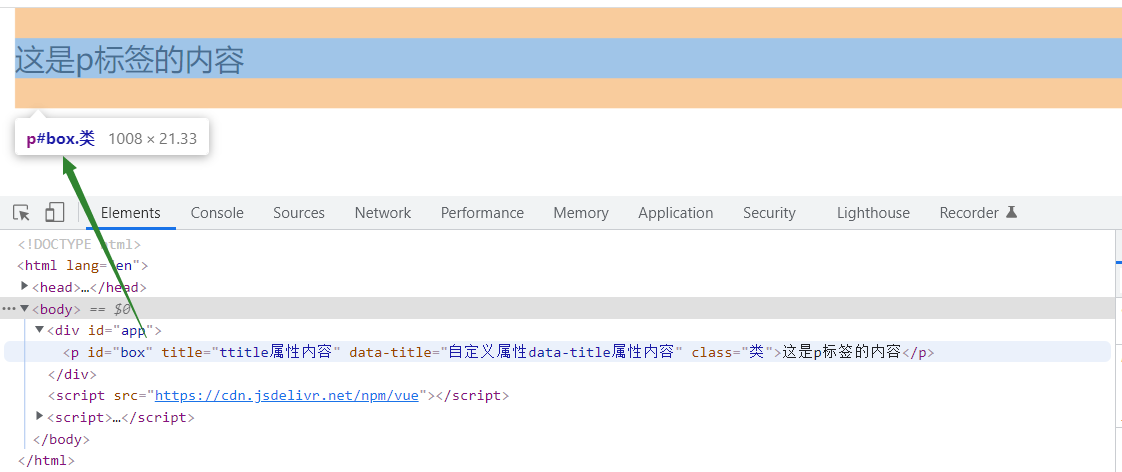
The v-bind instruction binds multiple attributes at a time -- binding objects
If you need to bind multiple attributes at once, you can also bind objects.
<body>
    <div id="app">
        <p v-bind="attrObj">This is p Label content</p>
    </div>

    <script src="https://cdn.jsdelivr.net/npm/vue"></script>
    <script>
        var vm = new Vue({
            el: '#app',
            data: {
                attrObj: {
                    id: 'box',
                    class: 'class',
                    title: 'ttitle Attribute content',
                    // In addition to the above inherent attributes, you can also bind custom attributes. Pay attention to wrapping them in single quotes
                    'data-title':'Custom properties data-title Attribute content'
                }
            }
        });
    </script>
</body>
Running results: (for the set class, the id attribute can be found in the Elements, and the element can be viewed in the web page after the mouse is moved)
2. Class binding
Class is an HTML attribute used to set the class name of an element, which can be bound through v-bind.
Classes bound by v-bind can coexist with ordinary class attributes.
Class binding example
<body>
    <div id="app">
        <p :class="cls">binding class</p><!-- Can follow data in cls Dynamic change of value p Class name of tag -->

        <p class="a" :class="cls">Can coexist</p>
        <!-- x It is dynamically bound, a Is a fixed class name. They can coexist -->
        <!-- Operation display p.a.x,Regardless class="a"and:class="cls"What is the order of writing, a All in x front -->
    </div>

    <script src="https://cdn.jsdelivr.net/npm/vue"></script>
    <script>
        var vm = new Vue({
            el: '#app',
            data: {
              cls: 'x'
            }
        });
    </script>
</body>
The first p tag: the class name bound by the P tag is x. because the data of data will be set in the data-driven view, when the cls changes, the class name of the P tag will change accordingly, so as to achieve the purpose of dynamically binding the class name.
The second p tag: set two class names. The left part is the ordinary class attribute, which is used to set the class name A. It is fixed and cannot be modified; The right part binds the class name through v-bind. The class name of this part is X. because ordinary classes can coexist with bound classes, the current element has two class names, one is a and the other is x, but only x is dynamically bound and a is a fixed class name.
Multiple class name bindings
One element can set multiple class names, such as < p clsaa = "a B C" > < / P >, which is the basic method.
If cls1:'x',cls2:'y',cls3:'z' in the data, note that the class bound by v-bind cannot directly write multiple values side by side with spaces as ordinary classes, so < p clsaa = "cls1 cls2 cls3" > < / P > this is wrong.
Binding multiple class names provides an idea:
<body>
    <div id="app">
        <p :class="cls">binding class</p>
    </div>

    <script src="https://cdn.jsdelivr.net/npm/vue"></script>
    <script>
        var vm = new Vue({
            el: '#app',
            data: {
              cls: 'x y z'
            }
        });
    </script>
</body>
The running result shows that p.x.y.z is successful, but note that this method is not commonly used because it is not flexible. X, y and Z in cls are string splicing by three parts. If you want to change it later, you can't change only one part. For example, if you want to change x, this method must be changed in cls, and the flexibility is not high.
Class name setting for conditional judgment
Case 1: single class name
Requirement: if the user has entered the content, if the input content meets the input rules, cls1 is adopted; otherwise, cls2 is adopted
<body>
    <div id="app">
        <p :class="bool?cls1:cls2">binding class</p>
    </div>

    <script src="https://cdn.jsdelivr.net/npm/vue"></script>
    <script>
        var vm = new Vue({
            el: '#app',
            data: {
              bool:true,
              cls1: 'x',
              cls2: 'y'
            }
        });
    </script>
</body>
Put the final processing result in a Boolean value, set the data to bool, and the default value of the value is true. Ternary operator can be used for v-bind binding, bool?cls1:cls2.
Note: this method is not commonly used.
Case 2: the current element has multiple class names
This requires Vue Special processing method of Class binding in JS.
Vue.js allows you to set the object structure during Class binding. The object has two parts: key and value. b:isB. The key represents the Class name to be set, that is, the final effective Class name is B, and the value after the colon is a Boolean value, which corresponds to whether the B Class name is effective or not. Therefore, the relationship between key and value represents the corresponding relationship between the Class name and whether it is effective or not. It is convenient to write, and multiple Class names can be written at the same time.
The fourth demonstration is' class-d':true. When the class name is horizontal line connection, the JavaScript key does not support this method, so it can be wrapped in quotation marks, which means that a variety of class name writing methods can be supported.
<body>
    <div id="app">
        <p :class="{ x:true, y:false, z:true, 'class-d':true }">binding class</p>
    </div>

    <script src="https://cdn.jsdelivr.net/npm/vue"></script>
    <script>
        var vm = new Vue({
            el: '#app',
            data: {

            }
        });
    </script>
</body>
In the above code, x, y, Z and Class-D represent the class name to be effective, and true and false after the colon represent whether it is effective. The running result of the above example p.x.z.class-d means that x, Z and Class-D are effective, and Y is not effective because the value is false.
When setting whether the current class name takes effect, the value after the colon can not only be written as a fixed value, but also be manipulated through the data in data. This is the most common form:
<body>
    <div id="app">
        <p :class="{ x:isX, y:isY, z:isZ }">binding class</p>
    </div>

    <script src="https://cdn.jsdelivr.net/npm/vue"></script>
    <script>
        var vm = new Vue({
            el: '#app',
            data: {
                isX: true,
                isY: false,
                isZ: true
            }
        });
    </script>
</body>
Multiple class names + conditional judgment - array setting method
Vue.js not only provides the above object processing methods, but also allows us to set the array when binding the class name. Array binding processing is a further extension of the object setting method.
<p :class="['a', { b:isB }, 'c' " >In binding class < / P >, bind the value of class into an array. A and C in the array are static fixed class names. The curly braces in the middle represent the dynamically bound area and indicate whether the current class name is displayed or not. This method allows you to set multiple class names at the same time, and allows you to set conditions for some class names that need condition control. Values that do not need condition setting, such as a and C, can be written separately, and there is no need to write true.
<body>
    <div id="app">
        <p :class="['a', { b:isB }, 'c', ClassD ]">binding class</p>
    </div>

    <script src="https://cdn.jsdelivr.net/npm/vue"></script>
    <script>
        var vm = new Vue({
            el: '#app',
            data: {
                isB: true,
                ClassD: 'D'
            }
        });
    </script>
</body>
Operation result p.a.b.c.D
v-bind binding Class summary
There are three ways to write Class binding. The first is to directly bind a single data. If you need to bind multiple data, it can be determined as the case may be. One is written by object and the other is written by array. The key of the object writing method represents the current Class name, and the value represents whether the current Class name is displayed. If there are some unconditional Class names and conditional Class names in the current element, you can set them in array mode. Write the part that needs conditions in the object and the part that does not need conditions directly in the array element.
3. Style binding
Style is an HTML attribute, which is used to set the style in HTML lines. It can be bound through v-bind.
Style binding example
Note that when Binding styles through v-bind, you cannot directly write ordinary strings as before, because styles have two parts: keys and values, so the basic form to be passed in is objects. The keys in the objects refer to the style name to be set, and the values in the objects refer to the style value to be set.
<body>
    <div id="app">
        <!-- Method 1: write the object directly in the line, but this method is very complex and difficult to maintain and is not commonly used -->
        <p v-bind:style="{ width: '300px', height:'100px'}">Direct inline writing object, not commonly used</p>
        <!-- Mode 2: in data Set data in, more commonly used -->
        <p v-bind:style="styleObj">stay data Setting data in, common methods</p>
    </div>

    <script src="https://cdn.jsdelivr.net/npm/vue"></script>
    <script>
        var vm = new Vue({
            el: '#app',
            data: {
                styleObj: {
                    width: '500px',
                    height: '200px',
                    backgroundColor: 'red',
                    'font-size': '30px'
                }
            }
        });
    </script>
</body>
Note two points:
- When setting the width height attribute with units, units cannot be omitted. For example, writing width:'100' has no effect.
- When setting styles with horizontal lines such as background color and font size in style, hump naming method backgroundColor: 'red' can be used in data, or quotation marks can be used, such as' font size ':' 30px '. Both methods are OK, but hump naming method is more recommended because it is closer to the traditional writing method.
Attributes bound through v-bind can coexist with ordinary style attributes.
<body>
    <div id="app">
        <p style="width: 100px;" :style="styleObj">Can coexist</p>
    </div>

    <script src="https://cdn.jsdelivr.net/npm/vue"></script>
    <script>
        var vm = new Vue({
            el: '#app',
            data: {
                styleObj: {
                    width: '200px',
                    height: '200px',
                    backgroundColor: 'red',
                    'font-size': '30px'
                }
            }
        });
    </script>
</body>
The previous setting of width as 100px is a fixed value. Later, when binding a Style through v-bind, you can also set width. If not set, 100px will be adopted. If set, the newly set value will prevail, so the width of the final element display should be 200px.
Binding multiple style objects -- array writing of style binding
When we want to bind multiple style objects to an element, we can set it to array.
Application: when multiple elements have the same attribute, the same attribute can be stored in one styleobj. Changing styleobj once can change the style of all elements.
<body>
    <div id="app">
        <p :style="[baseStyle, styleObj1]">first p label</p>
        <p :style="[baseStyle, styleObj2]">the second p label</p>
    </div>

    <script src="https://cdn.jsdelivr.net/npm/vue"></script>
    <script>
        var vm = new Vue({
            el: '#app',
            data: {
                baseStyle: {
                    //Public style
                    width: '200px',
                    height: '200px',
                },
                styleObj1: {
                    backgroundColor: 'red'
                },
                styleObj2: {
                    backgroundColor: 'blue'
                }
            }
        });
    </script>
</body>
IV. rendering instructions
v-for instruction: used to traverse the data and create the corresponding structure according to the content of the traversed data
v-show instruction: used to control the switching operation of element display and hiding
v-if instruction: used to create or remove specified elements through conditional judgment among multiple elements
1. v-for instruction
The v-for instruction is Vue JS is one of the most commonly used instructions, which is used to traverse the data rendering structure. Commonly used arrays and objects can be traversed.
The v-for instruction is used for arrays
Array traversal
<body>
    <div id="app">
       <ul>
           <li v-for="item in arr">The contents of array elements are:{{ item }}</li>
       </ul>
    </div>

    <script src="https://cdn.jsdelivr.net/npm/vue"></script>
    <script>
        var vm = new Vue({
            el: '#app',
            data: {
                arr: ['Array contents 1', 'Array contents 2', 'Array contents 3']
            }
        });
    </script>
</body>
The li tag is set in ul, and the v-for instruction is set on the li tag, indicating that the current li tag is traversed and rendered according to the data. Finally, li will perform the corresponding creation operation according to the actual number of data.
item is the identifier name of the internal data, and in arr indicates the array to be traversed.
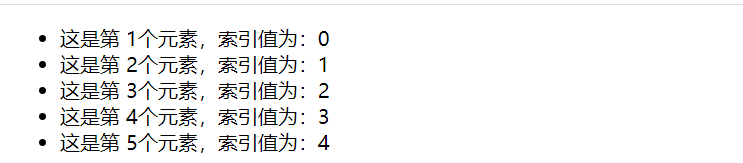
Array traversal with index
To obtain the index value, you can wrap the item part in parentheses followed by index, so that you can declare two flags, the first represents the value and the second represents the index.
<body>
    <div id="app">
       <ul>
           <li v-for="(item, index) in arr">
               The contents of array elements are:{{ item }},The element index is:{{ index }}
            </li>
       </ul>
    </div>

    <script src="https://cdn.jsdelivr.net/npm/vue"></script>
    <script>
        var vm = new Vue({
            el: '#app',
            data: {
                arr: ['Array contents 1', 'Array contents 2', 'Array contents 3']
            }
        });
    </script>
</body>
The v-for instruction is used for objects
Traversal object
value is the identifier name of the internal data, and in obj indicates that obj is the object structure to be traversed.
<body>
    <div id="app">
       <ul>
           <li v-for="value in obj">
               The content of the object element is:{{ value }}
            </li>
       </ul>
    </div>

    <script src="https://cdn.jsdelivr.net/npm/vue"></script>
    <script>
        var vm = new Vue({
            el: '#app',
            data: {
                obj: {
                    content1: 'Object content 1',
                    content2: 'Object content 2',
                    content3: 'Object content 3'
                }
            }
        });
    </script>
</body>
Print keys when traversing objects
Change the value part to (value, key).
<body>
    <div id="app">
       <ul>
           <li v-for="(value, key) in obj">
               The content of the object element is:{{ value }},The element key is:{{ key }}
            </li>
       </ul>
    </div>

    <script src="https://cdn.jsdelivr.net/npm/vue"></script>
    <script>
        var vm = new Vue({
            el: '#app',
            data: {
                obj: {
                    content1: 'Object content 1',
                    content2: 'Object content 2',
                    content3: 'Object content 3'
                }
            }
        });
    </script>
</body>
Print index when traversing object
If we also want to get the index when traversing the object, v-for allows us to mark the third position, namely (value, key, index), where index represents the index value and marks the index of the current key. However, in traditional operations, this value does not exist, and v-for provides us with this value.
<body>
    <div id="app">
       <ul>
           <li v-for="(value, key,index) in obj">
               The content of the object element is:{{ value }},The element key is:{{ key }},The index value is:{{ index }}
            </li>
       </ul>
    </div>

    <script src="https://cdn.jsdelivr.net/npm/vue"></script>
    <script>
        var vm = new Vue({
            el: '#app',
            data: {
                obj: {
                    content1: 'Object content 1',
                    content2: 'Object content 2',
                    content3: 'Object content 3'
                }
            }
        });
    </script>
</body>
Operation results:

Note: (value, key, index) these three can be combined according to specific conditions.
v-for is a numeric value used for countless groups or object structures
Vue.js, the v-for instruction can not only traverse arrays and objects, but also traverse numerical values. If you want to create Li tags in ul, create five. If there are data structures such as arrays or objects, you can traverse them directly. However, if there is no data base and you just want to create five li elements out of thin air, the traditional method can be realized by using the for loop for (int i = 0; I < 5; I + +), and v-for also has this function. Examples are as follows:
<body>
    <div id="app">
       <ul>
           <li v-for="(item, index) in 5">
               This is the second {{ item }}Elements with index value:{{ index }}
            </li>
       </ul>
    </div>

    <script src="https://cdn.jsdelivr.net/npm/vue"></script>
    <script>
        var vm = new Vue({
            el: '#app',
            data: {

            }
        });
    </script>
</body>
Operation results:
When using v-for, you should always specify a unique key attribute
When using v-for, you should always specify a unique key attribute to improve rendering performance and avoid problems.
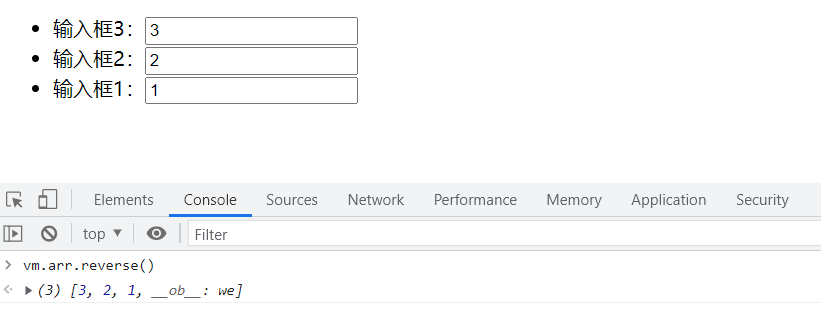
If the key is not set, enter 1, 2 and 3 in input box 1, input box 2 and input box 3, and the console executes VM Arr.reverse() is the array flip. The desired result is input box 1:1, input box 2:2 and input box 3:3. However, when the key is not set, the result is:
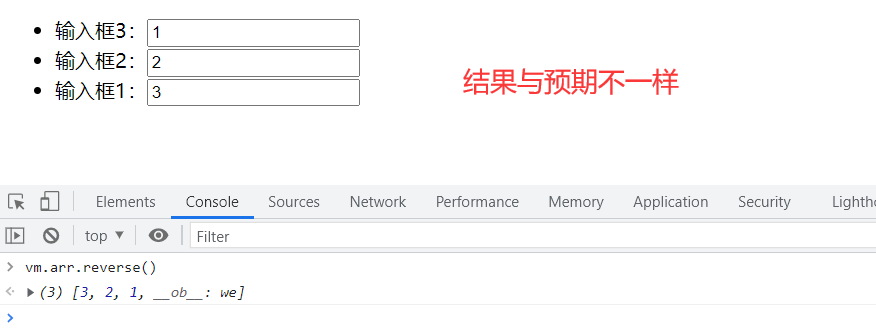
The reason for this problem is that when Vue JS will improve the execution efficiency as much as possible. When traversing settings through v-for, it should have a similar structure, such as these three input boxes. After data changes, Vue JS will try to improve the efficiency as much as possible. It may modify the view structure based on the current element, such as changing input box 1 into input box 3, but it is only limited to the structure part, and the input content belongs to the user's operation rather than the view function, so this problem will occur.
In order to avoid the above problems, set the key with v-bind on the element currently set through v-for. The key attribute is the name specified inside Vue. We are required to operate by specifying the name. After setting, this value must be a unique value. Here, there are two kinds of unique values. The first is the index and the second is the element. The index value is not recommended. For example, setting (item, index) in arr will result in the same result as above. Index can not completely avoid this problem, because the element corresponding to the index value will automatically change after the position changes, so the setting method of index is unreasonable, Because index is not unique. Therefore, each element should be set with its own unique key value, which can be set with item:
<body>
    <div id="app">
       <ul>
           <li v-for="item in arr" :key="item">
               Input box{{ item }}: <input type="text">
            </li>
       </ul>
    </div>

    <script src="https://cdn.jsdelivr.net/npm/vue"></script>
    <script>
        var vm = new Vue({
            el: '#app',
            data: {
                arr: [1, 2,3]
            }
        });
    </script>
</body>
Operation results:
You can see that after setting the unique key, the element is flipped, and the content entered in the input box is also flipped, because Vue JS found that the current elements are set with keys, so it is necessary to determine where each element is moved during rendering, instead of patching into new elements based on the current old elements, so there will be no problem that the contents of the input box do not correspond.
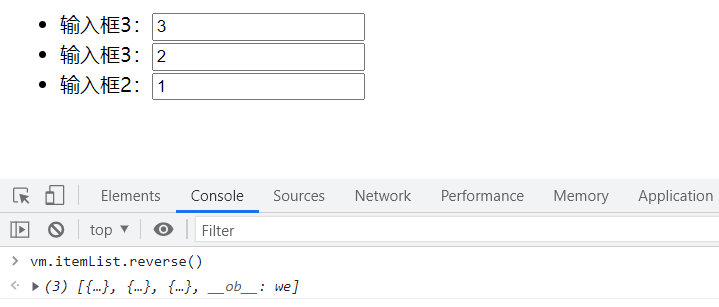
If the data has the same, such as arr[2, 3, 3], it is not recommended to use item to set it. You can set each part of the value as an object, mark it with a different id, identify the data with value, and set item in li Set the id as the key attribute and set the item Value as content.
<body>
    <div id="app">
       <ul>
           <li v-for="item in itemList" :key="item.id">
               Input box{{ item.value }}: <input type="text">
            </li>
       </ul>
    </div>

    <script src="https://cdn.jsdelivr.net/npm/vue"></script>
    <script>
        var vm = new Vue({
            el: '#app',
            data: {
               itemList: [
                   {
                       id: 1,
                       value: 2
                   },
                   {
                       id: 2,
                       value: 3
                   },
                   {
                       id: 3,
                       value: 3
                   }
                ]
            }
        });
    </script>
</body>
You can see the running result of successful turnover:
Emphasis: in the future, where v-for is used, you must set a unique key value for the element.
< template > label setting template placeholder
By setting the template placeholder with the < template > tag, you can operate some elements or contents as a whole.
After the < template > tag is executed, it will not be presented as a tag. It is just a placeholder, just an area, indicating that the internal content is a whole. Any label or combination of contents can be written inside the < template > label to realize multiple generation of the current element. For example, if the < div > tag does not need to be repeated twice, the < div > tag can be generated outside the < span > template. For example, if the < div > tag does not need to be repeated twice, the < div > tag can be generated outside the < span > template. In this way, the repeated setting of plain text content and multiple groups of labels are very convenient.
<body>
    <div id="app">
       <template v-for="item in obj">
           <!-- take span and br Repeat as a whole, one for each output item Wrap once -->
           <span> {{ item }}</span>
           <br>
       </template>
    </div>

    <script src="https://cdn.jsdelivr.net/npm/vue"></script>
    <script>
        var vm = new Vue({
            el: '#app',
            data: {
               obj: {
                   content1: 'Content 1',
                   content2: 'Content 2',
                   content3: 'Content 3'
               }
            }
        });
    </script>
</body>
Note: since < template > itself is not a real element, there is no way to set the key attribute for it. Therefore, even if v-for is set for < template >, there is no need to set the key attribute for < template >, otherwise an error will be reported.
2. v-show instruction
Function: used to control the display and hiding of elements. It is suitable for frequent switching between display and hiding.
Example:
true and false are written directly inside v-show
<body>
    <div id="app">
       <p v-show="true">This element displays 1</p>
       <p v-show="false">This element hides 2</p>
       <!-- except true and false,You can also use conditional expressions -->
       <p v-show="2>11">This element is hidden 3</p>
       <p v-show="22>11">This element displays 4</p>
    </div>

    <script src="https://cdn.jsdelivr.net/npm/vue"></script>
    <script>
        var vm = new Vue({
            el: '#app',
            data: {

            }
        });
    </script>
</body>
Statement < p v-show = "true" > this element displays true and false in < / P >. In addition to being written directly inside v-show, it can also be bound through the data in data. During operation, the purpose of element display and hiding switching can be achieved by modifying the bound data.
Bind data in data to v-show
The data in data is usually used for operation to facilitate subsequent processing.
<body>
    <div id="app">
       <p v-show="bool">This element displays 1</p>
    </div>

    <script src="https://cdn.jsdelivr.net/npm/vue"></script>
    <script>
        var vm = new Vue({
            el: '#app',
            data: {
              bool: true
            }
        });
    </script>
</body>
< template > cannot use the v-show instruction
Note: < template > cannot use the v-show instruction, because the v-show instruction actually controls the display and hiding through the display attribute of the element. Display is a real element attribute and element style, but < template > is not a real element, so < template > cannot set the v-show instruction.
Set the v-show instruction in < template >, and it will be displayed whether it is true or false. Therefore, do not set the v-show instruction for tags that are not real elements such as < template >.
3. v-if instruction
Function: used to control the creation and removal of elements according to conditions.
v-if basic example
<body>
    <div id="app">
       <p v-if="bool">This element will not be created</p> <!-- Generally used data Binding method -->
       <p v-else-if="true">This element will be created</p>
       <p v-else>This element will not be created</p>
    </div>

    <script src="https://cdn.jsdelivr.net/npm/vue"></script>
    <script>
        var vm = new Vue({
            el: '#app',
            data: {
              bool: false
            }
        });
    </script>
</body>
If v-if is true, it will be created; if it is false, it will not be created. Therefore, the element < p v-if = "false" > in the first sentence will not be created < / P > will not be created, the element < p v-else-if = "true" > in the second sentence will be created < / P > because it is true, and the last v-else will not be created because v-else-if has been successfully created in the second game. V-else will make the final display when the previous contents are not satisfied, that is, if the previous contents are false, v-else will make the final display.
Note that the false of v-if is not created or removed, while the false of v-show exists but is hidden.
Note: do not create or remove frequently, which will consume performance. If there is frequent switching, you can use v-show to control the display and hiding
Bind different key s to elements of the same type using v-if
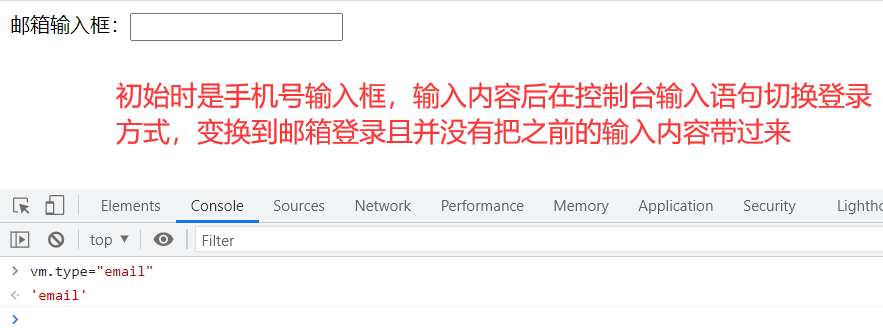
Suppose there are two input boxes waiting to be created. Initially, v-if is created. If no key is set, after the first input box is created and the element is entered, the first input box is removed to create the second input box, and the input content will change to the second input box.
When users log in, they may use account login, mobile number login or email login. When users choose, they switch between elements of different functions, but no matter which way, the structure required is always similar, but the internal judgment logic may be mobile number rule or email rule. In this case, switching will lead to problems, First input in the mobile phone number input box. After switching to the email login, the content in the mobile phone number input box will be automatically added to the email input box. There is a problem. The reason is the same as the previous v-for instruction setting key.
<body>
    <div id="app">
      <div v-if="type==='username'" :key="'username'">
          Mobile number input box:<input type="text">
      </div>
      <div v-else :key="'email'">
          Mailbox input box:<input type="text">
    </div>
    </div>

    <script src="https://cdn.jsdelivr.net/npm/vue"></script>
    <script>
        var vm = new Vue({
            el: '#app',
            data: {
              type: 'username'
            }
        });
    </script>
</body>
Operation results:
Avoid applying v-if and v-for to the same label
For performance reasons, avoid applying v-if and v-for to the same label.
According to Vue JS internal implementation rules, if v-if and v-for are applied to the same tag at the same time, the priority of v-for will be higher, that is, v-for will execute first, and v-if will be judged only after execution. If the v-if in the requirement is false, it should not be created, but it will be created by executing v-for first. At this time, the creation is meaningless and consumes a lot of unnecessary performance. Therefore, v-for and v-if cannot be used for the same label and should be used separately.
For example, when creating a list, bind v-for in the < li > tag. If you want to control the display and hiding, you can set v-if to the external parent element.
<body>
    <div id="app">
      <ul v-if="false">
          <li v-for="item in items"> {{ item }} </li>
      </ul>
    </div>

    <script src="https://cdn.jsdelivr.net/npm/vue"></script>
    <script>
        var vm = new Vue({
            el: '#app',
            data: {
              items: {
                  content1: 'Content 1',
                  content2: 'Content 2',
                  content3: 'Content 3'
              }
            }
        });
    </script>
</body>