Vue Tutorial
1. Introduction
1.1 Introduction
Description:
- Incremental JavaScript Framework
- Author: Yuyuxi (a former Chinese Google engineer)
- Role: Build user interface dynamically
Features of Vue:
- Follow MVVM pattern
- Compact encoding, small size, high efficiency, suitable for mobile/PC development
- It is UI-focused and can easily introduce vue plug-ins or other third library development projects
Associations with other front-end JS frameworks
- Learn from angular's templates and data binding techniques
- Draw lessons from react's component and virtual DOM Technology
1. Since the angular framework comes out first, and then the react framework comes out, vue uses the techniques of both frameworks for reference.
2. To be clear, vue, like jQuery, is a js framework that simplifies the operation of the dom and supports bidirectional binding, making our js development easier and more efficient, with Vue handy and small size
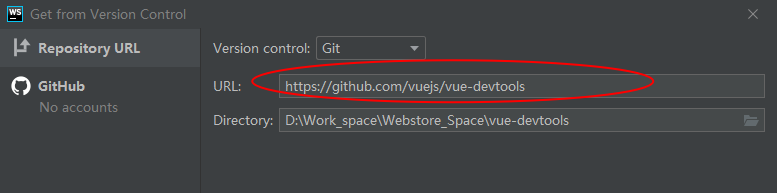
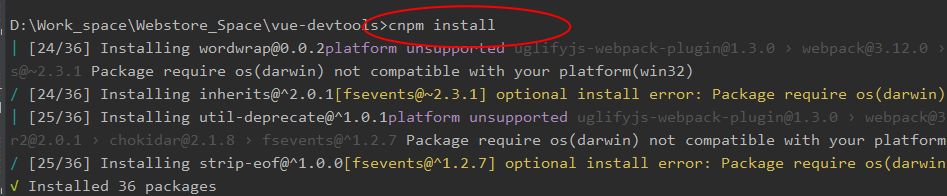
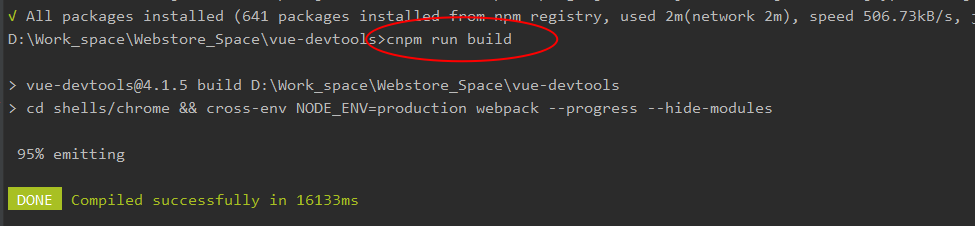
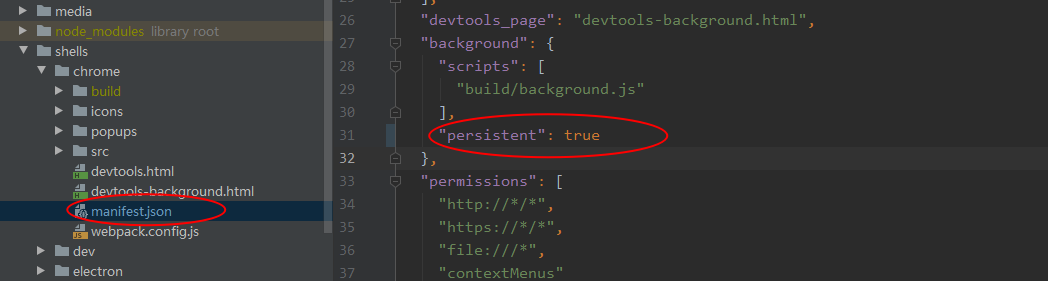
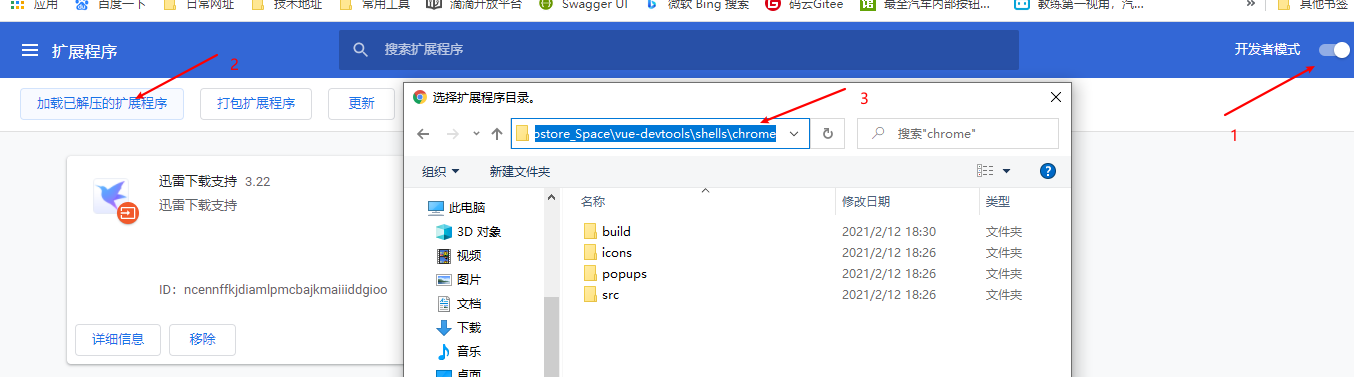
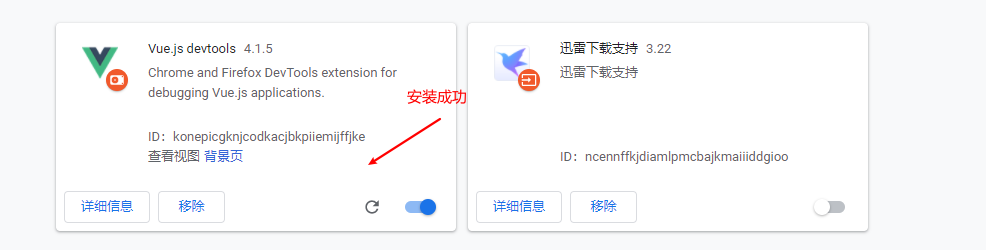
1.2 vue plug-in production
1. Download Tool Source https://github.com/vuejs/vue-devtools

2. Execute cnpm install, install dependencies
3. Perform a package build, cnpm run build
4. To modify the configuration item to true, you must modify it before using the side plugin.
5. Open Google Browser, more tools - extensions, and then find our compiled tools directory, find the chrome folder to load

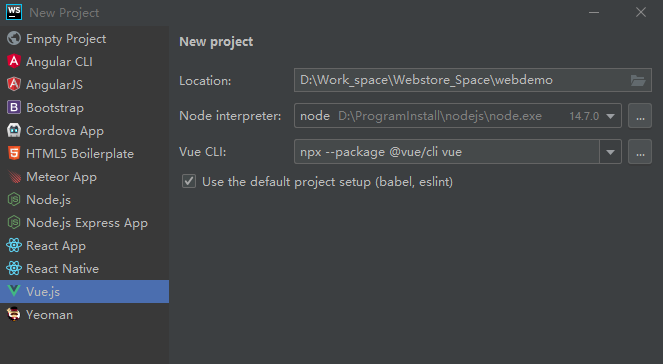
1.3 helloword
1. Create a vue project
2. Add code
<!DOCTYPE html>
<html lang="en">
<head>
  <meta charset="UTF-8">
  <title>01_HelloWorld</title>
</head>
<body>

<!--
  1. Introduce Vue.js
  2. Establish Vue object
    el : Specify Root element(selector)
    data : Initialize data(Page Accessible)
  3. Bidirectional data binding : v-model
  4. Display data : {{xxx}}
  5. Understand vue Of mvvm Realization
-->

<!--Template-->
<div id="test">
  <input type="text" v-model="msg"><br><!--instructions-->
  <p>hello {{msg}}</p><!--Brace expression-->
</div>

<script type="text/javascript" src="../js/vue.js"></script>
<script type="text/javascript">
  const vm = new Vue({ // Configuration object options
    // Configuration options
    el: '#Test', // element: Specifies which label area in the page to manage with vue
    data: {
      msg: 'atguigu'
    }
  })
</script>
</body>
</html>

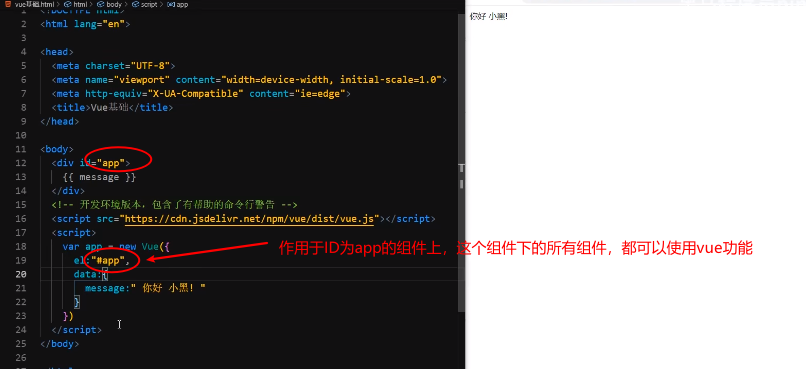
vue is introduced in the normal way (src):
<!--body You have to be on top because vue When instantiating, you need to find the correlation from top to bottom html Node, if not found html Unable to bind and error-->
<body>
    <div id="app" class="aa">
        <h1>{{msg}}</h1>
    </div>
</body>
</html>
<!--Introducing Core js file-->
<script src="js/vue.js"></script>
<!--write vue Code-->
<script>
    new Vue({
        el:"#The app', //el: element represents the scope of the vue instance, where all {{}} under the app node can retrieve data from the data
        data:{
            msg:"Hello vue",
            count:0,
            content:"hello vue"
        }  //Data data custom data
    });//Create a vue instance
</script>
# Summary:
	1.Only one page can exist Vue Instances cannot create more than one vue Example
	2.vue Instance el Attribute Representation vue Scope of the instance,Come back later vue Instance scope can be used{{data Variable name in attribute}} Direct acquisition data Medium variable name corresponds to attribute value
	3.vue Instance data Property is used for the current vue Instance Binding Custom Data,You can bind data later vue Direct use within the scope of an instance {{Variable Name}}Method acquisition
	4.Use{{}}Conduct data When data is acquired in,Can be used in{{}}Logical operations of arithmetic operations in the value grammar and calls to related types of methods
	5.vue Instance el Attributes can write anything css Selector but recommended id Selector because of one vue Instances can only work on a specific scope
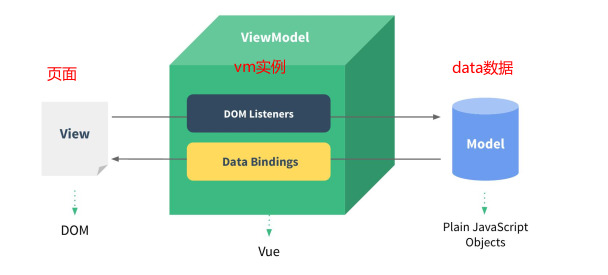
1.4 mvvm understanding
Page operation html component object, vm instance has listeners, when the data in the component object changes, it will synchronously modify the data of the data data data model, if the data of the data data data model changes, it will affect the display of page data.
1.5 Declaration Period
	stay vue A series of declared periodic function hooks are officially provided during the life cycle of an instance:  These life cycle functions are best characterized by vue Instance process triggered automatically
	vue Instance life cycle phase:  1.Initialization phase 2.Run Phase 3.Destruction phase
[External chain picture transfer failed, source station may have anti-theft chain mechanism, it is recommended to save the picture and upload it directly (img-jUpkFp2H-1630407740613). ( https://gitee.com/cfmCode/drawing-bed/raw/master/img/lifecycle- Life cycle (graphical version). png)
<script src="js/vue.js"></script>
<script>
    //During the vue instance life cycle, a series of declarative periodic function hooks are officially provided: the most important features of these life cycle functions are triggered automatically by the vue instance process
    //vue instance life cycle phase: 1. Initialization phase 2. Run Phase 3. Destruction phase
    var app = new Vue({
        el:"#app",
        data:{
            msg:"vue life cycle",
            users:[],
        },
        methods:{},
        computed:{},
        //Initialization phase
        beforeCreate(){//The first life cycle function This function only completes its own internal events and life cycle function injection when executed
            console.log("beforeCreate:",this.msg);
        },
        created(){//Second life cycle function This function completes its own internal events and life cycle function injection when it executes, including property injection and verification such as custom data methods computed
            console.log("created:",this.msg);
            //var _this = this;
            //axios.get().then(function(response){_this.users = response.data})
        },
        beforeMount(){//Third Life Cycle Function This function executes when el executes html or is a raw template and does not complete data rendering
            console.log("beforeMount:",document.getElementById("h1").innerText);
        },
        mounted(){//Fourth Life Cycle Function This function executes when vue has finished rendering html for template and el
            console.log("beforeMount:",document.getElementById("h1").innerText);
        },
        //Running phase
        beforeUpdate(){ //The first function in the run phase The data data changes when the function is executed, and the page data is still the original data
            console.log("beforeUpdate data:", this.msg);
            console.log("beforeUpdate view:",document.getElementById("h1").innerText);
        },
        updated(){//Run-time second function This function executes with data data page data consistent
            console.log("updated data:", this.msg);
            console.log("updated view:",document.getElementById("h1").innerText);
        },
        //Destruction phase
        beforeDestroy(){//First Function When Destroyed The vue instance just started destroying when the function executed
            console.log("beforeDestroy:","Start Destroying");
        },
        destroyed(){
            console.log("destroyed:","Destroy All");
        }

    })
2. Use
2.1 vue common properties

2.1.1 el mount point
el is the element used to set the Vue instance mount (management)
-
Vue manages the elements in the el option and their descendants inside
-
Other selectors are available, but ID selectors are recommended
For example:#app .app
-
You can use other double tags, but not for html and body Tags
2.1.2 data attribute
1. The data used in the Vue is defined in the data, that is, we can get the value by {{}}
2. Complex types of data can be written in data
  const vm = new Vue({
    el: '#app',
    data: {
      msg: 'atguigu',
      school: {
        name: 'xiaoming',
        age: 18
      }
    }
  })
3. When rendering complex types of data, just follow the js syntax
such as {{school.name}}
2.2 vue directive
The vue directive is a special set of syntax that starts with ==v-==
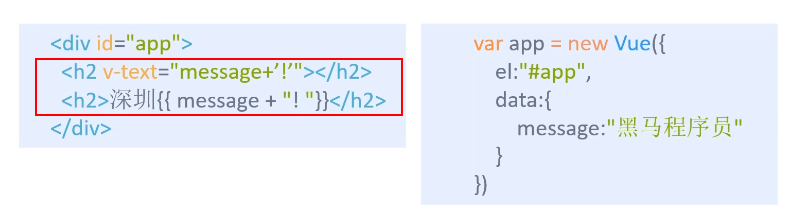
2.2.1 v-text
1. TextContent used to set labels (e.g., p,span, etc.), internal support for writing expressions
2. By default, the entire content is replaced, and a partial specification can be replaced with a difference expression
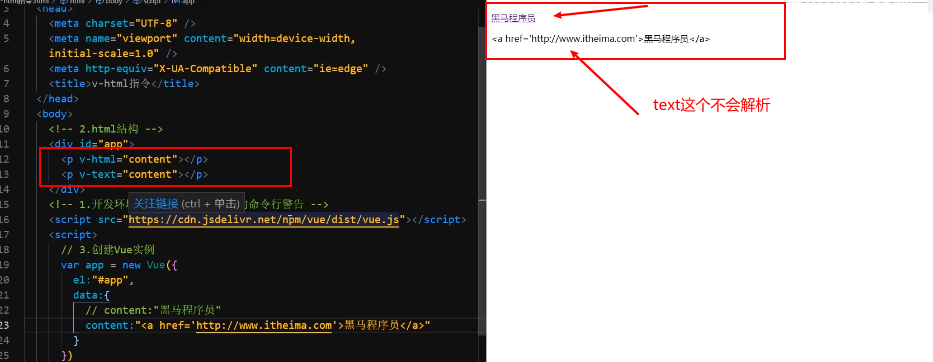
2.2.2 v-html
1. innerHTML used to set elements
2. Content with html structure will be parsed and labeled
3.v-text parses into text whatever it is
4. If only text is parsed, then HTML and text are the same. If you need to parse the HTML structure, you must use v-html
# Summary:
	v-text  and  v-html:  Effect: Used to get vue Instance data Attribute declaration data usage syntax: On which label to get the definition directly on which label v-text v-html  stay v-text="Property Name"

	{{}} Value and  v-text Value Difference:
		1.{{}}Value does not empty label raw data for use v-text Value Empty Label Raw Data    {{}}===>This way interpolation expressions are taken
		2.{{}}There is interpolation flicker in the value   v-text v-html No interpolation flicker for value

	Recommend: Both options are available  {{}} More flexibility

	v-text (innerText),  v-html (innerHtml)Difference:
		1.Use v-text Value:Render the fetched data directly into the specified label
		2.Use v-html Value:Get data first html Label Resolution,Render to specified tag after parsing
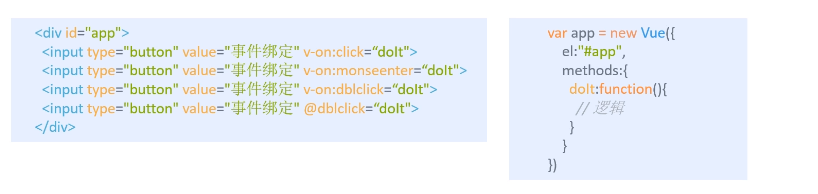
2.2.3 v-on
1. Bind events for elements
2. No on is required before the event name. Instructions can be abbreviated as @. Binding methods are defined in the methods property
3. Data defined in the data can be accessed internally through this keyword
4. Events followed by==. Modifier==can restrict events
5. Event-bound methods are written as functions that allow you to customize parameters to receive incoming arguments
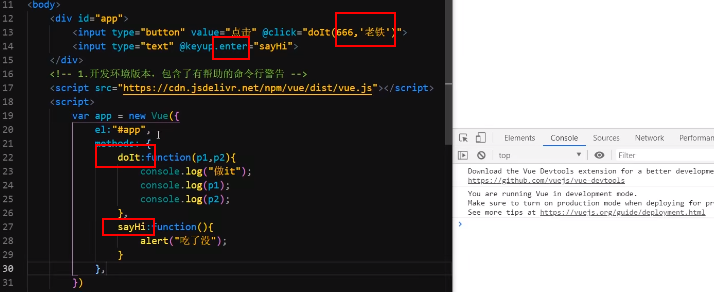
# Summary:

	js Medium Event(event): Event Three Elements:
		Event Source: Take a specific action html Label
		Event:   Occurs a specific action event Click Event onclick ondblclick onmouseover onmouseout keyup  keydown .....
		Monitor:  Event handlers are typically found in js Medium is an event handler  function(){}


	v-on instructions:  Effect: Syntax used to bind events to labels on pages: Use on corresponding labels v-on:Event Name="Event Handler Function Name"
    v-on instructions: Used to bind specific events to corresponding Tags
    v-on Instruction Simplified Writing    @  grammar: @Event Name=Event Handler Function Name
    Original Defined Function: Function name:function(){}   =====> Simplified function:  Function name(){}
2.2. 3.1 Event Modifier
Event modifier:
    .stop     Effect: Used to prevent event bubbles to prevent events from continuing to propagate outward
    .prevent  Effect: Default behavior to prevent labels
    .self     Effect: Listen only for events triggered by your own tag
    .once     Effect: This event is triggered only once

    grammar:      @Event Name Event Modifier="Event Handler"======> @click.stop="test"

        <div style="width: 200px;height: 200px;background: red" @click="parent">
        	//@click.stop indicates that after child1 clicks, the event only triggers on child1 and child1
            <div style="width: 100px;height: 100px;background: aquamarine" @click.stop="child">
                <div style="width: 50px;height: 50px;background:royalblue" @click="child1">
                </div>
            </div>

        </div>
2.2. 3.2 Key Modifier
Event modifier: Used to decorate some column descriptions of events
 Key modifier: Modifier used to modify keyboard key events
	keyup keydown ...
	.enter   Modify keyboard return key
	.tab     Switch keyboard tab Key Modification
	.delete (Capture Delete and Backspace keys)
	.esc     For keyboard esc Key Modification
	.space   Modify keyboard space keys
	.up      Up to
	.down    lower
	.left    Left
	.right   right

<input type="text" v-model="name" @keyup.enter.tab.delete.esc.space.up.down.left.right="keyup">
<input type="text" @keyup.enter="test">
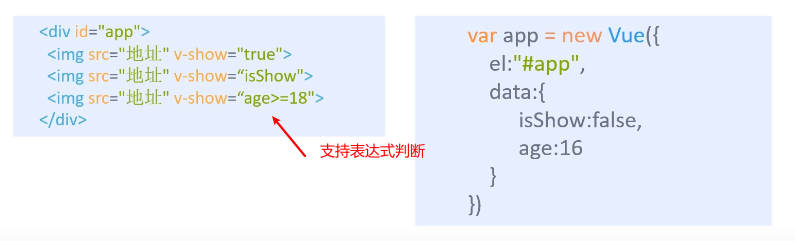
2.2.4 v-show
1. Switch the display and hiding of elements based on the authenticity of the expression
2. The principle is to modify the display of elements to show and hide them
3. Instruction must be followed by a Boolean value. If true, it will be displayed
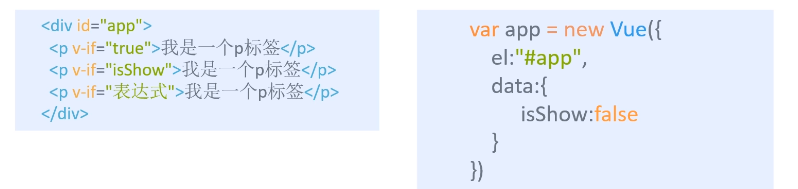
2.2.5 v-if
1. Switch the display state of an element based on the authenticity of the expression
2. The essence is to switch the display state by manipulating the dom element
3. The value of the expression is true, the element exists in the dom tree, false, then it is removed from the dom tree
4. Use v-show for frequent switching and v-if for converse switching because the former consumes less
# summary

v-if , v-show:
	Directive: Role: Used to pass through vue How to control which labels on the page are displayed and hidden
	grammar: Control the tab display hide directly on that tab v-if="true|false|Logical operation expression" v-show="true|false"
	Difference:
        1.v-if Bottom Through Control dom Element nodes on the tree display and hide page labels      dom tree
        2.v-show Bottom level by control label css in display Property implements label display and hiding   css style

Usage Summary:
	Generally speaking, v-if Has higher switching overhead, and v-show There is a higher initial rendering overhead. Therefore, if you need to switch very frequently, use v-show Better; If the runtime conditions rarely change, use v-if preferably
	Change Quick Use v-show  Slow change  v-if
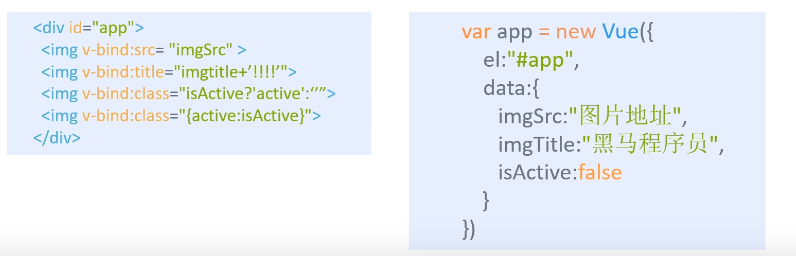
2.2.6 v-bind
1. Set the attributes of the element, such as src, title, class
2. Short form: attribute name
3. The class attribute needs to be deleted dynamically, so the object method is recommended
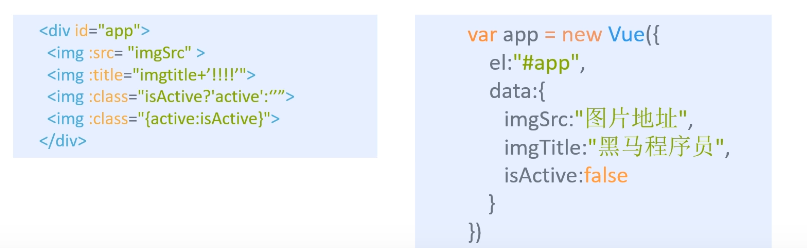
v-bind: binding
	Effect: Used for binding html An attribute in the label is given to vue Instance Management
	benefit: Once attributes are given to vue After instance management,It can be modified later vue Dynamic modification of label properties by binding properties in an instance
	grammar: On the corresponding label v-bind:Property Name
    Simplified Writing:  :Property Name="Attribute Value"   Recommend

1.Dynamic modification of label properties
 such as  <img v-bind:width="width" v-bind:height="height" src="https://img2.baidu.com/it/u=1909694165,3400923478&fm=26&fmt=auto&gp=0.jpg">
Label above src Attributes are written to death, so if we want to change them dynamically, we can src Hand vue Instances are managed so that we can vue Modify the instance to change the corresponding properties of the label:

<img v-bind:width="width" v-bind:height="height" v-bind:src="src">
var app = new Vue({
        el:"#app', // represents the scope of the vue instance
        data:{    //Bind data for vue instance
            msg:"hello vue",
            src:"https://img2.baidu.com/it/u=1909694165,3400923478&fm=26&fmt=auto&gp=0.jpg",
            width:200,
            height:200
        }
    });

2.Modify label style dynamically
v-bind: Used to html Label property binding vue Example,Modify later vue Instance attributes to dynamically modify label attributes
<div v-bind:class="cls?'aa':'bb'" @mouseover="changeClsBB" @mouseout="changeClsAA"></div>
    <style>
        .aa{
            width: 200px;
            height: 200px;
            border: 10px red solid;
        }
        .bb{
            width: 200px;
            height: 200px;
            border: 10px green dashed;
        }
    </style>
2.2.7 v-for
1. Generate list structure from data
2. Arrays are often used in conjunction with v-for
3. The syntax is (item, index) in data, item is an element, index is the index of the following table, item and index can be used in combination with other instructions

# Summary:

v-for
	instructions:   Effect: Used to implement in pages vue Traversal of data defined in
	grammar: Add directly to the corresponding label v-for instructions
		a.Traversing Objects: v-for="value,key,index in data Medium variable name"
		b.foreach: v-for="item Elements of common type,index in data Medium variable name"
		c.Traversing Array Objects:  v-for="item object,index in data Medium variable name"
	Be careful: in use v-for It is recommended to use whenever possible v-for Provided when key attribute  key Attribute Unique (although key No html Label Properties)

<h3>Traversing Objects</h3>
	<span v-for="value,key,index in user">   [{{index}} {{key}} {{value}}]  </span>
<h3>foreach</h3>
	<li v-for="item,index in schools">{{index+1}}--- {{item}}</li>
2.2.8 v-model
1. Get and set the values of form elements (bidirectional data binding)
2. Binding data is associated with form element values
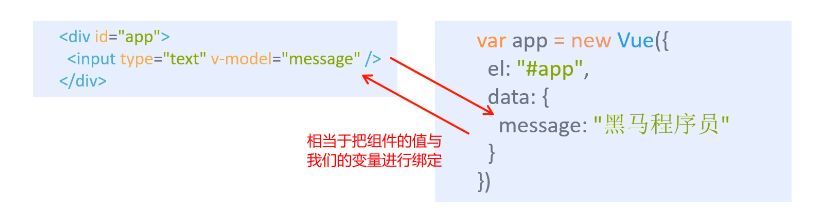
# Summary:

	v-bind:   Binding Role:  Used to html Label's properties are bound,Hand vue Instance Management Except value All attributes except attributes
	v-model:  Model Role:  Used to html Labeled value Property Binding,Hand vue Instance Management    A directive that best reflects the bidirectional binding mechanism on a form element
	grammar: Add directly to form element labels v-model="vue A variable in an instance"

For example:<input type="text" value="aaa"> The value of this form is aaa,Dead. If we want to modify and show its value in real time, we can use two-way binding.
<input type="text" v-model="msg">
		data:{    //Bind data for vue instance
            msg:"aaa",
        }
2.1 Template Syntax
Understanding templates: Dynamic html pages with some JS syntax code
1. Double brace expression
Syntax: {{exp}}
Functions:
- Output data to page
- Methods that can call objects
  <p>{{content}}</p>
  <p>{{content.toUpperCase()}}</p>
2. Directive: Custom label properties starting with v-
Directive 1: Force data binding
Function: Specify changing attribute values
Complete Writing:
v-bind:xxx='yyy'//yyy will be executed as expression resolution
Short Writing:
:xxx='yyy'
Directive 2: Bind event monitoring
Function: Bind callback function for specified event name
Complete Writing:
v-on:click='xxx'
Short Writing:
@click='xxx'
  <h2>2. Directive 1: Force data binding</h2>
  <a href="url">Visit the specified site</a><br>
  <a v-bind:href="url">Visit specified site 2</a><br>
  <a :href="url">Visit specified site 2</a><br>

  <h2>3. Directive 2: Bind Event Listening</h2>
  <button v-on:click="test">Click on me</button>
  <button @click="test">Click on me</button>

  <script type="text/javascript">
  new Vue({
    el: '#app',
    data: {
      content: 'NBA I Love This Game',
      url: 'http://www.atguigu.com'
    },
    methods: {
      test () {
        alert('Good!!!')
      }
    }
  })
</script>
2.2 Computing attributes
If we need to calculate the total price of a commodity, the most common way to do this is to method If the total price is displayed on several pages, then each page calls the method repeatedly to execute, and each method execution consumes performance, so you can use computed This is because the calculated results are cached

computed:  Compute attribute recommendation
	Effect:  For use in vue Complete related business calculations in an instance    When rendering a page with data in the future, it can be used if the data needs to be rendered after business processing computed
	benefit:  Promote vue Running performance is primarily used computed Computing the related processing caches the first calculation result,Convenient for multiple use of pages in the future
	Use:  {{Property Name}}

<h1> {{counts}} {{counts}} {{counts}}</h1>
        computed:{ //Computing attributes
            counts(){
                console.log("computed.counts----------------------");
                return this.count+10;
            }
		}
2.3 Monitoring
2.4 Forced Binding
3. Component Templates
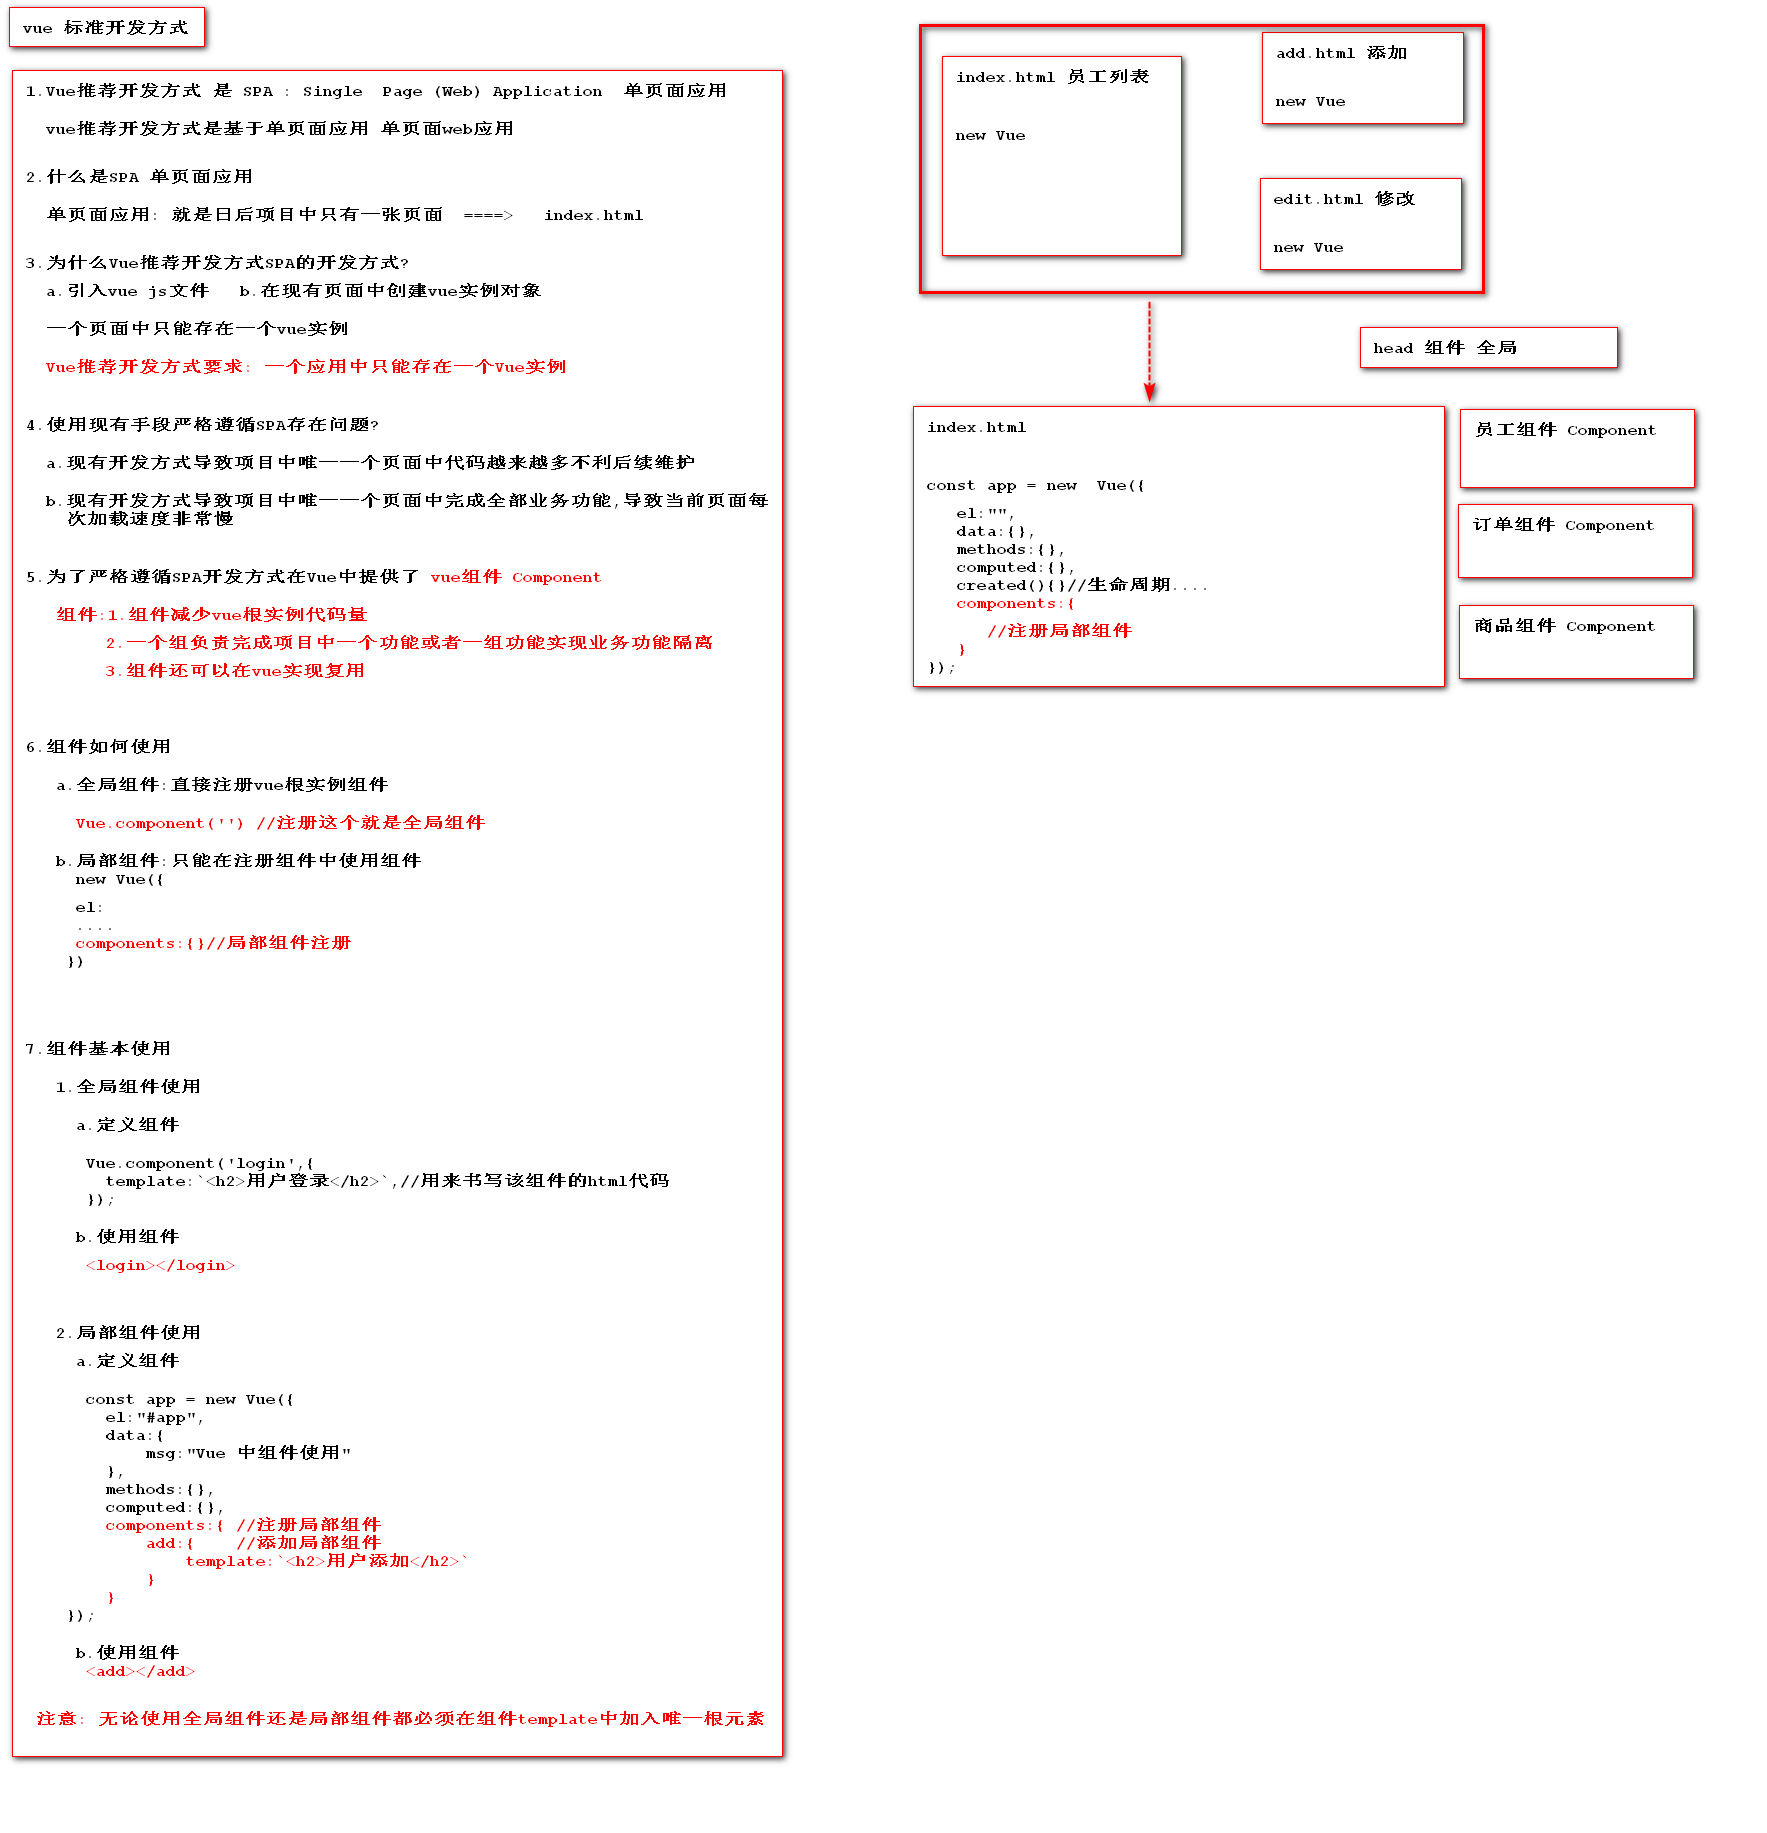
1. An application has only one Vue instance, which means that only one new vue() executes the whole application, and all subsequent operations are executed in this vue. It is impossible that there is one Vue instance per page.
2. The data attribute in the group price must be a function with a return value (the return value is an object). The data defined in the component will be placed in the data function, and the data data in the component can only be used in the current component.
3. If there are multiple label elements in a component, the component must have a root container wrapped around it (such as a div)
4. When you want to see some properties of an example, you can use console.log(this) to see the specific properties of the example
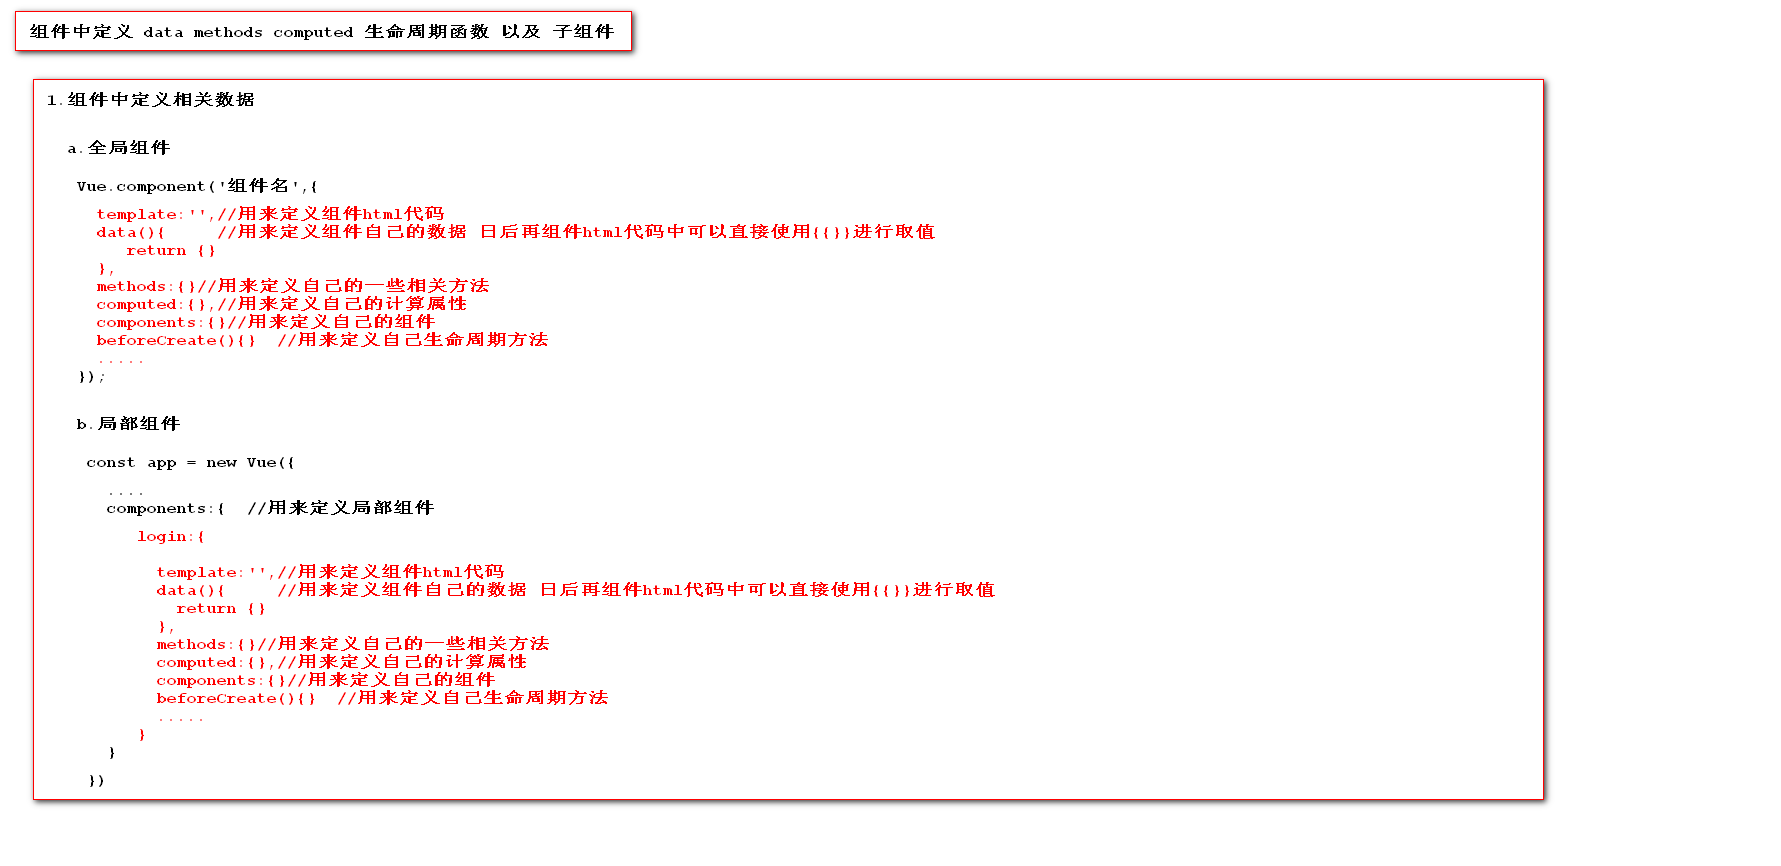
3.1 Component Role
Component role: Used to reduce the amount of code in the Vue instance object, in the future, during the development process using Vue, you can divide the page into different components according to different business functions, and then complete the layout of the entire page by multiple components, which facilitates page management when using Vue for future development, and facilitates developer maintenance.
3.2 Component Use
3.2. 1 Global Component
Description: A global component is registered with a Vue instance and can be used later within the scope of any Vue instance
//1. Develop global components
Vue.component('login',{
  template:'<div><h1>User Login</h1></div>'
});
//2. Use global components within the scope of the Vue instance
<login></login>
# Be careful:
 - 1.Vue.component Used to develop global component parameter 1: Component name parameter 2: Component Configuration{}  template:''Used to write components html Code  template There must be one and only one in root element
 - 2.Required for use Vue Use global components by component name within scope
 - 3.If the hump naming component is used during component registration, all lowercase words for the hump must be added when using the component-Line for use
3.2. 2 Local Components
Description: Complete component registration by registering components with a components property in the corresponding Vue instance, which does not add up to the Vue instance
- First Development Method
//Local component login template declaration
let login ={   //Specific local component name
  template:'<div><h2>User Login</h2></div>'
};
const app = new Vue({
  el: "#app",
  data: {},
  methods: {},
  components:{  //Used to register local components
    login:login  //Register local components
  }
});

//Local components are used within the scope of the Vue instance
<login></login>
- Second Development Method
//1. Declare local component template tags Note: Declare outside the scope of the Vue instance
  <template id="loginTemplate">
      <h1>User Login</h1>
  </template>

//2. Define variables to save template configuration objects
    let login ={   //Specific local component name
        template:'#loginTemplate'// Use custom template tag selector
    };

//3. Register Components
    const app = new Vue({
        el: "#app",
        data: {},
        methods: {},
        components:{  //Used to register local components
            login:login  //Register local components
        }
    });

 //4. Local components are used within the scope of the Vue instance
	 <login></login>
Code example:
    const login = {
        template:`<div id="aa">
                  <h2>User Login</h2>
                  <h2>{{counter}}---{{msg}}---{{counterSqrt}}---{{counterSqrt}}----{{counterSqrt}}</h2>
                  <button @click="test(10)">Click on me counter++</button>
                  <aa></aa>
                  <register></register>
                  </div>`, //Used to write component html code
        data(){ //Defining data for the current component that belongs to the component's own data component must be a function
           return {
               counter:1,
               msg:"I am a component msg"
           }
        },
        methods:{ //Used to define some column methods for components themselves
            test(count){
                this.counter+=count;
            }
        },
        computed:{ //Used to define some column calculation methods for components themselves
            counterSqrt(){
                return this.counter*this.counter;
            }
        },
        //Initialization phase
        beforeCreate(){
            console.log("beforeCreate:",this.msg);},
        created(){
            console.log("created:",this.msg);
        },
        beforeMount(){ //Whether the template or template in the component is not rendered at this time
            console.log(this);
            //console.log("beforeMount:",this.$el.innerHTML);
        },
        mounted(){  // The data of the page in the component is now consistent with that in the data
            console.log("mounted:",document.getElementById("aa").innerHTML);
        },
        //Running phase
        beforeUpdate(){// Whether the data in the data changes the page data or the original data at this time
            console.log("beforeUpdate:",this.counter);
            console.log("beforeUpdate:",document.getElementById("aa").innerHTML);
        },
        updated(){  //Data page data is consistent at this time
            console.log("updated:",this.counter);
            console.log("updated:",document.getElementById("aa").innerHTML);
        },
        //Destruction phase
        beforeDestroy(){},
        destroyed(){},
        components:{//There are also subcomponents within the component
            aa:{  //Define Components
                template:'<div><span>I am aa Subcomponents</span></div>'
            },
        }
    };
3.3 Component Data Transfer
3.3. 1 Use of Prop
1. Role: props are used to pass corresponding static or dynamic data to components
2. Can only complete data transfer from parent component to child component, is one-way
3.props: ['userName'], is equivalent to declaring a variable userName in data, so once a variable such as userName has been defined in props, there is no need to define a userName in data anymore
3.3. 1.1 Pass static data to components by declaring it on them
//1. Declare Component Template Configuration Objects
    let login = {
        template:"<div><h1>Welcome:{{ userName }} Age:{{ age }}</h1></div>",
        props:['userName','age']  //The props function receives data passed through the component label when using the component, and receives data passed by the parent component to the current component Note: The props mechanism receives data as if it were declared in its component data
    }

//2. Register Components
    const app = new Vue({
        el: "#app",
        data: {},
        methods: {},
        components:{
            login //Component Registration
        }
    });

//3. Complete data transfer through components
	<login user-name="Xiao Chen" age="23"></login>
# Summary:
			1.Components allow you to define multiple properties and corresponding data on them
			2.Can be used inside components props Array life Multiple property names defined on a component can be passed in the component later{{ Property Name }} Method to get property values in a component
3.3. 1.2 Transfer dynamic data to components by declaring on them
//1. Declare Component Template Objects
    const login = {
        template:'<div><h2>Welcome: {{ name }} Age:{{ age }}</h2></div>',
        props:['name','age']
    }

//2. Register local components
    const app = new Vue({
        el: "#app",
        data: {
            username:"Xiao Chen",
            age:23
        },
        methods: {},
        components:{
            login //Register Components
        }
    });

//3. Use Components
	 <login :name="username" :age="age"></login>  //Use v-bind to bind data to data attributes in Vue instances. The data attributes will change in the future and the data inside the component will change
3.3.1.3 prop one-way data stream
One-way data flow: All props result in a single downward binding between their parent and child props: updates to the parent prop flow down into the child components, but not vice versa.
-
All props result in a single downward binding between their parent and child props: updates to the parent prop flow down to the child components, but not vice versa. This prevents accidental changes in the state of parent components from child components, which can make the flow of data in your application difficult to understand.
-
Additionally, every time a parent component is updated, all props in the child component are refreshed to the latest value. This means that you should not change prop within a subcomponent. If you do, Vue will warn you in the browser's console. - From the official website
3.3. 2 Pass an event to and invoke it in a subcomponent
1. Calling related events passed in in a subcomponent must use this.$emit('function name') method call
2. Passing events to components when using components directly defines the delivery event on the corresponding component label @key=value @Passing event name="Passing event name in parent component"
//1. Declare Components
    const login = {
        template:"<div><h1>Best Knowledge Education {{ uname }}</h1> <input type='button' value='Click on me' @click='change'></div>",
        data(){
            return {
                uname:this.name
            }
        },
        props:['name'],
        methods:{
            change(){
                //Calling a function in a vue instance
                this.$emit('aaa');  //This. $is required when calling other functions passed in by components Emit('function name call')
            }
        }
    }

 //2. Register Components
    	const app = new Vue({
        el: "#app",
        data: {
            username:"Xiao Chen"
        },
        methods: {
            findAll(){  //An event function passes this function to a subcomponent
                alert('Vue Define a function in an instance');
            }
        },
        components:{
            login,//Registration of components
        }
    });

//3. Use Components
	<login  @aa="findAll"></login>    //=====>Use this within a component. $ Emit ('find')
Example of passing values to parent components:
const login = {
        template:`<div><h3>User Login---{{name}}---{{msg}}</h3> <button @click="testChild">Click me to remove an event from the parent component</button></div>`,
        data(){
            return {
                count:19
            }
        },
        props:['name','msg'],
        methods:{
            testChild(){
                alert('I am defining events in subcomponents');
                //Call the testParent event in the parent component
                this.$emit('testparent');//This method is used to invoke the event parameter 1 passed by the parent component: invoke the event name
                //this.$emit('bb',this.count,'xiaochen',true);// Transfer Scattered Parameters
                //this.$emit('bb',{count:this.count,name:'Xiao Chen', sex:true}); // Transfer Scattered Parameters
            }
        }
    };

    const app = new Vue({
        el: "#app",
        data: {
            msg: "Event Passing Between Components",
            count:0
        },
        methods:{
            testParent(){
                alert('I am an event on the parent component')
            },
            testHehe(obj){
                console.log("parent:","hehe");
                console.log("parent:",obj);
                console.log("parent:",obj.count);
                console.log("parent:",obj.name);
                console.log("parent:",obj.sex);
                this.count = obj.count;
            }
        },
        components:{ //Register local components
            login,
        }
    });
4. Slot slot
-
Slot: slot Role: Use to extend existing components to make components more flexible usb Interface Named slot: Named slot -
To put it plainly, it is a placeholder, which presets the position first. That is, if the component needs to display in the preset position later, it can add data to the slot and display it. If it is not used, it will not show the blank
    <login><span slot="bb">Welcome to our website</span></login>
    <hr>
    <login><span slot="aa">welcome to website!!! {{msg}}</span></login>
    <hr>
    <login><button slot="aa" @click="incrmentCount()">Click on me</button></login>


     const login={
        template:`<div><slot name="aa"><span>i am moren chacao</span></slot><h3>User Login</h3><slot name="bb"></slot></div>`
    };

    const app = new Vue({
        el: "#app",
        data: {
            msg: "Component's slot(slot)",
            count:0,

        },
        methods:{
            incrmentCount(){
                this.count++;
            }
        },
        components:{ //Register local components
            login,
        }
    });
5. Network Communication
5.1 axios
Axios is an asynchronous request technology whose core function is to send asynchronous requests in a page and get corresponding data to render the page local update technology Ajax
Chinese website: https://www.kancloud.cn/yunye/axios/234845
<script src="js/axios.min.js"></script>
<script>

    //Send axios get mode request
/*
    axios.get("http://localhost:8081/demo?id=21&name=xiaochen").then(function(res){
        console.log(res);
        console.log(res.data);
    }).catch(function (err) {
        alert('Enter catch')
        console.log(err);
    });
*/

    //Send a post request
    // axios.post("http://localhost:8081/test",{id:21,name:"xiaochen"}).then(function(res){
    //     console.log(res);
    //     console.log(res.data);// Response results
    // }).catch(function(err){
    //     console.log(err);
    // });

    //Send put Request
    // axios.put("http://localhost:8081/test1",{id:22,name:" junior three "}). then(function(res){
    //     console.log(res);
    //     console.log(res.data);// Response results
    // }).catch(function(err){
    //     console.log(err);
    // });


    //Create configuration objects for axios
    var instance = axios.create({
        baseURL:"http://localhost:8081/",
        timeout: 5000,
    });

    //request interceptor
    instance.interceptors.request.use(function (config) {
        if(config.url.indexOf("?")==-1){
            config.url+="?token=1234"
        }else{
            config.url +="&token=1234";
        }
        return config;
    });

    //Response Interceptor
    instance.interceptors.response.use(function (response) {
        if(response.status==500){
            alert('Server Error!');
        }
        return response;
    });

    //Send get request
    instance.get("/demo?id=11&name=xiaochen").then(function(res){
        console.log(res.data);
    });


    instance.post("http://localhost:8081/test",{id:21,name:"xiaochen"}).then(function(res){
        console.log(res.data);
    });
5.2 Scaffold Installation
# 1. Install axios
	npm install axios --save

# 2. Configure main. Introducing axios into JS
	import axios from 'axios';
	Vue.prototype.$http=axios;

# 3. Use axios
	Where asynchronous requests need to be sent:this.$http.get("url").then((res)=>{}) this.$http.post("url").then((res)=>{})
6. Custom Content Distribution
7.ES6
7.1 Introduction
    Previously developed by Netscape script,Then java Heat, named javascript,After contributing to the European Computer Association, it was introduced year by year ECMAScript 1.x ,5.x,6.x,7.x....
    javascript chrome  jscript ie =====> ECMAScript To Today js Browser still exists
    EcmaScript: 1.x=====> 7.x  8.x  ES11.x
 Most browsers now support 5.x Of, some of the latest support 6.x,Development can be used step by step ES6 Some new features are being developed
    EcmaScript: 5.x   General Version 5.x
    EcmaScript: 6.x   Abbreviation ES6
7.2 Common Syntax
ES6 provides some usage optimization, clarifies some data ranges, and simplifies usage. The four most commonly used are
7.2. 1 Variable declaration
	var Reason: Use var Declaring variables has scope confusion
	let:Used to declare local variable benefits: Scope Strictness From the beginning of the code declaration to the end of the code block is generally recommended when declaring basic variables let
	const:Used to declare js Constant Benefits: Once assigned cannot be modified Recommended use of these two keywords to declare variable declarations js Recommended for objects in const array
        Define an object  const When defining an object, it means that the address of the object is unchanged and that attributes in the object can be changed
        Define an array const When defining an array, the address of the array cannot be changed, but the elements in the array can be changed

	function test(){
        for (var i = 0; i < 10; i++) {
            console.log("for in",i);
        }
		console.log(i);//Variables defined with var continue to be accessible here, which can easily confuse the scope of a variable
    function test(){
        for (let i = 0; i < 10; i++) {
            console.log("for in",i);
        }
        const name = "xiaochen";
        console.log(name);
7.2. 2 Anonymous functions
    When using anonymous functions as parameters function(){}   Recommended Use es6 Middle Arrow Function  (parameter,parameter)=>{Function Body}

    axios.get("url").then(function(res){}).catch(function(err){});
     axios.get("url").then((res)=>{

     }).catch((err)=>{});
    Be careful:
      1.When the arrow function has no parameters or if the parameter is greater than one, it must be added()
      2.When the arrow function has only one parameter () Omit not writing
      3.Function body when there is only one line of code in it{} Omit not writing
      4.Arrow function and anonymous function Maximum difference Arrow function does not have its own this   Anonymous functions have their own this
7.2. 3 Template String
Template string using syntax: ` `
    let html = "<button οnclick=\"test('+id+')\">Click on me</button>" +
               "<button οnclick=\"test('+id+')\">Click on me</button>" +
               "<button οnclick=\"test('+id+')\">Click on me</button>" +
               "<button οnclick=\"test('+id+')\">Click on me</button>" +
               "<button οnclick=\"test('+id+')\">Click on me</button>" +
              "<button οnclick=\"test('+id+')\">Click on me</button>";
As shown above, we need to stitch together one html String, which will switch back and forth between single and double quotation marks, is very inconvenient, we can use``This way, you can just wrap it up
    let html1 = `<div>
                    <h1>I am Xiao Hei</h1>
                    <button οnclick="test()">Click on me</button>
                </div>`;
    console.log(html1);
7.2. 4 Object Definition
facilitate: When defining an object, if the object property name and variable name are identical,Write one
    let id = 21;
    let name = "Junior Three";
    let age = 23;
    //es5.x
    const emp = {id:id,name:name,age:age};
    console.log("es5",emp);
    //es6.x If the variable name is the same as the object's attribute name, you can simply write either name without writing out both IDS like E5:id
    const emp1 = {id,name,age}
    console.log("es6",emp1);
8. Routing

1. Routing: Conduct request forwarding according to certain routing rules to help us achieve unified request management
8.1 Routing Basic Use
-
Introducing Routes
<script src="https://cdn.jsdelivr.net/npm/vue/dist/vue.js"></script>
<script src="https://Unpkg. Com/vue-router/dist/vue-router. js'></script> //vue routing js
-
Create Component Object
//Declare component templates const login = { template:'<h1>Sign in</h1>' }; const register = { template:'<h1>register</h1>' }; -
Define rules for routing objects
//Create Routing Object const router = new VueRouter({ routes:[ {path:'/login',component:login}, //Path:Path component of the route:Component corresponding to the path {path:'/register',component:register} ] }); -
Register routing object to vue instance
const app = new Vue({ el: "#app", data: { username:"Xiao Chen", }, methods: {}, router:router //Set Routing Object }); -
Display the components of the route in the page
<!--Components displaying routes-->
<router-view></router-view>
-
Switch Routing Based on Connection
<a href="#/login ">Click me to log in </a>
<a href="#/register ">click me to register </a>
8.2 Several ways to switch routes
8.2. 1 Path Input Switching
  routes:[
    {path:'/login',component:login},   //Path:Path component of the route:Component corresponding to the path
    {path:'/register',component:register}
  ]
In this way, when a request url has a path string specified above, the routers match and go to the specified component to show it
8.2.2 router-link use
<a href="#/login "> user login </a>
<a href="#/reg ">User Registration </a>

<!--Route Switching Route: Switch display of different components based on request path-->
    <!--Switch Routing Link-->
    <a href="#/login "> user login </a>
	<a href="#/register ">user registration </a>

<!--Switch Routing Labels  router-link  Labels must be added to attribute to="Routing Path" -->
    <router-link to="/login">User Login</router-link>
	<router-link to="/register">User registration</router-link>

<!--Switch Routing Labels-->
    <router-link :to="{path:'/login'}">User Login</router-link>
	<router-link :to="{path:'/register'}">User registration</router-link>

<!--Name Switching Route: Switching routes by route object name Shows that different components switch routes by route name can only be used router-link  Recommended Named Routes-->
    <router-link :to="{name:'Login'}">User Login</router-link>
	<router-link :to="{name:'Register'}">User registration</router-link>


    const login =  {
        template:`<div><h4>User Login</h4></div>`
    };
    //register
    const register =  {
        template:`<div><h4>User registration</h4></div>`
    };

    //1. Create Routing Rule Objects
    const router = new VueRouter({
        routes:[
            //Name: This property represents the name of the routing object used to identify a unique name for the routing object
            {path:'/login',component:login,name:'Login'},
            {path:'/register',component:register,name:'Register'},
        ]
    });

    const app = new Vue({
        el: "#app",
        data: {
            msg:"vue router Use of Basic Use router-link Switching Routes"
        },
        methods:{},
        router,//Register Routing Objects
    });
1. Role: Replaces the use of label a to switch routes when we switch routes
2. Benefit: Routing paths can be automatically added #No need to join manually
8.2. 3 Router Switching
1.this.$route object The current route object, each component has a route object, which is the route information representing the current component
2.this.$router vueRouter represents the Router Manager object and manages all routes
methods:{
    login(){
        //Switch routes to home page after sending axios request complete login response back
        //this.$route object The current route object is this.$router vueRouter represents a Router Manager object
        //console.log(this.$route.name);
        //this.$router.push('/login'); // Switching Routes
        //this.$router.push({path:'/login'});
        //Error 1 when switching the same route multiple times in vuerouter. Judge manually before each switch 2. Join an official section to resolve errors
        // if(this.$route.name!='Login'){
        //     this.$router.push({name:'Login'}); // Switch by Name
        // }
        this.$router.push({name:'Login'});//Using name switching is recommended
    },
        register(){
            //console.log(this.$route.name);
            // if(this.$route.name!='Register') {
            //     This. $ Router. Push ({name:'Register'}); // Switch by Name
            // }
            this.$router.push({name: 'Register'});//Switch by Name
        }
},
8.3 Continuous access to the same path error resolution
1. Add the following code where the error occurred
    //Solve multiple switch errors for the same route
    const originalPush = VueRouter.prototype.push;
    VueRouter.prototype.push = function push(location) {
        return originalPush.call(this, location).catch(err => err)
    };
2. Or route jump join judgment
//Error 1 when switching the same route multiple times in vuerouter. Judge manually before each switch 2. Join an official section to resolve errors
 if(this.$route.name!='Login'){
     this.$router.push({name:'Login'});//Switch by Name
}
8.4 Default Routing Settings
Role: Used to display a default component in the first entry interface
const router = new VueRouter({
  routes:[
    //{ path:'/',component:login},
    { path:'/',redirect:'/login'},  //redirect: Used to jump to the specified route when accessing the default route'/'. Recommended
    { path:'/login', component:login},
    { path:'/register', component:register},
  ]
});
8.5 Routing parameter delivery
8.5. 1 Traditional way
-
Pass? Number splicing parameters
<router-link to="/login?id=21&name=zhangsan">I want to sign in</router-link> <router-link to="/login?name=xiaohei&password=123456">User Login</router-link> <router-link :to="{path:'/login',query:{name:'xiaohong',password:123456}}">User Login</router-link> <router-link :to="{name:'Login',query:{name:'xiaohei',password:123456}}">User Login</router-link> -
Get parameters in components
const login = {
  template:'<h1>User Login</h1>',
  data(){return {}},
  methods:{},
  created(){
    console.log("=============>"+this.$route.query.id+"======>"+this.$route.query.name);
  }
};
8.5.2 restful
-
Passing parameters by using paths
<router-link to="/register/24/Zhang San">I want to register</router-link> var router = new VueRouter({ routes:[ {path:'/register/:id/:name',component:register} //Getting corresponding parameters in a defined path ] }); <router-link :to="{path:'/register/22/xiaojindou'}">User registration</router-link> <router-link :to="{name:'Register',params:{id:233,name:'xiaojinniu'}}">User registration</router-link> -
Get parameters in components
const register = {
  template:'<h1>User registration{{ $route.params.name }}</h1>',
  created(){
    console.log("In the registration component id:   "+this.$route.params.id+this.$route.params.name);
  }
};
8.6 Nested Routing
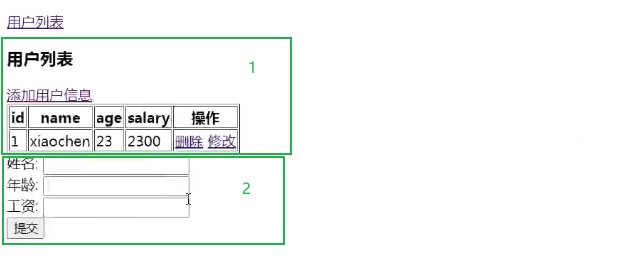
As shown above, there is a requirement that when you click "Add User Information" on the 1st panel, a form will be displayed below the table for information entry if we follow this line
    //Define Routing Rule Objects
    const router = new VueRouter({
        routes:[
            {
                path:'/users',name:'users',component:users,
				path:'/useradd',name:'useradd',component:useradd
            },
        ]
    });
Since both users and useradd routes are flat and there is only one, when we click on any route, the page content will be overwritten by the next route
The solutions are as follows:
<body>
    <div id="app">
        <h1>{{msg}}</h1>

        <router-link :to="{name:'users'}">User List</router-link>
        <!--1.Show routing components-->
        <router-view></router-view>
    </div>
</body>
</html>
<template id="users">
    <div>
        <h3>User List</h3>
        <a href="#/users/useradd'>Add user information </a>
        <table border="1">
            <tr>
                <th>id</th>
                <th>name</th>
                <th>age</th>
                <th>salary</th>
                <th>operation</th>
            </tr>
            <tr v-for="user,index in users">
                <td>{{user.id}}</td>
                <td>{{user.name}}</td>
                <td>{{user.age}}</td>
                <td>{{user.salary}}</td>
                <td><a href="">delete</a> <router-link :to="{name:'useredit',query:{id:user.id}}">modify</router-link></td>
            </tr>
        </table>
        <!--2.Show subrouting component labels-->
        <router-view></router-view>
    </div>
</template>
<script src="js/vue.js"></script>
<script src="js/vue-router.js"></script>
<script>


    //Define user list
    const users = {
        template:'#users',
        data(){
            return {
                users:[]
            }
        },
        created(){
            //Send axios request to query all
            this.users = [{id:1,name:'xiaochen',age:23,salary:2300}]
        }
    };

    //3. Define User Add Components
    const useradd={
        template:`<div><form action="">Full name: <input type="text"> <br> Age: <input type="text"> <br>  wages: <input type="text"> <br> <input type="submit" value="Submit"></form></div>`
    };
	//4. Edit Components
    const useredit={
        template:`<div><form action="">id: <input type="text" v-model="user.id"> <br> Full name: <input type="text" v-model="user.name"> <br> Age: <input type="text" v-model="user.age"> <br>  wages: <input type="text" v-model="user.salary"> <br> <input type="button" @click="editUser" value="Submit"></form></div>`,
        data(){
          return {
              user:{}
          }
        },
        methods:{
            editUser(){
                //Send axios request to update user
                // axios.post("url",this.user).then(res=>{
                //     this.user = {};// wipe data
                //     this.$router.push({name:'users'})//Switch Routing
                // });
                this.$router.push({name:'users'})//Switching Routes
            }
        },
        created(){
            let id = this.$route.query.id;
            console.log("updated: ",id);
            //Send axios request
            //axios.get("url?id="+id).then(res=>this.user = res.data);
            this.user = {id:id,name:'xiaochen',age:23,salary:2300};
        }
    };

    //5. Define routing rule objects
    const router = new VueRouter({
        routes:[
            {
                path:'/users',name:'users',component:users,
                children:[ //Nested subcomponent routing Note: Nested routing subrouting cannot use/start access subrouting/users/useradd
                    {path:'useradd',name:'useradd',component:useradd},
                    {path:'useredit',name:'useredit',component:useredit},
                ]
            },
        ]
    });


    const app = new Vue({
        el: "#app",
        data: {
            msg:"vue router Basic Nested Routing"
        },
        methods:{},
        router,//Register Routes
    });
</script>
9.webpack
Essentially, webpack is a static module bundler for modern JavaScript applications. When a webpack processes an application, it recursively builds a dependency graph that contains each module the application needs, then packages all of them into one or more bundles.
The Evolution of 9.1 Modularization
# 1.Script tag introduction
	I used to need someone else to write it js,Need to use script Tags are introduced, which can lead to variable conflicts, each package being introduced manually, and confusing management

# 2.CommonsJs
	CommonsJS Specification, the core idea is to allow modules to pass through require Method to load the required dependencies synchronously, then exports or module.exports To export interfaces that need to be exposed.
	However, this way is to load synchronously, not to load multiple modules in parallel, which is inefficient

# 3.AMD
	Given the special circumstances of browsers, another specification has emerged that allows dependent modules to be loaded asynchronously and that will load them earlier AMD Specification, whose core interfaces are: define(id?, dependencies?, factory) ,It specifies all dependencies when declaring modules dependencies ,And also as a parameter to factory In, for dependent modules to execute ahead of time, dependent on the front. Load modules asynchronously in the browser environment; Loading multiple modules in parallel
define("module", ["dep1", "dep2"], function(d1, d2) {
  return someExportedValue;
});
require(["module", "../file"], function(module, file) { /* ... */ });
	However, development costs are high and it is difficult to read and write code.


# 4. CMD
	Common Module Definition Specifications and AMD Similar, keep it as simple as possible, and CommonJS and Node.js Of Modules The specification maintains great compatibility.
define(function(require, exports, module) {
  var $ = require('jquery');
  var Spinning = require('./spinning');
  exports.doSomething = ...
  module.exports = ...
})
	Dependencies are close, and deferred execution can be easily done in Node.js Run in,But dependent SPM Packaging, module loading logic biased

# 5.ES6
	ES6 Modules are designed to be as static as possible so that when editing, you can determine the dependencies between modules, as well as input and output variables. and CommonJs and AMD That's what happens at run time.
	for example CommonJs A module is an object, and when you enter it, you must look for its properties, and ES6 Modules can expose any variables, functions, and so on.

	So ES6 Modules are loaded "compile-time" or statically.

	ES6 The module function consists of two main commands: export and import. export To specify the external interface of a module, import Used to enter functions provided by other modules.


Reference resources:
https://zhuanlan.zhihu.com/p/26625636
https://www.cnblogs.com/chinabin1993/p/10565816.html
https://zhuanlan.zhihu.com/p/41231046
https://www.imooc.com/article/20057/
9.2 Role
1. ES6 can be packaged into ES5 so that all browsers support running
2. It is a tool that writes many css files, js files, pictures and other "items" into one js file instead of introducing static resources through script,link tags on an html page
3.CSS preprocessing. Compile Less, Sass to css
(1) Modular development (import, require)
Preprocessing (Less, Sass, ES6, TypeScript...)
(3) Mainstream framework scaffolding support (Vue, React, Angular)
(4) Large community (rich resources, lower learning costs)
10. Scaffold Vue CLI
10.1 nodeJs installation
1.Node.js is an open source and cross-platform JavaScript runtime environment (equivalent to a browser that runs code directly). It is a popular tool for almost any project!
2.Node.js is an underlying platform. To make things easier and more exciting for developers, the community is in Node. Thousands of libraries are built on js.
3.Node.js is an event-driven I/O server-side JavaScript environment. Based on Google's V8 engine, the V8 engine executes Javascript very quickly and performs very well.
# 1. Download nodejs
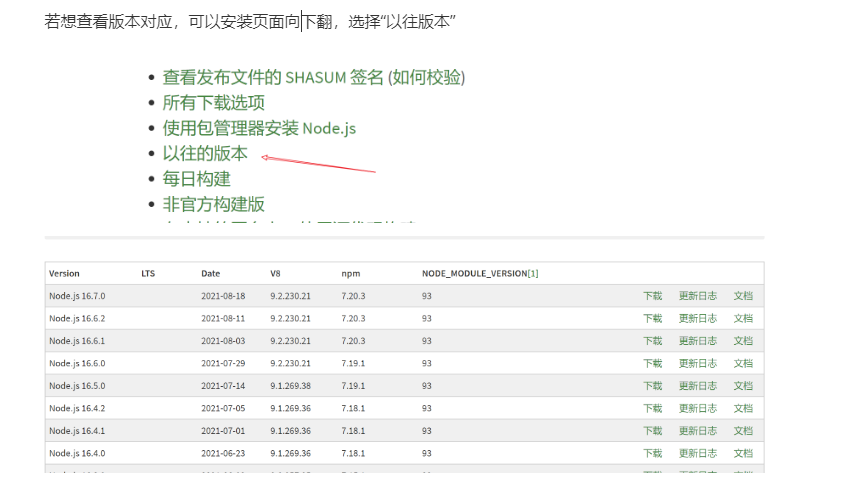
http://nodejs.cn/download/
windows system: .msi Installation package(exe)Specify installation location .zip(Compressed Packet)Decompress the specified directory directly
mac os system: .pkg Installation Package Format Automatically Configure Environment Variables .tar.gz(Compressed Packet)Unzip installation to specified name
After installation, it will be installed automatically npm,And add environment variables to path
`npm package manager`Express npm Package Manager
`online documentation shortcuts` Online Document Shortcuts
`Add to PATH`Add to node Installation path to environment variable
# 2. Configure nodejs environment variables
1.windows system: If not added automatically path,Then you need to configure it manually yourself
Calculate Upper Right-Click Properties----> Advanced Properties ---->Environment variables add the following configuration:
NODE_HOME= nodejs Installation Directory
PATH = xxxx;%NODE_HOME%
2.macos system
Recommended Use.pkg Install Direct Configuration node Environmental Science
# 3. Verify that the nodejs environment is successful
node -v
# 4.npm Introduction
node package mangager nodejs Package Management Tools Front-end mainstream technology npm Conduct unified management
maven Administration java Backend Dependency Remote warehouse(Central warehouse) Ali Cloud Mirror
npm Manage Front End System Dependencies Remote warehouse(Central warehouse) Configure Taobao Mirror
# 5. Configure Taobao mirror (since remote warehouse is abroad, downloading components is slow, so you need to configure Taobao warehouse)
Set up warehouse
npm config set registry https://registry.npm.taobao.org
View warehouse
npm config get registry
If you do not configure a remote warehouse, you can also configure it every time npm When downloading, add one after registry Specify repository to download
# 6. Configure npm download dependent locations
windows:
npm config set cache "D:\nodereps\npm-cache"
npm config set prefix "D:\nodereps\npm_global"
mac os:
npm config set cache "/Users/chenyannan/dev/nodereps"
npm config set prefix "/Users/chenyannan/dev/nodereps"
# 7. Verify nodejs environment configuration
npm config ls
; userconfig /Users/chenyannan/.npmrc
cache = "/Users/chenyannan/dev/nodereps"
prefix = "/Users/chenyannan/dev/nodereps"
registry = "https://registry.npm.taobao.org/"
Differences between npm and yarn
10.2 Vue cli installation
Command-line interface (English: command-line interface, abbreviation: CLI) is the most widely used user interface before GUI became popular. It usually does not support the mouse. Users enter instructions through the keyboard and the computer receives instructions to execute them. It is also called character user interface (CUI).
1. We used other js functionality before, so we usually imported the corresponding js manually through cript src, but now we can download the related dependencies directly through the vue command
2. Previous development required manual introduction of components such as vuejs vuerouter axios. After using scaffolding, it automatically helped us to introduce them.
3. When imported components need to be upgraded, they can be upgraded with only one command
4.webpack is a packaging method (yarn is another), similar to jar or war packaged in java, and can be easily packaged and compiled using scaffolding, then deployed to the server to run
5. Scaffolding also provides default configuration files that we can modify to achieve our desired project environment
6. Extensions can be made through plug-ins, such as v-chars elementui, etc.
vue.cli scaffolding, like our maven's skeleton, provides a template way to quickly generate a vue project (our page zombies a complete system after using the vue scaffolding) by predefining the project structure catalog, the code base, and so on.
Functions include: unified directory structure, local debugging, hot deployment, unit testing, integrated packaging Online
Scaffolding: The core idea is that everything is a component
@vue/cli is V3 version vue/cli is V2 version
# 0.Unload scaffolding
	npm uninstall -g @vue/cli  //Uninstall 3.x version scaffolding
	npm uninstall -g vue-cli  //Uninstall 2.x version scaffolding

# 1. Official Vue Cli website
	https://cli.vuejs.org/zh/guide/

# 2. Install vue Cli
	npm install -g vue-cli
Once installed, we can go to the local warehouse to check
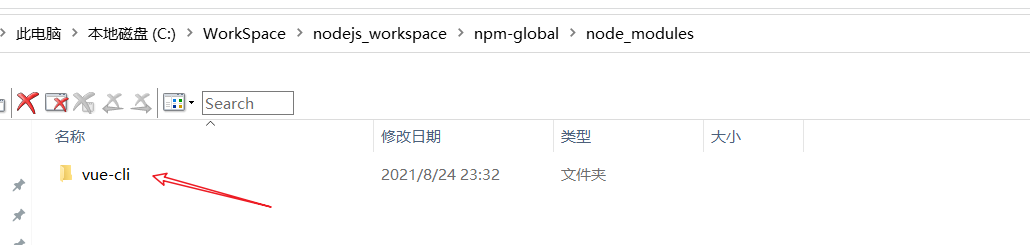
Installed, execute vue-V to see, if not, you need to manually add to the path, Reference resources After adding to the path, execute the vue, restart the webStorm if it is not possible, or restart the computer if it is not possible
10.3 Create vue project
1. Select a project parent directory, as shown in the following figure:

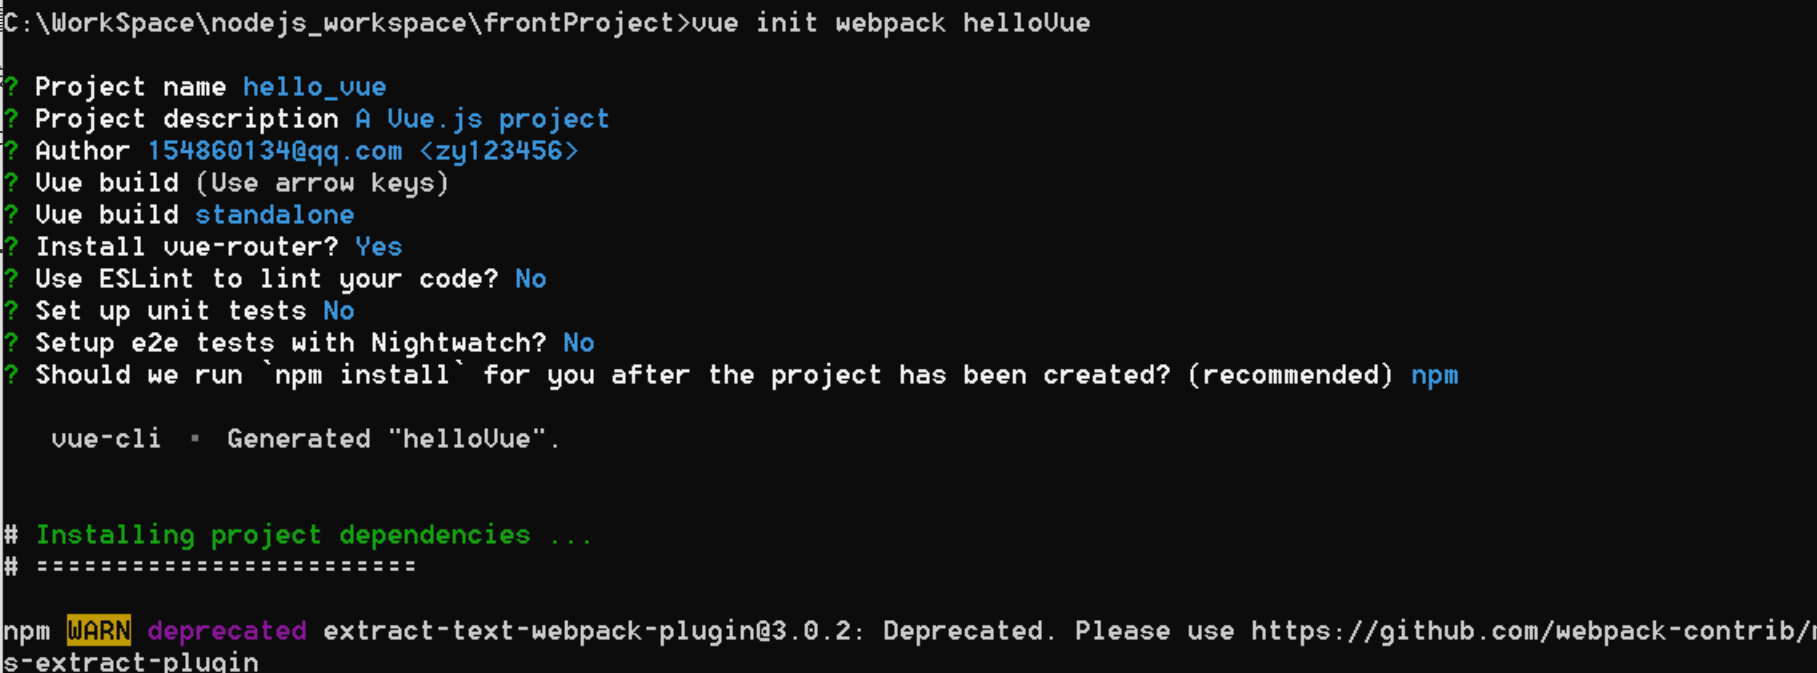
2. Initialization
vue init <template-name> <project-name>
Initialize a project, packaged as webpack
vue init webpack helloVue
3. Once initialized, we will get the start command step

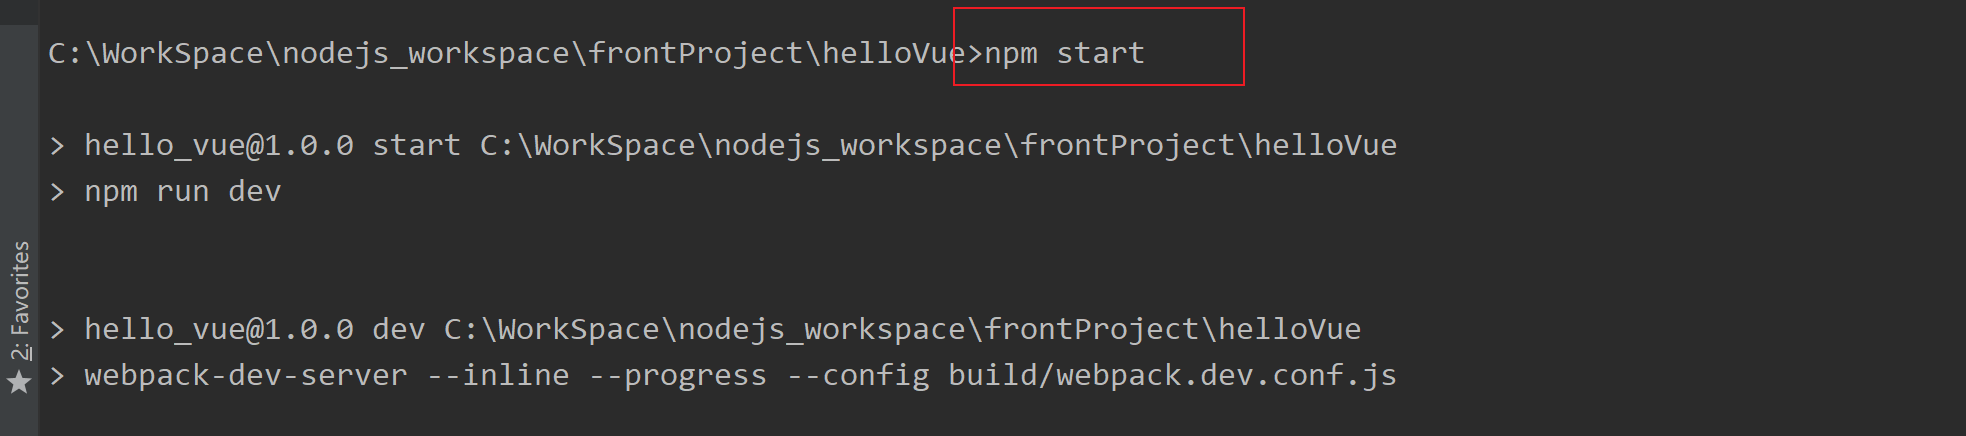
4. Enter into the package.json's directory, and then npm start
# 1. Create vue scaffolding first project
vue init webpack Project Name
# 2. Create the first project
hello ------------->Project Name
-build ------------->Used for use webpack Packaging build Dependency Build Some Dependency Files
-config ------------->Used as the entire project configuration catalog primarily to configure the development test environment
-node_modules ------>Used to manage the use of dependencies in projects
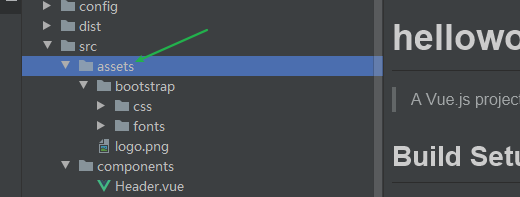
-src ------>For writing vue Source code for[A key]
+assets ------>Used to store static resources [A key]
components ------>For writing Vue assembly [A key]
router ------>Used to configure routing in a project[A key]
App.vue ------>Root Component in Project[A key]
main.js ------>Main Entry in Project[A key]
-static ------>Other Static
-.babelrc ------> take es6 Grammar to es5 Function
-.editorconfig ------> Project Editing Configuration
-.gitignore ------> git Version Control Ignores Files
-.postcssrc.js ------> Source correlation js
-index.html ------> Project Home
-package.json ------> Similar to and pom.xml Dependency Management jquery Manual modifications are not recommended
-package-lock.json ----> Yes package.json Locking
-README.md ----> Project description file
# 3. How to run execution in the project's root directory
npm start Run Front End System
# 4. How to access the project
http://localhost:8080
# 5. Project Development in Vue Cli
Be careful: Everything is a component in a component js Code html Code css style
1. VueCli The development method is to develop a component corresponding to a business function module in a project,In the future, multiple components can be grouped together to form a front-end system
2. Use later vue Cli Don't write when developing html,Writing is a component(Component Suffix.vue End File),When packaging later vue cli Components will be compiled to run html file
10.4 Scaffolding Project Startup Process Analysis

1. A vue project has only one html page, and index. We don't need to modify the html page. In fact, this page just provides the page mounted by the later root vue instance, and all the later components are bound to this instance to render various page replacement displays.
2. Start the project and go to main.js, then create a global instance Vue, and register some routing, component, and other information for the instance
import Vue from 'vue' //Reference vue component
import App from './App' //Reference App Component
import router from './router' //Actually, the full path to this reference is. / router/index.js simply introduces directory addresses, so the default is to look for an index.js

Vue.config.productionTip = false

/* eslint-disable no-new */
new Vue({
  el: '#App', //mounted on html Id as app tag
  router, //Register Router
  components: { App }, //Register Components
  template: '<App/>' //Mount Template
})
3.If there is an App in the Vue instance, you need to find it. Vue, and then mount this component into Vue's instance template
<template>
  <div id="app">
    <img src="./assets/logo.png">
    <!--After each template is rendered, different template content is displayed depending on the route-->
    <router-view/>
  </div>
</template>

<script>
export default {
  name: 'App' //Template name
}
</script>

<style>
#app {
  font-family: 'Avenir', Helvetica, Arial, sans-serif;
  -webkit-font-smoothing: antialiased;
  -moz-osx-font-smoothing: grayscale;
  text-align: center;
  color: #2c3e50;
  margin-top: 60px;
}
</style>
At the same time, you'll also go to the router to find the index.js, which defines a routing manager in which the URLs we need to access in the future can be configured
import Vue from 'vue'
import Router from 'vue-router'
import HelloWorld from '@/components/HelloWorld' //@/Indicates that the root path can also be switched to. / This relative path

Vue.use(Router) //Register Global Router

export default new Router({
  routes: [
    {
      path: '/',
      name: 'HelloWorld',
      component: HelloWorld
    }
  ]
})
4. When we visit http://localhost:8080 The HelloWorld component at the root path is found and rendered
<template>
  ...
</template>

<script>
export default {
  name: 'HelloWorld',
  data () {
    return {
      msg: 'Welcome to Your Vue.js App'
    }
  }
}
</script>

<style scoped> //Scoped: indicates the scope and is valid only for the current component. If scoped is removed, it is global
	...
</style>
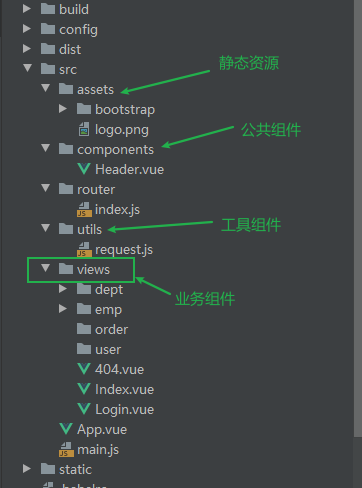
10.5 Description of scaffolding project development structure
Future development models follow this directory structure:
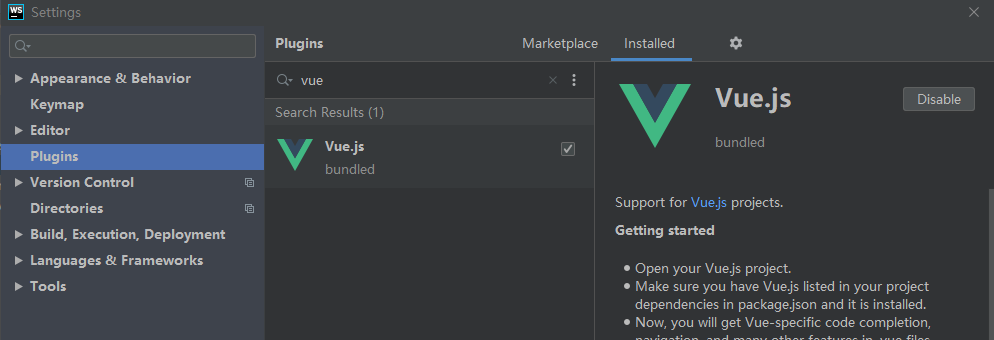
11.webStorm Configuration
11.1 Install vue plug-ins
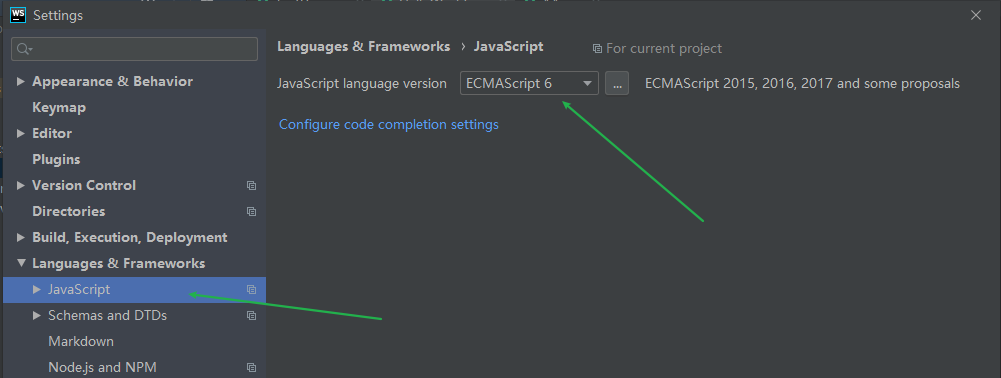
11.2 Front End supports ES6 grammar writing
12. Vuex State Management
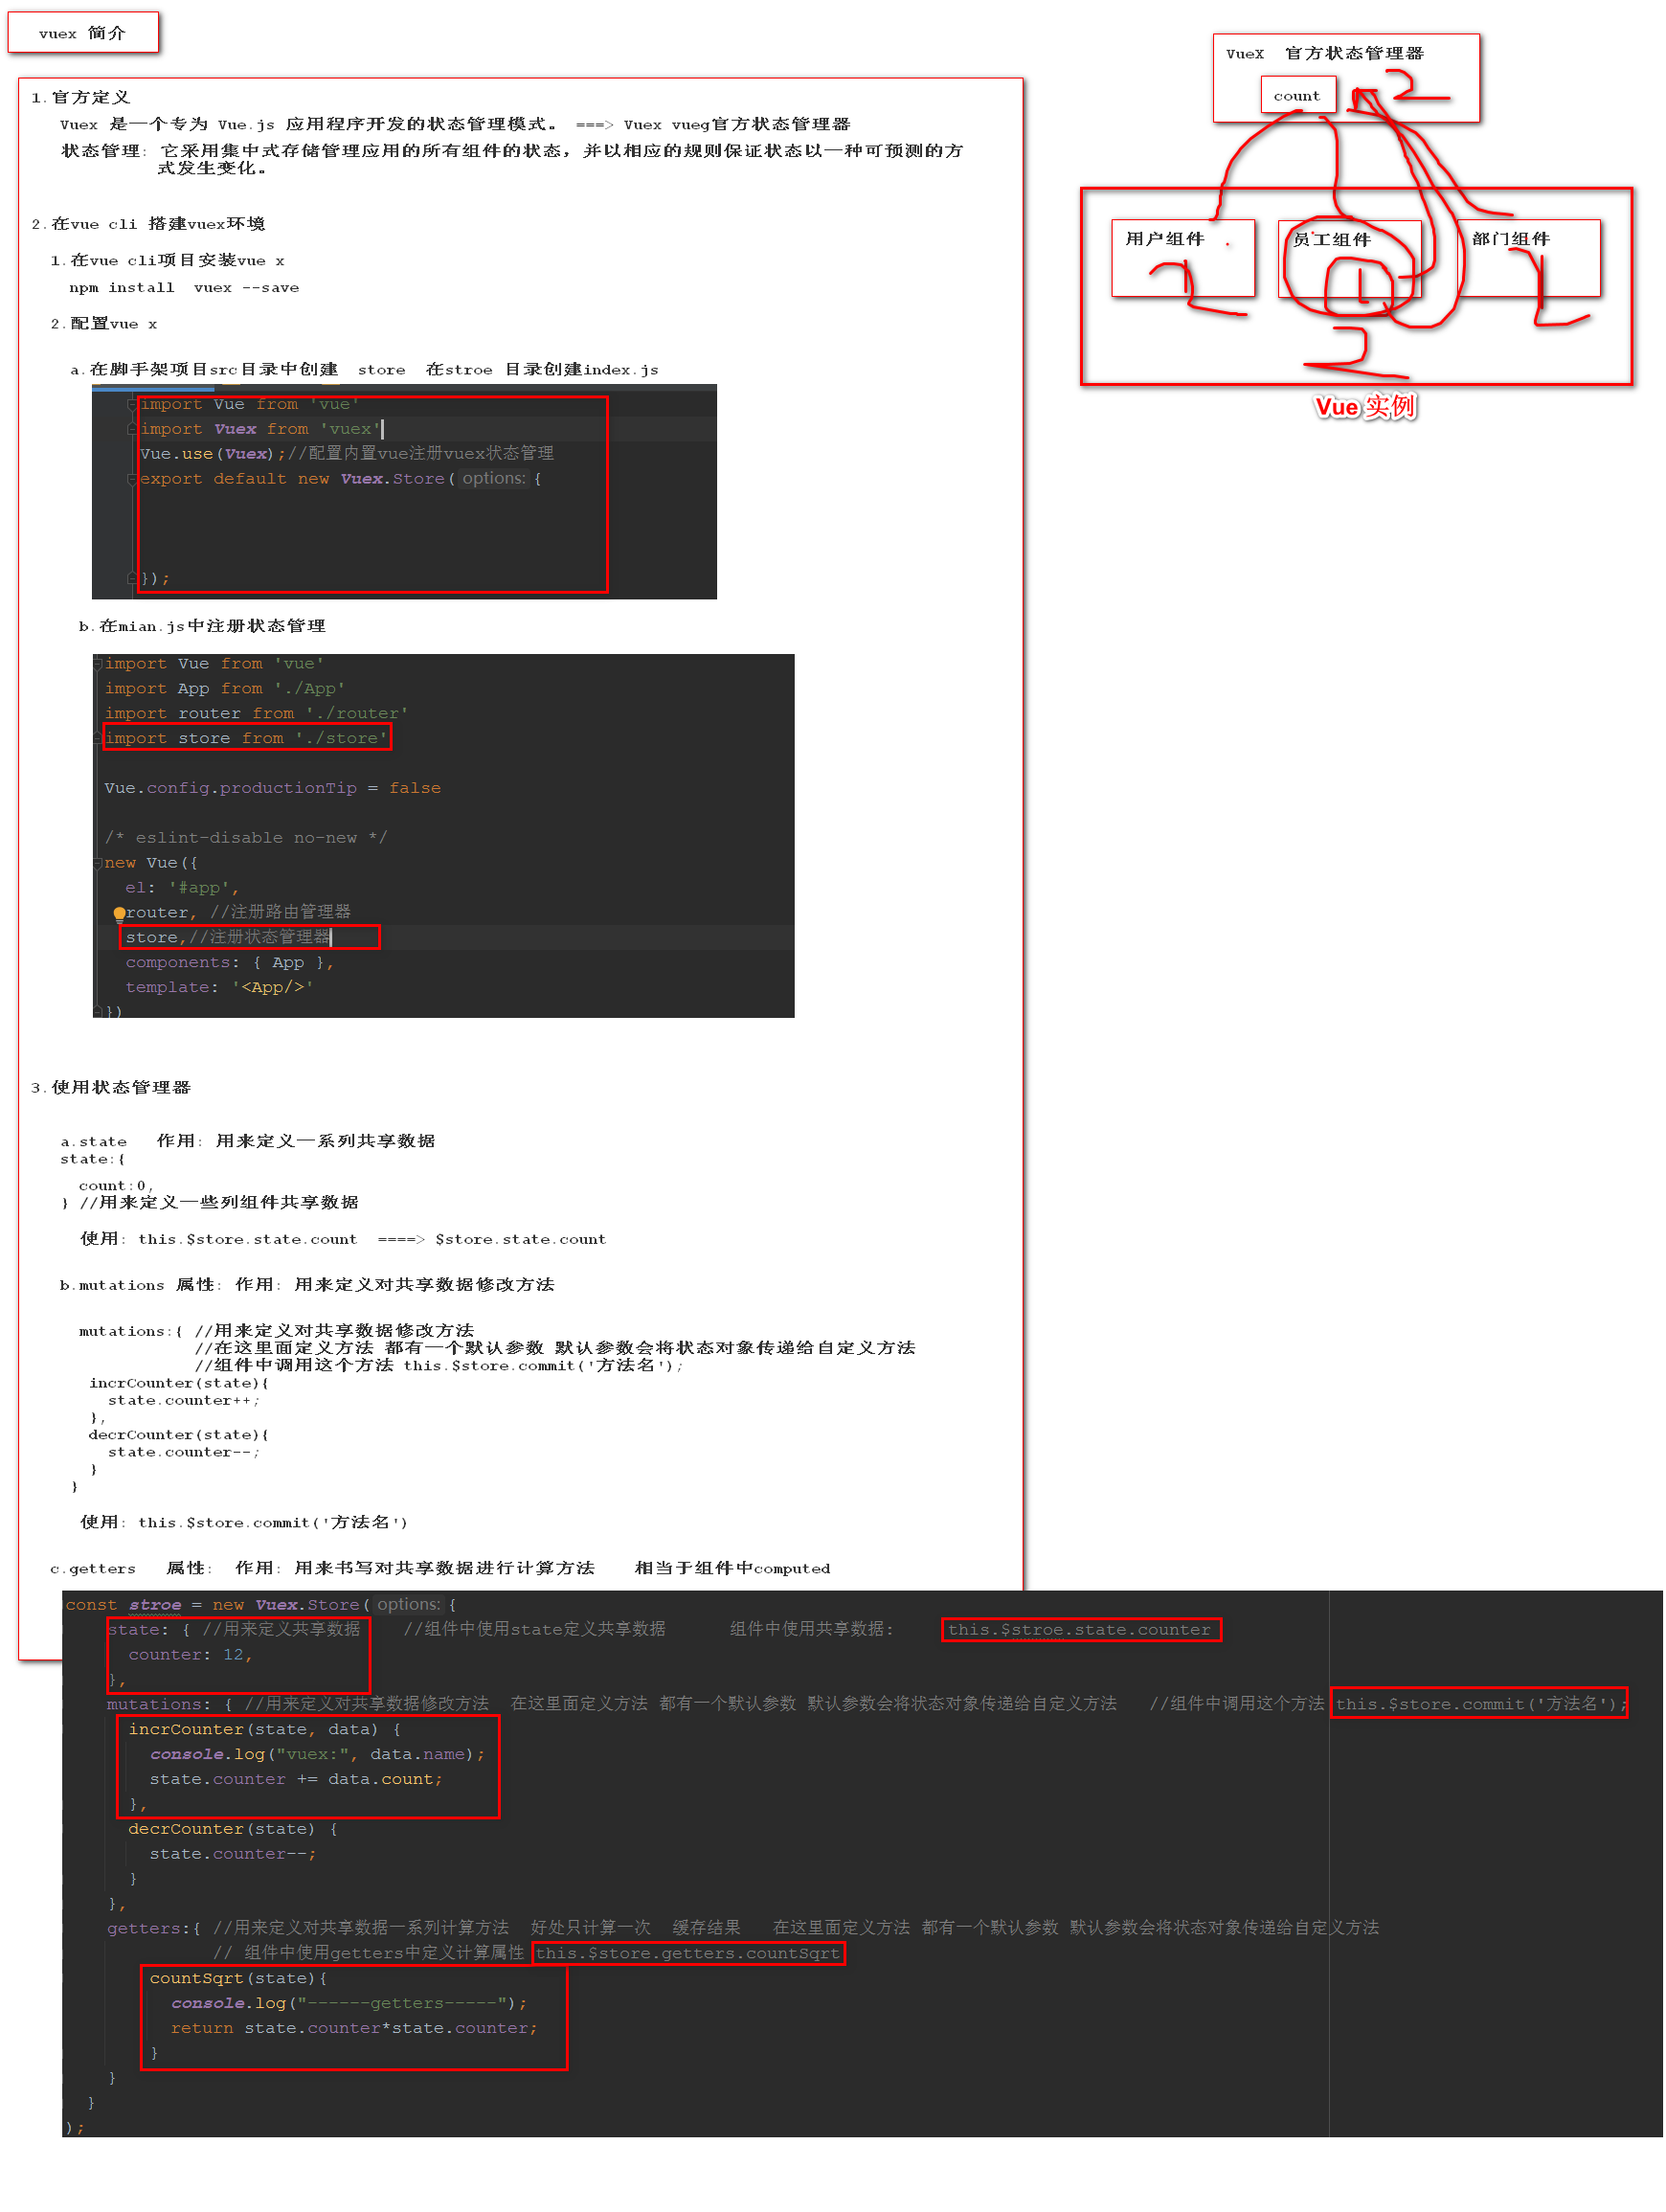
12.1 Introduction & Installation
# 1. Introduction
- Vuex Is a dedicated Vue.js State management mode for application development. It uses centralized storage management to manage the state of all components of an application and rules to ensure that the state changes in a predictable manner

# 2. Install vuex
-	npm install vuex --save

# 3. Create store folder in vue cli
[External chain picture transfer failed, source station may have anti-theft chain mechanism, it is recommended to save pictures and upload them directly (img-Tazz2XXo-16304077673) (D:\Work_spaceTypora_SpaceIMGSVue Tutorialimage-20201224098.png)]
# 4. Create an index in stroe. JS file
import Vue from 'vue'
import Vuex from 'vuex'
//1. Install vuex
Vue.use(Vuex);
//2. Create a store object
const store = new Vuex.Store({

});
//3. Exposing store objects
export default store;
# 5. In main. Introduce stroe into JS and register it with vue instance
import Vue from 'vue'
import App from './App'
import router from './router'
import store from "./stroe";//Introducing store
Vue.config.productionTip = false

/* eslint-disable no-new */
new Vue({
  el: '#app',
  router,
  components: { App },
  template: '<App/>',
  store,//Registration Status
})
12...2 state property
# 1.state property
- Effect: Used to globally define some shared data states

# 2. Grammar
    const store = new Vuex.Store({
    	state:{
    		counter:0,//Define Sharing Status
    	},
    }

# 3. Use
	 {{$store.state.counter}} ===> {{this.$store.state.counter}}
12...3 mutations property
# 1.mutations properties
- Effect: A series of functions used to define modifications to shared data

# 2. Grammar
    const store = new Vuex.Store({
      state:{
        counter:0,//Define Sharing Status
      },
      mutations:{
        //increase
        increment(state){
          state.counter++
        },
        //Reduce
        decrement(state){
          state.counter--
        }
      }
    });

# 3. Use
	this.$store.commit('decrement');
	this.$store.commit('increment');

# 4.mutations pass parameters

- a.Define a function with parameters
			mutations:{
     		//addCount parameter 1:state object parameter 2:custom parameter
     		addCount(state,counter){
        	console.log(counter);
        	return  state.counter += counter ;
      	}
    	}
- b.Pass parameter on call
		this.$store.commit('addCount',11);
12...4 getters attribute
# 1.getters properties
- Official:  Allow us to store Define " getter"(Can be considered store Computed properties). Just like calculating attributes, getter The return value of the
	Its dependencies are cached and recalculated only if their dependency values change.
- Effect: A series of functions that define the computational relevance of shared data is equivalent to computed Property caches the results

# 2. Grammar
	  getters:{
      //square
      mathSqrts(state){
        console.log("--------");
        return state.counter*state.counter;
      },
      //Multiply a number
      mathSqrtsNumber(state,getters){
        return getters.mathSqrts*3;
      },
      //Pass-through parameters
      mathSqrtsNumbers(state,getters){
        return function (number){
          return  number;
        }
      }
    }

# 3. Use
-		1.{{$store.getters.mathSqrts}}
-   2.{{$store.getters.mathSqrtsNumber}}
-   3.{{$store.getters.mathSqrtsNumbers(3)}}
13.UI Introduction
13.1 CSS
less saas

1.<style>and style Property introduced css Only works on this page, and html Mixed row, not recommended, recommended separately CSS File Control
2.CSS Files, spaces, tabs, and so on, actually take up traffic. Normally deployed to a server, these characters are compressed and removed.
3.commonly CSS There are fewer comments because the previous paragraph can be passed through debug,Find an element and see what it introduces css File and find the corresponding CSS Modify the file
4.CSS If the previous section of code is incorrect, it will not affect the execution of the following code. CSS Semicolon is required;End
5.CSS Through @import url("commom/munus.css"); This form imports new CSS File Content
6.install easy less Plug-ins, when we save.less After the file, it is automatically generated CSS Files, CSS The file lists the call relationships for each property
7.install live server Can write code side Preview
8.Selector:
*: Select All
a,h1,h2{...} You can specify the same property with multiple tags
.Name: Class Selector
#Name: Id selector Id is also used by other js, it is generally not recommended to use ID for CSS selection

Multiple selectors declare:
class = .Name .Name .Name

Structure selector:

main article h2,article h1{...} article All under Label H2,H1 Labels change

main article>h2{...} Whatever your children are, whatever your grandchildren are

main article h1~h2{...} h1 Later Brotherhood Element h2 Will work, but h1 Can't,

main article h1+h2{...} Only next to h1 Labeled h2 Will take effect, followed by h2 It won't work, h1 Nor will it take effect

<h1 title>...</h1>  h1[title]{...} :Have title Property is valid, property selector

<h1 title="www">...</h1>  h1[title="www"]{...} :Have title Attribute with value www Property selector

<h1 title^="www">...</h1>  h1[title="www"]{...} :Have title Attribute and value to www Is prefix valid, property selector

<h1 title$="www">...</h1>  h1[title="www"]{...} :Have title Attribute and value to www For the end to take effect, property selector

<h1 title*="www">...</h1>  h1[title="www"]{...} :Have title Attribute and value has www Character is valid, property selector


Descendant selector:

article :first-child{...} : Indicates that the first node under this node and its descendants will take effect

article>:first-child{...} : Indicates that the first node under this node will take effect

9.Weight calculation


Typeface:
1.Multiple fonts should be defined because some user browsers lack fonts and define multiple so that browsers of different users can recognize the following fonts for display

I saw it P28

2.Percentage of font, if the font size is set at the previous node, then the percentage is displayed with reference to the previous node

3.1em Equals the width of a character, equal to 100%Proportion


Floating, in which box, refer to which box size or seat
 Floating allows you to turn row-level elements into block-level elements
 Floating boxes must be set to a height, otherwise the height of the inner box will not be felt and the inner box will overflow
 Because the child element is floating, it has been detached from the document stream and cannot be felt by the parent element
 Setting float will detach you from the original standard document stream and subsequent elements will occupy the space of the previous floating elements
 If the following element is set clear Property clears the effect of floating, that is, where it was and where it was, and does not replace the previous floating position

If there are floating elements in front, then the elements in the standard stream behind will perceive that all the space occupied by the floating elements in front can not be replaced by the standard stream, but only in the back. This can be used when the parent and child classes have adaptive heights, that is, to add an empty space at the end of the parent class. div You can hold it up


Location is typically done after a document stream or a float is not well typesetted


Relative positioning, the original space will still occupy, even if moved to another location

Absolute positioning, no longer takes up space, equivalent to PS Like the layers in, they cover the parent element


When the parent element has position After attributes, the positioning of child elements refers to the parent element, if not, the positioning of child elements refers to the document

There are multiple parent elements, so refer to the last one that has position Of

fixed Fixed element, which is the location of the reference document

Reference resources: https://www.bilibili.com/video/BV1tJ411Y7fB?from=search&seid=3188297667789092636
13.2 Bootstrap
1. Download the bootstrap package and unzip it

2. Simply use the styles from the css and fonts files and import them into the project static directory
3. In main. Add css code to JS
//Configure vue to use bootstrap css
import '@/assets/bootstrap/css/bootstrap.css'

Vue.config.productionTip = false

/* eslint-disable no-new */
new Vue({
  el: '#app',
  router,
  components: { App },
  template: '<App/>'
})
4. Styles can be referenced directly in the project
<template>
  <div>
    <div class="container-fluid">

      <div class="row" style="margin-top: 70px;">
        <div class="col-sm-6 col-sm-offset-3">
          <form action="" class="form-horizontal">
            <div class="form-group">
              <label class="col-sm-2 control-label">User name:</label>
              <div class="col-sm-10">
                <input type="text" class="form-control" v-model="admin.username">
              </div>
            </div>
            <div class="form-group">
              <label class="col-sm-2 control-label">Password:</label>
              <div class="col-sm-10">
                <input type="text" class="form-control" v-model="admin.password">
              </div>
            </div>
            <input type="button" value="Sign in" class="btn btn-primary btn-block" @click="login">
          </form>
        </div>
      </div>

    </div>
  </div>
</template>
13.3 Element ui
Reference resources:
1.ElementUI tutorial for back-end programmers
2.Front and back end separation
Reference resources
2.VUE Core Technology-vue js-vue js-Front-end-Silicon Valley
3.The latest Vue, Vuejs tutorials, from introductory to proficient
4.VUE in-depth shallow series (in series)
5.[Poorly programmed person] The latest Vue family bucket series tutorial in 2021