Vue3 system introduction and project practice
Comprehensive knowledge points + high matching projects, easy entry and in-depth Mastery
Chapter 1 a preliminary study of Vue grammar
A very classic method is used here:
split()Method splits each character of a string object and treats each string as each element of the array
reverse()Method is used to change the array and arrange the elements in the array in reverse order. The first array element becomes the last and the last becomes the first
join() Method is used to put all the elements in the array into a string. The elements are separated by the specified separator.
This chapter makes two small examples, the first is to reverse the string, and the other is to show hidden characters
1.0 simple split components

Chapter 2 Vue basic syntax
2.1 basic concepts of applications and components in Vue
Use vue to create an application, which is attached to the root node. When creating an application, some parameters will be passed in
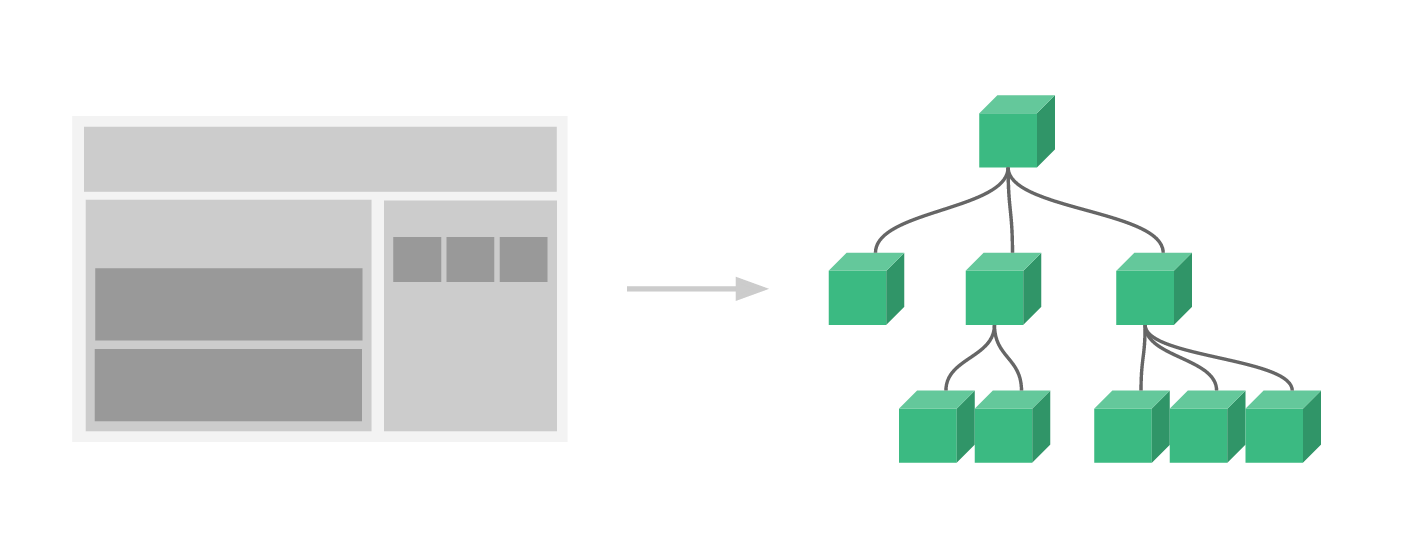
A web page is composed of components, and the outermost large components are determined by the parameters you pass in
<script>
    /**
     * createApp Means to create a Vue application and store it in the app variable
     * The parameters passed in indicate how the outermost components of the application should be displayed,
     */
    const app = Vue.createApp({
        data() {
            return {
                message: `hello world`
            }
        },
        template: `<div> {{message}}<div>`
    });
    app.mount('#root')
</script>
After creating an application, how do I get the root component corresponding to the component? In fact, when I call the mount method, its return value is the root component,
//vm represents the root component of vue
    const vm = app.mount('#root');
Here, we can feel that vue programming is data oriented programming. I define data and template in vue object, and vue will automatically associate the data and template into the effect we want to show now. In fact, vue's data oriented programming model refers to mvvm design pattern
- M - > model data in vue object,
- The V - > view view corresponds to the template in the vue object
- VM - > ViewModel view data connection layer template and data will be automatically connected. This layer is actually the view data connection layer,
The view data connection layer is actually the components of vue. The relationship between data and view is related by vm. We can use vm

2.2 understand the life cycle function in vue
The methods we usually write in vue need to be triggered to execute, but we write a mounted method that can be executed immediately after loading the page
mounted() {
          alert('Execute immediately');
      },
Vue life cycle: the process of creating Vue instances, initializing data, compiling templates, mounting DOM, updating rendering, unloading and other columns. We call this the life cycle of Vue
Role of Vue life cycle: all functions of Vue are implemented around the life cycle, and the corresponding hooks are called at different stages to realize component data management and DOM rendering
Lifecycle function (hook)
A lifecycle function is a function that is automatically executed at a certain time


As can be seen from the figure, the life cycle of Vue includes four stages: initialization, mount, update and destruction, and eight life cycles
Description of each Vue life cycle function
| Vue lifecycle function | describe |
|---|---|
| beforeCreate() | A function that executes immediately before the instance is generated |
| create() | Functions that are automatically executed after the instance is generated |
| beforeMount() | Functions that are executed immediately before the component is mounted on the page |
| mounted() | The function that is automatically executed after the component is mounted on the page |
| beforeUpdate() | A function that executes immediately when data is updated |
| updated() | The function that is automatically executed when the data update page is re rendered |
| beforeUmount() | Functions that execute immediately when vue application is destroyed |
| unmounted() | Function that is automatically executed when vue application is destroyed and DOM is completely destroyed |
<!DOCTYPE html>
<html lang="en">
  <head>
    <meta charset="UTF-8" />
    <meta http-equiv="X-UA-Compatible" content="IE=edge" />
    <meta name="viewport" content="width=device-width, initial-scale=1.0" />
    <title>lesson 06</title>
    <script src="https://unpkg.com/vue@next"></script>
  </head>
  <body>
    <div id="root"></div>
  </body>
  <script>
    //Life cycle function: a function that will be executed automatically at a certain time
    const app = Vue.createApp({
      data() {
        return {
          message: "Ink grandma",
        };
      },
      //   First life cycle function
      beforeCreate() {
        // console.log("beforeCreate");
      },
      //   Second life cycle function
      created() {
        // console.log("created");
      },
      //   The third life cycle function. At this time, the template has been vue wrapped in the render function
      // A function that is automatically executed before the component content is rendered to the page
      beforeMount() {
        // console.log(document.getElementById("root").innerHTML);
        // console.log("beforeMount");
      },
      // The fourth lifecycle function occurs when the virtual dom has been rendered
      // The function that will be executed automatically after the component content is rendered to the page
      mounted() {
        // console.log(document.getElementById("root").innerHTML);
        // console.log("mounted");
      },
    //   A function that will be executed automatically when the data in data changes
    //   A function that automatically executes immediately when data changes
      beforeUpdate() {
          console.log(document.getElementById("root").innerHTML+`beforeUpdate`);
      },
    //   When the data changes and the page is updated, the function will be executed automatically
    //   When the data changes and the page is re rendered, the function will be executed automatically
    updated() {
        // console.log(document.getElementById("root").innerHTML+`updated`);
    },
    // Functions that will be executed automatically when vue applications fail. Functions that will be executed automatically when vue instances are destroyed
    beforeUnmount() {
        console.log(document.getElementById("root").innerHTML+'beforeUnmount');
    },
    // Functions that are automatically executed when the Vue application fails and the dom is completely destroyed
    unmounted() {
        console.log(document.getElementById("root").innerHTML+'unmounted');
    },
      template: `<div>{{message}}</div>`,
    });
    const vm = app.mount("#root");
  </script>
</html>
2.4 explanation of common template syntax
- Vue.js uses HTML based template syntax, allowing developers to declaratively bind DOM to all Vue data of the underlying component instance JS templates are legal HTML, so they can be parsed by standard browsers and HTML parsers.
- In the underlying implementation, Vue compiles the template into a virtual DOM rendering function. Combined with the responsive system, Vue can intelligently calculate the minimum number of components that need to be re rendered and minimize the number of DOM operations.
-
Interpolation {{message}}
-
Raw HTML: Double curly braces interpret the data as plain text rather than HTML code. In order to output real HTML, you need to use v-html instruction:
-
attribute: for Boolean attributes (their existence means the value is true), v-bind works slightly differently. In this example:
<button v-bind:disabled="isButtonDisabled">Button</button>
-
Using JavaScript expressions, for all data bindings, Vue JS provides full JavaScript expression support
{{ number + 1 }}

{{ ok ? 'YES' : 'NO' }}

{{ message.split('').reverse().join('') }}

<div v-bind:id="'list-' + id"></div>
These expressions will be parsed as JavaScript under the data scope of the current active instance. One limitation is that each binding can only contain a single expression, so the following examples will not take effect.
<!--  This is a statement, not an expression:-->
{{ var a = 1 }}

<!-- Process control will not take effect, please use ternary expression -->
{{ if (ok) { return message } }}
- Abbreviation: at the same time, building a single page application with all templates managed by Vue (SPA - single page application) The v-prefix also becomes less important. Therefore, Vue provides specific abbreviations for the two most commonly used instructions, v-bind and v-on:
- v-bind is abbreviated as ":"
- v-on is abbreviated as@
- Dynamic parameters: you can also use JavaScript expressions in instructions by enclosing them in square brackets
<!--
Note that there are some constraints on the writing of parameter expressions, as described in the chapter "constraints on dynamic parameter expressions" later.
-->
<a v-bind:[attributeName]="url"> ... </a>
Similarly, you can use dynamic parameters to bind the handler function for a dynamic event name:
<a v-on:[eventName]="doSomething"> ... </a>
In this example, when the value of eventName is "focus", v-on:[eventName] will be equivalent to v-on:focus
- Modifier: modifier is a half angle period Indicates the special suffix used to indicate that an instruction should be bound in a special way. For example The prevent modifier tells the v-on instruction to call event for the triggered event preventDefault():
<form v-on:submit.prevent="onSubmit">...</form>
Next, yes v-on and v-for And other functions, you will see other examples of modifiers.
2.5 detailed explanation of Vue modifier
Event modifier:
- . stop prevents the event from continuing to propagate
- . prevent prevents the default behavior of the tag
- . capture uses the event capture mode, that is, the event triggered by the element itself is processed here first, and then handed over to the internal element for processing
- . self should only be in event Target is the processing function triggered when the current element itself
- The. Once event will only be triggered once
- . passive tells the browser that you don't want to block the default behavior of events
2.6 Data Property and method
Vue automatically binds this for methods so that it always points to component instances. This ensures that the method maintains the correct this point when used as an event listener or callback. Avoid using arrow functions when defining methods, as this prevents Vue from binding the appropriate this point.
<!DOCTYPE html>
<html lang="en">
  <head>
    <meta charset="UTF-8" />
    <meta http-equiv="X-UA-Compatible" content="IE=edge" />
    <meta name="viewport" content="width=device-width, initial-scale=1.0" />
    <title>Document</title>
    <script src="https://unpkg.com/vue@next"></script>
  </head>
  <body>
    <div id="root"></div>
  </body>
  <script>
    /**
     * data & methods & computed & watcher
     * message Is the data in the first layer returned by data
     */
    const app = Vue.createApp({
      data() {
        return {
          message: "Hello,world!",
        };
      },
      methods: {
        //   In vue, this in these methods points to unified instances of vue
        // Because the arrow function points to the outer this, which is window
          handClick() {
              console.log('click',this);
          }
      },
      template: `
      <div @click="handClick">{{message}} </div>
      `,
    });
    const vm = app.mount("#root");
  </script>
</html>
2.7 computing attributes and listeners
The expressions in the template are very convenient, but they are designed for simple operations. Putting too much logic in the template will make the template too heavy and difficult to maintain.
The difference between calculation attributes and methods. The internal cache mechanism of calculation attributes will be provided. The calculation will be re executed only when the content dependent on the calculation attributes changes
Listener
Although computed properties are more appropriate in most cases, sometimes a custom listener is required. This is why Vue provides a more general way to respond to changes in data through the watch option. This approach is most useful when asynchronous or expensive operations need to be performed when data changes.
The listener will listen for the change of a certain attribute. When the attribute changes, the asynchronous operation can be done in the watch. If it is a synchronous operation, it is better to calculate
2.8 binding between class and Style
<!DOCTYPE html>
<html lang="en">
<head>
    <title>lesson 2_8</title>
      <script src="https://unpkg.com/vue@next"></script>
      <style>
          .red{
              color: red;
          }
          .green{
              color: green;
          }
      </style>
</head>
<body>
    <div id="root"></div>
</body>
<script>
    const app = Vue.createApp({
        data() {
            return {
                classString: 'red',
            }
        },
        template: `
        <div :class="classString">Hello</div>

        `,
    });
    const vm = app.mount('#root');
</script>
</html>
You can use a variety of data formats to define
data() {
        return {
          classString: "red",
          //You can use an object
          classObject: {red: false, green: true},
        //   You can use an array or write another object in the array
        classArray: ["red" ,"green" ,{
            brown: false
        }]
        };
When there are multiple components in the outer layer of a sub component, you cannot directly set the style on the sub component
    //Show a widget
    app.component("demo", {
        template: `
        <div :class="$attrs.class">single_Small components</div>
        <div>single_Small components</div>
        `
    });
How to write inline style s? Styles can be bound using strings or through arrays
const app = Vue.createApp({
      data() {
        return {
          classString: "red",
          styleString: 'color: yellow',
          styleObject: {
              color: 'orange',
              background: 'yellow'
          }
        };
      },
      template: `
        <div :style="styleObject">
            Hello
        </div>
        `,
    });
2.9 conditional rendering
Because v-if is an instruction, it must be added to an element. Remove the element directly
When v-if is hidden, it controls the DOM to directly remove the element, while when v-show is hidden, it sets style="display: none;"
2.10 list rendering
When using v-for to loop objects
const app = Vue.createApp({
        data() {
            return {
                list: ['dell', 'lee', 'teacher'],
                listObject: {
                    firstName: 'Dell',
                    lastName: 'Teacher',
                    job: 'Teacher'
                }
            }
        },
        template:
        `
        <div>
            <div v-for="(value,key,index) in listObject">
                {{value}}--->{{key}}--->{{index}}
            </div>
        </div>
        `
    });
List loop. When adding data, in order to avoid rendering the page repeatedly, you can bind a ": key = '" attribute
  template: `
        <div>
            <button @click="handleAddBtnClick">newly added</button>
            <div v-for="(value,index) in list" :key="index">
                {{value}}--->{{index}}
            </div>
        </div>
        `,
How to add new data to an array
2.11 array update detection - change array
Change method
Vue wraps the change method of the array being listened on, so they will also trigger view updates. These wrapped methods include:
- push() adds a new element to the end of the data and returns a new length
- pop() deletes the last element of the array and returns it
- shift() deletes the first element of the array and returns it
- unshift() adds a new element to the beginning of the array and returns a new length
- splice() adds / removes elements from the array
- sort() sorts the array elements
- reverse() reverses the order of the elements in the array
You can open the console and try to call the change method on the items array in the previous example. For example, example1 items. push({ message: 'Baz' })
2.12 list loop rendering
When they are in the same node, the priority of v-if is higher than that of v-for, which means that v-if will not have access to the variables in v-for:
When using v-for to nest a v-if, the display data will have one more layer of display content
Use template placeholder
You can correct it by moving v-for to the < template > tab:
<template v-for="todo in todos" :key="todo.name">
  <li v-if="!todo.isComplete">
    {{ todo.name }}
  </li>
</template>
2.13 event binding
1. How to pass in both parameters and event,(2,$event)
  * 1.How to pass in parameters immediately,Incoming again event,(2,$event)
       */
      methods: {
        handleAddBtnClick(num,event) {
            console.log(event.target);
          this.counter += num;
        },
      },
      template: `
        <div>{{counter}}
            <button @click="handleAddBtnClick(2,$event)"> Button</button>
        </div>
        `,
2. Event binding multiple functions need to use references
3. The bound event will be triggered by bubbling, that is, the internal trigger will trigger the external nested trigger
Use event modifiers Stop can stop event bubbling
Block default behavior prevent
. capture capture mode, which can capture events from outside to inside,
Don't trigger yourself when you click on a child element self
 template: `
        <div>{{counter}}
            <div @click="handleDivClick">
            <button @click.stop="handleAddBtnClick"> Button</button>
            </div>
        </div>
        `,
- Event modifiers: stop, prevent, capture, self, once, passive
- Key modifier: enter tab delete esc up down left right
- Mouse modifier left right middle
- Precision modifier: exact
When using modifiers, order is important; The corresponding code will be generated in the same order. So use @ click prevent. Self blocks the default behavior of clicking on the element itself and its children, while @ click self. Prevent only blocks the default behavior of clicking on the element itself.
2.14 form input binding
Basic syntax: you can use the v-model instruction to create two-way data binding on form < input >, < textarea > and < Select > elements. It will automatically select the correct method to update the element according to the control type. Despite some magic, v-model is essentially just a grammar sugar. It is responsible for monitoring the user's input events to update the data, and some special processing in some extreme scenarios.
- Bidirectional binding of input box
<div>{{message}}
            <input v-model=" message"/>
</div>
- textarea is written with a single label closed
<div>{{message}}
            <textarea v-model=" message"/>
</div>
- Check box
 <script>
    const app = Vue.createApp({
        data() {
            return {
                message: []
            }
        },
        template: `
        <div>{{message}}
        jack<input type="checkbox" v-model="message" value="jack" />
        dell<input type="checkbox" v-model="message" value="dell" />
        lee<input type="checkbox" v-model="message" value="lee" />
        </div>
        `
    });
    const vm = app.mount("#root");
  </script>
- Radio box (Radio)
 <script>
    const app = Vue.createApp({
        data() {
            return {
                message: []
            }
        },
        template: `
        <div>{{message}}
        jack<input type="radio" v-model="message" value="jack" />
        dell<input type="radio" v-model="message" value="dell" />
        lee<input type="radio" v-model="message" value="lee" />
        </div>
        `
    });
    const vm = app.mount("#root");
  </script>
- You can use v-for with select
 <script>
    const app = Vue.createApp({
      data() {
        return {
          message: [],
          options: [
            {
              text: "A",
              value: "A",
            },
            {
              text: "B",
              value: "B",
            },
            {
              text: "C",
              value: "C",
            },
          ],
        };
      },
      template: `
            <div>{{message}}
            <select v-model="message">
                <option v-for="item in options" :value="item.value">{{item.text}}</option>
            </select>
            </div>
            `,
    });
Use value selection status
 <script>
    const app = Vue.createApp({
      data() {
        return {
          message: 'hello',
        };
      },
      template: `
            <div>{{message}}
                <input type="checkbox" v-model="message" true-value="hello" false-value="world" />
            </div>
            `,
    });
- Form modifier
.lazy
By default, v-model synchronizes the value of the input box with the data after each input event is triggered (except above Input method (when organizing text). You can add the lazy modifier to switch to synchronization after the change event:
.number
If you want to automatically convert the user's input value to numeric type, you can add the number modifier to the v-model:
 <script>
    const app = Vue.createApp({
      data() {
        return {
          message: 'hello',
        };
      },
      template: `
            <div>{{typeof message}}
                <input type="number" v-model="message"  />
            </div>
            `,
    });
.trim
If you want to automatically filter the first and last white space characters entered by the user, you can add the trim modifier to the v-model:
<input v-model.trim="msg" />
Chapter 3 explores the concept of components
- Definition of components
- Components are reusable
- Global components can be used everywhere as long as they are defined. The performance is not high, but it is simple to use. The name is recommended. Words in lowercase letters are used in the middle
- Local components are defined. They can only be used after registration. They have high performance and are troublesome to use. It is recommended to start with a capital letter and name the hump
- When using local components, you need to make a mapping object between the name and components. If you don't write the mapping, Vue bottom layer will automatically try to do the mapping
3.1 global components
These components are registered globally. That is, they can be used in the template of any newly created component instance after registration. For example:
The same is true in all sub components, that is, the three components can also be used with each other internally.
 <script>
    /**
     * 1.When creating a vue application, it will receive a parameter, which will determine how to render the root component of vue
     * 2.Components can be reused and, and the data is not public, but exclusive
     * 3.Global components can be used everywhere as long as they are defined. Their performance is not high, but they are easy to use
     */
    const app = Vue.createApp({
      template: `
        <div>
            hello
        </div>
        `,
    });
    app.component("counter-parent",{
        template: `<counter/>`
    })
    app.component("counter", {
        data() {
            return {
                count: 1
            }
        },
      template: `<div @click="count+=1">{{count}}</div>`,
    });
    const vm = app.mount("#root");
  </script>
<div id="app">
  <component-a></component-a>
  <component-b></component-b>
  <component-c></component-c>
</div>
3.2 local components
 <script>
    /**
     * 1.When creating a vue application, it will receive a parameter, which will determine how to render the root component of vue
     * 2.Components can be reused and, and the data is not public, but exclusive
     * 3.Global components can be used everywhere as long as they are defined. Their performance is not high, but they are easy to use
     */
    // Define a constant, which is a local component, but can not be directly used in vue. It is thought that it is not perceptible in vue,
    // How to associate vue with constant components
    const Conter = {
      data() {
        return {
          count: 1,
        };
      },
      template: `<div @click="count +=1">{{count}}</div>`,
    };
    const HelloWorld = {
      template: `<div>hello Hello</div>`,
    };
    const app = Vue.createApp({
      components: {
        // Assign constant component name to string
        Conter, HelloWorld,
      },
      template: `
        <div>
            <hello-world />
            <conter />
        </div>
        `,
    });

    const vm = app.mount("#root");
  </script>
3.3 value transfer between components
3.4 Prop verification
We can specify validation requirements for the prop of the component, such as these types you know. If a requirement is not met, Vue will warn you in the browser console. This is especially helpful when developing a component that will be used by others.
    const app = Vue.createApp({
        data() {
            return {
                num: ()=>{
                    alert('nihao')
                }
            }
        },
      template: `<div> <test v-bind:content="num" /> </div>`,
    });
    /**
     * Create a sub component test to verify string, Boolean, array, object and function
     */
    app.component("test", {
        props: {
            content: Function
        },
        template: `<div>{{typeof content}}</div>`
    });
    const vm = app.mount("#root");
  </script>
    /**
     * Create a sub component test to verify string, Boolean, array, object, function and symbol
     * Use the required parameter, which indicates that there must be a value
     * required: Required
     * default: Default value
     *
     */
    app.component("test", {
        props: {
            content: {
                type: Number,
                default: 789
            }
        },
        methods: {
            handleClick(){

            }
        },
        template: `<div @click="">{{ content}}</div>`
    });
    const vm = app.mount("#root");
  </script>
You can also use the function to verify, and the validator can interpret the size of the number
3.5 understanding of single data flow
v-bind="params"
Equivalent to: content = "params.content": a = "params.a"
Single data flow:
*The parent component can pass some data to the child component, but the child component can never be changed,
*So how to modify the value passed from the parent component? We can copy the value passed from the parent component and use it again
<script>
    const app = Vue.createApp({
      data() {
        return {
          params: {
            content: 1234,
            a: 1,
            b: 2,
            c: 3,
          },
        };
      },
      template: `<div> <test v-bind="params"/> </div>`,
    });
    app.component("test", {
      props: ["content", "a", "b", "c"],
      template: `<div>{{content}}--{{a}}--{{b}}--{{c}}</div>`,
    });
    const vm = app.mount("#root");
  </script>
Why is there the concept of one-way data flow in vue? Why can't a child component change the data of its parent component?
If the child component can change the data in the parent component in both directions, data coupling may occur
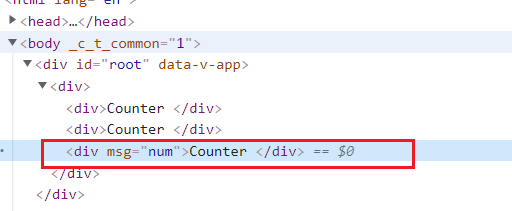
3.6 what is the non props attribute
/**
- Non prop attribute: from parent component to child component
- We hope that this binding property will not be displayed on the outermost node
- Make style decoration
<div v-bind="$attrs">Counter </div>
-
In vue, by default, when calling a component, pass in some attributes that are not defined in props. These "illegal" attributes will be rendered on the root element of the component (except some attributes), and these "illegal" attributes will be recorded on the $attrs attribute.
-
How to control not to render these illegal attributes on the root element of the component? The answer is to set inheritAttrs:false inside the component.
-
With v-bind="$attrs", you can render "illegal" attributes to an element of the specified component.
app.component("counter", {
        // inheritAttrs: false,
        template: `
        <div >Counter </div>
        <div >Counter </div>
        <div v-bind="$attrs">Counter </div>
        `
    });
    const vm = app.mount("#root");
  </script>
You can also use functions for testing
mounted() {
            console.log(this.$attrs.msg);
},
3.7 how to communicate between parent and child components through events
- Child components can also pass parameters to parent components
 <script>
    const app = Vue.createApp({
      data() {
        return {
          count: 1,
        };
      },
      methods: {
        handleAddOne(param) {
          this.count += param;
        },
      },
      template: `
        <div>
            <counter :count="count" @add-two="handleAddOne" />
        </div>
        `,
    });
    /**
     * How does the child component tell the parent component to modify the data content
     * Note: hump is used when triggering events, and "-" interval is used when monitoring events
     */
    app.component("counter", {
      props: ["count"],
      methods: {
        handleItemClick() {
          this.$emit("addTwo",3);
        },
      },
      template: `<div @click="handleItemClick"> {{count}} </div>`,
    });
    const vm = app.mount("#root");
  </script>
Define custom event: you can define the emitted event on the component through the emits option.
app.component('custom-form', {
  emits: ['inFocus', 'submit']
})
Verify events thrown
3.8 v-model parameters
By default, v-models on components use modelValue as prop and update:modelValue as events. We can modify these names by passing parameters to v-model:
    <div>
            <input v-model="text" />
            <counter v-model="count" />
        </div>
 <script>
    const app = Vue.createApp({
      data() {
        return {
          count: 1,
          text: 'hello world'
        };
      },

      template: `
        <div>
            <input v-model="text" />
            <counter v-model="count" />
        </div>
        `,
    });
    /**
     * How does the child component tell the parent component to modify the data content
     * Note: hump is used when triggering events, and "-" interval is used when monitoring events
     */
    app.component("counter", {
      props: ["modelValue"],
      //   The significance of emit is to enable us to clearly see what components are triggered externally,
      // The emits selection should be consistent with that in $emits
      //   emits: ['addTwo'],
      methods: {
        handleItemClick() {
          this.$emit("update:modelValue", this.modelValue + 2);
        },
      },
      template: `<div @click="handleItemClick"> {{count}} </div>`,
    });
    const vm = app.mount("#root");
In this example, the subcomponent will need a title prop and issue an update:title event to synchronize:
app.component('my-component', {
  props: {
    title: String
  },
  emits: ['update:title'],
  template: `
    <input
      type="text"
      :value="title"
      @input="$emit('update:title', $event.target.value)">
  `
})
3.9 multiple v-model bindings
<script>
    const app = Vue.createApp({
      data() {
        return {
          count: 1,
          count1: 1,
        };
      },
      //How to use multiple v-model s
      template: `
        <div>
            <counter v-model:count="count" v-model:count1="count1" />
        </div>
        `,
    });

    app.component("counter", {
      props: ["count", "count1"],
      methods: {
        handleItemClick() {
          this.$emit("update:count", this.count + 2);
        },
        handleItemClick1() {
          this.$emit("update:count1", this.count1 + 3);
        },
      },
      template: `
      <div @click="handleItemClick"> {{count}} </div>
      <div @click="handleItemClick1"> {{count1}} </div>
      `,
    });
    const vm = app.mount("#root");
  </script>
app.component('user-name', {
  props: {
    firstName: String,
    lastName: String
  },
  emits: ['update:firstName', 'update:lastName'],
  template: `
    <input
      type="text"
      :value="firstName"
      @input="$emit('update:firstName', $event.target.value)">

    <input
      type="text"
      :value="lastName"
      @input="$emit('update:lastName', $event.target.value)">
  `
})
3.10 handling v-model modifiers
When we study form input binding, we see that v-model has Built in modifier ——. trim,. number and lazy. However, in some cases, you may also need to add your own custom modifiers.
Let's create an example custom modifier, capitalize, which capitalizes the first letter of the string provided by the v-model binding.
Modifiers added to the component v-model will be provided to the component through modelModifiers prop. In the following example, we create a component that contains modelModifiers prop, which defaults to an empty object.
Note that when the created life cycle hook of the component is triggered, modelModifiers prop will contain capitalize and its value is true -- because capitalize is set to v-model Capitalize = "mytext" is bound to the v-model.
slot
1.0 slot contents
Strings and components can be placed in the slot,
2.0 slot data scope
All contents in the parent template are compiled in the parent scope; All contents in the sub template are compiled in the sub scope.

<script>
    /**
     * slot slot
     * slot There is no way to bind events
     * 1.slot You can pass not only strings, but also subcomponents
     * 2.It should be noted that the data attributes called in the parent template use the data in the parent template,
     * The data attributes called in the sub template use the data in the sub template
     */
    const app = Vue.createApp({
        data() {
            return {
                text: 'Submission 1'
            }
        },
      template: `
        <myform>
            <div>{{text}}</div>
        </myform>

        <myform>
            <button>{{text}}</button>
        </myform>

        `,
    });
    app.component('test',{
        template: '<div>test</div>',
    });
    app.component("myform", {
      methods: {
        handleClick() {
          alert(123);
        },
      },
      template: `
        <div>
            <input />
            <span @click="handleClick">
            <slot></slot>
            </span>
        </div>
        `,
    });
    const vm = app.mount("#root");
  </script>
3.0 using slots and named slots to solve the problem of component content delivery
Named slot:
<script>
  // Slot slot
  // The data used in slot and the scope
  // The data attributes called in the parent template use the data in the parent template
  // The data attributes called in the sub template use the data in the sub template
  // Named slot
  const app = Vue.createApp({
    template: `
      <layout>
        <template v-slot:header>
          <div>header</div>
        </template>
        <template v-slot:footer>
          <div>footer</div>
        </template>
      </layout>
    `
  });

  app.component('layout', {
    template: `
      <div>
        <slot name="header"></slot>
        <div>content</div>
        <slot name="footer"></slot>
      </div>
    `
  });

  const vm = app.mount('#root');
</script>