Today, we use vue3+ts+setup syntax to implement an infinitely nested tree component. Let's take a look at the implementation effect first. The style has not been modified too much.

This article is a very basic content. I have just come into contact with vue3 this set. Recently, I have also started to practice and use vue3 to implement some vue2 components developed by the company. I also hope to see people get something.
Vue3's setup syntax
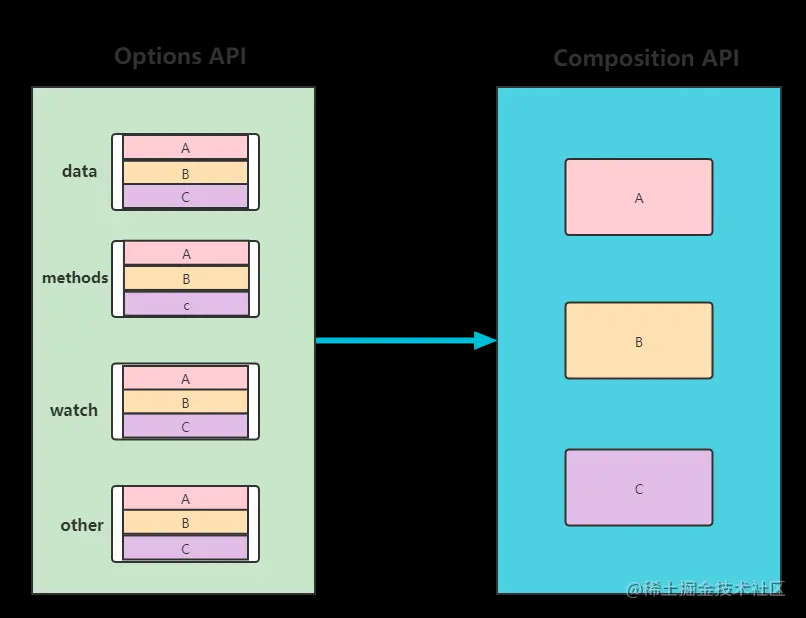
With the addition of setup in vue3, Vue can change from Options API to Composition API. The Options API will cause data, methods, computed, etc. to be implemented separately in different objects, making the logic too scattered. The Composition API can write the same function in the same code block in setup without writing it separately. Some students may think that writing all the functions of a component together will lead to all the codes in one lump, but it is easy to lead to logic confusion. In fact, there is no need to worry at all. Vue3 can separate a piece of logic like react hook. A logic is a code block, and then introduce it into the component, so that the logic is clear and easy to reuse, It also replaces the writing of mixin in vue2. Just look at the following picture:
In the setup syntax, we don't need to use return to return responsive variables, functions and components. We just need to declare them at the top level of the component, and then they can be used directly in the html template. See the following code:
const {dataList, levelPadL, selectIds} = defineProps({
  // Data source list
  dataList: {
    type: Array as PropType<BaseOptons[]>,
    required: true
  },
  // Hierarchy reduction, default 10px
  levelPadL: {
    type: Number,
    default: 10
  },
  // Selected id collection
  selectIds: {
    type: Array,
    default: []
  }
})
The three props of datalist, levelpadl and selectids above do not need to return. We can use them directly in the template. In addition, the difference between setup syntax sugar and setup hook function is that props and context parameters are not acceptable, but some global variables are added. Defineprops and definemits are mainly used here. The former is used to declare props that the component needs to accept, while the latter is used to accept events from the parent component. Here, our tree component needs to accept an updated selected event. The idea here is to realize the two-way binding of props. Therefore, props selectIds adopts the new syntax v-model:selectIds of vue3. See the following code:
const emits = defineEmits(['update:selectIds'])
// some change
emits('update:selectIds', selectIds)
Application of TS and ts in Vue3
First of all, in order for props to have type reminders, we need to define our props type. Here is mainly a dataList type accepted by the tree component, which is an infinitely nested array:
export interface BaseOptions {
    label: string,
    value: string | number,
    children?: BaseOptions[]
}
// Reference the type and use
const dataList = reactive<BaseOptions[]>([{
  label: 'Unhappy Monday',
  value: '1',
  children: [
    {label: 'Unhappy 1', value: '1-1', children: [{label: 'Unhappy 1-1', value: '1-1-1'}]},
    {label: 'Unhappy 2', value: '1-2', children: [{label: 'Unhappy 2-1', value: '1-2-1'}]},
    {label: 'Happy 3', value: '1-3', children: [{label: 'Happy 1-3-1', value: '1-3-1', children: [{label: 'Happy 1-3-2', value: '1-3-2'}]}]}
  ]
}])
// Accept the type props and mark the type
defineProps({
  // Data source list
  dataList: {
    type: Array as PropType<BaseOptions[]>,
    required: true
  }
})
As you can see, the generic type of TS needs to be used in reactive defined in vue3 to mark the type. If the type of props is declared at runtime, when the type of props is Object or Array, you need to use Array as proptype < baseoptions [] > to mark the type, which is much more troublesome than the use of conventional ts.
Other components of the assembly
The component uses a two-way bound props selectIds, which is slightly different from vue2: v-model:selectIds="selectIds", which can be more flexible. The subcomponent modifies the props through emits(update:propsName).
Template part
<ul class="treeList" :style="{'padding-left': `${levelPadL}px`}">
    <li v-for="item in dataList" class="item" :key="item.value" :class="{'hasChild': item?.children?.length}">
      <div class="label" :class="{'is-open': isOpen(item.value)}" @click="toggleItem(item)">
        <span>{{item.label}}</span>
        <span class="icon" v-if="item?.children?.length"></span>
      </div>
      <collapseTransition>
        <template v-if="isOpen(item.value)">
          <treeList v-bind="$props" :data-list="item.children"></treeList>
        </template>
      </collapseTransition>
    </li>
  </ul>
You can see that the template of vue3 can finally be used? The new syntax of optional chain is so cool that the whole dom will not be rendered because of the null pointer of the object or array. The collapseTransition animation component is implemented based on vue2 and seems to be fully compatible.
Component method
// Expand and collapse method
const toggleItem = (item: BaseOptions) => {
  const {value, children = []} = item
  if (children.length) {
    const findIndex = selectIds.findIndex(id => value === id)
    if (findIndex > -1) {
      selectIds.splice(findIndex, 1)
    } else {
      selectIds.push(value)
    }
    emits('update:selectIds', selectIds)
  }
}

// Judge whether to expand
const isOpen = (id: Number | String) => {
  return !!selectIds.find(item => id === item)
}
summary
The whole component is quite simple, which is often used by us. It is mainly based on vue3+setup+TS. get familiar with the syntax and new features. You can also practice your hands and experience vue3 to see if it is really fragrant. Roll it up!!!
Finally, I can pay attention to my official account number and get the latest push at the first time.
