1, Explanation of global component definition and reusability
01,Understand the concept of components with a picture
Let's take a look at an official picture given by Vue3. Through the picture, we can clearly understand some clues of what components in Vue are.
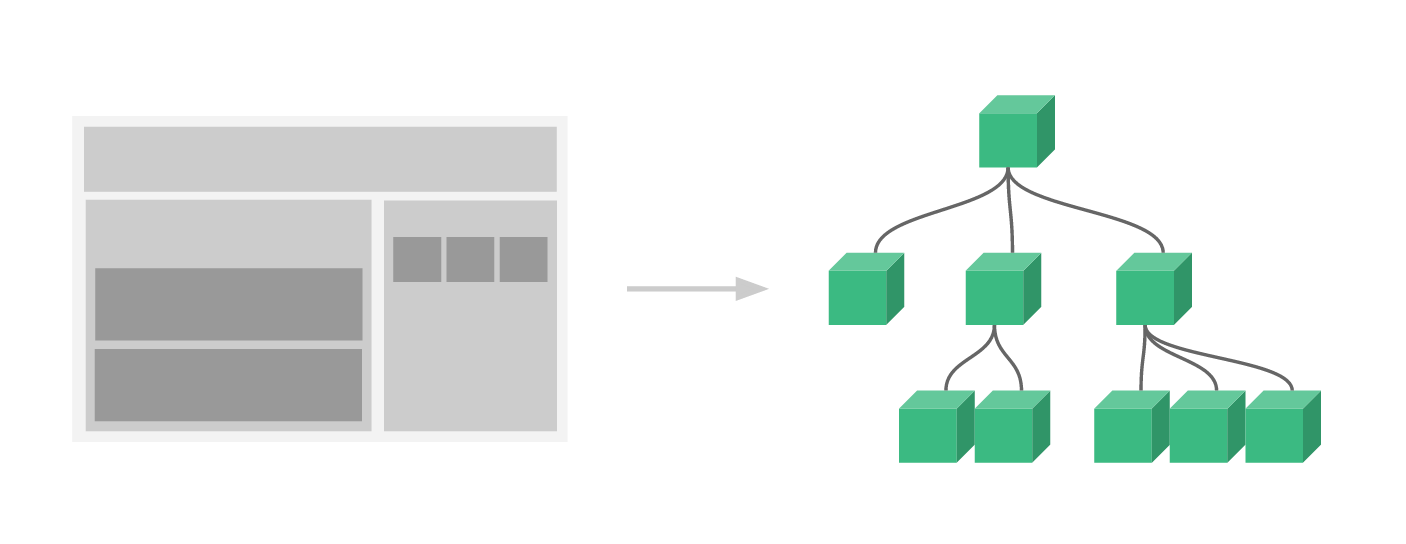
The left side of the figure is a web page, which is divided into header, left main body and right sidebar. At this time, using the concept of components, you can first divide the web page into three major components, namely the head, the left and the right. Then make more detailed component division according to the content and function of each large component. In this way, a complex large page can be decomposed into small pages that can be reused.
The summary is as follows:
The components in Vue are part of the page. Through layer by layer assembly, a complete component is finally formed. This is also the most popular front-end development method at present.
02,Explanation of root components in Vue3
After learning the theory, we open the VSCode code editor and write a basic Vue3 structure.
<!DOCTYPE html>
<html lang="en">
<head>
    <meta charset="UTF-8">
    <meta name="viewport" content="width=device-width, initial-scale=1.0">
    <title>Document</title>
    <script src="https://unpkg.com/vue@next"></script>
</head>
<body>
    <div id="app"></div>
</body>
</html>
With this code, you are writing the corresponding Vue code. Create an instance of Vue with # createApp(), and then mount it on the DOM node with # mount() method.
<script>
    const app=Vue.createApp({ })
    const vm=app.mount("#app")
</script>
Vue Createapp actually creates an instance of Vue, which is equivalent to the first root component just mentioned. You can define the specific style and method of the root component in the form of object attributes (in fact, the method accepts the parameters implemented by an object). For example, define a template on the root component, and then output the name "strawberry" on the page.
const app=Vue.createApp({
    template:`<h2>strawberry</h2>`
})
After writing, preview in the browser, and you can see "strawberry" on the page.
03,Definition of global components
The code is as follows:
app.component('website',{
    template:` <h2>website Global components</h2>`
})
app.component('describe',{
    template:` <h2>describe Global components</h2>`
})
After the component is defined, it can be used directly on the root component.
const app = Vue.createApp({
    template:`
        <website />
        <describe />
    `
})
Now the elements on the page are split. There are two sub components under a root component. We don't have any business logic here, so it doesn't seem to have much effect. However, if we split the business logic in this way once it is complex, it will reduce the difficulty of development.
04,Explanation of reusability of components
What we need to do now is to define a new counting component - count. Each time we click the button, the count variable in the component will be automatically increased by 1
app.component('count',{
    data(){
        return{
            count:0
        }
    },

    template:`<div>{{count}}<button @click="count++">Add 1</button></div>`
})
After the component is written, it can be reused in the root component. Here you can add multiple < count / > components, such as three.
const app=Vue.createApp({
    template:`
        <website />
        <describe />
        <count/>
        <count/>
        <count/>
    `
})
Then preview in the browser and you will find that the < count / > components do not interfere with each other. Because of this feature, the components in Vue are reusable.
05,Disadvantages of global components
Global components are really very convenient to write. At that time, global components will occupy system resources once you define them. It always exists, and you can use this global component anywhere. This is bound to have an impact on performance. For example, a real project will have thousands of components written by different people. If all of them are global components, the opening speed of the application must be very slow, and the fluency will also be affected.
Summary of global components: as long as they are defined, they can be used everywhere. The performance is not high, but it is simple to use.
2, Local components in Vue3
Corresponding to the global component is the local component. You can treat the local component as a variable, and then register the component where you use it before you can use it. The biggest advantage of local components is that they consume system resources only when they are used. Unlike global components, they always exist.
Open VSCode and create a new file demo2 HTML, directly copy Demo1 HTML content. Delete some useless content.
<!DOCTYPE html>
<html lang="en">
<head>
    <meta charset="UTF-8">
    <meta name="viewport" content="width=device-width, initial-scale=1.0">
    <title>Document</title>
    <script src="https://cdn.bootcdn.net/ajax/libs/vue/3.0.2/vue.global.js"></script>
</head>

<body>
    <div id="app"></div>
</body>
<script>
    const app = Vue.createApp({
        template: `<h2>JSPang.com</h2>`
    })
    const vm = app.mount("#app")
</script>
</html>
At this time, you can open the browser to see if normal content can be displayed. If it can be displayed normally, it means that everything is normal. Next, you can write a local component.
To register local components, in fact, you can understand that achievement is to declare a variable, which is an object, so we use curly braces (curly braces) for the outer layer, and Vue The parameters passed during createapp() are the same.
const counter = {
    data() {
        return {
            count: 0
        }
    },
    template: `<div>{{count}}<button @click="count++">Add 1</button></div>`
}
After registering the component, we can't use it directly. If we use it directly, an error will be reported. What to do at this time is in Vue Register in the createapp () method.
03. Registration part assembly
The method of registering local components is very simple. You can directly declare it with the components attribute.
const app = Vue.createApp({
    components: { counter },
    template: `
        <h2>JSPang.com</h2>
        <counter />
    `
})
But this is only a shorthand method. The correct way to write it should be components: {counter: counter}. In fact, it is to give a name to the component. You can even call it caomei.
const app = Vue.createApp({
        components: { caomei: counter },
        template: `
         <h2>caomei.com</h2>
         <caomei />
        `
After registration, you can use it directly in the template. It should be noted that local variables are also independent, so they can be reused.
There are some unwritten hidden rules for the preparation of local components, which are introduced below.
04,Large hump nomenclature is used for local components
Sometimes our component names are relatively long, such as writing a xieDaJiao component.
const xieDaJiao = {
   template: `<h2>Xie Dajiao</h2>`
}
Now the variable name has upper and lower case. At this time, this form (use - cut word) should be used when registering components.
const app = Vue.createApp({
    components: {
        caomei: counter,
        'xie-da-jiao': xieDaJiao
    },
    template: `
        <h2>caomei.com</h2>
        <xie-da-jiao />
        <caomei />

    `
This problem arises because of a contradiction that variables cannot be used -- and component calls can. Therefore, in order to distinguish components, when defining local components, the hidden rule is to capitalize handwritten subtitles, and then use hump naming method.
const XieDaJiao = {
        template: `<h2>Xie Dajiao</h2>`
    }
Here are all the codes of this lesson to help you learn better.
<!DOCTYPE html>
<html lang="en">

<head>
    <meta charset="UTF-8">
    <meta name="viewport" content="width=device-width, initial-scale=1.0">
    <title>Document</title>
    <script src="https://cdn.bootcdn.net/ajax/libs/vue/3.0.2/vue.global.js"></script>
</head>

<body>
    <div id="app"></div>
</body>
<script>
    const Counter = {
        data() {
            return {
                count: 0
            }
        },
        template: `<div>{{count}}<button @click="count++">Add 1</button></div>`
    }
    const XieDaJiao = {
        template: `<h2>Xie Dajiao</h2>`
    }
    const app = Vue.createApp({
        components: {
            caomei: Counter,
            'xie-da-jiao': XieDaJiao
        },
        template: `
            <h2>caomei.com</h2>
            <xie-da-jiao />
            <caomei />
        `
    })
    const vm = app.mount("#app")
</script>
</html>
3, Static and dynamic value transfer of parent-child components
01. Declaration and registration of components
Declare a global component Son.
app.component('Son',{
    template:`<div>Son div </div>`
})
Because this component is global, it can be used directly after being defined. (no need to declare in the registration)
const app = Vue.createApp({
    template:`
        <h2>caomei.com</h2>
        <Son />
    `
})
After use, you can view the effect in the browser. If it is normal, the parent-child component relationship has been formed at this time. Now we can explain how to transfer values from parent components to child components.
02,Value transfer from parent component to child component (static value transfer)
The Son div in the sub component is written dead. If you want to dynamically transfer it from the parent component, you can use the attribute method, and then the sub component uses props to receive it.
For example, when we call the subcomponent, we pass the text of "strawberry" through the attribute name.
const app = Vue.createApp({
    template:`
        <h2>caomei.com</h2>
        <Son name="strawberry" />
    `
})
After transmission, props is used to receive in the sub component, and then it is printed in the form of interpolation expression (double curly braces {name}}).
app.component('Son',{
    props:['name'],
    template:`<div>{{name}} div </div>`
})
In this way, the parameters are received and displayed.
The parameters passed by the above code are written dead, and business logic cannot be written, that is, we often call static parameters. If you want to make the code more flexible, you can use dynamic parameter passing here. For dynamic parameter transfer, first put the transfer parameters into the data item of Vue, that is, the data attribute.
For example, declare a name attribute in data and assign it to "strawberry". At this time, you need to bind the name attribute in the template. In this way, your value is not static, but dynamic.
const app = Vue.createApp({
    data(){
        return {
            name: "strawberry"
        }
    },
    template:`
        <h2>caomei.com</h2>
        <Son v-bind:name="name" />
    `
})
Of course, v-bind:name can also be abbreviated as: name. The rewritten code is as follows:
template:`
    <h2>caomei.com</h2>
    <Son :name="name" />
`
There is also a small hole in static parameters, which needs to be explained. Static parameters can only be String type, while dynamic parameters can be multiple types, even a function (method)
The example of passing parameters will be explained in detail below. Let's take a look at the example of passing numbers first.
For example, for example, we now change back to static parameter passing, and the content passed is the number 123, but when using typeof to view the attribute in the template, it is still a String.
Change to static parameter transfer, and the parameter is 123
template:`
    <h2>caomei.com</h2>
    <Son name="123" />
`
When you check the type with typeof in the subcomponent, you will find that it is still a string type
app.component('Son',{
    props:['name'],
    template:`<div>{{ typeof name}} div </div>`
})
However, if you change to dynamic parameter transfer, it becomes a numeric type.
const app = Vue.createApp({
    data(){
        return {
            name:123
        }
    },
    template:`
        <h2>caomei.com</h2>
        <Son :name="name" />
    `
})04,Usage when argument is a function
When using dynamic parameter passing, the parameter can be almost any type, even a function. Let me give you an example of transfer function to further understand the role of dynamic parameters.
The requirement is like this. We write a global sub component of XiaoJieJie. When we click it, the little sister will first say please pay, and then we give the money in the form of transfer function.
Write the sub components of the little sister:
app.component('XiaoJieJie',{
    props:['pay'],
    methods:{
        handleClick(){
            alert('Please pay....')
            this.pay()  // The customer decides how much to pay, so it can only be determined when calling
        }
    },
    template:`<div @click="this.handleClick"> Say hello to your little sister! </div>`
})
When the parent component calls, pay is a function defined in data, and then called in the form of dynamic parameters.
const app = Vue.createApp({
    data(){
        return {
            name:123,
            pay:()=>{
                alert('Here's 500 yuan')
            }
        }
    },
    template:`
        <h2>caomei.com</h2>
        <Son :name="name" />
        <xiao-jie-jie :pay="pay"/>
    `
}
4, Verification operation during component value transfer
Now you can easily transfer values to components, which is very convenient and free to use. In actual development, these parameters may also be obtained through user input, and necessary front-end verification is essential. However, the most basic verification is also required in the component. In this lesson, let's learn about the verification of component value transfer in Vue3.
Sometimes we want the attribute passed to be a string, but it is likely that the user passed a number. At this time, I hope the program can give me a hint so that I can do some business logic processing. This involves the judgment of parameter types.
app.component('Son', {
        props: {
            name: String
        },
        template: `<div>{{name}} div </div>`
    })
At this time, the code has the verification function. Open the Console and you can see the prompt. It should be noted here that this prompt will not report errors and block the program, but will give a warn warning message on the Console.
At this time, when 123 in the data item is modified into a String, the program will no longer report an error. The verification types supported by Vue include String, Boolean, Array, Object, Function and Symbol.
02,Required checksum default settings
Some parameters cannot be passed, but some parameters must be passed. We just need to give the system a default value. Therefore, it is necessary to learn these two knowledge.
Required: required
If the component is required to be used, parameters must be passed, and required can be used for verification
app.component('Son', {
        props: {
            name: {
                type: String,
                required: true
            }
        },
        template: `<div>{{name}} div </div>`
    })
The verification rule at this time is that the value of name must be a string and cannot be omitted. At this time, you can remove the parameters passed during the parent component call, and open the console in the browser to see the warning information.
Default: the default value
Let's take a look at the writing method of the default value. Just write default directly where required was originally written. For example, write it like the following.
app.component('Son', {
        props: {
            name: {
                type: String,
                default: 'caomei.com'
            }
        },
        template: `<div>{{name}} div </div>`
    })
This means that when calling a component, if no parameters are passed, the default value is caomei com.
03,Accuracy verification - validator
If none of the above verifications can meet your requirements, you can also conduct accurate verification.
For example, if the string to be passed must include the characters caomei, the validator can be used for verification. It is a function and accepts a value, which is the passed value.
app.component('Son', {
    props: {
        name: {
            type: String,
            validator: function (value) {
                console.log(value.search("caomei"))
                return value.search("caomei") != -1
            },
            default: 'caomei.com'
        }
    },
    template: `<div>{{name}} div </div>`
})
Because search is used for verification, the position of the string is returned, and - 1 is displayed only when it is not found. Therefore, it is determined here that if it is not - 1, it is verified.
When the verification fails, a warning is given on the console.
5, Important mechanism in component - single data flow
This lesson continues to talk about the single data flow when components pass parameters. It is an important mechanism for Vue to write components, which ensures the independence of components. As a programmer, we need to know, understand and master the concept and use of single data flow.
Write a global component. The global component accepts a parameter counter. The code is as follows.
app.component('Counter', {
    props: ['counter'],
    template: `
        {{counter}}<button @click="counter+=1">Increase quantity</button>
    `
})
After the data is declared in the global component, it can be passed to the child component in the Counter.
const app = Vue.createApp({
    data() {
        return {
            counter: 0
        }
    },
    template: `
        <counter :counter="counter"/>
    `
})
Everything seems normal, but when you preview in the browser, you will find that clicking the button doesn't work at all. This is the result of the limitation of one-way data flow mechanism.
02,Unidirectional data flow concept
What is one-way data flow? The official explanation is still rather obscure.
All props form a one-way downstream binding between their parent and child props: the updates of the parent props will flow down to the child components, but not vice versa.
When I first read this paragraph, I didn't know what it meant, but after learning and projects, the concept of single data flow is particularly easy to understand.
It can be simply said that data can only be bound one way when it is passed from parent component to child component. The data passed from the parent component cannot be modified directly inside the child component.
That's why the program we wrote above can't be used. How to modify this program to make it easy to use? The method is very simple. Declare a variable in the data item in the component, assign the variable passed by the parent component to the internal variable, and then you can modify it at will.
app.component('Counter', {
    props: ['counter'],
    data() {
        return {
            newCounter: this.counter
        }
    },
    template: `
        {{newCounter}}<button @click="this.newCounter+=1">Increase quantity</button>
    `
})
In this way, it can be modified. When we have a better understanding of what a single data flow is through the program, let's summarize it. One way data flow is that the parent component can transfer data to the child component, but the child component cannot modify the data.
03,Why is there a one-way data flow mechanism
The ultimate purpose of single data flow is to reduce the coupling and independence of components. For example, three < counter / > components are called on the page at the same time. Without the mechanism of single data flow, it is easy to change the value of one component and the value of other components. The data of page components are coupled together and cannot be used independently.
template: `
    <counter :counter="counter"/>
    <counter :counter="counter"/>
    <counter :counter="counter"/>
`
The purpose of this lesson is to understand the concept of single data flow in components.
6, Tips for using non props
This lesson mainly talks about the non props attribute. What is the non props attribute? In fact, the sub component does not accept the parameters passed by the parent component, but the sub component completely copies the attribute to its own label, which is called the non props attribute.
01,Preparation of basic pages and subcomponents
In order to show the style of the non props attribute, we need to write some code to explain the use
<!DOCTYPE html>
<html lang="en">

<head>
    <meta charset="UTF-8">
    <meta name="viewport" content="width=device-width, initial-scale=1.0">
    <title>Demo06</title>
    <script src="https://cdn.bootcdn.net/ajax/libs/vue/3.0.2/vue.global.js"></script>
</head>

<body>
    <div id="app"></div>
</body>
<script>
    const app = Vue.createApp({
        template: ` <h2>caomei.com</h2>`
    })
    const vm = app.mount("#app")
</script>

</html>
Then we write a global component of Hello. The code is as follows.
app.component('Hello', {
    template: `<h3>Hello World</h3>`
})
After the child component is written, it can be used directly in the parent component.
const app = Vue.createApp({
    template: `
        <hello />
    `
})02,Initial non props attribute
In the above code, we didn't accept any parameters passed in the sub component, so we didn't write props at all. At this time, we can still pass values when calling.
const app = Vue.createApp({
    template: `
        <hello msg="caomei" />
    `
})
At this time, you open the console in the browser and check the Elements tag. You can see that the < H3 > tag already has attributes such as msg=caomei, that is, the parent component transplants the attributes directly to the child attributes.
<h3 msg="caomei">Hello World</h3>
If you want to eliminate this migration or replication, you can accept this attribute in the sub component, but do not use it.
app.component('Hello', {
     props: ['msg'],
     template: `<h3>Hello World</h3>`
 })
At this time, when you open the Elements tab of the browser to view, there are no redundant properties.
After understanding the two methods, let's talk about the non prop attribute. It means that when the parent component passes parameters to the child component, the child component does not write any receiving methods. At this time, the parent component will directly copy the attribute to the child component, and the child component can also get the attribute value.
The most common use case is to write CSS styles directly on labels.
const app = Vue.createApp({
    template: `
        <hello style="color:red;" />
    `
})
At this time, the sub component will directly get this attribute, which will turn the font into red.
Sometimes we just don't want to accept parameters or make the non props attribute work. At this time, we can use the inheritAttrs attribute on the sub component to solve this problem.
app.component('Hello', {
    inheritAttrs: false,
    template: `<h3>Hello World</h3>`
})
At this time, the style tag will no longer be copied to the sub component, and the Hello World on the component will not turn red.
04,Non prop multi node failure solution
As mentioned earlier, when a component does not accept parameters, it will automatically copy the attributes to the root node of the component. If the component is not a root node, for example, write it as follows.
app.component('Hello', {
    template: `
        <h3>Hello World</h3>
        <h3>Hello World</h3>
        <h3>Hello World</h3>
    `
})
At this time, the copy will fail. Of course, you can add a root node to them, but there is a solution without adding a root node. For example, if we want the < H3 > tag in the first component to copy the attributes passed by the parent component, we can write it as follows.
pp.component('Hello', {
    template: `
        <h3 v-bind="$attrs">Hello World</h3>
        <h3>Hello World</h3>
        <h3>Hello World</h3>
    `
})
Note that the tested $attrs does not refer to a single attribute, but to all attributes. Of course, there is only one attribute here, so only one is copied. For example, if you write another attribute, it can also be copied.
const app = Vue.createApp({
    template: `
        <hello style="color:red;" msg="caomei" />
    `
})
When you open the browser, you will see that the two attributes are copied to the first < H3 > tag.
<h3 msg="caomei" style="color: red;">Hello World</h3>
It should be noted that v-bind="$attrs" means to copy all parameter attributes passed by the parent component to the child component.
If you want to copy only one attribute, for example, now we only copy one attribute style, that's it.
app.component('Hello', {
    template: `
        <h3 v-bind="$attrs">Hello World</h3>
        <h3 v-bind:style="$attrs.style">Hello World</h3>
        <h3>Hello World</h3>
    `
})
At this time, the second < H3 > tag only copies the style attribute. Of course, you can also abbreviate it, get rid of v-bind, and use: to represent.
05,Using the non props attribute in business logic
What I just said is to use the non props attribute on the tag. If you want to use the non props attribute in business logic, it is also OK. For example, in the life cycle.
app.component('Hello', {
    mounted() {
        console.log(this.$attrs.msg)
    },
    template: `
        <h3 v-bind="$attrs">Hello World</h3>
        <h3 v-bind:style="$attrs.style">Hello World</h3>
        <h3>Hello World</h3>
    `
})
Then go to the console in the browser to check, and you can see that the word caomei is printed. Actually, this$ Attrs is a common attribute of Vue, and we need to make good use of it.
7, Communication through events in components
Earlier, we talked about the concept of single data flow. In this section, we learn how sub components pass parameters to parent components through events to break the limitation of single data flow.
In the single data flow, we use the Counter as a small example to help you understand. Let's first review what is a single data flow.
Through the preparation of counters, our learning objectives in this section are as follows:
- The child component calls the writing method of the parent component event
- Method for passing parameters from child component to parent component event
- How to verify parameters of subcomponents through emits
Let's start our study directly.
<!DOCTYPE html>
<html lang="en">

<head>
    <meta charset="UTF-8">
    <meta name="viewport" content="width=device-width, initial-scale=1.0">
    <title>Demo07</title>
    <script src="https://cdn.bootcdn.net/ajax/libs/vue/3.0.2/vue.global.js"></script>
</head>

<body>
    <div id="app"></div>
</body>
<script>
    const app = Vue.createApp({
        data() {
            return {
                counter: 0
            }
        },
        template: `
            <counter :counter="counter"/>
        `
    })
    app.component('Counter', {
        props: ['counter'],
        template: `
            {{counter}}<button @click="this.counter+=1">Increase quantity</button>
        `
    })

    const vm = app.mount("#app")
</script>

</html>
In the above code, when we click add in the browser, we cannot increase the value of counter, which is the limitation of Vue one-way data flow. But sometimes, we just want to change the value passed by the parent component in the child component. What should we do?
02,Child component invokes parent component event
At this time, the child component needs to call the event of the parent component to change the value in the parent component. We first write a method called handleAddCounter in the parent component. This method does one thing. Each time it is executed, the counter in the data item is added by one.
methods: {
    handleAddCounter() {
        this.counter += 1
    }
},
With this method, the parent component can change the value of the couter data row. After having the method, the problem now becomes, how to call this method in the sub component.
At this time, you can first write a click event in the template of the sub component.
{{counter}}<button @click="handleClick">Increase quantity</button>A child component does not call a method in the parent component, but a method in the child component.
If you want to call the handleAddConter method in the parent component, you can create a new method handleClick in the child component, and then call the response event add of the parent component with $emit. The specific codes are as follows
app.component('Counter', {
    props: ['counter'],
    emits: ['add'],
    methods: {
        handleClick() {
            this.$emit('add')
        }
    },
    template: `
        {{counter}}<button @click="handleClick">Increase quantity</button>
    `
})
What is the add at this time? Add is the response event. Add an add response event in the template of the parent component, and then call the method handleAdCounter.
Template in parent component:
template: `
            <counter :counter="counter" @add="handleAddCounter"/>
        `
At this time, you can go to the browser to see the results. You will find that when you click the Add button, the counter value in the data item can be added. Only the warning will be printed on the console.
[Vue warn]: Extraneous non-emits event listeners (add) were passed to component but could not be automatically inherited because component renders fragment or text root nodes. If the listener is intended to be a component custom event listener only, declare it using the "emits" option.
  at <Counter counter=3 onAdd=fn<bound handleAddCounter> >
  at <App>
The warning means that the add method you call is not declared with emits.
app.component('Counter', {
    props: ['counter'],
    emits: ['add'],
    methods: {
        handleClick() {
            this.$emit('add')
        }
    },
Once declared, the warning in the console disappears. This is also a constraint of Vue when calling parent components for child components, that is, it needs to be declared before calling, otherwise a warning will be reported.
03,The child component passes parameters to the parent component
When we don't want to add 1 every time, for example, this value is determined by the sub component, such as 2. At this time, the child component needs to pass values to the parent component, which is also possible. You can write this in a sub component.
methods: {
    handleClick() {
        this.$emit('add', 2)
    }
},
Then accept the parameter param in the parent component (you can choose the name of this parameter freely), and print it on the console for convenience.
methods: {
    handleAddCounter(param) {
        console.log(param)
        this.counter += param
    }
},
At this time, the parameters of the child component are passed to the parent component and can be used. Of course, you have a better choice, that is, put all the business logic in the sub component, and then pass the results to the parent component. I usually prefer this method. For example, the code can be written as follows. Business logic is written in sub components
methods: {
    handleClick() {
        this.$emit('add', this.counter + 3)
    }
},
The parent component can accept the result directly
methods: {
    handleAddCounter(param) {
        console.log(param)
        this.counter = param
    }
},04,Verification of passed values
The verification function can also be enabled when the child component passes values to the parent component. Verification is declared through the emits option. For example, now we require that the value passed to add should not be greater than 20. Warning if greater than 20.
emits: {
    add: (value) => {
        return value < 20 ? true : false
    }
},
The business logic here is very simple. You can write the verification process according to your business logic.
8, Use of components in slots Slot-1
This section is about the use of slots in components. In order to understand the slot more vividly, we use the case of red romance to select technicians.
For better explanation, we will create a new file demo8 HTML, you can copy the following basic file structure. After copying, we can write other code.
<!DOCTYPE html>
<html lang="en">

<head>
    <meta charset="UTF-8">
    <meta name="viewport" content="width=device-width, initial-scale=1.0">
    <title>Demo08</title>
    <script src="https://cdn.bootcdn.net/ajax/libs/vue/3.0.2/vue.global.js"></script>
</head>

<body>
    <div id="app"></div>
</body>
<script>
    const app = Vue.createApp({
        template: ` <h2>Welcome to red romance-Please select your technician</h2>`
    })

    const vm = app.mount("#app")
</script>

</html>
This is the most basic Vue3 code. There is only one template. Then we create a new global sub component. The sub component is called technician component, and there is only one simplest template in it.
app.component('JiShi', {
    template: `
        <div>
            <span>After your careful consideration.Finally chose.</span>
            <span>
                xxx
            </span>
        </div>
    `
})
With the child component, the sub component is invoked in the parent component.
const app = Vue.createApp({
    template: `
        <h2>Welcome to red romance-Please select your technician</h2>
        <ji-shi />
        `
})
At this time, of course, XXX can be obtained through attribute transmission and acceptance. You have mastered this method. In this section, we will learn to use slots to move slots.
The slot declaration is very simple. Just add the < slot > < / slot > tag in the child component, and then use the double tag in the parent component to call. The specific codes are as follows:
<script>
    const app = Vue.createApp({
        template: `
            <h2>Welcome to red romance-Please select your technician</h2>
            <ji-shi > Xie Dajiao </ji-shi>
        `
    })

    app.component('JiShi', {
        template: `
            <div>
                <span>After your careful consideration.Finally chose.</span>
                <span>
                    <slot></slot>
                </span>
            </div>
        `
    })

    const vm = app.mount("#app")
</script>
At this time, go to the browser and you can see that the result we want appears on the page. You can make the page richer because the slot supports any DOM element. For example, we add a < div > and make the font red and 50 pixel font size.
const app = Vue.createApp({
    template: `
        <h2>Welcome to red romance-Please select your technician</h2>
        <ji-shi > <div style="color:red;font-size:50px;">Xie Dajiao</div> </ji-shi>
    `
})
For example, it is also possible to call the < Ji Shi > component twice and give different styles.
const app = Vue.createApp({
        template: `
            <h2>Welcome to red romance-Please select your technician</h2>
            <ji-shi > <div style="color:red;font-size:50px;">Xie Dajiao</div> </ji-shi>
            <ji-shi > <div style="color:green;font-size:50px;">Liu Ying</div> </ji-shi>
        `
})Slots can be powerful enough to use sub components directly. Next, let's take a small example of using sub components in slots. You can declare one of the simplest subcomponents first. The purpose of this sub project is to show the sub project that we have made.
app.component('project', {
    template: `<span style="color:blue;">Projects are subcomponents</span>`
})
After having a component, it can be directly used in the slot of the parent component. The code is as follows.
const app = Vue.createApp({
    template: `
        <h2>Welcome to red romance-Please select your technician</h2>
        <ji-shi >
                <div style="color:red;font-size:50px;">
                    Xie Dajiao,<project />
                </div>
        </ji-shi>
        <ji-shi > <div style="color:green;font-size:50px;">Liu Ying</div> </ji-shi>
    `
})
Preview in the browser and you can see that sub components can be placed in the slot.
04,Using dynamic data in slots
For example, we can directly use a data item in a slot.
const app = Vue.createApp({
    data() {
        return {
            jishi: 'Xiaohong'
        }
    },
    template: `
        <h2>Welcome to red romance-Please select your technician</h2>
        <ji-shi >
                <div style="color:red;font-size:50px;">
                    {{jishi}},<project />
                </div>
        </ji-shi>
        <ji-shi > <div style="color:green;font-size:50px;">Liu Ying</div> </ji-shi>
    `
})
At this time, we need to pay attention to the problem of variable scope. For example, there is also a data item jishi in our sub component, and then assign it to Xie Dajiao.
app.component('JiShi', {
    data() {
        return {
            jishi: 'Xie Dajiao'
        }
    },
    template: `
        <div>
            <span>After your careful consideration.Finally chose.</span>
            <span>
                <slot> </slot>
            </span>
        </div>
    `
})
At this time, you will find that Xiaohong is still displayed in the browser. At this time, we come to a conclusion, which is also convenient for you to remember.
- The data attributes called in the parent template use the data in the parent template
- The data attributes called in the sub template use the data in the sub template
9, Use of components in slots Slot-2
This section continues to explain the knowledge related to slots. In the previous article, you have found a simple way to use slots. In this lesson, I'll take you to learn more about the two writing methods often used in slots, the default value of slots and the use of named slots.
<!DOCTYPE html>
<html lang="en">

<head>
    <meta charset="UTF-8">
    <meta name="viewport" content="width=device-width, initial-scale=1.0">
    <title>Demo09</title>
    <script src="https://cdn.bootcdn.net/ajax/libs/vue/3.0.2/vue.global.js"></script>
</head>

<body>
    <div id="app"></div>
</body>
<script>
    const app = Vue.createApp({
        template: ` <h2>Welcome to red romance-Please select your technician</h2>`
    })

    const vm = app.mount("#app")
</script>
The above code is very simple and we won't introduce it any more. In order to learn the default value of the slot, let's review what we learned in the last lesson, write the simplest component and use the slot.
02,How to write the default value of the slot
First write a global component JiShi in the file. The code is as follows.
app.component('JiShi', {
    template:`
        <div>
            You chose<slot></slot>At your service.
        </div>
    `
})
With slots, you can pass values directly when using components.
const app = Vue.createApp({
    template: `
        <h2>Welcome to red romance-Please select your technician</h2>
        <ji-shi><span style="color:red;">Bigfoot</span></ji-shi>
    `
})
These are the knowledge of the last section, so we'll review it. Now there is a new guest. When he comes for the first time, I'm sorry to order a technician. Then we need to give him a default value, such as "Xiaohong".
The key syntax of the default value is to directly enter the value in the < slot > slot.
app.component('JiShi', {
    template:`
        <div>
            You chose<slot><span style="color:green;">Xiaohong</span></slot>At your service.
        </div>
    `
})
Now this writing method will display the normal value when a value is passed, and the default value "Xiaohong" will be displayed when there is no value.
This is the use of the default value in the slot. If you already know, let's learn the next knowledge, named slot.
Let's first look at a demand. If you go to the foot washing City, you need to go through three processes: arranging a location for customers, selecting technicians and selecting projects.
This is a process in order, including the display on the page. So we wrote a component. The component code is as follows.
app.component('HongLangMan',{
        template:`
            <div>
                 <div>1.A male guest, please go up to the second floor.</div>
                 <div>2.You chose Bigfoot to serve you</div>
                 <div>3.You ordered 198 yuan Thai massage</div>
            </div>
        `
    })
The requirements for programming are as follows: the choice of who will serve you remains unchanged, that is, the content in the second div remains unchanged. However, the first and third sentences should be defined by using the slot method in the parent component. At this time, you will find that there is a problem with the program. Where do you want to put < slot >? It seems that it's not appropriate to put it anywhere. We simply put two < slots >, one on the top and one on the bottom. Let's test it.
app.component('HongLangMan',{
    template:`
        <div>
                <slot></slot>
                <div>2.You chose Bigfoot to serve you</div>
                <slot></slot>
        </div>
    `
})
Then pass the corresponding value when the parent component is called, for example, write the code as follows.
const app = Vue.createApp({
    template: `
        <h2>Welcome to red romance-Please select your technician</h2>
        <hong-lang-man>
            <div>1.Female guest, please go up to the third floor.</div>
            <div>3.The customer chose the whole body SPA. </div>
        </hong-lang-man>
    `
})
At this time, when you open the browser, you will find that there are two duplicate contents in the position of the slot. It also means that our first attempt failed.
In fact, Vue has provided a method to use named slots, that is, add a name attribute to the < slot > tag, and you can write the sub components as follows.
app.component('HongLangMan',{
    template:`
        <div>
                <slot name="one"></slot>
                <div>2.You chose Bigfoot to serve you</div>
                <slot name="two"></slot>
        </div>
    `
})
Then the parent component can be called in the following way.
const app = Vue.createApp({
    template: `
        <h2>Welcome to red romance-Please select your technician</h2>
        <hong-lang-man>
            <template v-slot:one><div>1.Female guest, please go up to the third floor.</div></template>
            <template v-slot:two><div>3.The customer chose the whole body SPA. </div></template>
        </hong-lang-man>
    `
})
Now you can define two slots in a component. I hope you can learn this method.
To sum up, you should know how to use the default and named slots in this section. These knowledge are still used more in actual development, and can form a good module mechanism.
10, Named slot abbreviation and scope slot
01,Shorthand method of named slot
v-slot:one is used to determine the slot position in the parent template. In fact, this syntax can be abbreviated as #one. At this time, the code becomes the following.
const app = Vue.createApp({
    template: `
    <h2>Welcome to red romance-Please select your technician</h2>
    <hong-lang-man>
        <template v-slot:one><div>1.Female guest, please go up to the third floor.</div></template>
        <template v-slot:two><div>3.The customer chose the whole body SPA. </div></template>
    </hong-lang-man>
`
})
const app = Vue.createApp({
template: `
<h2>Welcome to red romance-Please select your technician</h2>
<hong-lang-man>
<template #one><div>1. Female guest, please go up to the third floor</ div></template>
<template #two><div>3. The customer chose the whole body SPA</ div></template>
</hong-lang-man>
`
})After modification, you can open the browser for preview and find the correct results. After learning the abbreviation of named slot, you can learn the focus of this section: scope slot.
02,Scope slot
In fact, the scope slot mainly solves the problem that there are slots and variables in the child component. How can these variables be used in the parent component. Let's first look at such a requirement: write a sub component with three name variables: Dajiao, Liu Ying and Xiaohong, and then output it in the form of loop in the sub component.
Before learning the scope slot, leave the most basic code.
<!DOCTYPE html>
<html lang="en">

<head>
    <meta charset="UTF-8">
    <meta name="viewport" content="width=device-width, initial-scale=1.0">
    <title>Demo10</title>
    <script src="https://cdn.bootcdn.net/ajax/libs/vue/3.0.2/vue.global.js"></script>
</head>

<body>
    <div id="app"></div>
</body>
<script>
    const app = Vue.createApp({
        template: `  <h2>Welcome to red romance-Please select your technician</h2>`
    })

    const vm = app.mount("#app")
</script>
The above is the most basic Vue3 code. Without too much explanation, you can directly copy this code and start your learning. Next, we will write a sub component to meet the requirements just mentioned.
<script>
    const app = Vue.createApp({
        template: `
            <h2>Welcome to red romance-Please select your technician</h2>
            <list />
        `
    })
    app.component('List', {
        data() {
            return {
                list: ['Bigfoot', 'Liu Ying', 'Xiaohong']
            }
        },
        template: `
            <div>
                <div v-for="item in list">{{item}}</div>
            </div>
        `
    })

    const vm = app.mount("#app")
</script>
In the above code, write a sub component list, and then declare an array data item of list in the list component. There are three values in the data item: Dajiao, Liu Ying and Xiaohong. Try the form of v-for in the template to cycle.
After writing this code, you can debug it in the browser to see if it can run normally? If everything is normal, the value of the loop should be displayed on the page.
03,Scope slot - specific explanation
With the basic code, you can learn the content of the scope slot. At present, the < div > tag is recycled in the child component. Now it is required that this tag is determined when the parent component calls, that is, the slot should be used. (it should be noted that this situation is often encountered when you write components, so you should pay enough attention to it).
Our initial idea is to transform the sub components and add slot slots. The template code after adding slots is as follows.
template: `
    <div>
        <slot v-for="item in list"  />
    </div>
`
Then call it in the parent component. The calling method is as follows.
const app = Vue.createApp({
    template: `
        <h2>Welcome to red romance-Please select your technician</h2>
        <list> <span></span> </list>
    `
})
At this time, check in the browser and open the console. You can see that there are three < span > tags in the dom. It indicates that DOM is passed in the form of slot. The next question is how the parent component uses the variables in the child component.
If the parent component wants to use the value in the slot of the child component, it can be passed in the form of: binding. For example, it can be written as: item="item". The specific code can be written as follows.
app.component('List', {
    data() {
        return {
            list: ['Bigfoot', 'Liu Ying', 'Xiaohong']
        }
    },
    template: `
        <div>
            <slot v-for="item in list" :item="item" />
        </div>
    `
After writing, the parent component accepts it in the form of v-slot="xxx". After receiving it, it can be used.
const app = Vue.createApp({
    template: `
    <h2>Welcome to red romance-Please select your technician</h2>
    <list v-slot="props">
        <span>{{props.item}}</span>
    </list>
`
})
At this time, you will find that the list can be displayed normally, and you can also change the label. You can try to change the < span > label to the < div > label.
Note that props here are subcomponents, and the data passed through are objects, so we need to add item can only be used. You can modify the code.
<list v-slot="props">
    <div>{{props.item}}-{{props}}</div>
</list>
The output results are as follows
Bigfoot-{ "item": "Bigfoot" }
Liu Ying-{ "item": "Liu Ying" }
Xiaohong-{ "item": "Xiaohong" }04,Simplify scope slot writing
In fact, the simplified method is also very simple. As long as the form of deconstruction is used, this is a writing method of ES6. If you are not familiar with this part, you can take a look at the syntax knowledge of deconstruction in ES6.
const app = Vue.createApp({
    template: `
        <h2>Welcome to red romance-Please select your technician</h2>
        <list v-slot="{item}">
            <div>{{item}}</div>
        </list>
        `
})
Although this writing method is simple, it is still troublesome to understand.
To sum up:
In this lesson, we mainly learned two knowledge: one is the abbreviation of named slot, and the other is the use and abbreviation of scope slot. The focus is on the scope slot. It is precisely because of the scope slot that the child component can pass its own data items for the parent component to use.
11, Dynamic components and state saving
In this article, we will mainly learn an important concept in Vue3 - dynamic components. Some small partners may find it difficult to hear dynamic components. In fact, it is not difficult to understand, and they will use more in their work.
Now let's make a virtual demand. We need to write a function of selecting technicians with pictures for red romantic foot washing City, and let customers manually switch these technicians. (in fact, there are several ways to realize this requirement, but here we deliberately use dynamic components for learning, which does not mean that it is the optimal solution.)
Create a new file Demo11 HTML, then copy the code content of Demo10 into demo 11 and modify it into the most basic code.
<!DOCTYPE html>
<html lang="en">

<head>
    <meta charset="UTF-8">
    <meta name="viewport" content="width=device-width, initial-scale=1.0">
    <title>Demo11</title>
    <script src="https://cdn.bootcdn.net/ajax/libs/vue/3.0.2/vue.global.js"></script>
</head>

<body>
    <div id="app"></div>
</body>
<script>
    const app = Vue.createApp({
        template: `
            <h2>Welcome to red romance-Please select your technician</h2>
        `
    })

    const vm = app.mount("#app")
</script>
You can also copy this code for quick learning, or even tap it yourself (to deepen the impression).
Now you can create two sub components to show the photos of big foot and Liu Ying. First give the photo address needed in the course (you can also find a photo to replace it by yourself)
Material picture (picture address is directly available):
Xie Dajiao picture address: https://newimg.jspang.com/xiedajiao01.jpg
 Liu Ying picture address:   https://newimg.jspang.com/liuying01.jpg
Then write two components:
app.component('dajiao',{
    template:`<img src="https://newimg.jspang.com/xiedajiao01.jpg" />`
})

app.component('liuying',{
    template:`<img src="https://newimg.jspang.com/liuying01.jpg" />`
})
These two components are then used directly in the parent component.
const app = Vue.createApp({
    template: `
        <h2>Welcome to red romance-Please select your technician</h2>
        <dajiao />
        <liuying />
    `
})
At this time, we can check the results in the browser. If the results are normal, it means that our writing is correct.
The requirement now is that if one component is displayed, the other component will not be displayed. The first thing I think of here is to implement it with v-show.
Let's first define a data item to control which component is displayed. The data item is called showItem, and then add the v-show attribute to the two sub components to control the final display.
const app = Vue.createApp({
    data(){
        return {showItem:'dajiao'}
    },
    template: `
        <h2>Welcome to red romance-Please select your technician</h2>
        <dajiao  v-show="showItem==='dajiao'" />
        <liuying v-show="showItem==='liuying'" />
    `
})
At this time, the showItem value is dajiao, so only dajiao components should be displayed in the browser.
Then write a button to switch between two components. The button needs to be bound with a method handleClick. In the method, I use the ternary operator to write this part.
<button @click="handleClick">Switch Jiali</button>
methods:{
    handleClick(){
        this.showItem= this.showItem=='dajiao'?'liuying':'dajiao'
    }
},
After writing this step, you can view the switching effect in the browser. If there are no errors, you should be able to achieve the effect mentioned before the beginning of the course. However, this implementation method is still troublesome and not elegant, so learn a better implementation method.
04,Dynamic component optimization code
Using dynamic component programming, you can omit the code of v-show and make the code look more elegant.
<component :is="showItem" />
With the above short code, you can delete the following two sentences of code.
<dajiao  v-show="showItem==='dajiao'" />
<liuying v-show="showItem==='liuying'" />
The meaning of this code is to use a dynamic component and finally display that component. It is determined by the data item showItem. If its value is dajiao, it will display the photo of Xie dajiao, and if its value is liuying, it will display the photo of Liu Ying.
Is it very simple and easy to use.
05,State saving in dynamic components
Dynamic component is very convenient to use, but it has a little problem. Now let's modify the dajiao component to turn the photo into an input box.
app.component('dajiao',{
    template:`<input />`
})
At this time, you can view in the browser and enter text in the input box after switching components. You will find that the text in the input box cannot be saved.
To save the text in the input box, you can use the < keep alive > tag to wrap the dynamic components.
<keep-alive>
    <component :is="showItem" />
</keep-alive>
At this time, the cache is enabled and the value of the input box is saved. When using dynamic components, they are often used together with the < keep alive > tag.
Well, that's what we learned in this lesson. I hope you can master the above two important knowledge: the use of dynamic components and the use of < keep alive > tags.
12, Asynchronous components and Promise explanation
In this section, we need to understand the asynchronous components in Vue and understand what asynchronous components are. In fact, there is pre knowledge, that is, you need to know what is synchronous and what is asynchronous. And you will also use Promise. If you are not very proficient in Promise, I suggest you review the basic knowledge of JavaScript before learning.
01,Writing basic code and synchronization components
Create a new file demo12 HTML, and then copy demo10 HTML content and modify it.
<!DOCTYPE html>
<html lang="en">

<head>
    <meta charset="UTF-8">
    <meta name="viewport" content="width=device-width, initial-scale=1.0">
    <title>Demo11</title>
    <script src="https://cdn.bootcdn.net/ajax/libs/vue/3.0.2/vue.global.js"></script>
</head>

<body>
    <div id="app"></div>
</body>
<script>
    const app = Vue.createApp({
        template: `

        `
    })

    const vm = app.mount("#app")
</script>
Then write a synchronization component (in fact, all the previous studies are synchronization components) and use it in the parent component.
const app = Vue.createApp({
    template: `<div><tongbu /></div>`
})
app.component('tongbu',{
    template:`<div>JSPang.com</div>`
})

const vm = app.mount("#app")
This is a synchronization component, because after calling, the code will be executed directly. After we understand synchronous components, let's look at asynchronous components.
02,Asynchronous components in vue3
Asynchronous component means that when calling a component, the component will not be rendered immediately, but will not execute the logic in the component and render to the page until some business logic is completed. Let's write an asynchronous component and feel it.
app.component('async-component',Vue.defineAsyncComponent(()=>{
    return new Promise((resolve,reject)=>{
        setTimeout(()=>{
            resolve({
                template:`<div>This is an asynchronous component</div>`
            })
        },3000)
    })

}))
In this code, we create a new component called async component, and then use defineasync component () to declare that it is an asynchronous component. Within the component, we use Promise to complete the logic. The logic is very simple. Use setTimeout to control the rendering of the template template after 3 seconds to display the content. In other words, after 3 seconds, the component will know what the final display content is. This is a typical asynchronous component.
Asynchronous components are often used when requesting data in the background. You can also split a large project into many small asynchronous components, and then load these small projects asynchronously as needed.
If you can't understand the content of this class, don't lose heart. Because the pre knowledge of this class is that you can use Promise. You can learn about Promise first, and then come back to this class. It should be much easier.
13, provide and inject multi-level component value transfer
The key words in this section are provide and inject, which are used to transfer values from multi-level components.
01,Create a multi-level component
Create a new file demo13 HTML, copy the basic code, or copy the code of the last lesson for modification.
<!DOCTYPE html>
<html lang="en">

<head>
    <meta charset="UTF-8">
    <meta name="viewport" content="width=device-width, initial-scale=1.0">
    <title>Demo13</title>
    <script src="https://cdn.bootcdn.net/ajax/libs/vue/3.0.2/vue.global.js"></script>
</head>

<body>
    <div id="app"></div>
</body>
<script>
    const app = Vue.createApp({
        template: `<div>I have a house. I'll pass it on to my son first</div>`
    })
    const vm = app.mount("#app")
</script>
The current requirement is to write a sub component, then call another sub component in the sub component (which can also be imagined as a grandson component), and then pass the value from the top parent component to the sub component.
Let's write the code of two sub components first.
<script>
    const app = Vue.createApp({
        data(){
            return {house:'A villa in Beijing'}
        },
        template: `<div>I have a house. I'll pass it on to my son first</div> `
    })

    app.component('child',{
        template:`
            <div>I'm a sub component. I'm going to pass the house on to my son.</div>
        `
    })

    app.component('child-child',{
        template:`
            <div>I'm a grandson, waiting to receive the house</div>
        `
    })
    const vm = app.mount("#app")
</script>
The basic results and components already exist. Let's see how to transfer this situation.
Now the demand is passed on layer by layer. We can receive it in the form of props and then continue to pass it. The code can be like this.
<script>
    const app = Vue.createApp({
        data(){
            return {house:'A villa in Beijing'}
        },
        template: `
            <div>I have a house. I'll pass it on to my son first</div>
            <child :house="house" />
         `
    })

    app.component('child',{
        props:['house'],
        template:`
            <div>I'm a sub component. I'm going to pass the house on to my son.</div>
            <div>Son receiving{{house}}</div>
            <child-child :house="house" />
        `
    })

    app.component('child-child',{
        props:['house'],
        template:`
            <div>I'm a grandson, waiting to receive the house</div>
            <div>Grandson reception{{house}}</div>
        `
    })
    const vm = app.mount("#app")
</script>
At this time, check the results in the browser and you can find that the results can be successful. Each time, it is received with props, and then passed to the next layer by binding attributes.
But now the demand has changed. There is a 200 square meter house in the Third Ring Road of Beijing. I don't want to pass it directly to my grandson through my son's hand. How can I operate it?
03,Multi level component value passing, provide passing and inject receive
At this time, you can use provide to pass and inject to receive. First declare a provide under the data item.
const app = Vue.createApp({
    data(){
        return {house:'A villa in Beijing'}
    },
    provide:{
        newHouse:'A 200 square meter house in Beijing'
    },
    template: `
        <div>I have a house. I'll pass it on to my son first</div>
        <child :house="house" />
        `
})
Then, the child component does not need to make any changes. It can be received directly in the child component with inject.
app.component('child-child',{
    props:['house'],
    inject:['newHouse'],
    template:`
        <div>I'm a grandson, waiting to receive the house</div>
        <div>Grandson reception{{house}},{{newHouse}}</div>
    `
})
After writing, you can open the browser to view and find that the grandson component can also be received smoothly.
We don't have many levels of learning cases, so you don't feel very strong. If this level relationship reaches level 5-6, and then use props for transmission, it will be very troublesome and there will be a lot of code redundancy. Project and provide can be used to solve this problem.