preface
In the previous section, the basic layout of MyCard was implemented using Templates, and I also said at the end of the article that because it is not reusable, its practicability is basically zero.
Today, we use named Slots to occupy a place in Templates, and then pass values to Slots in custom elements to improve the flexibility of custom elements.
Value transmission analysis
Because each person's information is different, and the corresponding Templates are all classnames The contents in the div of info content are variable. All variable values are summarized as follows:
- userName
- gender
- nation
- birthYear
- birthMonth
- birthDay
- address
- cardNO
That is, for each Card, the above attribute values need to be passed in the custom component.
Customize attributes using HTML tags
To customize components, in addition to Slots, you can also use the custom attributes of HTML tags.
Step 1: we add id to the variable parent tag inside Templates, for example:
<div class="info-content" id="user_name">Programming samadhi</div>
Step 2: get its own user-defined attributes inside the custom component:
class MyCard extends HTMLElement {
    constructor () {
        super();
        this.shadow = this.attachShadow({mode: "open"});
        let tempEle = document.getElementById("card_layout");
        this.shadow.appendChild(tempEle.content);
        // Get and fill in names
        let userName = this.getAttribute("userName") || "Programming samadhi";
        this.shadow.querySelector("#user_name").textContent = userName;
        // The process of obtaining and setting the remaining variables is the same
    }
}
Step 3: add the corresponding custom attribute on the label of the custom element:
<my-card userName="Recluse King"></my-card>
Through the above steps, you can also realize the effect of custom component value transmission, so as to achieve the purpose of component reuse.
Pass values using named Slots
Although the above uses the custom attributes of HTML tags to achieve the purpose of value transfer, the code of JS part doesn't look beautiful. Let's use Slots to realize the first version.
Step 1: add a named slot to the Templates for occupation.
<template id="card_layout">
<style>
* {
box-sizing: border-box;
}
:host {
display: inline-block;
width: 400px;
height: 240px;
border: 1px solid black;
border-radius: 10px;
box-shadow: -2px -2px 5px 0px #7a8489;
}
.container {
display: flex;
flex-direction: column;
padding: 10px;
height: 100%;
}
.card-body {
flex: 1;
display: flex;
}
.card-footer {
padding: 10px 0;
}
.main-info {
flex: 2;
}
.photo {
flex: 1;
display: flex;
align-items: center;
}
.photo img {
width: 100%;
}
.info-row {
display: flex;
padding-top: 15px;
}
.info-column {
display: flex;
align-items: center;
}
.info-title {
padding: 0 10px;
color: #0e5bd3;
font-size: 12px;
word-break: keep-all;
}
.info-content {
letter-spacing: 2px;
}
</style>
<div class="container">
<div class="card-body">
<div class="main-info">
<div class="info-row">
<div class="info-column">
<div class="info-title">full name</div>
</div>
<div class="info-content">
<slot name="userName">Recluse King</slot>
</div>
</div>
<div class="info-row">
<div class="info-column">
<div class="info-title">Gender</div>
<div class="info-content">
<slot name="gender">male</slot>
</div>
</div>
<div class="info-column">
<div class="info-title">nation</div>
<div class="info-content">
<slot name="nation">Chinese</slot>
</div>
</div>
</div>
<div class="info-row">
<div class="info-column">
<div class="info-title">birth</div>
<div class="info-content">
<slot name="birthYear">2022</slot>
</div>
</div>
<div class="info-column">
<div class="info-title">year</div>
<div class="info-content">
<slot name="birthMonth">12</slot>
</div>
</div>
<div class="info-column">
<div class="info-title">month</div>
<div class="info-content">
<slot name="birthDay"></slot>
</div>
</div>
<div class="info-column">
<div class="info-title">day</div>
</div>
</div>
<div class="info-row">
<div class="info-column">
<div class="info-title">address</div>
</div>
<div class="info-content">
<slot name="address">xx province xx city xx area xx street xx residential quarters xx floor xx unit xx floor xx room</slot>
</div>
</div>
</div>
<div class="photo">
<img src="./static/photo.jpg">
</div>
</div>
<div class="card-footer">
<div class="info-row">
<div class="info-column">
<div class="info-title">Citizenship number</div>
</div>
<div class="info-content">
<slot name="cardNO">12345678901234567X</slot>
</div>
</div>
</div>
</div>
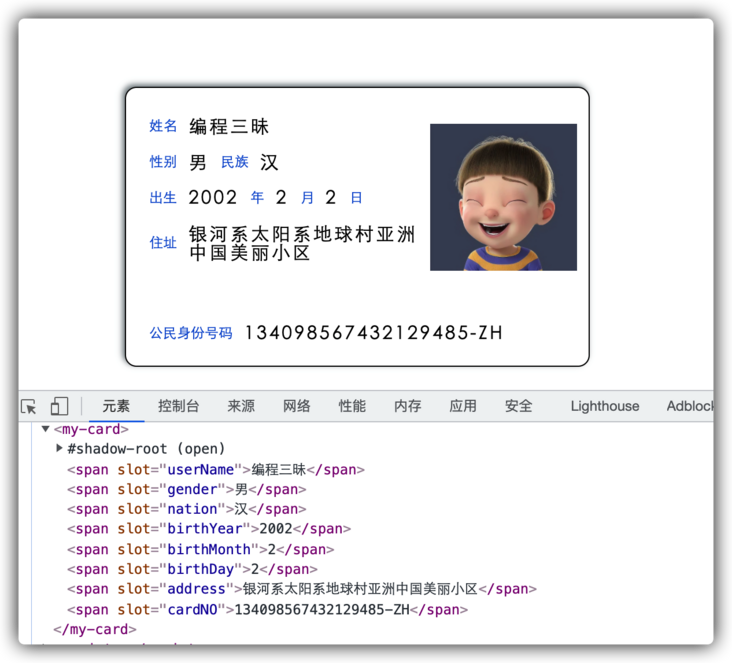
</template>Step 2: insert the label and content with slot = '' attribute in the custom element label.
<my-card>
    <span slot="userName">Programming samadhi</span>
    <span slot="gender">male</span>
    <span slot="nation">Chinese</span>
    <span slot="birthYear">2002</span>
    <span slot="birthMonth">2</span>
    <span slot="birthDay">2</span>
    <span slot="address">Galaxy earth village in China</span>
    <span slot="cardNO">134098567432129485-ZH</span>
</my-card>
The final results are as follows:
Realize a web page to display multiple mycards
If you want to display multiple cards to the same page at the same time, you will find that only the first one has content, and the rest are empty. This is because the first MyCard instance appends the contents of Templates to itself, and the other instances get tempele Contents are all empty nodes.
To solve this problem, you need to clone the Templates content inside the MyCard constructor instead of using it directly:
class MyCard extends HTMLElement {
    constructor () {
        super();
        this.shadow = this.attachShadow({mode: "open"});
        let tempEle = document.getElementById("card_layout");
        this.shadow.appendChild(document.importNode(tempEle.content,true));
    }
}
customElements.define("my-card", MyCard);
summary
This article uses two methods to pass values to custom components:
- Custom attribute value transfer of HTML tag
- Named Slots pass value
Both can be used, depending on the situation and personal preferences.
In addition, there is another detail to note: the appendChild() method will move the entire position of the incoming Node, and the position of the incoming Node in the DOM will change. Generally, when we call appendChild(), all the incoming nodes are clone nodes.
~
~End of this article, thank you for reading!
~
Learn interesting knowledge, make interesting friends and shape interesting souls!
Hello, I'm Programming samadhi Hermit Wang, my official account is " Programming samadhi "Welcome to pay attention and hope you can give us more advice!