Original address: http://blog.csdn.net/liuhe688/article/details/41971215
Web Notifications are HTML5 One of the exciting new features is that it allows developers to configure and display desktop notifications to provide users with a better experience. Most commendably, even when users are busy with other tasks, they can receive notifications from pages, such as a new email alert, or a message alert received in an online chat room, etc.
Next, we try to create our own notifications step by step.To create a message notification, we first need to create a message box, which is very simple. Just use the Notification class under the window object directly. The code is as follows:
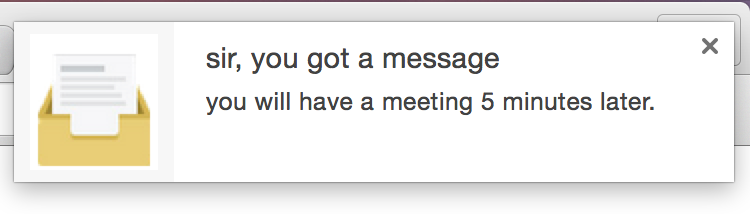
In the constructor of Notification class, there are two important parameters: the first is the title of the message, and the second is the body object, which includes the icon of the message box and the body of the message.
After executing the above code, we succeeded in creating an instance of a message box that will eventually appear under Chrome as follows:
Half of our success has been achieved here, but whether this message box can be displayed correctly depends ultimately on the user's authorization. In view of the browser's security mechanism, only when the user agrees that the message notification box pops up on the web page, can the message notification really be displayed. So now all we have to do is apply for user authorization.
The Notification class provides a requestPermission method to request user authorization, which is coded as follows:
When this code is executed, the browser asks the user if the site is allowed to display message notifications, as shown in the following figure:

If the user clicks the Block button on the left, no matter how we create the Notification instance, the message will never be displayed; only when the user chooses the Allow button can the code execute correctly and the message box be displayed.
As described in the code above, after the request Permission function is executed, it enters a callback function, which can pass a status parameter to indicate the final authorization status after the user has made a choice. If the user clicks the closing button on the right side of the authorization prompt, it is equivalent to ignoring the authorization request, when status is default, the message cannot be displayed in the default state; if the user clicks the Block button to reject the authorization request, status will be denied state, which is naturally unable to display the message; if the user clicks the Allow button to accept the authorization request, then status will change. In the granted state, the message can be displayed correctly only in the granted state.
At the same time, after the authorization request is executed, the browser assigns the permission status to the permission attribute of Notification, which is read-only for developers and has the same value as the status value mentioned above. So if we want to display a message notification, we can first determine whether we have permissions:
As described above, when the permission is granted, we can display the message notification. But simply displaying a message box is not attractive, so the message notification should be interactive, and events should be involved before and after displaying the message. Notification started with a series of event functions that developers can use to handle user interactions in a very specific way:
As we can see, Notification has four commonly used functions to handle event interaction, onshow function can be executed when the message is displayed, onclick function can be called after the user clicks on the message, onclose function is called when the message box is closed, onerror function is called when an error occurs, as mentioned above, if not authorized, continue to create a message pass. Knowing, the onerror function is also executed. After mastering the application of these functions, we can basically deal with message events very well.
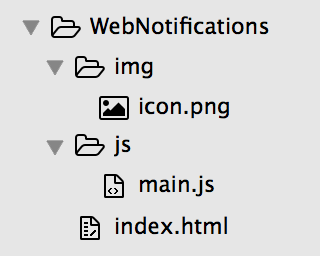
Finally, we will organize these steps to form a simple example to better demonstrate this new feature.
First, create the following file structure:
Then we need to organize the code of the above steps into one JavaScript Object, as shown in the following code:
As we can see, the above code creates an object of Notification Handler to manage the event logic associated with the message. Usually our process is as follows: after the page is loaded, we call the request Permission function to request user authorization, and then after the page code is executed for a period of time, when a message needs to be displayed, we call the showNotification function to display the message. For example:
Note that not all browsers support Notification, so we added an isNotification Supported attribute to identify whether message notification is supported by browsers. In the above code, if the browser does not support this API, it will return directly. Of course, in actual development, we can choose other forms to do it. Wake up users.
Then let's look at the index.html file:
This document is extremely simple and straightforward, so there is no need to say more. Finally, let's take a look at the actual effect.
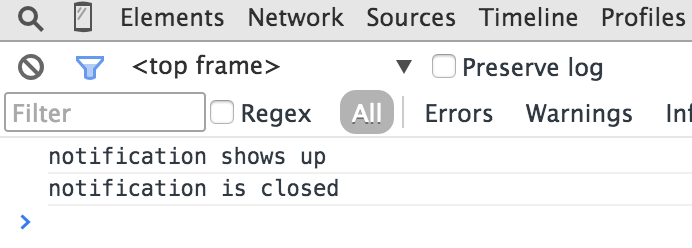
1. Click the button, pop up the message, then close it directly, or wait for 5 seconds, the console will print the following message:
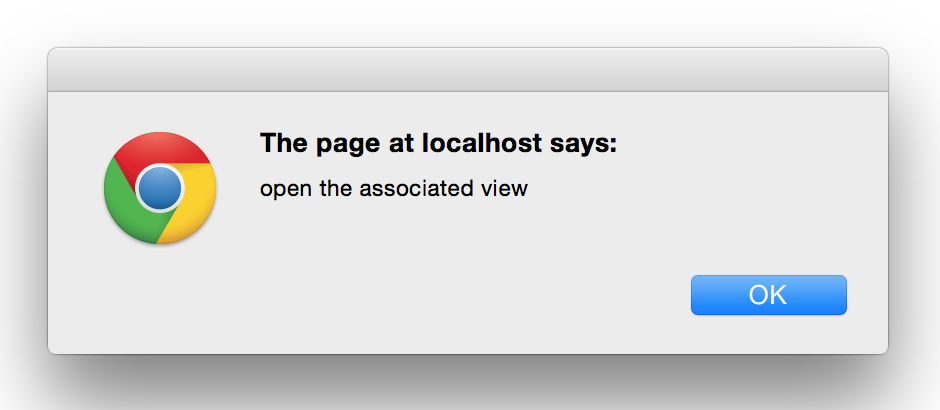
2. Click on the button, pop up the message, and then click on the content of the message, the pop-up box will pop up:
It looks good. In the actual development, the application may be more complex, but as long as you understand the basic mode of operation, everything will become simple.
Finally, it should be noted that the message notification takes effect only when the page is accessed through a Web service, and that if you double-click to open the local file directly, it has no effect. So when you do exercises in normal times, you also need to put the file directory into the Web container, remember.
Message notification is a good feature, but it also does not rule out that some sites maliciously use this function. Once the user authorizes, from time to time push some unfriendly messages to disturb the work of the user. At this time, we can remove the site's authority and disable its message notification function. We can click the Settings tab to open the settings in turn, then click on the display advanced settings at the bottom, click on the content settings in the privacy item, and finally pop up a content panel, slide down to find a message to inform one, how to change, it is presumably needless to say more.
Speaking of this, the basic application of message notification is almost covered. I hope you can understand it carefully. Finally, you can apply this new feature to the actual project, which will certainly add a lot of color.