Preface
The author started using webpack last year, and the first contact came from vue-cli. At that time, the main focus of work was also the use of vue. Little was known about the configuration of webpack. During that time, some questions were also asked about Daniel @Lv Dabao. By the way, for children's shoes with confused front-end knowledge system, we can pay attention to Brother Leopard's Wechat Public Number, Leopard Miscellaneous Talk. Brother Leopard knows all about Xiao Bai himself at the beginning (although he is also white now), and replies super fast and super serious. I really appreciate Brother Leopard here. Some time ago, when I was not busy with my work, I nibbled on the official documents of webpack. After all, my knowledge is still solid in my head. Then, according to the vue-cli configuration file, it enriches some new things and publishes them for everyone to share. At the same time, I have some doubts myself. You are also welcome to comment and correct the boy.
Learning of webpack
In the front-end field, we have to face all kinds of new frameworks and tools. How can we learn and master a skill effectively and quickly? The author's method is that practice is the best teacher. Suggest new things to understand some of the core API functions and use them immediately. This process will surely lead to various problems, and gradually deepen understanding in the search for ways to solve problems. Learning with problems will always achieve twice the result with half the effort. Take webpack for example, to understand some of its core concepts, configuration file entry and output parsing loader, plugin and so on can be used simply. Here's a suggestion. When we learn new knowledge, we suggest that we should learn from the official website and official documents. English is really not a problem. We need to try to know what we can understand. Looking at blogs is mainly what others digest, and then on the basis of these articles can certainly play the role of leak detection, but from the beginning, it is easy to be affected by the limitations of the author's thinking.
Of course, these are my own suggestions. So this article is facing some simple users of webpack. We just share our experience. If you have not started using webpack, it is recommended that you first learn the core knowledge of webpack. The official website has a Chinese version, and the translation is also very good.
Differences in webpack environments
Web pack is essentially a packaging tool, which is a modular development implementation. It is different from gulp and grunt, which are automated building tools. The building tools are to optimize our own workflow and change many manual methods to automation, such as compressing js, css, compiling scss, less. Of course, the loader and plugin of webpack can also accomplish these tasks. Tools are used to see the needs of individual companies. The main task of webpack is to package and compile the modular files we write into a way that browsers can recognize.
To put it bluntly, the development environment is where your code is tested, changed, and run on a local server, and the production environment where your code is already being used on a real server. Web pack can be applied to the development environment, mainly using node.js to build a local service. I remember last year when I first thought about needing a local service, I started using Hbuilder, and then I used a small tool called webservice.
package.json
As mentioned earlier, node.js is a javascript platform rather than a js framework. It implements that js can develop not only client browser but also server. A package.json will be found in front-end projects today.
{
  "name": "webpack_environment",
  "version": "1.0.0",
  "description": "A webpack environment test",
  "author": "abzerolee",
  "scripts": {
    "dev": "node build/dev-server.js",
    "build": "node build/build.js"
  },
  "dependencies": {
    "nimble": "^0.0.2"
  },
  "devDependencies": {
    "autoprefixer": "^7.1.2",
    "babel-core": "^6.22.1",
    "babel-loader": "^7.1.1",
    "babel-preset-stage-2": "^6.22.0",
    "chalk": "^2.0.1",
    "clean-webpack-plugin": "^0.1.16",
    "connect-history-api-fallback": "^1.3.0",
    "css-loader": "^0.28.0",
    "eventsource-polyfill": "^0.9.6",
    "express": "^4.14.1",
    "extract-text-webpack-plugin": "^3.0.0",
    "file-loader": "^0.11.1",
    "glob": "^7.1.2",
    "html-webpack-plugin": "^2.28.0",
    "http-proxy-middleware": "^0.17.3",
    "less": "^2.7.2",
    "less-loader": "^4.0.5",
    "mockjs": "^1.0.1-beta3",
    "opn": "^5.1.0",
    "ora": "^1.3.0",
    "postcss-loader": "^2.0.6",
    "rimraf": "^2.6.1",
    "style-loader": "^0.18.2",
    "url-loader": "^0.5.8",
    "webpack": "^3.1.0",
    "webpack-dev-middleware": "^1.10.0",
    "webpack-hot-middleware": "^2.18.0",
    "webpack-merge": "^4.1.0"
  }
}
This file can be generated by NPM module manager. It describes all kinds of information about a project. Notice that the dev build corresponding to script is the development environment and production environment. When we run the command, we actually execute the corresponding node compilation with `npm run dev'or `npm run build'. You can see that this configuration file tells us about the entry files / build/dev-server.js and / build/build.js for the development and production environments. The remaining dependencies / devDependencies represent the corresponding dependency needs of the two environments.
directory structure
Introduce / node_modules first. We use npm install to install some libraries you need through the dependency configuration in package.json. You can see that I need nimble in the production environment first. So where these stocks are stored is in / node_moudles. Of course, you can also use the old method to create a new / lib, then go to the official website to download the corresponding js files, and then put in / lib. But this is not very friendly for the management of the whole project, we only need to look at package.json to view the dependency Library of the project, instead of looking for < script > tags one by one on the html page.
Next comes a series of configuration files like. [filename]. [File names] are configuration files that you install depending on tools, such as Babel's. babelrc postcss's. postcssrc, and finally some files [filename]. md's, markdown markup language for the extension of md's name. For example, README.md generally introduces the content of the project, introduces the use of some API s, and so on.
/ build is some files when the project starts, such as web pack configuration file, development environment service configuration file, some simple tool functions / utils.js and so on. There's also a problem with dev-client.js configuration. dev-client is a module hot loaded by module. It should be the configuration of the newly opened form on the command line after the project runs in the development environment. I don't know if I understand it correctly. Of course, I don't use this now. It's OK to run the project.

/ config is about the environmental configuration of the whole project, including development and production. We can introduce directories directly when node introduces modules.
require('./config');
By default, he looks for the index.js file in that directory. Of course, it can also be called index.js, which requires a / config directory to write a package.json specified file.
/ The dist and / src /dist directories are files generated by compiling the source code in / src directories. General project deployment can directly put the files in the / dist directory in the root directory of the website. / dist corresponds to the production environment file, / src corresponds to the development environment file.
/ mock is a file of analog data interface developed by the front desk, which contains some analog data of the back-end interface.

var Mock = require('mockjs');

var User = {
  login: {
    code: 0,
    info: null,
    msg: 'Log in successfully!'
  },
  getVerifyCode: {
    code: 0,
    info: Mock.mock('@string("lower", 4)'),
    msg: 'Successful operation'
  }
};

module.exports = User;
Here mock.js is used to generate simulation data and module.exports in the Common JS specification is used to expose data. For AMD, CMD and Common JS, we should have a proper understanding of why there are modules and how they work. Of course, this is a simulation test to avoid cross-domain problems. The project also solves cross-domain problems through http-proxy-middleware. But if the progress of background is slower than that of foreground, this kind of mock is also a good way to develop.
Development environment dev-server.js
When the author first learned web pack, he also started by introducing a.js and b.js into main.js and finally packaging to generate bundle.js. At that time, I knew little about node.js, but now I know more about node.js does not mean proficiency. There's always a curiosity that when you start compiling, you use
webpack -config webpack.conf.js
How to start compiling with node later? In fact, webpack provides a Node.js API that can be used directly at the Node.js runtime. This is why the entry file changed from webpack.conf.js to dev-server.js|build.js. The advantage of compiling with node is that it can make better use of node's features to read files, simulate API interfaces, and so on.
var config = require('../config');
if(!process.env.ENV) {
  process.env.ENV = config.dev.ENV;
}
var utils = require('./utils');
var opn = require('opn');
var path = require('path');
var fs = require('fs');
var express = require('express');
var webpack = require('webpack');
var proxyMiddleware = require('http-proxy-middleware');
var webpackConfig = require('./webpack.dev.conf');

var port = process.env.PORT || config.dev.port;

var autoOpenBrowser = config.dev.autoOpenBrowser;

var proxyTable = config.dev.proxyTable;

var app = express()
var compiler = webpack(webpackConfig);

var apiRouter = express.Router();

var apis = fs.readdirSync(utils.resolve('/mock'));
var apiClass = apis.map(it => it.replace(/\.js$/, ''));

apiRouter.route('/:apiClass/:apiName').all(function(req, res) {
  var params = req.params;
  var apiIndex = apiClass.indexOf(params.apiClass)

  var err = {code: 99,info: null, msg: 'no such api'}
  if(apis.length < 1 || apiIndex  === -1)
    return res.json(err);

  var klass = require('../mock/'+ apis[apiIndex]);
  if(klass[params.apiName]){
    res.json(klass[params.apiName]);
  }else{
    res.json(err);
  }
})

app.use('/api', apiRouter);

var devMiddleware = require('webpack-dev-middleware')(compiler, {
  publicPath: webpackConfig.output.publicPath,
  quiet: true
});

var hotMiddleware = require('webpack-hot-middleware')(compiler, {
  log: () => {},
  heartbeat: 2000
})

compiler.plugin('compilation', function (compilation) {
  compilation.plugin('html-webpack-plugin-after-emit', function (data, cb) {
    hotMiddleware.publish({ action: 'reload' })
    cb()
  })
})

Object.keys(proxyTable).forEach(function (context) {
  var options = proxyTable[context]
  if (typeof options === 'string') {
    options = { target: options }
  }
  app.use(proxyMiddleware(options.filter || context, options))
});

// app.use(require('connect-history-api-fallback')())
app.use(devMiddleware)
app.use(hotMiddleware)

var staticPath = path.posix.join(config.dev.assetsPublicPath, config.dev.assetsSubDirectory)
app.use(staticPath, express.static('./static'));

var uri = 'http://localhost:'+ port;

var _resolve;

var readyPromise = new Promise(resolve => {
  _resolve = resolve
})

console.log('> Starting Server...');
devMiddleware.waitUntilValid(() => {
  console.log('> Listening at ' + uri + '\n')
  // when env is testing, don't need open it
  if (autoOpenBrowser && process.env.ENV !== 'testing') {
    opn(uri)
  }
  _resolve()
})

var server = app.listen(port);

module.exports = {
  ready: readyPromise,
  close: () => {
    server.close()
  }
}
The above code should be familiar to friends who have used vue-cli. For the introduction of vue-cli, you can go to the official website to check. A sentence-by-sentence comment on the configuration file is recommended here. Article There are differences in the subtleties, but they are almost the same.
Let's try to analyze the document in plain language.
- The program starts running, introducing the environment's configuration file / config, which mentioned earlier why index.js can be omitted. Then, the user environment variable ENV represented by process.env is determined. The official translation process object process is global, which provides information and control about the current Node.js process. This environment variable can be entered at the command line when the program is started. When node cannot judge the environment, we manually set it as a development environment variable at / config / index.js config. dev. ENV <=>'dev'. Then we introduce the libraries and files we need, such as tool library utils self-startup browser OPN (automatically open browser after service startup) file system FS node JS framework express (used to start local servers, deploy static services, simulate routing interfaces).
- After introducing the library, we define our whole project service app, compile the configuration file of the development environment through the node API of webpack, define the middleware of the service provided by webpack, write the compiled content into memory, enable the hot-loaded middleware, update the html template to force the refresh of the page, and configure the middleware of cross-domain proxy request. The concept of middleware is actually the idea of workflow. I remember an example that is very straightforward.
Coke production: water - > purification - > dispensing - > bottling - > Quality Control - > drinking coke, water to coke, each intermediate process is considered as a middleware - By using express.Router() to define the interface, all URLs at the beginning of the local request / api are parsed and then / api/:apiClass/:apiName, apiName corresponds to the js file name under the / mock file, and apiName corresponds to the properties of the objects exposed by the js file, that is, data.
- Here I remove connect-history-api-fallback for the reason of configuring mock. Its function is to specify a page redirection if the interface API is not found, and it will default to index.html if it is not found. Next is the stitching / static file path, which is deleted when all my static resources are placed in the assets directory. (I also have questions about what static resources this / static folder of vue-cli actually refers to?) Then the service starts and the listening port opens the browser.
At this point, we can modify and develop the source code of src.
Production environment build.js
process.env.ENV = 'prod';

var ora = require('ora');
var path = require('path')
var chalk = require('chalk')
var webpack = require('webpack')
var config = require('../config')
var webpackConfig = require('./webpack.prod.conf')

var spinner = ora('building for production...');
spinner.start()

webpack(webpackConfig, function (err, stats) {
  spinner.stop()
  if (err) throw err
  process.stdout.write(stats.toString({
    colors: true,
    modules: false,
    children: false,
    chunks: true,
    chunkModules: false
  }) + '\n\n')

  console.log(chalk.cyan('  Build complete.\n'))
  console.log(chalk.yellow(
    '  Tip: built files are meant to be served over an HTTP server.\n' +
    '  Opening index.html over file:// won\'t work.\n'
  ))
})
Compilation and packaging functions do not need to configure services, of course, when packaging needs a hint, progress, the need for ora chalk modules. Packing here is different from vue-cli in that I use a plug-in CleanWeb Packing Plugin instead of rmrf to empty files in the / dist directory. Of course, you can just empty a file instead of the entire directory.
configuration file
/config/index.js && /build/utils.js
- / config/index.js mainly exposes two objects and one attribute
var path = require('path');

module.exports = {
  // Project root directory
  _root_: path.resolve(__dirname, '../'),
  // Production Environment Settings
  build: {
    ENV: 'prod',
    index: path.resolve(__dirname, '../dist/index.html'), // Compile the home page
    assestsRoot: path.resolve(__dirname, '../dist'), // Static root directory
    assetsSubDirectory: 'static',
    assetsPublicPath: '',
    prodSourceMap: false,
    productionGzip: false,
    productionGzipExtensions: ['js', 'css']
  },
  // Development Environment Configuration
  dev: {
    ENV: 'dev',
    port: '3000',
    autoOpenBrowser: false,
    assetsSubDirectory: 'static',
    assetsPublicPath: '/',
    cssSourceMap: false,
    proxyTable: {
      // '/api': {
      //   target: 'http://localhost:3100',
      //   changeOrigin: true
      // }
    }
  }
}
One thing to note here is that build. assets PublicPath <=> compiles and publishes the root directory, which can be configured as the resource server domain name or CDN domain name. So many friends vue compiles the local File://can not open it because the'/'configuration here refers to the server's root directory. It is no problem to deploy to the server. If you want to open it locally, set it as an empty string.
The second thing to note is the interface properties of dev.proxyTable. For example, my configuration is actually a cross-domain request. http://localhost:3100/api 'Note the corresponding interface names.
- utils are some of the functions you need to write configuration files, such as the style loader in vue-cli, which is configured here.
var path = require('path');
var config = require('../config');
var ExtractTextPlugin = require('extract-text-webpack-plugin');
var glob = require('glob');

exports.assetsPath = function(_path) {
  var assetsSubDirectory = process.env.ENV === 'prod'
    ? config.build.assetsSubDirectory
    : config.build.assetsSubDirectory;
  return path.posix.join(assetsSubDirectory, _path)
}

exports.resolve = function(dir) {
  return path.join(__dirname, '..', dir);
}

exports.cssLoaders = function(options) {
  var cssLoader = {
    loader: 'css-loader',
    options: {
      minmize: process.env.ENV === 'prod',
      sourceMap: options.sourceMap
    }
  }

  function generLoaders(loader, loaderOptions) {
    var loaders = [cssLoader, ];
    if(loader) {
      loaders.push({
        loader: loader +'-loader',
        options: Object.assign({}, loaderOptions, {
          sourceMap: options.sourceMap
        })
      })
    }

    if(options.extract) {
      return ExtractTextPlugin.extract({
        use: loaders,
        fallback: 'style-loader',
      })
    }else {
      return ['style-loader'].concat(loaders)
    }
  }

  return {
    css: generLoaders(),
    postcss: generLoaders(),
    less: generLoaders('less'),
    sass: generLoaders('sass', {indentedSyntax: true}),
    scss: generLoaders('sass')
  }
}

exports.styleLoader = function(option) {
  var output = [];
  var loaders = exports.cssLoaders(option);
  for(var extension in loaders){
    output.push({
      test: new RegExp('\\.'+ extension +'$'),
      use: loaders[extension]
    })
  }
  return output
}

exports.getEntries = function(_path) {
  var entries = {};
  glob.sync(_path).forEach(function(entry) {
    var basename = path.basename(entry, path.extname(entry));
    var pathname = entry.split('/').splice(-3).splice(0, 1) +'/'+ basename;
    entries[basename] = entry;
  });

  return entries;
}
- assetsPath(_path) is the full path to return the static resource _path.
- Resolution (dir) is the absolute path to return dir. Why write resolve separately? The main reason is that the configuration file of webpack is not in the project root directory, but under / build.
-
getEntries(_path) is a function that matches multi-page entry files through glob (path pattern matching module), and eventually returns an entry object. Many other examples on the Internet are
{
'module/index': ...
'module/user': ...
}
This leads to the need to add URLs in the development environment http://localhost:3000/module/... To view the files, the files compiled by the production environment are also solved by directly using basename as the attribute name in / dist/module/index.html.
- Style Loader () returns an array corresponding to moudle.rules in the webpack configuration file, and calls cssLoader internally (to generate the corresponding sass, less load compilation). Some friends who are not clear here suggest that you can debug it at breakpoint under vscode to see some configuration corresponding to each generated object.
webpack.*.conf.js
The configuration files of webpack are various, because they are highly customized. You can configure any loader plugin you want to complete your work. For example, vue-cli defines a basic configuration, and then distinguishes between different plug-ins needed for development and production, which are all code reuse. The configuration of multi-entry and single-entry should be noticed in base.conf
...
var entries = utils.getEntries('./src/modules/**/*.js');

module.exports = {
  // entry: {
  //   app: utils.resolve('/src/main.js'),
  // },
  entry: entries,
  output: {
    path: config.build.assestsRoot,
    filename: '[name].js',
    publicPath: process.env.ENV === 'prod' ? config.build.assetsPublicPath : config.dev.assetsPublicPath,
  },
...
Configuration of dev.conf
module.exports = merge(baseWebpackConfig, {
  module: {
    rules: utils.styleLoader({
      sourceMap: config.dev.cssSourceMap
    })
  },
  plugins: [
    new webpack.DefinePlugin({
      'process.env': config.dev.ENV,
      dev_port: '"http://localhost:3000/api"'
    }),
    new webpack.HotModuleReplacementPlugin(),
    // spa applies the following configuration
    // new HtmlWebpackPlugin({
    //   title: 'Single-Page'+pathname,
    //   filename: 'index.html',
    //   template: utils.resolve('/src/index.html'),
    //   inject: true
    // })
  ]
})
// Multi-page application configuration dynamically generates html based on modules
var pages = utils.getEntries('./src/modules/**/*.html');

for(var pathname in pages){
  var conf = {
    filename: pathname +'.html',
    template: pages[pathname],
    chunks: [pathname],
    inject: true
  }
  module.exports.plugins.push(new HtmlWebpackPlugin(conf))
}
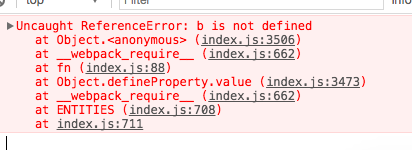
This configuration uses only three plug-ins, Define Plugin, which can be used to define global variables. When compiling, convert your reference dev_port to "http://locahost:3000/api", it should be noted that he converts values, such as dev_port<=>'b', so when you write your code, you refer to dev_port. In fact, he replaces the variable name with B instead of the'b'string, as follows Error reporting, so to use a string, you need to wrap the outer single quotation marks.
// dev.conf
...
 new webpack.DefinePlugin({
      'process.env': config.dev.ENV,
      dev_port: 'b'
    }),
...
// /src/modules/index.js
...
console.log(dev_port);
...
The HotModule Replacement Plugint plug-in will only redraw the corresponding page module when the page changes, and will not redraw the entire html file. Several pages of html Web pack Plugin generate several configurations.
prod.conf
Similar to dev.conf,
Define Plugin, but at this point dev_port is switched to the domain name of the server where the background interface is located. It's probably more accurate to call host without having to modify it every time before compiling. html Web pack Plugin is a set of configurations that generate html files whether to compress or not to remove attribute references.
The difference is that Commons Chunk Plugin extraction common module is configured (minChunks minimum number of references configuration) and ExtractTextPlugin extraction CSS file instead of style tag insertion html.
epilogue
After chewing documents for more than a week, practicing while chewing for a week, conceiving and writing for three days, at least now I am afraid of the configuration of weback. The article is a little too long to see. First of all, thank you for your reading. github This environment was also used to package a project previously using jquery, so there was no framework such as vue react. Over time, after gnawing at the implementation of create-react-app, there should be a learning note on the principles of webpack. We also hope to continue to pay attention to it. If there are some problems in the article, I hope you can correct them in time.