Article catalogue
- 1. WebAPI background
- 2. Basic concepts of DOM
- 3 get elements
- 4. Event introduction
- 5. Operation elements
- 6. Operation node
- 7. Cases
1. WebAPI background
1.1 basic introduction to API
API (Application Programming Interface): it refers to some predefined interfaces (such as functions and HTTP interfaces) or conventions for the connection of different components of the software system. It is used to provide a set of routines that can be accessed by applications and developers based on some software or hardware without accessing the source code or understanding the details of the internal working mechanism.
1.2 basic introduction to webapi
stay Introduction to [Web three piece set] JavaScript This chapter introduces that JS is basically divided into three parts
- ECMAScript (ES for short): is the syntax of JavaScript
- DOM (Document Object Model): Document Object Model, which is used to operate the elements in the page. (each HTML element on the page corresponds to an object in JS. By operating these objects through JS, the effect of controlling the presentation of the page can be achieved)
- BOM (Browser Object Model): Browser Object Model, which is used to operate the browser window. (the browser also provides some objects in JS, such as refreshing the page, controlling the size of the browser window, moving forward and backward, etc. Some browsing behaviors can be controlled by operating these objects in JS)
WebAPI includes DOM and BOM. The following focuses on several common interfaces. For more details, please refer to the WebAPI interface reference document
WebAPI interface reference document: https://developer.mozilla.org/zh-CN/docs/Web/API
2. Basic concepts of DOM
2.1 introduction to DOM
DOM (Document Object Model): it is a standard programming interface recommended by W3C organization to deal with extensible markup language. It is a platform and language independent application program interface (API), which can dynamically access programs and scripts, update their content, structure and the style of www documents (HTML and XML documents are defined through the description part). The document can be further processed, and the processing results can be added to the current page. DOM is a tree based API document, which requires that the whole document be represented in memory during processing.
Key concepts:
- Document: a page is a document
- element: all tags in a page are called elements
- node: all contents in a web page can be called nodes, such as label nodes, annotation nodes, text nodes and attribute nodes
The above concepts such as documents correspond to objects in JS code, so they are called document object model
2.2 DOM tree
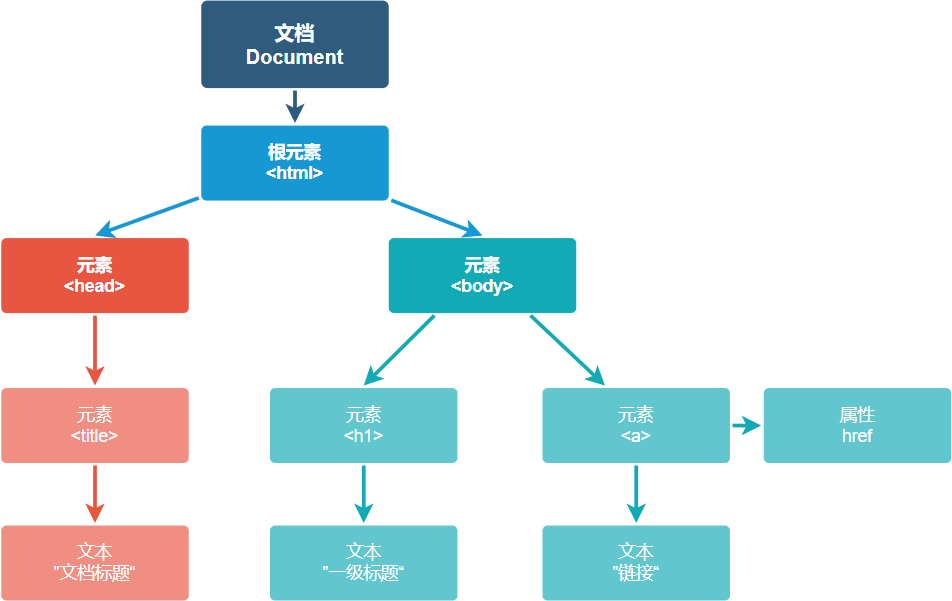
Basic introduction: DOM is a tree based API document. Because the structure of a page is a tree structure, it is called DOM tree.
Note: the DOM tree is not a collection of all tags, but according to the current page. Since the situation of each page is different, the DOM tree of each page is different
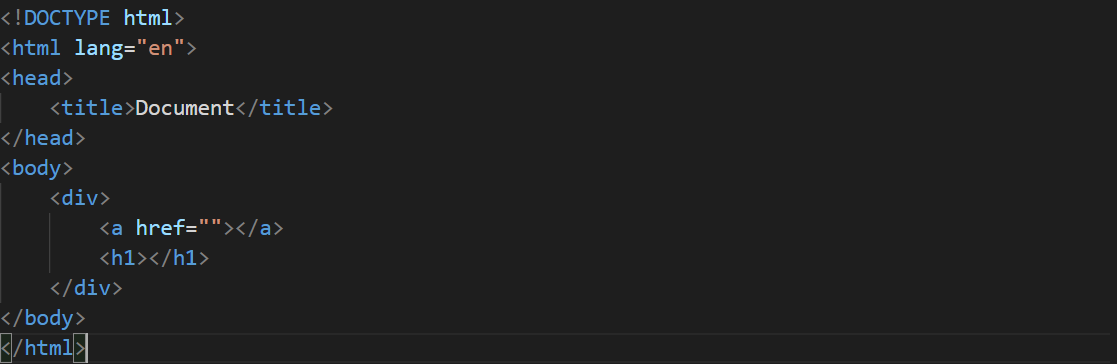
The page structure is as follows:
The DOM tree structure is as follows:
3 get elements
3.1 querySelector
Basic introduction:
The querySelector() method referenced by the Document object model returns the first Element object in the Document that matches the specified selector or selector group. Returns null if no match is found
Syntax:
let element = document.querySelector(selectors);
selectors parameter:
DOM string containing one or more selectors to match. The string must be a valid CSS selector string; If not, syntax is raised_ Err exception.
Example code:
<!DOCTYPE html>
<html lang="en">
<head>
<title>Document</title>
</head>
<body>
<input type="text" id="number" value="0">
<input type="button" id="button" value="Self increasing">
<script>
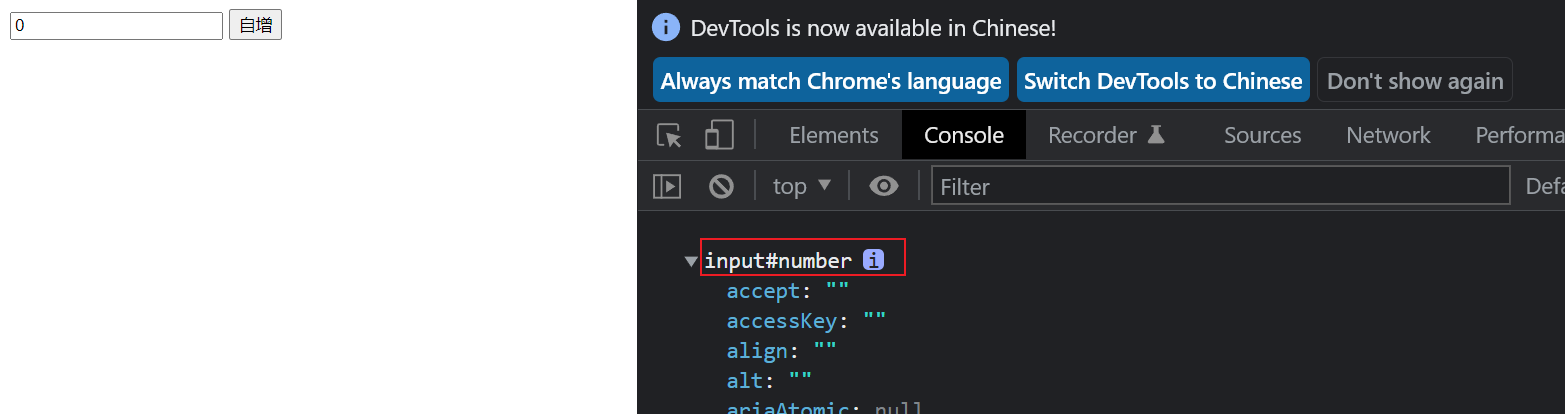
// Gets the first object with id name number
let number = document.querySelector('#number');
// Print an element object with dir, and you can see the specific attributes in it
console.dir(number)
</script>
</body>
</html>
3.2 querySelectorAll
Basic introduction: return the list of elements in the document matching the specified selector group (traverse the nodes of the document in depth first order). The returned object is NodeList. Unlike querySelector, the querySelectorAll method returns all Element objects in the document that match the specified selector or selector group.
Syntax:
let elementList = document.querySelectorAll(selectors);
selectors parameter:
A DOMString contains one or more matching selectors. This string must be a valid CSS selector. If not, a syntax error will be thrown.
Example code:
<!DOCTYPE html>
<html lang="en">
<head>
    <title>Document</title>
</head>
<body>
    <input type="text" id="number" value="0">
    <input type="button" id="button" value="Self increasing">

    <script>
        // Gets all the objects whose selector is input
        let inputs = document.querySelectorAll('input');
        // Print an element object using log, and you will see the html fragment
        console.log(inputs);
    </script>
</body>
</html>
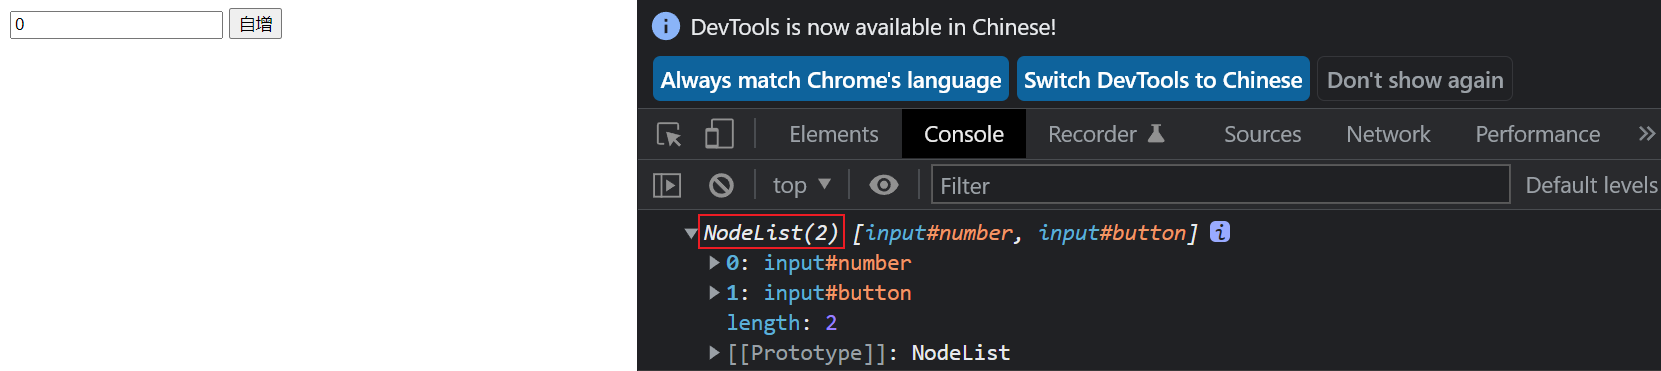
NodeList introduction:
- Node list is usually a collection of node attributes, such as node. List ChildNodes and methods, such as document Queryselectorall and methods, such as document Returned by queryselectorall.
- NodeList is not an array, but an array like object. Although NodeList is not an array, you can use forEach() to iterate. You can also use array From() converts it to an array.
4. Event introduction
4.1 basic concepts
Basic introduction:
-
Events are actions or events that occur in the system when you are programming. After the system responds to events, you can respond to events in some way if necessary. For example, if a user clicks a button on a web page, you may want to respond to this action by displaying a message box.
-
In the Web, events are triggered in the browser window and are usually bound to a specific part of the window, which may be an element, a series of elements, HTML code loaded into the window, or the entire browser window
-
Each available event will have an event handler, which is the code block that will run when the event is triggered. When we define a code block to respond to the event being fired, we say that we have registered an event handler. Note that event handlers are sometimes called event listeners
4.2 three elements of event
- Event source: which element is triggered
- Event type: click, select or modify
- Event handler: how to handle it further (often through a callback function)
4.3 click event
Basic introduction:
Click event is the most commonly used event. When we find the event source (any HTML element can trigger click event), we can use click event and use a callback function to process the object we get
Syntax:
element.onclick = function() {
	// Handling events
}
- element indicates the event source
- conclick indicates a click event
- Function means to use anonymous objects to handle the program, which is equivalent to a callback function, which is called by the browser on the appropriate real machine
- element.onclick = function() this operation indicates the registration event / binding event
Example code:
<!DOCTYPE html>
<html lang="en">
<head>
    <title>Document</title>
</head>
<body>
    <input type="text" id="number" value="0">
    <input type="button" id="submit" value="Self increasing">

    <script>
        // Get the first object with id name submit
        let submitButton = document.querySelector('#submit');
        // Handling number objects with click events
        submitButton.onclick = function() {
            // Handling events
            console.log('The user clicked the button')
        }
    </script>
</body>
</html>
5. Operation elements
5.1 get / modify element content
-
Method 1: innerHTML
Basic introduction: innerHTML attribute sets or obtains the descendants of elements represented by HTML syntax
Syntax:
element.innerHTML = htmlString;
be careful:
- Setting the innerHTML of an element will delete all descendants of the element and replace it with the htmlString given above.
- innerHTML can get the text in the tag and the nested tags
- Because innerHTML modifies the content in the tag, while the form tag (such as input) is a single tag, you cannot use innerHTML to modify the value value in the input tag
Example code:
<!DOCTYPE html>
<html lang="en">
<head>
    <title>Document</title>
</head>
<body>
    <div>The button pops up</div>

    <script>
        let div = document.querySelector('div');
        div.onclick = function() {
            if(div.innerHTML == 'The button pops up') {
                div.innerHTML = 'Button press';
            }else if(div.innerHTML == 'Button press') {
                div.innerHTML = 'The button pops up'
            }
        }
    </script>
</body>
</html>
-
Method 2: innerText
Basic introduction: innerText property sets or obtains the "rendered" text content of a node and its descendants
Syntax:
element.innerText = string;
Note: innerText can only modify the text in the label
Example code:
<!DOCTYPE html>
<html lang="en">
<head>
    <title>Document</title>
</head>
<body>
    <div>The button pops up</div>

    <script>
        let div = document.querySelector('div');
        div.onclick = function() {
            if(div.innerText == 'The button pops up') {
                div.innerText = 'Button press';
            }else if(div.innerText == 'Button press') {
                div.innerText = 'The button pops up'
            }
        }
    </script>
</body>
</html>
5.2 get / modify element attributes
Method: you can use the object Get or modify the attributes of an element directly by attributes
Note: you can use console To view the dir attribute of the element
Example code:
<!DOCTYPE html>
<html lang="en">
<head>
    <title>Document</title>
</head>
<body>
    <img src="image/background.jpg" title="Background map">;

    <script>
        let img = document.querySelector('img');
        img.onclick = function() {
            console.log(img.src);
            img.src = 'image/log.png';
            img.title = 'Icon';
        }
    </script>
</body>
</html>

5.3 get / modify form element attributes
Introduction: the following properties of the form (mainly referring to the input tag) can be modified through DOM
attribute
describe
value
Value of input
disabled
Disable
checked
The check box is used
selected
The drop-down box will use
type
Type of input (text / password / button / file, etc.)
Method: you can use the object Get or modify the attributes of an element directly by attributes
Example code:
<!DOCTYPE html>
<html lang="en">
<head>
    <title>Document</title>
</head>
<body>
    <input type="password" id="password">
    <input type="button" id="button" value="Show password">

    <script>
        let button = document.querySelector('#button');
        button.onclick = function() {
            let input = document.querySelector('#password');
            if(button.value == 'Show password') {
                button.value = 'Hide password';
                input.type = 'text';
            }else if(button.value == 'Hide password') {
                button.value = 'Show password';
                input.type = 'password';
            }
        }
    </script>
</body>
</html>
5.4 get / modify style attributes
The attributes assigned to elements in CSS can be modified through JS. The operation methods of the two styles are described below
-
Inline style operation
Introduction: style is an attribute of an object or an object, so it stores the in-line style above the current element
Operation syntax:
// Mode 1
element.style.Attribute name = Attribute value;

// Mode 2
element.style.cssText = Attribute name+Attribute value;
Example code:
<!DOCTYPE html>
<html lang="en">
<head>
    <title>Document</title>
</head>
<body>
    <div style="font-size: 20px;">Meat and egg impact</div>

    <script>
        let div = document.querySelector('div');
        div.onclick = function() {
            let fontSize = parseInt(div.style.fontSize);
            fontSize += 5;
            div.style.fontSize = fontSize + 'px';
        }
    </script>
</body>
</html>
-
Class name style operation
Introduction: when the style is complex, many attribute operations are involved. One assignment can be achieved through the class in CSS to set multiple CSS attributes. As long as the CSS class name is set, the attributes in this class will be applied to the current element
Operation syntax:
element.className = CSS Class name;
Example code:
<!DOCTYPE html>
<html lang="en">
<head>
    <title>Document</title>

    <style>
        .light {
            background-color: white;
            color: black;
        }

        .dark {
            background-color: black;
            color: white;
        }
    </style>
</head>
<body>
    <div class="light">
        Meat and egg impact <br>
        Meat and egg impact <br>
        Meat and egg impact <br>
        Meat and egg impact <br>
        Meat and egg impact <br>
    </div>

    <script>
        let div = document.querySelector('div');
        div.onclick = function() {
            if(div.className == 'light') {
                div.className = 'dark';
            }else if(div.className == 'dark') {
                div.className = 'light';
            }
        }
    </script>
</body>
</html>
6. Operation node
6.1 new nodes
Basic introduction: document The createElement () method is used to create an HTML element specified by the tag name tagName. If the user agent does not recognize tagName, an unknown HTML element HTMLUnknownElement is generated
Syntax:
let element = document.createElement(tagName);
tagName parameter:
Specify the string of the element type to be created. The nodeName when creating the element is initialized with the value of tagName. This method does not allow the use of qualified names (such as: "html:a"). Calling the createElement() method on the HTML document will convert the tagName into a small write before creating the element. In the Firefox, Opera and Chrome kernel, createElement(null) is equivalent to createElement("null")
Note: the elements created through createElement will not be directly displayed on the page, because the page content is on the DOM tree, but the newly created elements are not hung on the DOM tree
Example code:
let div = document.createElement('div');
div.innerHTML = 'Meat and egg impact';
div.style.fontSize = '30px';
6.2 insert the new node into the DOM tree
Basic introduction: there are two ways to insert new elements into the DOM tree
-
Method 1: use appendChild to insert the node behind the last child node of the specified node
Introduction: node The appendChild() method appends a node to the end of the child node list of the specified parent node. If the node to be inserted already exists in the document tree of the current document, appendChild() will only move it from the original location to the new location (there is no need to remove the node to be moved in advance).
Syntax:
element.appendChild(aChild)
aChild parameter:
The node to append to the parent node (usually an element).
Example code:
let div = document.createElement('div');
div.innerHTML = 'Meat and egg impact';
div.style.fontSize = '30px';
let body = document.querySelector('body');
body.appendChild(div);
-
Method 2: use insertBefore to insert the node before the specified node
Introduction: node The insertBefore () method inserts a child node with the specified parent node before the reference node. If a given child node is a reference to an existing node in the document, insertBefore() moves it from its current location to a new location (you do not need to delete the node from its parent node before attaching it to another node).
Syntax:
parentNode.insertBefore(newNode, referenceNode);
Parameters:
- parentNode: the parent node of the newly inserted node
- newNode: the node used to insert
- referenceNode: the newly inserted node will be inserted before this node
Note: if the referenceNode is null, the newNode will be inserted at the end of the child node
Example code:
<!DOCTYPE html>
<html lang="en">
<head>
    <title>Document</title>
</head>
<body>
    <div class="container">
        <div class="one">11111</div>
        <div class="two">22222</div>
    </div>
    <script>
        let div = document.createElement('div');
        div.innerHTML = '33333';
        let container = document.querySelector('.container');
        let two = document.querySelector('.two');
        container.insertBefore(div, two);

    </script>
</body>
</html>
6.3 deleting nodes
Basic introduction: node The removechild () method deletes a child node from the DOM. Returns the deleted node.
Syntax:
element.removeChild(child);
Parameters:
- element is the parent node of the node to be deleted
- child is the node to be deleted
- This function has a return value, which is the deleted node
Note: the deleted node is only deleted from the DOM tree, but it is still in memory and can be added to other locations of the DOM tree at any time
Example code:
<!DOCTYPE html>
<html lang="en">
<head>
    <title>Document</title>
</head>
<body>
    <div class="container">
        <div class="one">11111</div>
        <div class="two">22222</div>
    </div>
    <script>
        let container = document.querySelector('.container');
        let two = document.querySelector('.two');
        container.removeChild(two);
    </script>
</body>
</html>

7. Cases
7.1 guessing numbers
Sample display:
Sample code:
<!DOCTYPE html>
<html lang="en">
<head>
    <meta charset="UTF-8">
    <meta http-equiv="X-UA-Compatible" content="IE=edge">
    <meta name="viewport" content="width=device-width, initial-scale=1.0">
    <title>Figure guessing game</title>
</head>
<body>
    <input type="button" value="Restart a game" id="restart">
    <div>
        <span>Please enter the number you want to guess:</span>
        <input type="text" id="num">
        <input type="button" value="guess" id="guess">
    </div>
    <div>
        <span>Number of guesses: </span>
        <span id="count">0</span>
    </div>
    <div>
        <span>result: </span>
        <span id="result"></span>
    </div>

    <script>
        // First prepare the DOM objects of JS that need to be used
        let restartButton = document.querySelector('#restart');
        let numInput = document.querySelector('#num');
        let guessButton = document.querySelector('#guess');
        let countSpan = document.querySelector('#count');
        let resultSpan = document.querySelector('#result');

        // Generate a random integer between 1 and 100
        let toGuess = Math.floor(Math.random() * 100) + 1;
        let count = 0;
        console.log("toGuess: " + toGuess);

        guessButton.onclick = function() {
            // The user clicks the guess button to update the display of clicks first
            count++;
            countSpan.innerHTML = count;
            let num = parseInt(numInput.value);
            if(num < toGuess) {
                resultSpan.innerHTML = 'The number is too small!';
            }else if(num > toGuess) {
                resultSpan.innerHTML = 'The number is too big!';
            }else {
                resultSpan.innerHTML = 'Congratulations! You guessed right!';
            }
        }
        restartButton.onclick = function() {
            // Clear toGuess and count and regenerate a random integer
            toGuess = Math.floor(Math.random() * 100) + 1;
            count = 0;
            console.log("toGuess: " + toGuess);
            countSpan.innerHTML = count;
            resultSpan.innerHTML = '';
        }
    </script>
</body>
</html>
7.2 confession wall
Sample display:

Sample code:
<!DOCTYPE html>
<html lang="en">
<head>
    <meta charset="UTF-8">
    <meta http-equiv="X-UA-Compatible" content="IE=edge">
    <meta name="viewport" content="width=device-width, initial-scale=1.0">
    <title>Confession wall</title>

    <style>
        * {
            margin: 0;
            padding: 0;
            box-sizing: border-box;
        }
        .container {
            width: 600px;
            margin: 0 auto;
        }
        h1 {
            text-align: center;
            padding: 20px 0;
            color: pink;
        }
        p {
            text-align: center;
            font-size: 15px;
            color: grey;
            padding: 5px 0;
        }
        .row {
            display: flex;
            height: 40px;
            justify-content: center;
            align-items: center;
        }
        .row span {
            width: 80px;
        }
        .row .edit {
            width: 250px;
            height: 35px;
        }
        .row .submit {
            width: 330px;
            height: 40px;
            background-color: orange;
            color: #fff;
            border: none;
        }
        .row .submit:active {
            background-color: grey;
        }
    </style>
</head>
<body>
    <div class="container">
        <h1>Confession wall</h1>
        <p>Click Submit after input, and the message will be displayed on the wall</p>
        <div class="row">
            <span>who:</span>
            <input type="text" class="edit">
        </div>
        <div class="row">
            <span>To whom:</span>
            <input type="text" class="edit">
        </div>
        <div class="row">
            <span>what did you say?:</span>
            <input type="text" class="edit">
        </div>
        <div class="row">
            <input type="button" value="Submit"  class="submit">
        </div>
    </div>

    <script>
        let submitButton = document.querySelector('.submit');
        submitButton.onclick = function() {
            // 1. Get the content in the input box
            let edits = document.querySelectorAll('.edit');
            // 2. Add elements to the HTML input box according to the content of the page
            let message = edits[0].value + "yes" + edits[1].value + "say: " + edits[2].value;
            if(edits[0].value == '' || edits[1].value == '' || edits[2].value == '') {
                return;
            }
            let div = document.createElement('div');
            div.innerHTML = message;
            div.className = 'row';
            let container = document.querySelector('.container');
            container.appendChild(div);
            // 3. Clear the last input
            for(let i = 0; i < edits.length; i++){
                edits[i].value = '';
            }
        }
    </script>
</body>
</html>
7.3 to do list
Sample display:

Sample code:
<!DOCTYPE html>
<html lang="en">
<head>
    <meta charset="UTF-8">
    <meta http-equiv="X-UA-Compatible" content="IE=edge">
    <meta name="viewport" content="width=device-width, initial-scale=1.0">
    <title>To do list</title>
</head>
<body>
    <style>
        * {
            padding: 0;
            margin: 0;
            box-sizing: border-box;
        }

        .nav {
            width: 600px;
            margin: 0 auto;
            display: flex;
            justify-content: center;
            align-items: center;
            margin-top: 10px;
        }

        .nav input {
            width: 450px;
            height: 50px;
            font-size: 25px;
            padding-left: 10px;
        }

        .nav button {
            width: 150px;
            height: 50px;
            border: none;
            color: white;
            background-color: orange;
            font-size: 18px;
        }

        .nav button:active {
            background-color: grey;
        }

        .container {
            width: 600px;
            margin: 0 auto;
            display: flex;
            justify-content: center;
            /* padding-top: 10px; */
            margin-top: 10px;

            /* background-color: green; */
        }

        .container .left,
        .container .right {
            width: 50%;
        }

        .container .left h3,
        .container .right h3 {
            text-align: center;
            height: 50px;
            line-height: 50px;
            background-color: black;
            color: white;
        }

        .container .row {
            height: 50px;
            display: flex;
            align-items: center;
            justify-content: flex-start;
        }

        .container .row span {
            width: 240px;
        }

        .container .row button {
            width: 40px;
            height: 30px;
        }

        .container .row input {
            margin-right: 5px;
        }

    </style>

    <!-- Indicates the top div, There are input boxes and buttons inside -->
    <div class="nav">
        <input type="text">
        <button>New task</button>
    </div>

    <!-- This is the bottom div, It is divided into left and right columns -->
    <div class="container">
        <div class="left">
            <h3>hang in the air</h3>
            <!-- <div class="row">
                <input type="checkbox">
                <span>having dinner</span>
                <button>delete</button>
            </div> -->
        </div>
        <div class="right">
            <h3>Completed</h3>
        </div>
    </div>

    <script>
        let addTaskBtn = document.querySelector(".nav button");
        addTaskBtn.onclick = function() {
            // 1. Get the contents of the input box
            let input = document.querySelector(".nav input");
            let taskContent = input.value;
            // 2. Create a div.row, which sets the required check box, text and delete button
            let row = document.createElement('div');
            row.className = 'row';
            let checkBox = document.createElement('input');
            checkBox.type = 'checkbox';
            let span = document.createElement('span');
            span.innerHTML = taskContent;
            let deleteBtn = document.createElement('button');
            deleteBtn.innerHTML = 'delete';
            row.appendChild(checkBox);
            row.appendChild(span);
            row.appendChild(deleteBtn);
            // 3. Add div.row to In left~
            let left = document.querySelector('.left');
            left.appendChild(row);

            // 4. Add a click processing function to the checkBox Click to move the task
            checkBox.onclick = function() {
                // When the user clicks, the current row element is obtained
                // Add this row to the other side
                // You can also decide whether it is left or right according to the selected status of the checkBox
                let target = null;
                if (checkBox.checked) {
                    // It is already selected
                    // Just put this element on the right
                    target = document.querySelector('.right');
                } else {
                    // Is unchecked
                    // Just put this element on the left
                    target = document.querySelector('.left');
                }
                target.appendChild(row);
            }

            // 5. To achieve the deletion effect, add a deletion operation to the delete button
            deleteBtn.onclick = function() {
                // To delete a row, you need to know the parent element of the row
                let parent = row.parentNode;
                parent.removeChild(row);
            }
        }
    </script>
</body>
</html>