Author's Note: Because the pictures shown in the tutorial are github warehouse pictures, friends with slow network speed please move. "Webpack 4 series of tutorials (15): development mode and the original address of webpack-dev-server" . Welcome to my small station to see more original content: godbmw.com "Posture" communication (^^*)
0. Course introduction and information
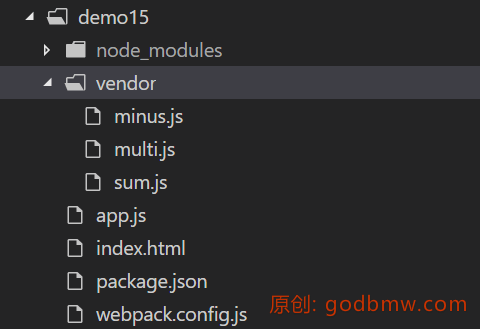
The code catalogue for this lesson is as follows:
The configuration files package.json for plugin and loader used in this lesson are as follows:
{
  "scripts": {
    "dev": "webpack-dev-server --open"
  },
  "devDependencies": {
    "clean-webpack-plugin": "^0.1.19",
    "html-webpack-plugin": "^3.2.0",
    "jquery": "^3.3.1",
    "webpack": "^4.16.1",
    "webpack-cli": "^3.1.0",
    "webpack-dev-server": "^3.1.4"
  }
}
1. Why do we need a development model?
In previous courses, we did not specify a parameter mode. But when you execute webpack for packaging, you automatically set it to production, but the console will pop up warning prompts. The development mode is to designate mode as development.
In development mode, we need to debug the code. The corresponding configuration is: devtool is set to source-map. In non-development mode, this option needs to be turned off to reduce packaging volume.
In the development mode, hot overload, routing redirection, hanging agent and other functions are also needed. webpack4 has provided devServer option to start a local server for developers to use these functions.
2. How to use the development model?
According to the package.json configuration at the beginning of the article, you only need to input npm run dev on the command line to start the developer mode.
The startup effect is shown in the following figure:
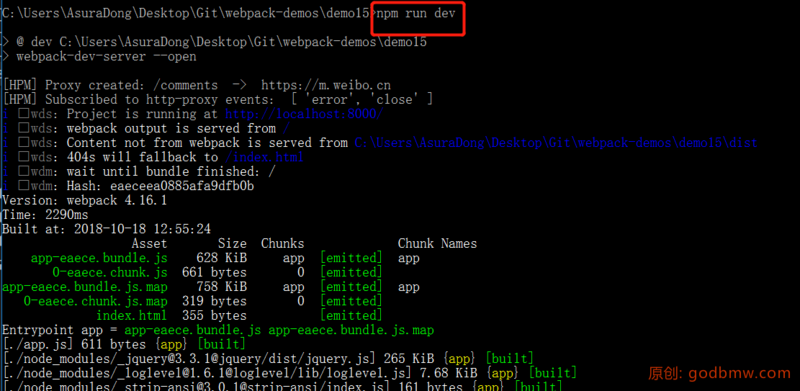
Although the console outputs the packaging information (assuming we have configured the hot overload), no / dist / folders and packaged files are created on the disk. The contents of the package files in the console are stored in memory.
3. Write some required documents
First, write the entry html file:
<!-- index.html -->
<!DOCTYPE html>
<html lang="en">
<head>
  <meta charset="UTF-8">
  <meta name="viewport" content="width=device-width, initial-scale=1.0">
  <meta http-equiv="X-UA-Compatible" content="ie=edge">
  <title>Document</title>
</head>
<body>
  This is Index html
</body>
</html>
Then, according to the project directory, simply encapsulate the three js files under / vendor / to facilitate app.js calls:
// minus.js
module.exports = function(a, b) {
  return a - b;
};

// multi.js
define(function(require, factory) {
  "use strict";
  return function(a, b) {
    return a * b;
  };
});

// sum.js
export default function(a, b) {
  console.log("I am sum.js");
  return a + b;
}
All right, get ready to get to the point.
4. Write webpack configuration file
4.1 Configuration Code
Because the configuration content is a little too much, so put the code, then explain.
The webpack.config.js configuration is as follows:
const webpack = require("webpack");
const HtmlWebpackPlugin = require("html-webpack-plugin");

const path = require("path");

module.exports = {
  entry: {
    app: "./app.js"
  },
  output: {
    publicPath: "/",
    path: path.resolve(__dirname, "dist"),
    filename: "[name]-[hash:5].bundle.js",
    chunkFilename: "[name]-[hash:5].chunk.js"
  },
  mode: "development", // Development mode
  devtool: "source-map", // Commissioning
  devServer: {
    contentBase: path.join(__dirname, "dist"),
    port: 8000, // Local Server Port Number
    hot: true, // Thermal overload
    overlay: true, // If the code goes wrong, the "floating layer" will pop up on the browser page. Scaffolds like vue-cli
    proxy: {
      // Cross-domain proxy forwarding
      "/comments": {
        target: "https://m.weibo.cn",
        changeOrigin: true,
        logLevel: "debug",
        headers: {
          Cookie: ""
        }
      }
    },
    historyApiFallback: {
      // HTML 5 history mode
      rewrites: [{ from: /.*/, to: "/index.html" }]
    }
  },
  plugins: [
    new HtmlWebpackPlugin({
      filename: "index.html",
      template: "./index.html",
      chunks: ["app"]
    }),
    new webpack.HotModuleReplacementPlugin(),
    new webpack.NamedModulesPlugin(),
    new webpack.ProvidePlugin({
      $: "jquery"
    })
  ]
};
4.2 Module Hot Update
HotModule Replacement Plugin and NamedModules Plugin are two plug-ins needed for module hot update, and the order can not be wrong. And specify devServer.hot as true.
With these two plug-ins, changes can be detected and processed in the project's js code.
For example, after we started the development mode, we changed the file vendor/sum.js, at this time, we need to print some information on the browser's console. So in app.js, you can write as follows:
if (module.hot) {
  // Detection of module hot update
  module.hot.accept("./vendor/sum.js", function() {
    // Further actions for the updated module
    console.log("/vendor/sum.js is changed");
  });
}
Whenever sum.js is modified, callback functions can be automatically executed.
4.3 Cross-domain Agent
With the popularity of front-end and back-end separate development, cross-domain requests become more and more common. In order to develop quickly, devServer.proxy can be used as a proxy forwarding to bypass the cross-domain restrictions of browsers.
According to the previous configuration file, if you want to call an interface of microblog: https://m.weibo.cn/comments/hotflow. Just request / comments / hotflow in the code:
$.get(
  "/comments/hotflow",
  {
    id: "4263554020904293",
    mid: "4263554020904293",
    max_id_type: "0"
  },
  function(data) {
    console.log(data);
  }
);
4.4 HTML5--History
When a project uses the HTML5 History API, any 404 response may need to be replaced by index.html.
In SPA, any response is directly replaced by index.html.
In the official scaffolding vue-cli of vuejs, the development mode is configured as follows:
// ...
historyApiFallback: {
  rewrites: [{ from: /.*/, to: "/index.html" }];
}
// ...
5. Write entry documents
Finally, on the basis of all the above, let's write the following entry file app.js:
import sum from "./vendor/sum";
console.log("sum(1, 2) = ", sum(1, 2));
var minus = require("./vendor/minus");
console.log("minus(1, 2) = ", minus(1, 2));
require(["./vendor/multi"], function(multi) {
  console.log("multi(1, 2) = ", multi(1, 2));
});

$.get(
  "/comments/hotflow",
  {
    id: "4263554020904293",
    mid: "4263554020904293",
    max_id_type: "0"
  },
  function(data) {
    console.log(data);
  }
);

if (module.hot) {
  // Detection of module hot update
  module.hot.accept("./vendor/sum.js", function() {
    // Further actions for the updated module
    console.log("/vendor/sum.js is changed");
  });
}
6. Effect Detection
On the command line, type: npm run dev opens the server, and the browser opens automatically. As shown in the following figure:

Open the console, and you can see that the code is working properly without any errors. In addition, because source-map is turned on, you can locate the code location (in the green box below):

7. References
- dev-server document: https://www.webpackjs.com/configuration/dev-server/
- Development Mode Documentation: https://www.webpackjs.com/guides/development/