In the last article< Webpack Performance Series 1: using Cache to improve build performance >In, we discussed how to apply various caching measures to improve construction performance in the context of Webpack. Next, we continue to talk about some effective parallel computing schemes in Webpack. The essence of caching is to save the results after the first round of calculation, and reuse the calculation results directly next time and skip the calculation process; The essence of parallelism is to execute multiple operations concurrently at the same time to improve the calculation efficiency per unit time. Both are common means to improve performance optimization in computer science.
Limited by node JS single thread architecture. In essence, all parsing, translation and merging operations of the native Webpack on all resource files are performed serially in the same thread, and the CPU utilization is very low. Therefore, naturally, there are some schemes for running Webpack based on multi process mode or working in some part of the Webpack construction process in the community, such as:
- HappyPack: running resource loading logic in multi process mode
- Thread loader: officially produced by Webpack, it also runs resource loading logic in a multi process mode
- Terser webpack plugin: supports multi process execution of code compression and uglify functions
- Parallel Webpack: run multiple Webpack build instances in multi process mode
The core designs of these schemes are very similar: create a sub process for a certain computing task, then transfer the parameters required for running to the sub process through IPC and start the computing operation. After the calculation, the sub process will transfer the results back to the main process through IPC, and the component instance hosted in the main process will submit the results to Webpack.
Next, I will introduce the use methods, principles and disadvantages of each scheme. Readers can choose according to their needs.
Using HappyPack
HappyPack is a Webpack component library that uses a multi process method to run the file Loader loader sequence to improve the construction performance. It can be regarded as the first popular concurrency scheme in the Webpack community. However, the author has made it clear that it will not continue to be maintained. Readers are recommended to give priority to the similar scheme officially launched by Webpack: thread Loader.
❝ official link: https://github.com/amireh/happypack ❞
usage method
Basic Usage
To use, first install the dependency:
yarn add happypack
After that, you need to replace the original loader configuration with happypack/loader, such as:
module.exports = {
    // ...
    module: {
        rules: [{
            test: /\.js$/,
            // Replace the original Loader configuration with happypack/loader
            use: 'happypack/loader',
            // use: [
            //  {
            //      loader: 'babel-loader',
            //      options: {
            //          presets: ['@babel/preset-env']
            //      }
            //  },
            //  'eslint-loader'
            // ]
        }]
    }
};
After that, you need to create an instance of the happypack plug-in and migrate the original loader configuration to the plug-in. The complete example is as follows:
const HappyPack = require('happypack');

module.exports = {
    // ...
    module: {
        rules: [{
            test: /\.js$/,
            use: 'happypack/loader',
            // use: [
            //  {
            //      loader: 'babel-loader',
            //      options: {
            //          presets: ['@babel/preset-env']
            //      }
            //  },
            //  'eslint-loader'
            // ]
        }]
    },
    plugins: [
        new HappyPack({
            loaders: [
                {
                    loader: 'babel-loader',
                    option: {
                        presets: ['@babel/preset-env']
                    }
                },
                'eslint-loader'
            ]
        })
    ]
};
After configuration, start the npx webpack command again to use the multi process capability of HappyPack to improve the build performance. In three JS as an example, the project contains 362 JS files, with a total of about 3w lines of code:
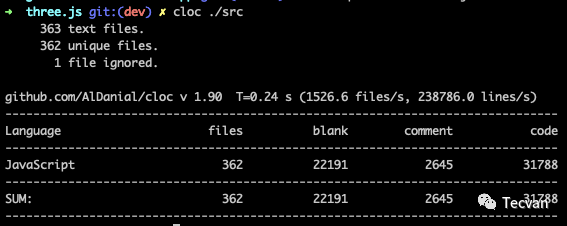
Before starting HappyPack, the construction time is between 11000ms and 18000ms. After starting HappyPack, the time is reduced to between 5800ms and 8000ms, an increase of about 47%.
Configure multiple instances
The above simple example can only process the same file type with the same Loader sequence. In practical application, you can also configure multiple corresponding Loader arrays for different files, for example:
const HappyPack = require('happypack');

module.exports = {
  // ...
  module: {
    rules: [{
        test: /\.js?$/,
        use: 'happypack/loader?id=js'
      },
      {
        test: /\.less$/,
        use: 'happypack/loader?id=styles'
      },
    ]
  },
  plugins: [
    new HappyPack({
      id: 'js',
      loaders: ['babel-loader', 'eslint-loader']
    }),
    new HappyPack({
      id: 'styles',
      loaders: ['style-loader', 'css-loader', 'less-loader']
    })
  ]
};
In the example, both js and less resources use happypack/loader as the unique loader, and are given the parameter id = 'js' |' styles' respectively; Secondly, in the example, two HappyPack plug-in instances are created, and loaders arrays for handling js and css are configured respectively. happypack/loader and HappyPack instances are associated through ID values, so as to realize multi resource configuration.
Shared thread pool
The above multi instance mode is closer to the actual application scenario, but by default, the HappyPack plug-in instances manage their own processes, resulting in the overall need to maintain a large number of process pools, which will lead to new performance losses.
To this end, HappyPack provides a set of easy-to-use shared process pool functions. You only need to create HappyPack threadPool instance and limit the total number of processes through the size parameter, and then configure the instance to the threadPool attribute of each HappyPack plug-in, for example:
const os = require('os')
const HappyPack = require('happypack');
const happyThreadPool = HappyPack.ThreadPool({
  size: os.cpus().length - 1
});

module.exports = {
  // ...
  plugins: [
    new HappyPack({
      id: 'js',
      threadPool: happyThreadPool,
      loaders: ['babel-loader', 'eslint-loader']
    }),
    new HappyPack({
      id: 'styles',
      threadPool: happyThreadPool,
      loaders: ['style-loader', 'css-loader', 'less-loader']
    })
  ]
};
After using the shared process pool function, HappyPack will create a group of shared HappyThread objects in advance, and the resource translation requirements of all plug-in instances will eventually be forwarded to idle processes for processing through the HappyThread object, so as to ensure that the overall number of processes is controllable.
principle
The operation process of HappyPack is shown in the following figure:
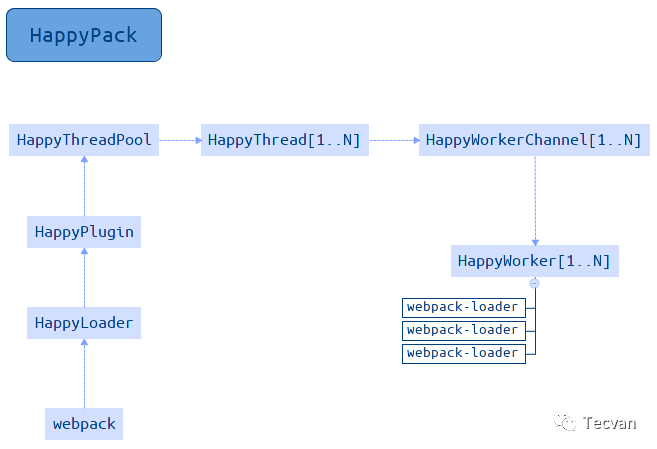
It can be roughly divided into:
- After receiving the translation request, the HappyPack / loader reads the corresponding HappyPack plug-in instance from the Webpack configuration
- Call the compile method of the plug-in instance to create a HappyThread instance (or fetch an idle instance from the HappyThreadPool)
- HappyThread calls child internally_ process. Fork creates a child process and executes the HappyWorkerChannel file
- The HappyWorkerChannel creates a HappyWorker and starts to execute the Loader translation logic
The intermediate process goes through several layers. Finally, the HappyWorker class re implements a set of translation logic similar to Webpack Loader. The code complexity is high, and the reader can understand it a little.
shortcoming
Although HappyPack can effectively improve the packaging and construction speed of Webpack, it has some obvious disadvantages:
- The author has made it clear that it will not continue to maintain, and the scalability and stability are not guaranteed. With the development and iteration of Webpack itself, it can be predicted that one day HappyPack will not be fully compatible with Webpack
- The bottom layer of HappyPack re implements the loader logic in its own way. The source code and use method are not as simple as thread loader
- Some loaders, such as awesome typescript Loader, are not supported
Using thread loader
Thread loader is also a component that runs loader in multi process mode to improve Webpack construction performance. Its function is very similar to that of HappyPack. The main differences between the two are:
- Thread loader is officially provided by Webpack and is still in the state of continuous iterative maintenance, which is more reliable in theory
- Thread loader only provides a single loader component, which is relatively simple in usage
- After the HappyPack is started, it will inject emitFile and other interfaces into its running loader, while thread loader does not have this feature, so it will have higher requirements on the loader and poor compatibility
❝ official link: https://github.com/webpack-contrib/thread-loader ❞
usage method
First, you need to install the thread loader dependency:
yarn add -D thread-loader
Secondly, configure the thread loader to the first place in the loader array to ensure that it runs first, such as:
module.exports = {
  module: {
    rules: [{
      test: /\.js$/,
      use: [
        'thread-loader',
        'babel-loader',
        'eslint-loader'
      ],
    }, ],
  },
};
After configuration, start the npx webpack command again. Still three JS as an example, before starting thread loader, the construction time is about 11000ms to 18000ms. After starting thread loader, the time is reduced to about 8000ms, an increase of about 37%.
principle
Webpack abstracts the logic related to the Loader to the Loader runner library, and thread Loader also reuses the library to complete the Loader's running logic. The core steps are as follows:
- During startup, the Loader execution chain is intercepted in the form of pitch
- Analyze the Webpack configuration object and get the Loader list behind the thread Loader
- Call child_process.spawn creates a working sub process and passes parameters such as Loader list, file path, context, etc. to the sub process
- loader-runner is invoked in the sub process to translate file contents.
- After the translation, the result is passed back to the main process
❝ reference: ❞
- ❝https://github.com/webpack/loader-runner❞
- ❝Webpack principle Series 7: how to write a loader❞
shortcoming
Thread loader is a parallel processing component officially recommended by Webpack. It is very simple to implement and use, but it also has some problems:
- emitAsset and other interfaces cannot be called in the Loader, which will cause the style Loader to fail to work normally. The solution is to place such components before the thread Loader, such as ['style Loader ',' thread Loader ',' CSS Loader ']
- Instance objects such as compilation and compiler cannot be obtained in Loader, and Webpack configuration cannot be obtained
As a result, some loaders cannot be used together with thread loaders, and readers need to carefully screen and test them.
Using parallel webpack
The parallel capabilities provided by components such as thread Loader and HappyPack only act on the process of executing Loader, and have no impact on the subsequent AST parsing, dependency collection, packaging, code optimization and other processes. The theoretical benefits are still relatively limited. In this regard, the community also provides another scheme with higher parallelism and running Webpack instances with multiple independent processes - parallel Webpack.
❝ official link: https://github.com/trivago/parallel-webpack ❞
usage method
Basic Usage
Before use, you still need to install dependencies:
yarn add -D parallel-webpack
Parallel Webpack supports two usages. The first one is in Webpack config. JS configuration file to export multiple Webpack configuration objects, such as:
module.exports = [{
    entry: 'pageA.js',
    output: {
        path: './dist',
        filename: 'pageA.js'
    }
}, {
    entry: 'pageB.js',
    output: {
        path: './dist',
        filename: 'pageB.js'
    }
}];
After that, execute the command NPX parallel webpack to complete the construction. The above example configuration will package Pagea at the same time JS and pageb JS two products.
Combined variable
Parallel Webpack also provides the createvariables function to generate multiple Webpack configuration objects according to the given variable combination, such as:
const createVariants = require('parallel-webpack').createVariants
const webpack = require('webpack')


const baseOptions = {
  entry: './index.js'
}


// Configuration variable combination
// The attribute name is webpack configuration attribute; The property value is an optional variable
// The combination of the following variables will eventually produce 2 * 2 * 4 = 16 configuration objects
const variants = {
  minified: [true, false],
  debug: [true, false],
  target: ['commonjs2', 'var', 'umd', 'amd']
}


function createConfig (options) {
  const plugins = [
    new webpack.DefinePlugin({
      DEBUG: JSON.stringify(JSON.parse(options.debug))
    })
  ]
  return {
    output: {
      path: './dist/',
      filename: 'MyLib.' +
                options.target +
                (options.minified ? '.min' : '') +
                (options.debug ? '.debug' : '') +
                '.js'
    },
    plugins: plugins
  }
}


module.exports = createVariants(baseOptions, variants, createConfig)
The above example uses the createvariables function to match 16 different combinations of minified, debug and target according to variables, and finally generates the following products:
[WEBPACK] Building 16 targets in parallel
[WEBPACK] Started building MyLib.umd.js
[WEBPACK] Started building MyLib.umd.min.js
[WEBPACK] Started building MyLib.umd.debug.js
[WEBPACK] Started building MyLib.umd.min.debug.js

[WEBPACK] Started building MyLib.amd.js
[WEBPACK] Started building MyLib.amd.min.js
[WEBPACK] Started building MyLib.amd.debug.js
[WEBPACK] Started building MyLib.amd.min.debug.js

[WEBPACK] Started building MyLib.commonjs2.js
[WEBPACK] Started building MyLib.commonjs2.min.js
[WEBPACK] Started building MyLib.commonjs2.debug.js
[WEBPACK] Started building MyLib.commonjs2.min.debug.js

[WEBPACK] Started building MyLib.var.js
[WEBPACK] Started building MyLib.var.min.js
[WEBPACK] Started building MyLib.var.debug.js
[WEBPACK] Started building MyLib.var.min.debug.js
principle
The implementation of parallel Webpack is very simple. It basically sets a shell on the Webpack. The core logic is:
- Call worker farm to create multiple worker processes according to the number of configuration items passed in
- The Webpack is called within the worker process to perform the build
- After the work process is completed, call node-ipc to send the end signal to the main process.
Here, all the work will be finished.
shortcoming
Although parallel webpack has higher parallelism than thread loader and HappyPack, there is no communication between process instances, which may cause the same work to be repeated on different processes - or different CPU cores. For example, when the compressed and uncompressed versions of the same code need to be packaged at the same time, under the parallel webpack scheme, the pre resource loading, dependency resolution, AST analysis and other operations will be repeated, but there are only differences when generating code in the final stage.
The implementation of this technology will not benefit a single entry project and will only increase the process creation cost; However, it is especially suitable for multiple entry scenarios such as MPA, or class library scenarios that need to compile esm, umd, amd and other product forms at the same time.
Parallel compression
In the context of Webpack, uglify JS, uglify es and Terser are usually used for code obfuscation compression. To varying degrees, they all natively implement the multi process parallel compression function.
❝ full introduction to TerserWebpackPlugin: https://webpack.js.org/plugins/terser-webpack-plugin/ ❞
Taking Terser as an example, the plug-in TerserWebpackPlugin has enabled parallel compression by default. Generally, the best performance benefit can be obtained by maintaining the default configuration, that is, parallel = true. The developer can also close or set the specific number of parallel processes through the parallel parameter, for example:
const TerserPlugin = require("terser-webpack-plugin");


module.exports = {
    optimization: {
        minimize: true,
        minimizer: [new TerserPlugin({
            parallel: 2 // number | boolean
        })],
    },
};
With the above configuration, the maximum number of parallel processes can be set to 2.
For Webpack 4 and earlier versions, the code compression plug-in uglifyjs webpack plugin also has similar functions and configuration items, which will not be repeated here.
Best practices
Theoretically, parallelism can indeed improve the operation efficiency of the system, but under the Node single thread architecture, the so-called parallel computing can only rely on the generation of child processes, and the action of creating a process itself consumes a lot of time - about 600ms. Therefore, it is recommended that readers use the above multi process scheme according to their actual needs.
For small projects, the construction cost may be low, but the introduction of multi process technology will increase the overall cost.
For large projects, since the official HappyPack has made it clear that it will not be maintained, it is recommended to use the thread loader component as much as possible to improve the performance of the Make phase. In the production environment, it can also cooperate with the parallel compression function of terser webpack plugin to improve the overall efficiency.