webpack workflow?
webpack overview
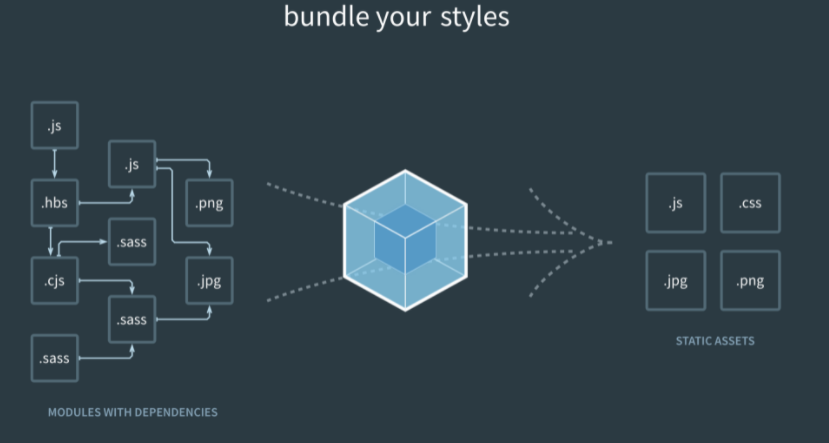
webpack is a popular front-end project construction tool (packaging tool), which provides functions such as code compression confusion, js compatibility, performance optimization and so on, so that programmers can focus on the specific function implementation.
webpack usage process
-
First, you need to install the package related to webpack: NPM I webpack webpack cli - D
-
In the root directory of the project, create a file named webpack.com config. Webpack configuration file of JS
-
On webpack config. JS configuration file, initialize the following basic configuration:
// webpack.config.js is the configuration file of webpack
// Expose a configuration object
module.exports = {
    // If the build mode is specified as the development mode, there is no need to compress the packaged output files during webpack packaging, and the packaging speed is fast; Compared with the product launch stage, the code will be compressed to reduce the file size and improve the performance
    mode: "development"
}
- In package Add a dev script in the JSON package management configuration file
{
  "name": "webpack",
  "version": "1.0.0",
  "description": "",
  "main": "index.js",
  "scripts": {
    "test": "echo \"Error: no test specified\" && exit 1",
    "dev": "webpack"  // New dev script
  },
  "keywords": [],
  "author": "",
  "license": "ISC",
  "dependencies": {
    "jquery": "^3.6.0"
  },
  "devDependencies": {
    "webpack": "^5.65.0",
    "webpack-cli": "^4.9.1"
  }
}
- Then input npm run dev in the terminal to start webpack for packaging to analyze the file dependency tree and directory structure of the whole project, and then automatically convert and package the modules that cannot be recognized by the browser to main under the dist file of the project JS, and then, according to the requirements, introduce the packaged output main JS files enable the browser to recognize the code.
webpack configures the entry and exit of packaging
The default packaging entry of webpack is index. Under src JS file and the default packaging export output are main in dist folder js
const path = require("path")
module.exports = {
    // If the build mode is specified as the development mode, there is no need to compress the packaged output files during webpack packaging, and the packaging speed is fast; Compared with the product launch stage, the code will be compressed to reduce the file size and improve the performance
    mode: "development",
    // mode: "production"
    // Configure packaging entry
    entry: path.join(__dirname, "./src/index.js"),
    // Configuration file packaging exit
    output: {
        // File path for packaged output
        path: path.join(__dirname, "./dist"),
        // File name of packaged output
        filename: "buldle.js"
    }
}
Configure the automatic packaging function of webpack
- Install webpack dev server, a tool that supports automatic project packaging, which will start an http server to try packaging. npm i webpack-dev-server ,
- Modify pack dev command in JSON file
 "scripts": {
    "test": "echo \"Error: no test specified\" && exit 1",
    "dev": "webpack-dev-server"  //Changed from "dev": "webpack" to "dev": "webpack dev server"
  },
- Index. Under src The reference path of script script in html is modified to "/ bundle. JS"
<!-- The output Auto Packaging file is in the root directory buldle.js,This file does not exist in the physical disk. It is placed in memory. It is virtual, invisible and hidden -->
<script src="/buldle.js"></script>
<!-- <script src="../dist/buldle.js"></script> -->
- npm run dev, repackage
- Access in browser http://localhost:8080 To see the effect of automatic packaging
Page preview function after configuring automatic packaging tool
- Install the plug-in that generates the preview page. npm i html-webpack-plugin
- Modify webpack config. JS file header area, add the following code information
// Import the plug-in that generates the preview page to get a constructor. Its function is to copy the same file from the file in a folder to the root directory
const HtmlWebpackPlugin = require("html-webpack-plugin")
// Create plug-in instance object
const htmlPlugin = new HtmlWebpackPlugin({
    template: "./src/index.html", //Specify the template file to use
    filename: "index.html" //Specify the name of the generated file. If the file exists in memory, it is virtual and will not be displayed in the directory
})
// Expose a configuration object
module.exports = {
    // Modify webpack config. JS file, add a new configuration node plugins
    plugins: [htmlPlugin], //The plugin array is a list of plug-ins that will be used during webpack packaging
}
- After executing npm run dev, you can directly see the index on the web page HTML pages instead of rendering individual directory files
Configure parameters related to automatic packaging
When npm run dev is run, the web page will pop up automatically without manually copying and pasting, and the browser will open.
Method: put package.js Medium  "dev": "webpack-dev-server "Become  "dev": "webpack-dev-server --open --host 127.0.0.1 --port 8888"The browser will pop up automatically,
among--open To automatically open the browser page after packaging;--host Is configuration ip Address;  --port Configure port number for
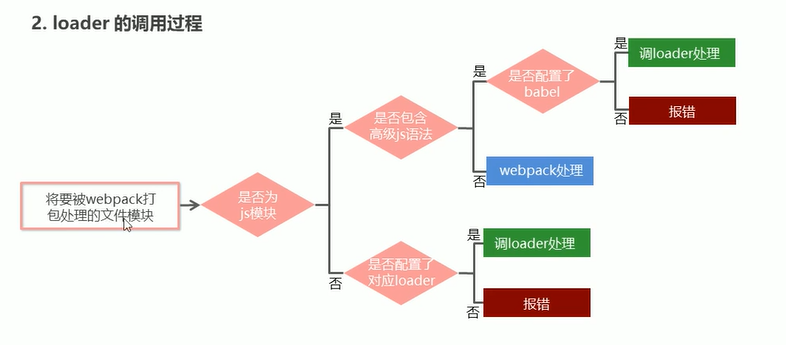
Packaging non js files with loader
In actual development, webpack can only be packaged and processed by default js suffix end module, other non The webpack of js module cannot be processed. It can only be packaged normally by using the loader loader, otherwise an error will be reported.
Such as sass loader to package Sass related files and less loader Less related files.
Steps to package related css files:
- Install the loader that handles css files, NPM I style loader css loader - D
- In the webpack configuration file config. JS, add the loader rule to the mudule - > rules array
// In the matching rules of all third-party file modules
    module: {
        // Array of matching rules
        rules: [{
            // This rule is the rule for packaging css files. NPM I style loader css loader needs to be installed
            test: /\.css$/, //test is a regular expression that represents the matching file type and is used to match what kind of file
            use: ["style-loader", "css-loader"] //Use is an array representing the loader to be called and what loader loader to use to process the matched file
        },
        {
            // NPM I less less loader needs to be installed for the rules of packaging less files
            test: /\.less$/,
            // The loader must be called in order, that is, call style loader first, then CSS loader and less loader
            use: ["style-loader", "css-loader", "less-loader"]
        }, {
            // NPM I sass loader node sass needs to be installed for the rules of packaging scss files
            test: /\.scss$/,
            use: ["style-loader", "css-loader", "sass-loader"]
        }
        ]
    }
Package and handle the high-level syntax in js files, such as the class class of ES6 (lower version of webpack)
The lower version of webpack cannot package the high-level syntax of js by default. You need to use the loader related to babel to parse and convert the high-level syntax (but the higher version of webpack can package by default)
Steps: install the package related to the babel converter, add the babel related dependency Library in the plugin array, and create the loader rule
Question 1: what is your understanding of webpack?
Webpack is a tool for packaging modular js. In webpack, all files are modules. Convert files through loader, inject hooks through plugin, and finally output files composed of multiple modules. Webpack focuses on building modular projects. Webpack can be regarded as a module packaging machine: what it does is to analyze your project structure, find js modules and other extension languages that cannot be run directly by browsers, such as Scss, TS, etc., and package them into an appropriate format for browsers to use.
Question 2: what is the difference between webpack and grunt and gulp?
All three are front-end building tools. grunt and gulp were popular in the early days. Now webpack is relatively mainstream, but some lightweight tasks will still be handled with gulp, such as packaging CSS files separately.
Question 3: what is a bundle, a chunk, and a module?
bundle: a file packaged by webpack. Chunk: code block. A chunk is composed of multiple modules, which is used for code merging and segmentation. Module: it is a single module under development. In the world of webpack, everything is a module. A module corresponds to a file. Webpack will recursively find all dependent modules from the configured entry
Question 4: what is Loader? What is Plugin?
1) Loaders is used to tell webpack how to convert and process a certain type of file and introduce it into the packaged file. 2) Plugin is used to customize the webpack packaging process. A plug-in is an object containing the apply method, which can participate in each process (life cycle) of the whole webpack packaging.