background
With the rapid development of business, the problem of Release construction speed has become increasingly prominent. The construction time from 50min at the end of 2020 to nearly 1h30min now, in which the Proguard phase takes up nearly 40%, which affects the work efficiency all the time. On the time-consuming link of the whole Release construction, there are many optimization schemes in the industry and have played a certain optimization effect. However, we have found another way to develop a set of Inc Proguard solution by ourselves, which solves the problem of unable to increment Proguard and reduces the time consumption to the minute level.
What's the problem?
At present, Android wechat adopts the modular Gradle construction method, which is also widely used in the industry. The general construction process is as follows:
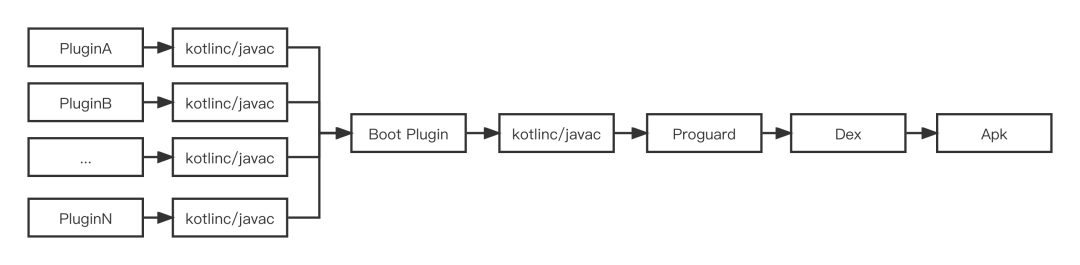
Figure 1
It can be seen from the above figure that each Plugin may Compile concurrently. When executing Boot Plugin, serial Compile is required. Finally, Apk is output through Proguard, Dex and other construction processes, and each task will be executed by a corresponding Gradle Task.
Through time-consuming sorting of tasks, we know that full Proguard (3 optimization passes) takes an average of 40 minutes [figure 2], and about 20 minutes in case of application mapping [figure 3]
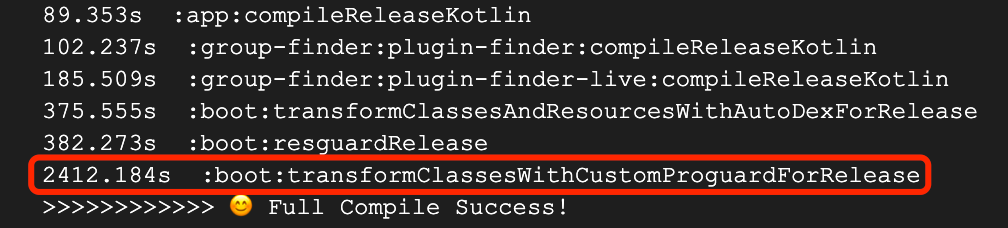
Figure 2 Full Proguard

Figure 3 Apply Mapping Proguard
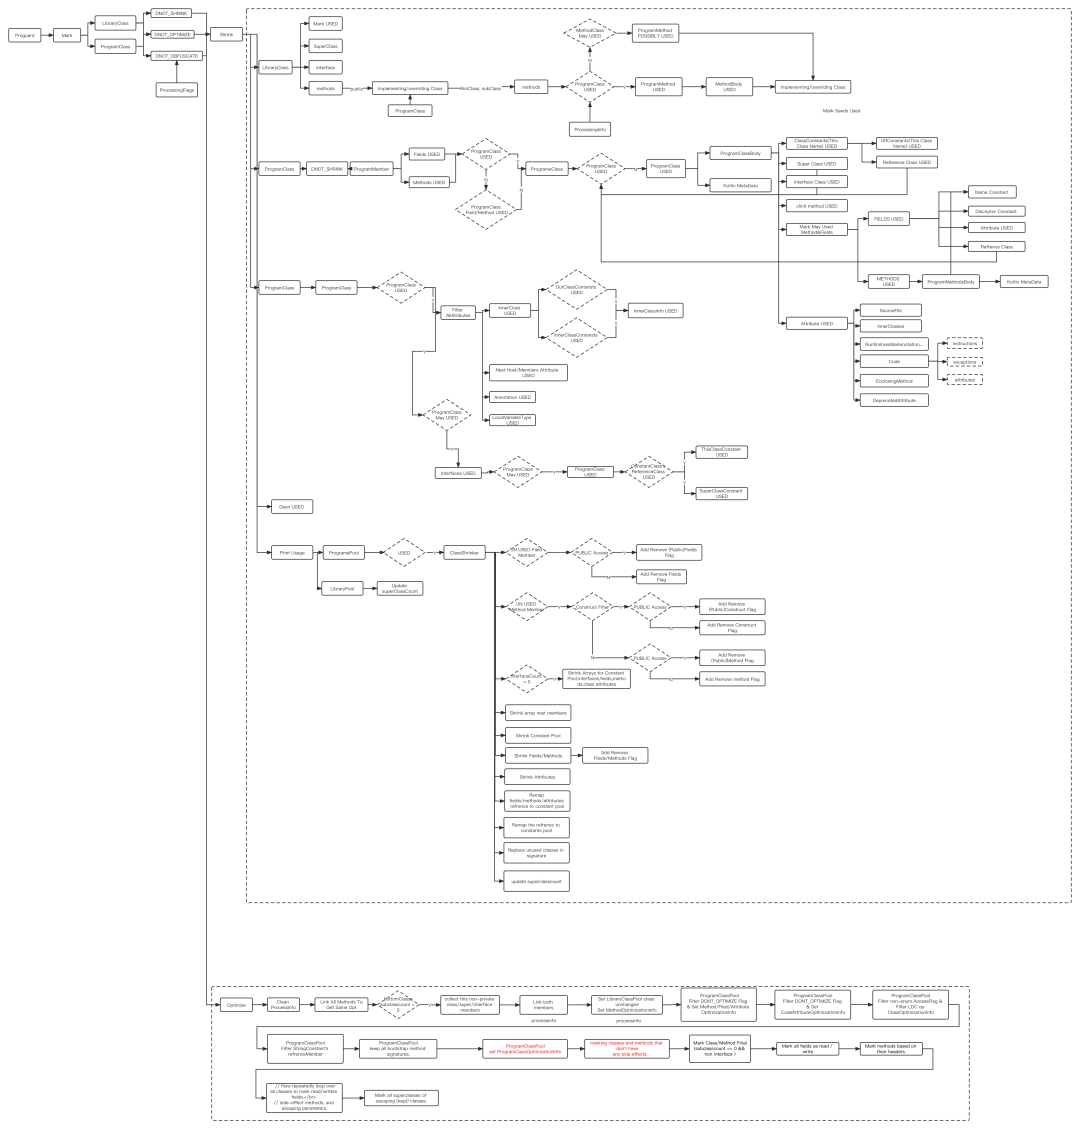
Figure 4 part of Proguard process
The specific reasons are as follows:
- The Proguard process is deeply complex [figure 4], and there is a certain time-consuming in each stage. For example, it is difficult to carry out single point optimization in the Initialize, Shrink, Optimize and Obfuscated stages;
- Concurrent execution only has the Optimize stage, which has no obvious effect on the overall optimization [profile. Classfile. Visitor. Parallelallclassvisitor];
- Code expansion;
- Optimization passes;
- Proguard optimization item selection;
Optimization scheme considered:
- One of the simplest optimization schemes is to reduce the number of Proguard optimizations to improve the time consumption, but it will have a great impact on the performance of Apk, such as the number of Dex, packet volume, startup performance and other indicators;
- Use Gradle incremental strategy to input Incremental Input Jars to Proguard for incremental confusion. If the Reference of Input Jars is incomplete, it is easy to cause Warning and cause Proguard failure. Even if Proguard succeeds, it may not be consistent with the last build result;
- R8 is adopted, but the time-consuming optimization of R8 can not reach our expected goal. It does not allow you to disable or enable discrete optimization, nor allow you to modify the optimization behavior, such as - optimizations and - optimizationpasses. Once this black box behavior has problems, the high maintenance cost can not be ignored; In the third chapter, we will further explain the reasons for adopting Proguard;
- From the perspective of engineering architecture, the level of business features is clear, and the features can be confused naturally. However, this scheme also requires further transformation of engineering architecture and constraints, which does not solve the fundamental problem;
To sum up, we consider that in the process of daily development and construction, there are not many codes submitted, and it is really bad to submit a full amount of construction at one time. Can we conduct incremental Proguard for the code part of incremental modification? The answer is feasible!
Why use Proguard?

Figure 5 Proguard + D8

Figure 6 R8
Before the emergence of R8, ProGuard was basically used with Dx/D8 to generate smaller and faster Java bytecode, and then handed it to Dx/D8 to generate Dalvik bytecode [figure 5]. D8 has fewer output quality instructions and better register allocation than dx. R8 [figure 6] is a derivative product of d8, which aims to integrate the functions of ProGuard and D8. At present, it is still being optimized and gradually mature. Please check the official website of quartsquare [1] for more details. For wechat, we still use ProGuard for the following reasons:
- Proguard optimization is similar to R8, which has no obvious advantages in this regard;
- Build Time R8 is not much faster than Proguard. If R8 is adopted based on Figure 1, it will be about 10 minutes faster. Due to the different optimization purposes of the two, R8 also includes Dalvik bytecode, which may increase the time consumption in the future. Other reasons are also mentioned above;
- Android wechat has its own optimization work for DEX. The main purpose is to reduce the number of DEX and help the size of Tinker Patch. With its own DEX optimization, we will still use Proguard for some time in the future, which is the main reason;
The following focuses on the core work of incremental confusion:
Incremental confusion
Let's take a look at the general input and output process of Proguard:
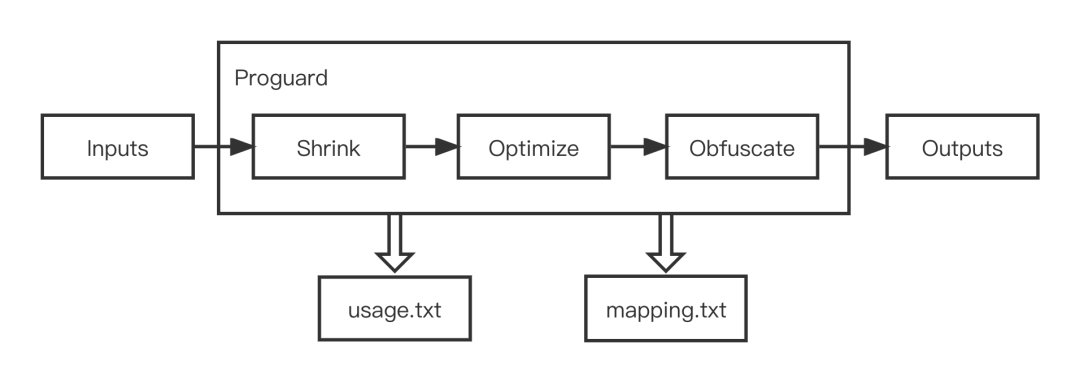
Figure 7
Proguard outputs two output files, usage Txt and mapping Txt [figure 7], usage Txt is to delete useless classes, fields and methods, mapping Txt retain the original obfuscate Class mapping and inline mapping of Class, Field and Method [figure 8], of which inline is the most common, which is one of the main reasons why Proguard is difficult to increment.
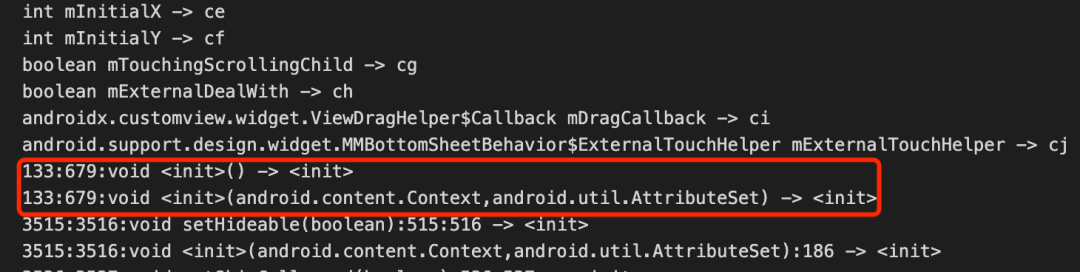
Figure 8 inline
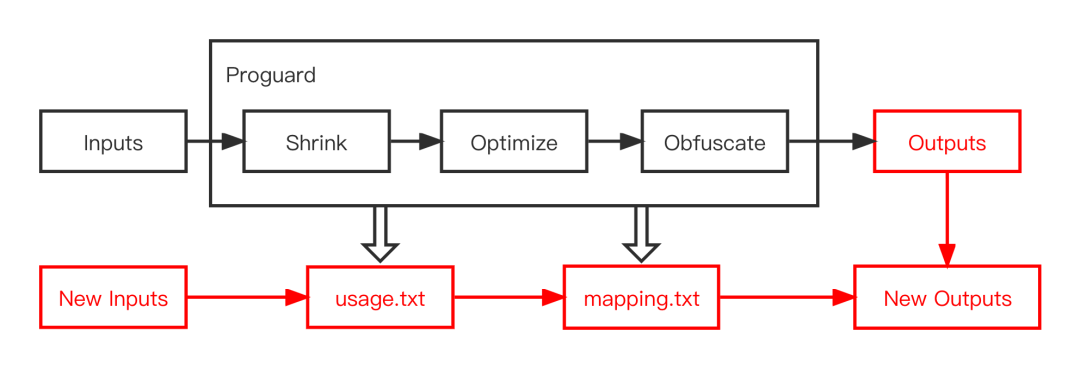
Figure 9
Then our work is to use the New Inputs currently constructed and the output of the last construction [figure 9] to carry out incremental Proguard. The specific implementation ideas are as follows:
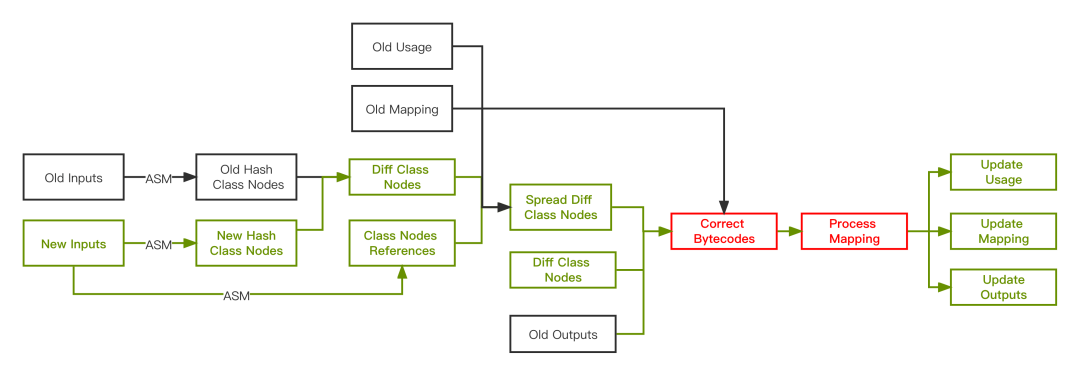
Figure 10 implementation idea
According to the above flow chart, the general implementation steps are summarized:
- Use ASM to build HashClassNodes Tree from the last built OutInput Jars and NewInputs Jars to serialize snapshots;
- NewInputs Jars constructs a Class Nodes Reference Graph to obtain the reference relationship between Class Nodes;
- HashClassNodes Tree builds Diff Class Nodes and gets the code changes of the current build;
- Diff Class Nodes and Class Nodes Reference Graph build Spread Diff Class Nodes to obtain code changes affected by diffusion;
- Spread / Diff Class Nodes combines the last built outputs Old Inputs Jars and usage txt,mapping.txt to Correct Bytecodes
- ReMapping the corrected bytecode (Process Mapping)
- Update usage txt ,mapping.txt and output jars
Diff
First, let's look at how to Hash the input Jars. First, it's easy to think of using ASM tool to parse Class, analyze the bytecode contents such as Fields/Methods, and calculate the hashcode value using Hash function. For example, figure 11:
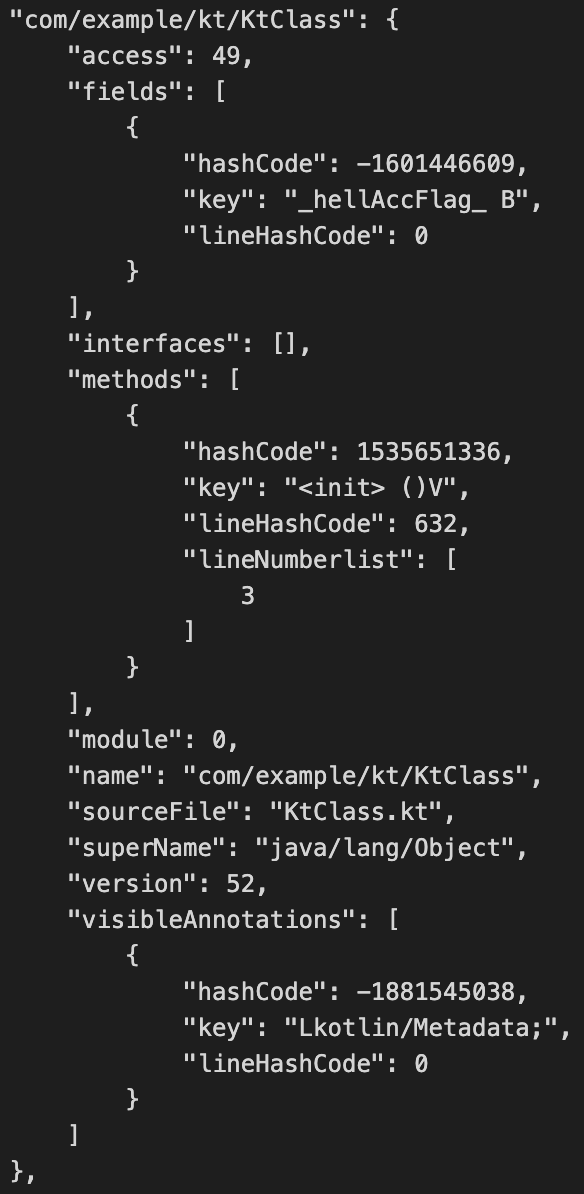
Figure 11 hash snapshot
We use hash = hash * iConstant+value, hash=17, iconstant=37 as hash function. We choose prime factor to avoid hash conflict as much as possible and distribute evenly. So far, we can easily calculate the code differences between adjacent constructions [figure 12]
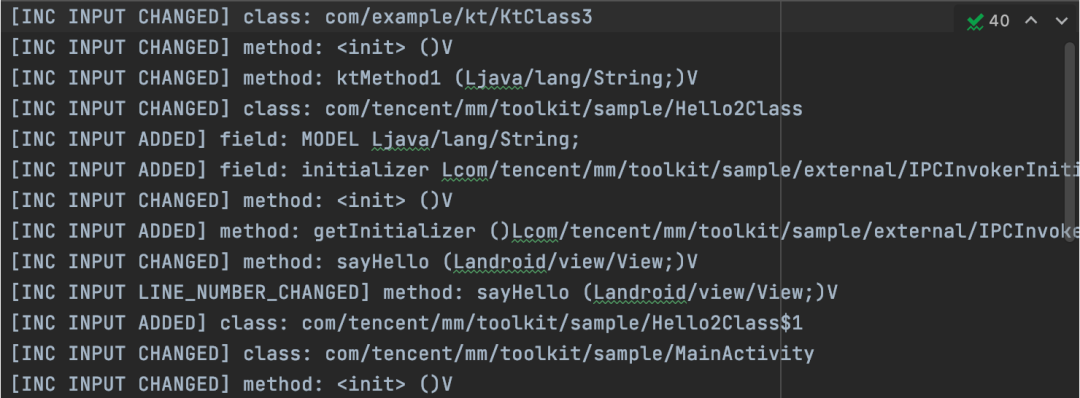
Figure 12 Diff
At present, we support the following types of changes, which basically cover all changes of code increment:
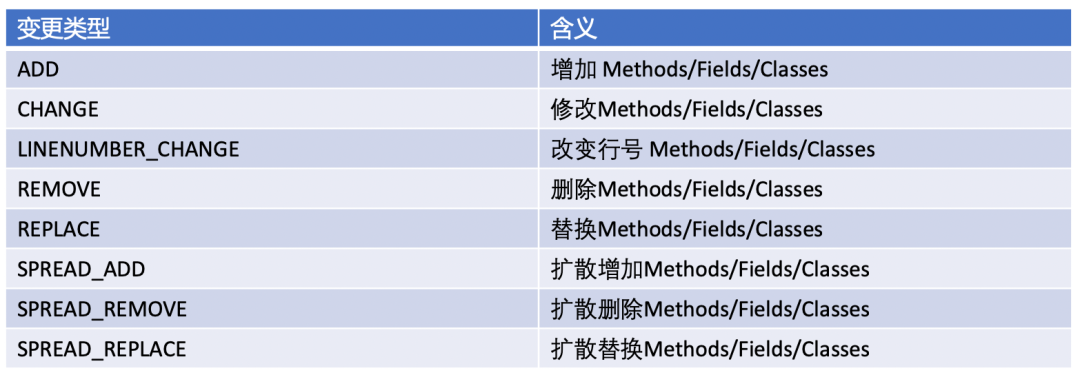
Figure 13 change type
Class Nodes
After specific code changes, in order to facilitate subsequent bytecode operations, we also need to build Class Node structured data for the current Class. Similarly, we use ASM Tree Library for analysis and expansion to build a more powerful mm classnode tree. The structure is as follows [Figure 14]:

Figure 14 ClassNode Tree
Each Node stores the direct reference and inline relationship to the Class. The reference relationship [15] can be obtained through the Constants Pool, and the inline information can be obtained from Mapping [figure 16]. Similarly, our Mapping and Usage information will be structured.
private fun findReferencedClasses(referencingClass: Clazz, member: Member?, descriptor: String, owner: String, name: String, node: String): ArrayList<Clazz?>? { val enumeration = DescriptorClassEnumeration(descriptor) val classCount = enumeration.classCount() var referencedClasses :ArrayList<Clazz?>? = null if (classCount > 0) { referencedClasses = ArrayList<Clazz?>() for (index in 0 until classCount) { val fluff = enumeration.nextFluff() val name = enumeration.nextClassName() val referencedClass: Clazz? = findClass(referencingClass, member, name, node) if (referencedClass != null) { referencedClasses.add(referencedClass) } } } val referencedClass: Clazz? = findClass(referencingClass, member, owner, node) if (referencedClass != null) { if (referencedClasses == null) { referencedClasses = ArrayList<Clazz?>() } referencedClasses.add(referencedClass) } return referencedClasses }Example 15: find reference
    public static class MethodInfo {        private int obfuscatedFirstLineNumber;        private int obfuscatedLastLineNumber;        private final String originalClassName;        private int originalFirstLineNumber;        private int originalLastLineNumber;        private final String originalType;        private final String originalName;        private final String originalArguments;
        private final String obfuscatedName;        private final String obfuscatedArguments;        public MethodInfo inlineToInfo;        public MethodInfo inlineByInfo;        //Whether the mapping file is: XXX: XXX [false],: XXX [true] private Boolean samelinumber;
        private boolean markRemoved;}
Example 16 mapping info (partial)
Next, it is necessary to continue to calculate the Spread Change of the current change. With the above reference and inline relationship, it is easy to calculate other Class Diff:
def spreadDiffClassMarker = new SpreadDiffClassVisitor(spreadDiffWriter, logWriter,                    configuration.classLoader, programClassPool)            programClassPool.classAccept(                    new ClassProcessingInfoFilter(Status.NodeStatusFlag.ADD.value |                                                  Status.NodeStatusFlag.CHANGE.value |                                                  Status.NodeStatusFlag.REPLACE.value, 0, 0,                            new MultiClassVisitor(                                    spreadDiffClassMarker,
                                    new MMAllMemberVisitor(                                            new MMemberProcessingInfoFilter(Status.NodeStatusFlag.ADD.value |                                                                            Status.NodeStatusFlag.CHANGE.value, 0, 0, spreadDiffClassMarker)))))}
Example 17: spread diff

Figure 18
Corrector
The above chapter mainly describes how to obtain Diff Class Nodes. The most critical part of the whole process is byte code correction. The following examples show that the processing methods are different for different change types:
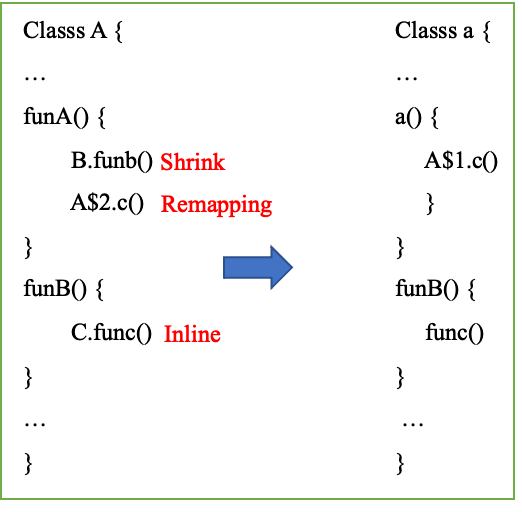
Figure 19
In the last build, class A was mapped to class A, and B.funb() was shrunk and saved in usage Txt, A is an anonymous internal class, and remapping is A . func method inline of class C is in method funB and saved in mapping Txt, consider correcting the current modification separately:
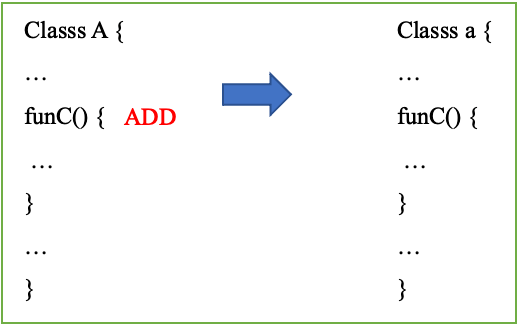
Figure 20 ADD
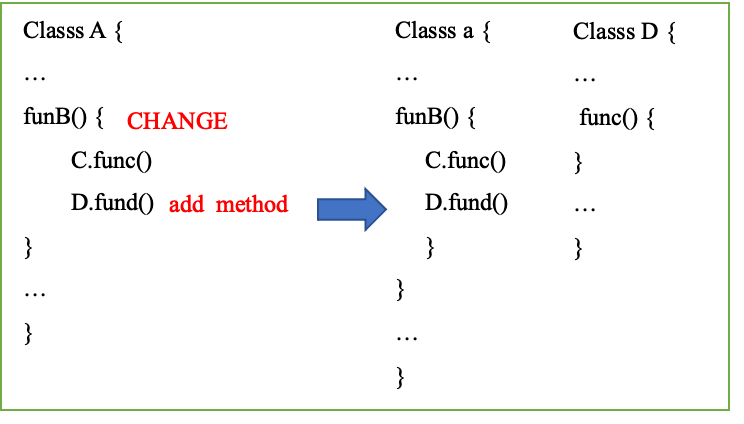
Figure 21 CHANGE
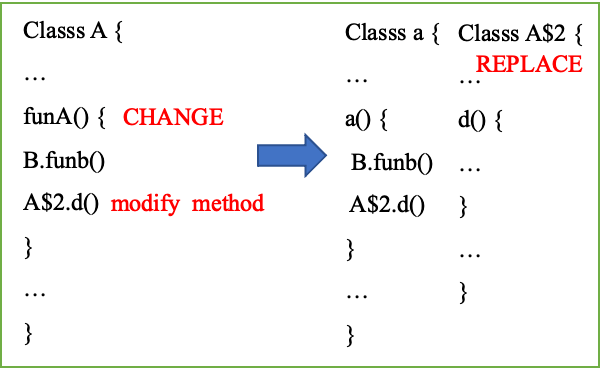
Figure 22 REPLACE
- ADD: func() is a newly added method. Since the mapping file does not have the mapping relationship of func, it can be directly added to class a, and the code part will be copied accordingly [figure 20]. If the code part of shrink/inline exists in the newly added method, it will also be processed with ADD;
usageMarker.isAdded(programMethod) || usageMarker.isSpreadAdded(programMethod) -> {                    val exceptionsArray: Array<String>? =                        if (programMethod.exceptions == null) null else programMethod.exceptions.toTypedArray<String>()                    val correctMethodVisitor = outputClass.visitMethod(                        programMethod.access,                        programMethod.name,                        programMethod.desc,                        programMethod.signature,                        exceptionsArray                    ) as MMethodNode
                    processingFlagMarker.markCorrectAdd(correctMethodVisitor)
programMethod.accept(InnerProcessingMethodVisitor( programClass = inputProgramClass, inputMethodNode = programMethod, methodVisitor = correctMethodVisitor )) }- CHANGE: if a D.fund method is added to the method funB, the funB of class A is in the CHANGE state. At this time, the C.func of inline and the newly added D.fund method are copied into class A. the ADD state of Class D of inline needs to be set and the func code part needs to be supplemented [figure 21];
usageMarker.isChanged(inputMethodNode) || usageMarker.isSpreadChanged(inputMethodNode) -> {
                    val index = outputProgramClass.methods.indexOf(outputProgramMethod)                    val exceptionsArray: Array<String>? =                if (outputProgramMethod.exceptions == null) null else outputProgramMethod.exceptions.toTypedArray<String>()            val newProgramMethod = MMProgramMethodNode(outputProgramMethod.access,                                                       outputProgramMethod.name,                                                       outputProgramMethod.desc,                                                       outputProgramMethod.signature,                                                       exceptionsArray)            inputMethodNode.accept(                InnerProcessingMethodVisitor(                    programClass = inputProgramClass,                    inputMethodNode = inputMethodNode,                    methodVisitor = newProgramMethod                )            )            outputProgramClass.methods[index] = newProgramMethod
processingFlagMarker.markCorrectChange(newProgramMethod) }- REMOVE: this process is relatively simple. To delete a method in class A, you can simply delete the corresponding method in class A;
- LINE NUMBER CHANGE: if you modify any code in class A, the following code line number information will be changed, which will also affect the de stacking operation. Here, we should also keep a copy of line code information in the hash process, change the current line number according to the current line number and combine the offset to calculate the current line number, and finally update it to outputs;
indexLineNumberOffsets = inputMethodNode.getLineNumberOffset(inputProgramClass)
val filterInputLineNumberNodes = inputMethodNode.filterLineNumberNodes() val filterOutputLineNumberNodes = outputProgramMethod.filterLineNumberNodes() if (filterInputLineNumberNodes.size == indexLineNumberOffsets?.size && filterOutputLineNumberNodes.size == indexLineNumberOffsets?.size ) { oldLineNumberArray = inputMethodNode.filterLineNumberNodes().mapIndexed { _index ,lineNumberNode -> lineNumberNode.line - indexLineNumberOffsets!![_index] } outputProgramMethod.insnsAccept(outputProgramClass, this, null) } else { logPrinter?.println("$TAG >>>>>>>>>>>>>> ERROR, lineNumberNodes is not same size!") }- SPREAD CHANGE/REMOVE/ADD... The processing logic is the same as above
Consider the following special cases:
- Anonymous inner class mapping:
Proguard may remove anonymous internal classes. For example, SearchView in Figure 23 will be remapped to SearchView.. Therefore, the mapping information built last time cannot be used to restore the current class. Here we adopt the method of REPLACE. See Figure 22. When the funA method body in class A is modified, it is marked as CHANGE state, At this time, A must be copied into class A, and A needs to be removed as A instead of A ;
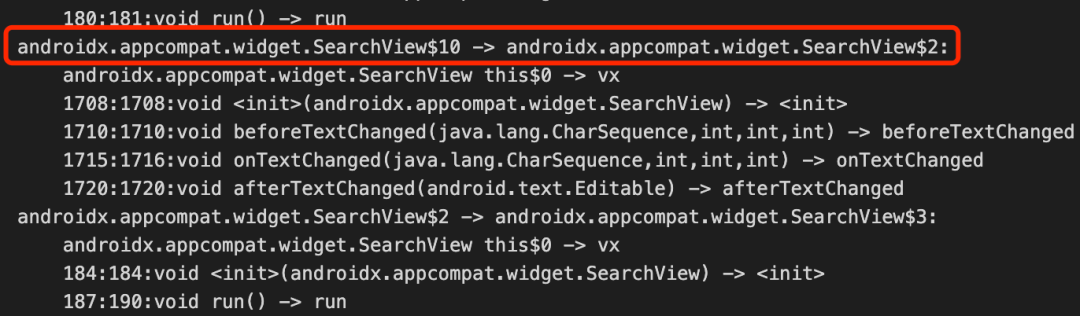
Figure 23 anonymous class
Other situations:
- arguments optimization
The method parameters of method may also be optimized by Shrink [Proguard. Optimize. Methoddescriptorshrinker #visitprogram method], which makes it impossible to retrieve them through mapping. Here we modify the Proguard source code and retain the mapping information before and after Shrink.
- return value optimization
Similarly, the return value of method will also be optimized. Considering that the optimization quantity is not obvious on wechat, it can be configured here! method/propagation/returnvalue simple processing
Update
After the corrector phase is processed, the output needs to be removed and the output file needs to be updated. The general principle is as follows:
- Remapping outputs
The corrected bytecode must be re confused before it can be output to the production environment Apk. Read the retrieve parsing process, and we can successfully map the last build Txt, and then confuse and remove the output classes/fields/methods/annotation/code insn that has been marked for processing [Fig. 24, 25, 26];
  // Process mapping  def mappingProcessor = new ProcessingMappingVisitor(mappingRemapper, logPrinter, outputProgramPool)  outputProgramPool.classAccept(new MultiClassVisitor(                                          // Update class mapping                                          new ClassProcessingFlagFilter(ProcessingFlag.CORRECTED_CHANGE.value |                                                                        ProcessingFlag.CORRECTED_ADD.value |                                                                        ProcessingFlag.CORRECTED_REPLACED.value,                                                  0,0, mappingProcessor),
                                          new MMAllMemberVisitor(                                                  // Update methods/fields mapping                                                  new MMemberProcessingFlagFilter(ProcessingFlag.CORRECTED_CHANGE.value |                                                                                  ProcessingFlag.CORRECTED_ADD.value|                                                                                  ProcessingFlag.CORRECTED_REPLACED.value,                                                          0, 0, mappingProcessor)),  ))
Figure 24 removing
if (typeInsnNode.opcode == Opcodes.NEW || typeInsnNode.opcode == Opcodes.ANEWARRAY || typeInsnNode.opcode == Opcodes.CHECKCAST || typeInsnNode.opcode == Opcodes.INSTANCEOF) { typeInsnNode.desc = obfuscatedDescriptor(typeInsnNode.desc, mapper, logPrinter) logPrinter?.println("$TAG, >>>>>>>> process typeInsn desc: ${typeInsnNode.desc}" + " -> obfuscate desc: ${typeInsnNode.desc}")}Figure 25 obfuscate insn (partial)
fun obfuscatedDescriptor(originalInternalDescriptor: String, mappingRemapper: FrameRemapper?, logPrinter: PrintWriter?, fixClassInfo: ProgramClassFixInfo? = null): String { val startIndex = originalInternalDescriptor.indexOf(TypeConstants.CLASS_START) val endIndex = originalInternalDescriptor.lastIndexOf(TypeConstants.CLASS_END) if (startIndex < 0 || endIndex <= 0) { return obfuscatedInternalClass(ClassUtil.externalClassName(originalInternalDescriptor), mappingRemapper, fixClassInfo) } try { val newDescriptorBuffer = StringBuffer(originalInternalDescriptor.length) val enumeration = DescriptorClassEnumeration(originalInternalDescriptor) if (enumeration.classCount() < 2) { return obfuscatedInnerDescriptor(originalInternalDescriptor, startIndex, endIndex, mappingRemapper, logPrinter, fixClassInfo) } newDescriptorBuffer.append(enumeration.nextFluff()) while (enumeration.hasMoreClassNames()) { val internalClassName = enumeration.nextClassName() val obfuscatedClassName = obfuscatedInternalClass(ClassUtil.externalClassName(internalClassName), mappingRemapper, fixClassInfo) newDescriptorBuffer.append(obfuscatedClassName) newDescriptorBuffer.append(enumeration.nextFluff()) } return newDescriptorBuffer.toString() } catch (ex: Exception) { logPrinter?.println("process obfuscatedDescriptor error, originalDescriptor: $originalInternalDescriptor") ex.printStackTrace() } return obfuscatedInnerDescriptor(originalInternalDescriptor, startIndex, endIndex, mappingRemapper, logPrinter, fixClassInfo)}Figure 26 obfuscate description
- Update usage/mapping.txt
Further, through the byte code status information after the corrector, it is also necessary to synchronously update the use / mapping structured data and Print it to the current use and mapping output file [figure 27];
...if (!methodInfo.isInlineInfo()) { if (methodInfo.originalFirstLineNumber > 0) { // Print out the line number range of the method, // ignoring line numbers of any inlined methods. pw.println(" " + methodInfo.originalFirstLineNumber + ":" + methodInfo.originalLastLineNumber + ":" + methodInfo.originalType + " " + methodInfo.originalName + JavaTypeConstants.METHOD_ARGUMENTS_OPEN + methodInfo.originalArguments + JavaTypeConstants.METHOD_ARGUMENTS_CLOSE + " -> " + obfuscatedMethodName); } else { // Print out the method mapping without line numbers. pw.println(" " + methodInfo.originalType + " " + methodInfo.originalName + JavaTypeConstants.METHOD_ARGUMENTS_OPEN + methodInfo.originalArguments + JavaTypeConstants.METHOD_ARGUMENTS_CLOSE + " -> " + obfuscatedMethodName); } } else { ... }Figure 27 print mapping
- Update outputs:
Finally, based on the bytecode status information after the corrector, ASM is used to update the last built Output Jars product [Fig. 28], so as to achieve the effect of incremental confusion;
...ExtensionUtil.isDir(outputFile.absolutePath) -> { classNameSets?.forEach { name -> val programClass = outputProgramPool.getClass(name) as MMClassNode IncrementalDirProcessor( logPrinter, classLoader, ignoreCheckClass, outputProgramPool, programClass, processFlagsMarker, outputFile.toPath(), outputFile.toPath() ).proceed() } } ...Figure 28 update outputs
effect
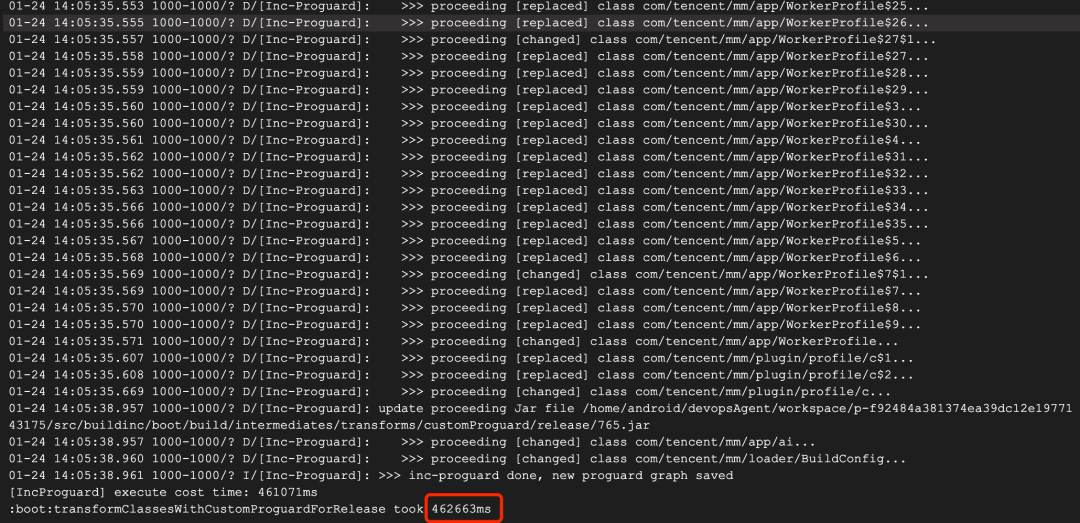
Figure 29

Figure 30
As can be seen from figures 29 and 30, the optimization effect is very obvious. The whole Inc Proguard process can be completed incrementally in about 8 minutes on average. The more pass es, the more obvious the optimization is, and the expected effect is achieved. In addition, in order to ensure the accuracy of increment, many details have been done, such as how to map the method of call super/interface class, how to map specific bytecode instructions, how to solve ClassNotFoundException in ClassReader, etc.
last
Finally, compilation optimization is not an easy task. The selection of some strategies is comprehensively considered in combination with the actual situation of the whole team. On the whole, the incremental confusion scheme basically maintains the advantages of relatively stable time-consuming, small code intrusion and completely controllable optimization degree. We are still optimizing the compilation problem. You are welcome to leave a message.
reference material
[1]
https://www.guardsquare.com/blog/proguard-and-r8