Wechat applet questionnaire case
Through the development of a "Questionnaire" case to master the use of common form components, and how to collect the form information filled in by users, submit it to the server and display it in the form after obtaining data from the server. The reference interface is shown in Figure 1.

Step 1: create a wechat applet project
Step 2: in pages / index / index. Of the applet project Set the navigation bar information and style in the JSON file.
Step 3: in pages / index / index. Of the applet project Write page code in wxml file. The specific code is as follows:
<view class="container">
  <form bindsubmit="submit">
    <view class="nn">
      <text>full name:</text>
      <input type="text" name="name" value="Zhang San" />
    </view>
    <view class="ss">
      <text>Gender:</text>
      <radio-group name="gender">
        <label><radio value="0" checked />male</label>
        <label><radio value="1"/>female</label>
      </radio-group>
    </view>
    <view class="zz">
      <text>Professional skills:</text>
      <checkbox-group name="skills">
        <label><checkbox value="html" checked />HTML</label>
        <label><checkbox value="css" checked />CSS</label>
        <label><checkbox value="js" />JavaScript</label>
        <label><checkbox value="ps" />Photoshop</label>
      </checkbox-group>
    </view>
    <view>
      <text>Your opinion:</text>
      <textarea name="opinion" value="test"></textarea>
    </view>
    <button form-type="submit" type="primary">Submit</button>
  </form>
</view>
Step 4: in pages / index / index. Of the applet project Write the page style in the wxss file. The reference code is as follows (you can set it according to your hobbies, and the public style file can be empty):
.container{margin:50rpx;}
 view{margin-bottom: 30rpx;}
 view.nn,view.ss{display: flex;}
 input{border: 2rpx solid #ccc;height:60rpx;width: 540rpx;margin-left: 20rpx;margin-top: -5rpx;}
view.ss label{margin-left: 20rpx;}
view.zz label{display: block;margin-top: 15rpx;}
textarea{border: 2rpx solid #ccc;width: 640rpx;height:200rpx;margin-top: 10rpx;}
Step 5: follow the steps below to use node JS set up an HTTP server locally. (very important)
① Download node js( https://nodejs.org ), select the long-term support version to download.
② Install node JS, double-click the downloaded installation package to install. All installation options use the default values.
③ Create an empty folder (such as form server) under the path of the folder where the applet project is located to store the server-side files corresponding to the applet project.
④ Enter the DOS command interface under the folder where the server-side file is located (such as form server).
⑤ Initializing the server-side project will automatically create the package JSON configuration file. npm init -y
⑥ Install the Express framework to quickly build the HTTP server. npm install express --save
⑦ Install nodemon monitoring code modification. npm install nodemon -g
⑧ Install Notepad + + software.
⑨ Create index. In the folder where the server-side file is located (for example, form server) JS file, using Notepad + + software to write simple server-side code as follows.
const express=require('express')  //Load express module
const bodyParser=require('body-parser')    //Load the bodyParser module to parse the entity information sent by the client
const app=express()  //Create an express instance and save it in the app
app.use(bodyParser.json())   //Add the bodyParser parsing module to the app in json format,
                        //Because the information submitted by wechat applet to the server adopts json format
//Processing post requests
app.post('/',(req,res)=>{   //Receive a post request. The first parameter is the request path and the second parameter is the callback function
console.log(req.body)     //Output the received data to the command line
res.json(req.body)           //Respond the received data to the client
})
//Monitor 3000 port
app.listen(3000,()=>{
  console.log('server running at http://127.0.0.1:3000')
})
⑩ Start the server. nodemon index.js
After the above command is executed, if you see server running at http://127.0.0.1:3000 Indicates successful startup.
Step 6: in pages / index / index. Of the applet project JS file to write the event handling function of form submission, using Wx Request() sends a post request to the local server. The specific code is as follows:
submit:function(e){
    console.log(e.detail.value);     // Look at the output to see how the form submission collects data
    wx.request({
      method:'post',             //Method indicates the request method
      url: 'http://127.0.0.1:3000 / ', / / url indicates the requested server interface address
      data:e.detail.value,         //Data represents the request parameters, that is, the data sent to the server
      success:function(res){      //success indicates the callback function of successful request, where res indicates the server response information
        console.log(res);       //Look at the output to understand the contents of res
      }
    })
  }
Run the applet, click the "submit" button on the page, and the results in Figure 2 are displayed under the console.
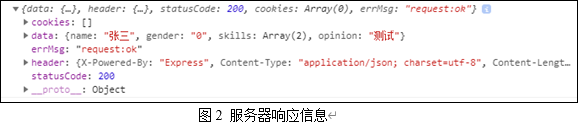
In the figure above:
Data: data of server response
errMsg: request success or failure information
Header: the response header of the server
statusCode: the response status code of the server
In this step, you should master Wx The request () API requests the use of the server.
Step 7: save the default data displayed in the form in the project pages / index / index JS file. The code is as follows:
data:{
    name:'Zhang San',
    gender:[
      {name:'male',value:'0',checked:true},
      {name:'female',value:'1',checked:false}
    ],
    skills:[
      {name:'HTML',value:'html',checked:true},
      {name:'CSS',value:'css',checked:true},
      {name:'JavaScript',value:'js',checked:false},
      {name:'Photoshop',value:'ps',checked:false}
    ],
    opinion:'test'
  }
Step 8: bind the data in data to the form to realize the default display state of the form. The pages / index / index of the project The content of the wxml file is modified as follows:
<view class="container">
  <form bindsubmit="submit">
    <view class="nn">
      <text>full name:</text>
      <input type="text" name="name" value="{{name}}" />
    </view>
    <view class="ss">
      <text>Gender:</text>
      <radio-group name="gender">
        <label wx:for="{{gender}}" wx:key="value">
          <radio value="{{item.value}}" checked="{{item.checked}}" />{{item.name}}
        </label>
      </radio-group>
    </view>
    <view class="zz">
      <text>Professional skills:</text>
      <checkbox-group name="skills">
        <label for="" wx:for="{{skills}}" wx:key="value">
          <checkbox value="{{item.value}}" checked="{{item.checked}}" />{{item.name}}
        </label>
      </checkbox-group>
    </view>
    <view>
      <text>Your opinion:</text>
      <textarea name="opinion" value="{{opinion}}"></textarea>
    </view>
    <button form-type="submit" type="primary">Submit</button>
  </form>
</view>
Step 9: add the pages / index / index of the applet project The data in the data of JS file is deleted and put into the server, and then the wechat applet sends a request to the server to obtain the data. On the server side, the project index App. JS file Add the following code before listen():
var data={
    name:'Zhang San',
    gender:[
      {name:'male',value:'0',checked:true},
      {name:'female',value:'1',checked:false}
    ],
    skills:[
      {name:'HTML',value:'html',checked:true},
      {name:'CSS',value:'css',checked:true},
      {name:'JavaScript',value:'js',checked:false},
      {name:'Photoshop',value:'ps',checked:false}
    ],
    opinion:'test'
}
//Processing get requests
app.get('/',(req,res)=>{
  res.json(data)     //Respond the data to the client in json format
})
Step 10: after the server-side code is completed, click pages / index / index. In the applet project The onLoad() event function of JS file automatically sends a request to the server after the page is loaded to obtain the initial data required by the form. The specific code is as follows:
 onLoad:function(){
    var that=this;
    wx.request({
      method:'get',      //It can be omitted. The default is get request
      url:'http://127.0.0.1:3000/',
       success:function(res){
         that.setData(res.data)     //The direction of this will change. Set the data requested by the server to / / pages / index / index Data in JS file
      }
    })
  }
Run the applet to achieve the desired effect and end.