CameraX Is a Jetpack support library designed to help you simplify the development of camera applications. It provides a consistent and easy-to-use API interface for most Android devices and is backward compatible with Android 5.0 (API level 21). In this article, we will introduce many functions of CameraX 1.1, such as video function.
If you prefer to learn about this through video, please check here:
https://www.bilibili.com/vide...
△ what are the new features of CameraX 1.1 released?
CameraX overview
CameraX is a support library designed to simplify the writing of camera applications. Its advanced API allows developers to focus on user interaction rather than the internal implementation of the camera. We have been exploring and fixing the complex compatibility problems behind it, so that each new version can run stably on more devices.
When to use CameraX or Camera2 depends on whether you want faster development speed or a higher degree of customization.
- CameraX can easily realize the shooting function of ordinary photos and videos, while Camera2 can specially control the shooting process, such as multiple exposure or full manual capture;
- CameraX aims to eliminate the differences between different devices and test them on different devices, while Camera2 needs applications to manage the differences between different devices and test their behavior;
- CameraX improves the speed of code development, allowing you to focus more on the user interface and experience process, while Camera2 is used for more in-depth development to create camera based customization functions;
- CameraX releases new versions frequently, while Camera2 updates with the Android version;
- CameraX can be developed when you are not familiar with cameras, while Camera2 requires you to have a deeper understanding of camera expertise.
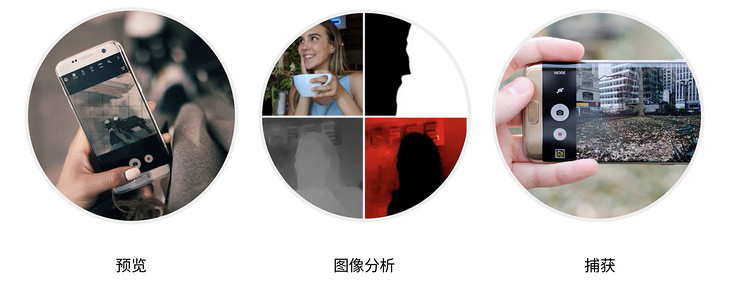
CameraX is built based on main usage scenarios, such as real-time preview of the camera, retrieval buffer for analysis and taking photos. Video shooting function is also added in cameraX version 1.1. Let's take a simple cameraX example:
fun bindPreview(cameraProvider : ProcessCameraProvider) {
    // Creating Preview use cases using CameraX
    var preview : Preview = Preview.Builder().build()

    // Create a cameraSelector that searches the device for the desired camera
    var cameraSelector : CameraSelector = CameraSelector.Builder()
        // In this example, we choose to search for the rear camera
        .requireLensFacing(CameraSelector.LENS_FACING_BACK).build()

    // Get the handle of previewView from CameraView package of CameraX
    // Using this method, you can easily add camera content to the view
    preview.setSurfaceProvider(previewView.getSurfaceProvider())

    // Bind preview to its lifecycle
    var camera = cameraProvider.bindToLifecycle(this as LifecycleOwner,
                                cameraSelector, preview)
}
△ CameraX code example
CameraX is a lifecycle aware component, which means that it will automatically process the application lifecycle events to start, stop, pause and resume. Now, when the application starts, a real-time preview will be displayed on the screen.
We have released the stable version of 1.0 in May 2021. We are currently developing the version of 1.1 Alpha and will enter the Beta stage soon. And we continue to launch compatibility fixes for new devices, such as 1.0.1 and 1.0.2.
In cameraX version 1.1, we have added features that are highly popular with developers. Specifically, in this article, we will focus on:
- Video capture
- YUV to RGB conversion
- Beta Extensions API
- Some other functions that need to be understood
Video capture
In cameraX version 1.1, we added the video capture function. The video capture API (still in Alpha stage, the details may change, but the overall structure will remain basically unchanged) provides basic functions such as recording to files, Quality Setting API that can automatically adapt to each device, and Lifecycle Management API. Next, let's learn how to set the video capture function. The code example is as follows:
// Create Recorder
val recorder = Recorder.Builder()
                       // Here we can use setQualitySelector to set the video quality
                       .setQualitySelector(...)
                       .build()

// Create VideoCapture using the newly created Recorder
val videoCapture = VideoCapture.withOutput(recorder)

// Bind it to the lifecycle
cameraProvider.bindToLifecycle(
    this, CameraSelector.DEFAULT_BACK_CAMERA, preview, videoCapture)

// Set VideoRecordEvent listener
val videoRecordEventListener = Consumer<VideoRecordEvent>{
    when (it) {
        is VideoRecordEvent.Start -> {}
        is VideoRecordEvent.Finalize -> {}
        is VideoRecordEvent.Status -> {
            // The status event is continuously updated during recording
            val stats: RecordingStats = it.recordingStats
            // RecordingStats contains the size and duration of the recording file
        }
        is VideoRecordEvent.Pause -> {}
        is VideoRecordEvent.Resume -> {}

// Specify output
val mediaStoreOutput = MediaStoreOutputOptions.Builder(this.contentResolver,
        MediaStore.Video.Media.EXTERNAL_CONTENT_URI)
    .setContentValues(contentValues)
    .build()

// Ready to record
val activeRecording = videoCapture.output.prepareRecording(this, mediaStoreOutput)
    // Associated event listener
    .withEventListener(ContextCompat.getMainExecutor(this), videoRecordEventListener)
    // Enable audio (provided this app has obtained audio permission)
    .withAudioEnabled()
    // start recording
    .start()
△ video capture example
videoCapture will be ready when the application starts. The application can use videoRecordEventListener to respond to shooting events such as start, end, pause and resume. The Status event provides RecordingStats including File size and duration. Video capture can be output to File, FileDescriptor or MediaStore. In this case, we choose MediaStore. If you choose to enable audio, you need this app to have audio permission. Calling start() to start recording provides us with an activeRecording handle that can be used to pause, resume, or stop recording. You can try these API s in version 1.1.
YUV to RGB conversion
Another popular function is the conversion from YUV to RGB. Let's learn about this function.
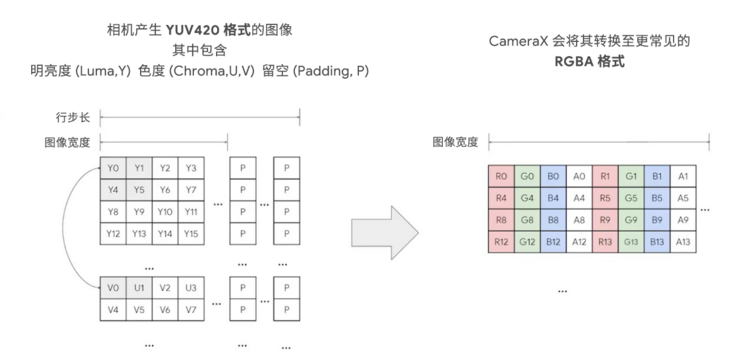
△ YUV format (left) to RGB format (right)
Cameras typically generate data in YUV420 format, including brightness (y), chroma (U, V), and some padding bytes to align rows with valid memory steps. However, image processing in this format may be troublesome, and now CameraX can convert the output of ImageAnalysis into RGBA, which is more familiar to everyone, for easy processing. Next, let's look at an example:
val imageAnalysis = ImageAnalysis.Builder()
        .setTargetResolution(Size(1280, 720))
        .setOutputImageFormat(ImageAnalysis.OUTPUT_IMAGE_FORMAT_RGBA_8888)
        .setBackpressureStrategy(ImageAnalysis.STRATEGY_KEEP_ONLY_LATEST)
        .build()
△ get RGB output from ImageAnalysis
In the sample code, we create an ImageAnalysis instance, specify the required resolution and back pressure policy for the image buffer, and call the new setOutputImageFormat method to request output in RGBA 8888 format. Now, the frame output by ImageAnalysis is RGBA 8888 data instead of YUV format.
The conversion from YUV to RGB in CameraX is based on libyuv. In addition, in CameraX version 1.1, the data itself can be converted to the target resolution. It takes about 5 ~ 10 milliseconds to convert data with image size of 640x480 to 1080p on the midrange device. The specific performance varies from device to device. In addition, APK will increase slightly by about 50KB.
Fix single pixel drift
YUV conversion also fixes the single pixel drift problem on some devices. On these devices, the YUV output is barrel shifted by one pixel, causing the rightmost column of data to appear on the left edge of the image. On devices where this is known to happen, YUV to RGB conversion and output YUV or RGB will be repaired, and CameraX will continue to repair more devices in need.
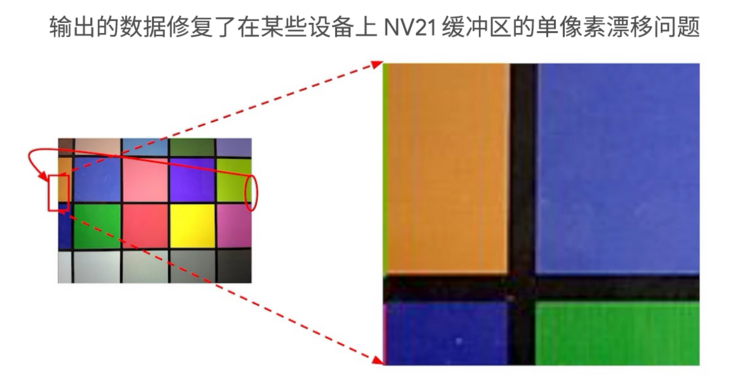
△ repair single pixel drift
For more information, see our previous tweets< YUV to RGB conversion for CameraX ImageAnalysis>.
CameraX Extensions API
Camera effects
The CameraX Extensions API in CameraX 1.1 can give full play to the powerful functions of the device.
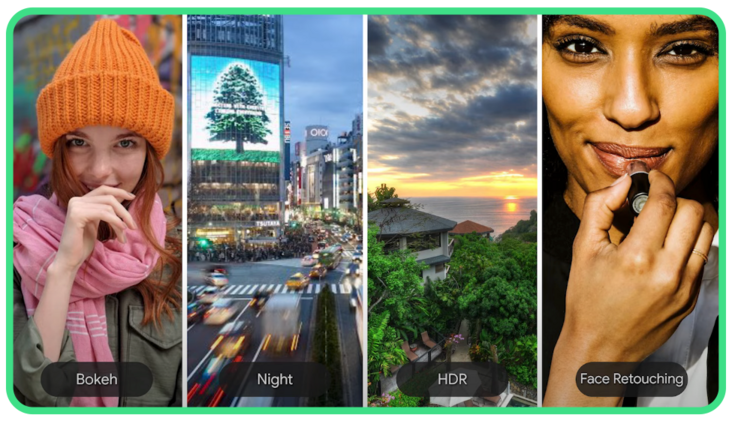
CameraX Extensions include some of the most common built-in camera effects:
- BOKEH: when taking photos in portrait mode, make the foreground characters clearer.
- HDR (high dynamic range): use different auto exposure (AE) configurations when taking pictures for best results.
- NIGHT: capture the best still image in a low illumination environment (usually at NIGHT).
- FACE RETOUCH: when taking a still image, modify the skin color and contour of the face.
- AUTO: automatically adjusts the final image based on the surrounding scenery.
Let's see how to use the CameraX Extensions API:
// Get a list of rear cameras
val cameraSelector = CameraSelector.DEFAULT_BACK_CAMERA

// Check whether all rear cameras support out of focus virtualization
if (extensionsManager.isExtensionAvailable(
    cameraProvider,
    cameraSelector,
    ExtensionMode.BOKEH
)) {
    // To create the extended cameraSelector, we provide the camera and specify the out of focus virtualization mode
    // It will start searching in the background for rear cameras that support out of focus virtualization
    val bokehCameraSelector = extensionsManager.getExtensionCameraSelector(
        cameraProvider,
        cameraSelector,
        ExtensionMode.BOKEH
    )

    // Create imageCapture and preview
    val imageCapture = ImageCapture.Builder().builder()
    val preview = Preview.Builder().build()

    // Bind them to the lifecycle using bokehCameraSelector
    cameraProvider.bindToLifecycle(lifecycleOwner,
        bokehCameraSelector,
        imageCapture,
        preview
    )
}
△ capture and preview the image with BOKEH effect
In the above example, the image output by imageCapture will have out of focus virtualization effect. If the device supports it, preview will also preview the out of focus virtualization effect.
For more information, see our previous tweets< Use the CameraX Extensions API to apply special effects to photos>.
Exposure compensation
CarmeraX 1.1 also adds an exposure compensation API, which can help users better capture overexposed or underexposed areas.
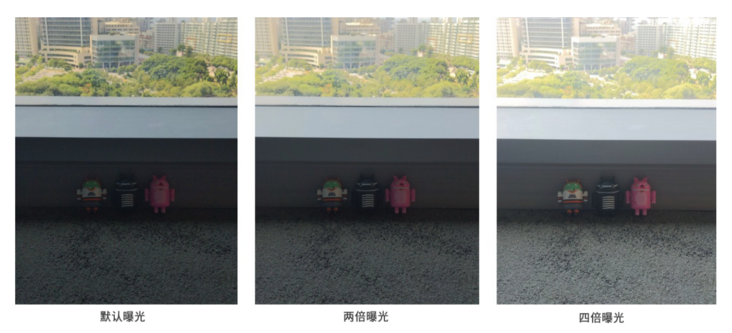
As shown in the figure, our scene is bright outside the window and dark inside. At this time, you can adjust the exposure compensation to better capture the bright outdoor or dark indoor scene. Let's take an example:
// Create a variable to track the exposureIndex value
var exposureIndex = 0
// Use the cameraSelector to bind imageCapture and preview to the lifecycle
val camera = cameraProvider.bindToLifecycle(
    lifecycleOwner,
    getCameraSelector(),
    preview,
    imageCapture
)

// Add a click event for a button in the view
evButton.setOnclickListener {

    // Check the valid range to prevent possible exceptions
    val range = camera.cameraInfo.exposureState.exposureCompensationRange

    if (range.contains(exposureIndex + 1)) {
        // Call camera Use the setexposurecompensation() method of cameracontrol to set exposure compensation
        camera.cameraControl.setExposureCompenstation(++exposureIndex)
        // Use exposurecompensation step to realize the conversion from index to EV
        val ev = camera.cameraInfo.exposureState.exposureCompensationStep.toFloat() * exposureIndex
        Log.i("CameraXLog", "EV: $ev")
    }
}
△ adjust the exposure through the button
Among them, exposureIndex is a device independent number, which will increase or decrease the exposure value in the minimum step allowed by the hardware, so it can operate in a similar way on different devices. If you want to show the EV value to the user, you can get the exposurecompensation step to implement the transformation.
For the application background and calling methods of exposure compensation API in CameraX, please refer to our previous tweets< CameraX exposure compensation API Getting Started Guide>.
Smooth scaling
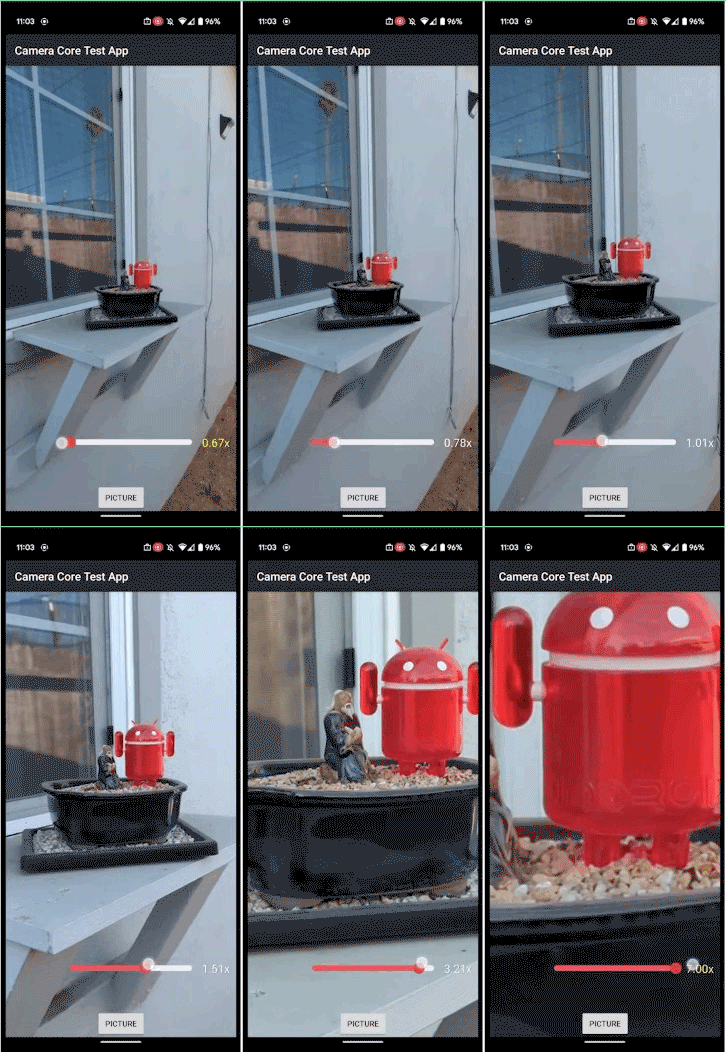
In CameraX 1.1, we also added smooth scaling. Some devices have multiple lenses including wide-angle and telephoto, and CameraX can detect whether these devices support SMOOTH_ZOOM framework, when using CameraX's zoom control on supported devices, it will automatically use all cameras to achieve a larger zoom range. If you are already using this zoom control, your application should be able to access all cameras on these devices when you compile with version 1.1.
More features of CameraX 1.1
Next, let's introduce more features we added in 1.1.
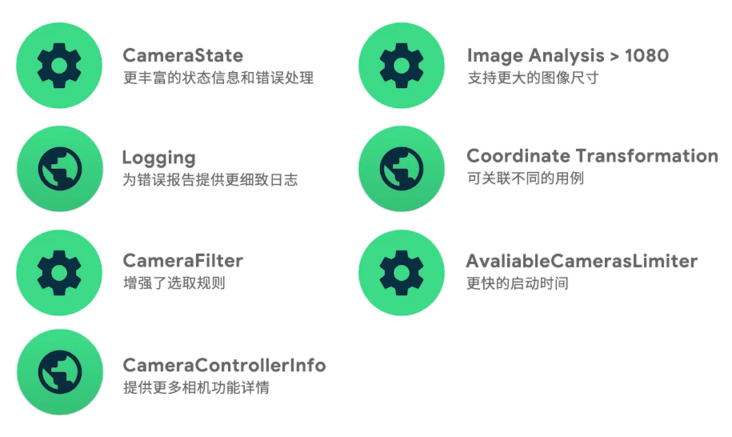
The CameraState API can now provide more information about the camera state, such as another application is using the camera or is in the do not disturb mode, so that the application can design a better interface and user experience process around different camera times. Image Analysis can now provide images of more than 1080p. The Logging API provides more detailed debugging logs and improves error reporting. The Coordinate Transformation API can associate the coordinates between different use cases. If you locate the point of interest in the imageAnalysis buffer, you can easily find it in the output or preview of image capture. You can use the CameraFilter API to specify detailed rules to select the appropriate camera. If the application only needs front or rear cameras, you can use AvailableCamerasLimiter to speed up the startup time. More details of camera functions are available in CameraControllerInfo.
Equipment compatibility
CameraX will continue to focus on device compatibility so that applications can work well on many devices. We fixed a lot of problems such as image stretching, incorrect scaling, image inversion and accidental output of green graphics when turning off the camera. This fix will be added to each release or patch of cameraX, and the latest stable version is 1.0.2.
You can Version record You can see the detailed changes in each version in Issue Tracker Look at the problems that have been fixed.
More information
- CameraX overview
- Getting started with CameraX Codelab
- CameraX Github sample code
- Android CameraX discussion group
I hope the brief introduction to CameraX version 1.1 will be helpful to you. I look forward to seeing the functions built by you using CameraX!
Welcome click here Submit feedback to us, or share your favorite content and found problems. Your feedback is very important to us. Thank you for your support!