1 ActiveMQ
ActiveMQ is a message middleware. There are many open source products of message middleware on the market, such as RocketMQ, RabbitMQ, Kafka and so on.
To take a simple analogy, message middleware is a transit station, adding a transit station in the program, with such a storage site similar to express delivery, can greatly reduce the pressure of logistics, and corresponding to the program, that is, to reduce the pressure of the program.
In addition, ActiveMQ is a message middleware that complies with the JMS specification, so what is the JMS specification?
JMS specification
JMS is a message service of java. JMS clients can transmit messages asynchronously through JMS services.
Message model
- Point-to-Point(P2P), point-to-point
- P2P schema diagram

As shown above, there are several concepts that need to be understood: sender, receiver, message queue.
In the point-to-point model, a message is sent by the sender to the message queue, and then the receiver consumes the message from the message queue. After the message is consumed by the consumer, the message does not exist.
- Publish/Subscribe(Pub/Sub), Publish and Subscribe Model
- Pub/Sub schema diagram
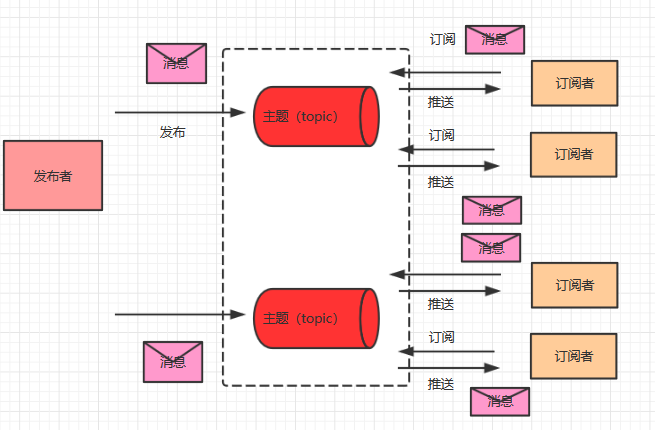
As shown above, there are the following concepts: theme, publisher, subscriber.
In the publish-subscribe model, the publisher usually publishes the message to the topic, and then the subscriber consumes the message by subscribing to the topic. Unlike the P2P model, the message of the publish-subscribe model can be consumed many times!
Differences between the two modes
1. P2P does not depend on time between sender and receiver. That is to say, after sender sends message, whether the receiver runs or not, it will not affect message sending to queue. Pub/Sub mode has time dependence. Consumers must subscribe to the topic before they can consume the message.
2. There can only be one consumer for each message in the P2P mode. When the message is consumed, it will not exist. Pub/Sub mode can have more than one consumer.
2 Why do you need to use message middleware
Now I have to tell a little story!
Xiao Ming, Xiao Li and Xiao Bai are all Java developers in a project group, but their team is relatively small, only a few developers, and they are developing a project, the project is relatively large, so the project manager considers the progress of the project, and divides each of them into a separate module. This will speed up the progress of the project.

Nevertheless, when the project develops to a certain stage, Xiao Ming, Xiao Li and Xiao Bai's respective modules need project invocation data. But now, the problem arises. Every time Xiao Bai needs data from Xiao Ming, Xiao Ming always needs to change the interface to meet Xiao Bai's needs, and he will also change the interface to meet Xiao Bai's needs. Worried about Xiaoming's system will not be a problem, if there is a problem can not be invoked how to do? This will always delay the progress of the project, Xiao Li there is also a problem of this kind!

So Xiao Ming thought of a way, if we add a module between each module to process data, such as a queue to store data, each time the data is thrown into that module, so that we don't have to worry about that problem. Is Xiao Ming very smart?
In fact, Xiao Ming did not do enough research, he said that this module is the role of ActiveMQ.
That is to say, to reduce the coupling degree between modules and achieve the goal of decoupling!

Then, they encounter another problem. When they develop a user registration module, they register first, then write to the database, and then send mail or text messages to inform users. However, they find that such a system is very slow.
Later, they discovered the message middleware and modified it into the following pattern.

They also found that this is the advantage of asynchronous execution brought about by message middleware!
System speed bar!
Later, Xiao Ming, Xiao Li and Xiao Bai developed the system on line, but the company's rapid development, when the traffic is large, the system's data calls are always not loaded, there are downtime problems, no way, can only change the code!
They have a brainpower, the previous use of message middleware, but did not find another function, we can join the message middleware, control the number of messages consumed each time, to ensure that the system will not go down, the rest of the message in the system when the flow is small can not be executed regularly. Not too good!
Xiao Ming, Xiao Li and Xiao Bai finally understand the advantages of message middleware through the development of this system.
3 Installation and use
3.1 Download
Download at the following official address, including different versions of linux and Windows.
3.2 decompression
How to Use windows
First, decompress to a directory of your own, the ActiveMQ directory is as follows.

Enter the corresponding bin directory;
There is an activemq executable file, open cmd, execute: activemq start

Successfully started!
Close;
activemq stop
linux usage method
Unzip to the specified directory;
sudo tar zxvf activemq-x.x.x-bin.tar.gz
Enter the bin directory and execute the following commands.
./activemq start
Close;
./activemq stop
Background management interface
After successful startup, you can output http://localhost:8161/admin/view the background management interface of ActiveMQ, both user name and password are admin.

ok, at this point, ActiveMQ installation and basic use should be no problem. Next, we use the Java API of ActiveMQ to start with an introductory example!
4 ActiveMQ Starter Program
4.1 Prerequisites
Before we start, let's state the configuration of the Java environment we need. The configuration can be solved by itself.
- Java JDK 1.7 or more
- Maven 3.0 or more
- Development tool IDEA
4.2 Get you started
Step 1: Import Maven-related dependencies;
<build>
        <plugins>
            <plugin>
                <groupId>org.apache.maven.plugins</groupId>
                <artifactId>maven-compiler-plugin</artifactId>
                <configuration>
                    <source>8</source>
                    <target>8</target>
                </configuration>
            </plugin>
        </plugins>
    </build>

    <properties>
        <project.build.sourceEncoding>UTF-8</project.build.sourceEncoding>
        <spring.version>4.3.10.RELEASE</spring.version>
    </properties>

    <dependencies>
        <dependency>
            <groupId>org.apache.activemq</groupId>
            <artifactId>activemq-all</artifactId>
            <version>5.15.0</version>
        </dependency>
        <dependency>
            <groupId>org.springframework</groupId>
            <artifactId>spring-jms</artifactId>
            <version>${spring.version}</version>
        </dependency>
        <dependency>
            <groupId>org.apache.commons</groupId>
            <artifactId>commons-pool2</artifactId>
            <version>2.6.2</version>
        </dependency>
        <dependency>
            <groupId>junit</groupId>
            <artifactId>junit</artifactId>
            <version>4.12</version>
        </dependency>
        <dependency>
            <groupId>org.springframework</groupId>
            <artifactId>spring-test</artifactId>
            <version>4.2.5.RELEASE</version>
        </dependency>
    </dependencies>
Step 2: Create the sender class;
/**
 * @ClassName JmsSender
 * @Description
 * @Author Ouyang Sihai
 * @Date 2019/8/13 16:39
 * @Version 1.0
 **/
public class JmsSender {
    public static void main(String[] args) {
        ConnectionFactory connectionFactory = new ActiveMQConnectionFactory("tcp://localhost:61616");
        Connection connection = null;
        try {
            connection = connectionFactory.createConnection();
            connection.start();

            Session session = connection.createSession(Boolean.FALSE, Session.CLIENT_ACKNOWLEDGE);
            Destination destination = session.createQueue("queue");
            MessageProducer producer = session.createProducer(destination);
            TextMessage textMessage = session.createTextMessage("hello activemq");
            producer.send(textMessage);

            //session.commit();
            session.close();
        } catch (JMSException e) {
            e.printStackTrace();
        } finally {
            if (connection != null) {
                try {
                    connection.close();
                } catch (JMSException e) {
                    e.printStackTrace();
                }
            }
        }
    }
}
The above code creates a message sender, as follows:
1. Create the JMS specification implementation class of ActiveMQ connectionFactory, and give the service address of the parameter ActiveMQ.
2. Create connection object by calling method createConnection of connectionFactory;
3. createSession method is called by connection object to create session session object.
4. With the session object, you can create a queue, session.createQueue("queue"), with the queue name given.
5. The session object creates the producer through the method createProducer, and creates the message session.createTextMessage("hello activemq").
6. The producer calls the send method to send the message, producer.send(textMessage);
Through the above steps, messages can be sent to the queue, and then just wait for consumer consumption messages. After message consumption, the message disappears.
Through the above explanation, the main interfaces of JMS are also summarized, including: Connection Factory (Connection Factory), Session (Session), Connection (Connection);
Step 3: Create consumer class;
/**
 * @ClassName JmsReceiver
 * @Description
 * @Author Ouyang Sihai
 * @Date 2019/8/13 16:47
 * @Version 1.0
 **/
public class JmsReceiver {
    public static void main(String[] args) {
        ConnectionFactory connectionFactory = new ActiveMQConnectionFactory("tcp://localhost:61616");
        Connection connection = null;
        try {
            //Create a connection
            connection = connectionFactory.createConnection();
            connection.start();

            Session session = connection.createSession(Boolean.TRUE, Session.AUTO_ACKNOWLEDGE);

            //Create a queue (queue is the name of the queue if it already exists)
            //Destination denotes destination
            Destination destination = session.createQueue("queue");
            //Create Message Receiver
            MessageConsumer consumer = session.createConsumer(destination);

            TextMessage textMessage = (TextMessage) consumer.receive();
            System.out.println(textMessage.getText());
            session.commit();
            session.close();
        } catch (JMSException e) {
            e.printStackTrace();
        } finally {
            if (connection != null) {
                try {
                    connection.close();
                } catch (JMSException e) {
                    e.printStackTrace();
                }
            }
        }
    }
}
The difference between consumers and producers is not big. The difference is that session.createConsumer(destination) creates consumers through sessions, and then calls the receive method to receive messages.
Running the sender, looking at the background management interface, clicking the Queues option, we found that there was a message entering the queue, and there was no queue.
Running the receiver;
Then look at the background management interface, the message is consumed;

5 ActiveMQ Integration Spring
This part took a lot of time to think about, first of all, in the actual development, we integrate Spring to develop the project is the most way. If we can learn this piece thoroughly, it is very good for project development. From this point of departure, we should explain the relevant knowledge as comprehensively as possible.
First of all, this part is divided into three parts to explain.
- Do not use Spring configuration file
- Using Spring Configuration File
- Annotation mode (0 configuration)
5.1 Prerequisites
- JDK 1.7 or more
- Maven 3.0 or more
- Spring 4.3.1, or above
- ActiveMQ 5.15.9 is the latest stable version
Project structure
This project is a sub-module aggregation project, the structure is as follows;
The aggregated project is divided into two sub-modules, Producer and Consumer.
Importing Maven dependencies
<properties>
        <project.build.sourceEncoding>UTF-8</project.build.sourceEncoding>
        <spring.version>4.3.10.RELEASE</spring.version>
    </properties>

    <dependencyManagement>
        <dependencies>
            <dependency>
                <groupId>org.apache.activemq</groupId>
                <artifactId>activemq-all</artifactId>
                <version>5.15.9</version>
            </dependency>
            <dependency>
                <groupId>org.springframework</groupId>
                <artifactId>spring-jms</artifactId>
                <version>${spring.version}</version>
            </dependency>
            <dependency>
                <groupId>org.apache.commons</groupId>
                <artifactId>commons-pool2</artifactId>
                <version>2.6.2</version>
            </dependency>
            <dependency>
                <groupId>junit</groupId>
                <artifactId>junit</artifactId>
                <version>4.12</version>
            </dependency>
            <dependency>
                <groupId>org.springframework</groupId>
                <artifactId>spring-test</artifactId>
                <version>4.2.5.RELEASE</version>
            </dependency>
        </dependencies>
    </dependencyManagement>
Reminder
Since I am using sub-module aggregation here, if you are not a project in this way, just give the dependent versions directly in your project!
5.2 Do not use Spring configuration file
In this section, we will use a configuration file that does not use Spring. Maven's dependencies are given above. Please refer to the previous section.
Producer
First, let's look at the producer side, which is responsible for sending messages to Broker. Destination can be divided into Queue and Topic. Next, let's see how to send messages without Spring configuration files.
public static void main(String[] args) {
        ConnectionFactory cf = new ActiveMQConnectionFactory("tcp://localhost:61616");
        Connection connection = null;
        try {
            connection = cf.createConnection();
            connection.start();

            Session session = connection.createSession(Boolean.TRUE, Session.AUTO_ACKNOWLEDGE);
            Queue destination = session.createQueue("queue2");

            JmsQueueSenderWithNotXml jmsQueueSender = new JmsQueueSenderWithNotXml();
            jmsQueueSender.setConnectionFactory(cf);
            jmsQueueSender.setQueue(destination);
            jmsQueueSender.simpleSend();
            jmsQueueSender.sendWithConversion();
        } catch (JMSException e) {
            e.printStackTrace();
        }
    }

    private JmsTemplate jmsTemplate;
    private Queue queue;

    public void setConnectionFactory(ConnectionFactory cf) {
        this.jmsTemplate = new JmsTemplate(cf);
    }

    public void setQueue(Queue queue) {
        this.queue = queue;
    }

    /*
     * @Author Ouyang Sihai
     * @Description  Send simple messages
     * @Date 15:45 2019/8/16
     * @Param []
     * @return void
     **/
    public void simpleSend() {
        this.jmsTemplate.send(this.queue, new MessageCreator() {
            public Message createMessage(Session session) throws JMSException {
                return session.createTextMessage("hello queue world");
            }
        });
        System.out.println("Send successfully!");
    }

    /*
     * @Author Ouyang Sihai
     * @Description  Send map-type messages
     * @Date 15:46 2019/8/16
     * @Param []
     * @return void
     **/
    public void sendWithConversion() {
        Map map = new HashMap();
        map.put("Name", "sihai");
        map.put("Age", new Integer(18));
        jmsTemplate.convertAndSend("Queue3", map, new MessagePostProcessor() {
            public Message postProcessMessage(Message message) throws JMSException {
                message.setIntProperty("num", 189);
                message.setJMSCorrelationID("00001");
                return message;
            }
        });
        System.out.println("Send successfully!");
    }
Step 1: All the code examples on the producer side are above. In this example, we first set up ConnectionFactory and Queue through the following code, and call the tool class provided by JmsTemplate Spring to provide two methods for sending messages.
    private JmsTemplate jmsTemplate;
    private Queue queue;

    public void setConnectionFactory(ConnectionFactory cf) {
        this.jmsTemplate = new JmsTemplate(cf);
    }

    public void setQueue(Queue queue) {
        this.queue = queue;
    }

    /*
     * @Author Ouyang Sihai
     * @Description  Send simple messages
     * @Date 15:45 2019/8/16
     * @Param []
     * @return void
     **/
    public void simpleSend() {
        this.jmsTemplate.send(this.queue, new MessageCreator() {
            public Message createMessage(Session session) throws JMSException {
                return session.createTextMessage("hello queue world");
            }
        });
        System.out.println("Send successfully!");
    }

    /*
     * @Author Ouyang Sihai
     * @Description  Send map-type messages
     * @Date 15:46 2019/8/16
     * @Param []
     * @return void
     **/
    public void sendWithConversion() {
        Map map = new HashMap();
        map.put("Name", "sihai");
        map.put("Age", new Integer(18));
        jmsTemplate.convertAndSend("Queue3", map, new MessagePostProcessor() {
            public Message postProcessMessage(Message message) throws JMSException {
                message.setIntProperty("num", 189);
                message.setJMSCorrelationID("00001");
                return message;
            }
        });
        System.out.println("Send successfully!");
    }
Step 2: Use the Main method to set the ConnectionFactory and Queue objects, and then call the sending method to send the message.
public static void main(String[] args) {
        ConnectionFactory cf = new ActiveMQConnectionFactory("tcp://localhost:61616");
        Connection connection = null;
        try {
            connection = cf.createConnection();
            connection.start();

            Session session = connection.createSession(Boolean.TRUE, Session.AUTO_ACKNOWLEDGE);
            Queue destination = session.createQueue("queue2");

            JmsQueueSenderWithNotXml jmsQueueSender = new JmsQueueSenderWithNotXml();
            jmsQueueSender.setConnectionFactory(cf);
            jmsQueueSender.setQueue(destination);
            jmsQueueSender.simpleSend();
            jmsQueueSender.sendWithConversion();
        } catch (JMSException e) {
            e.printStackTrace();
        }
    }
Step 2: Next, we run the above code, output the following results, and then look at the console of ActiveMQ to see if the message was sent successfully.

A pending message and a queued message were found, indicating that the message was sent successfully.
Consumer
For consumers, without explaining in this section, you can first refer to the code consumption information of the consumer side of the above entry program, and then explain the consumer side consumption information in the next way.
5.3 Using Spring Profile
In the previous section, I explained how to send messages without Spring configuration. I want you to understand the principle of Spring configuration. In this section, I will use Spring configuration to explain how to send messages. This method is still used more in actual development.
Producer
Since it's the way of configuration files, first of all, I have to talk about how to configure xml.
Step 1: xml configuration file
<?xml version="1.0" encoding="UTF-8"?>
<beans xmlns="http://www.springframework.org/schema/beans"
       xmlns:xsi="http://www.w3.org/2001/XMLSchema-instance"
       xmlns:jms="http://www.springframework.org/schema/jms"
       xsi:schemaLocation="
            http://www.springframework.org/schema/beans https://www.springframework.org/schema/beans/spring-beans.xsd
            http://www.springframework.org/schema/jms https://www.springframework.org/schema/jms/spring-jms.xsd">

    <bean id="connectionFactory" class="org.apache.activemq.pool.PooledConnectionFactory" destroy-method="stop">
        <property name="connectionFactory">
            <bean class="org.apache.activemq.ActiveMQConnectionFactory">
                <property name="brokerURL">
                    <value>tcp://localhost:61616</value>
                </property>
            </bean>
        </property>
        <property name="maxConnections" value="50"/>
    </bean>

    <bean id="destination" class="org.apache.activemq.command.ActiveMQQueue">
        <constructor-arg index="0" value="spring-queue"/>
    </bean>

    <!--<bean id="destinationTopic" class="org.apache.activemq.command.ActiveMQTopic">
        <constructor-arg index="0" value="spring-topic"/>
    </bean>-->

    <bean id="jmsTemplate" class="org.springframework.jms.core.JmsTemplate">
        <property name="connectionFactory" ref="connectionFactory"/>
        <property name="defaultDestination" ref="destination"/>
        <property name="messageConverter">
            <bean class="org.springframework.jms.support.converter.SimpleMessageConverter"/>
        </property>
    </bean>

</beans>
In the above configuration, first, you need to configure the connectionFactory (corresponding to the connectionFactory object that does not use configuration), then you need to configure destination (corresponding to destination that does not use configuration), where you can send messages to the queue, you can also use Topic, and finally, you need to configure Spring. Provided jmsTemplate template class.
Step 2: Run with the Main method
public static void main(String[] args) {
        ApplicationContext application = new FileSystemXmlApplicationContext("G:\\ideaproject\\activemq\\Producer\\src\\main\\resources\\service-jms.xml");
        JmsTemplate jmsTemplate = (JmsTemplate) application.getBean("jmsTemplate");
        for (int i = 0; i < 10; i++) {
            int finalI = i;
            jmsTemplate.send((session) -> {
                TextMessage textMessage = session.createTextMessage();
                textMessage.setText("first message" + finalI);
                return textMessage;
            });
        }
    }
In the code above, the send method of JmsTemplate is called to send the message. After running, the message is sent successfully, which is still quite succinct.
Reminder
I used FileSystem xml Application Context to get the xml configuration file above. In addition, you can use ClassPath xml Application Context to get it.
Consumer
In the previous section, there is no explanation for consumers. In this section, we will focus on the explanation.
Step 1: First, we need to configure the xml file
<?xml version="1.0" encoding="UTF-8"?> <beans xmlns="http://www.springframework.org/schema/beans" xmlns:context="http://www.springframework.org/schema/context" xmlns:xsi="http://www.w3.org/2001/XMLSchema-instance" xmlns:amq="http://activemq.apache.org/schema/core" xmlns:jms="http://www.springframework.org/schema/jms" xsi:schemaLocation="http://www.springframework.org/schema/beans http://www.springframework.org/schema/beans/spring-beans-4.1.xsd http://www.springframework.org/schema/context http://www.springframework.org/schema/context/spring-context-4.1.xsd http://www.springframework.org/schema/jms http://www.springframework.org/schema/jms/spring-jms-4.1.xsd http://activemq.apache.org/schema/core http://activemq.apache.org/schema/core/activemq-core-5.8.0.xsd"> <!--Connecting factories--> <bean id="connectionFactory" class="org.apache.activemq.pool.PooledConnectionFactory" destroy-method="stop"> <property name="connectionFactory"> <bean class="org.apache.activemq.ActiveMQConnectionFactory"> <property name="brokerURL"> <value>tcp://localhost:61616</value> </property> </bean> </property> <property name="maxConnections" value="50"/> </bean> <!--Configuration queue--> <bean id="destination" class="org.apache.activemq.command.ActiveMQQueue"> <constructor-arg index="0" value="queue2"/> </bean> <!-- Configuration theme( topic)--> <!-- <bean id="destinationTopic" class="org.apache.activemq.command.ActiveMQTopic"> <constructor-arg index="0" value="spring-topic"/> </bean>--> <!--To configure spring Of jms Template--> <bean id="jmsTemplate" class="org.springframework.jms.core.JmsTemplate"> <property name="connectionFactory" ref="connectionFactory"/> <property name="defaultDestination" ref="destination"/> <property name="messageConverter"> <bean class="org.springframework.jms.support.converter.SimpleMessageConverter"/> </property> </bean> <!-- MessageListener --> <!--<bean id="messageListener" class="com.sihai.activemq.listener.MyMessageListener"/>--> <bean id="messageListener" class="com.sihai.activemq.listener.MySessionAwareMessageListener"></bean> <!--jta affair--> <!--<bean id="transactionManager" class="org.springframework.transaction.jta.JtaTransactionManager"/>--> <!-- Message listener container --> <bean id="jmsContainer" class="org.springframework.jms.listener.DefaultMessageListenerContainer"> <property name="connectionFactory" ref="connectionFactory"/> <property name="destination" ref="destination"/> <property name="messageListener" ref="messageListener"/> <!--Configuring Local Resource Transactions--> <!--<property name="sessionTransacted" value="true"/>--> <!--To configure jta affair--> <!--<property name="transactionManager" ref="transactionManager"/>--> </bean> <!--<!– Monitoring Annotation Support –> <jms:annotation-driven />--> </beans>
The first configuration is the same as the producer. You need to configure the connectionFactory (for connectionFactory objects that do not use configuration), and then you need to configure destination (for destinations that do not use configuration).
The difference is that the consumer needs to configure a message listener container, as follows.
<!-- MessageListener -->
    <!--<bean id="messageListener" class="com.sihai.activemq.listener.MyMessageListener"/>-->
    <bean id="messageListener" class="com.sihai.activemq.listener.MySessionAwareMessageListener"></bean>

    <!--jta affair-->
    <!--<bean id="transactionManager" class="org.springframework.transaction.jta.JtaTransactionManager"/>-->

    <!-- Message listener container -->
    <bean id="jmsContainer" class="org.springframework.jms.listener.DefaultMessageListenerContainer">
        <property name="connectionFactory" ref="connectionFactory"/>
        <property name="destination" ref="destination"/>
        <property name="messageListener" ref="messageListener"/>
        <!--Configuring Local Resource Transactions-->
        <!--<property name="sessionTransacted" value="true"/>-->
        <!--To configure jta affair-->
        <!--<property name="transactionManager" ref="transactionManager"/>-->
    </bean>
So how to configure this? Look on, please.
Step 2: Message listener container configuration
First, we need to write a class that implements the MessageListener interface, and then implement a method called onMessage, through which we can listen for messages and consume them.
/**
 * @ClassName MyMessageListener
 * @Description Implementation of Message Consumption Monitor
 * @Author Ouyang Sihai
 * @Date 2019/8/13 20:39
 * @Version 1.0
 **/
@Component
public class MyMessageListener implements MessageListener {

    @Override
    public void onMessage(Message message) {
        if (message instanceof TextMessage) {
            try {
                System.out.println(((TextMessage) message).getText());
            }
            catch (JMSException ex) {
                throw new RuntimeException(ex);
            }
        }
        else {
            throw new IllegalArgumentException("Message must be of type TextMessage");
        }
    }
}
In this way, the configuration is complete.
Step 3: Start the spring container and run.
/*
     * @Author Ouyang Sihai
     * @Description  xml Configuration way to get messages
     * @Date 18:09 2019/8/16
     * @Param []
     * @return void
     **/
    @Test
    public void test_01() throws IOException {
        ClassPathXmlApplicationContext application = new ClassPathXmlApplicationContext("G:\\ideaproject\\activemq\\Consumer\\src\\main\\resources\\service-jms.xml");
        /*JmsTemplate jmsTemplate = (JmsTemplate) application.getBean("jmsTemplate");
        String msg = (String) jmsTemplate.receiveAndConvert();
        System.out.println(msg);*/
        System.in.read();
    }
In the above code, System.in.read(), this function is to wait all the time and consume the information.
Step 4: Open message listener transactions
Transactions can be opened during message processing, and rollbacks occur if processing fails. In a message listener container, you can configure a local transaction whose attribute is session Transacted, and if value is true, it represents the opening of a local transaction. The specific configuration is as follows:
<!-- Message listener container -->
    <bean id="jmsContainer" class="org.springframework.jms.listener.DefaultMessageListenerContainer">
        <property name="connectionFactory" ref="connectionFactory"/>
        <property name="destination" ref="destination"/>
        <property name="messageListener" ref="messageListener"/>
        <!--Configuring Local Resource Transactions-->
        <property name="sessionTransacted" value="true"/>
    </bean>
Message listener container
In the above consumer's explanation, in fact, the most important thing is the configuration of the message listener container. In this part, we will explain the configuration method of the message listener container in detail.
1 Implementing MessageListener Interface
This is the way the example above uses it. Let's look at the interface first.
public interface MessageListener {
    void onMessage(Message var1);
}
This interface is very simple. There is only one method, onMessage, to read the message by getting the Message parameter, so I won't say much more here.
2 Implementing Session Aware MessageListener Interface
This interface is seldom used, but in fact, it can be implemented. This interface is somewhat different from the MessageListener interface above. This interface is provided by Spring.
public interface SessionAwareMessageListener<M extends Message> {
    void onMessage(M var1, Session var2) throws JMSException;
}
In addition, you can see that this interface provides a generic interface, which can be of the type of M extends Message. At the same time, the way to implement onMessage, there is an additional Session parameter, which can process Session while getting the message.
Use examples
/**
 * @ClassName MySessionAwareMessageListener
 * @Description Implementation of Message Listener for Session Aware Message Listener
 * @Author Ouyang Sihai
 * @Date 2019/8/16 16:02
 * @Version 1.0
 **/
public class MySessionAwareMessageListener implements SessionAwareMessageListener {
    @Override
    public void onMessage(Message message, Session session) throws JMSException {
        if (message instanceof TextMessage) {
            try {
                System.out.println(((TextMessage) message).getText());
            }
            catch (JMSException ex) {
                throw new RuntimeException(ex);
            }
        }
        else {
            throw new IllegalArgumentException("Message must be of type TextMessage");
        }
    }
}
5.4 Annotation Mode (0 Configuration)
We have already introduced two ways, one is not to use xml configuration and the other is to use xml configuration. However, due to the rise of microservices, convention is better than configuration, so in this section, we use annotations to deal with it.
Producer
Because of the way annotations are used, we no longer need XML configuration files, but we can configure annotations by referring to the above configuration of xml.
Step 1: First, we need a Java configuration class, as follows.
/**
 * @ClassName ProducerConfig
 * @Description Configuration classes without xml
 * @Author Ouyang Sihai
 * @Date 2019/8/16 17:41
 * @Version 1.0
 **/
@Configuration
public class ProducerConfig {

    @Bean
    //Configure ConnectionFactory to generate connection s
    public ActiveMQConnectionFactory connectionFactory() {
        ActiveMQConnectionFactory activeMQConnectionFactory
                = new ActiveMQConnectionFactory("tcp://localhost:61616");
        return activeMQConnectionFactory;
    }

    @Bean
    //Register Single Connection Factory, a packaging factory in spring for managing real Connection Factory
    public SingleConnectionFactory singleConnectionFactory(ActiveMQConnectionFactory activeMQconnectionFactory) {
        SingleConnectionFactory connectionFactory = new SingleConnectionFactory();
        //Setting up target factories
        connectionFactory.setTargetConnectionFactory(activeMQconnectionFactory);
        return connectionFactory;
    }

    @Bean
    //Configure the producer, jmsTemplate
    public JmsTemplate jmsTemplate(SingleConnectionFactory connectionFactory) {
        JmsTemplate jmsTemplate = new JmsTemplate();
        jmsTemplate.setConnectionFactory(connectionFactory);
        return jmsTemplate;
    }

    /**
     * Configuration Queue Purpose: Configure one of the queues according to test requirements
     * 1.queue Point-to-Point queue
     * 2.One-to-many topic s
     */
    @Bean //
    public ActiveMQQueue queueDestination() {
        ActiveMQQueue activeMQQueue = new ActiveMQQueue("queue-anno");
        return activeMQQueue;
    }

    @Bean
    public ActiveMQTopic topicDestination() {
        ActiveMQTopic activeMQTopic = new ActiveMQTopic("topic-anno");
        return activeMQTopic;
    }
}
Each method of the above configuration corresponds to each node of the xml configuration, which is relatively simple. Each method uses the @Bean annotation, and the class uses Configuration to add these configurations to the spring container.
Step 2: Start the spring container and send the message.
/**
 * @ClassName JmsSenderWithAnnotation
 * @Description Annotation sending mode
 * @Author Ouyang Sihai
 * @Date 2019/8/16 18:04
 * @Version 1.0
 **/
public class JmsSenderWithAnnotation {

    /*
     * @Author Ouyang Sihai
     * @Description  Test point-to-point
     * @Date 18:05 2019/8/16
     * @Param []
     * @return void
     **/
    @Test
    public void testActiveMqAnnotation() {
        AnnotationConfigApplicationContext aContext =
                new AnnotationConfigApplicationContext(ProducerConfig.class);

        //Get the sender's template object
        JmsTemplate jmsTemplate = aContext.getBean(JmsTemplate.class);
        Destination bean = (Destination) aContext.getBean("queueDestination");

        //send message
        jmsTemplate.send(bean, new MessageCreator() {
            @Override
            public Message createMessage(Session session) throws JMSException {
                TextMessage message = session.createTextMessage();
                message.setText("activemq message for queue");
                return message;
            }
        });
    }

    /*
     * @Author Ouyang Sihai
     * @Description  Test topic Sending
     * @Date 18:06 2019/8/16
     * @Param []
     * @return void
     **/
    @Test
    public void testActiveMqAnnotation2() {
        AnnotationConfigApplicationContext aContext =
                new AnnotationConfigApplicationContext(ProducerConfig.class);
        //Get the sender's template object
        JmsTemplate jmsTemplate = aContext.getBean(JmsTemplate.class);

        Destination bean = (Destination) aContext.getBean("topicDestination");

        //send message
        jmsTemplate.send(bean, new MessageCreator() {
            @Override
            public Message createMessage(Session session) throws JMSException {
                TextMessage message = session.createTextMessage();
                message.setText("activemq message for topic");
                return message;
            }
        });
    }
}
Running these two tests separately, looking at the ActiveMQ console, we found that both Queue and Topic had a message sent successfully.

Consumer
Consumers are about the same. Like xml configuration, there are many configuration of message listener container. Let's see.
Step 1: First, Java configuration classes
**
 * @ClassName ConsumerConfig
 * @Description No need xml Configuration class
 * @Author Ouyang Sihai
 * @Date 2019/8/16 17:44
 * @Version 1.0
 **/
@ComponentScan(basePackages = {"com.sihai"})
@EnableJms
@Configuration
public class ConsumerConfig {

    @Bean
    //Configure ConnectionFactory to generate connection s
    public ActiveMQConnectionFactory connectionFactory() {
        ActiveMQConnectionFactory activeMQConnectionFactory
                = new ActiveMQConnectionFactory("tcp://localhost:61616");
        return activeMQConnectionFactory;
    }

    @Bean
    //Register Single Connection Factory, a packaging factory in spring for managing real Connection Factory
    public SingleConnectionFactory singleConnectionFactory(ActiveMQConnectionFactory activeMQconnectionFactory) {
        SingleConnectionFactory connectionFactory = new SingleConnectionFactory();
        //Setting up target factories
        connectionFactory.setTargetConnectionFactory(activeMQconnectionFactory);
        return connectionFactory;
    }


    /*The following configurations in xml work the same way
     * <bean class="org.springframework.jms.listener.DefaultMessageListenerContainer">
     *        <property name="connectionFactory" ref="connectionFactory" />
     *        <property name="destination" ref="topicDestination" />
     *        <property name="messageListener" ref="itemListenerMessage" />
     *    </bean>
     **/
    @Bean
    public DefaultMessageListenerContainer jmsListenerContainerFactory(SingleConnectionFactory singleConnectionFactory, MyMessageListener myMessageListener, Destination destination) {
        //Create containers
        DefaultMessageListenerContainer jmsContainer = new DefaultMessageListenerContainer();
        //Setting up listeners
        jmsContainer.setMessageListener(myMessageListener);
        //Setting up Connection Factory
        jmsContainer.setConnectionFactory(singleConnectionFactory);
        //Set the name of the listener destination / You can also set the object destination directly
        jmsContainer.setDestination(destination);
        return jmsContainer;
    }

    /**
     * 1.queue Point-to-Point queue
     * 2.One-to-many topic s
     */
    @Bean
    public ActiveMQQueue queueDestination() {
        ActiveMQQueue activeMQQueue = new ActiveMQQueue("queue-anno");
        return activeMQQueue;
    }

    /*@Bean
    public ActiveMQTopic topicDestination() {
        ActiveMQTopic activeMQTopic = new ActiveMQTopic("topic-anno");
        return activeMQTopic;
    }*/
}
Only one message listener container is configured differently from the producer's. The configuration of the message listener container requires the configuration of the message listener, the connection factory and the destination (Destination).
 /*The following configurations in xml work the same way
     * <bean class="org.springframework.jms.listener.DefaultMessageListenerContainer">
     *        <property name="connectionFactory" ref="connectionFactory" />
     *        <property name="destination" ref="topicDestination" />
     *        <property name="messageListener" ref="itemListenerMessage" />
     *    </bean>
     **/
    @Bean
    public DefaultMessageListenerContainer jmsListenerContainerFactory(SingleConnectionFactory singleConnectionFactory, MyMessageListener myMessageListener, Destination destination) {
        //Create containers
        DefaultMessageListenerContainer jmsContainer = new DefaultMessageListenerContainer();
        //Setting up listeners
        jmsContainer.setMessageListener(myMessageListener);
        //Setting up Connection Factory
        jmsContainer.setConnectionFactory(singleConnectionFactory);
        //Set the name of the listener destination / You can also set the object destination directly
        jmsContainer.setDestination(destination);
        return jmsContainer;
    }
Step 2: Message listener
/**
 * @ClassName MyMessageListener
 * @Description Implementation of Message Consumption Monitor
 * @Author Ouyang Sihai
 * @Date 2019/8/13 20:39
 * @Version 1.0
 **/
@Component
public class MyMessageListener implements MessageListener {

    @Override
    public void onMessage(Message message) {
        if (message instanceof TextMessage) {
            try {
                System.out.println(((TextMessage) message).getText());
            }
            catch (JMSException ex) {
                throw new RuntimeException(ex);
            }
        }
        else {
            throw new IllegalArgumentException("Message must be of type TextMessage");
        }
    }
}
As I've already mentioned before, I won't be burdensome here, but what I need to talk about here is the configuration of the annotation mode of the message listener, as follows.
Step 3: Configuration Method of Message Listener Annotation
/**
 * @ClassName JmsAnnotation
 * @Description Annotation mode monitoring
 * @Author Ouyang Sihai
 * @Date 2019/8/16 17:01
 * @Version 1.0
 **/
@Component
@EnableJms
public class JmsAnnotation {

    @JmsListener(destination = "queue-anno")
    public void onMessage(Message message) {
        if (message instanceof TextMessage) {
            try {
                System.out.println(((TextMessage) message).getText());
            }
            catch (JMSException ex) {
                throw new RuntimeException(ex);
            }
        }
        else {
            throw new IllegalArgumentException("Message must be of type TextMessage");
        }
    }
}
You will find that two configurations @Component and @EnableJms are required on the class of message listener to mark this as a message listener. In addition, on the onMessage method, a @JmsListener (destination = queue-anno) annotation is needed to mark which destination is required.
Note: If annotated message listening is used, you need to modify the configuration of the message listening container of the Java class, otherwise there will be problems.
Step 4: Message listener container configuration changes
take
 /*The following configurations in xml work the same way
     * <bean class="org.springframework.jms.listener.DefaultMessageListenerContainer">
     *        <property name="connectionFactory" ref="connectionFactory" />
     *        <property name="destination" ref="topicDestination" />
     *        <property name="messageListener" ref="itemListenerMessage" />
     *    </bean>
     **/
    @Bean
    public DefaultMessageListenerContainer jmsListenerContainerFactory(SingleConnectionFactory singleConnectionFactory, MyMessageListener myMessageListener, Destination destination) {
        //Create containers
        DefaultMessageListenerContainer jmsContainer = new DefaultMessageListenerContainer();
        //Setting up listeners
        jmsContainer.setMessageListener(myMessageListener);
        //Setting up Connection Factory
        jmsContainer.setConnectionFactory(singleConnectionFactory);
        //Set the name of the listener destination / You can also set the object destination directly
        jmsContainer.setDestination(destination);
        return jmsContainer;
    }
Change to
 @Bean
    public DefaultJmsListenerContainerFactory jmsListenerContainerFactory() {
        DefaultJmsListenerContainerFactory factory = new DefaultJmsListenerContainerFactory();
        factory.setConnectionFactory(connectionFactory());
//        factory.setDestinationResolver(destinationResolver());
        factory.setSessionTransacted(true);
        factory.setConcurrency("3-10");
        return factory;
    }
The above modification will find that the listener implementing the interface uses DefaultMessageListener Container, while the annotation uses DefaultJmsListener Container Factory, so special attention should be paid here.
At this point, the Java configuration class in which message listeners are annotated is the following.
/**
 * @ClassName ConsumerConfig
 * @Description Configuration classes without xml
 * @Author Ouyang Sihai
 * @Date 2019/8/16 17:44
 * @Version 1.0
 **/
@ComponentScan(basePackages = {"com.sihai"})
@EnableJms
@Configuration
public class ConsumerConfig {

    @Bean
    //Configure ConnectionFactory to generate connection s
    public ActiveMQConnectionFactory connectionFactory() {
        ActiveMQConnectionFactory activeMQConnectionFactory
                = new ActiveMQConnectionFactory("tcp://localhost:61616");
        return activeMQConnectionFactory;
    }

    @Bean
    //Register Single Connection Factory, a packaging factory in spring for managing real Connection Factory
    public SingleConnectionFactory singleConnectionFactory(ActiveMQConnectionFactory activeMQconnectionFactory) {
        SingleConnectionFactory connectionFactory = new SingleConnectionFactory();
        //Setting up target factories
        connectionFactory.setTargetConnectionFactory(activeMQconnectionFactory);
        return connectionFactory;
    }

    @Bean
    public DefaultJmsListenerContainerFactory jmsListenerContainerFactory() {
        DefaultJmsListenerContainerFactory factory = new DefaultJmsListenerContainerFactory();
        factory.setConnectionFactory(connectionFactory());
//        factory.setDestinationResolver(destinationResolver());
        factory.setSessionTransacted(true);
        factory.setConcurrency("3-10");
        return factory;
    }

    /**
     * 1.queue Point-to-Point queue
     * 2.One-to-many topic s
     */
    @Bean
    public ActiveMQQueue queueDestination() {
        ActiveMQQueue activeMQQueue = new ActiveMQQueue("queue-anno");
        return activeMQQueue;
    }

    /*@Bean
    public ActiveMQTopic topicDestination() {
        ActiveMQTopic activeMQTopic = new ActiveMQTopic("topic-anno");
        return activeMQTopic;
    }*/
}
Step 5: Start the container, consume the message
/**
 * @ClassName SpringSender
 * @Description
 * @Author Ouyang Sihai
 * @Date 2019/8/13 17:22
 * @Version 1.0
 **/
public class SpringReceiver {
    /*
     * @Author Ouyang Sihai
     * @Description  xml Configuration way to get messages
     * @Date 18:09 2019/8/16
     * @Param []
     * @return void
     **/
    @Test
    public void test_01() throws IOException {
        ApplicationContext application = new FileSystemXmlApplicationContext("G:\\ideaproject\\activemq\\Consumer\\src\\main\\resources\\service-jms.xml");
        /*JmsTemplate jmsTemplate = (JmsTemplate) application.getBean("jmsTemplate");
        String msg = (String) jmsTemplate.receiveAndConvert();
        System.out.println(msg);*/
        System.in.read();
    }

    /*
     * @Author Ouyang Sihai
     * @Description  Annotation way to get messages
     * @Date 18:10 2019/8/16
     * @Param []
     * @return void
     **/
    @Test
    public void test_02() throws IOException {
        AnnotationConfigApplicationContext aContext =
                new AnnotationConfigApplicationContext(ConsumerConfig.class);
        /*JmsTemplate jmsTemplate = (JmsTemplate) application.getBean("jmsTemplate");
        String msg = (String) jmsTemplate.receiveAndConvert();
        System.out.println(msg);*/
        System.in.read();
    }
}


Finally, I've come to the end of the whole story of integrating ActiveMQ into Spring. This part covers three parts, namely:
- Do not use Spring configuration file
- Using Spring Configuration File
- Annotation mode (0 configuration)
6 ActiveMQ Supported Transport Protocol
6.1 Introduction to Default Protocol
There are still many protocols supported in ActiveMQ, which is one of the characteristics of ActiveMQ. For example, AMQP, MQTT, OpenWire, STOMP, WebSocket are supported by default. These default protocols are configured in the activemq.xml configuration file.
<transportConnectors> <!-- DOS protection, limit concurrent connections to 1000 and frame size to 100MB --> <transportConnector name="openwire" uri="tcp://0.0.0.0:61616?maximumConnections=1000&wireFormat.maxFrameSize=104857600"/> <transportConnector name="amqp" uri="amqp://0.0.0.0:5672?maximumConnections=1000&wireFormat.maxFrameSize=104857600"/> <transportConnector name="stomp" uri="stomp://0.0.0.0:61613?maximumConnections=1000&wireFormat.maxFrameSize=104857600"/> <transportConnector name="mqtt" uri="mqtt://0.0.0.0:1883?maximumConnections=1000&wireFormat.maxFrameSize=104857600"/> <transportConnector name="ws" uri="ws://0.0.0.0:61614?maximumConnections=1000&wireFormat.maxFrameSize=104857600"/> </transportConnectors>
Note: The ports of each protocol above must be different.
6.2 Other agreements
In addition to the above protocols, these protocols are supported: TCP, UDP, NIO, SSL, Http (s), vm.
So how do you use these protocols?
Simply add the transportConnectors node in the activemq.xml configuration file above, for example, add the nio protocol.
<transportConnectors> <!-- Additional agreements --> <transportConnector name="nio" uri="nio://0.0.0.0:61619"/> <!-- DOS protection, limit concurrent connections to 1000 and frame size to 100MB --> <transportConnector name="openwire" uri="tcp://0.0.0.0:61616?maximumConnections=1000&wireFormat.maxFrameSize=104857600"/> <transportConnector name="amqp" uri="amqp://0.0.0.0:5672?maximumConnections=1000&wireFormat.maxFrameSize=104857600"/> <transportConnector name="stomp" uri="stomp://0.0.0.0:61613?maximumConnections=1000&wireFormat.maxFrameSize=104857600"/> <transportConnector name="mqtt" uri="mqtt://0.0.0.0:1883?maximumConnections=1000&wireFormat.maxFrameSize=104857600"/> <transportConnector name="ws" uri="ws://0.0.0.0:61614?maximumConnections=1000&wireFormat.maxFrameSize=104857600"/> </transportConnectors>
Adding other protocols is similar!
6.3 Simplified configuration
There is also a simpler configuration method in ActiveMQ. In uri, auto can be used to simplify the configuration. ActiveMQ adapts the message of the listener port to the corresponding protocol automatically.
<transportConnector name="auto" uri="auto://0.0.0.0:61619"/>
If you need more security, you can add ssl Protocol on this basis.
<transportConnector name="auto+ssl" uri="auto+ssl://0.0.0.0:61619"/>
If you want to improve the transmission performance, you can cooperate with the above nio protocol to improve network performance.
<transportConnector name="auto+nio" uri="auto+nio://0.0.0.0:61619"/>
7 ActiveMQ persistent storage mechanism
What is the role of persistence?
The main purpose is to avoid message loss caused by outage outside the system. ActiveMQ supports a variety of persistence mechanisms, such as JDBC, AMQ, KahaDB, LevelDB. Here are a brief description of these mechanisms.
- JDBC: Based on the way of database storage, it can be stored in Mysql and other databases. The performance bottleneck of this mechanism is in Mysql and other databases, so its performance is not very good.
Configuration method
Configure it in the activemq.xml configuration file. Here we use Mysql to configure it.
Step 1: Modify the persistence adapter node
<persistenceAdapter>
            <jdbcPersistenceAdapter dataSource="#mysqlDataSource" createTablesOnStartup="true"/>
            <!--<kahaDB directory="${activemq.data}/kahadb"/>-->
        </persistenceAdapter>
Where dataSource=" mysqlDataSource" is the data source reference.
Step 2: Configure Mysql data source
<bean id="mysqlDataSource" class="org.apache.commons.dbcp.BasicDataSource" destroy-method="close">
        <property name="driverClassName" value="com.mysql.jdbc.Driver"/>
        <property name="url" value="jdbc:mysql://localhost:3306/test"/>
        <property name="username" value="root"/>
        <property name="password" value="123456"/>
    </bean>
This is how spring is configured.
Step 3: Import Jar packages such as database connection pool, driver, etc.
There is a lib directory in ActiveMQ's directory, which is the directory where jar packages are stored.
Put the following Jar s in.
Step 4: Start ActiveMQ and view the results
After startup, the mysql database was opened and three tables were generated.
This is a success. Every time a message is generated, the information of the message is stored in the three tables. After consumption, the information is deleted.
- AMQ: Based on file storage, this method writes messages to log files and is a sequential storage method, which is better than JDBC. The disadvantage is that it creates an index for each Destination and takes up a lot of disk space.
Configuration method
Configuration in the activemq.xml configuration file. For more details, please refer to: https://activemq.apache.org/a....
<broker brokerName="broker" persistent="true" useShutdownHook="false">
    <persistenceAdapter>
      <amqPersistenceAdapter directory="Data Storage Directory" maxFileLength="32mb"/>
    </persistenceAdapter>
  </broker>
- KahaDB: The default persistence approach that emerged after version 5.4 is very similar to AMQ, except that only an index is created for Destination.
Configuration method
Configuration in the activemq.xml configuration file. For more details, please refer to: https://activemq.apache.org/k....
<broker brokerName="broker">
    <persistenceAdapter>
      <kahaDB directory="Data Storage Directory" journalMaxFileLength="32mb"/>
    </persistenceAdapter>
 </broker>
- LevelDB: A new persistence approach introduced after version 5.6. This is faster than KahaDB, similar to KahaDB, but not implemented with custom B numbers. However, it should be noted that KahaDB is no longer recommended on the official website at present.
Configuration method
For more detailed parameters, please refer to the Actemq.xml configuration file: https://activemq.apache.org/l....
<broker brokerName="broker" ... >
    ...
    <persistenceAdapter>
      <levelDB directory="Data Storage Directory"/>
    </persistenceAdapter>
    ...
  </broker>
8 ActiveMQ Network Connection Support
There are three main configurations for Broker's network configuration: static configuration, dynamic configuration and master-slave configuration.
8.1 Static Configuration
Static transport provides a hard-coding mechanism for discovering other connections using URI lists. Connections using this discovery mechanism will attempt to connect to all URIs in the list until they succeed.
Configure in the activemq.xml configuration file.
<networkConnectors>
            <networkConnector uri="static:(tcp://localhoat:61616)"/>
        </networkConnectors>
Configuration grammar
static:(uri1,uri2,uri3,...)?options
Give an example
static:(tcp://localhost:61616,tcp://remotehost:61617?trace=false,vm://localbroker)?initialReconnectDelay=100
Attribute description of uri
8.2 Dynamic Configuration
Configure in the activemq.xml configuration file.
<networkConnectors>
      <networkConnector uri="multicast://default"/>
    </networkConnectors>
8.3 Master-slave configuration
Master-Slave model is very common. Master-slave model is mainly proposed to prevent a network node from having problems, which improves the stability.
It is also configurable in ActiveMQ, and we can configure it in the activemq.xml configuration file.
<networkConnectors>
  <networkConnector uri="masterslave:(tcp://host1:61616,tcp://host2:61616,tcp://..)"/>
</networkConnectors>
Note: The first url for Master-Slave mode needs to be master, and the other is slave.
In addition, the Network Connector node has other attributes to configure. Details can be found on the official website: https://activemq.apache.org/n....
8.4 Fault-tolerant Client Connection Method
In the previous client connection to ActiveMQ, only a simple url was used to connect.
ActiveMQConnectionFactory activeMQConnectionFactory
                = new ActiveMQConnectionFactory("tcp://localhost:61616");
However, there is a problem in this way. Once the ActiveMQ is down, it will not be able to connect. So, there is another fault-tolerant way, when one is down, it can connect to other machines, so there will be no problem.
ActiveMQConnectionFactory activeMQConnectionFactory
                = new ActiveMQConnectionFactory("failover:(tcp://localhost:61616,tcp://remotehost:61616)");
For other attribute parameters, please refer to: https://activemq.apache.org/f....