Do the partners remember the fear once dominated by SSM integration? I believe many small partners have experienced this experience. A lot of configuration problems, various troubleshooting scans, importing a new dependency and adding a new configuration. Since spring boot, we have taken off! Various zero configurations are available out of the box, and the reason why we can develop so cool is due to automatic configuration. Today, let's discuss the principle of SpringBoot automatic configuration.
This paper is mainly divided into three parts:
- Spring boot source code common annotations
- SpringBoot startup process
- SpringBoot auto configuration principle
1. Excerpt of common annotations of springboot source code
This part mainly talks about the annotations often used in the SpringBoot source code to remove the obstacles when reading the source code later.
Combined annotation
When it is possible to use a large number of annotations to the same class at the same time, you can consider applying these annotations to other annotations. The annotated annotation is called composite annotation.
- Meta annotation: annotation that can be annotated on other annotations.
- Combined annotation: the annotated annotation is called combined annotation.
@Value [provided by Spring]
@Value is equivalent to the value field in a traditional xml configuration file.
Assuming a code exists:
@Component
public class Person {

@Value("i am name")
private String name;

}
The above code is equivalent to the configuration file:
<bean class="Person">
<property name ="name" value="i am name"></property>
</bean>
We know that the value in the configuration file can be:
- Literal
- Get values from environment variables through ${key}
- Get the value from the global configuration file through ${key}
- #{SpEL}
Therefore, we can obtain the specified configuration items in the global configuration file through @ Value(${key}).
@ConfigurationProperties [provided by SpringBoot]
If we need to get N configuration items, we need to get them one by one through @ Value, which is a little low. We can use @ ConfigurationProperties.
All properties of the class marked @ ConfigurationProperties are bound to the relevant configuration items in the configuration file. (get the configuration value from the global configuration file by default). After binding, we can access the attribute value in the global configuration file through this class.
Here is an example:
1. Add the following configuration in the main configuration file
person.name=kundy
person.age=13
person.sex=male
2. To create a configuration class, setter and getter methods are omitted due to space problems, but they are necessary in actual development, otherwise they cannot be successfully injected. In addition, @ Component annotation also needs to be added.
@Component
@ConfigurationProperties(prefix = "person")
public class Person {

private String name;
private Integer age;
private String sex;

}
Here @ ConfigurationProperties has a prefix parameter, which is mainly used to specify the prefix of the configuration item in the configuration file.
3. Test. In the SpringBoot environment, write a test method and inject the Person class to get the value of the configuration file through the Person object.
@Import [provided by Spring]
@The Import annotation supports importing ordinary java classes and declaring them as a bean. It is mainly used to merge multiple distributed java config configuration classes into a larger Config class.
- @Before 4.2, the Import annotation only supported importing configuration classes.
- After 4.2, the @ Import annotation supports importing ordinary java classes and declaring them as a bean.
@There are three ways to use Import
- Import ordinary Java classes directly.
- Use with custom ImportSelector.
- Used with ImportBeanDefinitionRegistrar.
1. Import ordinary Java classes directly
1. Create a normal Java class.
public class Circle {

public void sayHi() {
System.out.println("Circle sayHi()");
}

}
2. Create a configuration class without explicitly declaring any beans, and then import the Circle just created.
@Import({Circle.class})
@Configuration
public class MainConfig {

}
3. Create a test class.
public static void main(String[] args) {

ApplicationContext context = new AnnotationConfigApplicationContext(MainConfig.class);
Circle circle = context.getBean(Circle.class);
circle.sayHi();

}
4. Operation results:
Circle sayHi()
We can see that we successfully obtained the Circle object from the IOC container, which proves that the Circle class we imported in the configuration class is indeed declared as a Bean.
2. Use with custom ImportSelector
ImportSelector is an interface in which there is only one selectImports method to return an array of full class names. Therefore, using this feature, we can dynamically import N beans into the container.
1. Create a normal Java class Triangle.
public class Triangle {

public void sayHi(){
System.out.println("Triangle sayHi()");
}

}
2. Create an ImportSelector implementation class, and selectImports returns the full class name of Triangle.
public class MyImportSelector implements ImportSelector {

@Override
public String[] selectImports(AnnotationMetadata annotationMetadata) {
return new String[]{"annotation.importannotation.waytwo.Triangle"};
}

}
3. Create a configuration class and import MyImportSelector on the basis of the original.
@Import({Circle.class,MyImportSelector.class})
@Configuration
public class MainConfigTwo {

}
4. Create test class
public static void main(String[] args) {

ApplicationContext context = new AnnotationConfigApplicationContext(MainConfigTwo.class);
Circle circle = context.getBean(Circle.class);
Triangle triangle = context.getBean(Triangle.class);
circle.sayHi();
triangle.sayHi();

}
5. Operation results:
Circle sayHi() Triangle sayHi()
You can see that the Triangle object has also been successfully instantiated by the IOC container.
3. Use with ImportBeanDefinitionRegistrar
ImportBeanDefinitionRegistrar is also an interface, which can manually register beans into the container, so that we can personalize the class. (it needs to be used with @ Import and @ Configuration.)
1. Create a normal Java class Rectangle.
public class Rectangle {

public void sayHi() {
System.out.println("Rectangle sayHi()");
}

}
2. Create an ImportBeanDefinitionRegistrar implementation class. The implementation method directly manually registers a Bean named rectangle into the IOC container.
public class MyImportBeanDefinitionRegistrar implements ImportBeanDefinitionRegistrar {

@Override
public void registerBeanDefinitions(AnnotationMetadata annotationMetadata, BeanDefinitionRegistry beanDefinitionRegistry) {

RootBeanDefinition rootBeanDefinition = new RootBeanDefinition(Rectangle.class);
// Register a bean named rectangle
beanDefinitionRegistry.registerBeanDefinition("rectangle", rootBeanDefinition);
}

}
3. Create a configuration class and import the MyImportBeanDefinitionRegistrar class.
@Import({Circle.class, MyImportSelector.class, MyImportBeanDefinitionRegistrar.class})
@Configuration
public class MainConfigThree {

}
4. Create a test class.
public static void main(String[] args) {

ApplicationContext context = new AnnotationConfigApplicationContext(MainConfigThree.class);
Circle circle = context.getBean(Circle.class);
Triangle triangle = context.getBean(Triangle.class);
Rectangle rectangle = context.getBean(Rectangle.class);
circle.sayHi();
triangle.sayHi();
rectangle.sayHi();

}
5. Operation results
Circle sayHi()
Triangle sayHi()
Rectangle sayHi()
Well, yes, the Rectangle object is also registered.
@Conditional [provided by Spring]
@The Conditional annotation enables some configurations only when certain conditions are met.
Here is a simple example:
1. Create a common Java class ConditionBean, which is mainly used to verify whether the Bean is loaded successfully.
public class ConditionBean {

public void sayHi() {
System.out.println("ConditionBean sayHi()");
}

}
2. Create a condition implementation class. The @ Conditional annotation has only one parameter of condition type. Condition is an interface. The interface has only one matches() method that returns a Boolean value. If the method returns true, the condition is established and the configuration class takes effect. Otherwise, it will not take effect. In this example, we directly return true.
public class MyCondition implements Condition {

@Override
public boolean matches(ConditionContext conditionContext, AnnotatedTypeMetadata annotatedTypeMetadata) {
return true;
}

}
3. When you create a configuration class, you can see that the @ Conditional of the configuration is passed into the Condition implementation class we just created for Condition judgment.
@Configuration
@Conditional(MyCondition.class)
public class ConditionConfig {

@Bean
public ConditionBean conditionBean(){
return new ConditionBean();
}

}
4. Write test methods.
public static void main(String[] args) {

ApplicationContext context = new AnnotationConfigApplicationContext(ConditionConfig.class);
ConditionBean conditionBean = context.getBean(ConditionBean.class);
conditionBean.sayHi();

}
5. Result analysis
Because the matches method of Condition directly returns true, the configuration class will take effect. We can change matches to return false, and the configuration class will not take effect.
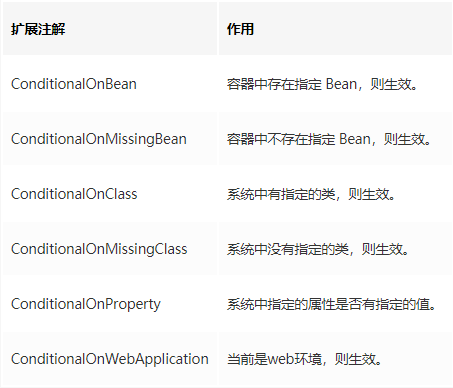
In addition to custom conditions, Spring also extends some common conditions for us.
2. SpringBoot startup process
In the process of looking at the source code, we will see that the methods of the following four classes are often called. We need to have some impressions of the following classes:
- ApplicationContextInitializer
- ApplicationRunner
- CommandLineRunner
- SpringApplicationRunListener
Let's start the source code analysis, starting with the run () method of the SpringBoot startup class. Here is the call chain: springapplication run()->run(newClass[]{primarySource},args)->newSpringApplication(primarySources)). run(args).
I've been running and finally got to the point. Let's look directly at the new spring application (primary sources) run (args) this method.
The above method mainly includes two steps:
- Create a SpringApplication object.
- Run the run() method.
Create a SpringApplication object
public SpringApplication(ResourceLoader resourceLoader, Class... primarySources) {

this.sources = new LinkedHashSet();
this.bannerMode = Mode.CONSOLE;
this.logStartupInfo = true;
this.addCommandLineProperties = true;
this.addConversionService = true;
this.headless = true;
this.registerShutdownHook = true;
this.additionalProfiles = new HashSet();
this.isCustomEnvironment = false;
this.resourceLoader = resourceLoader;
Assert.notNull(primarySources, "PrimarySources must not be null");
// Save the main configuration class (here is an array, indicating that there can be multiple main configuration classes)
this.primarySources = new LinkedHashSet(Arrays.asList(primarySources));
// Determine whether it is currently a Web application
this.webApplicationType = WebApplicationType.deduceFromClasspath();
// Find meta / inf / spring. From the classpath All applicationcontextinitializers configured by factories, and then save them
this.setInitializers(this.getSpringFactoriesInstances(ApplicationContextInitializer.class));
// Find meta / inf / spring. From the classpath All applicationlisteners configured by factories, and then save them
this.setListeners(this.getSpringFactoriesInstances(ApplicationListener.class));
// Find the main configuration class with main method from multiple configuration classes (only one)
this.mainApplicationClass = this.deduceMainApplicationClass();

}
Run the run() method
public ConfigurableApplicationContext run(String... args) {

// Create timer
StopWatch stopWatch = new StopWatch();
stopWatch.start();
// Declare IOC container
ConfigurableApplicationContext context = null;
Collection<SpringBootExceptionReporter> exceptionReporters = new ArrayList();
this.configureHeadlessProperty();
// Find meta / inf / spring. From the classpath Factories get SpringApplicationRunListeners
SpringApplicationRunListeners listeners = this.getRunListeners(args);
// Callback the starting() method of all SpringApplicationRunListeners
listeners.starting();
Collection exceptionReporters;
try {
// Encapsulating command line parameters
ApplicationArguments applicationArguments = new DefaultApplicationArguments(args);
// Prepare the environment, including creating the environment. After creating the environment, call back the SpringApplicationRunListeners#environmentPrepared() method to indicate that the environment preparation is complete
ConfigurableEnvironment environment = this.prepareEnvironment(listeners, applicationArguments);
this.configureIgnoreBeanInfo(environment);
// Print Banner
Banner printedBanner = this.printBanner(environment);
// Create an IOC container (decide whether to create an IOC container for the web or an ordinary IOC container)
context = this.createApplicationContext();
exceptionReporters = this.getSpringFactoriesInstances(SpringBootExceptionReporter.class, new Class[]{ConfigurableApplicationContext.class}, context);
/*
 * Prepare the context environment, save the environment to the IOC container, and call the applyInitializers() method
 * applyInitializers() Method calls back the initialize() method of all applicationcontextinitializers saved before
 * Then call back all the SpringApplicationRunListener#contextPrepared() methods
 * Finally, call back all SpringApplicationRunListener#contextLoaded() methods
 */
this.prepareContext(context, environment, listeners, applicationArguments, printedBanner);
// Refresh the container, initialize the IOC container (create embedded Tomcat if it is a Web application), and scan, create and load all components
this.refreshContext(context);
// Get all ApplicationRunner and CommandLineRunner from IOC container for callback
this.afterRefresh(context, applicationArguments);
stopWatch.stop();
if (this.logStartupInfo) {
(new StartupInfoLogger(this.mainApplicationClass)).logStarted(this.getApplicationLog(), stopWatch);
}
// Call all SpringApplicationRunListeners#started() methods
listeners.started(context);
this.callRunners(context, applicationArguments);
} catch (Throwable var10) {
this.handleRunFailure(context, var10, exceptionReporters, listeners);
throw new IllegalStateException(var10);
}
try {
listeners.running(context);
return context;
} catch (Throwable var9) {
this.handleRunFailure(context, var9, exceptionReporters, (SpringApplicationRunListeners)null);
throw new IllegalStateException(var9);
}
}
Summary:
The run() stage is mainly to call back the methods in the four listeners mentioned at the beginning of this section and load the components in the project into the IOC container, and all listeners that need to be called back are from meta / inf / spring Factories, so as to achieve various customization operations before and after startup.
3. SpringBoot auto configuration principle
@SpringBootApplication annotation
Everything about the SpringBoot project starts with the @ SpringBootApplication annotation.
@Description of SpringBootApplication annotation on a class:
- This class is the main configuration class of SpringBoot.
- SpringBoot should run the main method of this class to start the SpringBoot application.
The annotation is defined as follows:
@SpringBootConfiguration
@EnableAutoConfiguration
@ComponentScan(
excludeFilters = {@Filter(
type = FilterType.CUSTOM,
classes = {TypeExcludeFilter.class}
), @Filter(
type = FilterType.CUSTOM,
classes = {AutoConfigurationExcludeFilter.class}
)}
)
public @interface SpringBootApplication {

}
You can see that the SpringBootApplication annotation is a combined annotation (mentioned at the beginning of the article on combined annotation), which mainly combines the following three annotations:
- @SpringBoot Configuration: this annotation indicates that this is a SpringBoot Configuration class. In fact, it is just a @ Configuration annotation.
- @ComponentScan: turn on component scan.
- @EnableAutoConfiguration: it can be seen from the name that this class enables automatic configuration. Well, the secret of automatic configuration is all in this annotation.
@EnableAutoConfiguration annotation
Let's first look at how the annotation is defined:
@AutoConfigurationPackage
@Import({AutoConfigurationImportSelector.class})
public @interface EnableAutoConfiguration {
@AutoConfigurationPackage
It literally means to automatically configure the package. Click in to see a @ Import annotation: @ Import({Registrar.class}), which imports a component of the Registrar. The usage of @ Import is also introduced in the article.
We set a breakpoint on the registerBeanDefinitions method in the Registrar class, and we can see that a package name is returned, which is actually the package where the main configuration class is located.
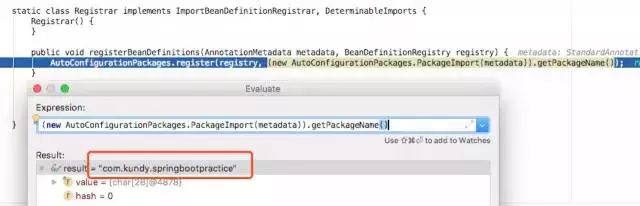
Bottom line: @ AutoConfigurationPackage annotation is to scan all components in the package of the main configuration class (@ SpringBootConfiguration marked class) and all sub packages below into the Spring container. Therefore, by default, the Spring container cannot scan components other than the main configuration class package and sub packages.
@Import({AutoConfigurationImportSelector.class})
This annotation imports another N automatic configuration classes for the current configuration class. (the detailed usage of this note is mentioned above).
Configure class import rules
What are the specific import rules? Let's take a look at the source code. Before starting to look at the source code, let's say a few words. As little brother Ma said, we don't have to look at all the source code. We don't have to figure out what it means in every line of code. We just need to grasp the key places.
We know that the selectImports of the AutoConfigurationImportSelector is used to return an array of the full class names of the components to be imported, so how to get these arrays?
A getAutoConfigurationEntry() method is invoked in the selectImports method.
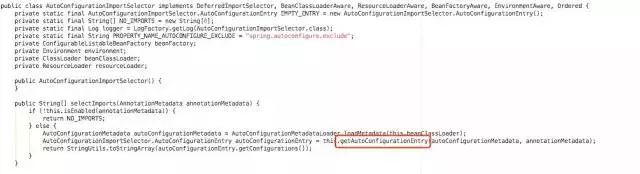
Due to the space problem, I won't take screenshots one by one. I will directly tell you the call chain: in getautoconfigurationentry() - > getcandidateconfigurations() - > loadfactorynames().
Here, the loadFactoryNames() method passes in enableautoconfiguration Class. Remember this parameter first, which will be used later.

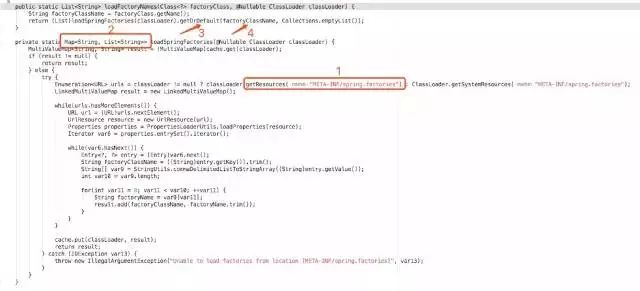
Three key steps in loadFactoryNames():
- Get all meta-inf / spring.xml from the classpath of the current project The information under the file factories.
- Encapsulate the information obtained above into a Map return.
- From the returned Map, use the enableautoconfiguration Class parameter to get all the values under the key.
META-INF/spring.factories exploration
It may be a little confused to hear me say this. Let's take a look at meta-inf / spring I'm not confused about what files like factories are. Of course, there will be this file in many third-party dependencies. Generally, every time a third-party dependency is imported, in addition to its own jar package, there will also be a XXX spring boot autoconfigure, which is the automatic configuration class written by the third-party dependency itself. Let's take the spring boot autoconfigure dependency as an example.
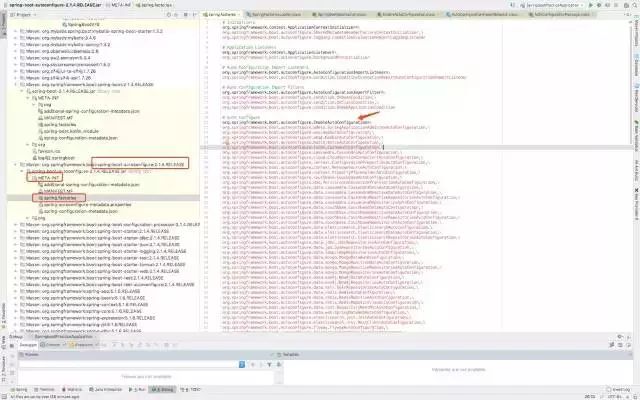
You can see that there are many classes under EnableAutoConfiguration. These are the classes for automatic configuration of our project.
In a word: put meta-inf / Spring.com under the classpath All EnableAutoConfiguration values configured in factories are added to the Spring container.
HttpEncodingAutoConfiguration
In the above way, all automatic configuration classes are imported into the main configuration class. However, with so many configuration classes, it is obvious that there are many automatic configurations that we usually do not use. There is no reason why all of them will take effect.
Next, let's take HttpEncodingAutoConfiguration as an example to see how an autoconfiguration class works. Why choose this category? It is mainly a simple and typical example of this class.
Let's take a look at the notes marked on this class:
@Configuration
@EnableConfigurationProperties({HttpProperties.class})
@ConditionalOnWebApplication(
type = Type.SERVLET
)
@ConditionalOnClass({CharacterEncodingFilter.class})
@ConditionalOnProperty(
prefix = "spring.http.encoding",
value = {"enabled"},
matchIfMissing = true
)
public class HttpEncodingAutoConfiguration {

}- @Configuration: marked as a configuration class.
- @ConditionalOnWebApplication: it takes effect only under the web application.
- @ConditionalOnClass: the specified class (dependency) takes effect only when it exists.
- @ConditionalOnProperty: the specified property exists in the main configuration file to take effect.
- @EnableConfigurationProperties({HttpProperties.class}): start the ConfigurationProperties function of the specified class; Bind the corresponding value in the configuration file with HttpProperties; And add HttpProperties to the IOC container.
Because @ EnableConfigurationProperties({HttpProperties.class}) binds the configuration item in the configuration file to the current HttpProperties class.
Then HttpProperties are referenced in HttpEncodingAutoConfiguration, so finally, the values in the configuration file can be used in HttpEncodingAutoConfiguration.
Finally, add components to the container through @ Bean and some condition judgment to realize automatic configuration. (of course, the property values in the Bean are obtained from HttpProperties)
HttpProperties
HttpProperties binds the configuration file to its own properties through the @ ConfigurationProperties annotation.
All properties that can be configured in the configuration file are encapsulated in the xxproperties class; The attribute class corresponding to a function can be referenced for what can be configured in the configuration file.
@ConfigurationProperties(
prefix = "spring.http"
)// Get the specified value from the configuration file and bind it with the properties of the bean
public class HttpProperties {
}
Summary:
- SpringBoot will load a large number of auto configuration classes.
- Let's see if the required functions have the auto configuration class written by SpringBoot by default.
- Let's look at the components configured in the automatic configuration class (as long as we have components to use, we don't need to configure them again).
- When adding components to the automatic configuration class in the container, some properties will be obtained from the properties class. We can specify the values of these properties in the configuration file. xxxAutoConfiguration: automatically configure classes to add components to containers. xxxProperties: encapsulates the related properties in the configuration file.
I wonder if my friends have found that many classes to be loaded are placed in meta-inf / spring. Under the class path Instead of directly writing it in the code, we can easily extend it ourselves or a third party. We can also implement our own starter and let SpringBoot load it. Now understand why SpringBoot can achieve zero configuration and use it out of the box!