WPF multi trigger and multi data trigger
We use triggers to get dynamic styles. So far, they all trigger animation based on a single attribute. WPF also supports multiple triggers: detect multiple attributes and trigger the animation after the conditions of each detected attribute are met.
Multiple triggers can be divided into two types: MultiTrigger, which, like general triggers, applies to dependency properties. The other is MultiTrigger, which can be bound to any property type. Let's take a simple example to demonstrate how to use MultiTrigger.
MultiTrigger
<Window x:Class="WpfTutorialSamples.Styles.StyleMultiTriggerSample"
        xmlns="http://schemas.microsoft.com/winfx/2006/xaml/presentation"
        xmlns:x="http://schemas.microsoft.com/winfx/2006/xaml"
        Title="StyleMultiTriggerSample" Height="100" Width="250">
    <Grid>
        <TextBox VerticalAlignment="Center" HorizontalAlignment="Center" Text="Hover and focus here" Width="150">
            <TextBox.Style>
                <Style TargetType="TextBox">
                    <Style.Triggers>
                        <MultiTrigger>
                            <MultiTrigger.Conditions>
                                <Condition Property="IsKeyboardFocused" Value="True" />
                                <Condition Property="IsMouseOver" Value="True" />
                            </MultiTrigger.Conditions>
                            <MultiTrigger.Setters>
                                <Setter Property="Background" Value="LightGreen" />
                            </MultiTrigger.Setters>
                        </MultiTrigger>
                    </Style.Triggers>
                </Style>
            </TextBox.Style>
        </TextBox>
    </Grid>
</Window>
In this example, we use trigger to make TextBox change its background color when it has both keyboard focus and mouse over it, as shown in the screenshot. This trigger needs to meet two conditions, but we can easily add more conditions as needed. In the Setters section, we set the attribute whose value needs to be changed when all conditions are met: background color.
Multiple data trigger
Like a normal DataTrigger, MultiDataTrigger is also cool because it uses bindings to detect a property. This means that you can take advantage of all the cool WPF binding techniques, including binding properties of other controls, and so on. Let me demonstrate how easy this is:
<Window x:Class="WpfTutorialSamples.Styles.StyleMultiDataTriggerSample"
        xmlns="http://schemas.microsoft.com/winfx/2006/xaml/presentation"
        xmlns:x="http://schemas.microsoft.com/winfx/2006/xaml"
        Title="StyleMultiDataTriggerSample" Height="150" Width="200">
    <StackPanel HorizontalAlignment="Center" VerticalAlignment="Center">
        <CheckBox Name="cbSampleYes" Content="Yes" />
        <CheckBox Name="cbSampleSure" Content="I'm sure" />
        <TextBlock HorizontalAlignment="Center" Margin="0,20,0,0" FontSize="28">
            <TextBlock.Style>
                <Style TargetType="TextBlock">
                    <Setter Property="Text" Value="Unverified" />
                    <Setter Property="Foreground" Value="Red" />
                    <Style.Triggers>
                        <MultiDataTrigger>
                            <MultiDataTrigger.Conditions>
                                <Condition Binding="{Binding ElementName=cbSampleYes, Path=IsChecked}" Value="True" />
                                <Condition Binding="{Binding ElementName=cbSampleSure, Path=IsChecked}" Value="True" />
                            </MultiDataTrigger.Conditions>
                            <Setter Property="Text" Value="Verified" />
                            <Setter Property="Foreground" Value="Green" />
                        </MultiDataTrigger>
                    </Style.Triggers>
                </Style>
            </TextBlock.Style>
        </TextBlock>
    </StackPanel>
</Window>
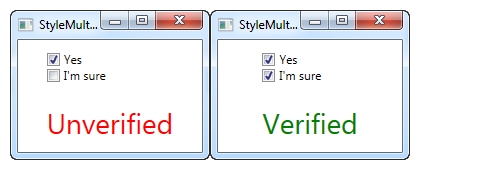
In this example, I reuse the previous DataTrigger example. However, instead of just binding a property, I bind the same property (IsChecked) in the two controls. This allows us to touch the relevant style only after the two check boxes are selected - if the selection of any check box is removed, the default style will be applied.
Summary
As you can see, multiple triggers are as easy to use as normal triggers. Especially when you develop your own controls, they can be exceptionally useful.
Reprint: WPF Tutorial https://blog.csdn.net/ccvah/article/details/90482472
