xml configuration of SpringBoot-19-Mybatis
In the previous chapter, we have briefly introduced the basic operations of addition, deletion, modification and query of mybatis. The addition, deletion, modification and query of basic (single table) can be implemented according to. If it is slightly more complex, we need to use the xml format of mybatis.
Then we begin to use the xml method of mybatis to add, delete, modify and query.
code implementation
Dependent addition
After you create a project, you can create it in its POM Add the corresponding driver in mysql and mysql XML
        <!--mysql drive-->
        <dependency>
            <groupId>mysql</groupId>
            <artifactId>mysql-connector-java</artifactId>
            <scope>runtime</scope>
        </dependency>

        <!--mybatis rely on-->
        <!-- https://mvnrepository.com/artifact/org.mybatis.spring.boot/mybatis-spring-boot-starter -->
        <dependency>
            <groupId>org.mybatis.spring.boot</groupId>
            <artifactId>mybatis-spring-boot-starter</artifactId>
            <version>2.2.2</version>
        </dependency>
In application YML add configuration
server:
port: 8899
spring:
datasource:
url: jdbc:mysql://localhost:3306/mybatis?useUnicode=true&serverTimezone=Asia/Shanghai&characterEncoding=utf-8&useSSL=false
username: root
password: root
driver-class-name: com.mysql.cj.jdbc.Driver
mybatis:
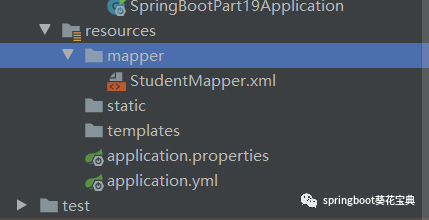
mapper-locations: classpath:mapper/*.xml
Note:
- Mybatis by configuring mybatis Map locations to set * xml path
Student entity class creation
student table. The specific sql can be viewed Spring data JPA multi data source configuration
@Data
public class Student implements Serializable {

    /**
     * ID
     */
    private Long id;

    /**
     * Student name
     */
    private String name;

    /**
     * Gender default male
     */
    private String sex;

    /**
     * Age
     */
    private Integer age;

    /**
     * Registered mobile number
     */
    private String mobile;

    /**
     * Registered mailbox
     */
    private String email;

    private Date createDate;

    private Date updateDate;

    /**
     *Available (1 available, 0 delete user)
     */
    private Integer isEnabled;

    private static final long serialVersionUID = 1L;
}
Interface implementation of mapper
@Mapper
public interface StudentMapper {
    Student findById(@Param("id") Long id);
    void updateStudent(Student student);
    int insert(@Param("name") String name,
               @Param("sex") String sex,
               @Param("age") Integer age,
               @Param("email") String email,
               @Param("mobile") String mobile
               );
    int insertByObject(Student student);
}
Note: here is a small knowledge point, which was not explained in the previous chapter
Injection method of StudentMapper:
-
@Mapper method: by adding @ mapper annotation to mapper interface, let mybatis create the implementation class object of this interface for us, as shown above
-
Use @ MapperScan("com.learn.springboot.mapper") to implement batch injection mapper
@MapperScan("com.learn.springboot.mapper")
@SpringBootApplication
public class SpringBootPart19Application {

    public static void main(String[] args) {
        SpringApplication.run(SpringBootPart19Application.class, args);
    }

}
Configuration and implementation of xml corresponding to mapper
After creating the mapper interface, add its xml configuration under the previously configured path
<?xml version="1.0" encoding="UTF-8" ?>
<!DOCTYPE mapper
        PUBLIC "-//mybatis.org//DTD Mapper 3.0//EN"
        "http://mybatis.org/dtd/mybatis-3-mapper.dtd">
<mapper namespace="com.learn.springboot.mapper.StudentMapper">
    <select id="findById" resultType="com.learn.springboot.entity.Student">
        SELECT * FROM STUDENT WHERE ID = #{id}
    </select>

    <insert id="insertByObject">
        INSERT INTO STUDENT(NAME, SEX,AGE,EMAIL,MOBILE) VALUES(#{name}, #{sex}, #{age}, #{email}, #{mobile})
    </insert>

    <update id="updateStudent" parameterType="com.learn.springboot.entity.Student">
       UPDATE STUDENT SET NAME=#{name},SEX=#{sex},AGE=#{age},EMAIL=#{email},MOBILE=#{mobile} WHERE id=#{id}
    </update>
</mapper>
Note: the path of xml is SRC \ main \ resources + mybatis The path configured in mapper locations, for example, the xml path in this article is
src\main\resources\mapper
Implementation of Service layer
In this layer, we implement the StudentService interface and its implementation StudentServiceImpl respectively
- Implementation of StudentService
public interface StudentService {
    Student updateStudent(Student student);
    int insertByObject(Student student);
    Student findById(Long id);

}
- Implementation of StudentServiceImpl
@AllArgsConstructor
@Service
public class StudentServiceImpl implements StudentService {

    private StudentMapper studentMapper;

    @Override
    public int insertByObject(Student student){
        return  studentMapper.insertByObject(student);
    }
    @Override
    public Student updateStudent(Student student){
        studentMapper.updateStudent(student);
        return  student;
    }

    @Override
    public Student findById(Long id) {
        return studentMapper.findById(id);
    }
}
Implementation of control layer
In this layer, we create StudentController and inject StudentService into it
@Slf4j
@RequestMapping("/student")
@RestController
public class StudentController {

    /**
     * studentService Inject StudentController
     */
    @Autowired
    private StudentService studentService;

    @PostMapping("insert")
    public int insertByObject(@RequestBody Student student){
        return  studentService.insertByObject(student);
    }

    @PostMapping("update")
    public Student updateStudent(@RequestBody Student student) {
      return   studentService.updateStudent(student);
    }

    @GetMapping("/select/{id}")
    public Student findByName(@PathVariable("id") Long id) {
        return studentService.findById(id);
    }
}
This concludes the implementation and introduction of mybatis through xml. Go and implement it quickly. If it doesn't succeed, you can send me a private letter to get the code to see the difference.
If you think this article is good, you are welcome to click the attention support below. Your attention is the driving force of my persistence!
Original is not easy, reprint please indicate the source, thank you for your support! If this article is useful to you, welcome to forward and share!