Original title: YOLO: Real-Time Object Detection
English text: https://pjreddie.com/darknet/...
Highly recommended (TED video): https://www.ted.com/talks/jos...
You only look once (YOLO) is the most advanced real-time object detection system at present.On a Titan X, it can process 40-90 frames per second in real time, with accuracy as high as 78.6% (VOC 2007) and 48.1% (COCO test-dev).
Model    Train    Test    mAP    FLOPS    FPS    Cfg    Weights
Old YOLO    VOC 2007+2012    2007    63.4    40.19 Bn    45    link
SSD300      VOC 2007+2012    2007    74.3    -    46    link
SSD500      VOC 2007+2012    2007    76.8    -    19    link
YOLOv2      VOC 2007+2012    2007    76.8    34.90 Bn    67    cfg    weights
YOLOv2 544x544    VOC 2007+2012    2007    78.6    59.68 Bn    40    cfg    weights
Tiny YOLO    VOC 2007+2012    2007    57.1    6.97 Bn    207    cfg    weights
SSD300    COCO trainval    test-dev    41.2    -    46    link
SSD500    COCO trainval    test-dev    46.5    -    19    link
YOLOv2 608x608    COCO trainval    test-dev    48.1    62.94 Bn    40    cfg    weights
Tiny YOLO    COCO trainval    -    -    7.07 Bn    200    cfg    weights
Working principle
Previous detection systems achieved target recognition by reusing classifiers and locators.They apply models to different locations and large or small areas of the image and use the highest score of each area to determine the result.
We used a completely different approach.We identify by placing a single neural network over the entire image.This network divides the image into regions and predicts the likelihood of borders and regions.These borders are weighted by the predicted likelihood.

Our model has several advantages over classifier-based systems.It looks at the entire image during the test, so its prediction is based on the entire image context.And it predicts through a single network, unlike those R-CNN systems that require thousands of networks for an image.This feature makes our system super fast, thousands of times faster than R-CNN, 100 times faster than fast R-CNN.For a better understanding of the whole system, read our paper.
Prediction using a pre-trained model
Below you can use a pre-trained model for object detection using the YOLO system.If you haven't installed Darknet yet, you can install it with the following commands:
git clone https://github.com/pjreddie/darknet
cd darknet
make
It's that simple!
YOLO configuration files are already pre-set in the cfg/subdirectory.You also need to download a pre-trained weight file (258 MB):
wget https://pjreddie.com/media/files/yolo.weights
Then you can start running the detector!
./darknet detect cfg/yolo.cfg yolo.weights data/dog.jpg
You will see output like the following:
layer     filters    size              input                output
    0 conv     32  3 x 3 / 1   416 x 416 x   3   ->   416 x 416 x  32
    1 max          2 x 2 / 2   416 x 416 x  32   ->   208 x 208 x  32
    .......
   29 conv    425  1 x 1 / 1    13 x  13 x1024   ->    13 x  13 x 425
   30 detection
Loading weights from yolo.weights...Done!
data/dog.jpg: Predicted in 0.016287 seconds.
car: 54%
bicycle: 51%
dog: 56%
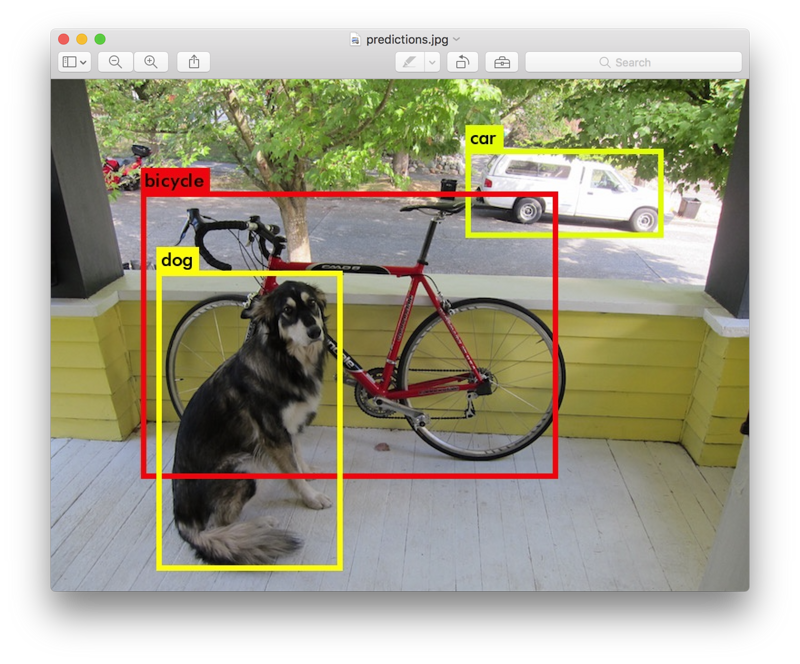
Darknet shows what it detects, confidence, and how long it took.Because we didn't compile Darknet with OpenCV, we couldn't display the image results directly.But we saved the image results in the predictions.png file.You can open this file to see the results after the detection.Since we are running Darknet on the CPU now, it will take 6 to 12 seconds to process an image.It will take much less time if we use the GPU version.
I've provided several other images here, so you can try them one by one if you're interested.Try data/eagle.jpg, data/dog.jpg, data/person.jpg and data/horses.jpg!
Detecti in the above command is a simplified version of a more general command, which is equivalent to the following command:
./darknet detector test cfg/coco.data cfg/yolo.cfg yolo.weights data/dog.jpg
You don't need to know this if you just want to detect it on an image.But this command is useful if you want to test it on the camera.Later we will talk about how to do real-time detection on the camera.
Multiple images
In addition to providing a file name on the command line for image detection, you can also do multiple image detection without entering a file name.When the configuration and weight files are loaded, you are prompted to enter the file name:
./darknet detect cfg/yolo.cfg yolo.weights
layer     filters    size              input                output
    0 conv     32  3 x 3 / 1   416 x 416 x   3   ->   416 x 416 x  32
    1 max          2 x 2 / 2   416 x 416 x  32   ->   208 x 208 x  32
    .......
   29 conv    425  1 x 1 / 1    13 x  13 x1024   ->    13 x  13 x 425
   30 detection
Loading weights from yolo.weights ...Done!
Enter Image Path:
This image can be detected by entering an image file name such as data/horses.jpg here.
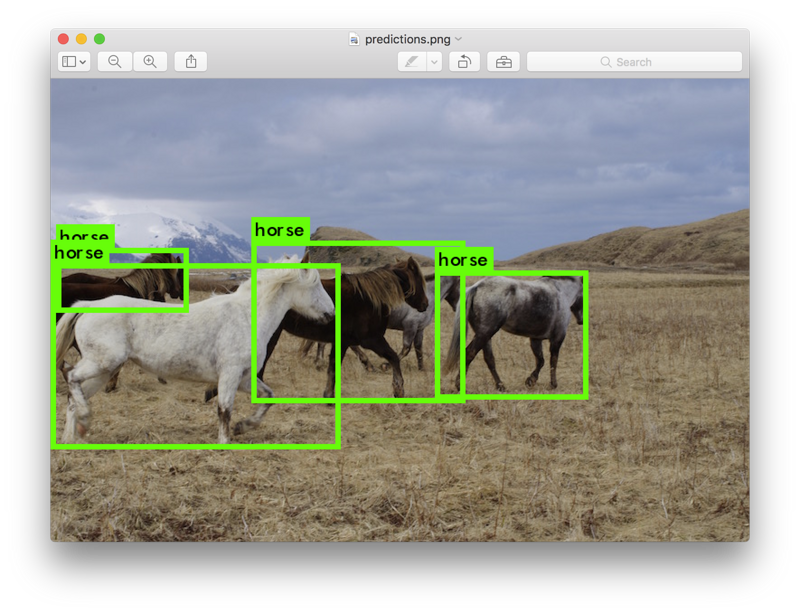
After the detection is complete, you will be prompted to enter the file name of other images.Press Ctrl-C to exit after all detection is complete.
Modify detection threshold
By default, YOLO only displays objects with a heart greater than.25.You can modify this setting by appending the -thresh <val>parameter.For example, you can modify the threshold to zero to show all detected objects:
./darknet detect cfg/yolo.cfg yolo.weights data/dog.jpg -thresh 0
The results are as follows:
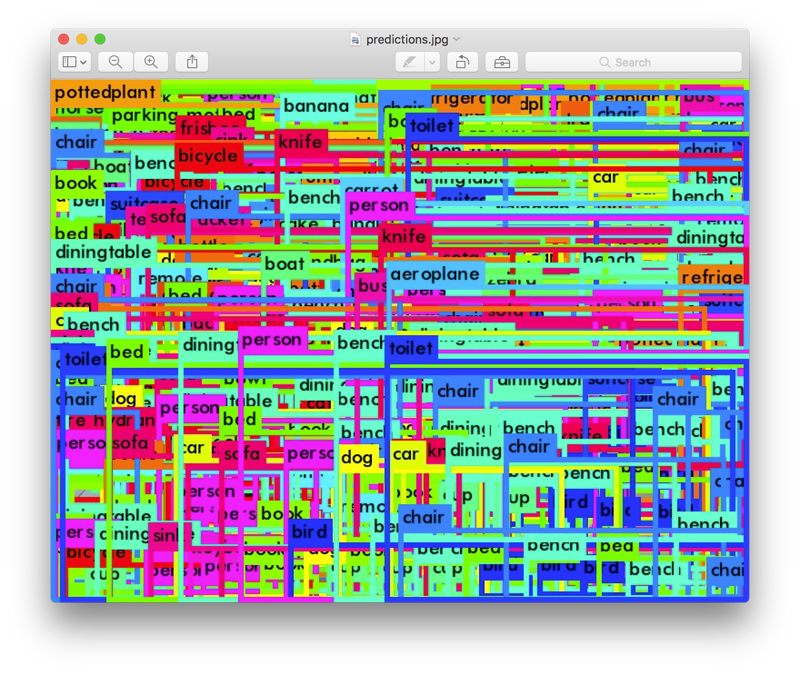
Such results may not seem useful, but you can control the results of model detection by modifying them to different values.
Tiny YOLO
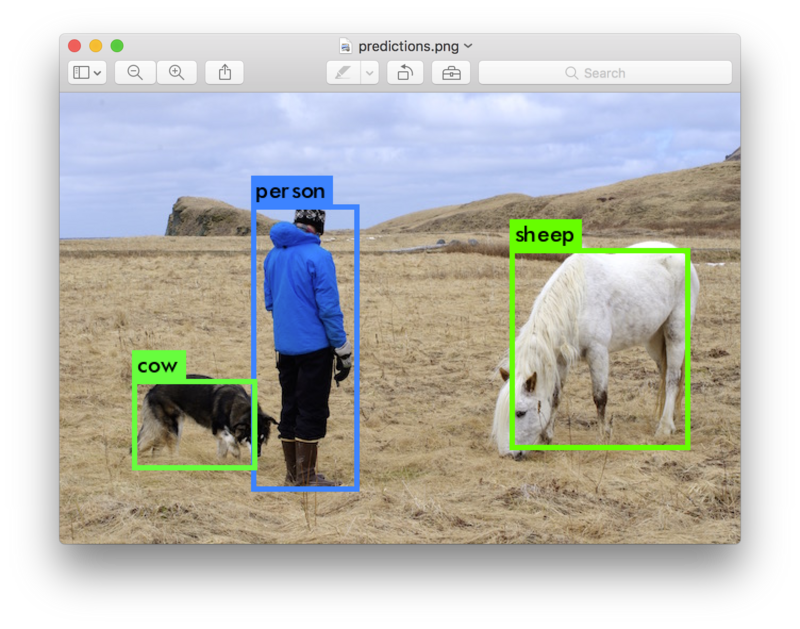
Tiny YOLO is a very fast but less accurate model based on the Darknet reference network than regular YOLO.The usage is as follows:
wget https://pjreddie.com/media/files/tiny-yolo-voc.weights
./darknet detector test cfg/voc.data cfg/tiny-yolo-voc.cfg tiny-yolo-voc.weights data/dog.jpg
This is, oh, imperfect (white horse as sheep, black dog as cow), but it's really fast.On the GPU version, it can handle over 200 frames per second.
Camera real-time detection
Running YOLO on test data is not interesting and you cannot see the results directly.Let's let it process the camera input directly!
To run this example, you need to integrate Darknet with CUDA and OpenCV and run the following commands:
./darknet detector demo cfg/coco.data cfg/yolo.cfg yolo.weights
YOLO displays the current frame rate and adds a box to the object it detects.
You must install a camera on your computer to connect to OpenCV, otherwise it will not work.If you have multiple cameras, you can specify one of them by -c <num> (OpenCV uses a camera number 0 by default).
You can also let it process a video:
./darknet detector demo cfg/coco.data cfg/yolo.cfg yolo.weights <video file>
The following Youtube video deals with this:
