This article will take you to build a car detector, using the algorithm of PyTorch version of YOLOV3. We will not explain the details of the algorithm, but focus on how to implement our own car detector, mainly including data download, data cleaning, data set production, training and detection (image detection, video detection). Even if you don't know what YOLOV3 is, it doesn't matter, which has little impact on reading this article.
It is suggested to read the following step by step to make the typesetting more exquisite:
1 data set download
In order to detect cars, we first need to obtain the marked data set containing cars. Here I choose KITTI. Due to the slow download of the official website, it is recommended to use the following Baidu cloud link for download.
Download KITTI dataset: https://pan.baidu.com/s/1t3TXXkqVR4NGqZwQiGEIzg
Extraction code: cw35
Source code from Github open source project https://github.com/eriklindernoren/PyTorch-YOLOv3 In order to adapt to the content of this article, I made some changes to upload it to Baidu cloud, and reply to detect in the background of official account.
2 data cleaning
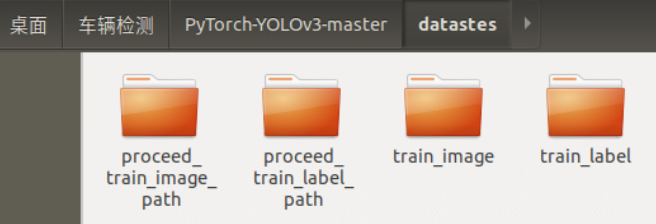
Create a new folder datasets under the home directory PyTorch-YOLOv3-master, and create four new folders in datasets: train_image,train_label,proceed_train_image_path,proceed_train_label_path
Move all downloaded picture data (. png) to train_image, all label data (. txt) are moved to train_label.
The data cleaning in this part mainly aims at the following problems:
-
For unknown reasons, some pictures in the downloaded data are damaged and cannot be added to the training set
-
In addition to the necessary information of the model (1 target category + 4 location coordinates), the label of the original kitti dataset also contains other information, which we need to filter out;
-
At the same time, we only need to detect Car, so we need to filter out the information of other categories (non Car).
-
In kitti dataset, the coordinate format is: < left top right bottom >
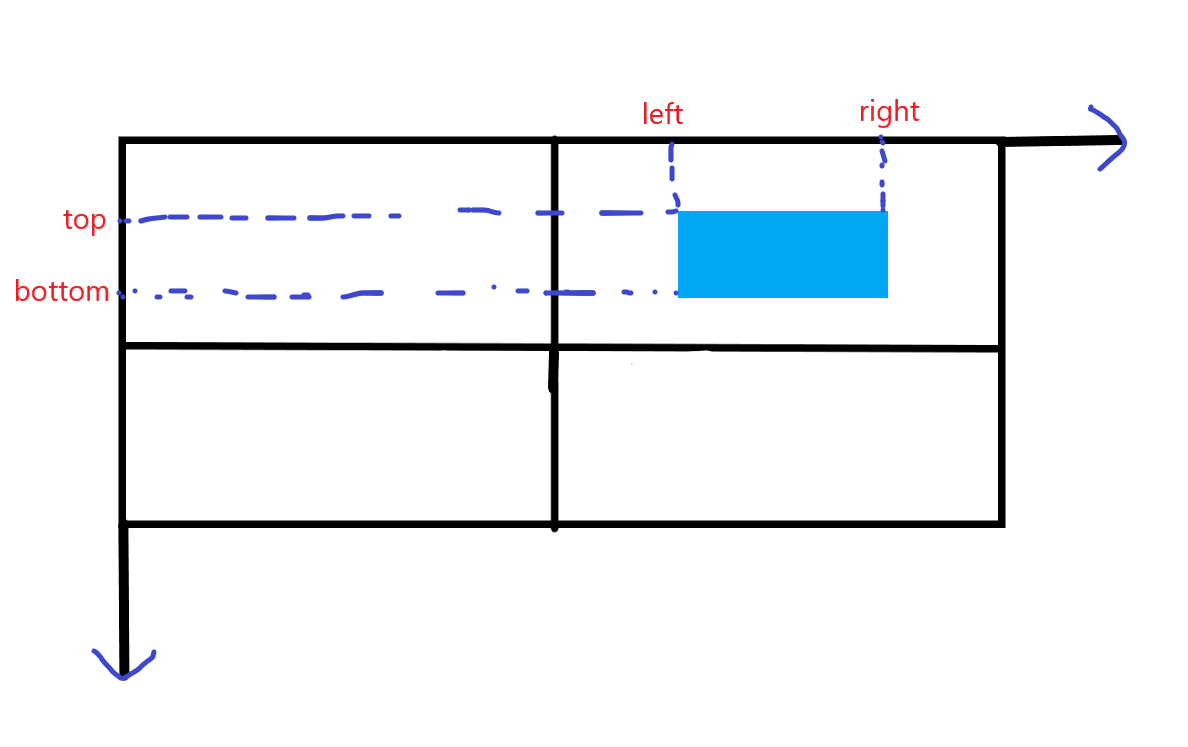
The format required by the YOLOV3 model used this time is: < X_ center y_ center width height>
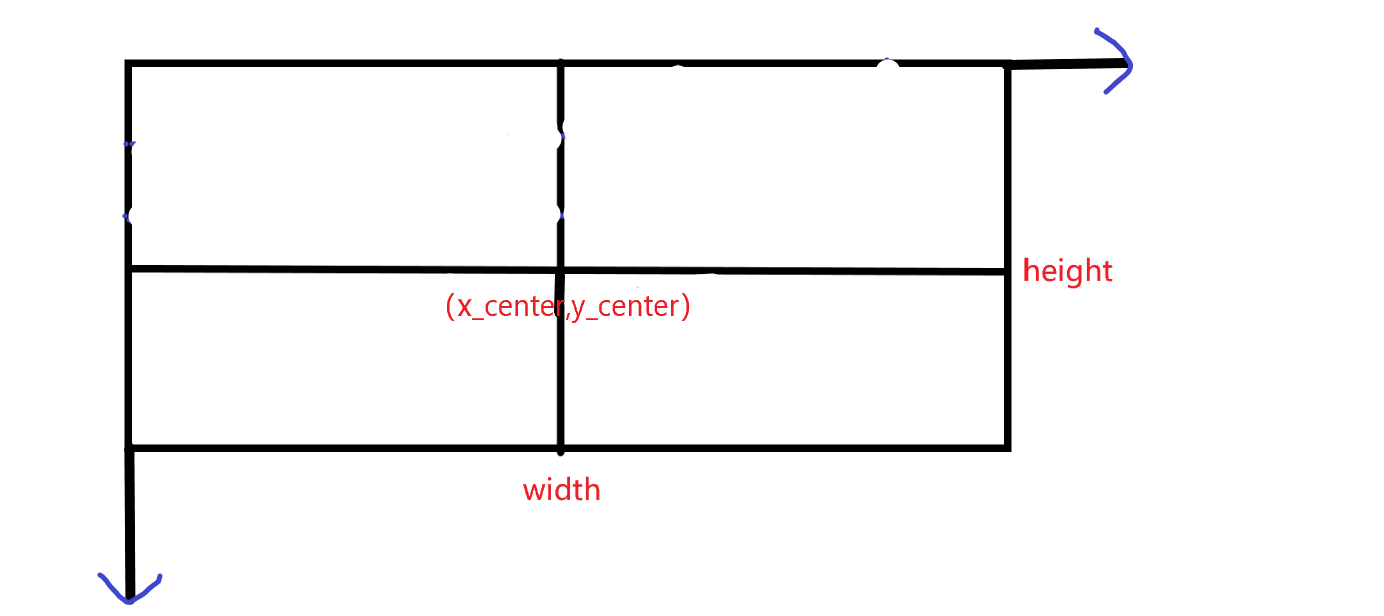
Therefore, a conversion is required. The conversion formula is:
-
According to the requirements of the model, the coordinates need to be normalized:
Where, and represent the width and height of the training set image respectively.
The code to realize the above requirements is as follows:
import os
import cv2
import shutil

#Original data storage path
train_img_path='train_image'
train_label_path='train_label'
#Filtered data storage path
proceed_train_image_path='proceed_train_image_path'
proceed_train_label_path='proceed_train_label_path'
#Image size
w=1242
h=375

for img_name in os.listdir(train_img_path):
    current_img=cv2.imread(os.path.join(train_img_path,img_name))
    if current_img is not None:
        print(img_name)
        label_name=img_name.split('.')[0]+'.txt'
        label_path=os.path.join(train_label_path,label_name)

        flag=0#Does the current picture contain Car
        with open(label_path,'r') as f:
            all_obj=f.readlines()
            #For each target in the current picture
            for obj in all_obj:
                info=obj.split(' ')
                name=info[0]#category
                left,top,right,bottom=float(info[4]),float(info[5]),float(info[6]),float(info[7])#Four coordinates
                #Convert four coordinates to X_ center,y_ Format of center, width and height
                width=right-left
                height=bottom-top
                x_center=left+width/2
                y_center=top+height/2
                #Normalize it
                width=width/w
                height=height/h
                x_center=x_center/w
                y_center=y_center/h

                #Find car and start writing
                if name == 'Car':
                    flag=1
                    with open(os.path.join(proceed_train_label_path,label_name),'a+') as nf:
                        nf.write('0 '+str(x_center)+' '+str(y_center)+' '+str(width)+' '+str(height)+'\n')

        if flag==1:
            pass
            shutil.copy(os.path.join(train_img_path,img_name),os.path.join(proceed_train_image_path,img_name))

    else:
        print('{}The picture is damaged'.format(img_name))
Open the Jupiter notebook under the datasets folder, create a new file, write the above code and run it to complete the data cleaning.
The cleaned picture data (. png) is stored in processed_ train_ image_ Path, and the corresponding label data (. txt) is stored in the processed_ train_ label_ path.
Among them, picture data is pictures one by one, while label data is text documents one by one, and each picture corresponds to one such text document: 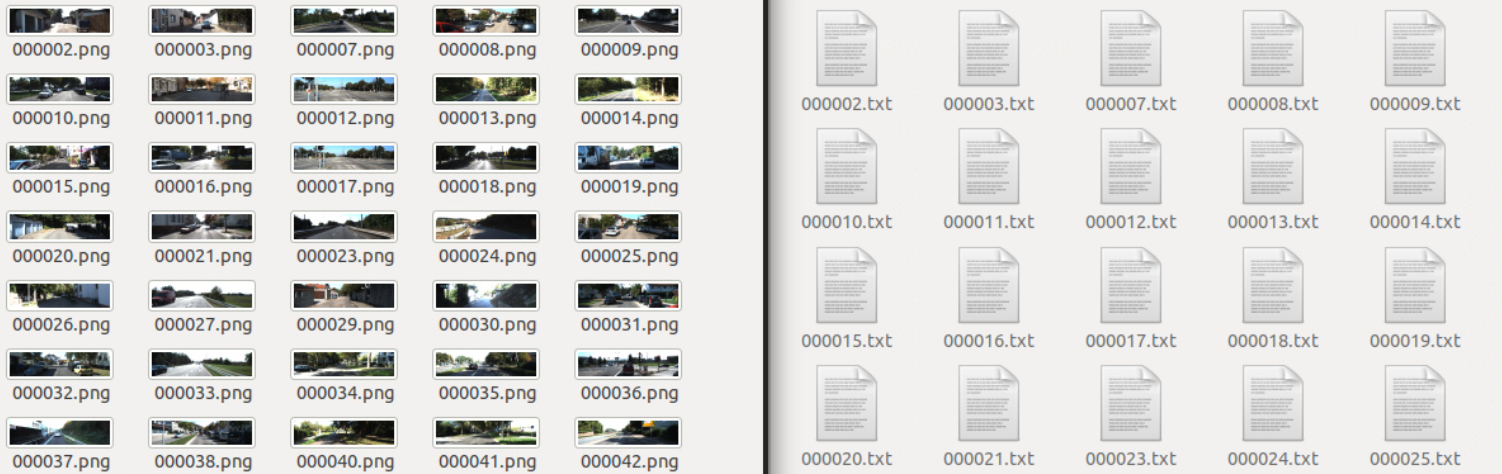
The content of the text document is data line by line. Each line represents a target marked in the corresponding picture of the text document (the target here is Car). If several cars are marked in the picture, there will be as many lines of the text document.
Each line contains five pieces of information. The first one is the category to which the target belongs. Since only cars are detected here, that is, there is only one category, they are all 0 (according to the requirements of the model, 0 represents Car, we only need to write Car in the first line of data/custom/classes.names). The last four represent the coordinates of the processed (coordinate conversion + normalization) bounding box respectively: 
3 making data sets
Move the picture data (. png) and label data (. txt) obtained in the previous step to data/custom/images and data/custom/labels respectively. If there are no these two folders, you need to create them manually first.
Now start making the dataset. It mainly makes the corresponding of training set and verification set txt file:
In the home directory PyTorch-YOLOv3-master, open the Jupiter notebook, create a new file, and write the following code:
import os
img_path='data/custom/images'
#make. txt
for i,img_name in enumerate(os.listdir(img_path)):
    if i<100:
        with open(os.path.join('data/custom','valid.txt'),'a+') as f1:
            f1.write(os.path.join(img_path,img_name+'\n'))
    else:
        with open(os.path.join('data/custom','train.txt'),'a+') as f2:
            f2.write(os.path.join(img_path,img_name+'\n'))
As can be seen from the above code, the first 100 are selected as the verification set and the rest as the training set.
Now, the structure of all files (folders) under the data/custom path is as follows: 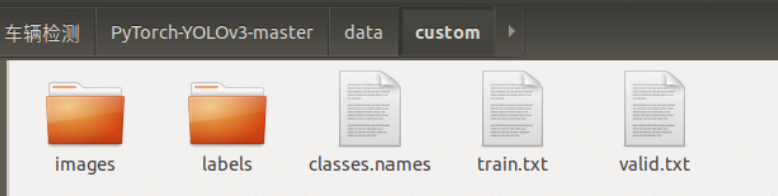
4 start training
Before training, download the pre trained darknet53 weights provided by the author. Specifically, in the weights folder, execute the following commands:
sh download_weights.sh
It will also download two additional weights: yolov3 Weights and yolov3 tiny Weights, these are actually useless and can be ignored.
Then enter the config folder and execute the following command:
sh create_model.sh 1
This is the configuration file of yolov3 network, in which 1 represents several types in total. Since only cars are detected here, there is only 1 type.
After completing the above operations, if the video memory is large enough, you can start training. Open the terminal under the main directory PyTorch-YOLOv3-master and execute the following commands:
python train.py --model config/yolov3-custom.cfg --data config/custom.data --pretrained_weights weights/darknet53.conv.74
If the video memory is small, CUDA memory overflow error may be reported, and batch can be manually reduced_ size. I trained on GTX1070 and reported this error. I want to adjust batch_size, but it is found that it is not a super parameter given directly, but calculated. Print it and find the current batch_size 16: 
I took a simple and crude method, that is, directly manually_ batch_ Set size to 4: 
Now, execute the above command again and start the long training process 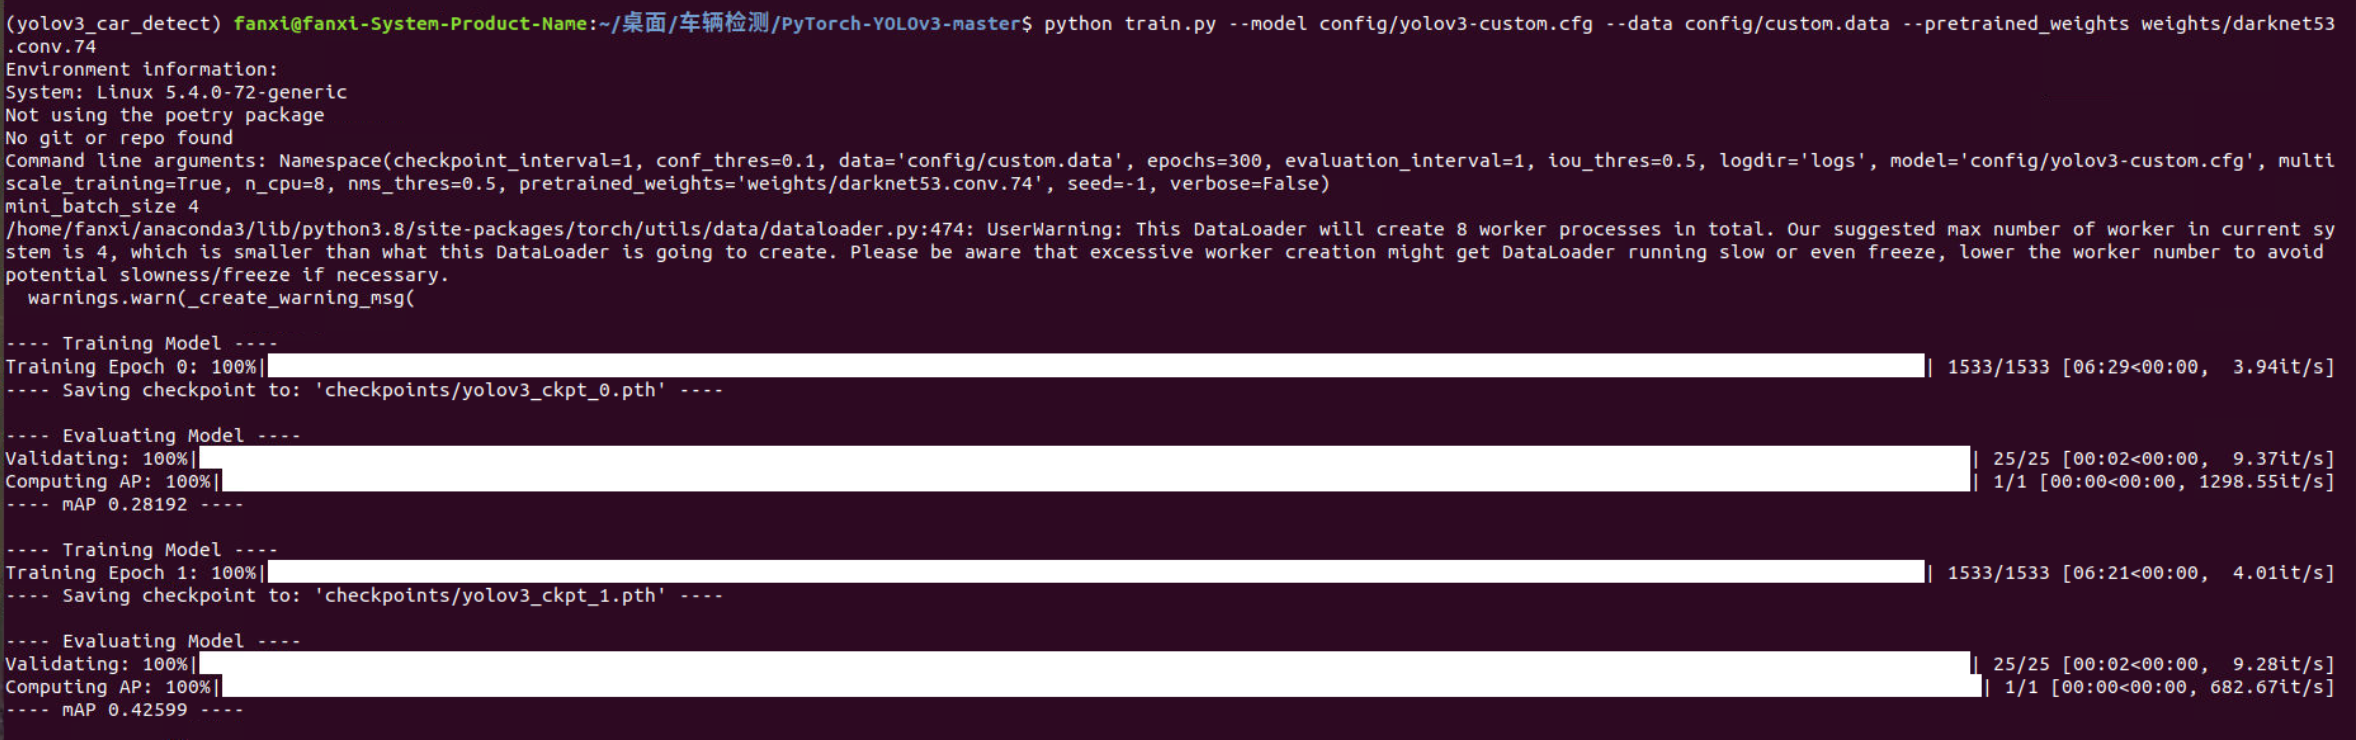
5 start detection
After the training, you can use the model to detect your own data.
Put the image data to be detected in data/samples, and pay attention to emptying other images in this folder: 12, and then open detect Py, modify part of the code of the run function:
141 in weights represents the weight obtained by the 141st epoch. You can choose the weight file corresponding to the epoch with better effect by yourself. Just replace 141 with your epoch.
Now, open the terminal under the home directory PyTorch-YOLOv3-master and enter the following command:
python detect.py --images data/samples/
The output of the detection process is as follows:
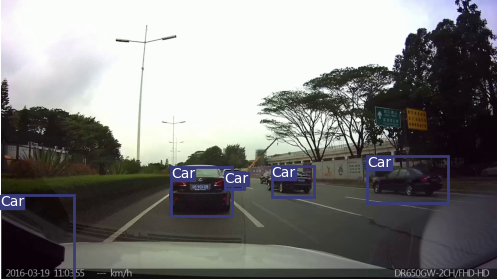
After the test is completed, you can see the test results in the output folder, and each detected Car is framed:
If you have completed the training, but do not get the above output during the detection process, and the Car in the picture in the output folder is not framed, you can open detect Py, conf_ Turn down the thres. For example, I set it to 0.1:
Then save the file and execute the detection command again.
6 video detection
The video is divided into frames, and each frame is a picture. All frames are sent to the detector for detection, and then the detected pictures are synthesized back to the video to complete the target detection of the video.
Under the home directory PyTorch-YOLOv3-master, create a new folder process_video and image, and put the video to be detected into process_ In the video folder and in process_ Create a new script in video and write the following video segmentation code:
import cv2
vc=cv2.VideoCapture("segment-1.avi")
c=1
if vc.isOpened():
    rval,frame=vc.read()
else:
    rval=False
while rval:
    rval,frame=vc.read()
    cv2.imwrite('image/'+str(c)+'.jpg',frame)
    c=c+1
    cv2.waitKey(1)
vc.release()
Run the above code to complete the video segmentation, and the segmented pictures are stored in the new image folder.
Execute the following detection commands:
python detect.py --images process_video/image
The detected pictures are saved in the output folder. Similarly, pay attention to emptying the folder before detection to facilitate the next video synthesis.
Some of the detected results are shown as follows:
Now, under the home directory PyTorch-YOLOv3-master, create a new script and type the following code to synthesize the pictures into Videos:
import cv2
import os
img=cv2.imread('output/10.png')
size=img.shape[:2][::-1]
fourcc = cv2.VideoWriter_fourcc('M', 'J', 'P', 'G')
videoWriter = cv2.VideoWriter('out.avi', fourcc, 30, size)
img_dir='output'
for img_name in sorted(os.listdir(img_dir),key=lambda x: int(x.split('.')[0])):
    print(img_name)
    img = os.path.join('output', img_name)
    frame = cv2.imread(img)
    videoWriter.write(frame)
videoWriter.release()
Output video file out Avi is saved in the main directory PyTorch-YOLOv3-master.