preface
The configuration process of yolov5 is generally OK, but most blogs on the Internet do not carefully introduce the specific steps. This paper will record the whole process of yolov5 environment configuration under Windows 10 system from the most detailed level, as well as some details of yolov5 use, and how to make and train their own data sets.
Note: the update speed of yolov5 official website code is fast, and relevant dependent environments such as pytorch and apex will also adopt the updated version. The blogger uploaded the project files successfully configured in February 2021. If you need the old version code, you can download it yourself or from the official website. If you encounter difficulties in configuration, you can refer to some answers in the comment area. If it has not been solved, you are welcome to leave a message or private letter in the comment area, and the blogger will try his best to solve it.
catalogue
- [yolov5 introduction]
- [information]
- 1, Basic part:
- 2, Code part:
- 3, Excellent practical application:
- [information]
- [resources required for environment configuration]
- [step 1 - download the source code]
- [step 2 - install anaconda and pycharm]
- [step 3 - install cuda10.2 and cudnn-10.2-windows10-x64-v7.6.5.32]
- [step 4 - install pytorch1.5.1 and other libraries]
- [step 5 - Download weight file]
- [step 6 - actual test]
- [step 7 (optional) - install apex]
- [step 8 - training self-made data sets]
- [1.coco128 dataset]
- [2.coco2017 dataset]
- [3. Real Homemade dataset]
- [4. False self-made data sets]
- [1. The code for generating random data set is as follows]
- [2. Create yaml file]
- [3. Change the setting of train.py]
yolov5 introduction
Let's introduce yolov5
Insert picture description here
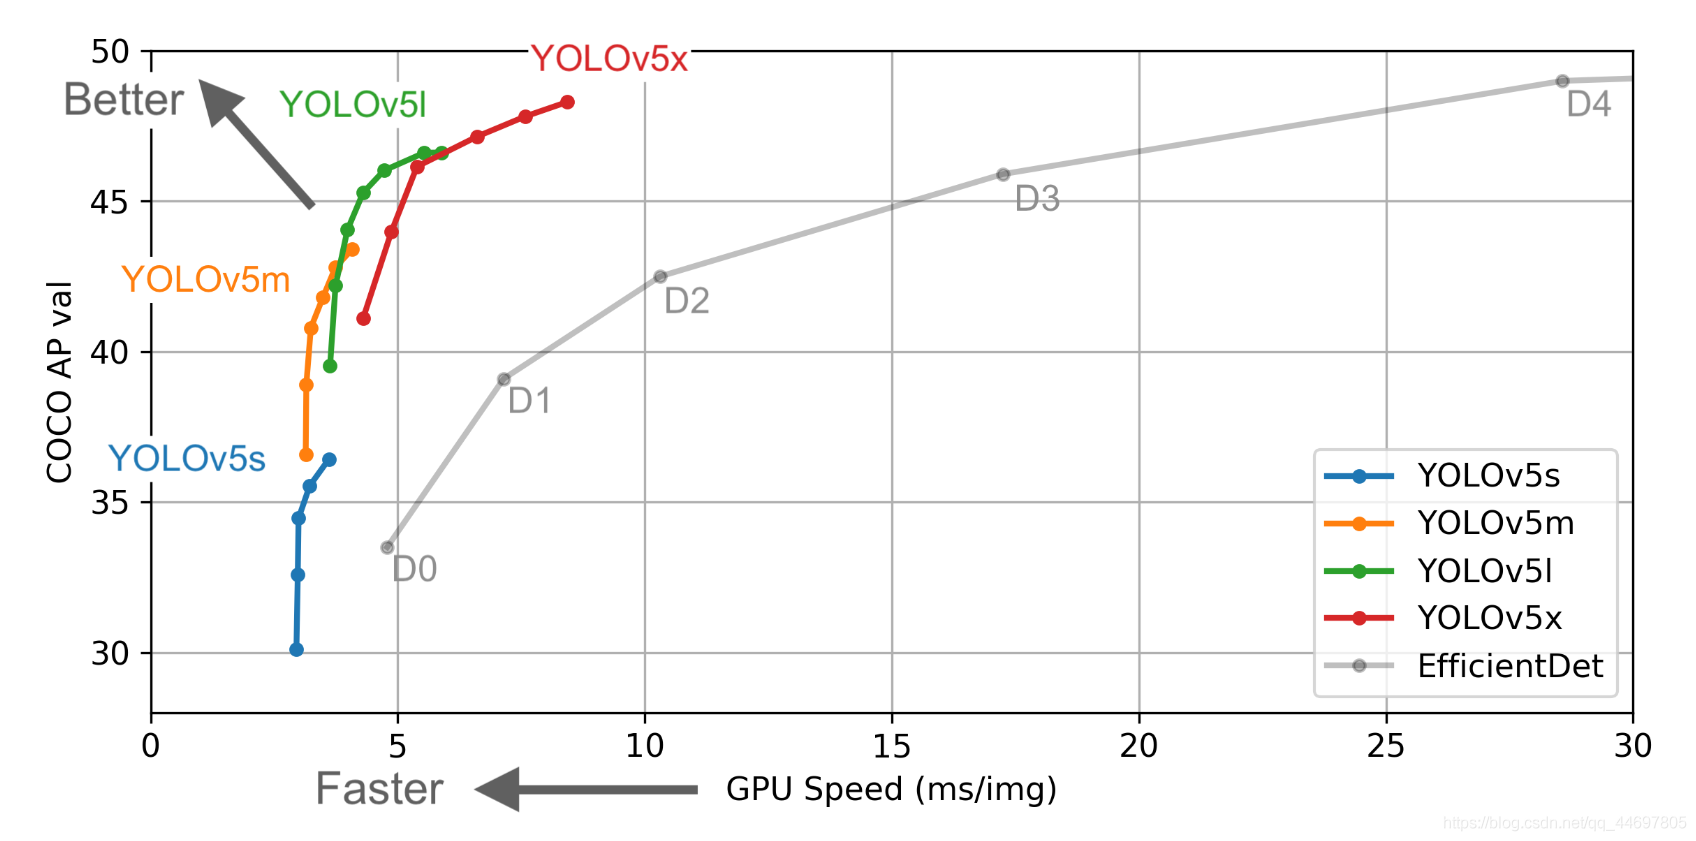
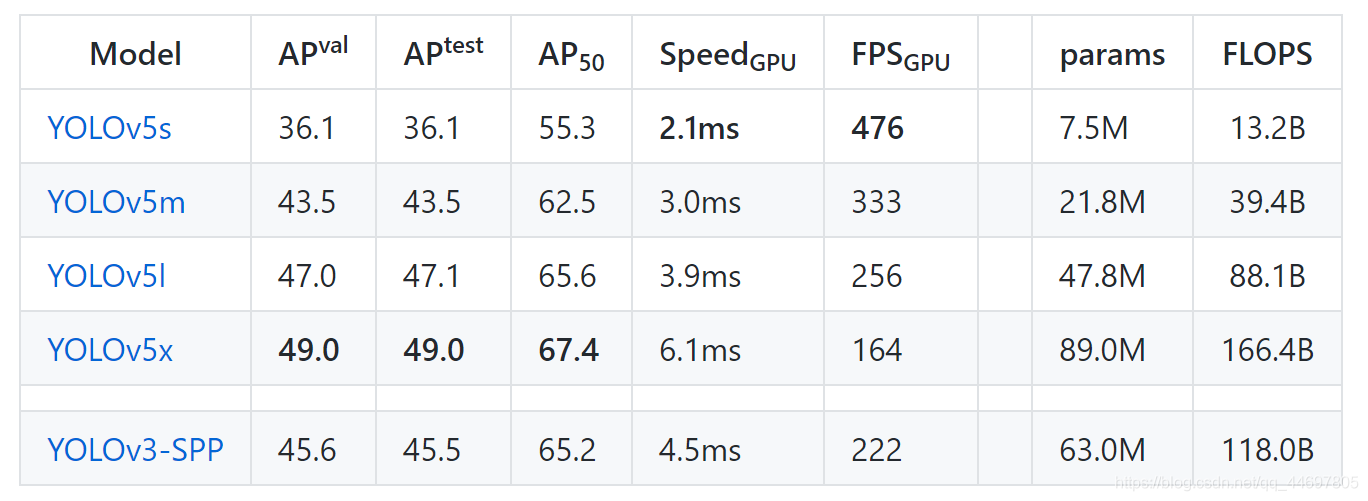
One of the features of yolov5 is that the weight file is very small and can be carried on mobile devices with lower configuration
Insert picture description here
Moreover, yolov5 is faster and more accurate than yolov4
Insert picture description here
This blog also includes some other materials in the learning process, including:
data
1, Basic part:
1.A complete explanation of the core basic knowledge of yolov3 & yolov4 & yolov5 in Yolo series
2.A complete explanation of Yolov5 core basic knowledge of Yolo series
3.From V1 to V4, you can understand the principle of YOLO
2, Code part:
4.Detailed explanation of YOLOv5 code (yolov5l.yaml part)
5.Detailed explanation of YOLOv5 code (common.py part)
6.Detailed explanation of YOLOv5 code (test.py)
7.Detailed explanation of YOLOv5 code (train.py)
3, Excellent practical application:
8.Real time smoking target detection
Resources required for environment configuration
The tools used are
1.anaconda,pycharm
2.cuda10.2+cudnn-10.2-windows10-x64-v7.6.5.32+pytorch1.5.1-gpu+. . . . . . . .
ps (for the old version code used in this article, pytorch can only be greater than or equal to 1.5.1, and the new version code needs to be the same as the requirements of the official website -- 1.6.0 +. This article will explain the installation steps later)
Resource requirements:
This blog provides all cuda and cudnn of win10 for free, Baidu cloud , extraction code: 78il
And the installation packages of anaconda and pycharm Baidu cloud , extraction code: 95q7
And weight file Baidu cloud , extraction code: 9pfg
And GitHub's official yolov5 source code Baidu cloud (the source code of the official website has been updated. It is recommended to download this source code). Extraction code: tyn6
And the official coco test data set Baidu cloud , extraction code: ny9j
Configuration officially started
Step 1 - download the source code
This paper adopts yolov5 official website Provide the source code under the pytorch framework (the official code is the latest modification, it is recommended to use the code version provided in this article - updated on July 31, which can be downloaded from the baidu cloud link above). Click the red area to download the source code compression package
Insert picture description here
Unzip it to a folder without Chinese characters (if it contains Chinese characters, the cv2.imread() function of OpenCV will not be able to read the pictures or videos to be detected)
Step 2 - install anaconda and pycharm
Both development tools can be downloaded from the official website.
anaconda is a platform for managing virtual environments containing different libraries for python development. It can efficiently manage and create project interpreter s suitable for multiple different projects. The installation is completed with a root environment. The path is in the installation directory of conda. After entering, you can create a new environment on the environment management page. The path of the new environment is stored in envs under the installation directory. When setting the interpreter in python, you need to find the storage location of the required environment. For the interpreter setting, select conda environment and fill in python Exe path to complete the binding between the compilation environment and the project. Then set the virtual environment. When installing a new library, just open cmd and enter the activate environment name to enter the environment directory. Then pip can install the required library.
First, Download anaconda-py3.0 from the official website For version 7-64, check these two items to facilitate environment configuration. If these two items are not checked during installation, it is recommended to reinstall and install again! Heavy! Open!, It is recommended to restart after the change of environment variables.
Insert picture description here
Wait until anaconda is installed, enter the environment interface, click create, name the new environment yolov5test, and choose python 3 for python version 7. Click ok, wait for the initial environment to be generated automatically, and then close anaconda.
PS (in case of anaconda card load application, refer to Anaconda creates a new python environment Use cmd to create a new environment (installation of operation package)
Insert picture description here
After completing the installation of anaconda, Download pycharm from the official website, unzip the project after the installation is completed, and select the path to the path without Chinese characters that unzipped the source code before. Note!!!!, After creation, the file marked with red box here is the correct path (you can also create it first and then extract it into the project file)
Insert picture description here
Then enter pycharm and select the interpreter required by the project
Insert picture description here
Step 3 - install cuda10 2 and cudnn-10.2-windows10-x64-v7 6.5.32
Insert picture description here
Because pytorch1.0 is used this time 5.1 (if you use the latest version of the official website code, please install it according to the environmental requirements in requirement.txt and upgrade pytorch to 1.6), and the corresponding CUDA is 10.1 (CUDA ≥ 10.1, just match cudnn with CUDA version), ps (I used tf=1.14+cuda10.0 for deep learning development before, but pytorch1.5.1 needs to install a new CUDA, so cuda10.2 is installed. The solution to this situation is given below)
Step 1: download, double-click and run, select from definition
Insert picture description here
Step 2: do not select visual studio integration, otherwise it cannot be installed
Insert picture description here
Wait for the installation to complete -- about 2 minutes. If GeForce experience fails during this period, repeat the above steps
Step 3: change environment variables
Enter the environment variable editing page, and cuda10.0 has been 2. To install in the default NVIDIA cumputing toolkit path, you need to change the system environment variable to cuda10 2. Remove the variable of 10.0. The same computer can have multiple different versions of CUDA. If you need to use a lower version of CUDA, you only need to change the system environment variable to the lower version and delete the higher version.
Insert picture description here
New environment variable
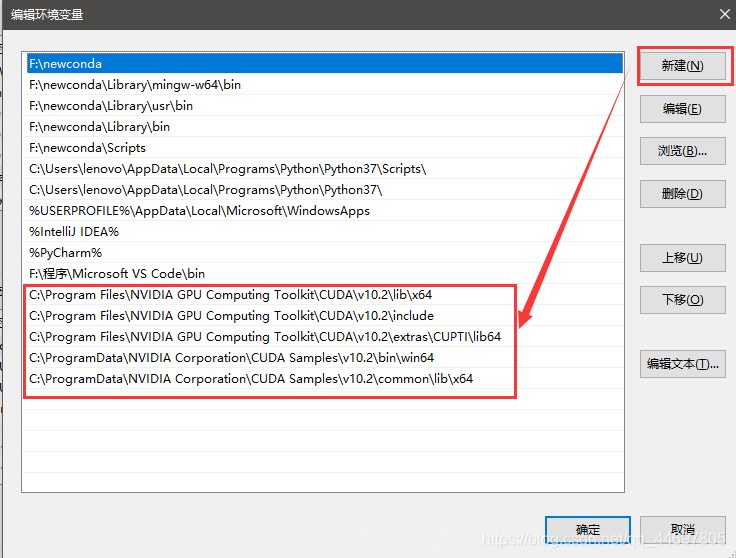
Insert picture description here
C:\Program Files\NVIDIA GPU Computing Toolkit\CUDA\v10.2\lib\x64
C:\Program Files\NVIDIA GPU Computing Toolkit\CUDA\v10.2\include
C:\Program Files\NVIDIA GPU Computing Toolkit\CUDA\v10.2\extras\CUPTI\lib64
C:\ProgramData\NVIDIA Corporation\CUDA Samples\v10.2\bin\win64
C:\ProgramData\NVIDIA Corporation\CUDA Samples\v10.2\common\lib\x64
At this time, there should be the following two variables. If there are residual cuda10 installed previously The path of 0 can be deleted
Insert picture description here
Step 4: install cudnn
After extracting cudnn, copy all the contents to the following path, ps (the default path, which can be used directly)
C:\Program Files\NVIDIA GPU Computing Toolkit\CUDA\v10.2
Step 5: Verification
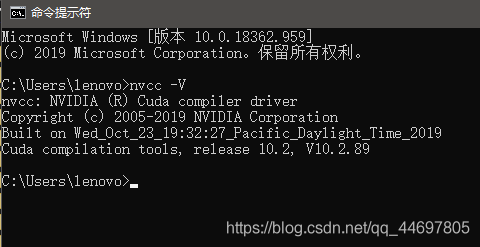
Open cmd and enter nvcc -V to verify whether cuda is installed successfully. The following interface appears to be successful
Insert picture description here
Step 4 - install pytorch1 5.1 and other libraries
Enter cmd as an administrator, enter activate yolov5test, enter the environment directory, and enter
pip install torch===1.5.1 torchvision===0.6.1 -f https://download.pytorch.org/whl/torch_stable.html -i https://pypi.douban.com/simple
Many of the Douban source installations use Tsinghua source, but the installation of Tsinghua source is easy to timeout, resulting in installation failure. If possible, you can climb over the wall and install directly, and the effect is very good.
After installation, create a file in pycharm and enter it to verify whether pytorch installation is successful
import torch
print(torch.cuda.is_available())
print(torch.__version__)
If the following results appear, the installation is successful
Insert picture description here
The installation of other libraries is recommended according to the requirements Txt files are installed one by one... Tsinghua source is too easy to collapse
Requirements are given below Txt content
# pip install -U -r requirements.txt
Cython
numpy>=1.18.5
opencv-python
torch>=1.5.1
matplotlib
pillow
tensorboard
PyYAML>=5.3
torchvision>=0.6
scipy
tqdm
# pycocotools>=2.0

# Nvidia Apex (optional) for mixed precision training --------------------------
# git clone https://github.com/NVIDIA/apex && cd apex && pip install -v --no-cache-dir --global-option="--cpp_ext" --global-option="--cuda_ext" . --user && cd .. && rm -rf apex

# Conda commands (in place of pip) ---------------------------------------------
# conda update -yn base -c defaults conda
# conda install -yc anaconda numpy opencv matplotlib tqdm pillow ipython
# conda install -yc conda-forge scikit-image pycocotools tensorboard
# conda install -yc spyder-ide spyder-line-profiler
# conda install -yc pytorch pytorch torchvision
# conda install -yc conda-forge protobuf numpy && pip install onnx==1.6.0  # https://github.com/onnx/onnx#linux-and-macos
You can install the corresponding libraries by entering the following commands according to the following instructions:
pip install Cython
pip install numpy
pip install opencv-python
pip install matplotlib
pip install pillow
pip install tensorboard
pip install PyYAML
pip install torchvision
pip install scipy
pip install tqdm
Step 5 - download the weight file
Put the downloaded weight file into the project folder!!!! Note that it is the project folder, not the weights folder!!!!!!
Insert picture description here
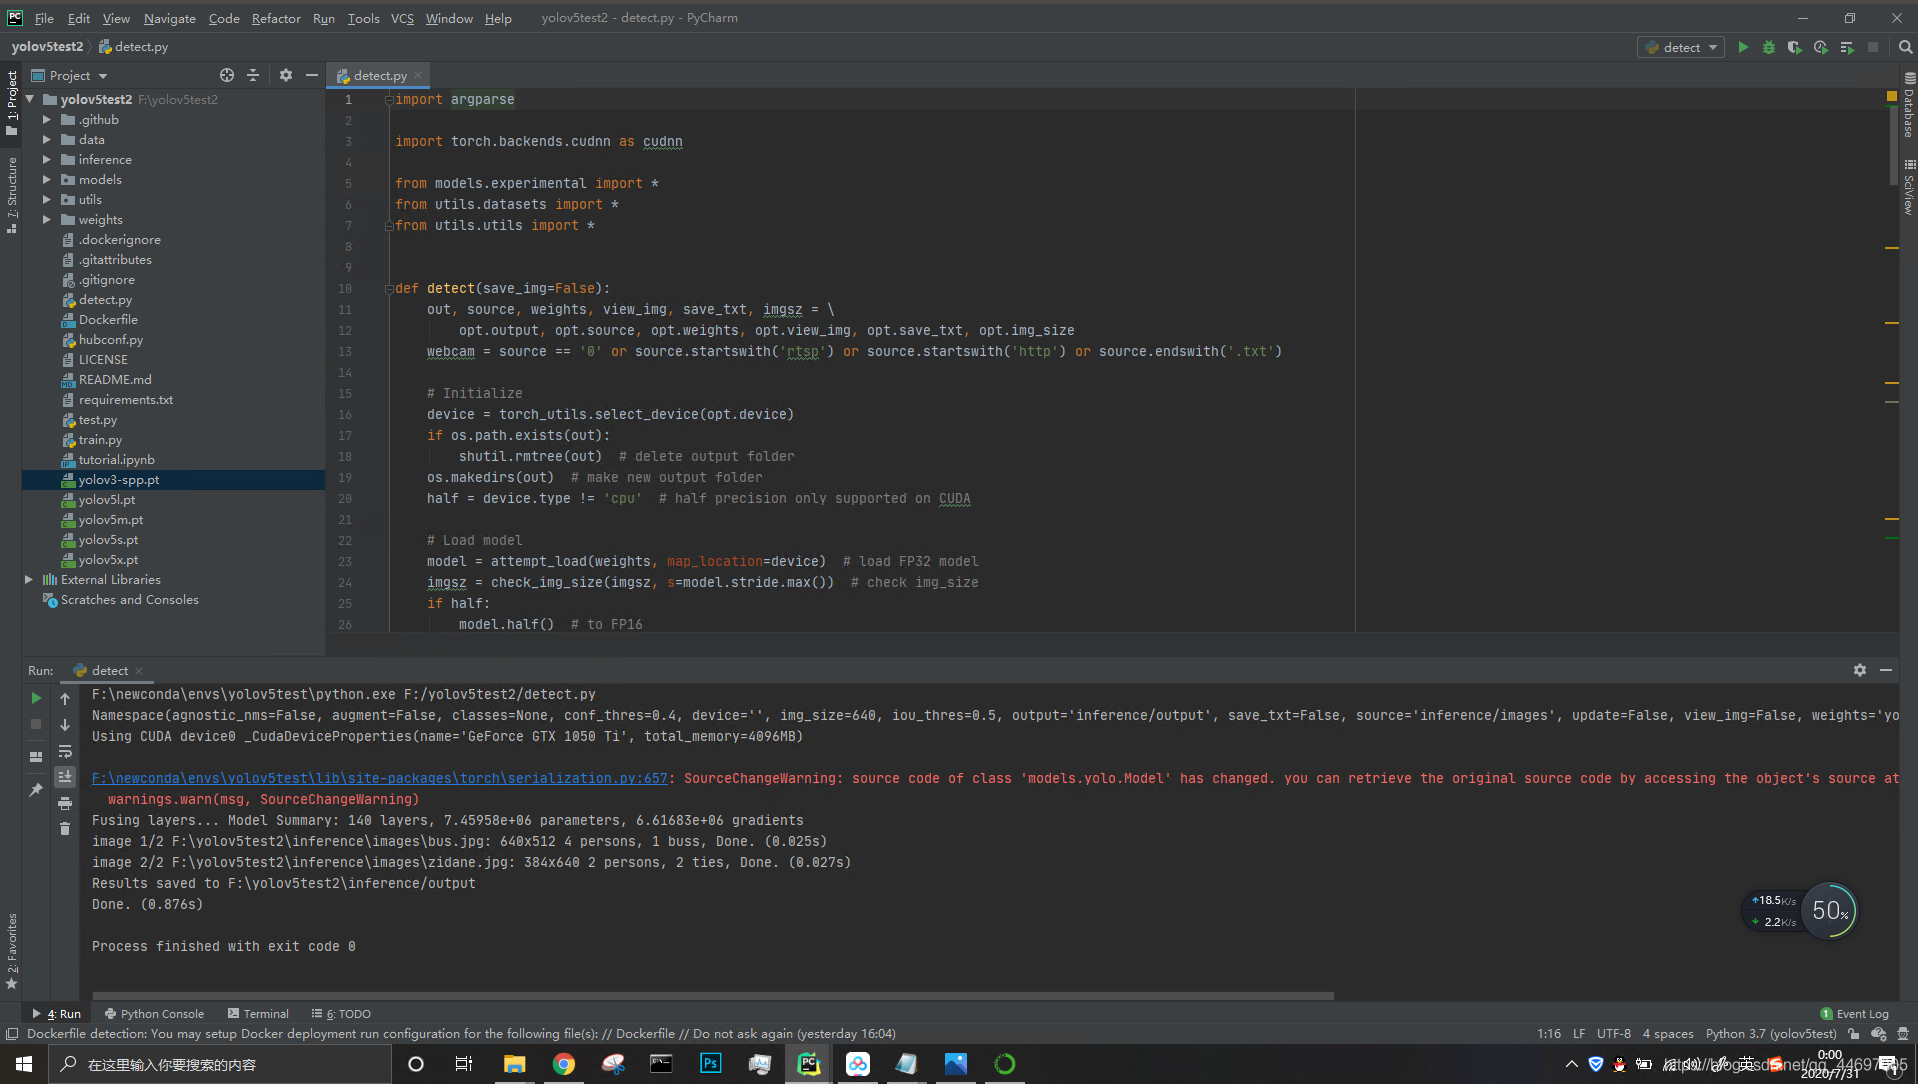
Step 6 - actual test
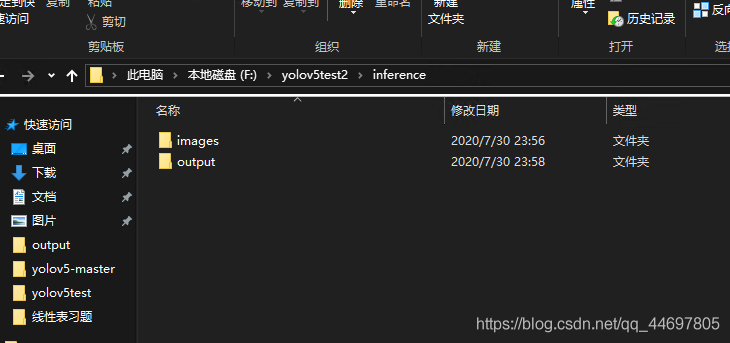
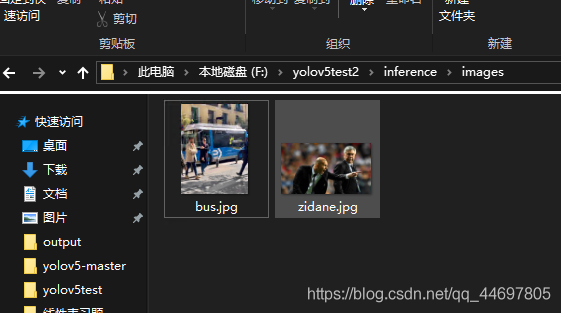
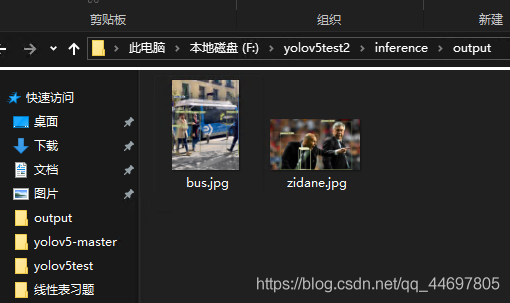
Open the project folder and find information, where images stores test data and output stores test results. Similarly, the name of test data cannot contain Chinese characters
The basic test needs to run detect The running results in py and pycharm are as follows
Insert picture description here
Insert picture description here
Insert picture description here
Insert picture description here
Insert picture description here
The basic test needs to run detect The running results in py and pycharm are as follows
Insert picture description here
Note: the test data can be pictures or videos, or local cameras.
The use method is to find it at the end of the detect file
d_argument('--source', type=str, default='0', help='source') # file/folder, 0 for webcam
The default value can be changed to 0
I use i7-8750+1050Ti mobile phone to record 30~50FPS, and the effect is OK
ps: if the page file is too small to complete the operation, this error is due to insufficient virtual memory (the definition of virtual memory refers to the virtual memory of the operating system) Modify page file Can be solved
Step 7 (optional) - install apex
Introduction:
This repository contains nvidia maintained utilities to simplify hybrid accuracy and distributed training in pytoch. Some of the code here will be included in the upstream pytoch final. The purpose of Apex is to provide users with the latest utilities as soon as possible.
Windows support is experimental, and Linux is recommended.
pip install -v --no-cache-dir --global-option="--cpp_ext" --global-option="--cuda_ext" .may work if you were able to build Pytorch from source on your system. pip install -v --no-cache-dir .(without CUDA/C++ extensions) is more likely to work. If you installed Pytorch in a Conda environment, make sure to install Apex in that same environment.
1. Download the source code from the official website and unzip the contents to the yolov5 project folder
2. Open the terminal interface of pycharm and enter
pip install -v --no-cache-dir --global-option="--cpp_ext" --global-option="--cuda_ext"
But it doesn't seem right.. Input meeting report
ERROR: You must give at least one requirement to install (see "pip help install")
You can try entering in terminal
python setup.py install --cpp_ext --cuda_ext
Wait 1-2 minutes to complete the installation
Step 8 - train self-made data sets
1.coco128 data set
The training data set needs to download the coco data set, decompress it to the location parallel to the project file, and run train py
Note: if we use self-made training set to train our own network model and GPU is not awesome, we can adjust network parameters and training scale. (because there are only 128 pictures in the coco128 data set and there are many types of markers, the final effect of the trained network is not ideal, which is only used to test whether it can be trained)
2.coco2017 dataset
Because the dataset is large and marked in json format.... (it's said that you need to transfer xml and then txt to train yolov5?), Gu re studies. If there are big guys who know, they can comment and add a wave
Thank you ♪ ω・) ノ
coco2017 is marked in json format
Insert picture description here
Only instances are needed for target detection_ train2017. JSON and instances_val2017.json has two annotation files, one is the annotation of training set and the other is the annotation of verification set
Here are the compressed packages of two formats that have been converted xml,txt
Insert picture description here
Insert picture description here
The source code of JSON - > XML - > TXT format annotation is given
json2xml.py
# When using, you only need to modify the 21, 22 and 24 line path files
import os
import time
import json
import pandas as pd
from tqdm import tqdm
from pycocotools.coco import COCO

def trans_id(category_id):
    names = []
    namesid = []
    for i in range(0, len(cats)):
        names.append(cats[i]['name'])
        namesid.append(cats[i]['id'])
    index = namesid.index(category_id)
    return index

root = 'coco2017'  # The directory where you downloaded the COCO dataset
dataType = 'train2017'
anno = '{}/annotations/instances_{}.json'.format(root, dataType)
xml_dir = '{}/xml/{}_xml'.format(root, dataType)

coco = COCO(anno)  # read file
cats = coco.loadCats(coco.getCatIds())  # Here, loadCats is the interface provided by coco to obtain categories

# Create anno dir
dttm = time.strftime("%Y%m%d%H%M%S", time.localtime())
if os.path.exists(xml_dir):
    os.rename(xml_dir, xml_dir + dttm)
os.mkdir(xml_dir)

with open(anno, 'r') as load_f:
    f = json.load(load_f)

imgs = f['images']

df_cate = pd.DataFrame(f['categories'])
df_cate_sort = df_cate.sort_values(["id"], ascending=True)
categories = list(df_cate_sort['name'])
print('categories = ', categories)
df_anno = pd.DataFrame(f['annotations'])

for i in tqdm(range(len(imgs))):
    xml_content = []
    file_name = imgs[i]['file_name']
    height = imgs[i]['height']
    img_id = imgs[i]['id']
    width = imgs[i]['width']

    xml_content.append("<annotation>")
    xml_content.append("    <folder>VOC2007</folder>")
    xml_content.append("    <filename>" + file_name + "</filename>")
    xml_content.append("    <size>")
    xml_content.append("        <width>" + str(width) + "</width>")
    xml_content.append("        <height>" + str(height) + "</height>")
    xml_content.append("    </size>")
    xml_content.append("    <segmented>0</segmented>")
    # Through img_id found annotations
    annos = df_anno[df_anno["image_id"].isin([img_id])]

    for index, row in annos.iterrows():
        bbox = row["bbox"]
        category_id = row["category_id"]
        cate_name = categories[trans_id(category_id)]

        # add new object
        xml_content.append("    <object>")
        xml_content.append("        <name>" + cate_name + "</name>")
        xml_content.append("        <pose>Unspecified</pose>")
        xml_content.append("        <truncated>0</truncated>")
        xml_content.append("        <difficult>0</difficult>")
        xml_content.append("        <bndbox>")
        xml_content.append("            <xmin>" + str(int(bbox[0])) + "</xmin>")
        xml_content.append("            <ymin>" + str(int(bbox[1])) + "</ymin>")
        xml_content.append("            <xmax>" + str(int(bbox[0] + bbox[2])) + "</xmax>")
        xml_content.append("            <ymax>" + str(int(bbox[1] + bbox[3])) + "</ymax>")
        xml_content.append("        </bndbox>")
        xml_content.append("    </object>")
    xml_content.append("</annotation>")

    x = xml_content
    xml_content = [x[i] for i in range(0, len(x)) if x[i] != "\n"]
    ### list save file
    xml_path = os.path.join(xml_dir, file_name.replace('.jpg', '.xml'))
    with open(xml_path, 'w+', encoding="utf8") as f:
        f.write('\n'.join(xml_content))
    xml_content[:] = []
xml2txt.py
import os.path
import xml.etree.ElementTree as ET

class_names = ['lip']

xmlpath = 'F:\\share\\tagging\\xml\\' # Location of the xml file
txtpath = 'F:\\share\\tagging\\txt\\' # Where to export txt

files=[]

for root, dirs, files in os.walk(xmlpath):
    None

number = len(files)
i = 0
while i < number:

    name = files[i][0:-4]
    xml_name = name + ".xml"
    txt_name = name + ".txt"
    xml_file_name = xmlpath + xml_name
    txt_file_name = txtpath + txt_name

    xml_file = open(xml_file_name)
    tree = ET.parse(xml_file)
    root = tree.getroot()
    filename = root.find('filename').text

    image_name = root.find('filename').text
    w = int(root.find('size').find('width').text)
    h = int(root.find('size').find('height').text)

    f_txt = open(txt_file_name, 'w+')
    content = ""

    first = True

    for obj in root.iter('object'):

        name = obj.find('name').text
        class_num = class_names.index(name)

        xmlbox = obj.find('bndbox')

        x1 = int(xmlbox.find('xmin').text)
        x2 = int(xmlbox.find('xmax').text)
        y1 = int(xmlbox.find('ymin').text)
        y2 = int(xmlbox.find('ymax').text)

        if first:
            content += str(class_num) + " " + \
                       str((x1+x2)/2/w) + " " + str((y1+y2)/2/h) + " " + \
                       str((x2-x1)/w) + " " + str((y2-y1)/h)
            first=False
        else:
            content += "\n" + \
                       str(class_num) + " " + \
                       str((x1 + x2) / 2 / w) + " " + str((y1 + y2) / 2 / h) + " " + \
                       str((x2 - x1) / w) + " " + str((y2 - y1) / h)

    print(str(i/(number - 1) * 100) + "%\n")
    f_txt.write(content)
    f_txt.close()
    xml_file.close()
    i += 1

print("done!")
3. Real self-made data sets
All kinds of marking tools for target detection are OK. I use them LabelImg
Insert picture description here
You can download the source code and install it, or you can install it directly with pip
Installation method reference:
https://blog.csdn.net/qq_34809033/article/details/80589868?utm_medium=distribute.pc_relevant_t0.none-task-blog-BlogCommendFromMachineLearnPai2-1.edu_weight&depth_1-utm_source=distribute.pc_relevant_t0.none-task-blog-BlogCommendFromMachineLearnPai2-1.edu_weight
Usage reference:
https://zhuanlan.zhihu.com/p/90834296
https://blog.csdn.net/python_pycharm/article/details/85338801
4. False self-made data sets
Try to train the coco128 data set, but the effect is not ideal.
We can use the pygame drawing self-made data set training method.
1. The code for generating random data set is as follows
import math
import random
import pygame
pygame.init()

windowSize = [640, 640]
screen = pygame.display.set_mode(windowSize)
clock = pygame.time.Clock()

color = pygame.color.Color('#57B0F6')
black = pygame.color.Color('#000000')

count = 0
done = False
fileNo = 0

round = 1

while not done and round<1000:
    screen.fill(black)

    x = 100 + random.randint(0, 400)
    y = 100 + random.randint(0, 400)
    pygame.draw.ellipse(screen, color, [x, y, 100, 100])

    pygame.display.flip()

    zero=""
    if round>=1 and round<=9:
        zero="00000000000"
    if round>=10 and round<=99:
        zero="0000000000"
    if round>=100 and round<=999:
        zero="000000000"
    pygame.image.save(screen, "images\\" + zero + str(round) + ".jpg") #This sentence saves the picture

    f=open("labels\\" + zero +str(round)+".txt",'w+')
    f.write("0 "+str((x+50)/640)+" "+str((y+50)/640)+" 0.15625 0.15625")
    f.close()

    for event in pygame.event.get():
        if event.type == pygame.QUIT:
            done = True

    round+=1
pygame.quit()
Draw a blue circular pattern under the black background through pygame, and according to the import rule of yolov5 tag - a txt file for each picture, and each line represents an object. The first number represents the subscript of the category defined in yaml (write 0 if there is only one), the second and third numbers represent the abscissa and ordinate of the center of the rectangular box (0.5 if it is in the middle), and the fourth and fifth numbers represent the width and height of the rectangle (0.5 if both the width and height are half of the picture)
Insert picture description here
images folder
Insert picture description here
Insert picture description here
labels folder
Insert picture description here
Insert picture description here
A total of 1000 pictures are randomly generated, the positions are random, and the corresponding annotations are generated.
2. Create yaml file
Find the data folder in the project file of yolov5 and create circle Yaml file, enter the following code
train: ../creat_image/images/ #Change the path to your own training file
val: ../creat_image/images/ #Change to the path of your own test file

# number of classes
nc: 1

# class names
names: ['circle']
3. Change train Py settings
Training attribute setting description
    # Configuration file for storing model structure
    parser.add_argument('--cfg', type=str, default='models/yolov5s.yaml', help='model.yaml path')

    # File for storing training and test data coco128 yaml->circle. yaml
    parser.add_argument('--data', type=str, default='data/circle.yaml', help='data.yaml path')

    #
    parser.add_argument('--hyp', type=str, default='', help='hyp.yaml path (optional)')

    # It refers to how many times the whole data set will be iterated during the training process. If the graphics card can't work, you can turn it down
    parser.add_argument('--epochs', type=int, default=100)

    # Batch size: how many pictures do you read at a time before updating the weight? For the mini batch with gradient decline, if the graphics card can't work, you can turn it down.
    parser.add_argument('--batch-size', type=int, default=30, help="Total batch size for all gpus.")

    # Input the width and height of the picture. If the graphics card doesn't work, you can turn it down------- It must be a multiple of 32. Entering 250 will automatically adjust to 256
    parser.add_argument('--img-size', nargs='+', type=int, default=[320, 320], help='train,test sizes')

    # Rectangle training
    parser.add_argument('--rect', action='store_true', help='rectangular training')

    # Restore the recently saved model and start training
    parser.add_argument('--resume', nargs='?', const='get_last', default=False,
                        help='resume from given path/to/last.pt, or most recent run if blank.')

    # Save only the final checkpoint
    parser.add_argument('--nosave', action='store_true', help='only save final checkpoint')

    # Test only the last epoch
    parser.add_argument('--notest', action='store_true', help='only test final epoch')

    #
    parser.add_argument('--noautoanchor', action='store_true', help='disable autoanchor check')

    # Evolutionary hyperparameter
    parser.add_argument('--evolve', action='store_true', help='evolve hyperparameters')

    # gsutil bucket
    parser.add_argument('--bucket', type=str, default='', help='gsutil bucket')

    # Cache images to speed up training
    parser.add_argument('--cache-images', action='store_true', help='cache images for faster training')

    # The weight file path is used for migration training. It can be trained based on several trained models provided by the official
    # default='' ----> default='yolov5s.pt'
    parser.add_argument('--weights', type=str, default='', help='initial weights path')

    # Rename results txt to results_ name. txt
    parser.add_argument('--name', default='', help='renames results.txt to results_name.txt if supplied')

    # cuda device, i.e. 0 or 0,1,2,3 or cpu
    parser.add_argument('--device', default='', help='cuda device, i.e. 0 or 0,1,2,3 or cpu')

    # Multiscale training, IMG size + / - 50%
    parser.add_argument('--multi-scale', action='store_true', help='vary img-size +/- 50%%')

    # Single category training set
    parser.add_argument('--single-cls', action='store_true', help='train as single-class dataset')
Open train Py, find the statement in the following position, and change the default to its own circle Yaml path
parser.add_argument('--data', type=str, default='data/circle.yaml', help='data.yaml path')
I use 1050Ti+i7-8750 notebook computer, use 320320 picture input, train 100 rounds, and the training time is about 1.5 hours
After the training, the training model and training parameter chart will be saved under run in yolov5 folder