Friendly participation: @Cotton cotton
YOLO is a target detection method, which is characterized by fast detection and high accuracy. The author regards the target detection task as a regression problem of target region prediction and category prediction. This method uses a single neural network to directly predict the boundary and category probability of items, and realizes end-to-end item detection. At the same time, the detection speed of this method is very fast, and the basic version can achieve real-time detection of 45 frames / s; FastYOLO can reach 155 frames / s. Compared with the current best system, the positioning error of YOLO target area is greater, but the false positive of background prediction is better than the current best method.
Knowledge is limited. Once again, we do not deeply explore the network structure and principle of YOLO, but only record how to use it.
Objective: to detect the characters in the video
1, Install & configure environment
I use anaconda for environment configuration
conda create --name Yolov5 python=3.8
After creating the new environment, there is a requirement in the installation path of YOLOv5 Txt file, which lists all the package s required for YOLOv5. Open cmd and enter
pip install -r requirements.txt
The installation can be completed automatically. The installation may fail halfway. It is probably a network problem. Just reinstall it.
Since the pytorch it automatically downloads is the cpu version, we need to delete the downloaded pytorch first
pip uninstall torch
Then go Official website Manually download the gpu version of pytorch. After the test can use gpu, the configuration of the environment is completed.
torch.cuda.is_available()
2, Get data
Here I want to extract several frames from the video as data for annotation. The frame extraction code is as follows. In order to facilitate future use, I directly encapsulated it into class:
package required: cv2, os. There should be no need to install it separately. It will be installed when YOLOv5 is configured
class Video2Frame:
    def __init__(self, videoPath, savePath, timeInterval=1):
        '''
        Initialization, get videoPath All videos under

        PARAMETERS:
         @ videoPath: Storage path of video
         @ framesSavePath: Save path of pictures after video segmentation into frames
         @ timeInterval: Save interval
        '''
        self.videoPath = videoPath
        self.savePath = savePath
        self.timeInterval = timeInterval
        self.videos = os.listdir(videoPath)

    def getVideoList(self):
        return self.videos

    def getFrameFromVideos(self, start=0, end=None):
        '''
        Create a folder for each video and save it frame
        PARAMETER:
         @ start: From which video
         @ end: To which end (barring end)
        '''
        length = len(self.videos)
        if end == None:
            end = length - 1
        start = start % length
        end = end % length + 1
        for i in range(start, end):
            self.getFrameFromVideo(i)

    def getFrameFromVideo(self, i=0):
        '''
        Create a folder for a video and save it frame
        PARAMETER:
         @ i: The first i Videos
        '''
        video = self.videos[i]
        folderName = video[:-4]
        os.chdir(self.savePath)
        if not os.path.exists(folderName):
            os.mkdir(folderName)

        vidCap = cv2.VideoCapture(self.videoPath + "\\" + video)
        success, image = vidCap.read()
        cnt = 0
        while success:
            success, image = vidCap.read()
            cnt += 1
            if cnt % self.timeInterval == 0:
                cv2.imencode('.jpg', image)[1].tofile(self.savePath + "\\" + folderName + r"\frame%d.jpg" % cnt)
            # if cnt == 200:
            #     break
        print(folderName + ": ", cnt // self.timeInterval, "images")


if __name__ == "__main__":
    videos_path = r'.\video'
    frames_save_path = r'.\data'
    time_interval = 30
    v2f = Video2Frame(videos_path, frames_save_path, time_interval)
    v2f.getFrameFromVideos(-2)
3, Label dataset
Labeling datasets requires a tool, labelImg( Download link ). After downloading and decompressing, the first thing to do is to delete labelimg master \ data \ predefined_ classes. Txt file, otherwise some preset categories will be automatically added when marking.
Then install pyqt5 (pay attention to the YOLOv5 environment)
pip install pyqt5
If an error is reported during installation, you need to install SIP first
pip install SIP
After installation, run cmd in the installation directory of labelImg, switch to the YOLOv5 environment, and enter
python labelImg.py
labelImg can be opened, and then the selected pictures can be marked.
4, train
Once the data is ready, you can start training the model. But before we start training, we need to do some preparations.
4.1 preparations before training
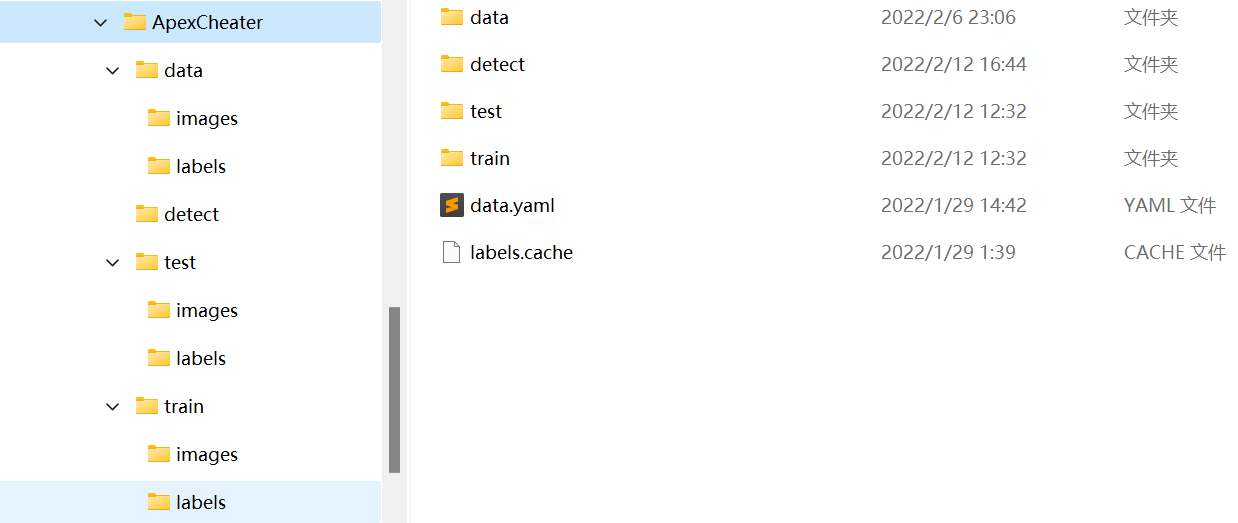
We first need to create the following folders:

data folder, detect folder and labels Cache is optional. Let me explain the functions of these documents one by one.
The data folder is used to put all the data. The detect folder is used to put files for prediction. I put videos or pictures here. Under the train folder are two subfolders, images and labels, which respectively contain pictures and labels for training. The test folder has the same structure as train and is used to store test data. data.yaml is a configuration file. We need to write the following code in the file:
train: ../ApexCheater/train/images
val: ../ApexCheater/test/images

nc: 2
names: ['body', 'head']
train and val are relative to the YOLOv5 installation path. nc indicates the number of categories, and names indicates the names of various categories. Pay attention to the order.
4.2 dividing data sets
Due to the small scale of the data, I divide it according to the ratio of 7:3, and the code is as follows:
package required: os, shutil, random
class separateData:
    def __init__(self, lst, dataPath):
        '''
        Initialise the class and print the size of train, test, detect set

        PARAMETERS:
          @ lst: Represents the proportion of train, test, detect set
          @ dataPath: The path of the data set
        '''

        # Get the total size of the data set
        self.tot = len(os.listdir(dataPath + r"\images"))
        self.dataPath = dataPath
        # Get train size, test size and print them
        self.trainSize = int(self.tot * lst[0])
        self.testSize = int(self.tot * lst[1])
        print("train size: ", self.trainSize)
        print("test size: ", self.testSize)

        # If you need to separate data into detect set
        if len(lst) == 3:
            self.detectSize = int(self.tot * lst[2])
            print("detect size: ", self.detectSize)

    def getRandomList(self, num, selected=[]):
        '''
        This function is used to choose some data randomly.

        PARAMETERS:
         @ num: The number of the elements of list.
         @ selected: A list represents previously selected data. Default value selected=[]

        RETURN:
         Return a list represents the serial number of the data, randomly.
        '''
        lst = []
        for i in range(0, num):
            # Loops until r is not in lst and selected. That means r
            # was never chosen in this for loop or previous program.
            while True:
                r = random.randint(0, self.tot - 1)
                if not((r in lst) or (r in selected)):
                    lst.append(r)
                    break
        return lst

    def copyData(self, i, path):
        '''
        There must be two folders under the given path, 'images' and 'labels'
        and this function will copy the images and labels into given folders respectively.

        PARAMETERS:
         @ i: The serial number of the data.
         @ path: Where the data will be copied to.
        '''
        JPG = self.dataPath + r"\images\apexCheater(" + str(i) + ").jpg"
        TXT = self.dataPath + r"\labels\apexCheater(" + str(i) + ").txt"
        shutil.copy(JPG, path + r"\images")
        shutil.copy(TXT, path + r"\labels")

    def deleteData(self, path):
        '''
        Delete the data under the given path.
        There must be two folders under the given path, 'images' and 'labels'.

        PARAMETER:
         @ path: The path you want to delete data under it.
        '''
        if path == "":
            return

        jpgPath = path + r"\images"
        txtPath = path + r"\labels"
        os.chdir(jpgPath)
        for data in os.listdir(jpgPath):
            os.remove(data)
        os.chdir(txtPath)
        for data in os.listdir(txtPath):
            os.remove(data)

    def separateTrainTestDetect(self, trainPath, testPath, detectPath="", isDataDelete=False):
        '''
        Separate data set into train, test, detect set, or just train and test set.

        PARAMETERS:
         @ trainPath: The path of train set.
         @ testPath: The path of test set.
         @ detectPath: The path of detect set. Default value detectPath="".
         @ isDataDelete: Whether to delete original data. Default value isDataDelete=False.
        '''
        if isDataDelete:
            self.deleteData(trainPath)
            self.deleteData(testPath)
            self.deleteData(detectPath)

        testList = self.getRandomList(self.testSize)
        detectList = self.getRandomList(self.detectSize, testList)

        for i in detectList:
            self.copyData(i, detectPath)
        for i in testList:
            self.copyData(i, testPath)
        for i in range(0, self.tot):
            if not((i in testList) or (i in detectList)):
                self.copyData(i, trainPath)


if __name__ == "__main__":
    rootPath = r".\ApexCheater"
    dataPath = rootPath + r"\data"
    trainPath = rootPath + r"\train"
    testPath = rootPath + r"\test"
    detectPath = rootPath + r"\detect"

    sd = separateData([0.7, 0.3, 0], dataPath)
    sd.separateTrainTestDetect(trainPath, testPath, isDataDelete=True)
    print("finished")
4.3 start training
I use pycharm because YOLOv5 provides a tutorial on training with jupyter notebook. I won't expand it here. I just remember how to use pycharm for training.
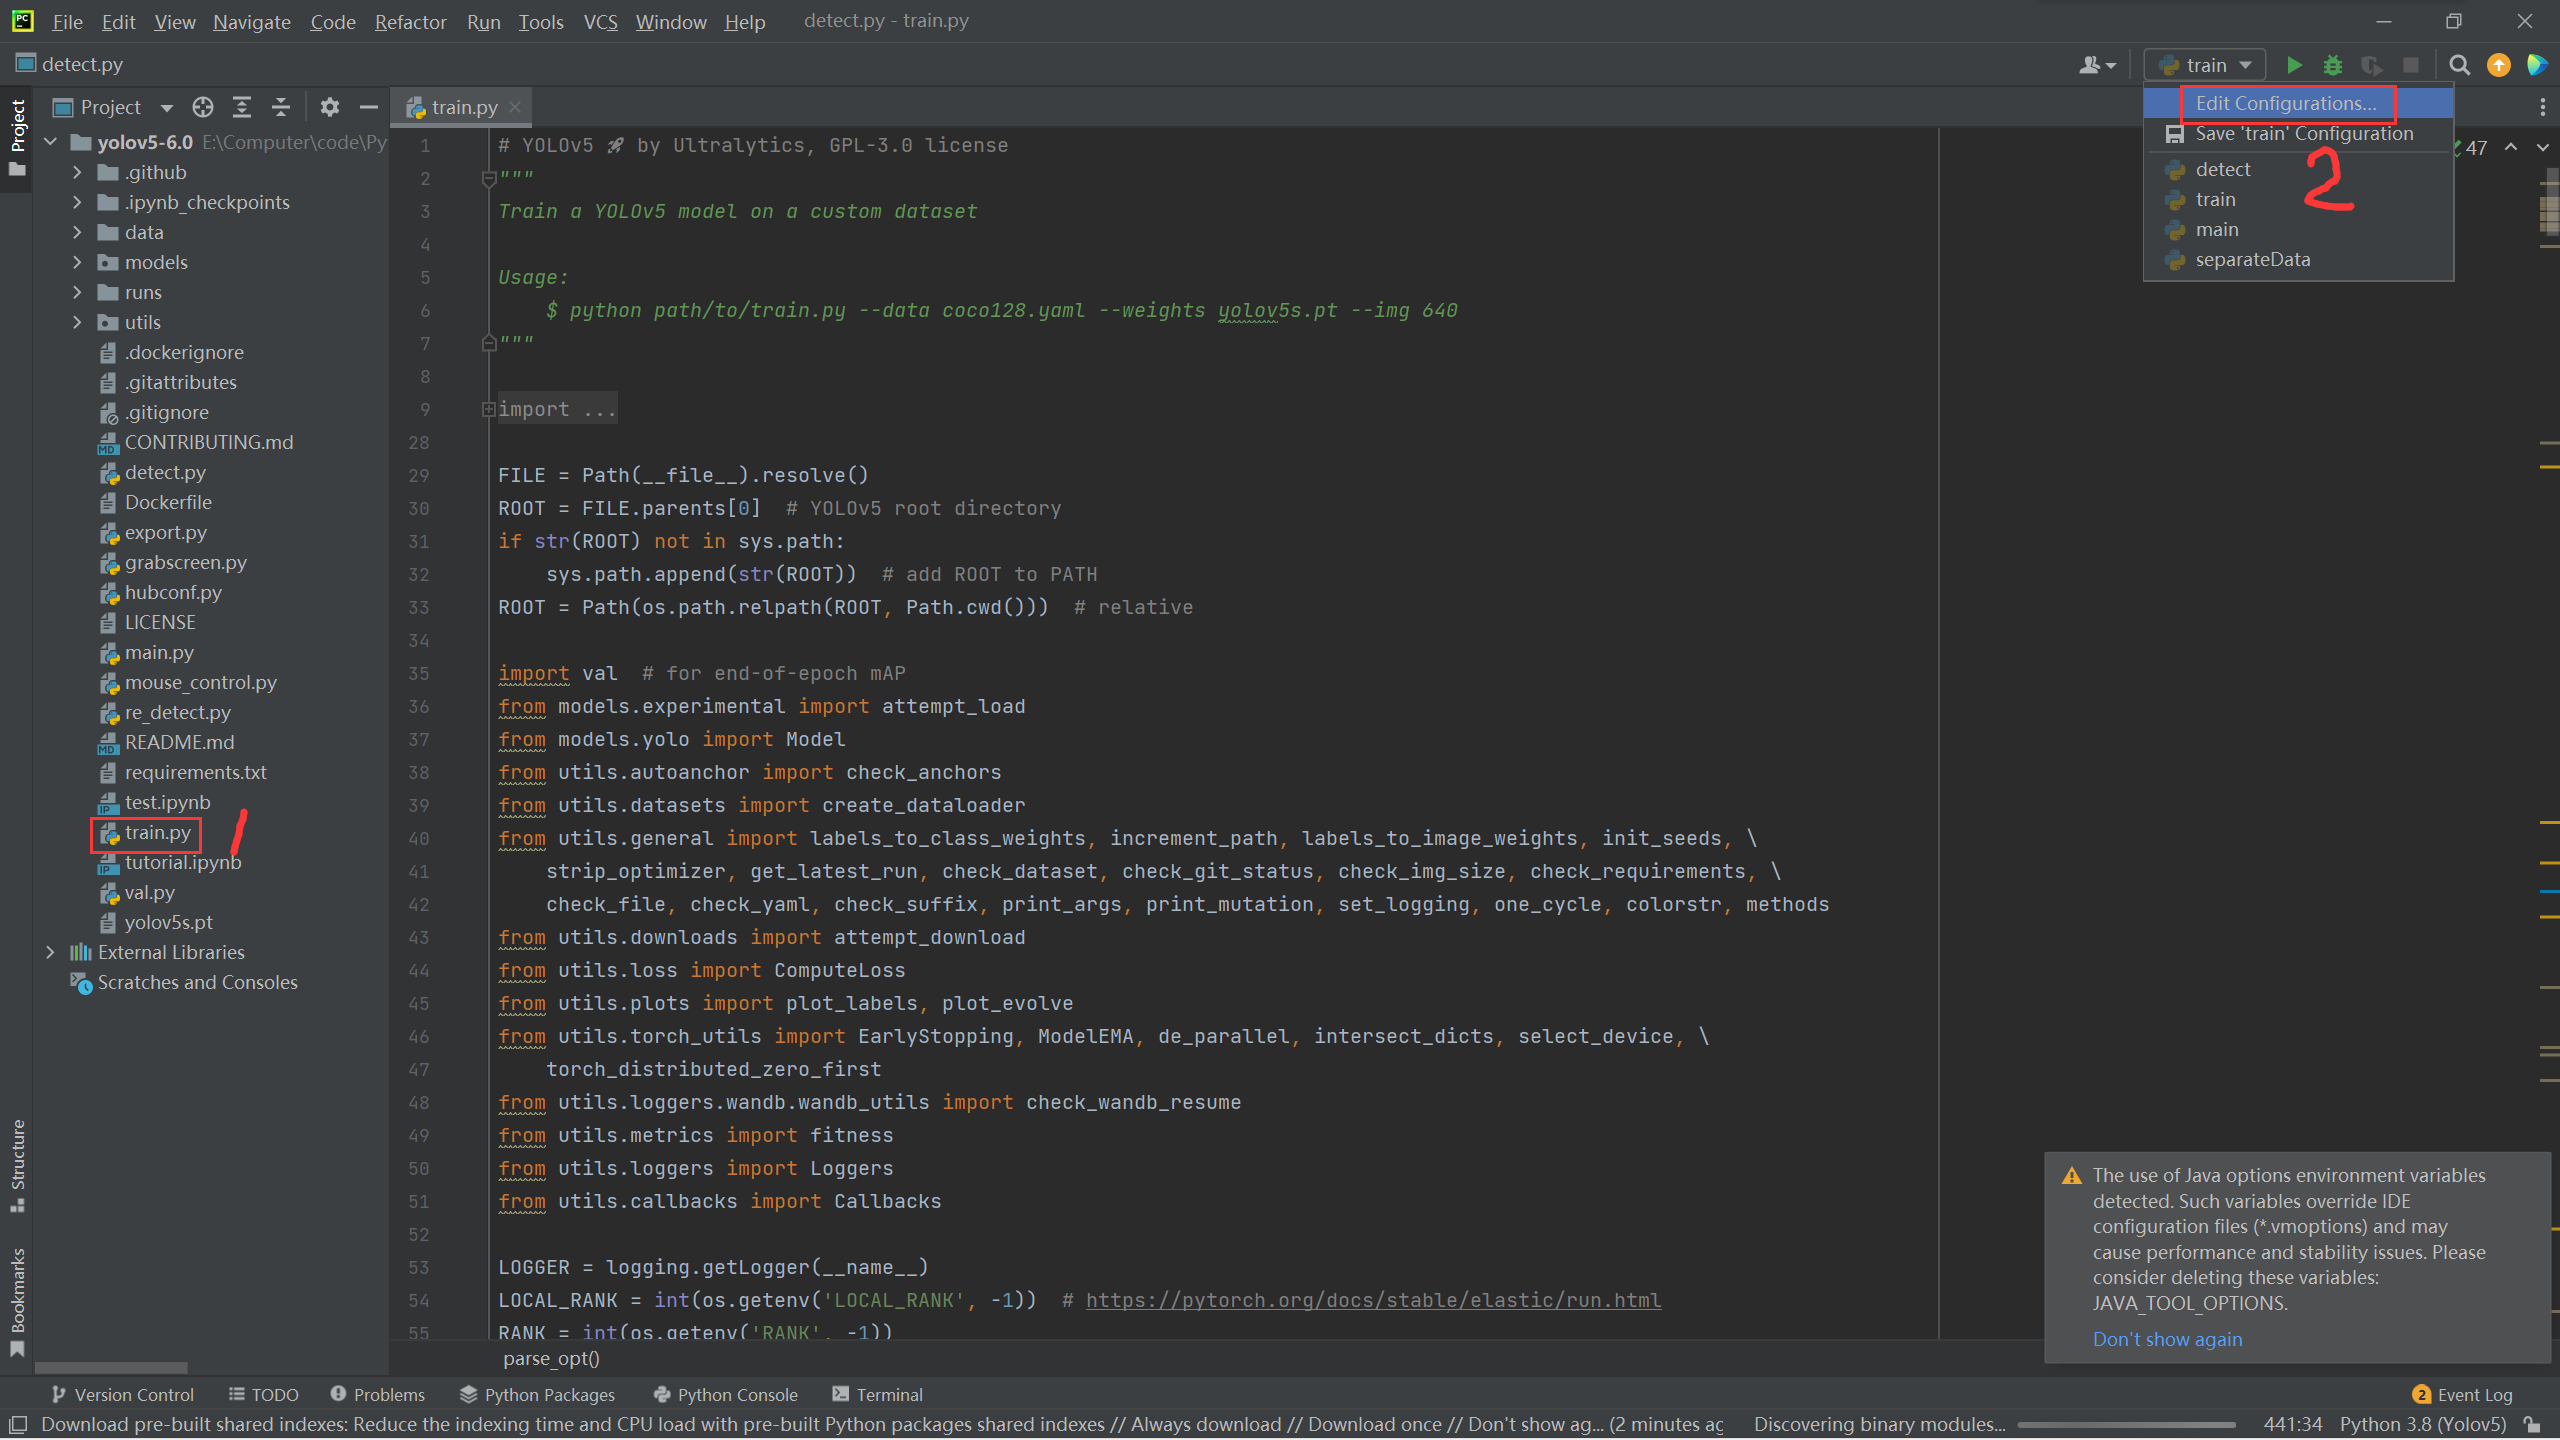
First open the YOLOv5 project, and then open train Py file


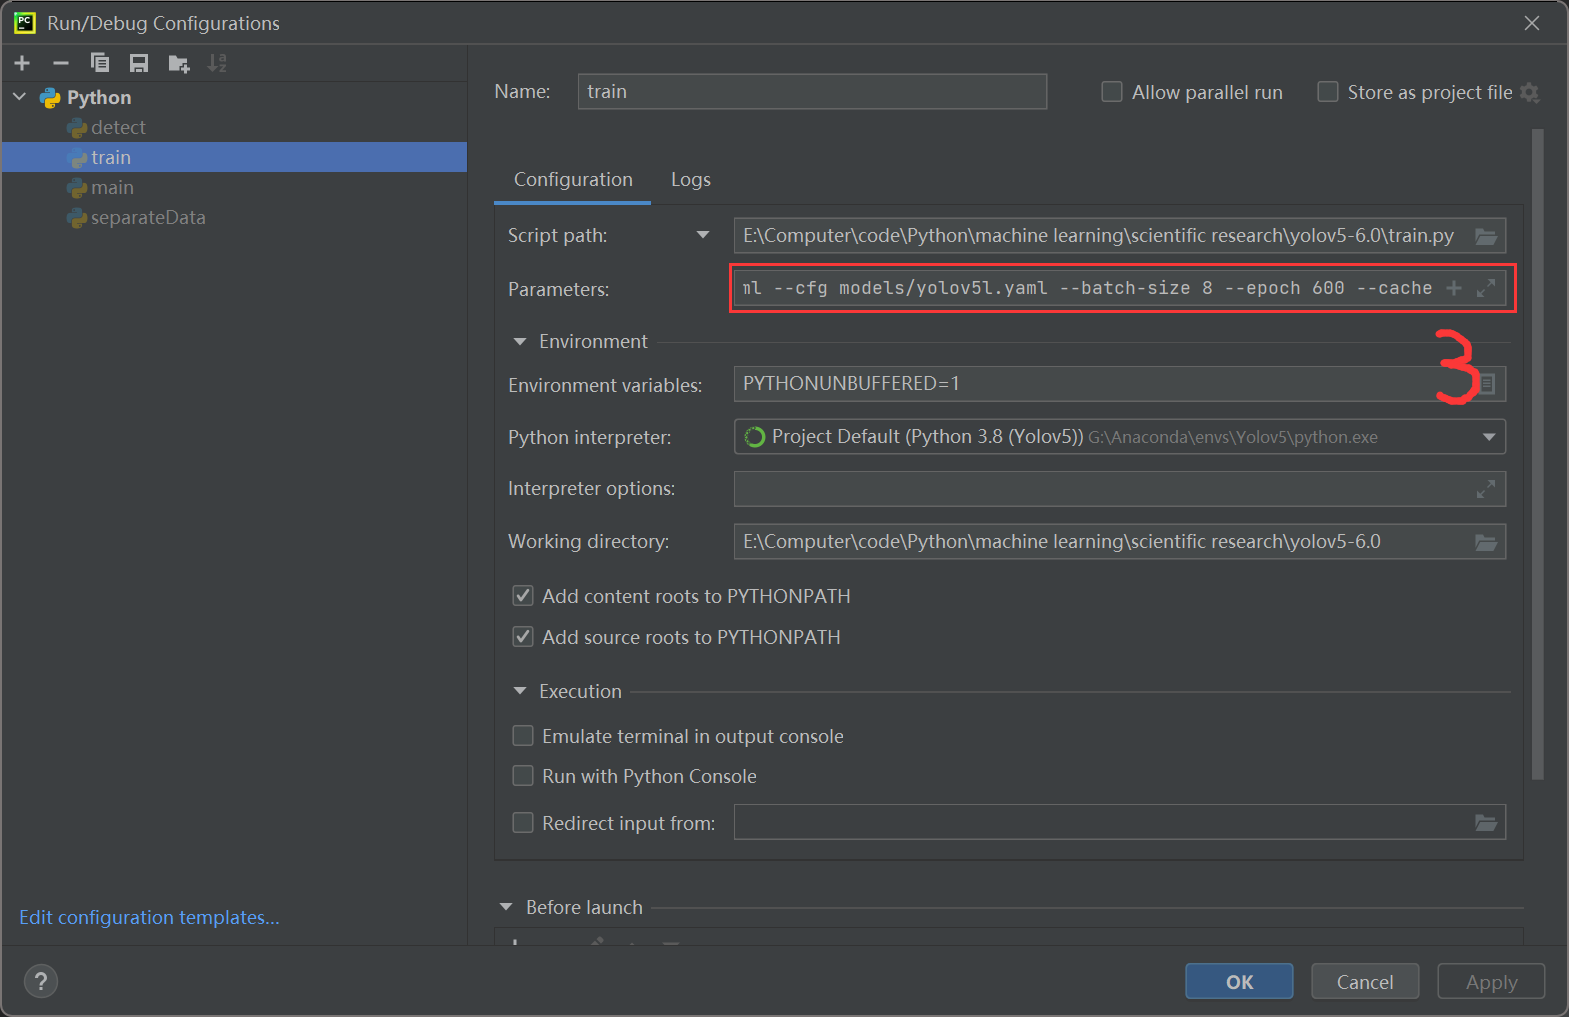
Configure the following parameters:
--data ../ApexCheater/data.yaml
--cfg models/yolov5s.yaml
--batch-size 8
--epoch 600
--cache
There are many models in the models folder, which can be selected according to the situation. Click Run after configuration.
The solution to the error "the page file is too small to complete the operation":
The reason for this error is that the virtual memory is too small. Just set the virtual memory of Disk C to be larger. However, according to Mian Mian, it should be to expand the virtual memory of the disk corresponding to the python installation location. But the specific situation is: my conda is on disk G and occupies virtual memory of C; The continuous conda is in disk E, and the virtual memory of disk E is occupied. In addition, running the same data and model, the continuous memory occupation is almost four times that of me. We don't know the specific reason and can't verify it.
5, detect
Open detect. In the YOLOv5 project Py file, configure the following parameters:
--weight ./runs/train/exp12/weights/best.pt
--img 640
--conf 0.25
--source ../ApexCheater/detect
Then run the program. Note --img's image size must be consistent with that of train.
6, Broken thoughts
In order to run the model, I changed the memory module with Mianmian. It's cool to play games after changing it!
Swing!