preface
View can be said to be a role used every day in daily development. Although view does not belong to the four components, its role and importance can not be underestimated. This type of article is intended to write a series to provide a way for self review or novice learning.
View Basics
This article mainly introduces some basic knowledge of View, which can pave the way for the contents of subsequent articles. The main contents involved include View position parameters, MotionEvent and touchslope objects, velocity tracker, GestureDetector and Scroller objects. Through the introduction of these basic knowledge, I believe you can catch more complex operations easily.
View introduction
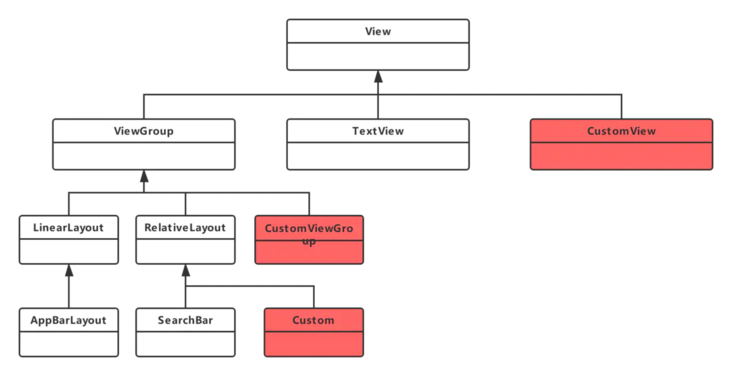
Before introducing the basics of view, we need to know what it is? View is the base class of all controls in Android (see the figure above for the structure). The common top-level parent class of simple TextView, complex ViewGroup, CustomView or RecyclerView is view. Therefore, view is an abstraction of interface layer control, which represents a control. It can be seen from the above figure that ViewGroup is a subclass of view. ViewGroup can have any child view in the view layer.
Understanding the hierarchical relationship of View is helpful to understand the working mechanism of View. From the above figure, we can also know that the implementation of custom View controls can inherit from View or ViewGroup.
View location parameter
The position of View is mainly determined by its four vertices, which correspond to the four attributes of View: top, left, right and bottom. Top is the ordinate of the upper left corner, left is the abscissa of the upper left corner, right is the abscissa of the lower right corner and bottom is the ordinate of the lower right corner. It should be noted that these coordinates are relative to the parent container of View, because it is a relative coordinate. The relationship between the coordinates of View and the parent container can be seen in the figure below. In Android, the positive directions of x axis and y axis are right and down respectively. This is not difficult to understand. Not only Android, but most display systems define the coordinate system according to this standard.
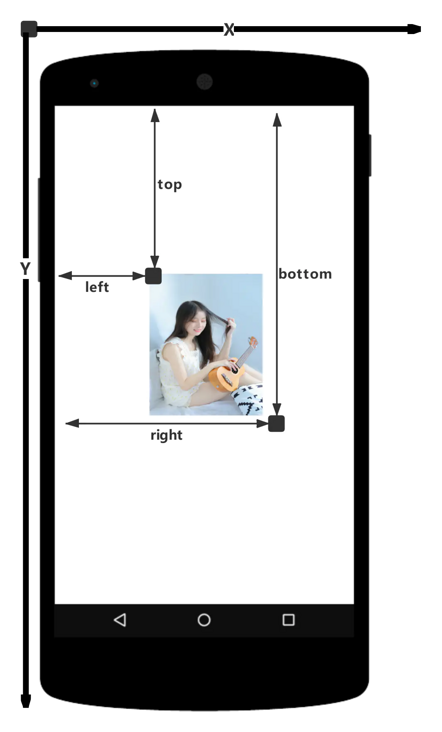
According to the above figure, we can easily get the relationship between the width and height of the View and the coordinates:
val width = right - left
val height = bottom - top
So how to get these four parameters of View? It's also very simple. In the source code of View, they correspond to the four member variables mLeft, mRight, mTop, and mBottom. They are obtained through code as follows:
val left = left;
val right = right
val top = top
val bottom = bottom
Starting from Android 3.0, View has added several additional parameters, x, y, translationX and translationY, where x and y are the coordinates of the upper left corner of View, while translationX and translationY are the offset of the upper left corner of View relative to the parent container. These parameters are also coordinates relative to the parent container, and the default values of translationX and translationY are 0. Like the four basic position parameters of View, View also provides them with set/get methods. The conversion relationship of these parameters is as follows:
val x = left + translationX
val y = top + translationY
It should be noted that during View translation, top and left represent the position information of the original upper left corner, and their values will not change. At this time, the four parameters x, y, translationX and translationY will change.
MotionEvent and touchslope
MotionEvent
    override fun onTouchEvent(event: MotionEvent): Boolean {
        when (event?.action) {
            MotionEvent.ACTION_DOWN -> {
                println("Finger press")
            }
            MotionEvent.ACTION_UP -> {
                println("Finger lift")

            }
            MotionEvent.ACTION_MOVE -> {
                println("Finger movement")
            }
        }
        return true

    }
In the series of events generated after the finger touches the screen, the common and very typical event types are as follows:
- MotionEvent.ACTION_DOWN: your finger just touched the screen
- MotionEvent.ACTION_MOVE: slide your finger on the screen
- MotionEvent.ACTION_UP: this event is triggered at the moment when the finger is raised on the screen
Under normal circumstances, a finger touching the screen will trigger some columns of click events. Consider the following situations:
- Down -- > up: the event triggered by lifting your finger to release the screen immediately after clicking the screen
- Down -- > move -- > move -- > move -- > up: click the screen and then release the event after sliding on the screen
The above three cases are typical event sequences. At the same time, we can get the x and y coordinates of the click event through the MotionEvent object. Therefore, the system provides two groups of methods, getX / getY and getRawX / getRawY. Their differences are actually very simple, as follows:
- getX / getY: returns the x and y coordinates relative to the upper left corner of the current View
- getRawX / getRawY: returns the x and y coordinates relative to the upper left corner of the phone screen.
TouchSlop
The official explanation of touchslope is that the minimum distance recognized by the system is considered to be the sliding distance. Generally speaking, when the finger slides on the screen, if the distance between two slides is less than this constant, the system thinks you are not sliding, and you can obtain the constant value through the following API,
/**
  * The minimum distance that can be recognized by the system and considered as sliding
  */
val scaledDoubleTapSlop = ViewConfiguration.get(context).scaledDoubleTapSlop;
This constant can help us use this value to filter when dealing with sliding. For example, when the sliding distance of two sliding events is less than this value, we can not reach the critical point of sliding distance, so we can think that they are not sliding, which can have a better user experience.
Velocity tracker, GestureDetector and Scroller
VelocityTracker
Velocity tracker is used to track the speed during sliding, including horizontal and vertical speeds. Its use process is very simple. First, track the speed of the current click event in the onTouchEvent method of View;
/**
  * Speed tracking
  */
 val velocityTracker = VelocityTracker.obtain()
   velocityTracker.addMovement(event)
Then, when we know the current sliding speed first, we can obtain the current speed in the following ways:
velocityTracker.computeCurrentVelocity(1000)
val xVelocity = velocityTracker.getXVelocity()
val yVelocity = velocityTracker.getYVelocity()
There are two points to note in this step. First, the speed must be calculated before obtaining the speed, that is, the computeCurrentVelocity method must be called in front of the getXVelocity and getYVelocity methods. Second, the speed here refers to the pixel value that the finger slides over in a period of time, for example, when the time interval is set to 1000 ms, If the finger slides 500 px from left to right in the horizontal direction within 1s, the horizontal speed is 500. Note that the speed can be negative. When the finger slides from right to left, the horizontal speed is negative. This needs to be understood. The speed can be calculated by the following formula:
Speed = (end position - start position) / time period
According to the above formula and the coordinate system of Android system, we can know that the speed generated by sliding the finger against the positive direction of the coordinate system is negative. In addition, the parameter of computeCurrentVelocity method represents a time unit or time interval, and its unit is milliseconds (ms), The speed obtained when calculating the speed is the pixel value of the finger sliding in the horizontal or vertical direction during this time interval.
For the above example, if we obtain the speed through obtain.computeCurrentVelocity(1000), the obtained speed is the px value that the finger slides over in 1000 ms, so we can directly apply the above formula:
Horizontal speed = 500 px / 1000 ms
Since the horizontal speed is 500, it needs to be understood here.
Finally, when it is not needed, you need to call the clear method to reset and reclaim memory:
velocityTracker.clear()
velocityTracker.recycle()
The API of velocity tracker is simple and clear, and we can remember a routine.
- The touch event is action_ When you go down or enter the onTouchEvent method, obtain a velocity tracker through obtain
- The touch event is action_ When up, call recycle to release the VelocityTracker
- Enter the onTouchEvent method or set ACTION_DOWN,ACTION_MOVE,ACTION_ The up event is added to the velocity tracker through the addMovement method
- Where the speed needs to be obtained, first call the computeCurrentVelocity method, and then obtain the speed in the corresponding direction through getXVelocity and getYVelocity
To unlock more poses, you can refer to this article
GestureDetector
GestureDetector is used to assist in detecting the user's stand-alone, sliding, long press, double click and other behaviors. It is not complicated to use GestureDetector. Refer to the following procedure:
First, create a GestureDetector object and implement the OnGestureListener interface. If necessary, we can also implement OnDoubleTapListener to listen to double-click behavior;
val mGetDetector = GestureDetector(context,this)
//Solve the problem that you can't drag after long pressing the screen
mGetDetector.setIsLongpressEnabled(false)
Take over the onTouchEvent method of the current View, and add the following code to the onTouchEvent method of the View:
override fun onTouchEvent(event: MotionEvent) = mGetDetector.onTouchEvent(event)
After completing the above two steps, we can selectively implement the methods in OnGestureListener and OnDoubleTapListener. The methods in these two interfaces are described as follows:
| OnGestureListener / method name | describe |
|---|---|
| onDown | The moment your finger gently touches the screen consists of 1 ACTION_DOWN trigger |
| onShowPress | Finger gently touch the screen, not yet released or dragged by an ACTION_DOWN trigger, which emphasizes that there is no state of loosening or dragging |
| onSingleTapUp | Release your finger (after gently touching the screen) with 1 motinevent.action_ Triggered by up, which is a click behavior |
| onScroll | Finger press and drag the screen by 1 ACTION_DOWN, multiple actions_ Move is triggered, which is the drag behavior |
| onLongPress | The user presses the screen for a long time |
| onFling | The user presses the touch screen, slides it quickly and releases it by 1 ACTION_DOWN, multiple actions_ Move and 1 ACTION_UP trigger, which is a fast sliding behavior |
| OnDoubleTapListener / method name | describe |
|---|---|
| onDoubleTap | Double click consists of two consecutive clicks. It cannot coexist with onSingleTapConfirmed |
| onSingleTapConfirmed | Strict stand-alone behavior (note the difference between it and onSingleTapUp. If onSingleTapConfirmed is triggered, it cannot be followed by another click behavior, that is, it can only be a click, not a single click in a double click) |
| onDoubleTapEvent | Indicates that a double-click behavior has occurred. During the double-click period, ACTION_DOWN ,ACTION_MOVE and ACTION_UP will trigger this callback |
There are many methods in the above chart, but not all of them will be commonly used. In daily development, the more commonly used methods are onSingleTapUp click, onFling quick slide, onScroll drag, onLongPress long press and onDoubleTap double click. In addition, in the actual development, you can completely implement the required monitoring in the OnTouchEvent method of View without using GestureDector. It depends on the actual scene and personal preferences.
Scroller
Scroller is used to realize the elastic sliding of view. We know that when the scrollTo / scrollBy method of view is used for sliding, the process is completed instantly, and no transition effect experience is unfriendly. At this time, the scroller can be used to realize the sliding of transition effect. The scroller itself cannot make the View Slide elastically. It needs to be used in conjunction with the computeScroll method of view to complete this function. So how do I use scroller? Its typical code can be said to be fixed, as follows:
class ScrollerSample_1 : LinearLayout {

    constructor(context: Context, attrs: AttributeSet?) : super(context, attrs)

    constructor(context: Context) : super(context)

    /**
     * Define sliding Scroller
     */
    private val mScroller = Scroller(context)

    public fun smoothScrollTo(destX: Int = -100, destY: Int = -100) {
        //Sliding position
        val scrollX = scrollY;
        val delta = destY - scrollY;
        //Slide to destX within 2000 ms, the effect is to slide slowly
        mScroller.startScroll(scrollX, 0, 0, delta, 2000)
        invalidate()
    }

    override fun computeScroll() {
        if (mScroller.computeScrollOffset()) {
            scrollTo(mScroller.currX, mScroller.currY)
            postInvalidate()
        }
    }
}
There are three main steps:
- The first step is to instantiate the Scroller
- The first step is to call the Scroller's startScroll method to save the new variable value
- The second step is to rewrite the computeScroll method of View and schedule its own scrollTo method to slide slowly and elastically
Sliding of View
Above, we have introduced some basic knowledge of View and some position parameter concepts. In this section, we will introduce an important content of View sliding
Should almost all software on the market now have the function of sliding? It can be said that the sliding function is the standard configuration of an APP. Sliding plays a very important role in Android development. Therefore, mastering the sliding method is the basis for optimizing the user experience. Sliding can be realized in the following three ways. Of course, there are not only three. Others have to be excavated by yourself. The method is as follows:
- The scrollTo / scrollBy method provided by the View itself is used to realize sliding (we have used the scrollTo method in the previous section)
- Sliding is achieved by animating the View to apply a translation effect
- By changing the position parameters of View
scrollTo,scrollBy
In order to realize the sliding View of the View, the scrollTo and scrollBy methods are provided, as shown below:
//View.java
    public void scrollTo(int x, int y) {
        /**
         * The incoming position is inconsistent with the current sliding position before it starts sliding
         */
        if (mScrollX != x || mScrollY != y) {
            int oldX = mScrollX;
            int oldY = mScrollY;
            mScrollX = x;
            mScrollY = y;
            invalidateParentCaches();
            onScrollChanged(mScrollX, mScrollY, oldX, oldY);
            if (!awakenScrollBars()) {
                postInvalidateOnAnimation();
            }
        }
    }

    public void scrollBy(int x, int y) {
        /**
         * Internally, it also calls the scrollTo method of View, adds the specified bit * to the currently sliding mscollx and mscolly respectively, and then slides. Multiple calls are equivalent to the previous position sliding
         */
        scrollTo(mScrollX + x, mScrollY + y);
    }
Through the above source code, we know that the scrollBy method calls the scrollTo method internally. What's the difference between them before? Please see the following analysis:
scrollTo: perform absolute sliding based on the transmitted X and Y coordinates. Click repeatedly. If the sliding parameters are not changed, the internal judgment will be made, and the equality will not slide again.
scrollBy: through the source code, we know that the scrollTo method is called internally, passing mscrollx + X and mscrolly + y. what does this mean? In fact, it is a relative sliding based on the current position. Clicking slide repeatedly will continue to slide at the current position.
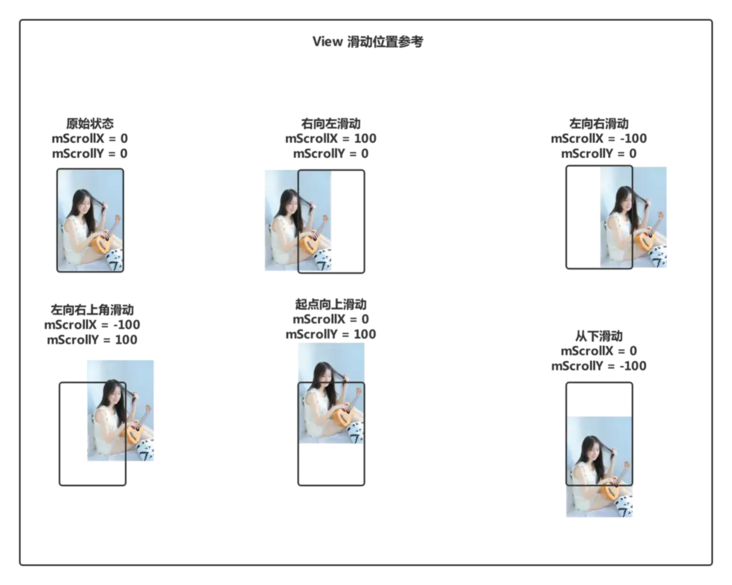
Another knowledge point we need to know is that there are two default variables mscollx. Mscolly is implemented internally through scrollTo. We know that the passed X and y are assigned to mscollx and mscolly respectively. What is the specific meaning of doing so here? They can get specific values through getScrollX and getScrollY. Let's make a specific analysis below:
Mscollx: during sliding, the value of mscollx is always equal to the horizontal distance between the left edge of View and the left edge of View content. Moreover, when the left edge of the View is on the right of the left edge of the View content, the value of mScrollX is positive and vice versa. Generally speaking, if you slide from left to right, the value of mScrollX is negative and vice versa.
Mscolly: during sliding, the value of mscolly is always equal to the horizontal distance between the upper edge of View and the upper edge of View content. Moreover, when the upper edge of the View is below the upper edge of the View content, mscolly is positive and vice versa. Generally speaking, if you slide from top to bottom, mscolly is negative and vice versa.
So much has been explained above. In order to better understand, I'll draw a picture here. The horizontal and vertical values slide by 100 px, and then look at the corresponding mScrollX and mScrollY values. Please see the following figure:
Note: when scrollBy / scrollTo is used to slide the View, only the contents of the View can be moved, not the View itself.
Use animation
In the previous section, we know that the scrollTo / scrollBy method of the View itself can be used to realize the sliding function. This section introduces another way to realize the sliding, that is, using animation. Through animation, we can make a View translate, and translation is a kind of sliding. Using animation to move the View mainly operates the translationX and translationY attributes of the View. Traditional View animation or attribute animation can be used. If attribute animation is used, it should be compatible with versions below 3.0. Of course, it is now Android x version. It can be handled according to the actual project situation. The translation code for sliding is as follows:
Using View animation, move the View 100 px from its original position to the lower right corner within 100ms
<?xml version="1.0" encoding="utf-8"?>
<set xmlns:android="http://schemas.android.com/apk/res/android"
     android:fillAfter="true"
>
    <translate
            android:duration="100"
            android:fromXDelta="0"
            android:fromYDelta="0"
            android:toXDelta="100"
            android:toYDelta="100"
            android:repeatCount="-1"
    />
</set>
Note: the View animation does not really change the position of the View.
Using attribute animation, translate the View 100 px to the right from its original position within 100ms
//Animation attributes include translationX, translationY, alpha, rotation, rotationX, rotationY, scaleX, scaleY
val objAnimator = ObjectAnimator.ofFloat(View targetView,"translationX",0f,100f).setDuration(100).start()
Change View LayoutParams
This section will introduce the third method to realize View sliding, that is, directly changing the layout parameters, namely LayoutParams. For example, if we want to shift a LinearLayout to the right by 100px, we only need to increase the value of the marginLeft parameter inside its LayoutParams by 100px. The code is as follows:
val layoutParams = scroller.layoutParams as LinearLayout.LayoutParams
layoutParams.let {
                it.leftMargin += 100
                it.weight += 100
            }
            scroller.requestLayout()
The View sliding is also realized by changing the LayoutParams parameter of LinearLayout.
Comparison of sliding modes
The above describes three different sliding methods, which can realize the sliding of View. What are the differences between them? Please see the table below:
| Implementation mode | advantage | shortcoming |
|---|---|---|
| scrollTo/scrollBy | It is specially used for View sliding, which can easily realize the sliding effect without affecting its own stand-alone events | You can only slide the contents of the View, not the View itself |
| animation | Complex animation using attribute animation is relatively simple | View animation cannot change its own properties |
| Change layout parameters | Use is not concise |
Here is a brief summary of the above situation:
- scrollTo/scrollBy is easy to operate and is suitable for sliding View content
- The animation operation is simple. It is mainly suitable for views without interaction and complex animation effects
- The operation of changing layout parameters is slightly more complex, which is suitable for views with interaction
Elastic sliding
When we know how to slide the View, we also need to know how to realize the elastic sliding of the View. The stiff sliding experience is really poor. Next, we will introduce how to realize the elastic sliding of the View
Using Scroller
Please refer to the introduction to View basics #Scroller
Through animation
Use the characteristics of animation to achieve some effects that cannot be achieved by animation. Imitate the Scroller to realize the elastic sliding of View. The code is as follows:
val valueAnimator = ValueAnimator.ofInt(0, 1).setDuration(2000);
valueAnimator.addUpdateListener {
   val animatedFraction = it.animatedFraction
   scroller.scrollTo(- (100 * animatedFraction).toInt(), 0)
}
valueAnimator.start()
In the above code, our animation does not act on any object in essence. It only completes the whole animation process within 2s. Using this feature, we can obtain the proportion of animation completion when each frame of the animation comes, and then calculate the sliding distance according to this proportion.
Through delay strategy
In this section, we continue to introduce another effect of elastic sliding, namely delay strategy. Its core idea is to achieve an asymptotic effect by sending a series of delay messages. The code is as follows:
    val MESSAGE_SCROLLER_TO = 1;
    val FRAME_COUNT = 30;
    val DELAYED_TIME = 33L;
    var mCount = 0;
    private val mHandler = object : Handler() {
        override fun handleMessage(msg: Message) {
            super.handleMessage(msg)
            when (msg.what) {
                MESSAGE_SCROLLER_TO -> {
                    mCount++
                    if (mCount <= FRAME_COUNT) {
                        val fraction = mCount / FRAME_COUNT.toFloat()
                        val scrollX = (fraction * 100).toInt()
                        scroller.scrollTo(scrollX, 0)
                        sendEmptyMessageDelayed(MESSAGE_SCROLLER_TO, DELAYED_TIME)
                    }
                }

            }
        }
    }
The effects are the same. There is no paste effect here. In practice, you can choose which one to use to achieve elastic sliding according to project requirements or flexibility.
That's all for the basics. Let's practice a few custom views on sliding based on the basics we've learned
Use the learned knowledge for actual combat
Here is a case exercise from shallow to deep.
1. View moves with your fingers
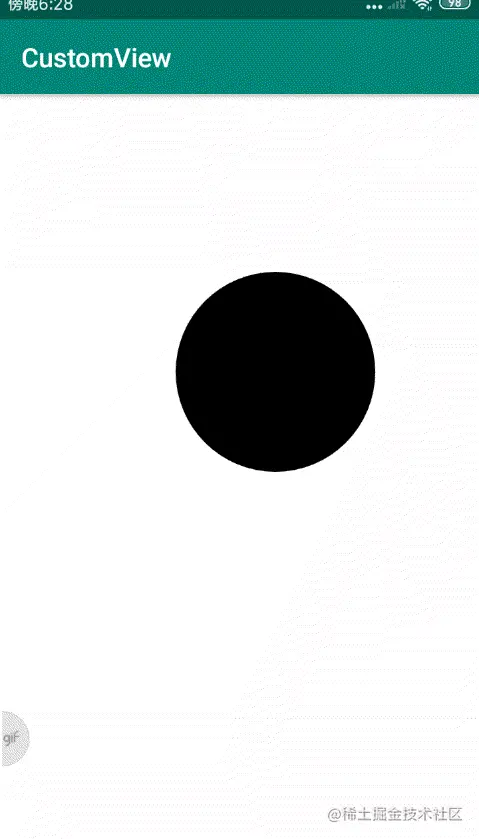
public class SlideView1(context: Context?, attrs: AttributeSet?) : View(context, attrs) {

    /**
     * Record the coordinates of the last slide
     */
    private var mLastX = 0;
    private var mLastY = 0;

    /**
     * Initialize brush
     */
    val paint = Paint().apply {
        color = Color.BLACK
        isAntiAlias = true
        strokeWidth = 3f
    }

    override fun onTouchEvent(event: MotionEvent): Boolean {
        when (event.action) {
            MotionEvent.ACTION_DOWN -> {
                //Get the coordinate point pressed relative to the screen
                mLastX = event.getX().toInt();
                mLastY = event.getY().toInt();
                println("Get the coordinate point pressed relative to the screen: x:$mLastX y:$mLastY")

            }
            MotionEvent.ACTION_MOVE -> {
                var offsetX = event.getX().toInt() - mLastX;//Calculate the new placement of View
                var offsetY = event.getY().toInt() - mLastY;
                //Reposition the new location
                layout(getLeft() + offsetX, getTop() + offsetY, getRight() + offsetX, getBottom() + offsetY);
            }

            MotionEvent.ACTION_UP -> {

            }
        }
        return true//Consumption touch event
    }

    override fun onDraw(canvas: Canvas) {
        super.onDraw(canvas)
        canvas.drawCircle(300f, 300f, 150f, paint)
    }

}
The second setX/setY mode
public class SlideView2(context: Context?, attrs: AttributeSet?) : View(context, attrs) {

    /**
     * Record the coordinates of the last slide
     */
    private var mLastX = 0;
    private var mLastY = 0;

    private val mScroller = Scroller(context)

    /**
     * Initialize brush
     */
    val paint = Paint().apply {
        color = Color.BLACK
        isAntiAlias = true
        strokeWidth = 3f
    }

    override fun onTouchEvent(event: MotionEvent): Boolean {
        when (event.action) {
            MotionEvent.ACTION_DOWN -> {
                //Get the coordinate point pressed relative to the screen
                mLastX = event.getRawX().toInt();
                mLastY = event.getRawY().toInt();
                println("Get the coordinate point pressed relative to the screen: x:$mLastX y:$mLastY")

            }
            MotionEvent.ACTION_MOVE -> {
              //1
//                x = event.getRawX() - mLastX
//                y =  event.getRawY() - mLastY

                            //2
                translationX = event.getRawX() - mLastX
                translationY = event.getRawY() - mLastY
            }

            MotionEvent.ACTION_UP -> {

            }
        }
        return true//Consumption touch event
    }

    override fun onDraw(canvas: Canvas) {
        super.onDraw(canvas)
        canvas.drawCircle(300f, 300f, 150f, paint)
    }
}
The second method is to call setX and setY of View. In fact, setTranslationX and setTranslationY are called internally. In fact, setX will also call setTranslationX internally. You can see the source code as follows:
//View.java
    public void setX(float x) {
        setTranslationX(x - mLeft);
    }
Here, in order to demonstrate the effect, the code does not make boundary judgment. Those who are interested in it can study it by themselves. There are other implementations that slide with their fingers.
2. High imitation ViewPager
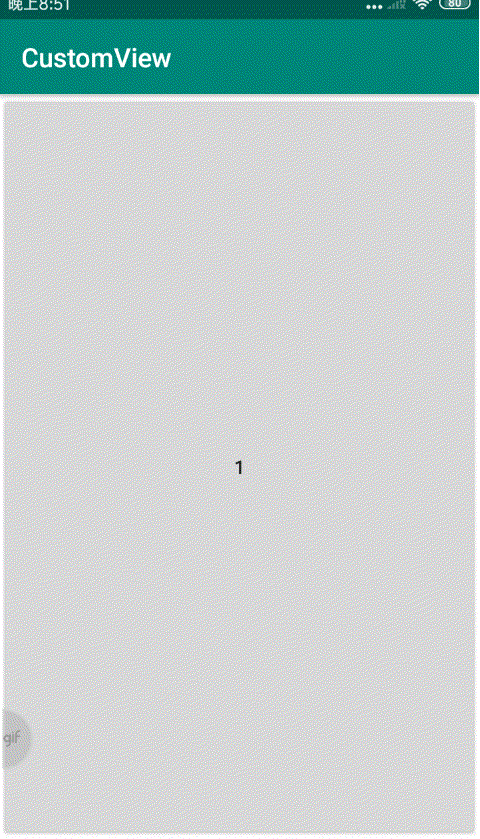
Here's a simple version of ViewPager effect with Scroller. To realize the Scroller effect, the fixed steps are as follows:
- Create an instance of Scroller
- Call the startScroll() method to initialize the scrolling data and refresh the interface
- Override the computeScroll() method and complete the logic of smooth scrolling inside it
/**
 * <pre>
 *     author  : devyk on 2019-11-16 19:23
 *     blog    : https://juejin.cn/user/3368559355637566
 *     github  : https://github.com/yangkun19921001
 *     mailbox : yang1001yk@gmail.com
 *     desc    : This is ScrollerViewPager
 * </pre>
 */
class ScrollerViewPager(context: Context?, attrs: AttributeSet?) : ViewGroup(context, attrs) {
    /**
     * The first step is to define the Scroller instance
     */
    private var mScroller = Scroller(context)

    /**
     * Determine the minimum moving pixel point to drag
     */
    private var mTouchSlop = 0

    /**
     * Press the x coordinate of the screen with your finger
     */
    private var mDownX = 0f

    /**
     * The current coordinate of the finger
     */
    private var mMoveX = 0f

    /**
     * Record the coordinates of the last trigger press
     */
    private var mLastMoveX = 0f

    /**
     * The left boundary of the interface that can be scrolled
     */
    private var mLeftBorder = 0

    /**
     * The right boundary of the interface that can be scrolled
     */
    private var mRightBorder = 0

    init {
        init()
    }

    constructor(context: Context?) : this(context, null) {
    }

    private fun init() {
        /**
         * Get the shortest movement px value of finger sliding through ViewConfiguration
         */
        mTouchSlop = ViewConfiguration.get(context).scaledPagingTouchSlop
    }

    /**
     * Measure the width and height of child
     */
    override fun onMeasure(widthMeasureSpec: Int, heightMeasureSpec: Int) {
        super.onMeasure(widthMeasureSpec, heightMeasureSpec)
        //Number of sub views obtained
        val childCount = childCount
        for (index in 0..childCount - 1) {
            val childView = getChildAt(index)
            //Measure the size of each child control in the ScrollerViewPager
            measureChild(childView, widthMeasureSpec, heightMeasureSpec)

        }
    }

    /**
     * After the measurement, get the size of the child and start taking seats according to the number
     */
    override fun onLayout(changed: Boolean, left: Int, top: Int, right: Int, bottom: Int) {
        if (changed) {
            val childCount = childCount
            for (child in 0..childCount - 1) {
                //Get sub View
                val childView = getChildAt(child)
                //Start taking your seats
                childView.layout(
                    child * childView.measuredWidth, 0,
                    (child + 1) * childView.measuredWidth, childView.measuredHeight
                )
            }
            //Initialize left and right boundaries
            mLeftBorder = getChildAt(0).left
            mRightBorder = getChildAt(childCount - 1).right

        }

    }

    /**
     * Override intercept event
     */
    override fun onInterceptTouchEvent(ev: MotionEvent): Boolean {
        when (ev.action) {
            MotionEvent.ACTION_DOWN -> {
                //Get your finger and press the coordinates equivalent to the screen
                mDownX = ev.getRawX()
                mLastMoveX = mDownX
            }
            MotionEvent.ACTION_MOVE -> {
                //Get the x coordinate of the current movement
                mMoveX = ev.getRawX()
                //Get the difference
                val absDiff = Math.abs(mMoveX - mDownX)
                mLastMoveX = mMoveX
                //When the finger drag value is greater than the touchslope value, it is considered to be sliding and intercept the touch event of the child control
                if (absDiff > mTouchSlop)
                    return true
            }
        }

        return super.onInterceptTouchEvent(ev)
    }

    /**
     * If the parent container does not intercept the event, the user's touch event will be received here
     */
    override fun onTouchEvent(event: MotionEvent): Boolean {
        when (event.action) {
            MotionEvent.ACTION_MOVE -> {
                //Get the coordinates of the current slide relative to the upper left corner of the screen
                mMoveX = event.getRawX()
                var scrolledX = (mLastMoveX - mMoveX).toInt()
                if (scrollX + scrolledX < mLeftBorder) {
                    scrollTo(mLeftBorder, 0)
                    return true
                }else if (scrollX + width + scrolledX > mRightBorder){
                    scrollTo(mRightBorder-width,0)
                    return true

                }
                scrollBy(scrolledX,0)
                mLastMoveX = mMoveX
            }
            MotionEvent.ACTION_UP -> {
                //When the finger is raised, determine which child control interface should be rolled back according to the current scroll value
                var targetIndex = (scrollX + width/2 ) / width
                var dx = targetIndex * width - scrollX
                /** The second step is to call the startScroll method to roll back elastically and refresh the page*/
                mScroller.startScroll(scrollX,0,dx,0)
                invalidate()
            }
        }
    return super.onTouchEvent(event)
    }

    override fun computeScroll() {
        super.computeScroll()
        /**
         * The third step is to rewrite the computeScroll method and complete the logic of smooth scrolling inside it
         */
        if (mScroller.computeScrollOffset()){
            scrollTo(mScroller.currX,mScroller.currY)
            postInvalidate()
        }
    }
}
<?xml version="1.0" encoding="utf-8"?>
<com.devyk.customview.sample_1.ScrollerViewPager
xmlns:android="http://schemas.android.com/apk/res/android"
xmlns:tools="http://schemas.android.com/tools"
android:layout_width="match_parent"
android:layout_height="match_parent"
tools:context=".MainActivity">
<Button
android:id="@+id/btn_1"
android:text="1"
android:layout_width="match_parent"
android:layout_height="match_parent"/>
<Button
android:id="@+id/btn_2"
android:text="2"
android:layout_width="match_parent"
android:layout_height="match_parent"/>
<Button
android:id="@+id/btn_3"
android:text="3"
android:layout_width="match_parent"
android:layout_height="match_parent"/>
<Button
android:id="@+id/btn_4"
android:text="4"
android:layout_width="match_parent"
android:layout_height="match_parent"/>
<Button
android:id="@+id/btn_5"
android:text="5"
android:layout_width="match_parent"
android:layout_height="match_parent"/>
<Button
android:id="@+id/btn_6"
android:text="6"
android:layout_width="match_parent"
android:layout_height="match_parent"/>
</com.devyk.customview.sample_1.ScrollerViewPager>The above customized ViewGroup achieves the same effect as ViewPager, basically using the knowledge learned in this article, such as Scroller, touchslope, and the event interception, processing and distribution mechanism to be analyzed in the next section.
summary
This article must be mastered by novices, especially the basic knowledge in the article and the sliding implementation of View. It is easy to read the open source custom framework or write your own custom only after you have laid a good foundation.
(ps: you can see that the above code examples are based on Kotlin If you are interested in Kotlin or learn from 0, read it Kotlin basic grammar After that, I believe The novice entry-level Kotlin GitHub APP is exactly what you need)
Thank you for reading, thank you.
Author: DevYK
Link: https://juejin.im/post/5dcff9d3f265da0bd20af0da
More Android tutorials can be uploaded on bilibili bili:** https://space.bilibili.com/686960634