Zabbix deployment
Experimental environment:
CentOS 7-2: 192.168.18.147 (monitoring end: deployment and installation zabbix)
CentOS 7-3: 192.168.18.128 (monitored end)
Monitoring end operation:
[root@cacti ~]# systemctl stop firewalld.service #Turn off firewall function
[root@cacti ~]# systemctl disable firewalld.service #Turn on and disable firewall function
Removed symlink /etc/systemd/system/multi-user.target.wants/firewalld.service.
Removed symlink /etc/systemd/system/dbus-org.fedoraproject.FirewallD1.service.
[root@cacti ~]# setenforce 0 #Turn off enhanced security
`install LAMP Framework`
[root@cacti ~]# yum install -y \
httpd \
mariadb-server mariadb \
php \
php-mysql \
php-gd \
libjpeg* \
php-ldap \
php-odbc \
php-pear \
php-xml \
php-xmlrpc \
php-mhash
`edit apache configuration file`
[root@cacti ~]# vim /etc/httpd/conf/httpd.conf
95 ServerName www.yun.com:80 #Line 95, delete comments, domain name customization
164 DirectoryIndex index.html index.php #Line 164, add the homepage support class type index.php
#After modification, press Esc to exit the insertion mode, enter: wq to save and exit
`Change time zone to China`
[root@cacti ~]# vim /etc/php.ini
878 date.timezone = PRC #Line 878, delete the; sign of the previous template, and add PRC of China time zone after it
#After modification, press Esc to exit the insertion mode, enter: wq to save and exit
[root@cacti ~]# systemctl start httpd.service #Start apache service
[root@cacti ~]# systemctl start mariadb.service #Start mariadb service
[root@cacti ~]# netstat -ntap | egrep '(3306|80)' #Use the egrep command to view ports 3306 and 80 at the same time
tcp 0 0 0.0.0.0:3306 0.0.0.0:* LISTEN 4410/mysql
tcp6 0 0 :::80 :::* LISTEN 4131/httpd
`Initialize database configuration`
[root@cacti ~]# mysql_secure_installation
NOTE: RUNNING ALL PARTS OF THIS SCRIPT IS RECOMMENDED FOR ALL MariaDB
SERVERS IN PRODUCTION USE! PLEASE READ EACH STEP CAREFULLY!
In order to log into MariaDB to secure it, we'll need the current
password for the root user. If you've just installed MariaDB, and
you haven't set the root password yet, the password will be blank,
so you should just press enter here.
Enter current password for root (enter for none): #Direct return here
OK, successfully used password, moving on...
Setting the root password ensures that nobody can log into the MariaDB
root user without the proper authorisation.
Set root password? [Y/n] y #Set password
New password: #abc123
Re-enter new password: #Confirm input: abc123
Password updated successfully!
Reloading privilege tables..
... Success!
By default, a MariaDB installation has an anonymous user, allowing anyone
to log into MariaDB without having to have a user account created for
them. This is intended only for testing, and to make the installation
go a bit smoother. You should remove them before moving into a
production environment.
Remove anonymous users? [Y/n] n #Whether to delete anonymous users? Choose not to delete
... skipping.
Normally, root should only be allowed to connect from 'localhost'. This
ensures that someone cannot guess at the root password from the network.
Disallow root login remotely? [Y/n] y #Remote connection or not
... Success!
By default, MariaDB comes with a database named 'test' that anyone can
access. This is also intended only for testing, and should be removed
before moving into a production environment.
Remove test database and access to it? [Y/n] n #Delete test database
... skipping.
Reloading the privilege tables will ensure that all changes made so far
will take effect immediately.
Reload privilege tables now? [Y/n] y #Reload or not
... Success!
Cleaning up...
All done! If you've completed all of the above steps, your MariaDB
installation should now be secure.
Thanks for using MariaDB!
#Verify login database
[root@cacti ~]# mysql -u root -p
Enter password: #Enter password abc123
Welcome to the MariaDB monitor. Commands end with ; or \g.
Your MariaDB connection id is 8
Server version: 5.5.64-MariaDB MariaDB Server
Copyright (c) 2000, 2018, Oracle, MariaDB Corporation Ab and others.
Type 'help;' or '\h' for help. Type '\c' to clear the current input statement.
`Establish zabbix Database and set to utf8 Form, convert the string into binary`
MariaDB [(none)]> CREATE DATABASE zabbix character set utf8 collate utf8_bin;
Query OK, 1 row affected (0.00 sec)
`Enhance user`
MariaDB [(none)]> show databases;
+--------------------+
| Database |
+--------------------+
| information_schema |
| mysql |
| performance_schema |
| test |
| zabbix |
+--------------------+
5 rows in set (0.00 sec)
#At this time, there is a zabbix database. You need to create users of this database in the management
MariaDB [(none)]> GRANT all privileges ON *.* TO 'zabbix'@'%' IDENTIFIED BY 'admin123';
Query OK, 0 rows affected (0.01 sec)
#Give zabbix all databases and tables for management, and set the password to admin123
MariaDB [(none)]> flush privileges; #Refresh
Query OK, 0 rows affected (0.00 sec)
MariaDB [(none)]> quit #Exit database
Bye
`test php Essential information`
[root@localhost ~]# cd /var/www/html/
[root@localhost html]# ls
[root@localhost html]# vim index.php
<?php
phpinfo();
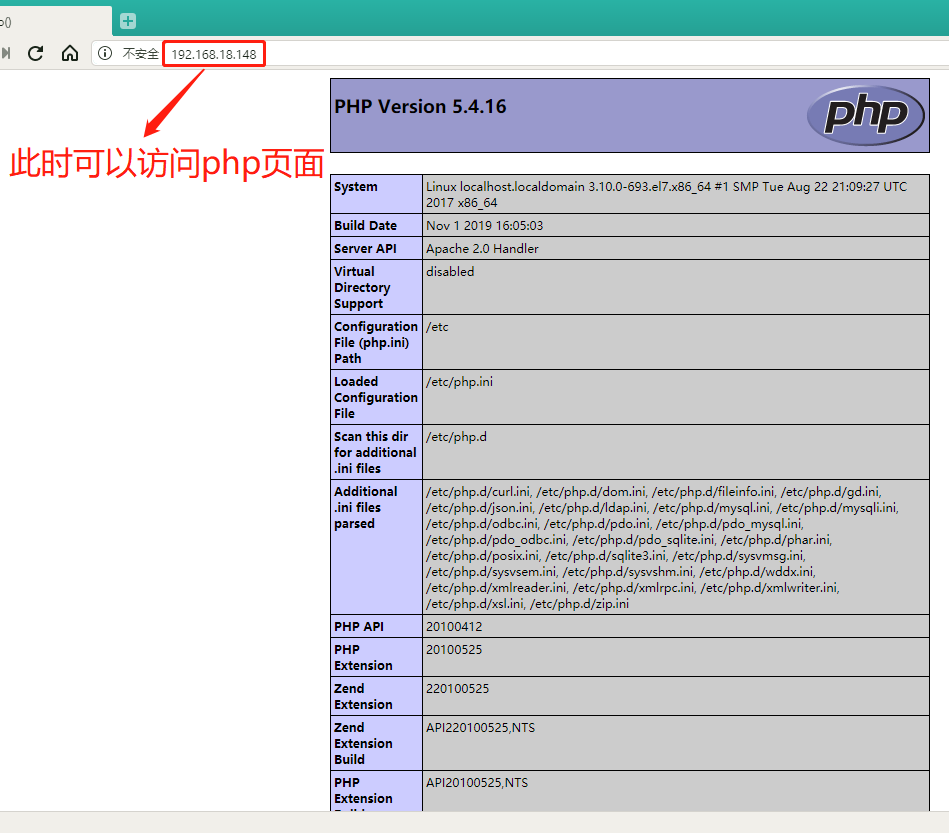
?>At this time, enter 192.168.18.147 in the host computer to see if you can access the php page:
Test the ability to connect to the database:
[root@localhost html]# vim index.php
#First press 3dd to delete the original content, then insert the following content
<?php
$link=mysql_connect('192.168.18.147','zabbix','admin123');
if($link) echo "<h1>Success!!</h1>";
else echo "Fail!!";
mysql_close();
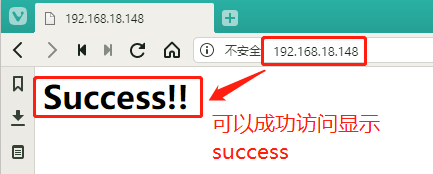
?>At this time, refresh the previous page in the host: 192.168.18.147. If you can access the mysql database, you will return the Success prompt. If you cannot, you will return the Fail prompt:
solve the problem:
If the failure message is generally the local login failure, you can use the following methods to solve it
[root@cacti html]# mysql -u zabbix -p
Enter password:     #At this time, input admin123 to log in to the database, indicating that there is a user occupation
ERROR 1045 (28000): Access denied for user 'zabbix'@'localhost' (using password: YES)

`First use root User login database`
[root@cacti html]# mysql -u root -p
Enter password:
Welcome to the MariaDB monitor.  Commands end with ; or \g.
Your MariaDB connection id is 15
Server version: 5.5.64-MariaDB MariaDB Server

Copyright (c) 2000, 2018, Oracle, MariaDB Corporation Ab and others.

Type 'help;' or '\h' for help. Type '\c' to clear the current input statement.

MariaDB [(none)]> select user,host from mysql.user;
+--------+-----------+
| user   | host      |
+--------+-----------+
| zabbix | %         |
| root   | 127.0.0.1 |
| root   | ::1       |
|        | cacti     |
|        | localhost |
| root   | localhost |
+--------+-----------+
6 rows in set (0.00 sec)

`To delete an empty user`
MariaDB [(none)]> drop user ''@localhost;
Query OK, 0 rows affected (0.00 sec)

MariaDB [(none)]> drop user ''@cacti;
Query OK, 0 rows affected (0.00 sec)

`This time and space user is deleted`
MariaDB [(none)]> select user,host from mysql.user;
+--------+-----------+
| user   | host      |
+--------+-----------+
| zabbix | %         |
| root   | 127.0.0.1 |
| root   | ::1       |
| root   | localhost |
+--------+-----------+
4 rows in set (0.00 sec)

MariaDB [(none)]> quit
Bye

`Refresh the page again and it will display Success!!Successful login`
Deploy Zabbix Server
[root@cacti html]# yum install php-bcmath php-mbstring -y
`install zabbix source`
[root@cacti html]# rpm -ivh http://repo.zabbix.com/zabbix/3.5/rhel/7/x86_64/zabbix-release-3.5-1.el7.noarch.rpm
//Get http://repo.zabbix.com/zabbix/3.5/rhel/7/x86_/zabbix-release-3.5-1.el7.noarch.rpm
//Warning / var/tmp/rpm-tmp.13QGZK: header V4 RSA/SHA512 Signature, key ID a14fe591: NOKEY
//[100%]
//Upgrading / installing
   1:zabbix-release-3.5-1.el7         ################################# [100%]

`View source`
[root@cacti html]# cd /etc/yum.repos.d/
[root@cacti yum.repos.d]# ls
CentOS-Base.repo  CentOS-Debuginfo.repo  CentOS-Media.repo    CentOS-Vault.repo
CentOS-CR.repo    CentOS-fasttrack.repo  CentOS-Sources.repo  zabbix.repo
[root@cacti yum.repos.d]# cat zabbix.repo
[zabbix]
name=Zabbix Official Repository - $basearch
baseurl=http://repo.zabbix.com/zabbix/3.5/rhel/7/$basearch/
enabled=1
gpgcheck=1
gpgkey=file:///etc/pki/rpm-gpg/RPM-GPG-KEY-ZABBIX-A14FE591

[zabbix-non-supported]
name=Zabbix Official Repository non-supported - $basearch
baseurl=http://repo.zabbix.com/non-supported/rhel/7/$basearch/
enabled=1
gpgkey=file:///etc/pki/rpm-gpg/RPM-GPG-KEY-ZABBIX
gpgcheck=1

[root@cacti yum.repos.d]# yum install zabbix-server-mysql zabbix-web-mysql -y
......Multiple lines are omitted here
//Installed:
  zabbix-server-mysql.x86_64 0:4.0.0-1.1rc3.el7    zabbix-web-mysql.noarch 0:4.0.0-1.1rc3.el7

//Installed as a dependency:
  OpenIPMI.x86_64 0:2.0.27-1.el7                   OpenIPMI-libs.x86_64 0:2.0.27-1.el7
  OpenIPMI-modalias.x86_64 0:2.0.27-1.el7          fping.x86_64 0:3.10-1.el7
  iksemel.x86_64 0:1.4-2.el7.centos                zabbix-web.noarch 0:4.0.0-1.1rc3.el7

`Generate database file`
[root@cacti yum.repos.d]# zcat /usr/share/doc/zabbix-server-mysql-4.0.0/create.sql.gz | mysql -u zabbix -p  zabbix
Enter password:     #Enter the password admin123

[root@cacti yum.repos.d]# grep -n '^'[a-Z] /etc/zabbix/zabbix_server.conf
38:LogFile=/var/log/zabbix/zabbix_server.log
49:LogFileSize=0
72:PidFile=/var/run/zabbix/zabbix_server.pid
82:SocketDir=/var/run/zabbix
101:DBName=zabbix
117:DBUser=zabbix
357:SNMPTrapperFile=/var/log/snmptrap/snmptrap.log
475:Timeout=4
518:AlertScriptsPath=/usr/lib/zabbix/alertscripts
529:ExternalScripts=/usr/lib/zabbix/externalscripts
565:LogSlowQueries=3000
#What is missing in the configuration file is the password. Other systems have been configured automatically

[root@cacti yum.repos.d]# vim /etc/zabbix/zabbix_server.conf
125 DBPassword=admin123     #Line 125 delete the comment and add the password admin123 after the = sign
#After modification, press Esc to exit the insertion mode, enter: wq to save and exit

`Modify time zone`
[root@cacti yum.repos.d]# vim /etc/httpd/conf.d/zabbix.conf
20         php_value date.timezone Asia/Shanghai        #20 lines delete the comment and change the loss to Asia/Shanghai
#After modification, press Esc to exit the insertion mode, enter: wq to save and exit

`Correction of Chinese characters in charts`
[root@cacti yum.repos.d]# vim /usr/share/zabbix/include/defines.inc.php
#Enter the following to replace the global font with kaiti
:%s /graphfont/kaiti/g
#After modification, press Esc to exit the insertion mode, enter: wq to save and exit

`copy STKAITI.TTF File to font directory`
[root@cacti yum.repos.d]# mkdir /aaa        #Create mount directory
[root@cacti yum.repos.d]# mount.cifs //192.168.0.105/rpm/aaa for remote mount
Password for root@//192.168.0.105/rpm:
[root@cacti yum.repos.d]# cd /aaa/zabbix/
[root@cacti zabbix]# ls
php-bcmath-5.4.16-42.el7.x86_64.rpm    STKAITI.TTF
php-mbstring-5.4.16-42.el7.x86_64.rpm  zabbix.conf.php
[root@cacti zabbix]# cp STKAITI.TTF /usr/share/zabbix/fonts/

`Start the service to check the opening of the port`
[root@cacti zabbix]# systemctl enable zabbix-server
Created symlink from /etc/systemd/system/multi-user.target.wants/zabbix-server.service to /usr/lib/systemd/system/zabbix-server.service.
[root@cacti zabbix]# systemctl start zabbix-server
[root@cacti zabbix]# netstat -ntap | grep zabbix        #Listening port is 10051
tcp        0      0 0.0.0.0:10051           0.0.0.0:*        LISTEN    6735/zabbix_server
tcp6       0      0 :::10051                :::*             LISTEN    6735/zabbix_server
[root@cacti zabbix]# systemctl restart httpd.service    #Restart httpd service to verify login to zabbix
Verify: login operation, install zabbix
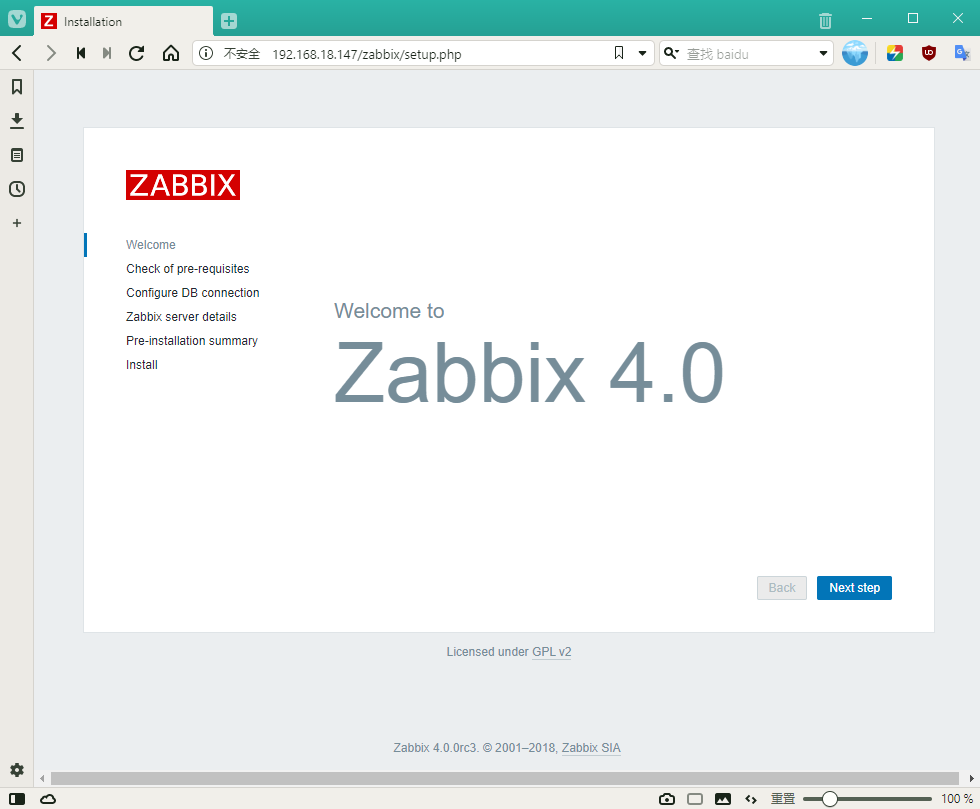
Step 1: in the host address field, enter: http://192.168.18.147/zabbix/ to access the following page, press Next Step to the next step
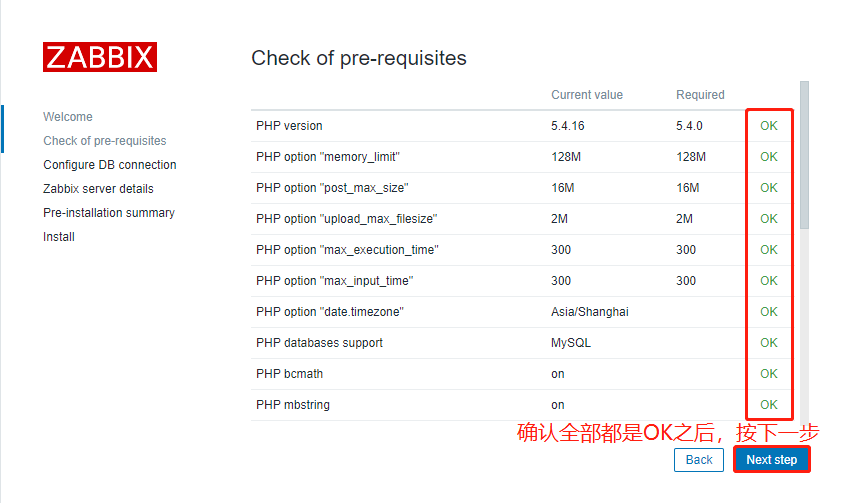
Step 2: after confirming that all the checks are OK, press Next step to enter the Next step
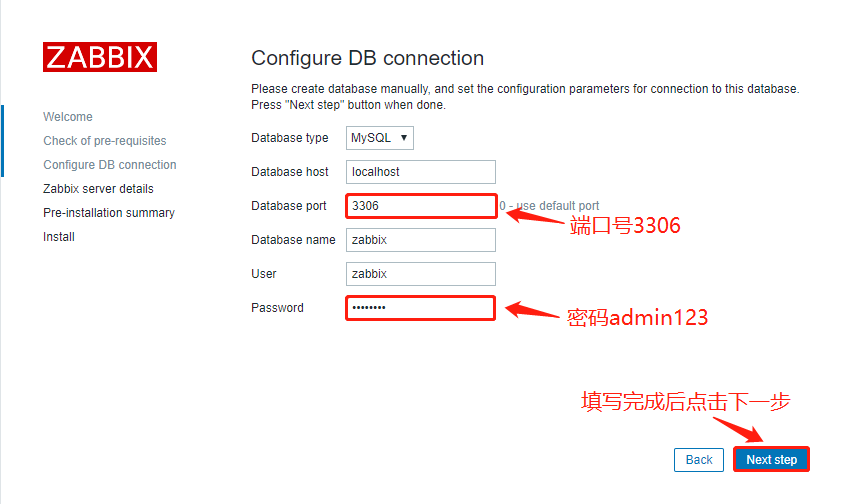
Step 3: set the database, input the port number 3306, fill in the password admin123, and press Next step to enter the Next step
Step 4: fill in the ZABBIX service name, fill in the ZABBIX (self defined) here, and press Next step to enter the Next step

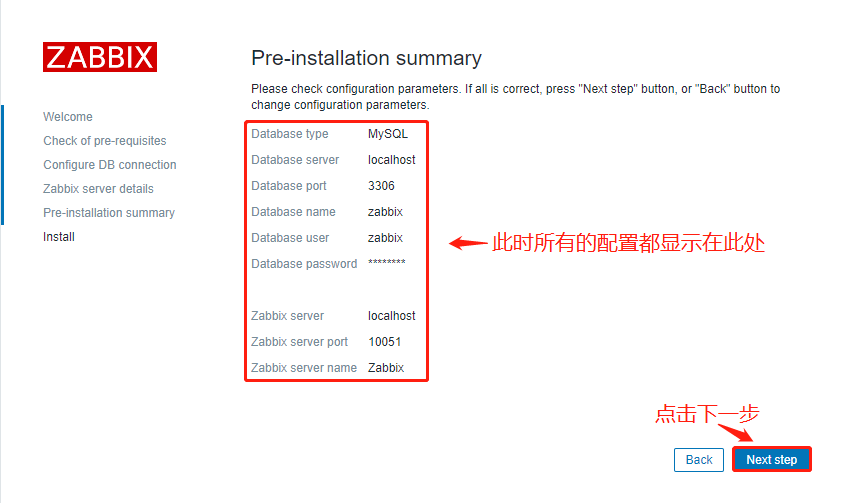
Step 5: you can display all the previously configured contents, and directly press Next step to enter the Next step
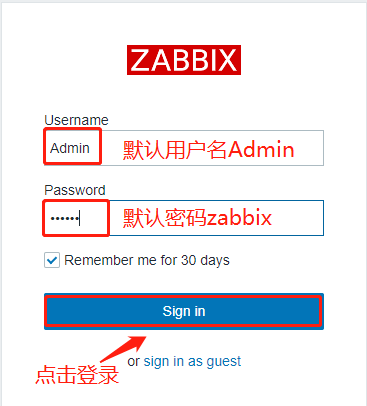
Step 6: after entering the page, directly press Finish to Finish, enter the login interface, enter the default account Admin, the default password zabbix, and click login
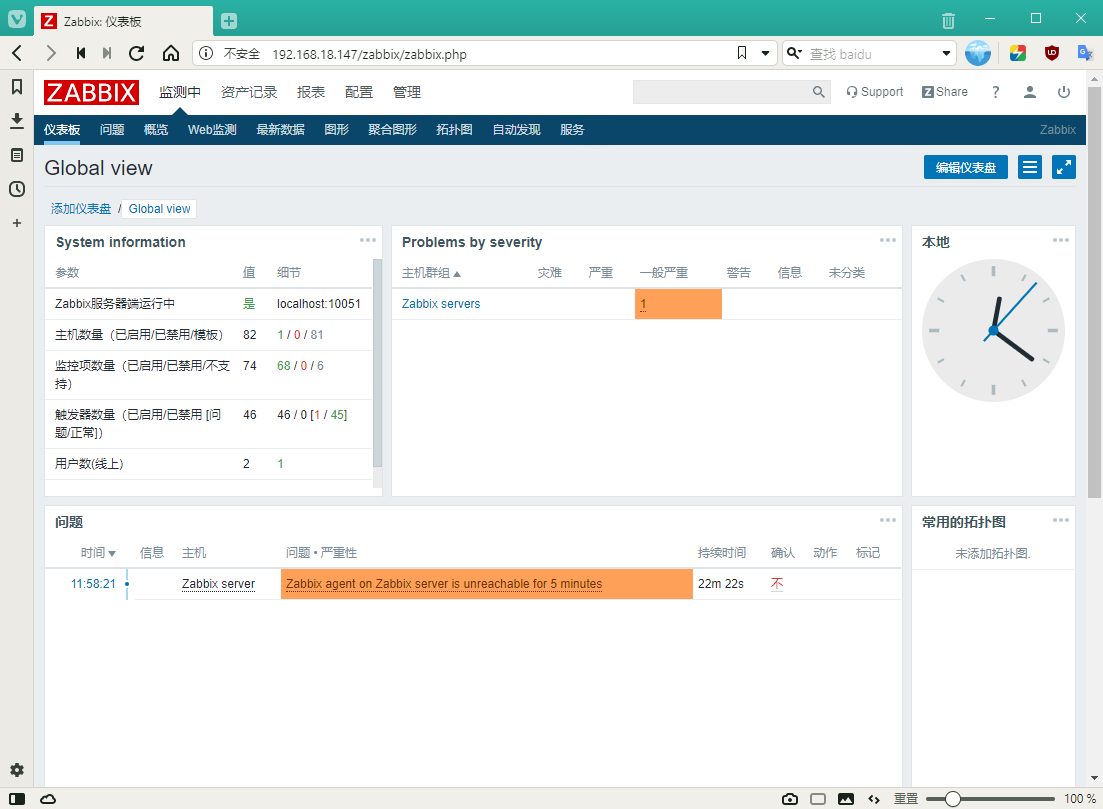
At this time, you can enter the monitoring interface of zabbix:
You can click the figure in the upper right corner, select Chinese (zh CN) simplified Chinese in the Language column, and click Update to update
The above is all the operation of the monitoring end!
Operation of monitored end:
[root@localhost ~]# systemctl stop firewalld.service
[root@localhost ~]# systemctl disable firewalld.service
Removed symlink /etc/systemd/system/multi-user.target.wants/firewalld.service.
Removed symlink /etc/systemd/system/dbus-org.fedoraproject.FirewallD1.service.
[root@localhost ~]# setenforce 0

`install yum source`
[root@localhost ~]# rpm -ivh http://repo.zabbix.com/zabbix/3.5/rhel/7/x86_64/zabbix-release-3.5-1.el7.noarch.rpm
//Get http://repo.zabbix.com/zabbix/3.5/rhel/7/x86_/zabbix-release-3.5-1.el7.noarch.rpm
//Warning / var/tmp/rpm-tmp.elS5cl: header V4 RSA/SHA512 Signature, key ID a14fe591: NOKEY
//[100%]
//Upgrading / installing
   1:zabbix-release-3.5-1.el7         ################################# [100%]

[root@localhost ~]# cd /etc/yum.repos.d/
[root@localhost yum.repos.d]# ls
CentOS-Base.repo  CentOS-Debuginfo.repo  CentOS-Media.repo    CentOS-Vault.repo
CentOS-CR.repo    CentOS-fasttrack.repo  CentOS-Sources.repo  zabbix.repo
[root@localhost yum.repos.d]# yum install zabbix-agent -y

`Modify profile`
[root@localhost yum.repos.d]# grep -n '^'[a-Z] /etc/zabbix/zabbix_agentd.conf
13:PidFile=/var/run/zabbix/zabbix_agentd.pid
32:LogFile=/var/log/zabbix/zabbix_agentd.log
43:LogFileSize=0
98:Server=127.0.0.1             #It needs to be modified to monitor IP
139:ServerActive=127.0.0.1      #It needs to be modified to monitor IP
150:Hostname=Zabbix server
268:Include=/etc/zabbix/zabbix_agentd.d/*.conf

[root@localhost yum.repos.d]# vim /etc/zabbix/zabbix_agentd.conf
98 Server=192.168.18.147            #Line 98, pointing to monitoring server IP
139 ServerActive=192.168.18.147     #Line 139, pointing to monitoring server IP
150 Hostname=zhou                   #Host name, self defined
#After modification, press Esc to exit the insertion mode, enter: wq to save and exit

`Startup service`
[root@localhost yum.repos.d]# systemctl enable zabbix-agent.service
Created symlink from /etc/systemd/system/multi-user.target.wants/zabbix-agent.service to /usr/lib/systemd/system/zabbix-agent.service.
[root@localhost yum.repos.d]# systemctl restart zabbix-agent.service
[root@localhost yum.repos.d]# netstat -ntap | grep zabbix       #Listening port is 10050
tcp        0      0 0.0.0.0:10050           0.0.0.0:*         LISTEN   5425/zabbix_agentd
tcp6       0      0 :::10050                :::*              LISTEN   5425/zabbix_agentd
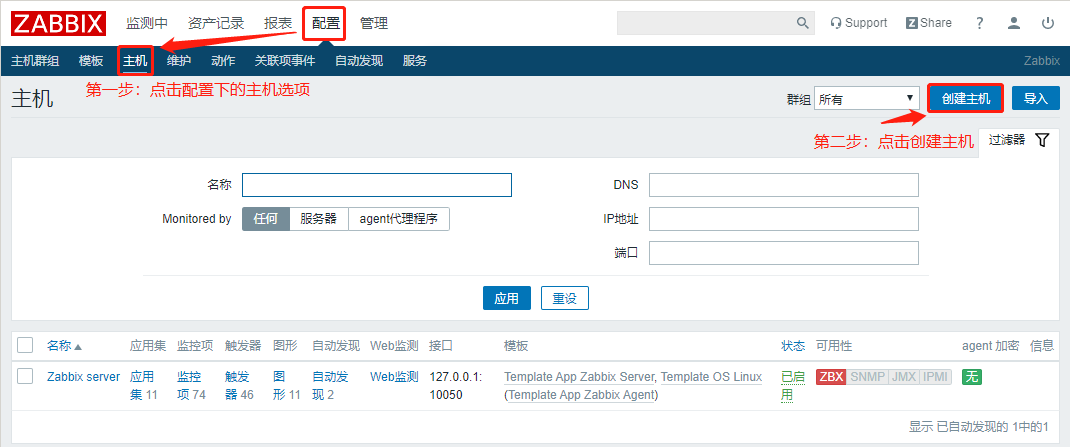
At this time, the monitored end will not be automatically identified, and the following operations need to be done:
Step 1: find the host option under configuration and click Create host
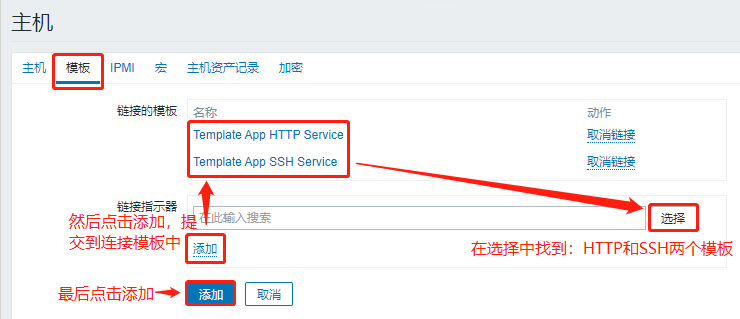
Step 2: fill in the corresponding content in the host configuration interface, and then click the template

Step 3: select the template links of HTTP and SSH in the template, click add in the prompt, and then click the blue add Icon
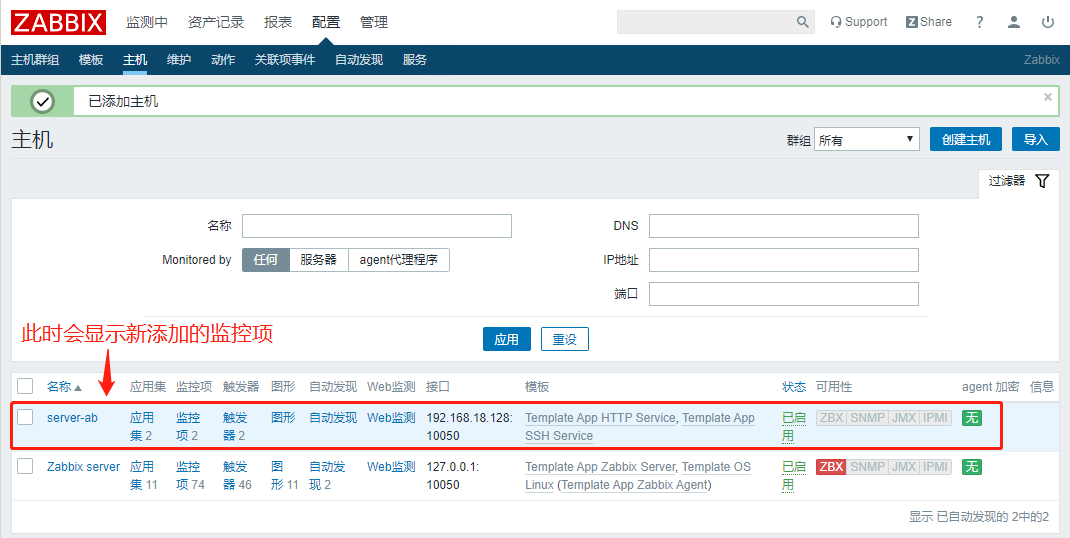
The newly added monitoring items will be displayed when you return to the start interface
The above enables the server to monitor the monitored end. If the monitored end encounters problems, it will trigger an alarm and finally provide it in the form of email (mail sending service needs to be added)
Zabbix monitoring and alarm mechanism
Operation of installing mail alarm function at monitoring end
[root@cacti zabbix]# yum install mailx -y
[root@cacti zabbix]# vim /etc/mail.rc
#Insert the following under the last line
set from=E-mail address   #For example, 19919911@163.com
set smtp=smtp.163.com
set smtp-auth-user=E-mail address
set smtp-auth-password=Mailbox password
set smtp-auth=login
#After modification, press Esc to exit the insertion mode, enter: wq to save and exit

`Try to send a test message`
[root@cacti zabbix]# echo "hello world" | mail -s "testmail" email address
At this time, the mailbox receives the test email:

To script an outgoing message:
[root@cacti zabbix]# cd /usr/lib/zabbix/alertscripts
[root@cacti alertscripts]# vim mail.sh
#!/bin/bash
#send mail
messages=`echo $3 | tr '\r\n' '\n'`
subject=`echo $2 | tr '\r\n' '\n'`
echo "${messages}" | mail -s "${subject}" $1 >>/tmp/mailx.log 2>&1
#After modification, press Esc to exit the insertion mode, enter: wq to save and exit
[root@cacti alertscripts]# mv mail.sh mailx.sh
`stay tmp Create under directory mailx Log files for`
[root@cacti alertscripts]# touch /tmp/mailx.log
`Grant authority`
[root@cacti alertscripts]# chown -R zabbix.zabbix /tmp/mailx.log
[root@cacti alertscripts]# chmod +x /usr/lib/zabbix/alertscripts/mailx.sh
[root@cacti alertscripts]# chown -R zabbix.zabbix /usr/lib/zabbix/
`Verification process`
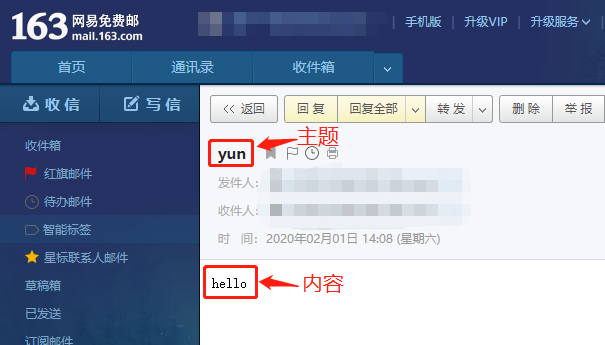
[root@cacti alertscripts]# . / mailx.sh email address "yun" "hello"
#Where email address is $1,yun is $2 subject and hello is $3 contentAt this point, after executing the script, you can receive the corresponding email in the mailbox!
Next, enter the Web interface to set:
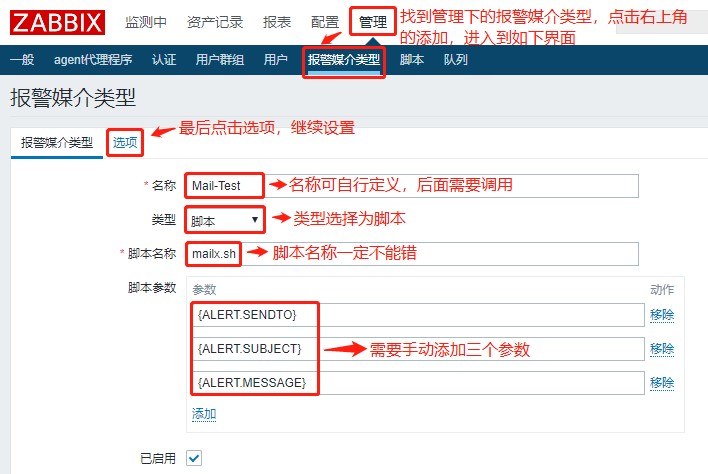
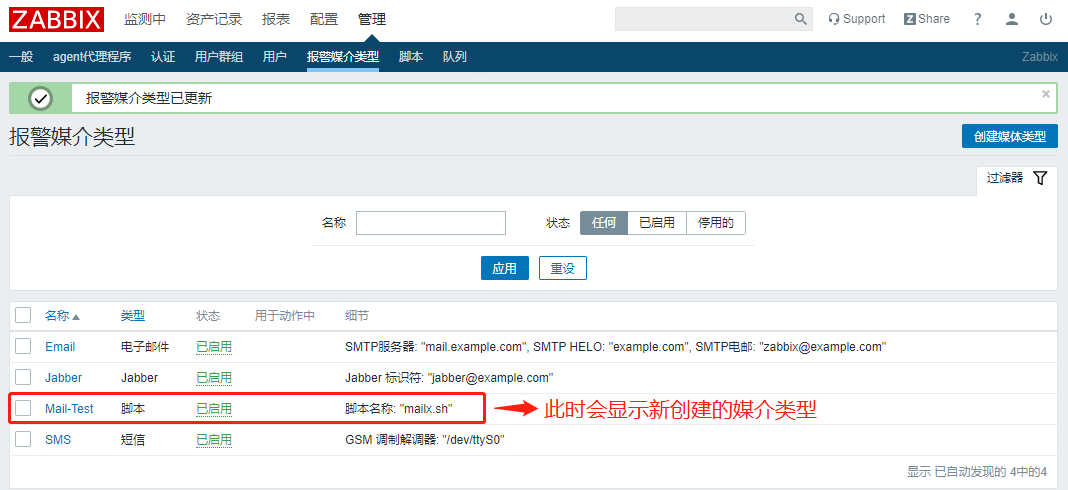
Step 1: select management at the top, find the alarm media type, click create media type at the top right corner of the page, and enter relevant information in the interface
Step 2: three times of detection service will be displayed in the option. If it goes down, an alarm will be triggered. Finally, click the blue Add icon below to generate a new alarm type
Next we need to specify users
Step 1: find the user interface in the configuration, and click Admin user
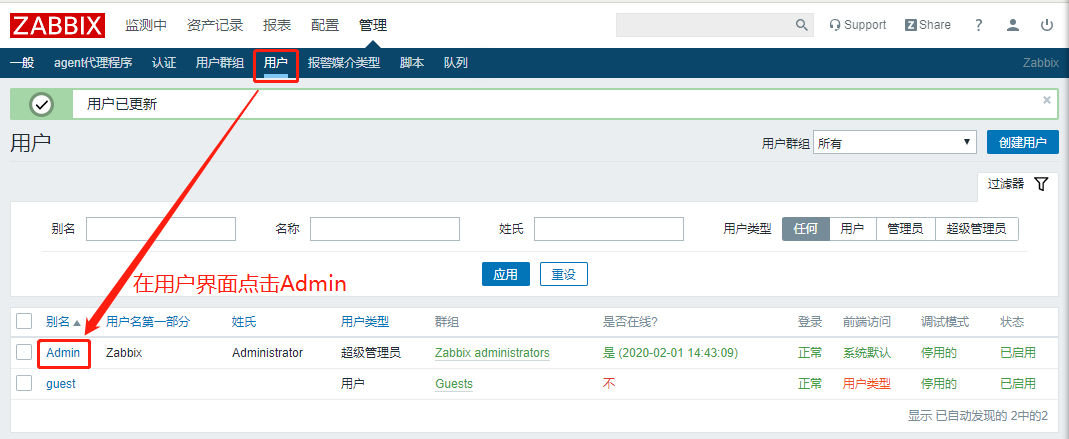
Step 2: click add in the user's alarm media, input the corresponding media information, and finally click Add
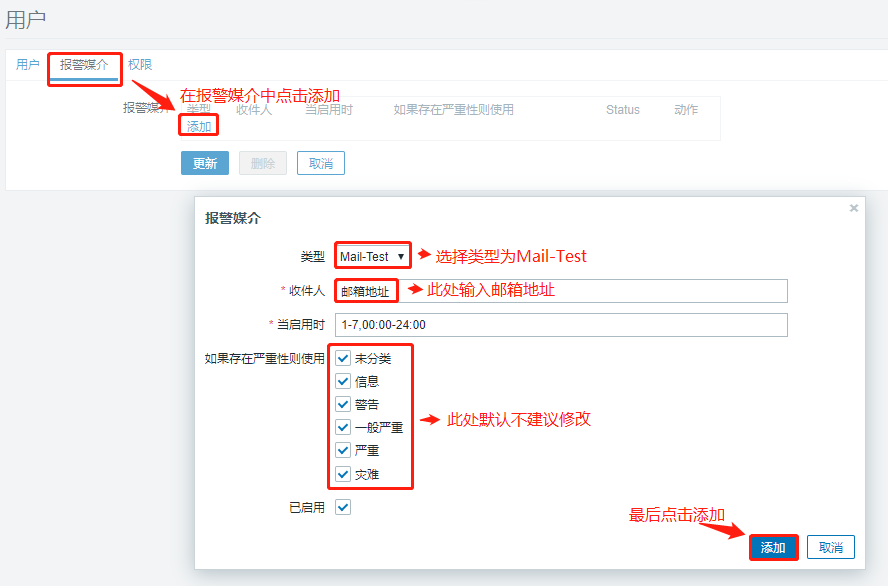
Step 3: do not forget to click Update after adding media

Delete the original template in the action, redefine it, and click create action in the upper right corner
Step 1: enter a name in the action interface to generate a new trigger condition
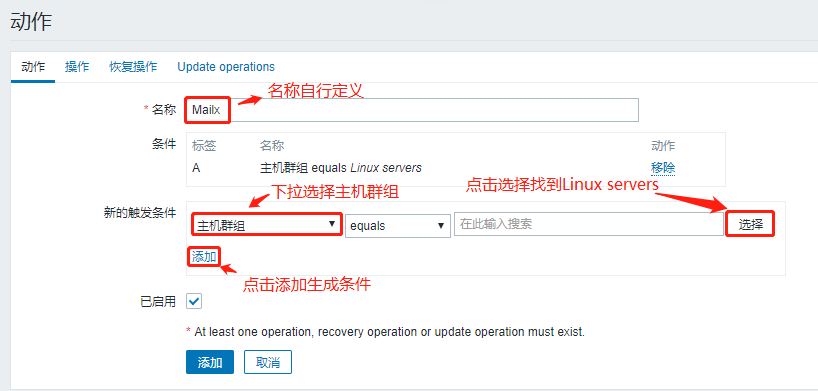
Step 2: do the following operations in the operation, click new below, add, and finally click follow new
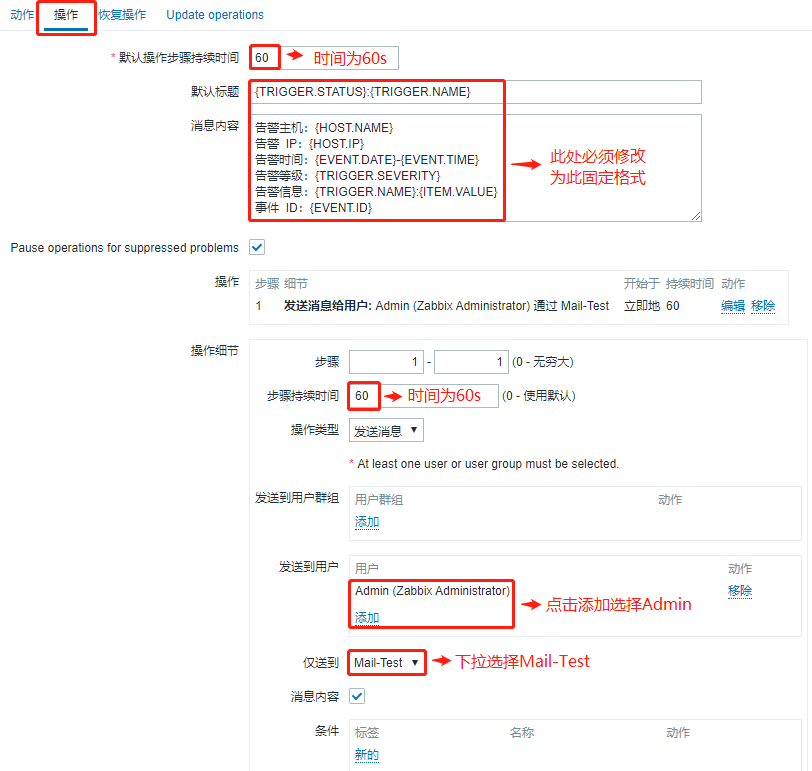
At this time, the new operation is generated!

Step 3: fill in the following in the recovery operation
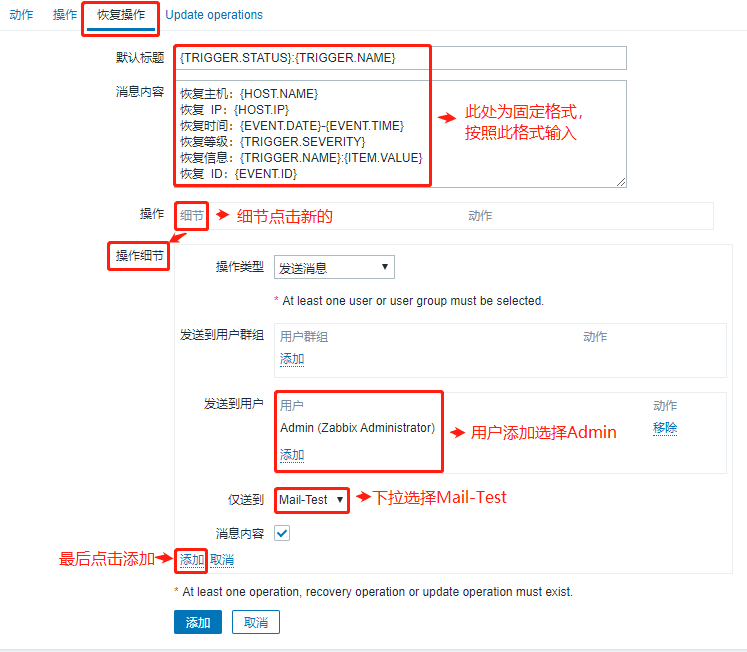
At this time, the new operation is generated!

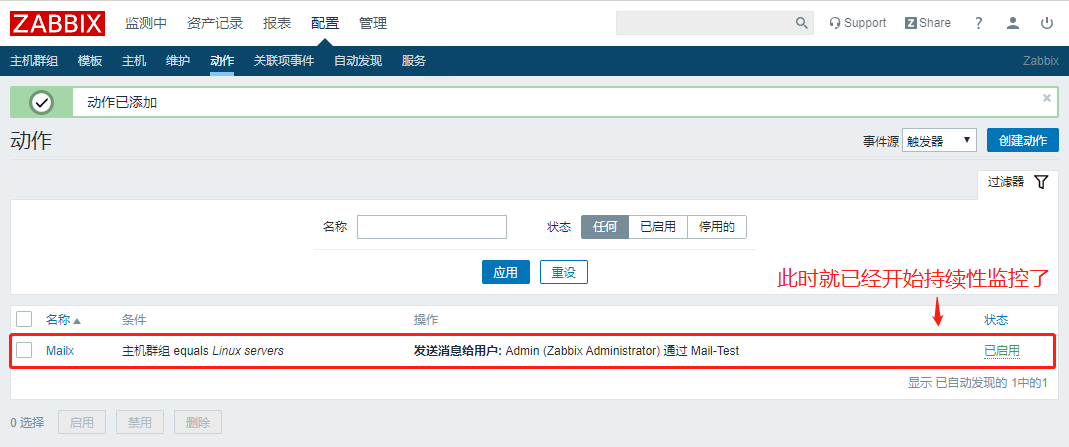
Step 4: click the blue icon to add, and then the continuous monitoring will be carried out
View the SSH Remote Connection Service Status of the monitored end
[root@localhost yum.repos.d]# systemctl status sshd
● sshd.service - OpenSSH server daemon
   Loaded: loaded (/usr/lib/systemd/system/sshd.service; enabled; vendor preset: enabled)
   Active: active (running) since One 2019-11-25 11:00:11 CST; 2 months 7 days ago
#The running status is displayed

`Stop this service`
[root@localhost yum.repos.d]# systemctl stop sshd
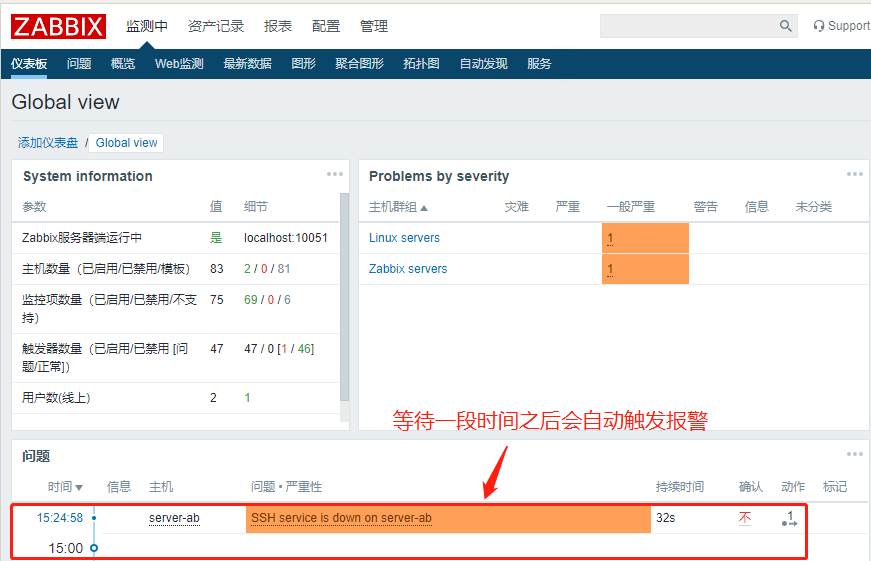
Now let's see if the monitoring interface will pop up
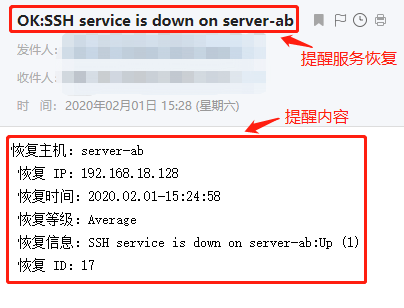
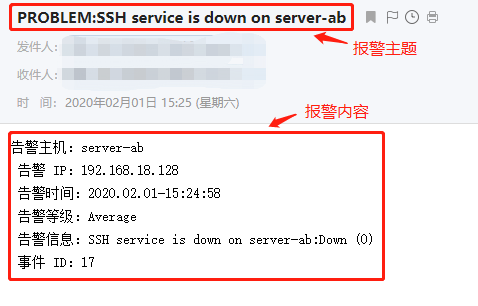
After waiting for a few minutes, the monitoring interface will automatically pop up the SSH service down prompt, at this time, the mailbox will also receive the email
`start-up sshd service`
[root@localhost yum.repos.d]# systemctl start sshd
In this case, after a few minutes, it will be automatically detected that the service is successfully started, the alarm has been resolved, and the mailbox will receive the mail of service recovery