Introduction to zabbix:
zabbix is a fully open source tool that integrates features such as cacti and nagios
Annex: SNMP (udp 161 UDP 162)
Many network tools support this protocol, such as common routing switching, common OS.
It can be managed as well as managed.
There are roughly three versions of snmp protocol: V1 V2 V3
The security of v1 and v2 is poor, because the transmission is plaintext, and the authentication password of V3 is encrypted by MD5/SHA digest algorithm.
Many tools support the function of network management, and for non-network devices (operating systems), snmp can be completely abandoned as an insecure architecture to achieve monitoring. So many tools are control side and agent architecture, they have proprietary agent.
The main functions of Zabbix are:
It has the functions of common commercial monitoring software (host performance monitoring, network equipment performance monitoring, database, FTP and other general protocol monitoring, multiple police reporting, detailed report chart drawing)
Support for automatic discovery of network devices and servers (by configuring automatic discovery server rules)
Supporting distributed, centralized display and management of distributed monitoring points, strong scalability
server provides a general interface (api function), can develop and improve various types of monitoring (according to the relevant interface programming implementation), easy to write plug-ins, can customize monitoring items, alarm level settings.
Data collection, support SNMP (including trapping and polling), IPMI, JMX, SSH, TELNET;
Customized detection; Customized frequency of data collection;
Server/proxy and client mode;
Flexible triggers; can define very flexible problem thresholds, called triggers;
High customizable alarm; send notification, customizable alarm upgrade, recipient, media type.
CPU load, memory usage, disk usage, network status, port monitoring, log monitoring, etc.
Hardware monitoring: Zabbix IPMI Interface
System monitoring: ZabbixAgent Interface
Java monitoring: Zabbix JMXInterface
Network Equipment Monitoring: Zabbix SNMP Interface
Application Service Monitoring: Zabbix Agent UserParameter
MySQL database monitoring: percona-monitoring-plulgins
URL monitoring: Zabbix Web monitoring
zabbix Important Components Description:
1) zabbix server: the core component responsible for receiving report information sent by agent, which organizes all configuration, statistics and operation data;
2) database storage: dedicated to storing all configuration information and data collected by zabbix;
3) web interface: GUI interface of zabbix;
4) proxy: optional components, often used in distributed environment with many monitoring nodes, proxy server collects part of the data and forwards it to server, which can reduce the pressure of server;
5) agent: Deployed on the monitored host, responsible for collecting host local data such as cpu, memory, database, etc. and sending it to server or proxy.
In addition, zabbix server, proxy, agent have their own configuration files and log files, important parameters need to be configured here, which will be explained in detail later.
The general process of a monitoring system is as follows:
agentd needs to be installed on the monitored host. It collects data regularly and sends it to the zabbix server. zabbix server stores data in the database. zabbix web displays and draws data on the front end. Here, the data collected by agent is divided into two modes: active mode and passive mode.
Active: agent requests server to get active list of monitors and submit the data needed to be detected in monitors to server/proxy on its own initiative
Passive: The server requests the agent to get the data of the monitored item, and the agent returns the data.
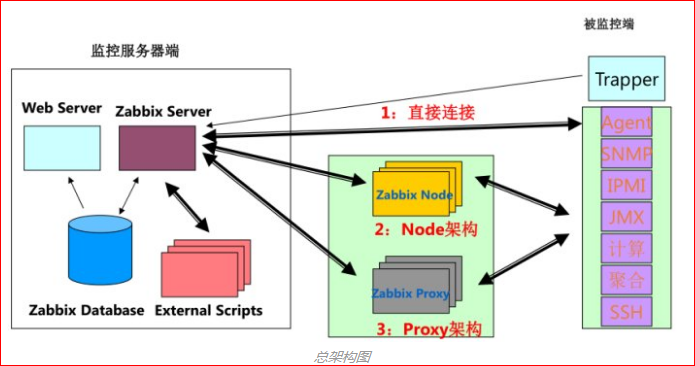
Common monitoring architecture platform of zabbix
1. Server-agent mode:
This is the simplest architecture, often used to monitor fewer hosts.
2. Server-proxy-agent mode:
This is often used in more machines, using proxy for distributed monitoring, effectively reducing the pressure on the server side.
zabbix system architecture:
Zabbix is an enterprise-level open source solution based on Web interface that provides distributed system monitoring and network monitoring functions. With the help of Zabbix, the heavy server management tasks of operation and maintenance personnel can be easily alleviated, and the continuous operation of business systems can be realized. Following is a step-by-step introduction to the deployment and use of Zabbix distributed monitoring system
Configure IP, DNS and gateway to ensure that the server can be connected using remote connection tools
zabbix server monitoring server: 192.168.0.103 #zabbix server (to monitor the local machine, you need to configure the local zabbix agent)
Zabbix agent monitored host: 192.168.0.104 #zabbix client (monitored side, need to configure Zabbix agent)
2. The process of building the LNMP environment before Zabbix deployment:
Install compiler tools and library files
[root@Zabbix-Server ~]# yum -y install make apr* autoconf automake curl-devel gcc gcc-c++ openssl openssl-devel gd kernel keyutils patch perl kernel-headers compat* mpfr cpp glibc libgomp libstdc++-devel keyutils-libs-devel libcom_err-devel libsepol-devel libselinux-devel krb5-devel zlib-devel libXpm* freetype libjpeg* libpng* libtool* libxml2 libxml2-devel patch libcurl-devel bzip2-devel freetype-devel
Install MySQL 5.7.13
The process is slight, because the environment has been deployed before, and previous articles have related operations, you can refer to.
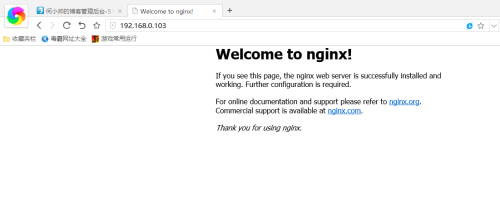
Install nginx
decompression zlib
[root@Zabbix-Server ~]# tar zxf zlib-1.2.8.tar.gz
//Note: No need to compile, just decompress.
//Decompress pcre
[root@Zabbix-Server ~]# tar zxf pcre-8.39.tar.gz
[root@Zabbix-Server ~]# groupadd www
[root@Zabbix-Server ~]# useradd -g www www -s /sbin/nologin
//Download the source package for nginx: http://nginx.org/download
//Decompress the source package:
[root@Zabbix-Server ~]# tar zxf nginx-1.10.2.tar.gz
[root@Zabbix-Server nginx-1.10.2]# cd nginx-1.10.2/
[root@Zabbix-Server nginx-1.10.2]# ./configure --prefix=/usr/local/nginx1.10 --with-http_dav_module --with-http_stub_status_module --with-http_addition_module --with-http_sub_module  --with-http_flv_module --with-http_mp4_module --with-pcre=/root/pcre-8.39 --with-zlib=/root/zlib-1.2.8 --with-http_ssl_module --with-http_gzip_static_module --user=www --group=www && make && make install
[root@Zabbix-Server nginx-1.10.2]# ln -s /usr/local/nginx1.10/sbin/nginx /usr/local/sbin/
[root@Zabbix-Server nginx-1.10.2]# nginx
[root@Zabbix-Server nginx-1.10.2]# netstat -antp | grep nginx
tcp        0      0 0.0.0.0:80              0.0.0.0:*               LISTEN      99063/nginx: master
[root@Zabbix-Server nginx-1.10.2]# firewall-cmd --permanent --add-port=80/tcp
success
[root@Zabbix-Server nginx-1.10.2]# firewall-cmd --reload
success
After startup, the page can be opened in the browser, and the default page of nginx will be displayed.
Install php
[root@Zabbix-Server ~]# tar zxf libmcrypt-2.5.7.tar.gz
[root@Zabbix-Server ~]# cd libmcrypt-2.5.7/
[root@Zabbix-Server libmcrypt-2.5.7]# ./configure && make && make install
[root@Zabbix-Server libmcrypt-2.5.7]# cd
[root@Zabbix-Server ~]# tar zxf php-5.6.27.tar.gz
[root@Zabbix-Server ~]# cd php-5.6.27/
[root@Zabbix-Server php-5.6.27]# ./configure --prefix=/usr/local/php5.6 --with-config-file-path=/etc  --with-mysql=/usr/local/mysql --with-mysqli=/usr/local/mysql/bin/mysql_config --with-mysql-sock=/usr/local/mysql/mysql.sock --with-gd --with-iconv --with-libxml-dir=/usr --with-mhash --with-mcrypt --with-config-file-scan-dir=/etc/php.d --with-bz2 --with-zlib --with-freetype-dir --with-png-dir --with-jpeg-dir --enable-xml --enable-bcmath --enable-shmop --enable-sysvsem --enable-inline-optimization --enable-mbregex --enable-fpm --enable-mbstring --enable-ftp --enable-gd-native-ttf --with-openssl --enable-pcntl --enable-sockets --with-xmlrpc --enable-zip --enable-soap --without-pear --with-gettext --enable-session --with-mcrypt --with-curl && make && make install
[root@Zabbix-Server php-5.6.27]# cp php.ini-production /etc/php.ini
//Edit the configuration file / etc/php.ini. The revised contents are as follows: Edit the configuration file / etc/php.ini, and the revised contents are as follows:
//Find:
;date.timezone =
//Amend as follows:
date.timezone = PRC #timezone
//Find:
expose_php = On
//Amend as follows:
expose_php = Off #Disable display of php version information
//Find:
short_open_tag = Off
//Amend as follows:
short_open_tag = On //Support for php short tags
//Find:
post_max_size = 8M
//Amend as follows:
post_max_size = 16M  //Upload file size
//Find:
max_execution_time = 30
//Amend as follows:
max_execution_time = 300  //Maximum execution time of php scripts
//Find:
max_input_time = 60
//Amend as follows:
max_input_time = 300  //Limit the time to receive data by POST, GET and PUT in seconds
//Find:
;always_populate_raw_post_data = -1
//Amend as follows:
always_populate_raw_post_data = -1
//Find:
;mbstring.func_overload = 0
//Amend as follows:
mbstring.func_overload= 0
//Create a php-fpm service startup script:
[root@Zabbix-Server php-5.6.27]# cp sapi/fpm/init.d.php-fpm /etc/init.d/php-fpm
[root@Zabbix-Server php-5.6.27]# chmod +x /etc/init.d/php-fpm
[root@Zabbix-Server php-5.6.27]# chkconfig --add php-fpm
[root@Zabbix-Server php-5.6.27]# chkconfig php-fpm on
//Provide php-fpm configuration file and edit:
[root@Zabbix-Server php-5.6.27]# cp /usr/local/php5.6/etc/php-fpm.conf.default /usr/local/php5.6/etc/php-fpm.conf
[root@Zabbix-Server php-5.6.27]# vi /usr/local/php5.6/etc/php-fpm.conf
//The amendments are as follows:
pid = run/php-fpm.pid
user = www
group = www
listen =127.0.0.1:9000
pm.max_children = 300
pm.start_servers = 10
pm.min_spare_servers = 10
pm.max_spare_servers =50
//Start the php-fpm service:
[root@Zabbix-Server php-5.6.27]# service php-fpm start
Starting php-fpm  done
[root@Zabbix-Server php-5.6.27]# netstat -anpt | grep php-fpm
tcp        0      0 127.0.0.1:9000          0.0.0.0:*               LISTEN      110892/php-fpm: mas
//Configuring nginx to support php
[root@Zabbix-Server php-5.6.27]# cat /usr/local/nginx1.10/conf/nginx.conf
user  www www;
worker_processes  4;
#error_log  logs/error.log;
#error_log  logs/error.log  notice;
#error_log  logs/error.log  info;
#pid        logs/nginx.pid;
events {
use epoll;
    worker_connections  1024;
}
http {
include       mime.types;
    default_type  application/octet-stream;
    #log_format  main  '$remote_addr - $remote_user [$time_local] "$request" '
    #                  '$status $body_bytes_sent "$http_referer" '
    #                  '"$http_user_agent" "$http_x_forwarded_for"';

    #access_log  logs/access.log  main;
sendfile        on;
    #tcp_nopush     on;
    #keepalive_timeout  0;
    keepalive_timeout  65;
    #gzip  on;
server {
listen       80;
        server_name  localhost;
charset utf-8;
        #access_log  logs/host.access.log  main;
location / {
root   html;
index  index.php index.html index.htm;
        }
location ~ \.php$ {
root html;
            fastcgi_pass 127.0.0.1:9000;
            fastcgi_index index.php;
include fastcgi.conf;
        }
        #error_page  404              /404.html;
        # redirect server error pages to the static page /50x.html
        #
        error_page   500 502 503 504  /50x.html;
location = /50x.html {
root   html;
        }
location /status {
stub_status on;
        }
   }
}
[root@Zabbix-Server php-5.6.27]# nginx -t nginx: the configuration file /usr/local/nginx1.10/conf/nginx.conf syntax is ok nginx: configuration file /usr/local/nginx1.10/conf/nginx.conf test is successful [root@Zabbix-Server php-5.6.27]# killall -s HUP nginx
Testing LNMP
Go to the default root directory of nginx and create a test page for.php
[root@Zabbix-Server php-5.6.27]# cat /usr/local/nginx1.10/html/test1.php
<?php
phpinfo()
?>
[root@Zabbix-Server php-5.6.27]# cat /usr/local/nginx1.10/html/test2.php
<?php
$link=mysql_connect('localhost','root','123.abc');
if($link) echo "ok";
mysql_close();
?>
Visit results:
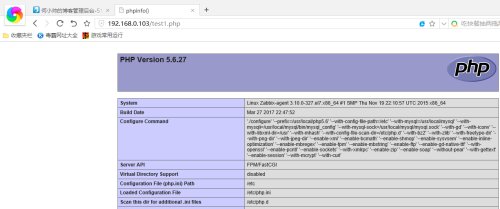
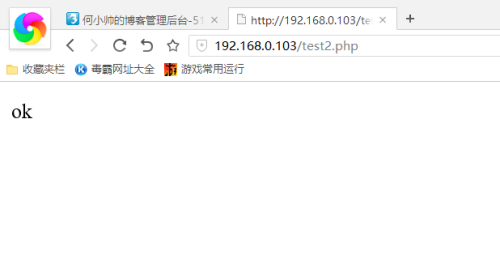
So far, LNMP has been deployed.
Installation of Monitoring System Zabbix-3.2.1
zabbix-server End-to-end operation
zabbix Server should be installed in advance LNMP Environment( mysql,nginx,php5 The installation directories are/usr/local)
//Create users running Zabbix:
[root@Zabbix-Server ~]# groupadd zabbix
[root@Zabbix-Server ~]# useradd -g zabbix zabbix
//Install libcurl and net-snmp:
[root@Zabbix-Server ~]# yum -y install net-snmp net-snmp-devel curl-devel java-1.8.0-openjdk java-1.8.0-openjdk-devel OpenIPMI-devel libssh2-devel
//Note: OpenIPMI-devel and libssh2-devel packages are installed using centos online yum software source
//Install Fping:
[root@Zabbix-Server ~]# tar zxf fping-3.12.tar.gz
[root@Zabbix-Server ~]# cd fping-3.12/
[root@Zabbix-Server fping-3.12]# ./configure && make && make install
[root@Zabbix-Server fping-3.12]# chown root:zabbix /usr/local/sbin/fping
[root@Zabbix-Server fping-3.12]# chmod 4710 /usr/local/sbin/fping
//Install Zabbix Server:
[root@Zabbix-Server fping-3.12]# cd
[root@Zabbix-Server ~]# tar zxf zabbix-3.2.1.tar.gz
[root@Zabbix-Server ~]# cd zabbix-3.2.1/
[root@Zabbix-Server zabbix-3.2.1]# ./configure --prefix=/usr/local/zabbix --enable-server --enable-agent --enable-java --with-mysql=/usr/local/mysql/bin/mysql_config --with-net-snmp --with-libcurl --with-openipmi
//Note: It's better to take the parameter - enable-java when compiling to facilitate the subsequent monitoring of tomcat programs.
--with-ssh2 No need to install on the client server Zabbix agent,If needed ssh Check, need to add this when compiling, minimum need libssh2 1.0.0 Version, need to be installed ssh Development Kit
--with-openipmi Users can use it IPMI Monitor the physical characteristics of the server, such as temperature, voltage, fan working status, power supply, etc.
//If -- enable-proxy is added, two commands, get and sender, are generated. The following commands are used to receive information from the agent and send it to the server at the same time.
[root@Zabbix-Server zabbix-3.2.1]# make && make install
//Adding System Soft Connection
[root@Zabbix-Server zabbix-3.2.1]# ln -s /usr/local/zabbix/bin/* /usr/local/bin/
[root@Zabbix-Server zabbix-3.2.1]# ln -s /usr/local/zabbix/sbin/* /usr/local/sbin/
ZabbixServer Configuration and Startup
//Create a Zabbix database and MySQL users:
mysql> create database zabbix character set utf8;
Query OK, 1 row affected (0.00 sec)

mysql> grant all privileges on zabbix.* to zabbix@localhost identified by 'zabbix';
Query OK, 0 rows affected, 1 warning (0.00 sec)
//Import Zabbix initial data:
//Switch to the decompressed directory of zabbix
[root@Zabbix-Server zabbix-3.2.1]# cd database/mysql/
[root@Zabbix-Server mysql]# pwd
/root/zabbix-3.2.1/database/mysql
[root@Zabbix-Server mysql]# ls
data.sql  images.sql  schema.sql
[root@Zabbix-Server mysql]# mysql -uzabbix -pzabbix -hlocalhost zabbix < schema.sql
mysql: [Warning] Using a password on the command line interface can be insecure.
[root@Zabbix-Server mysql]# mysql -uzabbix -pzabbix -hlocalhost zabbix < images.sql
mysql: [Warning] Using a password on the command line interface can be insecure.
[root@Zabbix-Server mysql]#  mysql -uzabbix -pzabbix -hlocalhost zabbix < data.sql
mysql: [Warning] Using a password on the command line interface can be insecure.
//Edit/usr/local/zabbix/etc/zabbix_server.conf:
[root@Zabbix-Server mysql]# grep -v "^#" /usr/local/zabbix/etc/zabbix_server.conf | grep -v "^$"
LogFile=/usr/local/zabbix/logs/zabbix_server.log
PidFile=/usr/local/zabbix/logs/zabbix_server.pid
DBHost=localhost
DBName=zabbix
DBUser=zabbix
DBPassword=zabbix
DBPort=3306
FpingLocation=/usr/local/sbin/fping
[root@Zabbix-Server mysql]# mkdir -p /usr/local/zabbix/logs
[root@Zabbix-Server mysql]# chown -R zabbix:zabbix /usr/local/zabbix/
//Start Zabbix Server:
[root@Zabbix-Server mysql]# /usr/local/zabbix/sbin/zabbix_server -c /usr/local/zabbix/etc/zabbix_server.conf
/usr/local/zabbix/sbin/zabbix_server: error while loading shared libraries: libmysqlclient.so.20: cannot open shared object file: No such file or directory
//Solution:
//Add / usr/local/mysql/lib to ld.so.conf
[root@Zabbix-Server mysql]# find / -name libmysqlclient.so.20
/root/mysql-5.7.13/libmysql/libmysqlclient.so.20
/usr/local/mysql/lib/libmysqlclient.so.20
[root@Zabbix-Server mysql]# vi /etc/ld.so.conf
[root@Zabbix-Server mysql]# cat /etc/ld.so.conf
include ld.so.conf.d/*.conf
/root/mysql-5.7.13/libmysql/
/usr/local/mysql/lib/
//Load the / etc/ld.so.conf file into effect and restart zabbix_server
[root@Zabbix-Server mysql]# ldconfig
[root@Zabbix-Server mysql]# /usr/local/zabbix/sbin/zabbix_server -c /usr/local/zabbix/etc/zabbix_server.conf
[root@Zabbix-Server mysql]# netstat -anpt | grep zabbix_server
tcp        0      0 0.0.0.0:10051           0.0.0.0:*               LISTEN      15820/zabbix_server
//Add boot-up script
[root@Zabbix-Server ~]# cd zabbix-3.2.1/
[root@Zabbix-Server zabbix-3.2.1]# cp misc/init.d/fedora/core/zabbix_server /etc/rc.d/init.d/zabbix_server
[root@Zabbix-Server zabbix-3.2.1]# cp misc/init.d/fedora/core/zabbix_agentd /etc/rc.d/init.d/zabbix_agentd
[root@Zabbix-Server zabbix-3.2.1]# chmod +x /etc/rc.d/init.d/zabbix_server
[root@Zabbix-Server zabbix-3.2.1]# chmod +x /etc/rc.d/init.d/zabbix_agentd
[root@Zabbix-Server zabbix-3.2.1]# chkconfig --add zabbix_server
[root@Zabbix-Server zabbix-3.2.1]# chkconfig --add zabbix_agentd
[root@Zabbix-Server zabbix-3.2.1]# chkconfig zabbix_server on
[root@Zabbix-Server zabbix-3.2.1]# chkconfig zabbix_agentd on
//Modify the zabbix installation directory in the zabbix boot-up script
vi /etc/rc.d/init.d/zabbix_server #Editing Server Configuration Files
BASEDIR=/usr/local/zabbix/ #zabbix installation directory
PIDFILE=/usr/local/zabbix/logs/$BINARY_NAME.pid    #pid file path
:wq! #Save out
vi /etc/rc.d/init.d/zabbix_agentd #Editing Client Configuration File
BASEDIR=/usr/local/zabbix/ #zabbix installation directory
PIDFILE=/usr/local/zabbix/logs/$BINARY_NAME.pid  #pid file path
:wq! #Save out
[root@Zabbix-Server zabbix-3.2.1]# systemctl daemon-reload
[root@Zabbix-Server zabbix-3.2.1]# /etc/init.d/zabbix_server stop
Stopping zabbix_server (via systemctl):                    [  OK  ]
[root@Zabbix-Server zabbix-3.2.1]# netstat -antp | grep zabbix
[root@Zabbix-Server zabbix-3.2.1]# /etc/init.d/zabbix_server start
Starting zabbix_server (via systemctl):                    [  OK  ]
[root@Zabbix-Server zabbix-3.2.1]# netstat -antp | grep zabbix
tcp        0      0 0.0.0.0:10051           0.0.0.0:*               LISTEN      17223/zabbix_server
//Setting Firewall Rules
[root@Zabbix-Server zabbix-3.2.1]# firewall-cmd --permanent --add-port=10051/tcp
success
[root@Zabbix-Server zabbix-3.2.1]# firewall-cmd --reload
success
//Configure zabbix web page
//Copy frontends to the specified web root in the installation directory:
[root@Zabbix-Server zabbix-3.2.1]# pwd
/root/zabbix-3.2.1
[root@Zabbix-Server zabbix-3.2.1]# cp -r frontends/php/ /usr/local/nginx1.10/html/zabbix
[root@Zabbix-Server zabbix-3.2.1]# chown -R www:www /usr/local/nginx1.10/html/zabbix/
//Note: / usr/local/nginx/html is the default site directory for Nginx. www is the Nginx running account
//Note: PHP needs to at least turn on extensions:
gd,bcmath,ctype,libXML,xmlreader,xmlwriter,session,sockets,mbstring,gettext,mysql
//As follows, see if the extension module mentioned above is included.
[root@Zabbix-Server zabbix-3.2.1]# /usr/local/php5.6/bin/php -m
[PHP Modules]
bcmath
bz2
Core
ctype
curl
date
dom
ereg
fileinfo
filter
ftp
gd
gettext
hash
iconv
json
libxml
mbstring
mcrypt
mhash
mysql
mysqli
openssl
pcntl
pcre
PDO
pdo_sqlite
Phar
posix
Reflection
session
shmop
SimpleXML
soap
sockets
SPL
sqlite3
standard
sysvsem
tokenizer
xml
xmlreader
xmlrpc
xmlwriter
zip
zlib

[Zend Modules]
Install web
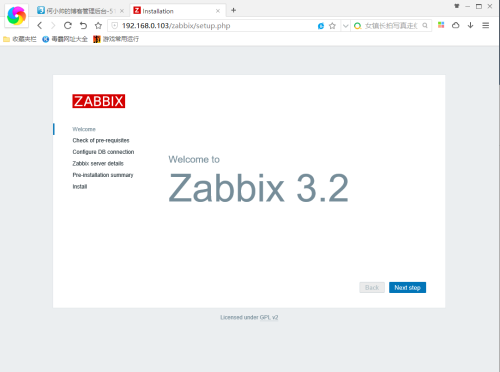
Visit the Web interface http://192.168.0.103/zabbix and configure it. After configuring, login with the default user admin (password: zabbix).
Enter ZABBIX WEB Installation Screen
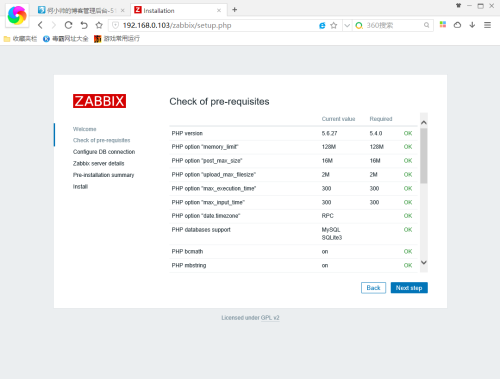
Enter ZABBIX Detection Screen
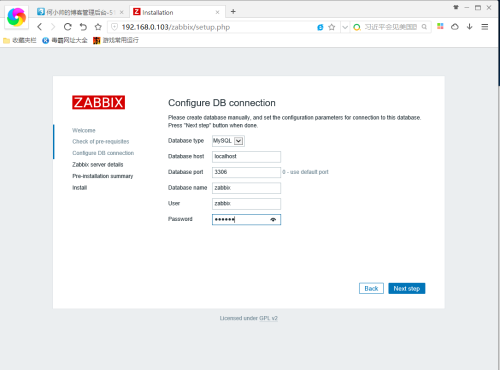
Set up the database, where you can use 0 if the database is local.
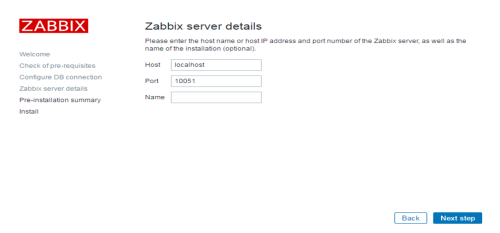
Click Next step to set up the details of zabbix server by default
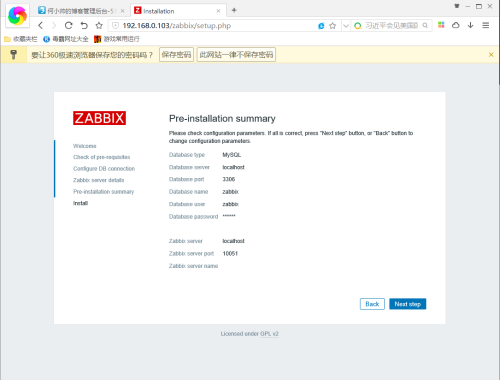
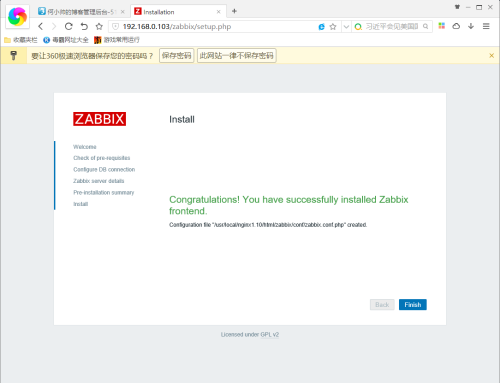
Click on Installation, after the installation is completed, if there are no errors, you will enter the completion screen.
Completion screen has settings file placed in the server location, please note down
Click Finish to complete
Log in using Admin with the default password zabbix
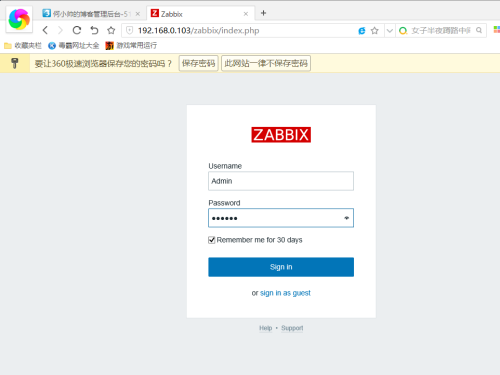
After login, the screen is as follows
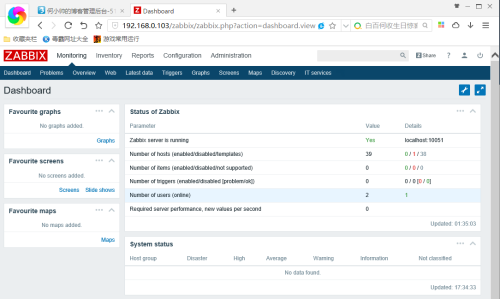
So far, the basic installation of ZABBIX has been completed.
Note: 1. Show Simplified Chinese Interface
The zabbix library has been set utf-8 characters when installing the database
Firstly, it is determined that zabbix has enabled Chinese support function:
Log in to the data directory of the zabbix server (the previously deployed zabbix data directory is / usr/local/nginx1.10/html/zabbix /), and open the locales.inc.php file
[root@Zabbix-Server include]# pwd
/usr/local/nginx1.10/html/zabbix/include
[root@Zabbix-Server include]# vi locales.inc.php

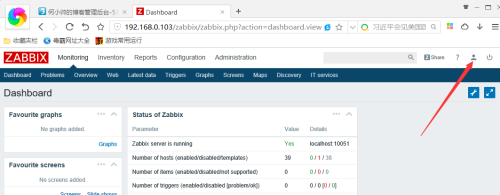
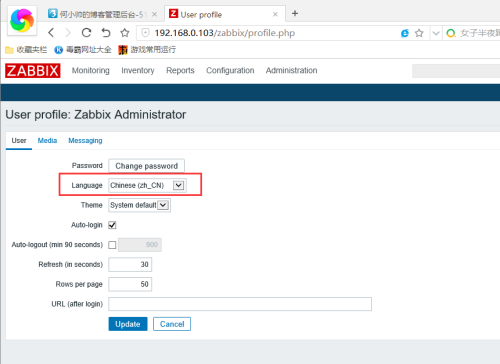
After landing in zabbix, click on the "User" icon in the upper right corner and set the language to "Chinese":
Select Chinese(zh_CN) as shown in the figure, and click update:
To solve the problem of Chinese scrambling in zabbix drawing:
A. Select a Chinese font library such as "italics" from the control panel - > font - > under windows

b. Copy it to the fonts directory on the web side of zabbix, such as: / usr/local/nginx1.10/html/zabbix/fonts /, and change the TTF suffix to ttf
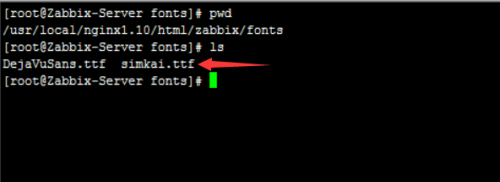
And move the previous font file DejaVuSans.ttf elsewhere
c. Then, change the font configuration in the code include/defines.inc.php file to replace the font settings in it with simkai from DejaVuSans
vi Replacement Skills:%s/DejaVuSans/simkai
Among them: simkai is the font name and does not contain ttf suffix
[root@Zabbix-Server fonts]# cd /usr/local/nginx1.10/html/zabbix/
[root@Zabbix-Server zabbix]# vi include/defines.inc.php
Enter% s/DejaVuSans/simkai in the last line mode of vi editor
In this way, after modification, the Chinese characters in zabbix monitor graphics will not be scrambled.
IV. Installation of zabbix Client
Since we want to monitor, we need to add the host to monitor. Before adding the host, we first need to install agent on the tested host. Installing agent is relatively simple. We also download the software package according to the process of installing server. When compiling, we only choose agent.
192.168.0.104 serves as the monitored end of zabbix, providing web and mysql applications
Install Zabbix and configure Zabbix agent:
[root@Zabbix-agent ~]#tar zxf zabbix-3.2.1.tar.gz
[root@Zabbix-agent ~]# cd zabbix-3.2.1/
[root@Zabbix-agent zabbix-3.2.1]# ./configure --prefix=/usr/local/zabbix --enable-agent && make && make install
[root@Zabbix-agent zabbix-3.2.1]# cp misc/init.d/fedora/core/zabbix_agentd /etc/init.d/
[root@Zabbix-agent zabbix-3.2.1]# mkdir -p /usr/local/zabbix/logs
[root@Zabbix-agent zabbix-3.2.1]# groupadd zabbix
[root@Zabbix-agent zabbix-3.2.1]# useradd -g zabbix zabbix
[root@Zabbix-agent zabbix-3.2.1]# chown -R zabbix:zabbix /usr/local/zabbix/
//Configure boot-up auto-start:
[root@Zabbix-agent zabbix-3.2.1]# chkconfig --add zabbix_agentd
[root@Zabbix-agent zabbix-3.2.1]# chkconfig zabbix_agentd on
//Modify the zabbix installation directory in the zabbix boot-up script
vi /etc/rc.d/init.d/zabbix_agentd #Editing Client Configuration File
BASEDIR=/usr/local/zabbix/ #zabbix installation directory
PIDFILE=/usr/local/zabbix/logs/$BINARY_NAME.pid  #pid file path
:wq! #Save out
//Edit zabbix_agent d.conf
[root@Zabbix-agent zabbix-3.2.1]# vi /usr/local/zabbix/etc/zabbix_agentd.conf
//The contents are as follows:
[root@Zabbix-agent zabbix-3.2.1]#grep -v "^#" /usr/local/zabbix/etc/zabbix_agentd.conf | grep -v "^$"
PidFile=/usr/local/zabbix/logs/zabbix_agentd.pid
LogFile=/usr/local/zabbix/logs/zabbix_agentd.log
Server=192.168.0.103
ListenPort=10050
ServerActive=192.168.0.103
Hostname=192.168.0.104
Timeout=15
Include=/usr/local/zabbix/etc/zabbix_agentd.conf.d/
Note:
Server and Server Active both specify the IP address of zabbixserver, but the former is passive and the latter is active. That is to say, the Server configuration is used to allow 192.168.0.103 IP to fetch data from me. Server Active 192.168.0.103 means that the client submits the data to him on its own initiative.
Hostname=XXX, the name of this definition must be the same as the name of host in the web page.
Start zabbix_agent d:
[root@Zabbix-agent zabbix-3.2.1]# /usr/local/zabbix/sbin/zabbix_agentd -c /usr/local/zabbix/etc/zabbix_agentd.conf
[root@Zabbix-agent zabbix-3.2.1]# netstat -anpt | grep zabbix_agentd
tcp        0      0 0.0.0.0:10050           0.0.0.0:*               LISTEN      18142/zabbix_agentd
[root@Zabbix-agent zabbix-3.2.1]# firewall-cmd --permanent --add-port=10050/tcp
success
[root@Zabbix-agent zabbix-3.2.1]# firewall-cmd --reload
success
So far, the basic environment of Zabbix 3.2.1 monitoring system has been installed.
Implementing zabbix to add monitoring items
Adding Monitoring to Linux Host
Open in browser: http://192.168.0.103/zabbix
Log in to zabbix, add host monitoring in "configuration" - "host", monitor os resources: memory, cpu, io, load, bandwidth, etc.
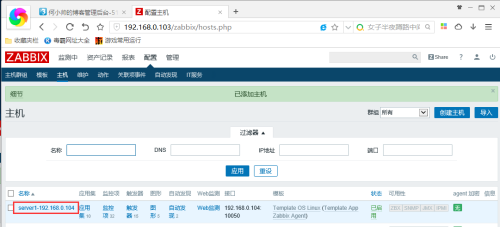
Log in to zabbix and create the host by clicking on Configuration - "Host"
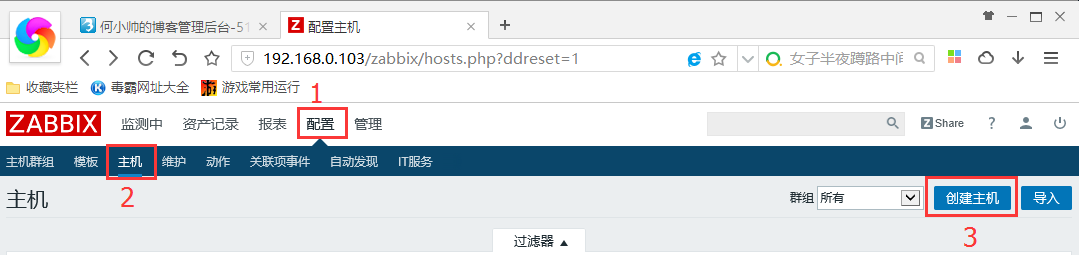
Click on the "Host" tab and fill in the relevant information
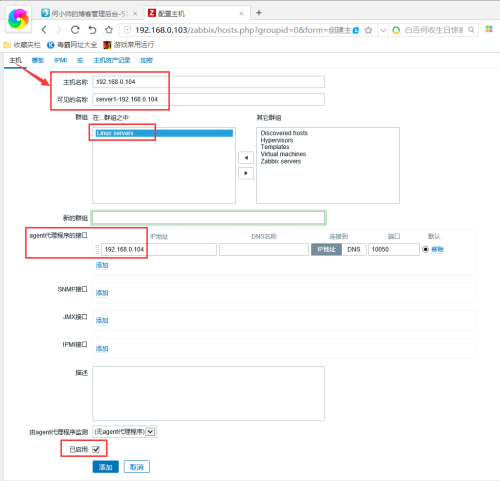
Note: The "host name" in the figure below should be the same as the name after "Hostname" set in the zabbix_agent d.conf file!
Host name: 192.168.0.104
Groups: Linux servers
agent Agent Interface ip: 192.168.0.104
Enabled: Check
Other options are available by default.
Switch to Template
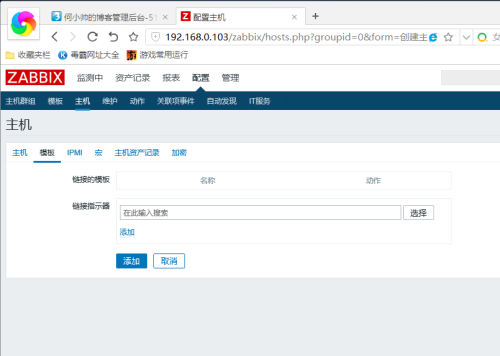
Choice
Selection: Template OS Linux
Point addition
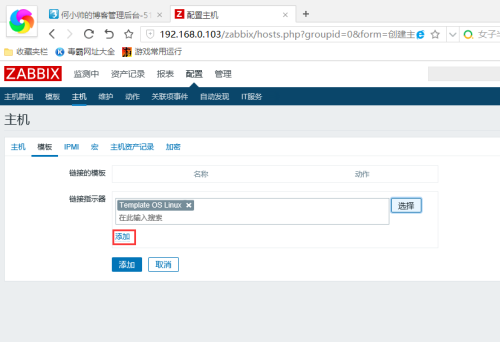
Add to
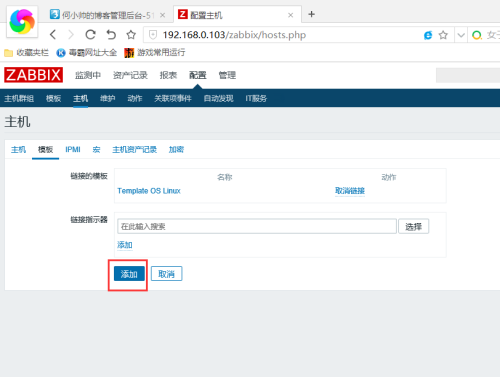
At this point, Zabbix monitors the completion of Linux host settings.
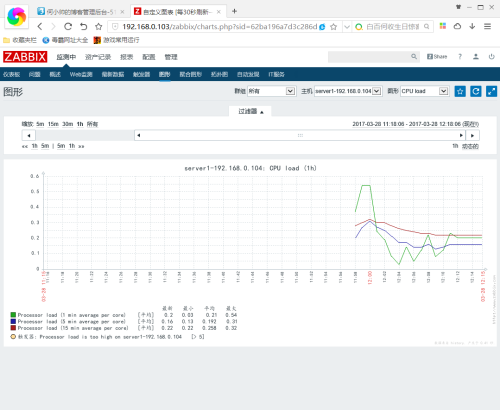
After configuring for a period of time, observe whether the effect of the monitoring chart comes out or not:
Zabbix 3.0 server comes with it mysql Templates, just configure the agent client, and then add templates to the host on the web side.
Zabbix_agent client operation
(1) First, add permissions to the client's mysql, that is, the local connection to the local MySQL using the zabbix account.
mysql> grant all on *.* to zabbix@'localhost' identified by '123.abc';
Query OK, 0 rows affected, 1 warning (0.19 sec)

mysql> flush privileges;
Query OK, 0 rows affected (0.00 sec)
(2) Create a. my.cnf connection file under the zabbix_agent service directory. The ZABBIX installation directory is / usr/local/zabbix
[root@Zabbix-agent zabbix-3.2.1]# cd /usr/local/zabbix/etc/
[root@Zabbix-agent zabbix]# vi .my.cnf
[root@Zabbix-agent zabbix]# cat .my.cnf
[client]
user=zabbix
password=123.abc
Be careful:
If the database grant is authorized for localhost, there is no need to add the host parameter to this. my.cnf [as configured above].
But if grant is authorized for native ip (such as 192.168.0.104), then the host parameter is added to the. my.cnf file to specify it.
That is to say, the.my.cnf file should be added:
host=192.168.0.104
socket= /usr/local/mysql/mysql.sock
user=zabbix
password=123.abc
(3) Configure MySQL key file
This can be copied from the decompression package of the ZABBIX 3.2 installation, and the directory can be decompressed from the zabbix_server server server installation.
/ Copy root/zabbix-3.2.1/conf/zabbix_agent d/userparameter_mysql.conf to the client/usr/local/zabbix/etc/zabbix_agent d.conf.d/directory
[root@Zabbix-agent zabbix]# cd /usr/local/zabbix/etc/zabbix_agentd.conf.d/
[root@Zabbix-agent zabbix_agentd.conf.d]# pwd
/usr/local/zabbix/etc/zabbix_agentd.conf.d
[root@Zabbix-agent zabbix_agentd.conf.d]# cp /root/zabbix-3.2.1/conf/zabbix_agentd/userparameter_mysql.conf ./
[root@Zabbix-agent zabbix_agentd.conf.d]# ls userparameter_mysql.conf
userparameter_mysql.conf
 Then look at the userparameter_mysql.conf file and see the path settings similar to HOME=/var/lib/zabbix. Replace all paths with / usr/local/zabbix/etc/, which is the directory path of the. my.cnf file above.
In addition, pay attention to the MySQL command path in the userparameter_mysql.conf file (do the system environment variables of MySQL in advance to prevent the MySQL command from being recognized by the system)
As follows:
[root@Zabbix-agent zabbix_agentd.conf.d]# cat userparameter_mysql.conf
[root@Zabbix-agent zabbix_agentd.conf.d]# cat userparameter_mysql.conf
# For all the following commands HOME should be set to the directory that has .my.cnf file with password information.
# Flexible parameter to grab global variables. On the frontend side, use keys like mysql.status[Com_insert].
# Key syntax is mysql.status[variable].
UserParameter=mysql.status[*],echo "show global status where Variable_name='$1';" | HOME=/usr/local/zabbix/etc/ mysql -N | awk '{print $$2}'
# Flexible parameter to determine database or table size. On the frontend side, use keys like mysql.size[zabbix,history,data].
# Key syntax is mysql.size[<database>,<table>,<type>].
# Database may be a database name or "all". Default is "all".
# Table may be a table name or "all". Default is "all".
# Type may be "data", "index", "free" or "both". Both is a sum of data and index. Default is "both".
# Database is mandatory if a table is specified. Type may be specified always.
# Returns value in bytes.
# 'sum' on data_length or index_length alone needed when we are getting this information for whole database instead of a single table
UserParameter=mysql.size[*],bash -c 'echo "select sum($(case "$3" in both|"") echo "data_length+index_length";; data|index) echo "$3_length";; free) echo "data_free";; esac)) from information_schema.tables$([[ "$1" = "all" || ! "$1" ]] || echo " where table_schema=\"$1\"")$([[ "$2" = "all" || ! "$2" ]] || echo "and table_name=\"$2\"");" | HOME=/usr/local/zabbix/etc/ mysql -N'
UserParameter=mysql.ping,HOME=/usr/local/zabbix/etc/ mysqladmin ping | grep -c alive
UserParameter=mysql.version,mysql -V
(4) Check after modifying the above and restart zabbix_agent
[root@Zabbix-agent zabbix_agentd.conf.d]# pkill -9 zabbix_agent
[root@Zabbix-agent zabbix_agentd.conf.d]# netstat -anpt | grep zabbix_agent
[root@Zabbix-agent zabbix_agentd.conf.d]# /usr/local/zabbix/sbin/zabbix_agentd
[root@Zabbix-agent zabbix_agentd.conf.d]# netstat -anpt | grep zabbix_agent
tcp        0      0 0.0.0.0:10050           0.0.0.0:*               LISTEN      100593/zabbix_agent
Then the command line test is performed on the zabbix_server server server server server [192.168.0.103 below is the ip of the client]
If the following error is reported
[root@localhostzabbix]# /usr/local/zabbix/bin/zabbix_get -s 192.168.0.104 -p 10050 -k"mysql.status[Uptime]"
sh: mysql: command notfound
Solution:
Add an absolute path before the MySQL command in userparameter_mysql.conf
[root@Zabbix-Server zabbix]# /usr/local/zabbix/bin/zabbix_get -s 192.168.0.104 -p 10050 -k "mysql.status[Uptime]"
6893897
If a number like this string of key s appears, it means that the server can monitor the client's mysql data by configuring ok.
Successful, then add the MySQL template corresponding to the host in the monitoring interface.
Note: Introduction to the zabbix_get command
Description of parameters:
- s --host: Specify the client host name or IP
- p --port: Client port, default 10050
- I --source-address: Specify the source IP and write the IP address of the ZABBIX server. It's usually left blank. If the server has more ips, you specify one.
- k --key: The key you want to get
zabbix_get to get data
Obtain load
[root@Zabbix-Server zabbix]# zabbix_get -s 192.168.0.104 -p 10050 -k "system.cpu.load[all,avg15]"
0.050000
Get the host name
[root@Zabbix-Server zabbix]# zabbix_get -s 192.168.0.104 -p 10050 -k "system.hostname"
Zabbix-agent
(5) Log in to the zabbix monitoring interface, and you can see the mysql monitoring template in "Configuration" - "Template"
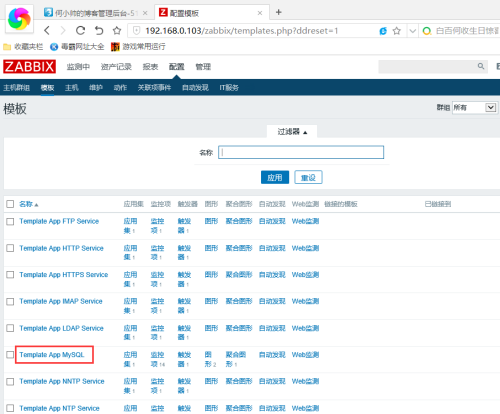
Add the monitoring template of mysql (which comes with zabbix) to the corresponding host monitoring configuration.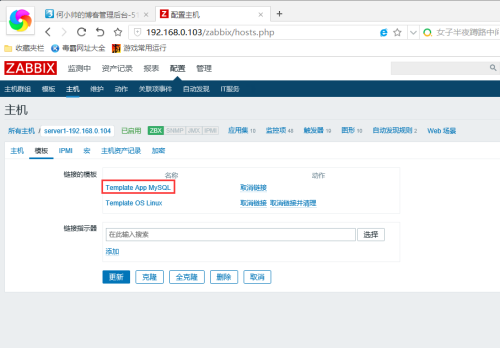
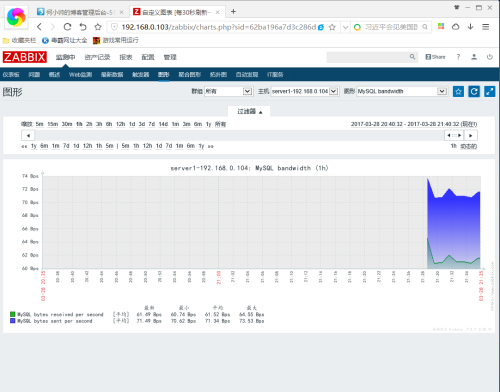
Following is an illustration of mysql monitoring items:
[1] Monitor the bandwidth of mysql: The number of bytes sent and received by MySQL can be viewed in real time at the front end of zabbix. Where bytes receive denotes the number of bytes received from all clients and bytes send denotes the number of bytes sent to all clients.
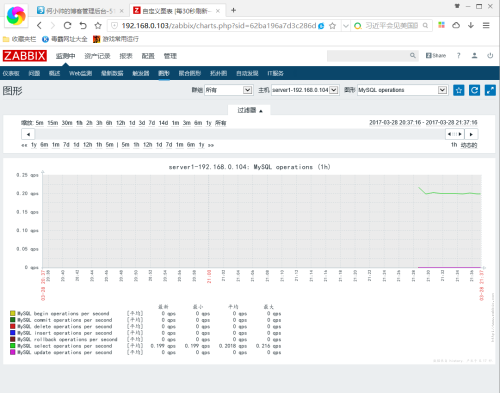
[2] Monitor the operation status of mysql: In the front end of zabbix, the number of operations per second of various SQL statements can be viewed in real time.
zabbix3.2.1 Mail Alarm Settings:
Zabbix monitoring server and client have been deployed, the monitored host has been added, and Zabiix monitoring is running normally.
Mail alarm is set in Zabbix server. When the monitored host is down or reaches the preset value of trigger, alarm mail will be sent automatically to the designated mailbox.
Specific operation:
The following operations are performed on the Zabbix monitoring server
Download sendemail software
Then install the two dependency packages. The command is:
[root@Zabbix-Server zabbix]# yum -y install perl-Net-SSLeay perl-IO-Socket-SSL
//Unzip the software, then copy sendemail to / usr/local/bin / directory, add executable permissions, and modify users and groups.
[root@Zabbix-Server ~]# tar zxf sendEmail-v1.56.tar.gz
[root@Zabbix-Server ~]# cd sendEmail-v1.56/
[root@Zabbix-Server sendEmail-v1.56]# cp sendEmail /usr/local/bin/sendEmail
[root@Zabbix-Server sendEmail-v1.56]# chown zabbix:zabbix /usr/local/bin/sendEmail
[root@Zabbix-Server sendEmail-v1.56]# ll /usr/local/bin/sendEmail
-rwxr-xr-x. 1 zabbix zabbix 80213 Mar 28 21:42 /usr/local/bin/sendEmail
//Execute #/usr/local/bin/sendEmail-h to see the help of sendEmail
[root@Zabbix-Server sendEmail-v1.56]# /usr/local/bin/sendEmail -h

sendEmail-1.56 by Brandon Zehm <caspian@dotconf.net>

Synopsis:  sendEmail -f ADDRESS [options]

  Required:
    -f ADDRESS                from (sender) email address
    * At least one recipient required via -t, -cc, or -bcc
    * Message body required via -m, STDIN, or -o message-file=FILE

  Common:
    -t ADDRESS [ADDR ...]     to email address(es)
    -u SUBJECT                message subject
    -m MESSAGE                message body
    -s SERVER[:PORT]          smtp mail relay, default is localhost:25

  Optional:
    -a   FILE [FILE ...]      file attachment(s)
    -cc  ADDRESS [ADDR ...]   cc  email address(es)
    -bcc ADDRESS [ADDR ...]   bcc email address(es)
    -xu  USERNAME             username for SMTP authentication
    -xp  PASSWORD             password for SMTP authentication

  Paranormal:
    -b BINDADDR[:PORT]        local host bind address
    -l LOGFILE                log to the specified file
    -v                        verbosity, use multiple times for greater effect
    -q                        be quiet (i.e. no STDOUT output)
    -o NAME=VALUE             advanced options, for details try: --help misc
        -o message-content-type=<auto|text|html>
        -o message-file=FILE         -o message-format=raw
        -o message-header=HEADER     -o message-charset=CHARSET
        -o reply-to=ADDRESS          -o timeout=SECONDS
        -o username=USERNAME         -o password=PASSWORD
        -o tls=<auto|yes|no>         -o fqdn=FQDN


  Help:
    --help                    the helpful overview you're reading now
    --help addressing         explain addressing and related options
    --help message            explain message body input and related options
    --help networking         explain -s, -b, etc
    --help output             explain logging and other output options
    --help misc               explain -o options, TLS, SMTP auth, and more
[root@Zabbix-Server sendEmail-v1.56]# /usr/local/bin/sendEmail -f 17600339557@163.com -t 17600339557@163.com -s smtp.163.com -u "hello" -o message-content-type=html -o message-charset=utf8 -xu 17600339557@163.com -xp 123abc -m "hello"
The main options of the command are as follows:
/ usr/local/bin/sendEmail Command main program
- f from@126.com Sender mailbox
- t to@126.com
- smtp.126.com Smtp server for sender mailbox
- u "I am the subject of the mail". Title of the mail
- o message-content-type=html mail content format, html means it is html format
- o message-charset=utf8
- xu from@126.com User name of sender's mailbox
- xp WEE78@12l$
- m "I am the content of the mail". Specific content of the mail
Enter / usr/local/zabbix/share/zabbix/alertscripts / directory
Then create the alert script sendmail.sh in this directory
[root@Zabbix-Server alertscripts]# vi mail.sh
#!/bin/bash
to=$1
subject=$2
body=$3
/usr/local/bin/sendEmail -o tls=auto -f 17600339557@163.com -t "$to" -s smtp.163.com -u "$sbuject" -o message-content-type=html -o messag
e-charset=utf8 -xu 17600339557@163.com -xp 123abc -m "$body"
[root@Zabbix-Server alertscripts]# chmod +x mail.sh
[root@Zabbix-Server alertscripts]# ./mail.sh 17600339557@163.com test 123
*******************************************************************
 Using the default of SSL_verify_mode of SSL_VERIFY_NONE for client
 is deprecated! Please set SSL_verify_mode to SSL_VERIFY_PEER
 together with SSL_ca_file|SSL_ca_path for verification.
 If you really don't want to verify the certificate and keep the
 connection open to Man-In-The-Middle attacks please set
 SSL_verify_mode explicitly to SSL_VERIFY_NONE in your application.
*******************************************************************
  at /usr/local/bin/sendEmail line 1906.
invalid SSL_version specified at /usr/share/perl5/vendor_perl/IO/Socket/SSL.pm line 415.
Note: The first error occurred during the test of sending mail.
The reason is the incompatibility between sendemail software and ssl version in Perl 5. This problem can be solved by modifying the contents of sendemail.
Solution:
Put 1906 lines in the sendemail file
if (!IO::Socket::SSL->start_SSL($SERVER, SSL_version => 'SSLv3 TLSv1')) {
//Amend to read
if(! IO::Socket::SSL->start_SSL($SERVER)) {
That is, the version of SSL is not specified, so that the program can choose by itself.
Whether you use 163/126 mailbox or QQ mailbox, you must open the pop3 service, and 126/qq mailbox also requires the use of third-party clients to send mail must use authorization number login, when using account password authentication, there will be errors in the following pictures.
sendEmail[50684]: ERROR => ERROR => SMTP-AUTH: Authentication to smtp.163.com:25 failed.
As for the authorization code of mailbox, just log in to 163 mailbox and set it up.
After dealing with the above two problems, we can send the mail normally and show the successful prompt as shown below.
[root@Zabbix-Server alertscripts]# ./mail.sh 17600339557@163.com test 123
*******************************************************************
 Using the default of SSL_verify_mode of SSL_VERIFY_NONE for client
 is deprecated! Please set SSL_verify_mode to SSL_VERIFY_PEER
 together with SSL_ca_file|SSL_ca_path for verification.
 If you really don't want to verify the certificate and keep the
 connection open to Man-In-The-Middle attacks please set
 SSL_verify_mode explicitly to SSL_VERIFY_NONE in your application.
*******************************************************************
  at /usr/local/bin/sendEmail line 1906.
Mar 28 22:34:28 zabbix-server sendEmail[50764]: Email was sent successfully!
zabbix web-side configuration
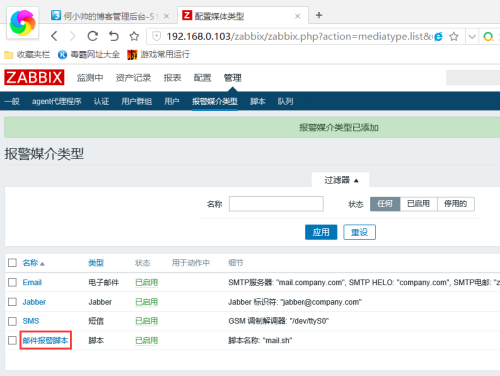
After configuring the above mail script, we need to add alarm media on the web side, manage the web page, alarm media type page, and click on the right to create media type.

Enter the creation page, then enter the name "mail alarm script". Type selection script, name selection mail.sh, click the Add button, and add three script parameters, namely {ALERT.SENDTO},{ALERT.SUBJECT},{ALERT.MESAGE}, respectively, for to, subject and body in mail.sh. After adding the Add button below the completion point, our alarm media is created.

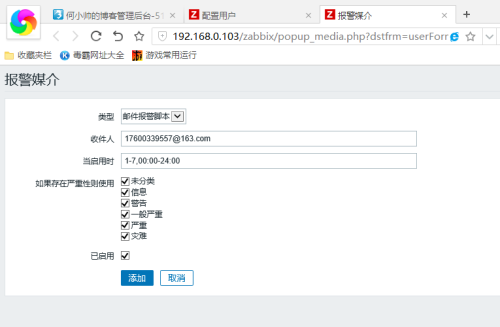
After creating the alarm media, we need to link the alarm media to our users. Click Management, User, and then select our user admin to create a new user. Click the username to enter the User Configuration Interface. Click on the alarm media, then click Add, select the email alarm script we created in the next step, enter the recipient, select the alarm time and type, and then click Add, the created alarm media will be associated with our users.

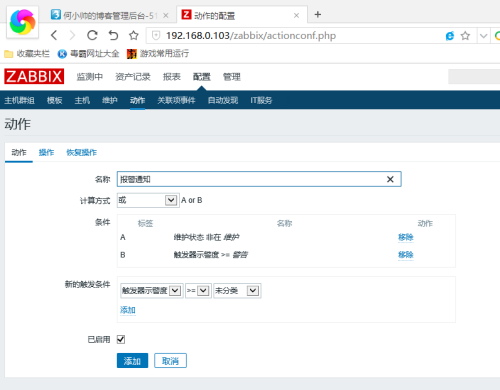
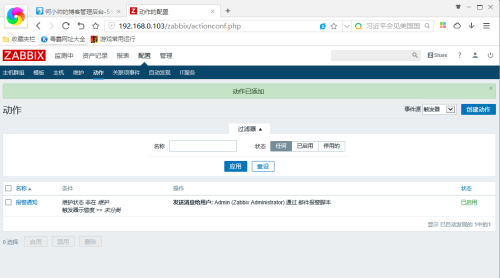
What we need to do now is to create a trigger action, that is, when the system fails, trigger the action, and then send an alarm message to our mailbox. Click Configuration, select Action, and then click Create Action on the right.
Write our defined action name and trigger condition in the action page name
Setting "Operation"
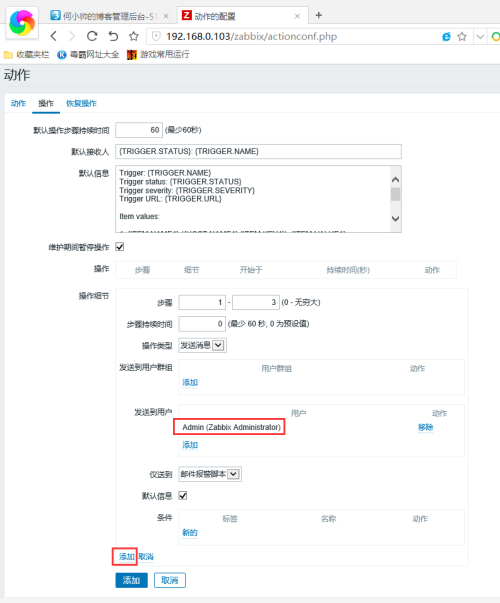
Step 1-3, that is, from 1 to 3. Once a failure occurs, the Email.sh script is executed to send an alert message to the zabbix user.
If the failure lasts for an hour, it will only send three times. The first three times (i.e. the first three times) the mailbox will be sent to the zabbix user at a time interval of 0 seconds.
If changed to 1-0, 0 means unlimited. Infinite transmission
Setting "Recovery Operation"
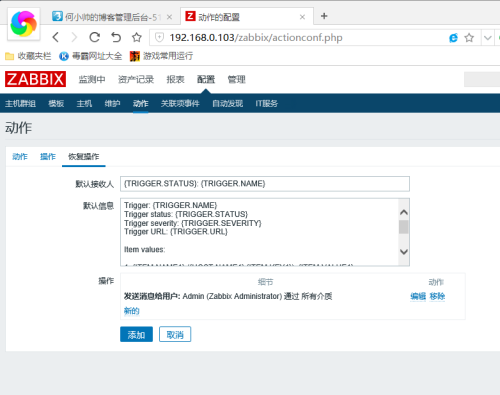
When you add it, you can see the name of the action we added and the status of the action enabled.
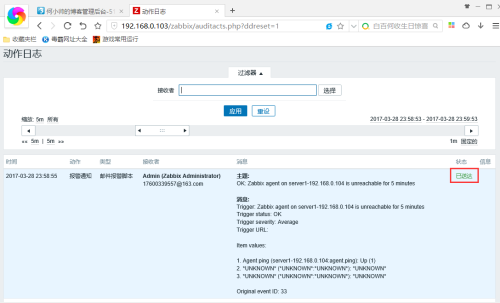
Alarm test
Shut down the zabbix_agent process on the 192.168.0.104 server.
[root@Zabbix-agent etc]# pkill -9 zabbix_agent
[root@Zabbix-agent etc]# netstat -anpt | grep zabbix_agent
It is found that failure alarm mail can be received normally.

Finally, click on "Report" - > "Action Log" to see the number of triggers (see also on the right to see the status of mail delivery "served").