start-up
The entry of FLUENT is in the main() function of "lib/main.dart", which is the starting point of dart application. In the Flutter application, the simplest implementation of the main() function is as follows:
void main() => runApp(MyApp());
You can see that the main() function only calls one runApp() method. Let's see what is done in the runApp() method:
void runApp(Widget app) {
  WidgetsFlutterBinding.ensureInitialized()
    ..attachRootWidget(app)
    ..scheduleWarmUpFrame();
}
The parameter app is a widget, which is the first component to be displayed after the fluent application is started. WidgetsFlutterBinding is the bridge between the widget framework and the Flutter engine, which is defined as follows:
class WidgetsFlutterBinding extends BindingBase with GestureBinding, ServicesBinding, SchedulerBinding, PaintingBinding, SemanticsBinding, RendererBinding, WidgetsBinding {
  static WidgetsBinding ensureInitialized() {
    if (WidgetsBinding.instance == null)
      WidgetsFlutterBinding();
    return WidgetsBinding.instance;
  }
}
We can see that WidgetsFlutterBinding inherits from BindingBase and mixes many bindings. Before introducing these bindings, let's introduce Window. The following is the official explanation of Window:
The most basic interface to the host operating system's user interface.
Obviously, Window is the interface of the fluent framework to connect the host operating system. Let's take a look at some definitions of the Window class:
class Window {

  // DPI of the current device, that is, how many physical pixels are displayed in a logical pixel. The larger the number, the finer the display effect and fidelity.
  // DPI is the firmware attribute of the device screen. For example, the DPI of Nexus 6 screen is 3.5
  double get devicePixelRatio => _devicePixelRatio;

  // The size of the drawing area of the fluent UI
  Size get physicalSize => _physicalSize;

  // The default language of the current system is Locale
  Locale get locale;

  // Current system font scaling.
  double get textScaleFactor => _textScaleFactor;

  // Callback when drawing area size changes
  VoidCallback get onMetricsChanged => _onMetricsChanged;
  // Callback when Locale changes
  VoidCallback get onLocaleChanged => _onLocaleChanged;
  // System font scaling change callback
  VoidCallback get onTextScaleFactorChanged => _onTextScaleFactorChanged;
  // The callback before drawing is generally driven by the vertical synchronization signal VSync of the display and will be called when the screen is refreshed
  FrameCallback get onBeginFrame => _onBeginFrame;
  // Draw callback
  VoidCallback get onDrawFrame => _onDrawFrame;
  // Click or pointer event callback
  PointerDataPacketCallback get onPointerDataPacket => _onPointerDataPacket;
  // Scheduling Frame. After the method is executed, onBeginFrame and onDrawFrame will be called at the right time,
  // This method will directly call the window of fluent engine_ Scheduleframe method
  void scheduleFrame() native 'Window_scheduleFrame';
  // To update the rendering applied on GPU, this method will directly call the window of fluent engine_ Render method
  void render(Scene scene) native 'Window_render';

  // Send platform message
  void sendPlatformMessage(String name,
                           ByteData data,
                           PlatformMessageResponseCallback callback) ;
  // Platform channel message processing callback
  PlatformMessageCallback get onPlatformMessage => _onPlatformMessage;

  ... //Other properties and callbacks

}
You can see that the Window class contains some information about the current device and system, as well as some callbacks from the shuttle engine. Now let's go back to various bindings mixed with WidgetsFlutterBinding. By viewing the source code of these bindings, we can find that these bindings basically listen to and process some events of Window objects, and then wrap, abstract and distribute these events according to the model of the Framework. You can see that WidgetsFlutterBinding is the "glue" between the flutter engine and the upper Framework.
- GestureBinding: provides window The onpointerdatapacket callback is bound to the Framework gesture subsystem and is the binding entry between the Framework event model and the underlying events.
- ServicesBinding: provides window The onplatformmessage callback is used to bind the platform message channel and mainly handles native and fluent communication.
- SchedulerBinding: provides window Onbeginframe and window The ondrawframe callback listens to refresh events and binds the Framework drawing scheduling subsystem.
- PaintingBinding: binding drawing library, which is mainly used to process picture caching.
- SemanticsBinding: the bridge between semantic layer and fluent engine, which is mainly the bottom support of auxiliary functions.
- RendererBinding: provided window onMetricsChanged ,window.onTextScaleFactorChanged and other callbacks. It is the bridge between rendering tree and fluent engine.
- WidgetsBinding: provides window Onlocalechanged, onBuildScheduled and other callbacks. It is the bridge between the fluent widget layer and engine.
WidgetsFlutterBinding.ensureInitialized() is responsible for initializing a global singleton of WidgetsBinding. Then it will call the attachRootWidget method of WidgetsBinding, which is responsible for adding the root Widget to RenderView. The code is as follows:
void attachRootWidget(Widget rootWidget) {
  _renderViewElement = RenderObjectToWidgetAdapter<RenderBox>(
    container: renderView,
    debugShortDescription: '[root]',
    child: rootWidget
  ).attachToRenderTree(buildOwner, renderViewElement);
}
Note that there are two variables in the code: renderView and renderviveelement. renderView is a RenderObject, which is the root of the rendering tree, and renderviveelement is the Element object corresponding to renderView. It can be seen that this method mainly completes the whole association process from root widget to root RenderObject and then to root Element. Let's look at the source code implementation of attachToRenderTree:
RenderObjectToWidgetElement<T> attachToRenderTree(BuildOwner owner, [RenderObjectToWidgetElement<T> element]) {
  if (element == null) {
    owner.lockState(() {
      element = createElement();
      assert(element != null);
      element.assignOwner(owner);
    });
    owner.buildScope(element, () {
      element.mount(null, null);
    });
  } else {
    element._newWidget = this;
    element.markNeedsBuild();
  }
  return element;
}
This method is responsible for creating the root element, RenderObjectToWidgetElement, and associating the element with the widget, that is, creating the element tree corresponding to the widget tree. If the element has been created, set the associated widget in the root element as new, which shows that the element will be created only once and reused later. So what is BuildOwner? In fact, it is the management class of widget framework, which tracks which widgets need to be rebuilt.
After the component tree is built, it returns to the implementation of runApp. After calling attachRootWidget, the last line will call the scheduleWarmUpFrame() method of the WidgetsFlutterBinding instance. This method is implemented in SchedulerBinding. After it is called, it will draw once immediately. Before the drawing is completed, this method will lock the event distribution, That is to say, before the end of this drawing, fluent will not respond to various events, which can ensure that new redrawing will not be triggered during the drawing process.
Render pipeline
Frame
A painting process is called a frame. As we said before, the fluent can achieve 60fps (frame per second), which means that it can trigger redrawing up to 60 times a second. The larger the FPS value, the smoother the interface. It should be noted here that the frame concept in fluent is not equivalent to the screen refresh frame, because the frame of the fluent UI framework is not triggered every screen refresh. This is because if the UI remains unchanged for a period of time, it is unnecessary to go through the rendering process again every screen refresh. Therefore, After the rendering of the first frame, fluent will take a way of actively requesting the frame, and will only go back to the rendering process when the UI may change.
- Finally, a callback will be registered in drawFrame and drawFrame.
- When we call window After the scheduleframe () method, the Fletter engine will call onBeginFrame and onDrawFrame at an appropriate time (it can be considered before the next refresh of the screen, depending on the implementation of the Fletter engine).
It can be seen that drawFrame will be executed only when scheduleFrame() is actively called. Therefore, when we refer to frame in fluent, unless otherwise specified, it corresponds to the call of drawFrame(), rather than the refresh rate of the screen.
Scheduler phase
Simply speaking, the execution process of the Fletter application is divided into two states: idle and frame. The idle state represents that there is no frame processing. If the application state changes and the UI needs to be refreshed, you need to request a new frame through scheduleFrame(). When the frame arrives, it enters the frame state. The whole life cycle of the Fletter application is to switch between the idle and frame states.
frame processing flow
When a new frame arrives, start calling schedulerbinding Handledrawframe is used to process the frame. The specific processing process is to execute four task queues in turn: transientCallbacks, midFrameMicrotasks, persistentCallbacks and postFrameCallbacks. When the four task queues are completed, the current frame ends.
To sum up, fluent divides the whole life cycle into five states, which are represented by the SchedulerPhase enumeration class:
enum SchedulerPhase {

  ///Idle state, no frame is processing. This state means that the page has not changed and does not need to be re rendered.
  ///If the page changes, you need to call 'scheduleFrame()' to request the frame.
  ///Note that the idle state only refers to that there is no frame processing. Generally, micro tasks, timer callbacks or user event callbacks are not available
  ///It may be executed. For example, the tap event is monitored. After the user clicks, our onTap callback is executed in the idle phase.
  idle,

  ///Execute the temporary callback task. The temporary callback task can only be executed once and will be removed from the temporary task queue after execution.
  ///A typical example is that the animation callback will be executed at this stage.
  transientCallbacks,

  ///When executing a temporary task, some new micro tasks may be generated, such as creating a new micro task when executing the first temporary task
  ///Future, and the future has been resolve d before all temporary tasks are completed
  ///The callback of Future will be executed in the [midFrameMicrotasks] phase
  midFrameMicrotasks,

  ///Perform some persistent tasks (tasks to be performed by each frame), such as rendering pipelines (construction, layout, drawing)
  ///It is executed in this task queue
  persistentCallbacks,

  ///Some work will be done before the current frame and postbacks are executed
  ///Request a new frame.
  postFrameCallbacks,
}
It should be noted that the rendering pipeline we will focus on next is executed in persistent callbacks.
Rendering pipeline
When a new frame arrives, call the drawFrame() method of WidgetsBinding. Let's see its implementation:
@override
void drawFrame() {
 ...//Omit irrelevant code
  try {
    buildOwner.buildScope(renderViewElement); // Execute build first
    super.drawFrame(); //Then call the drawFrame method of the parent class.
  }
}
In fact, the key code is just two lines: re build first, and then call the drawFrame method of the parent class. After expanding the drawFrame method of the parent class:
void drawFrame() {
  buildOwner!.buildScope(renderViewElement!); // 1. Rebuild the widget tree
  //Here is how to expand super Drawframe() method
  pipelineOwner.flushLayout(); // 2. Update layout
  pipelineOwner.flushCompositingBits(); //3. Update "layer composition" information
  pipelineOwner.flushPaint(); // 4. Redraw
  if (sendFramesToEngine) {
    renderView.compositeFrame(); // 5. On the screen, the drawn bit data will be sent to GPU
    ...
  }
}
It can be seen that five main things have been done:
-
Rebuild the widget tree.
-
Update layout.
-
Update layer composition information.
-
Redraw.
-
On screen: display the drawn product on the screen
We call the above five steps as rendering pipeline, which is translated into "rendering pipeline" or "rendering pipeline" in Chinese. The specific process of these five steps of rendering pipeline is the focus of this chapter. Let's take the update process of setState as an example. First, we have a general impact on the whole update process
setState execution flow
After the setState call:
- First, call the markNeedsBuild method of the current element and mark the current element as dirty.
- Then call scheduleBuildFor to add the current element to the dirtyElements list of piplineOwner.
- Finally, request a new frame, and then draw a new frame: onbuildscheduled - > ensurevisuanupdate - > scheduleframe(). Execute rendering pipeline when new frame arrives
void drawFrame() {
  buildOwner!.buildScope(renderViewElement!); //Rebuild the widget tree
  pipelineOwner.flushLayout(); // Update layout
  pipelineOwner.flushCompositingBits(); //Update composition information
  pipelineOwner.flushPaint(); // Update drawing
  if (sendFramesToEngine) {
    renderView.compositeFrame(); // On the screen, the drawn bit data will be sent to GPU
    pipelineOwner.flushSemantics(); // this also sends the semantics to the OS.
    _firstFrameSent = true;
  }
}
- Rebuild widget tree: if the dirtyElements list is not empty, traverse the list and call the rebuild method of each element to rebuild the new widget (tree). Since the new widget (tree) is built with a new state, the widget layout information (occupied space and location) may change. If it changes, It will call the markNeedsLayout method of its renderObject, which will find a relayboundary node from the current node to the parent, and then add it to a global nodesNeedingLayout list; If the relayboundary is not found until the root node, add the root node to the nodesNeedingLayout list.
- Update layout: traverse the nodesNeedingLayout array, rearrange each renderObject (call its layout method), and determine the new size and offset. Markneedsplaint() will be called in the layout method, which has similar functions to markneedsplayout method. It will also look up the parent node from the current node until it finds a parent node with isRepaintBoundary attribute of true, and then add it to a global nodesNeedingPaint list; Since the isRepaintBoundary of the root node (RenderView) is true, one must be found. When the lookup process is complete, buildowner.com is called Requestvisualupdate method, which will eventually call scheduleFrame(). In this method, it will first judge whether a new frame has been requested. If not, it will request a new frame.
- Update synthesis information: ignore it first, and we will introduce it later.
- Update painting: traverse the nodesNeedingPaint list, call the paint method of each node to redraw, and the painting process will generate a Layer. It should be noted that the drawing results in the shuttle are saved in the Layer, that is, as long as the Layer is not released, the drawing results will be cached. Therefore, the Layer can cache the drawing results across the frame to avoid unnecessary redrawing overhead. During the drawing process of the fluent framework, a new Layer will be generated only when a node with isRepaintBoundary of true is encountered. It can be seen that Layer and rendereobject are not one-to-one correspondence, and parent-child nodes can be shared. We will verify this in a subsequent experiment. Of course, if it is a custom component, we can manually add any number of layers in rendereobject, which is usually used for the cache scene of painting elements that only need to be painted once and will not change later. We will also demonstrate this through an example later.
- On screen: after drawing, we get a Layer tree. Finally, we need to display the drawing information in the Layer tree on the screen. We know that fluent is a self implemented rendering engine, so we need to submit the rendering information to fluent engine and renderview Compositeframe accomplishes this mission.
The above is the update process from setState to UI. The actual process will be more complex. For example, setState is not allowed to be called again in the build process, and the framework needs to do some checks. For another example, the scheduling of animation will be involved in the frame. When on the screen, all layers will be added to the Scene object before rendering the Scene. The reader of the above process can have an image first, which will be described in detail in the following sections.
setState execution timing
setState will trigger build, which is executed in the stage of executing persistentCallbacks. Therefore, as long as setState is not executed in this stage, it is absolutely safe, but such granularity is too coarse. For example, in the stage of transientCallbacks and midFrameMicrotasks, if the application state changes, the best way is to only mark the component as dirty, There is no need to request a new frame, because the current frame has not been executed to persistentCallbacks, so the UI will be refreshed in the current frame rendering pipeline after it is executed later. Therefore, after marking dirty, setState will first judge the scheduling status. If it is idle or executes the postFrameCallbacks stage, it will request a new frame:
void ensureVisualUpdate() {
  switch (schedulerPhase) {
    case SchedulerPhase.idle:
    case SchedulerPhase.postFrameCallbacks:
      scheduleFrame(); // Request a new frame
      return;
    case SchedulerPhase.transientCallbacks:
    case SchedulerPhase.midFrameMicrotasks:
    case SchedulerPhase.persistentCallbacks: // Pay attention to this line
      return;
  }
}
The above code is not a problem in most cases, but it will still be a problem if we call setState again in the build phase, because if we call setState again in the build phase, it will lead to build This will lead to circular calls. Therefore, if the fluent framework finds that setState is called in the build phase, it will report an error, such as:
  @override
  Widget build(BuildContext context) {
    return LayoutBuilder(
      builder: (context, c) {
        // The build phase cannot call setState, and an error will be reported
        setState(() {
          ++index;
        });
        return Text('xx');
      },
    );
  }
An error will be reported after running, and the console will print:
==== Exception caught by widgets library ====
The following assertion was thrown building LayoutBuilder:
setState() or markNeedsBuild() called during build.
It is important to note that if we call setState directly in build, the code is as follows:
@override
Widget build(BuildContext context) {
  setState(() {
    ++index;
  });
  return Text('$index');
}
No error will be reported after running. The reason is that the dirty state of the current component (in the corresponding element) is true when building is executed. It will be set to false only after building is executed. When setState is executed, the current dirty value will be judged first. If it is true, it will be returned directly, so there will be no error.
We only discussed that calling setState in the build phase will lead to errors. In fact, setState cannot be called synchronously in the whole construction, layout and drawing phases. This is because calling setState in these phases may request new frame s and may lead to circular calls. Therefore, if you want to update the application state in these phases, You can't call setState directly.
Security update
Now we know that setState cannot be called in the build phase. In fact, it cannot be directly resynchronized to request re layout or re drawing in the layout phase and drawing phase of components. The reason is the same. What is the correct update method in these phases? Taking setState as an example, we can use the following methods:
// Security update in build, layout and drawing stages
void update(VoidCallback fn) {
  SchedulerBinding.instance!.addPostFrameCallback((_) {
    setState(fn);
  });
}
Note that the update function should only be executed when the frame executes persistentCallbacks, and setState can be called directly in other stages. Because the idle state is a special case, if you call Update in the idle state, you need to manually call scheduleFrame() to request a new frame, otherwise the postFrameCallbacks will not be executed before the next frame (the frame requested by other components) arrives. Therefore, we can modify the update:
void update(VoidCallback fn) {
  final schedulerPhase = SchedulerBinding.instance!.schedulerPhase;
  if (schedulerPhase == SchedulerPhase.persistentCallbacks) {
    SchedulerBinding.instance!.addPostFrameCallback((_) {
      setState(fn);
    });
  } else {
    setState(fn);
  }
}
So far, we have encapsulated an update function that can safely update the status.
summary
This section introduces the main process of the Flutter App from Startup to display to the screen, focusing on the rendering process of the Flutter, as shown in Figure 14-4:
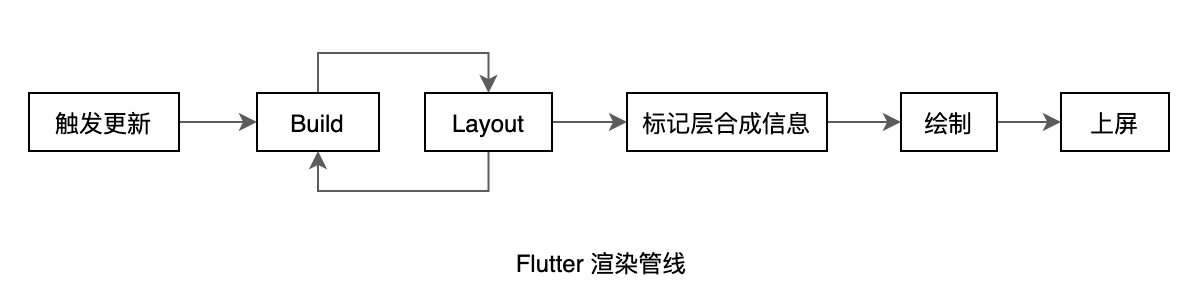
It should be noted that the build process and layout process can be executed alternately, which we have explained in the section introducing LayoutBuilder. Readers need to have a general image of the whole rendering process, which will be described in detail later. However, before introducing the rendering pipeline in depth, we have to carefully understand the three classes of Element, BuildContext and RenderObject.