Hello, everyone. Today, I'd like to share with you how to use {MediaPipe+Opencv to control the movement and click of the computer mouse through gesture recognition. If you are interested, you can play games instead of the mouse. Let's see the effect first. Test with a drawing board
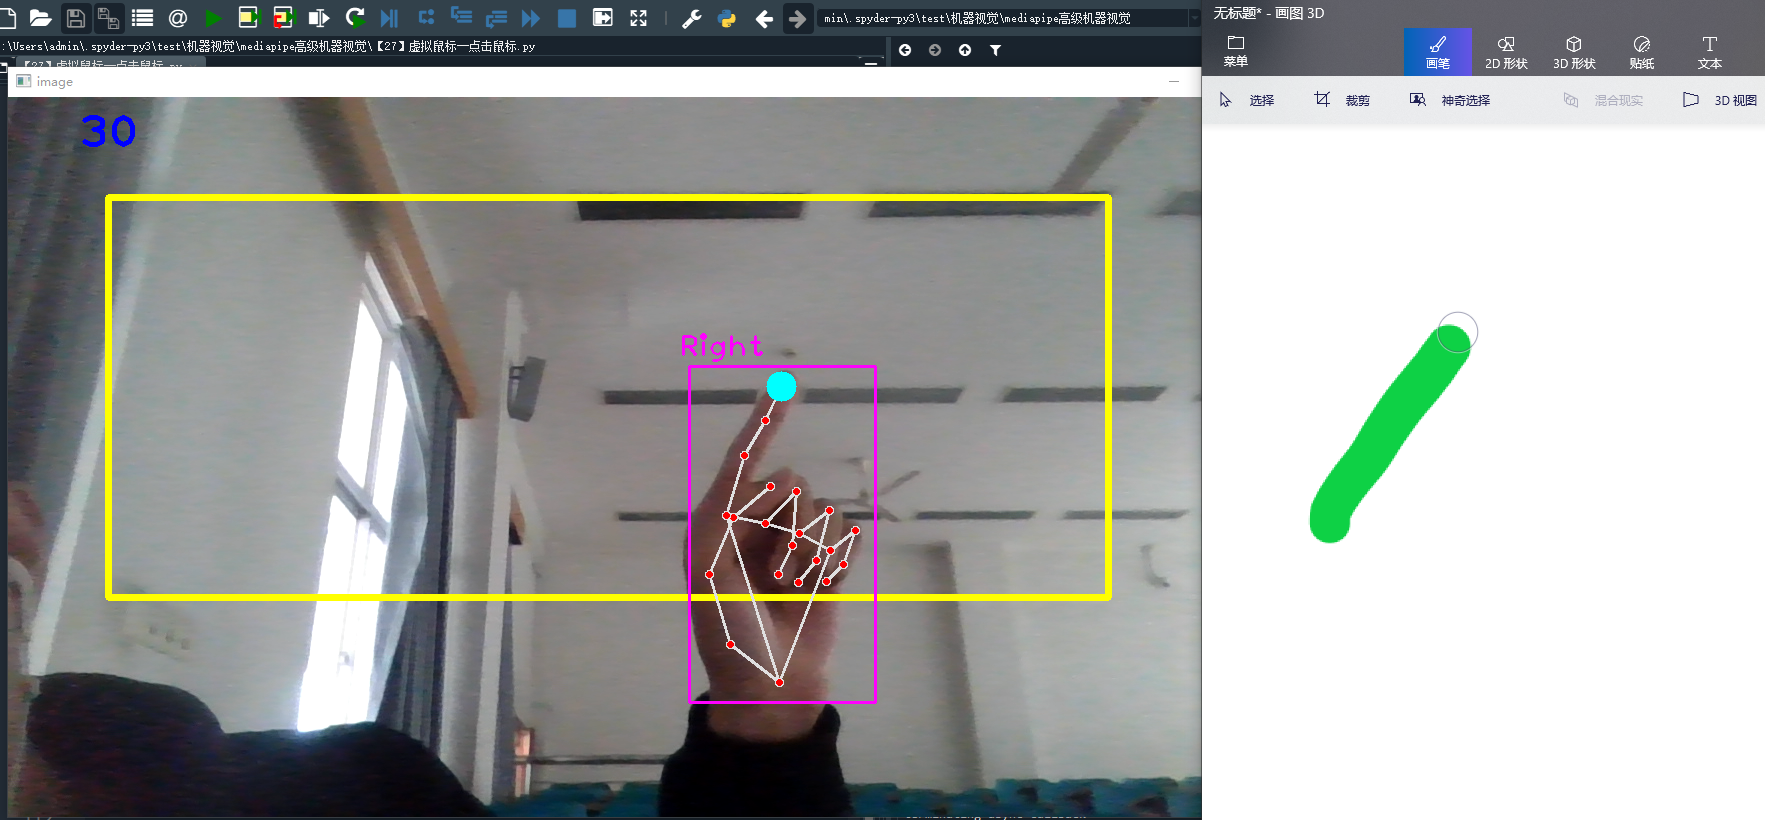
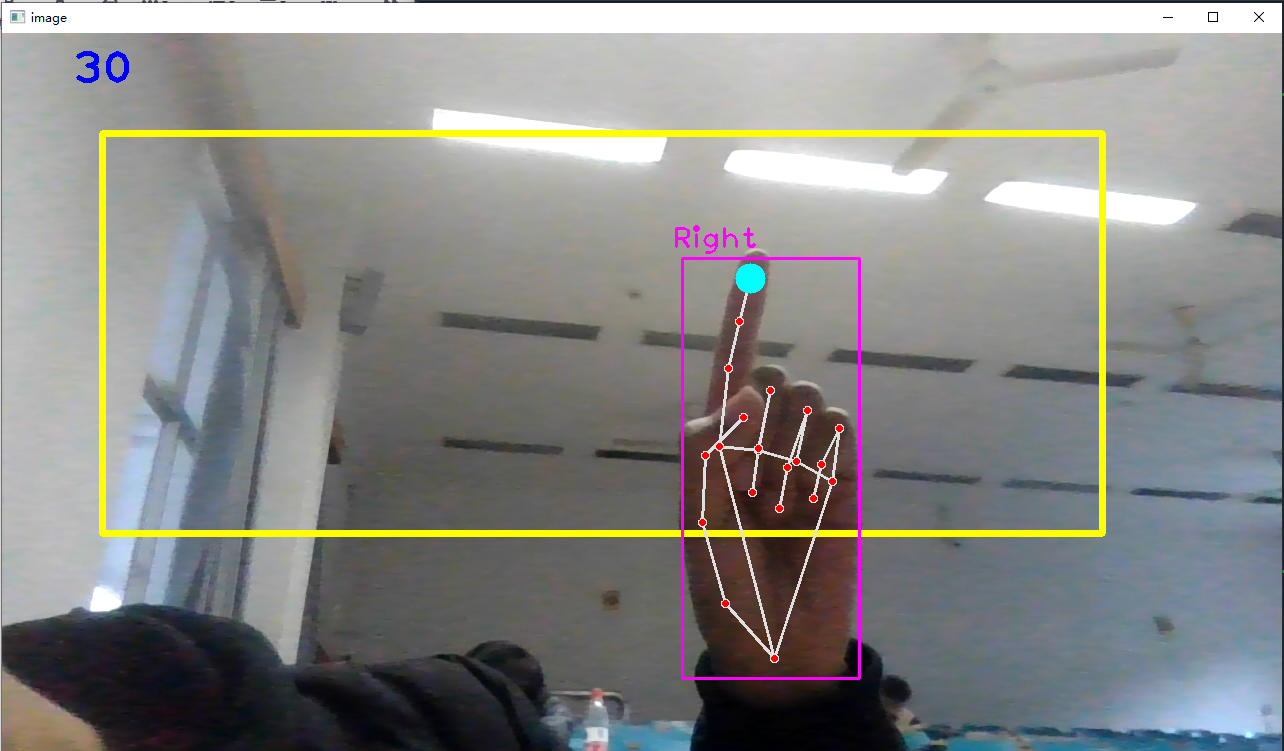
The yellow box represents the range of the computer screen and maps the width and height of the yellow box to the width and height of the computer screen. When the index finger is up and the middle finger is bent, move the mouse. When the index finger and middle finger are up and the distance between the two fingertips is less than 50, it is considered to be clicking the mouse. The upper left 30 represents the FPS value
Move the mouse: when moving, there are light blue dots on the tip of the index finger, indicating that the mouse is moving. For example, the green line in the right figure is the moving track of the mouse
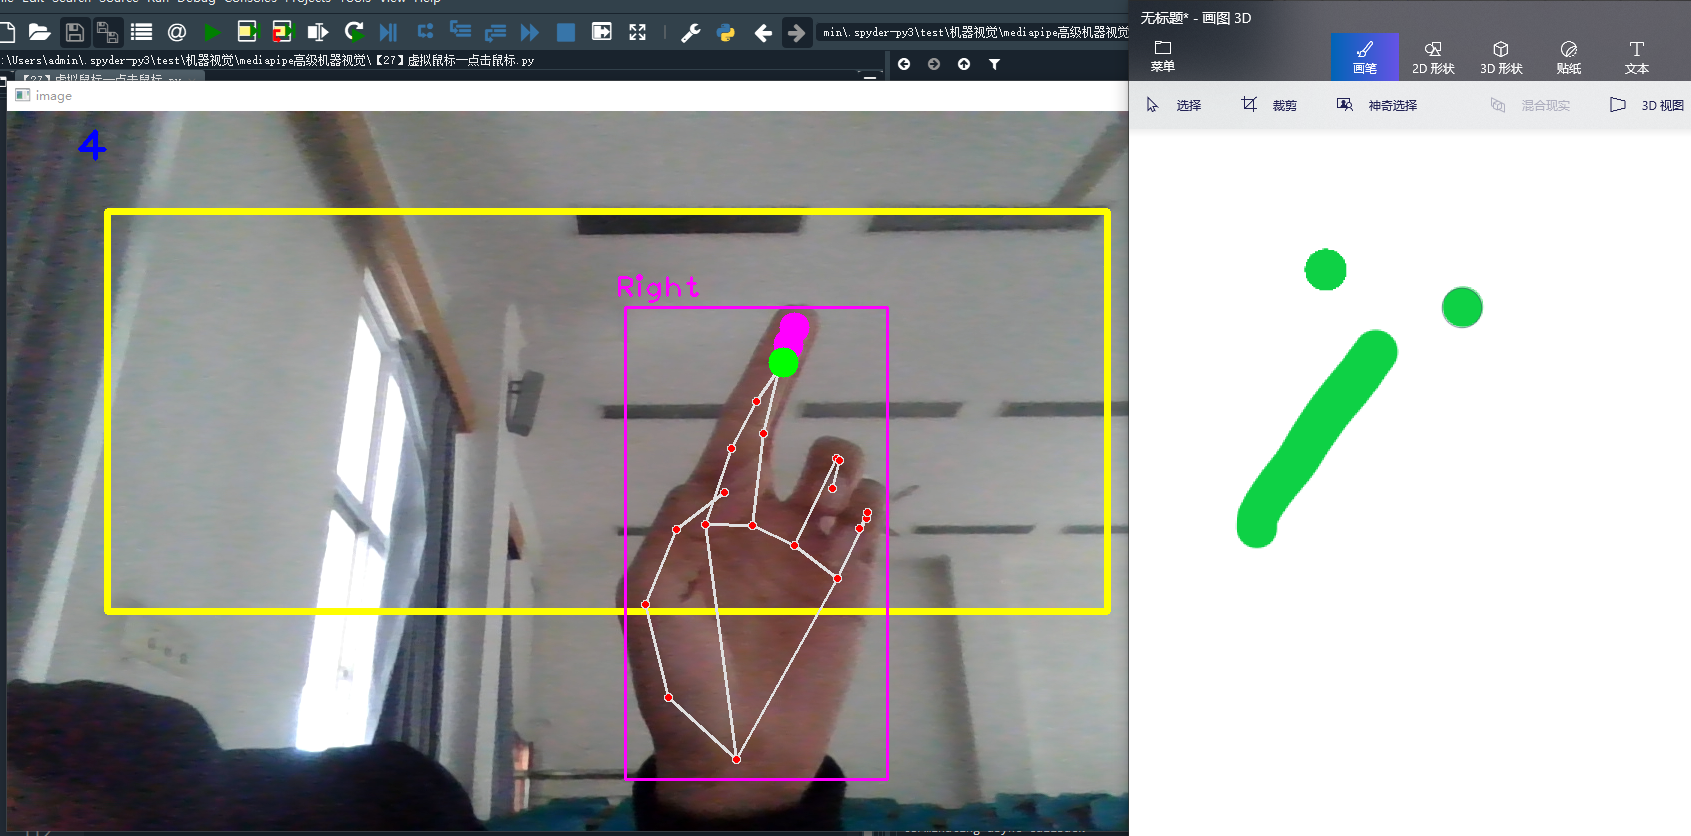
Click the mouse: when the distance between the index finger and the middle finger is less than 50, the dot on the tip of the index finger turns green. Click the mouse, such as two points on the drawing board, just click twice.
1. Import Toolkit
# Setup Toolkit
pip install opencv-contrib-python  # Install opencv
pip install mediapipe  # Install mediapipe
# pip install mediapipe --user  #Try this if you report an error
pip install cvzone  # Install cvzone
pip install autopy  # Mouse control unit

# Import Toolkit
import numpy as np
import cv2
from cvzone.HandTrackingModule import HandDetector  # Hand tracking method
import mediapipe as mp
import time
import autopy
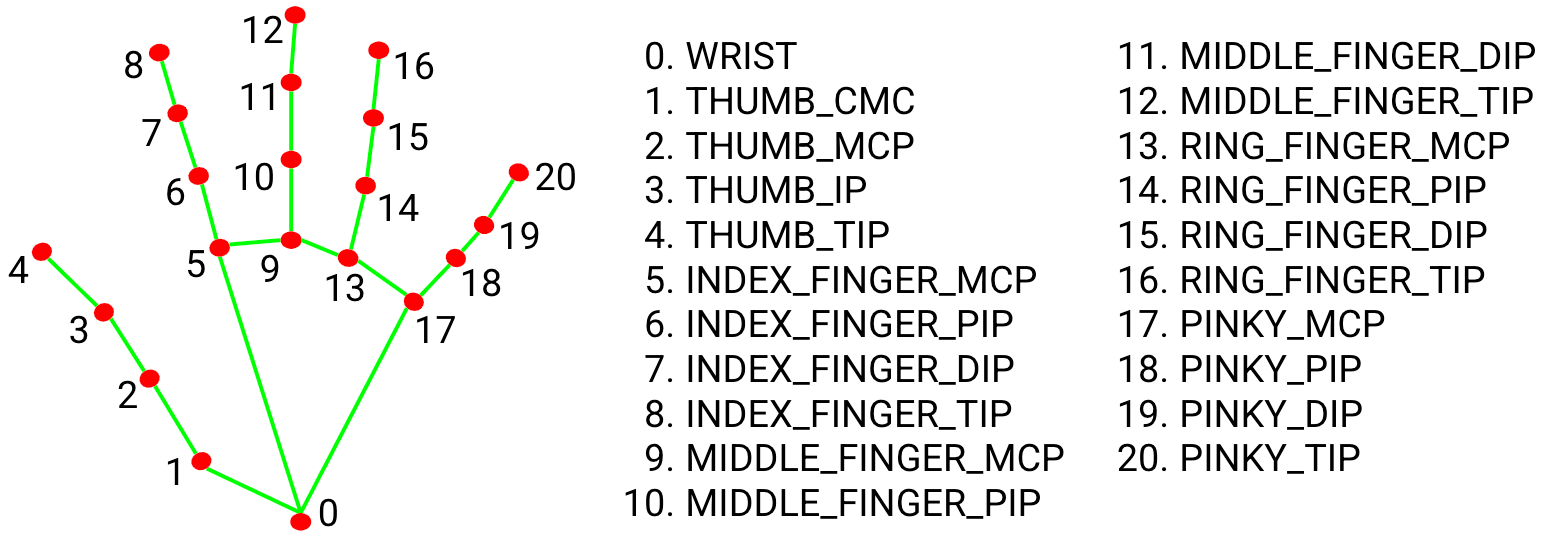
The information of 21 key points of the hand is as follows. In this section, we mainly study the coordinate information of index finger tip "8" and middle finger tip "12".
2. Hand key point detection
(1) cvzone.HandTrackingModule.HandDetector() hand key point detection method
Parameters:
mode: the default is False, and the input image is regarded as a video stream. It will try to detect the hand in the first input image and further locate the coordinates of the hand after successful detection. In subsequent images, once all maxHands hands hands are detected and the coordinates of the corresponding hands are located, it will track these coordinates without invoking another detection until it loses tracking of any hand. This reduces latency and is well suited for processing video frames. If set to True, hand detection is run on each input image to process a batch of static and possibly unrelated images.
maxHands: how many hands can be detected at most? The default value is 2
detectionCon: the minimum confidence value of the hand detection model (between 0-1). If it exceeds the threshold, the detection is successful. The default is 0.5
minTrackingCon: the minimum confidence value of the coordinate tracking model (between 0-1), which is used to treat the hand coordinates as successful tracking. If unsuccessful, the hand detection will be automatically called on the next input image. Setting it to a higher value can improve the robustness of the solution, but at the cost of higher latency. If mode is True, this parameter is ignored and hand detection will run on each image. The default is 0.5
Its parameters and return values are similar to the official function mediapipe solutions. hands. Hands()
(2)cvzone.HandTrackingModule.HandDetector.findHands() finds the hand keys and draws
Parameters:
img: frame image to detect key points in BGR format
Draw: whether it is necessary to draw key points and identification boxes on the original image
flipType: whether the image needs to be flipped. When the video image is not a mirror relationship with ourselves, it can be set to True
Return value:
hands: detected hand information, including 21 key point coordinates, detection frame coordinates and width height, detection frame center coordinates, and which hand is detected.
img: returns the image after drawing key points and connecting lines
The code of hand detection is as follows:
import cv2
from cvzone.HandTrackingModule import HandDetector   # Hand detection method
import time

#(1) Derivative video data
cap = cv2.VideoCapture(0)  # 0 represents your computer's camera
cap.set(3, 1280)  # Set the width of the display box 1280
cap.set(4, 720)  # Set the height of the display box 720

pTime = 0  # Set the start time when the first frame starts processing

#(2) Receiving hand detection method
detector = HandDetector(mode=False,  # Video stream image
                        maxHands=1,  # Detect up to one hand
                        detectionCon=0.8,  # Minimum detection confidence
                        minTrackCon=0.5)   # Minimum tracking confidence

#(3) Process each frame of image
while True:

    # Whether the picture is successfully received, img frame image
    success, img = cap.read()

    # Flip the image so that it mirrors itself in the camera
    img = cv2.flip(img, flipCode=1)  # 1 stands for horizontal flip and 0 stands for vertical flip

    #(4) Hand detection method
    # Input the image of each frame, return the coordinate information of the key points of the hand (list hands composed of Dictionary), and draw the image img after the key points
    hands, img = detector.findHands(img, flipType=False)  # The top has been reversed, so there's no need to flip here
    # print(hands)

    #(5) Display image
    # View FPS
    cTime = time.time() #Time to finish processing one frame of image
    fps = 1/(cTime-pTime)
    pTime = cTime  #Reset start time

    # fps information is displayed on the video, which is first converted into an integer and then into a string. The text display coordinates, text font and text size
    cv2.putText(img, str(int(fps)), (70,50), cv2.FONT_HERSHEY_PLAIN, 3, (255,0,0), 3)

    # Display the image and input the window name and image data
    cv2.imshow('image', img)
    if cv2.waitKey(1) & 0xFF==27:  #After each frame stays for 20 milliseconds, it disappears, and ESC key exits
        break

# Free video resources
cap.release()
cv2.destroyAllWindows()
Print the hands list of hand information detected in each frame of image, which is composed of a dictionary. lmList represents the pixel coordinates of 21 hand key points; bbox represents the coordinates of the upper left corner of the detection frame and the width and height of the frame; Center represents the pixel coordinates of the center point of the detection frame; type represents whether the left hand or the right hand is detected.
----------------------------------------------------------------------------
[{'lmList': [[522, 755], [621, 761], [709, 724], [765, 675], [794, 615], [705, 629], [761, 588], [749, 643], [715, 686], [676, 599], [743, 565], [713, 637], [664, 684], [634, 565], [710, 543], [668, 622], [613, 666], [576, 533], [657, 519], [640, 580], [597, 620]],
'bbox': (522, 519, 272, 242),
'center': (658, 640),
'type': 'Left'}]
[{'lmList': [[520, 763], [620, 774], [716, 753], [779, 707], [816, 650], [716, 655], [781, 619], [767, 677], [727, 721], [689, 627], [759, 595], [731, 667], [683, 710], [649, 594], [727, 579], [680, 653], [620, 689], [593, 558], [674, 549], [655, 608], [608, 642]],
'bbox': (520, 549, 296, 225),
'center': (668, 661),
'type': 'Left'}]
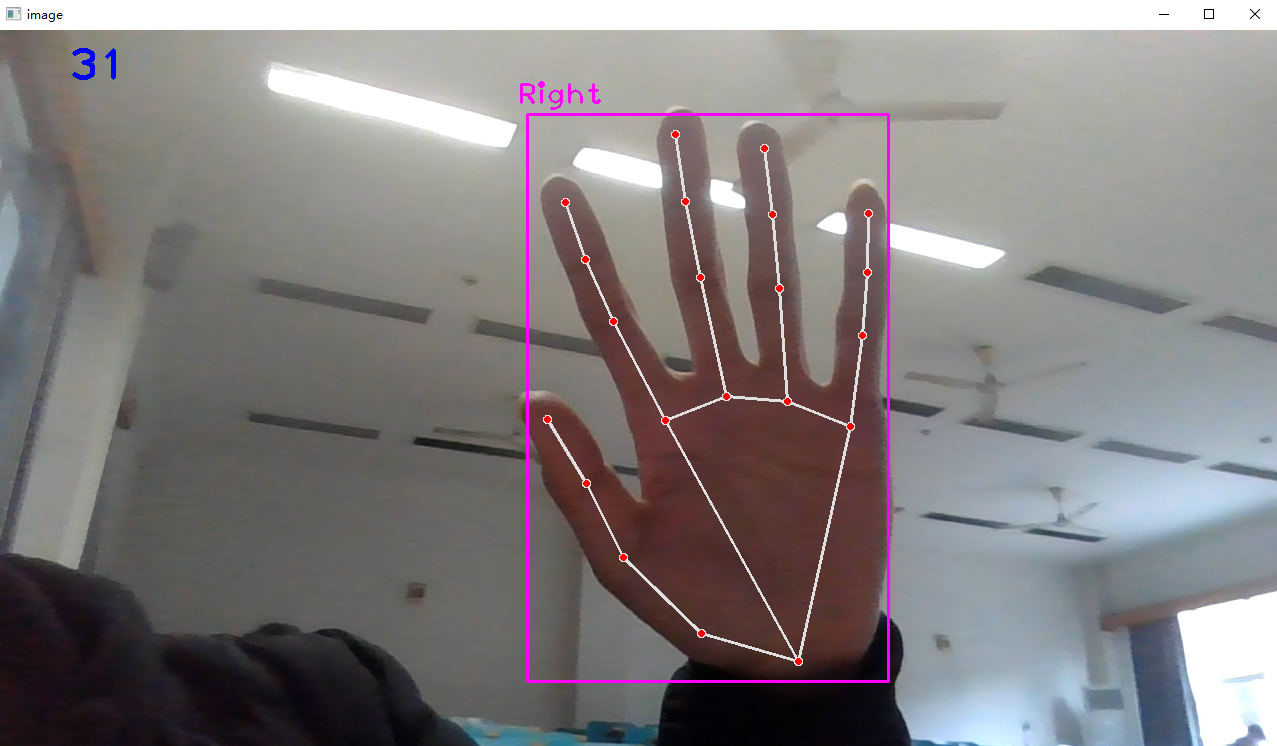
----------------------------------------------------------------------------The test results are shown in the figure:
2. Move the mouse
The idea of moving the mouse is: if it is detected that the index finger is up and the middle finger is bent, it is considered to be moving the mouse. The position coordinate of the mouse is the position coordinate of the tip of the index finger.
The method to detect which finger is upright is} detector Fingersup(), pass in the detected hand information hands[0]; The return value is a list composed of five elements. The element 1 represents that the finger is up and 0 represents that the finger is bent. For example: [0,1,1,0,0] represents that the index finger and middle finger are up and the other fingers are bent.
When the finger moves in the lower half of the camera picture, due to the problem of the camera boundary range, the palm will disappear in the camera picture, resulting in the failure to detect the key points of the hand. Therefore, draw a yellow rectangular box in the upper half of the screen, and the finger can only move in the rectangular box to avoid the disappearance of the key points of the hand.
Because the size of the rectangular box we set is obviously smaller than the size of the computer screen, the manual mouse cannot move on the whole computer screen. Therefore, it is necessary to map the width and height of the rectangular box to the width and height of the computer screen. Use the linear interpolation method NP Interp (x, xp, fp) is simply mapping the range of variable x from the original xp to fp. For example: NP Interp (x1, (pt1[0], pT2 [0]) (0, wScr)) is to map the range of X coordinates from the original pt1[0] to pt1[0]+w to the whole computer screen.
Returns the width and height of the computer screen: autopy screen. size()
Move the mouse position to the coordinates (x,y): autopy mouse. move(x,y)
See the following for the specific usage of autopy: https://blog.csdn.net/qq_30462003/article/details/100130472
Therefore, we add in the above code:
import cv2
import numpy as np
from cvzone.HandTrackingModule import HandDetector   # Hand detection method
import time
# pip install autopy  #Mouse control unit
import autopy

#(1) Derivative video data
wScr, hScr = autopy.screen.size()   # Returns the width and height of the computer screen (1920.0, 1080.0)
wCam, hCam = 1280, 720   # Width and height of video display window
pt1, pt2 = (100,100), (1100, 500)   # The moving range of the virtual mouse, the upper left coordinate pt1 and the lower right coordinate pt2

cap = cv2.VideoCapture(0)  # 0 represents your computer's camera
cap.set(3, wCam)  # Set the width of the display box 1280
cap.set(4, hCam)  # Set the height of the display box 720

pTime = 0  # Set the start time when the first frame starts processing

#(2) Receiving hand detection method
detector = HandDetector(mode=False,  # Video stream image
                        maxHands=1,  # Detect up to one hand
                        detectionCon=0.8,  # Minimum detection confidence
                        minTrackCon=0.5)   # Minimum tracking confidence

#(3) Process each frame of image
while True:

    # Whether the picture is successfully received, img frame image
    success, img = cap.read()

    # Flip the image so that it mirrors itself in the camera
    img = cv2.flip(img, flipCode=1)  # 1 stands for horizontal flip and 0 stands for vertical flip

    # Create a rectangular box on the image window and move the mouse within the area
    cv2.rectangle(img, pt1, pt2, (0,255,255), 5)

    #(4) Hand key point detection
    # Input the image of each frame, return the coordinate information (Dictionary) of the key points of the hand, and draw the image after the key points
    hands, img = detector.findHands(img, flipType=False)  # The top has been reversed, so there's no need to flip here
    # print(hands)

    # If the hand can be detected, proceed to the next step
    if hands:

        # Get 21 key point information in hands
        lmList = hands[0]['lmList']  # hands is a list of N dictionaries, which contains the key point information of each hand

        # Obtain the index finger tip coordinates and the middle finger tip coordinates
        x1, y1 = lmList[8]  # The key index number of the index finger tip is 8
        x2, y2 = lmList[12] # Middle finger tip index 12


        #(5) Check which finger is up
        fingers = detector.fingersUp(hands[0])  # afferent
        # print(fingers) returns [0,1,1,0,0], which means that only the index finger and middle finger stand up

        # If the index finger is up and the middle finger is bent, it is considered to move the mouse
        if fingers[1] == 1 and fingers[2] == 0:

            # When you start moving, draw a circle on the tip of your index finger to see more clearly
            cv2.circle(img, (x1,y1), 15, (255,255,0), cv2.FILLED)  # Color fills the entire circle

            #(6) Determines the range of mouse movement
            # Map the movement range of the index finger from the prefabricated window range to the computer screen range
            x3 = np.interp(x1, (pt1[0], pt2[0]), (0, wScr))
            y3 = np.interp(y1, (pt1[1], pt2[1]), (0, hScr))

            #(7) Move mouse
            autopy.mouse.move(x3, y3)  # Give the coordinates of the mouse movement position

    #(8) Display image
    # View FPS
    cTime = time.time() #Time to finish processing one frame of image
    fps = 1/(cTime-pTime)
    pTime = cTime  #Reset start time

    # fps information is displayed on the video, which is first converted into an integer and then into a string. The text display coordinates, text font and text size
    cv2.putText(img, str(int(fps)), (70,50), cv2.FONT_HERSHEY_PLAIN, 3, (255,0,0), 3)

    # Display the image and input the window name and image data
    cv2.imshow('image', img)
    if cv2.waitKey(1) & 0xFF==27:  #After each frame stays for 20 milliseconds, it disappears, and ESC key exits
        break

# Free video resources
cap.release()
cv2.destroyAllWindows()
The renderings are as follows:
3. Click the mouse
The idea of clicking the mouse is: if the index finger and middle finger are erected at the same time, and the pixel distance between the tips of the index finger and middle finger is less than 50, it is considered to be clicking the mouse.
The method to detect which finger is upright is the} detector explained above Fingersup() method. The method to detect the fingertip distance is: detector Finddistance (pt1, pt2, IMG). pt1 and pt2 are the coordinates of two points. Input img to draw the fingertip connection diagram.
Click the mouse function, autopy mouse. click()
Because the coordinate position of each frame changes greatly when the mouse is controlled by the finger, the computer mouse is easy to shake under the control of the finger, and it is difficult to accurately locate a target. Therefore, it is necessary to smooth the coordinate change of each frame to make the coordinate change slower.
For example: cLocx = pLocx + (x3 - pLocx) / smooth, where: the x coordinate cLocx of the mouse position of the previous frame; The x coordinate of the mouse position of the previous frame {pLocx; x coordinate of the current mouse position: x3; Customize the smoothing coefficient smooth. The larger the value, the slower the mouse moves and the higher the smoothness.
Therefore, add the following in the above code:
import cv2
import numpy as np
from cvzone.HandTrackingModule import HandDetector   # Hand detection method
import time
import autopy

#(1) Derivative video data
wScr, hScr = autopy.screen.size()   # Returns the width and height of the computer screen (1920.0, 1080.0)
wCam, hCam = 1280, 720   # Width and height of video display window
pt1, pt2 = (100,100), (1100, 500)   # The moving range of the virtual mouse, the upper left coordinate pt1 and the lower right coordinate pt2

cap = cv2.VideoCapture(0)  # 0 represents your computer's camera
cap.set(3, wCam)  # Set the width of the display box 1280
cap.set(4, hCam)  # Set the height of the display box 720

pTime = 0  # Set the start time when the first frame starts processing

pLocx, pLocy = 0, 0  # Mouse position at the previous frame

smooth = 4  # Customize the smoothing coefficient to make the mouse move gently

#(2) Receiving hand detection method
detector = HandDetector(mode=False,  # Video stream image
                        maxHands=1,  # Detect up to one hand
                        detectionCon=0.8,  # Minimum detection confidence
                        minTrackCon=0.5)   # Minimum tracking confidence

#(3) Process each frame of image
while True:

    # Whether the picture is successfully received, img frame image
    success, img = cap.read()

    # Flip the image so that it mirrors itself in the camera
    img = cv2.flip(img, flipCode=1)  # 1 stands for horizontal flip and 0 stands for vertical flip

    # Create a rectangular box on the image window and move the mouse within the area
    cv2.rectangle(img, pt1, pt2, (0,255,255), 5)

    #(4) Hand key point detection
    # Input the image of each frame, return the coordinate information (Dictionary) of the key points of the hand, and draw the image after the key points
    hands, img = detector.findHands(img, flipType=False)  # The top has been reversed, so there's no need to flip here
    # print(hands)

    # If the hand can be detected, proceed to the next step
    if hands:

        # Get 21 key point information in hands
        lmList = hands[0]['lmList']  # hands is a list of N dictionaries, which contains the key point information of each hand

        # Obtain the index finger tip coordinates and the middle finger tip coordinates
        x1, y1 = lmList[8]  # The key index number of the index finger tip is 8
        x2, y2 = lmList[12] # Middle finger tip index 12

        #(5) Check which finger is up
        fingers = detector.fingersUp(hands[0])  # afferent
        # print(fingers) returns [0,1,1,0,0], which means that only the index finger and middle finger stand up

        # If the index finger is up and the middle finger is bent, it is considered to move the mouse
        if fingers[1] == 1 and fingers[2] == 0:

            # When you start moving, draw a circle on the tip of your index finger to see more clearly
            cv2.circle(img, (x1,y1), 15, (255,255,0), cv2.FILLED)  # Color fills the entire circle

            #(6) Determines the range of mouse movement
            # Map the movement range of the index finger from the prefabricated window range to the computer screen range
            x3 = np.interp(x1, (pt1[0], pt2[0]), (0, wScr))
            y3 = np.interp(y1, (pt1[1], pt2[1]), (0, hScr))

            #(7) Smooth, so that the mouse arrow will not shake all the time when the finger moves the mouse
            cLocx = pLocx + (x3 - pLocx) / smooth  # Coordinates of the current mouse position
            cLocy = pLocy + (y3 - pLocy) / smooth

            #(8) Move mouse
            autopy.mouse.move(cLocx, cLocy)  # Give the coordinates of the mouse movement position

            # Update the mouse position coordinates of the previous frame, and change the mouse position of the current frame to the mouse position of the previous frame of the next frame
            pLocx, pLocy = cLocx, cLocy

        #(9) If the index finger and middle finger are up and the fingertip distance is less than a certain value, it is considered as clicking the mouse
        if fingers[1] == 1 and fingers[2] == 1:  # Both index and middle fingers stand up

            # Calculate the distance between the tip of the index finger and the tip of the middle finger, draw the drawn image img, and the information of the fingertip connection info
            distance, info, img = detector.findDistance((x1, y1), (x2, y2), img)
            # print(distance)

            # When the distance between fingers is less than 50 (pixel distance), it is considered as clicking the mouse
            if distance < 50:

                # Draw a green circle on the tip of the index finger to click the mouse
                cv2.circle(img, (x1,y1), 15, (0,255,0), cv2.FILLED)

                # Click the mouse
                autopy.mouse.click()

    #(10) Display image
    # View FPS
    cTime = time.time() #Time to finish processing one frame of image
    fps = 1/(cTime-pTime)
    pTime = cTime  #Reset start time

    # fps information is displayed on the video, which is first converted into an integer and then into a string. The text display coordinates, text font and text size
    cv2.putText(img, str(int(fps)), (70,50), cv2.FONT_HERSHEY_PLAIN, 3, (255,0,0), 3)

    # Display the image and input the window name and image data
    cv2.imshow('image', img)
    if cv2.waitKey(1) & 0xFF==27:  #After each frame stays for 20 milliseconds, it disappears, and ESC key exits
        break

# Free video resources
cap.release()
cv2.destroyAllWindows()
The resulting image shows that a circle is drawn with each click on the drawing board.
