First put a complete multi-channel / multi environment packaged configuration, and then explain it.
Achieved:
- Different environments and package names;
- Modify different strings in different environments XML resource file;
- Modify the specified constant in different environments;
- For different environments, modify androidmanifest Channel variables in XML;
- Different environments reference different module s.
Put a complete configuration first. You can refer to:
apply plugin: 'com.android.application'

android {
    compileSdkVersion 22
    buildToolsVersion '22.0.1'

    // Signature file
    signingConfigs {
        config {
            keyAlias 'lyl'
            keyPassword '123456'
            storeFile file('../lyl.jks')
            storePassword '123456'
        }
    }

    // Default configuration
    defaultConfig {
        //applicationId "com.lyl.app"
        minSdkVersion 16
        targetSdkVersion 22
        versionCode 1
        versionName "1.0.0"

        signingConfig signingConfigs.config
        multiDexEnabled true

        // This is required for gradle 3.0.0 and above
        // flavorDimensions "app"
    }

    // Different configurations of multi-channel / multi environment
    productFlavors {
        dev {
            // This is required for gradle 3.0.0 and above
            // dimension "app"

            // Each environment has a different package name
            applicationId "com.lyl.dev"
            // Dynamically add string XML field;
            // Note that here is the addition, in string XML cannot have this field, it will have the same name!!!
            resValue "string", "app_name", "dev_myapp"
            resValue "bool", "isrRank", 'false'
            // Dynamically modify constant fields
            buildConfigField "String", "ENVIRONMENT", '"dev"'
            // Modify androidmanifest Channel variables in XML
            manifestPlaceholders = [UMENG_CHANNEL_VALUE: "dev"]
        }
        stage {
            // This is required for gradle 3.0.0 and above
            // dimension "app"

            applicationId "com.lyl.stage"

            resValue "string", "app_name", "stage_myapp"
            resValue "bool", "isrRank", 'true'

            buildConfigField "String", "ENVIRONMENT", '"stage"'

            manifestPlaceholders = [UMENG_CHANNEL_VALUE: "stage"]
        }
        prod {
            // This is required for gradle 3.0.0 and above
            // dimension "app"

            applicationId "com.lyl.prod"

            resValue "string", "app_name", "myapp"
            resValue "bool", "isrRank", 'true'

            buildConfigField "String", "ENVIRONMENT", '"prod"'

            manifestPlaceholders = [UMENG_CHANNEL_VALUE: "prod"]
        }
    }

    dexOptions {
        incremental true
        // javaMaxHeapSize "4g"
    }

    //Remove lint detected error
    lintOptions {
        abortOnError false
    }

    def releaseTime() {
        return new Date().format("yyyy-MM-dd", TimeZone.getTimeZone("UTC"))
    }

    buildTypes {
        debug {
            signingConfig signingConfigs.config
        }

        release {
            buildConfigField("boolean", "LOG_DEBUG", "false")
            minifyEnabled false
            zipAlignEnabled true
            //Remove useless resource files
            shrinkResources true
            proguardFiles getDefaultProguardFile('proguard-android.txt'), 'proguard-rules.pro'
            signingConfig signingConfigs.config

            // Batch packaging (below gradle 3.0.0)
            applicationVariants.all { variant ->
                variant.outputs.each { output ->
                    def outputFile = output.outputFile
                    if (outputFile != null && outputFile.name.endsWith('.apk')) {
                        //Output APK Name: channel name_ Version name_ Time apk
                        def fileName = "${variant.productFlavors[0].name}_v${defaultConfig.versionName}_${releaseTime()}.apk"
                        output.outputFile = new File(outputFile.parent, fileName)
                    }
                }
            }

            // Batch packaging (gradle 3.0.0 or above)
            // android.applicationVariants.all { variant ->
            // variant.outputs.all {
            //     outputFileName = // "${variant.productFlavors[0].name}_v${defaultConfig.versionName}_${releaseTime()}.apk"
            // }
        }
        }
    }
}

repositories {
    mavenCentral()
}

dependencies {
    compile 'com.facebook.android:facebook-android-sdk:4.0.0'
    compile project(':qrscan')
    compile 'com.android.support:appcompat-v7:22.0.0'
    compile 'com.google.code.gson:gson:2.3'
    compile files('libs/android-async-http-1.4.6.jar')
    compile 'com.google.android.gms:play-services:7.5.0'
    compile 'com.android.support:support-annotations:22.1.1'
    compile 'com.github.bumptech.glide:glide:3.7.0'
    compile 'de.hdodenhof:circleimageview:2.1.0'
}
Next, let's take a closer look at modifying specific fields.
The settings of different environments are basically set in productFlavors,
And you can add as many environments as you want.
1. Different environments and package names;
productFlavors {
    dev {
        applicationId "com.lyl.dev"
    }

    stage {
        applicationId "com.lyl.stage"
    }

    prod {
        applicationId "com.lyl.prod"
    }
}
Note here that in defaultConfig, everyone should write a default applicationId.
After testing, different environment package names set by productFlavors will override the settings in defaultConfig,
Therefore, we can speculate that its execution order should be the default execution first, and then the sub channel execution. If there is a conflict, the processing will be overwritten, which is also very logical.
2. Add string for different environments XML resource file;
Use resValue to define the value of resources. As the name suggests, the contents under res should be created. Finally, use r.xxx XXX.
As follows, different apps are added according to different types_ The name field and the Boolean value are defined, which can be passed through r.string app_name.
Note that here is the addition, which is in string XML adds a field app_name, so in the existing string XML cannot have this field, otherwise an error will be reported!!!
productFlavors {
    dev {
        resValue "string", "app_name", "dev_myapp"
        resValue "bool", "isrRank", 'false'
    }
    stage {
        resValue "string", "app_name", "stage_myapp"
        resValue "bool", "isrRank", 'true'
    }
    prod {
        resValue "string", "app_name", "myapp"
        resValue "bool", "isrRank", 'true'
    }
}
From the above, we can probably infer that color and dimen sion can also be added in a similar way.
3. Dynamically modify the specified constant in different environments;
Use the BuildConfig variable.
① Define field
After we define the following fields, the files will be generated automatically after compilation, which can be found in APP / build / source / buildconfig / dev / com lyl. Dev / buildconfig directory,
Open this file and we can see the fields we defined.
productFlavors {
    dev {
        buildConfigField "String", "ENVIRONMENT", '"dev"'
    }
    stage {
        buildConfigField "String", "ENVIRONMENT", '"stage"'
    }
    prod {
        buildConfigField "String", "ENVIRONMENT", '"prod"'
    }
}
② Reference field
In any of our own classes, we can call the fields we define directly through BuildConfig.
public class Constants {
    public static final String ENVIRONMENT = BuildConfig.ENVIRONMENT;

}
Note: here is a small detail. Look at the third parameter. It uses "'" first and then "" "". This syntax may be strange in Java, but it is very common in many other languages.
It means that "dev" as a whole belongs to a string. As for why, remove the single quotation marks and go to app / build / source / buildconfig / dev / com lyl. Take a look at the dev / buildconfig file.
4. Modify androidmanifest in different environments Channel variables in XML
① At androidmanifest Add channel variables to XML
<application
    android:icon="${app_icon}"
    android:label="@string/app_name"
    android:theme="@style/AppTheme">
    ...
    <meta-data
        android:name="UMENG_CHANNEL"
        android:value="${ENVIRONMENT}" />
    ...
</application>
② In build Gradle set productFlavors
productFlavors {
    dev {
        manifestPlaceholders = [ENVIRONMENT: "dev",
                                app_icon   : "@drawable/icon_dev"]
    }
    stage {
        manifestPlaceholders = [ENVIRONMENT: "stage",
                                app_icon   : "@drawable/icon_stage"]
    }
    prod {
        manifestPlaceholders = [ENVIRONMENT: "prod",
                                app_icon   : "@drawable/icon_prod"]
    }
}
In this way, we can use different key values in different environments.
5. Reference different module s in different environments
This is very powerful. Reference the corresponding module according to different environments.
You can replace a lot of pictures, string s, color s, vaule s and so on.
First, create the module corresponding to the channel, and then reference it.
The reference method is as follows:
dependencies {
    compile fileTree(dir: 'libs', include: ['*.jar'])

    // Projects referencing this
    devCompile project(':devModule')
    stageCompile project(':stageModule')
    prodCompile project(':prodModule')

    // You can also refer to the network by channel. Because they are the same here, the address is the same
    devCompile 'com.roughike:bottom-bar:2.0.2'
    stageCompile 'com.roughike:bottom-bar:2.0.2'
    prodCompile 'com.roughike:bottom-bar:2.0.2'
}
xxxCompile represents the name of each channel.
Then put the files that need to be distributed into different module s and delete the files of the main project.
Please note: if this is done, every time you need to reference, you must place files in the module s of various channels, otherwise you will not find resources.
In this way, the whole set of material resources can be replaced. The specific use depends on the project requirements.
Through the above methods, we can basically dynamically set the application title, application icon, replacement constant, set different package names, change channels, etc. through gradle.
Package compilation
Finally, after all the configuration is completed, the packaging operation is started.
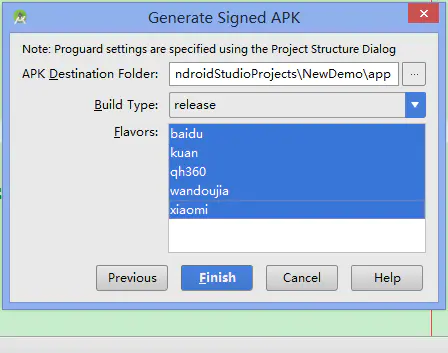
Package a (daily compilation)
Because there are two types in buildTypes, each channel will have two modes.
Packaging all is the normal packaging process
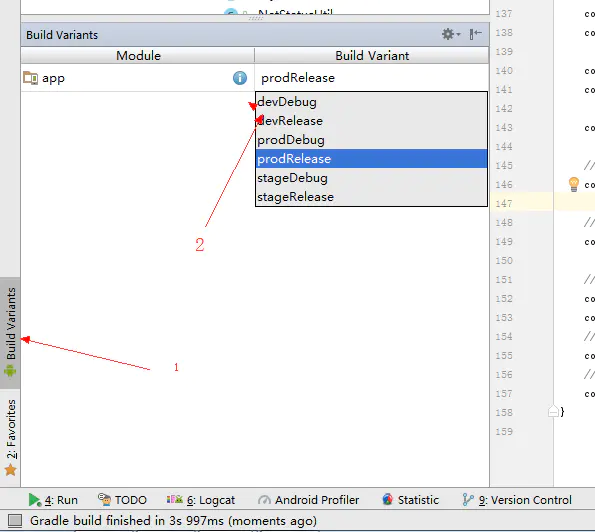
As shown in the figure:
After packaging, you can see the apk package we generated in the directory we specified.
Use local Properties store private configuration
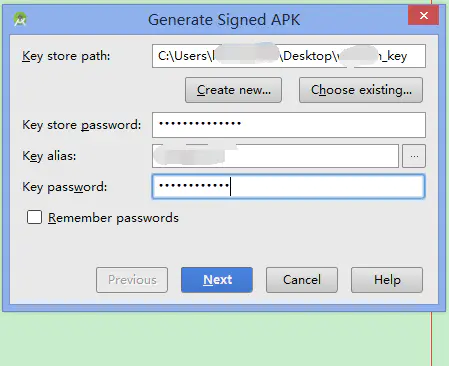
The above can basically realize the settings of gradle, but if we want to upload our project to Github or send the project to others. Some private things on it will be seen by others. For example: The password for the jks file.
Under the project directory, there is a local Properties file, we can use it to store some private properties, and then read them in gradle, while local The properties file does not need to be uploaded.
local. The settings in the properties file are as follows:
sdk.dir=D\:\\Android\\android-sdk

gaodeKey=e348025dd034d1c347dd0345e34802

keyPassword=123456
In build Gradle reads local Properties field information
// Load local Properties resource
Properties properties = new Properties()
InputStream inputStream = project.rootProject.file('local.properties').newDataInputStream() ;
properties.load( inputStream )

android {
    ...

    // Signature file
    signingConfigs {
        config {
            keyAlias 'lyl'
            // Get local Properties field information
            keyPassword properties.getProperty( 'keyPassword' )
            storeFile file('../lyl.jks')
            storePassword properties.getProperty( 'keyPassword' )
        }
    }

    ...
}
In this way, you can hide some data you want to hide.
Possible ways to speed up Android Studio compilation
1. In the root directory of build Add the following code to gradle:
allprojects {
    // Add this
    tasks.withType(JavaCompile) {
        //Enables compilation in a separate daemon
        options.fork = true
        //Incremental compilation
        options.incremental = true
    }

    repositories {
        jcenter()
    }
}
2. Build at the app level Gradle plus
android {
    dexOptions {
        incremental true
    }
}
Finally, put a multi-channel project address, which can be referred to:
https://github.com/Wing-Li/boon
Author: Wing_Li
Link: https://www.jianshu.com/p/533240d222d3
Source: Jianshu
The copyright belongs to the author. For commercial reprint, please contact the author for authorization, and for non-commercial reprint, please indicate the source.