Create your own Python IDE development tool with Tkinter (2) to realize Python code execution and output information
In the previous article, we introduced the implementation of the editor. This article describes how to implement Python code execution and output information.
To execute Python code, we use the function exec(). Its usage is as follows.
exec(object[, globals[, locals]])
For specific use, see the following code with detailed comments. If you are not clear, you can come to my QQ group for consultation.
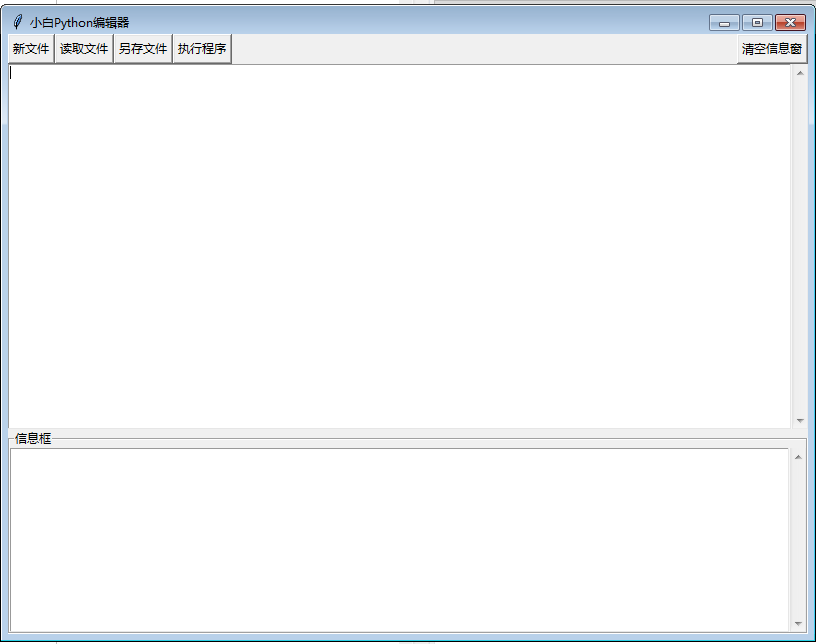
We create an output information window.
For beauty, we use the LabelFrame container control.
Place another ScrolledText control in this control as the output information box textmessage.
Add two more buttons, execute program and clear information window.
The whole interface is designed, as shown in the figure below.

First, we want to output the program output information to the information window. At present, we can't directly use print() statement to output, nor can we use input() statement to input. I'll teach you how to do it later.
If you want to know how to take over or intercept print() and input() statements, you can refer to the module HP I developed_ tk. Py source code.
class console is to take over the print() and input() statements.
Buy genuine books and add readers to download the source code. In xb2g Zig compressed package.
Jingdong purchase website
https://item.jd.com/61567375505.html
Tmall purchase website
https://detail.tmall.com/item.htm?id=607469269858
Let's imitate the print() statement and output it to the information box.
We design two output functions, the text output function myprint() and the color information output function colorprint(). The implementation code is as follows.
#User output information
def myprint(txt):
    global textMess
    if textMess != None :
        textMess.insert(tk.END, txt)
        textMess.see(tk.END)

#Output color information
def colorprint(txt,color='black'):
    global textMess
    if textMess != None :
        if color!='black':
            textMess.tag_config(color, foreground=color)
        textMess.insert(tk.END, txt,color)
        textMess.see(tk.END)
Finally, the two buttons [execute program] and [empty information window] are realized.
##Clear the information window
def clearMess():
    global textMess
    textMess.delete(1.0,tk.END)

#Run user program
def runpy():
    global textPad,textMess
    try:
        msg = textPad.get(1.0,tk.END)
        mg=globals()
        ml=locals()
        exec(msg,mg,ml)
    except Exception as e:
        colorprint('\n#Error in user code: '+ str(e)+'\n','red ')
Next, we give the completion program code myide001 py.
# -*- coding: utf-8 -*-
"""
#Function: Python little white code editor
#Version: ver1 00
#Designer: single wolf Hepu
#Tel: 18578755056
#QQ: 2775205/2886002
#Xiaobai quantitative Chinese Python Tkinter group: 983815766
#Baidu: Hepu index, Xiaobai quantification
#Design start date: January 21, 2022
#Users please agree to the final < copyright notice >
#Last revision date: January 25, 2022
#Main program: myide py
"""
import  tkinter  as  tk   #Import Tkinter
import  tkinter.ttk  as  ttk   #Import Tkinter ttk
from  tkinter.scrolledtext  import ScrolledText  #Import ScrolledText
from tkinter.filedialog import *

mytitle='Xiaobai Python editor '

#Create main window
root=tk.Tk()
root.title(mytitle)
root.geometry('{}x{}+{}+{}'.format(800, 600, 100, 100))

#Put some buttons
frame=tk.Frame(root)
button1=tk.Button(frame,text='new file')
button2=tk.Button(frame,text='read file')
button3=tk.Button(frame,text='Save file as')
button4=tk.Button(frame,text='Execution procedure')
button5=tk.Button(frame,text='Clear the information window')

button1.pack(side=tk.LEFT)
button2.pack(side=tk.LEFT)
button3.pack(side=tk.LEFT)
button4.pack(side=tk.LEFT)
button5.pack(side=tk.RIGHT)
frame.pack(side=tk.TOP,fill=tk.BOTH)

#Place a text box
global textPad
textPad= ScrolledText(bg='white')
textPad.pack(fill=tk.BOTH, expand=1)
textPad.focus_set()

global filename
filename='newfile.py'

#Realize button function
def btnfunc01():  #new file
    global textPad,filename
    textPad.delete(1.0,tk.END)
    filename='newfile.py'

def btnfunc02(): #read file
    global textPad,filename
    filename2 = askopenfilename(defaultextension='.py')
    if filename2 != '':
        textPad.delete(1.0,tk.END)#delete all
        f = open(filename2,'r',encoding='utf-8',errors='ignore')
        textPad.insert(1.0,f.read())
        f.close()
        filename=filename2


def btnfunc03(): #Save file as
    global textPad,filename
    filename = asksaveasfilename(initialfile = filename,defaultextension ='.py')
    if filename != '':
        fh = open(filename,'w',encoding='utf-8',errors='ignore')
        msg = textPad.get(1.0,tk.END)
        fh.write(msg)
        fh.close()

#Set function for button
button1['command']=lambda:btnfunc01()
button2['command']=lambda:btnfunc02()
button3['command']=lambda:btnfunc03()

##Set a container for the message box
frame2=tk.LabelFrame(root,text='Information box',height=100)
frame2.pack(fill=tk.BOTH, expand=1)

global textMess

#Place a text box as the information output window
textMess= ScrolledText(frame2,bg='white', height=10)
textMess.pack(fill=tk.BOTH, expand=1)
##Clear the information window
def clearMess():
    global textMess
    textMess.delete(1.0,tk.END)

#User output information
def myprint(txt):
    global textMess
    if textMess != None :
        textMess.insert(tk.END, txt)
        textMess.see(tk.END)

#Output color information
def colorprint(txt,color='black'):
    global textMess
    if textMess != None :
        if color!='black':
            textMess.tag_config(color, foreground=color)
        textMess.insert(tk.END, txt,color)
        textMess.see(tk.END)

#Run user program
def runpy():
    global textPad,textMess
    try:
        msg = textPad.get(1.0,tk.END)
        mg=globals()
        ml=locals()
        exec(msg,mg,ml)
    except Exception as e:
        colorprint('\n#Error in user code: '+ str(e)+'\n','red ')

button4['command']=lambda:runpy()
button5['command']=lambda:clearMess()

root.mainloop() #Enter Tkinter message loop
The running results of this program are shown in the figure above.
I suggest readers change the name of this editor to the name of their favorite editor.
mytitle='Xiaobai Python editor '
Just modify it here.
In this editor, we write and execute our own code.
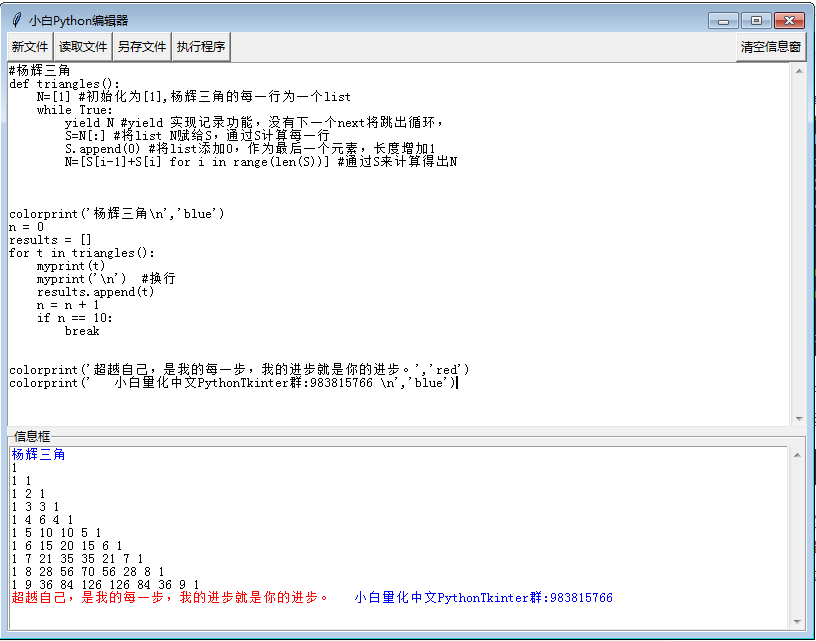
We use Python to design a Yanghui triangle program, which can only be run in the IDE we developed. The completed program code is as follows:
#Yanghui triangle
def triangles():
    N=[1] #Initialized to [1], each behavior of Yang Hui triangle is a list
    while True:
        yield N #yield realizes the recording function, and no next will jump out of the loop,
        S=N[:] #Assign list N to S and calculate each row through S
        S.append(0) #Add 0 to the list as the last element, and increase the length by 1
        N=[S[i-1]+S[i] for i in range(len(S))] #N is calculated from S


colorprint('Yanghui triangle\n','blue')
n = 0
results = []
for t in triangles():
    myprint(t)
    myprint('\n')  #Line feed
    results.append(t)
    n = n + 1
    if n == 10:
        break


colorprint('Surpassing myself is my every step, and my progress is your progress.','red')
colorprint('   Xiaobai quantitative Chinese PythonTkinter group:983815766 \n','blue')
The running results of the program are shown in the figure below.

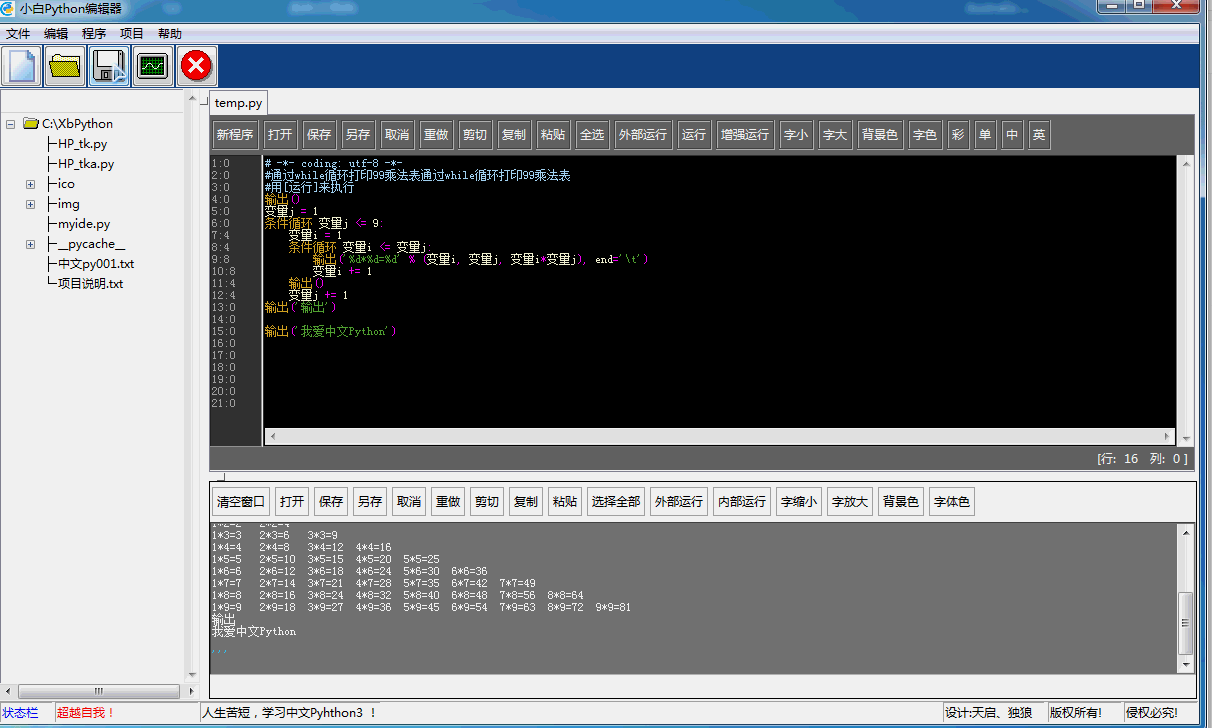
Some readers may say that this IDE is too simple. We are here to guide everyone's interest in learning Python by designing an IDE and gradually become a python bull.
It's also easy to design the following IDE.

Well, welcome to follow my blog.
Surpassing myself is my every step! My progress is your progress!