Introduction to machine learning for programmers (XI) - object recognition YOLO - recognition of face position and whether to wear a mask
This article will introduce the most popular object recognition model YOLO. YOLO is characterized by fast recognition speed 🤗, However, the accuracy is only a little worse than that of fast RCNN (after YOLOv3). Before reading this article, you need to understand the principle of object recognition. If you haven't read the previous articles in this series (articles introducing RCNN, fast RCNN and fast RCNN), please read them first.
YOLO model overview
YOLO's abbreviation is You only look once, which translates into Chinese as baby. You only need to see it once 😘. The YOLO model can directly output the classification of the area containing the object and the corresponding area according to the picture, which can be achieved in one step. Unlike the RCNN series model, which needs to calculate the area containing the object first, and then judge the corresponding classification according to the area, the speed of the YOLO model is much faster than that of the RCNN series model.
The structure of YOLO model is as follows:
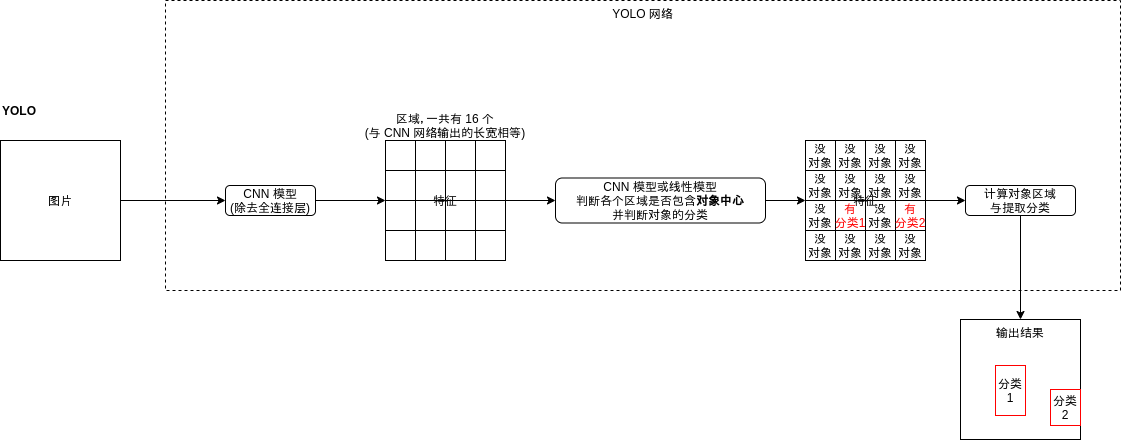
Do you feel a little familiar? It looks like the area generation network (RPN) of fast RCNN. Indeed, in principle, the YOLO model is to find the region and judge the object classification contained in the region. The YOLO model is different from the region generation network in the following ways:
- The YOLO model outputs whether each area contains the center of the object rather than a part of the object
- The YOLO model outputs the object classification at the same time
- The output area offset of YOLO model will be calculated according to the center point of the object. The specific algorithm is described below
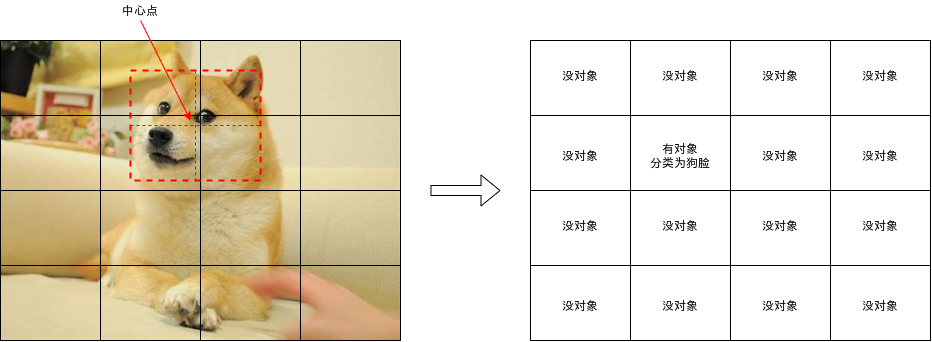
The biggest difference between YOLO model and fast RCNN's area generation network is that it will judge whether each area contains the object center. As shown in the figure below, the dog face covers four areas, but only the area in the lower left corner contains the center of the dog face. YOLO model should only judge whether this area contains the object.
Of course, if the center of the object is very close to the boundary of the region, it will be difficult to judge. The YOLO model will ignore the region where the object overlap rate is higher than a certain level during training. For details, please refer to the code given later.
YOLO model will output the following results for each region. Here, it is assumed that there are three classifications:
- Include object center (yes = 1, no = 0)
- Area offset x
- Area offset y
- Area offset w
- Area offset h
- Possibility of classification 1 (0 ~ 1)
- Possibility of classification 2 (0 ~ 1)
- Possibility of classification 3 (0 ~ 1)
The dimensions of output results are} batch size, area quantity, and 5 + classification quantity.
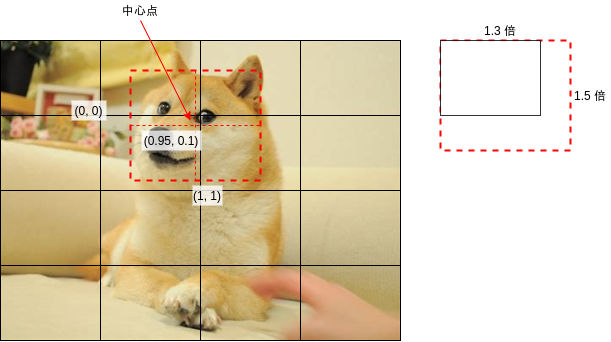
The area offset is used to adjust the area range of the output. For example, the center point of the dog face in the above figure is about the upper right corner of the area. If the upper left corner of the area is regarded as (0,0) and the lower right corner is regarded as (1,1), the center point of the dog face should be at the position of (0.95,0.1), and the size of the dog face relative to the length and width of the area is about (1.3,1.5) times, When generating training data, the area offset will be calculated according to these four values. The specific calculation code is given below.
Seeing here, you may think that the YOLO model looks very simple. I can throw away the fucking fast RCNN model 🤢. No, it's not that simple. The above introduction is only the yoov1} model. The accuracy of the yoov1 model is very low. Later, in order to improve the recognition accuracy, yoov2, yov3, yoov4 and yov5 models have been developed 😮, Next, we will introduce the main improvements of yolov2 and YOLOv3 model, and then give the implementation of YOLOv3 model. YOLOv4 and YOLOv5 models mainly improve the CNN model (also known as Backbone Network) for feature extraction. The original YOLO model uses Darknet written in C language as the backbone network, while this article uses Resnet as the backbone network, so it only introduces YOLOv3.
YOLOv2
The main improvement of YOLOv2 is the introduction of anchor. If you have read the previous articles, you should know what the anchor is. The anchor will derive multiple anchor areas of different shapes from the center of each area:
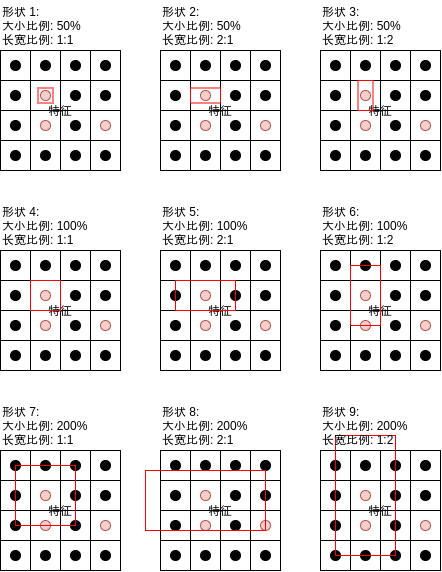
Fast RCNN uses anchor points mainly to improve the area overlap rate to avoid missing some objects (fast RCNN will judge whether the area contains objects according to the overlap rate during training. If the object is long or wide but the shape is only square, the overlap rate will be relatively low, resulting in the object being missed). However, YOLO uses the center point of the object, There will be no problem of missing objects due to insufficient overlap rate. YOLO uses anchor points to support the recognition of multiple objects whose center is located in the same area, as shown in the following figure:
If the object center falls in an area, YOLO calculates the overlap rate of each shape corresponding to the area and uses the shape with the highest overlap rate. In this way, if multiple object centers fall in the same area but their shapes are different, different classifications will be judged respectively. The output of YOLOv2 is shown in the following figure:
The dimensions of output results are} batch size, area quantity * shape quantity, 5 + classification quantity.
YOLOv2 also has some improvements for the backbone network and training methods, but this article has not been used, so it will not be introduced. If you are interested, you can refer to the paper link given later.
You may notice that the area divided by YOLO is fixed, and only the data in the area will be used to judge whether there are objects in the area and object classification, which will lead to the following problems:
- If the relative area of the object is too large, it is difficult for the model to determine which area contains the center point
- Fast RCNN determines whether to include objects according to the overlap rate of the anchor area rather than the center point, so this problem will not occur
- If the relative area of the object is too large, each area contains only a small part of the object. It is difficult to judge the object classification based on this small part (for example, when the area only contains the nose, the model needs to judge whether the face is based on the nose)
- Fast RCNN is divided into two steps. The label classification network will judge the classification according to the regional interception characteristics given by the regional generation network, so there will be no such problem
- If the relative area of an object is too small, multiple objects may be in the same area
- Because fast RCNN will not have the above two problems, smaller areas can be used
Therefore, YOLOv2 is only suitable for scenes where the object size and area size are close.
YOLOv3
In order to better support different sizes of objects, YOLOv3 introduced a multi-scale detection mechanism (Multi-Scale Detection). This mechanism can be said to be the essence of YOLO model. Before introducing this mechanism, the accuracy of YOLO model is very unsatisfactory. After introducing it, the YOLO model reaches the accuracy of Faster-RCNN, and the speed is faster than Faster-RCNN.
The multi-scale detection mechanism is simply to divide regions according to different scales, and then detect whether these regions of different sizes contain objects. When detecting, the characteristics of large regions will be mixed into small regions, so that small regions have a certain degree of context information when judging.
To realize the multi-scale detection mechanism, first let the CNN model output features of different scales. We have seen that the convolution layer in the CNN model can output features smaller than the original size (refer to Chapter 8). For example, when the specified kernel_size is 3, the processing interval is 2, and the padding size is 1, The output size is just half of the input size. Put such convolution layer at the end of CNN model, and then retain the output of each convolution layer to obtain the characteristics of different scales. For example, when three scales are specified, three features of the following sizes may be obtained:
- Batch size, number of channels, 8, 8
- Batch size, number of channels, 4, 4
- Batch size, number of channels, 2, 2
Then reverse process the three features. First, submit the "batch size, number of channels, 2, 2" to the CNN model for further processing the features. This model will make the output length and width equal to the input length and width, so the output size is the same as the original size, and then expand the features to "batch size, number of channels, 4, 4, for example:
a b
c d
After expansion, it will become
a a b b
a a b b
c c d d
c c d d
Then merge this feature into the feature with the size of "batch size, number of channels, 4,4" to obtain the feature of "batch size, number of channels * 2,4,4", and submit this feature to the CNN model for further processing the feature. The subsequent process is shown in the figure above. Finally, three results of the following sizes will be obtained:
- Batch size, number of shapes * (5 + number of classifications), 8, 8
- Batch size, number of shapes * (5 + number of classifications), 4, 4
- Batch size, number of shapes * (5 + number of classifications), 2, 2
After deformation:
- Batch size, 8 * 8 * shape quantity, 5 + classification quantity
- Batch size, 4 * 4 * shape quantity, 5 + classification quantity
- Batch size, 2 * 2 * shape quantity, 5 + classification quantity
To sum up, the structure of YOLOv3 model is shown in the following figure:
Implementation of YOLO model
Next, let's take a look at the implementation details of the YOLO model, and the complete code will be given later. Note that the implementation of this article is not exactly the same as the official implementation 🤕, In this article, Resnet will be used as the backbone network, and the parameters will be adjusted with the goal of recognizing the position of human face.
Define anchor
The first is to generate the anchor range list. The code looks similar to that used by fast RCNN:
IMAGE_SIZE = (256, 256) # Zoom picture size

Anchors = None # Anchor list, including the range of anchor number * shape number
AnchorSpans = (16, 32, 64) # List of scales, the value is the distance between anchors
AnchorAspects = ((1, 1), (1, 2), (2, 1)) # List of length width ratio of the area corresponding to the anchor point

def generate_anchors():
    """Generates a list of anchor ranges based on anchor points and shapes"""
    w, h = IMAGE_SIZE
    anchors = []
    for span in AnchorSpans:
        for x in range(0, w, span):
            for y in range(0, h, span):
                xcenter, ycenter = x + span / 2, y + span / 2
                for ratio in AnchorAspects:
                    ww = span * ratio[0]
                    hh = span * ratio[1]
                    xx = xcenter - ww / 2
                    yy = ycenter - hh / 2
                    xx = max(int(xx), 0)
                    yy = max(int(yy), 0)
                    ww = min(int(ww), w - xx)
                    hh = min(int(hh), h - yy)
                    anchors.append((xx, yy, ww, hh))
    return anchors

Anchors = generate_anchors()
However, YOLO needs to process each scale separately, so the generated anchor range list will be sorted by scale first. The generated structure is as follows:
[
    Scale 1 area 1 range of shape 1,
    Range of scale 1 area 1 shape 2,
    Range of scale 1 area 1 shape 3,
    Scale 1 area 2 range of shape 1,
    Scale 1 area 2 range of shape 2,
    Scale 1 area 2 shape 3 range,
    ...
    Scale 2 area 1 range of shape 1,
    Scale 2 area 1 range of shape 2,
    Scale 2 area 1 range of shape 3,
    ...
    Scale 3 area 1 range of shape 1,
    Scale 3 range of area 1 and shape 2,
    Scale 3 area 1 range of shape 3,
    ...
]
It will eventually include (256 / 16) ^ 2 * 3 + (256 / 32) ^ 2 * 3 + (256 / 64) ^ 2 * 3 = 768 + 192 + 48 = 1008 anchor point ranges.
In this article, the YOLO model will be used to recognize the position of the face and whether to wear a mask, and the shape of the face is usually close to 1:1, so the following code will generate a list of anchor ranges using the following parameters:
AnchorSpans = (16, 32, 64) # List of scales, the value is the distance between anchors
AnchorAspects = ((1, 1), (1.5, 1.5)) # List of length width ratio of the area corresponding to the anchor point
If you want to detect other objects, you can modify the parameters to make the shape of the anchor range more match the shape of the object, so as to improve the detection rate.
Algorithm for adjusting region range
After having the anchor range, we also need to decide an algorithm to adjust the anchor range to the object range. A total of four parameters are required. The calculation rules are as follows:
- Area offset X: the center point of the object is in the x-axis position in the anchor range, between 0 and 1
- Area offset Y: the center point of the object is in the y-axis position in the anchor range, between 0 and 1
- Area offset W: log (the ratio of the length of the object to the length of the anchor range)
- Area offset H: log (the ratio of the height of the object to the height of the anchor range)
It looks simple 😎, It should be noted that the center point of the object range adjusted in this way must be in the anchor range, which is different from the algorithm used by fast RCNN.
The following is the code used in the calculation. The "actual area" in the note represents the object range and the "candidate area" represents the anchor range.
def calc_box_offset(candidate_box, true_box):
    """Calculate the offset value between the candidate area and the actual area. It is required that the center point of the actual area must be in the candidate area"""
    # Calculate the position of the center point of the actual area in the candidate area, and the range will be between 0 and 1
    x1, y1, w1, h1 = candidate_box
    x2, y2, w2, h2 = true_box
    x_offset = ((x2 + w2 // 2) - x1) / w1
    y_offset = ((y2 + h2 // 2) - y1) / h1
    # Calculate the ratio of the actual area length and width to the candidate area length and width, and use log to reduce the excessive value
    w_offset = math.log(w2 / w1)
    h_offset = math.log(h2 / h1)
    return (x_offset, y_offset, w_offset, h_offset)

def adjust_box_by_offset(candidate_box, offset):
    """Adjust the candidate area according to the offset value"""
    x1, y1, w1, h1 = candidate_box
    x_offset, y_offset, w_offset, h_offset = offset
    w2 = math.exp(w_offset) * w1
    h2 = math.exp(h_offset) * h1
    x2 = x1 + w1 * x_offset - w2 // 2
    y2 = y1 + h1 * y_offset - h2 // 2
    x2 = min(IMAGE_SIZE[0]-1,  x2)
    y2 = min(IMAGE_SIZE[1]-1,  y2)
    w2 = min(IMAGE_SIZE[0]-x2, w2)
    h2 = min(IMAGE_SIZE[1]-y2, h2)
    return (x2, y2, w2, h2)
Generate actual output for training
After determining the algorithm of anchor point and adjusting area range, we can generate actual output results according to the data set used for training. The data set used for training needs to include:
- picture
- Can contain multiple objects
- Scope of object
- Classification of objects
After the dataset is ready, we compare the anchor range list with the range of objects in the dataset, and then generate the following data for each anchor range of each picture:
- Object or not
- Area offset x
- Area offset y
- Area offset w
- Area offset h
- Possibility of classification 1
- Possibility of classification 2
- Possibility of classification 3
Whether the object has only two values of 0 or 1. If the anchor range contains the center of the object and the overlap ratio (IOU) between the anchor range and the object range is greater than the threshold (for example, 30%), it is 1, otherwise it is 0. Note that if the object is 0 or not, the later area offset and the possibility of each classification do not need to be calculated (for example, set to 0), and they will also be removed when calculating the loss.
The offset of the four areas will be calculated according to the anchor point range and object range. Refer to the above description for the algorithm.
The probability of each classification is calculated according to the classification of the object. If the classification of the object is "human", and the three classifications are "human, cat and dog", the probability of classification 1 is 1, and the probability of classification 2 and classification 3 is 0. In addition, YOLO also supports multiple classifications (binarycrossentry is required when calculating losses). If it is classified as "human man woman pig boar sow" and the object is "sow", the possibility of each classification is "0 0 0 1 0 1". It should be noted that the value calculated here is for the model to learn. After learning the model, floating-point numbers such as "0.9 0.2 0.0" may be output. It is necessary to judge the maximum value, find out the most possible classification, and judge how confident the model is about the result according to the size of the value.
If you remember the previous article introducing the fast RCNN model, you should think of a classification representing "non object". The area generation network of fast RCNN will first judge whether it is an object, and then the label classification network will remove the results classified as non object classification again. This practice improves the recognition accuracy a lot. However, the YOLO model has only one step and does not need non object classification in principle. Even adding non object classification will not improve the accuracy of judging whether it is an object or not. However, if the amount of data is insufficient, adding non object classification can help better identify the classification. For example, if there are brown cats and red pigs in the picture, the model may judge that the brown ones are cats and the red ones are pigs. However, after adding non object classification, if the picture also includes brown stools and red rice cookers, the model will not judge only by color. Therefore, the following example of face location recognition will add non object classification.
For the specific code, please refer to the prepare function later 🤒.
Calculation characteristics
The computing feature of the original YOLO model uses a network called Darknet, which is implemented by the YOLO author in C language. It can be regarded as the publicity of the framework written by the YOLO author 😤. However, as long as you understand the principle of YOLO model, you can achieve the same effect with other networks (although the author has made many adjustments to brush points, but the accuracy can not catch up with other networks). Here I use the most widely used Resnet model, and the code is as follows:
self.previous_channels_out = 4
self.resnet_models = nn.ModuleList([
    nn.Sequential(
        nn.Conv2d(3, self.previous_channels_out, kernel_size=3, stride=1, padding=1, bias=False),
        nn.BatchNorm2d(self.previous_channels_out),
        nn.ReLU(inplace=True),
        self._make_layer(BasicBlock, channels_out=16, num_blocks=2, stride=1),
        self._make_layer(BasicBlock, channels_out=32, num_blocks=2, stride=2),
        self._make_layer(BasicBlock, channels_out=64, num_blocks=2, stride=2),
        self._make_layer(BasicBlock, channels_out=128, num_blocks=2, stride=2),
        self._make_layer(BasicBlock, channels_out=256, num_blocks=2, stride=2)),
    self._make_layer(BasicBlock, channels_out=256, num_blocks=2, stride=2),
    self._make_layer(BasicBlock, channels_out=256, num_blocks=2, stride=2)
])
_ make_ The codes of layer and BasicBlock are the same as those given in previous articles. You can also refer to the complete code below.
RESNET defined here_ The width of the first 32 sub models will be 256, and then the width of the second 32 sub models will be 256. The results of the first 32 sub models will be output, and then the width of the second 32 sub models will be 256. The results of the second 32 sub models will be output, 256, picture width / 64, picture height / 64. These three results represent the corresponding features of each region after the image is divided into 16x16, 32x32 and 64x64 regions.
The codes used to output the three features are as follows:
def forward(self, x):
    features_list = []
    resnet_input = x
    for m in self.resnet_models:
        resnet_input = m(resnet_input)
        features_list.append(resnet_input)
Predict output according to characteristics
In the last step, we got three features, and then we can predict whether each region in the three scales contains objects and object classification according to these three features. As described above, the process needs to be divided into three steps:
- Further processing of features (constant length and width)
- Features that expand the length and width of the feature and merge to the next scale (finer scale)
- Determine whether the object center and label are classified
Model Code:
self.yolo_detectors = nn.ModuleList([
    # Further processing features
    nn.ModuleList([nn.Sequential(
        nn.Conv2d(256 if index == 0 else 512, 256, kernel_size=1, stride=1, padding=0, bias=True),
        nn.ReLU(inplace=True),
        nn.Conv2d(256, 512, kernel_size=3, stride=1, padding=1, bias=True),
        nn.ReLU(inplace=True),
        nn.Conv2d(512, 256, kernel_size=1, stride=1, padding=0, bias=True),
        nn.ReLU(inplace=True)),
    # Expand feature length and width
    nn.Upsample(scale_factor=2, mode="nearest"),
    # Determine whether the object center and label are classified
    nn.Sequential(
        nn.Conv2d(256, 512, kernel_size=3, stride=1, padding=1, bias=True),
        nn.ReLU(inplace=True),
        nn.Conv2d(512, 256, kernel_size=3, stride=1, padding=1, bias=True),
        nn.ReLU(inplace=True),
        nn.Conv2d(256, MyModel.AnchorTotalOutputs, kernel_size=1, stride=1, padding=0, bias=True))])
    for index in range(len(self.resnet_models))
])
The part of "judging whether the object center and label classification" can use CNN model or linear model. The combination of multiple convolution layers without changing the length and width can achieve the effect close to the multi-layer linear model. If CNN model is used, the input with dimension (B, C, W, H) can be transformed into the result with dimension (B, O, W, H). If linear model is used, the input needs to be transformed into (B*W*H, C) first, and then transformed into the result with dimension (B*W*H, O) through linear model, and then transformed into (B, O, W, H). The fast RCNN implementation introduced in the previous article uses the linear model, while this article uses the CNN model, which can be used in principle 🤒.
Code for processing characteristics:
previous_upsampled_feature = None
outputs = []
for index, feature in enumerate(reversed(features_list)):
    if previous_upsampled_feature is not None:
        # Merge features extracted from large anchor distance to features extracted from small anchor distance
        feature = torch.cat((feature, previous_upsampled_feature), dim=1)
    # Calculate features for merging
    hidden = self.yolo_detectors[index][0](feature)
    # Zoom in on features (for merging on next process)
    upsampled = self.yolo_detectors[index][1](hidden)
    # Calculate the final predicted output
    output = self.yolo_detectors[index][2](hidden)
    previous_upsampled_feature = upsampled
    outputs.append(output)
After that, * outputs "will contain three results. The dimensions are (batch size, (5 + classification quantity) * shape quantity, width corresponding to scale and height corresponding to scale). Connecting these three results, the number will be just equal to the number of anchor points generated before. The code for connecting the three results is as follows. Note that the order should be the same as that used when generating the anchor point, so that the connected result can have a one-to-one relationship with the anchor point range.
outputs_flatten = []
# Reverse is used in the previous feature processing. Here, you need to use reverse again to reverse the order
# The order of the three results after exchange should be consistent with that of AnchorSpans
for output in reversed(outputs):
    # Deformation to (batch size, width corresponding to scale, height corresponding to scale, (5 + classification quantity) * shape quantity)
    output = output.permute(0, 2, 3, 1)
    # Deformation to (batch size, width * height * number of shapes, 5 + number of classifications)
    # The order in which anchors are generated is width = > height = > shape
    output = output.reshape(output.shape[0], -1, MyModel.AnchorOutputs)
    outputs_flatten.append(output)
# Dimensions after connection are (batch size, number of scales * width * height * number of shapes, 5 + number of classifications)
# I.e. (batch size, number of anchors, 5 + number of classifications)
outputs_all = torch.cat(outputs_flatten, dim=1)
When returning outputs_ Before all, you also need to use sigmoid to make the value corresponding to the object center and the possibility of each classification fall between 0 and 1. Note that some YOLO implementations will use sigmoid to process region offset x and region offset y, because these two values should also fall between 0 and 1. However, I personally think sigmoid is only suitable for processing the value that the expected result is binary (0 or 1), while the expected result of region offset is evenly distributed between 0 and 1, which can not play the role of merging, and the effect will be similar to hardtanh.
# Whether the object center should be between 0 and 1. Use sigmoid for processing
outputs_all[:,:,:1] = self.sigmoid(outputs_all[:,:,:1])
# The classification should be between 0 and 1. Use sigmoid for processing
outputs_all[:,:,5:] = self.sigmoid(outputs_all[:,:,5:])
After processing, outputs_all is the result returned by the YOLO model. It will be used to calculate the loss and adjust the parameters during training. In the actual prediction, it will cooperate with the previously generated anchor list to obtain the area containing the object and object classification, and mark it on the picture or video.
Calculate loss
It's time to calculate the loss again 😩, The predicted output and actual output dimensions of YOLO are the same, but we can't use only one loss function to calculate them. YOLO also needs to calculate multiple losses and combine them.
First of all, we need to distinguish between positive samples (including the area of the object center) and negative samples (excluding the area of the object center). The method is also mentioned earlier:
- Positive sample: contains the object center and the overlap rate is greater than a certain threshold
- Negative sample: it does not contain the object center and the overlap rate with any object is less than a certain threshold
The requirement that the overlap rate of negative samples is lower than the threshold is to take care of the objects whose object center is very close to the edge of the region. At this time, it is difficult for the model to judge which region the object center is in. Excluding these samples from the negative samples can help the model learn more easily. Finally, the model can judge that the object center is in two adjacent regions, but it will not be adjusted.
YOLO model calculates and consolidates the following losses:
- If the object center of the positive sample is, use mselos
- Object center of negative sample * 0.5, use mselos
- Since most areas do not contain the object center, multiply it by 0.5 here to reduce the impact of the loss of negative samples on the adjustment parameters
- Area offset of positive samples, using mselos
- The regional offset of non positive samples will be ignored and meaningless to calculate
- Label classification loss of positive samples, using BCELoss
- The BinaryCrossEntropy loss function supports multiple classifications, although this example only has a single classification
- If there is non object classification, calculate the label classification loss of negative samples and use BCELoss
- If non object classification is not used, no calculation is required
The specific calculation code is as follows:
def loss_function(predicted, actual):
    """YOLO Multitasking loss calculator used"""
    result_tensor, result_isobject_masks, result_nonobject_masks = actual
    objectness_losses = []
    offsets_losses = []
    labels_losses = []
    for x in range(result_tensor.shape[0]):
        mask_positive = result_isobject_masks[x]
        mask_negative = result_nonobject_masks[x]
        # Calculate whether the loss of the object center is calculated for positive and negative samples respectively
        # Because most areas do not contain the object center, the influence of the loss of negative samples on the adjustment parameters is reduced
        objectness_loss_positive = nn.functional.mse_loss(
            predicted[x,mask_positive,0], result_tensor[x,mask_positive,0])
        objectness_loss_negative = nn.functional.mse_loss(
            predicted[x,mask_negative,0], result_tensor[x,mask_negative,0]) * 0.5
        objectness_losses.append(objectness_loss_positive)
        objectness_losses.append(objectness_loss_negative)
        # Calculate the loss of area offset, which is only calculated for positive samples
        offsets_loss = nn.functional.mse_loss(
            predicted[x,mask_positive,1:5], result_tensor[x,mask_positive,1:5])
        offsets_losses.append(offsets_loss)
        # Calculate the loss of label classification, respectively for positive and negative samples
        labels_loss_positive = nn.functional.binary_cross_entropy(
            predicted[x,mask_positive,5:], result_tensor[x,mask_positive,5:])
        labels_loss_negative = nn.functional.binary_cross_entropy(
            predicted[x,mask_negative,5:], result_tensor[x,mask_negative,5:]) * 0.5
        labels_losses.append(labels_loss_positive)
        labels_losses.append(labels_loss_negative)
    loss = (
        torch.mean(torch.stack(objectness_losses)) +
        torch.mean(torch.stack(offsets_losses)) +
        torch.mean(torch.stack(labels_losses)))
    return loss
Merge result area
Finally, the prediction results returned by the YOLO model are converted to the specific area list. The algorithm is the NMS algorithm introduced in the previous articles. The code is as follows:
ObjScoreThreshold = 0.9 # It is considered to be the minimum score required for the center of the object
IOUMergeThreshold = 0.3 # Threshold value for determining whether overlapping regions should be merged

def convert_predicted_result(predicted):
    """Convert forecast results to (label, region, Object center score, Label recognition score) List of overlapping areas NMS Algorithm merging"""
    # Record the overlapping result area, and the result is [(label, area, RPN score, label identification score)],...]
    final_result = []
    for anchor, tensor in zip(Anchors, predicted):
        obj_score = tensor[0].item()
        if obj_score <= ObjScoreThreshold:
            # The center score of the object is required to exceed a certain value
            continue
        offset = tensor[1:5].tolist()
        offset[0] = max(min(offset[0], 1), 0) # The offset of center point x should be between 0 and 1
        offset[1] = max(min(offset[1], 1), 0) # The offset of center point y should be between 0 and 1
        box = adjust_box_by_offset(anchor, offset)
        label_max = tensor[5:].max(dim=0)
        cls_score = label_max.values.item()
        label = label_max.indices.item()
        if label == 0:
            # Skip non object classification
            continue
        for index in range(len(final_result)):
            exists_results = final_result[index]
            if any(calc_iou(box, r[1]) > IOUMergeThreshold for r in exists_results):
                exists_results.append((label, box, obj_score, cls_score))
                break
        else:
            final_result.append([(label, box, obj_score, cls_score)])
    # Merge overlapping result areas (use the object center score * label to identify the area with the highest score as the result area)
    for index in range(len(final_result)):
        exists_results = final_result[index]
        exists_results.sort(key=lambda r: r[2]*r[3])
        final_result[index] = exists_results[-1]
    return final_result
This example uses non object classification, so it will skip the area of non object classification. If it is not used, it does not need to be handled in this way.
YOLO model paper
If you want to see the original YOLO paper, you can click the link below 🤒, It's hard:
- YOLO: https://arxiv.org/pdf/1506.02640.pdf
- YOLOv2: (this article also introduces how to predict more than 9000 classifications)
- YOLOv3: https://arxiv.org/pdf/1804.02767.pdf
Use YOLO model to recognize the position of face and whether to wear mask
Next, let's use the YOLO model to catch the guy without mask 🤗, As in the previous article, two data sets will be used.
This dataset contains 853 images (some of which are not used), and the number of each category is as follows:
- With_mask: 3232
- Without_mask: 717
- Mask_worn_incorrect: 123
Because the number of samples with masks but incorrect posture is very small, they are all classified as wearing masks 😠.
Count the number of Faces present in an Image | Kaggle
There are 24533 areas in this data set, all without masks.
The total quantity is as follows:
- With_mask: 3232 + 123 = 3355
- Without_mask: 717 + 24533 = 25250
After training with this data set and successful training, the complete code of using the model to identify pictures or videos is as follows:
import os
import sys
import torch
import gzip
import itertools
import random
import numpy
import math
import pandas
import json
from PIL import Image
from PIL import ImageDraw
from PIL import ImageFont
from torch import nn
from matplotlib import pyplot
from collections import defaultdict
from collections import deque
import xml.etree.cElementTree as ET
# Zoom picture size
IMAGE_SIZE = (256, 192)
# Data set path for training
DATASET_1_IMAGE_DIR = "./archive/images"
DATASET_1_ANNOTATION_DIR = "./archive/annotations"
DATASET_2_IMAGE_DIR = "./784145_1347673_bundle_archive/train/image_data"
DATASET_2_BOX_CSV_PATH = "./784145_1347673_bundle_archive/train/bbox_train.csv"
# Classification list
# YOLO does not need other classification in principle, but adding this classification in the actual measurement will help to improve the accuracy of label classification
CLASSES = [ "other", "with_mask", "without_mask" ]
CLASSES_MAPPING = { c: index for index, c in enumerate(CLASSES) }
# Threshold value for judging whether there is the area overlap rate used by the object (in addition, the center of the object is required to be in the area)
IOU_POSITIVE_THRESHOLD = 0.30
IOU_NEGATIVE_THRESHOLD = 0.30
# Used to enable GPU support
device = torch.device("cuda" if torch.cuda.is_available() else "cpu")
class BasicBlock(nn.Module):
"""ResNet Base block used"""
expansion = 1 # The actual outgoing channels that define this block are channels_ Several times of out, and the implementation here is fixed
def __init__(self, channels_in, channels_out, stride):
super().__init__()
# Generate 3x3 convolution layer
# When the processing interval stripe = 1, the length and width of the output will be equal to the length and width of the input, for example, (32-3 + 2) / / 1 + 1 = = 32
# When the processing interval stripe = 2, the length and width of the output will be equal to half of the length and width of the input, for example, (32-3 + 2) / / 2 + 1 = = 16
# In addition, the 3x3 convolution layer of resnet does not use the offset value bias
self.conv1 = nn.Sequential(
nn.Conv2d(channels_in, channels_out, kernel_size=3, stride=stride, padding=1, bias=False),
nn.BatchNorm2d(channels_out))
# Then define a 3x3 convolution layer with the same output and input dimensions
self.conv2 = nn.Sequential(
nn.Conv2d(channels_out, channels_out, kernel_size=3, stride=1, padding=1, bias=False),
nn.BatchNorm2d(channels_out))
# When adding the original input and output, the dimensions need to be consistent. If the dimensions are inconsistent, they need to be integrated
self.identity = nn.Sequential()
if stride != 1 or channels_in != channels_out * self.expansion:
self.identity = nn.Sequential(
nn.Conv2d(channels_in, channels_out * self.expansion, kernel_size=1, stride=stride, bias=False),
nn.BatchNorm2d(channels_out * self.expansion))
def forward(self, x):
# x => conv1 => relu => conv2 => + => relu
# | ^
# |==============================|
tmp = self.conv1(x)
tmp = nn.functional.relu(tmp, inplace=True)
tmp = self.conv2(tmp)
tmp += self.identity(x)
y = nn.functional.relu(tmp, inplace=True)
return y
class MyModel(nn.Module):
"""YOLO (be based on ResNet Variant of)"""
Anchors = None # Anchor list, including the range of anchor number * shape number
AnchorSpans = (16, 32, 64) # List of scales, the value is the distance between anchors
AnchorAspects = ((1, 1), (1.5, 1.5)) # List of length width ratio of the area corresponding to the anchor point
AnchorOutputs = 1 + 4 + len(CLASSES) # Output quantity corresponding to each anchor range, whether the object center (1) + area offset (4) + classification quantity
AnchorTotalOutputs = AnchorOutputs * len(AnchorAspects) # Number of outputs corresponding to each anchor point
ObjScoreThreshold = 0.9 # It is considered to be the minimum score required for the center of the object
IOUMergeThreshold = 0.3 # Threshold value for determining whether overlapping regions should be merged
def __init__(self):
super().__init__()
# ResNet for extracting picture features
# Because there are three anchor distances, the corresponding features of each anchor distance will be output here
self.previous_channels_out = 4
self.resnet_models = nn.ModuleList([
nn.Sequential(
nn.Conv2d(3, self.previous_channels_out, kernel_size=3, stride=1, padding=1, bias=False),
nn.BatchNorm2d(self.previous_channels_out),
nn.ReLU(inplace=True),
self._make_layer(BasicBlock, channels_out=16, num_blocks=2, stride=1),
self._make_layer(BasicBlock, channels_out=32, num_blocks=2, stride=2),
self._make_layer(BasicBlock, channels_out=64, num_blocks=2, stride=2),
self._make_layer(BasicBlock, channels_out=128, num_blocks=2, stride=2),
self._make_layer(BasicBlock, channels_out=256, num_blocks=2, stride=2)),
self._make_layer(BasicBlock, channels_out=256, num_blocks=2, stride=2),
self._make_layer(BasicBlock, channels_out=256, num_blocks=2, stride=2)
])
# The output convolution layer is predicted according to the characteristics corresponding to the distance of each anchor point
# Features extracted with large anchor distance will be merged into features extracted with small anchor distance
# The meanings of the three sub models here are:
# -Calculate features for merging
# -Zoom in feature
# -Calculate the final predicted output
self.yolo_detectors = nn.ModuleList([
nn.ModuleList([nn.Sequential(
nn.Conv2d(256 if index == 0 else 512, 256, kernel_size=1, stride=1, padding=0, bias=True),
nn.ReLU(inplace=True),
nn.Conv2d(256, 512, kernel_size=3, stride=1, padding=1, bias=True),
nn.ReLU(inplace=True),
nn.Conv2d(512, 256, kernel_size=1, stride=1, padding=0, bias=True),
nn.ReLU(inplace=True)),
nn.Upsample(scale_factor=2, mode="nearest"),
nn.Sequential(
nn.Conv2d(256, 512, kernel_size=3, stride=1, padding=1, bias=True),
nn.ReLU(inplace=True),
nn.Conv2d(512, 256, kernel_size=3, stride=1, padding=1, bias=True),
nn.ReLU(inplace=True),
nn.Conv2d(256, MyModel.AnchorTotalOutputs, kernel_size=1, stride=1, padding=0, bias=True))])
for index in range(len(self.resnet_models))
])
# Function that processes the result range
self.sigmoid = nn.Sigmoid()
def _make_layer(self, block_type, channels_out, num_blocks, stride):
"""establish resnet Layers used"""
blocks = []
# Add first block
blocks.append(block_type(self.previous_channels_out, channels_out, stride))
self.previous_channels_out = channels_out * block_type.expansion
# The remaining processing blocks will be added with a fixed width, and the remaining processing blocks will not be changed
for _ in range(num_blocks-1):
blocks.append(block_type(self.previous_channels_out, self.previous_channels_out, 1))
self.previous_channels_out *= block_type.expansion
return nn.Sequential(*blocks)
@staticmethod
def _generate_anchors():
"""Generates a list of anchor ranges based on anchor points and shapes"""
w, h = IMAGE_SIZE
anchors = []
for span in MyModel.AnchorSpans:
for x in range(0, w, span):
for y in range(0, h, span):
xcenter, ycenter = x + span / 2, y + span / 2
for ratio in MyModel.AnchorAspects:
ww = span * ratio[0]
hh = span * ratio[1]
xx = xcenter - ww / 2
yy = ycenter - hh / 2
xx = max(int(xx), 0)
yy = max(int(yy), 0)
ww = min(int(ww), w - xx)
hh = min(int(hh), h - yy)
anchors.append((xx, yy, ww, hh))
return anchors
def forward(self, x):
# Extract the features corresponding to the distance of each anchor point
# The dimensions are:
# torch.Size([16, 256, 16, 12])
# torch.Size([16, 256, 8, 6])
# torch.Size([16, 256, 4, 3])
features_list = []
resnet_input = x
for m in self.resnet_models:
resnet_input = m(resnet_input)
features_list.append(resnet_input)
# Predict output according to characteristics
# The dimensions are:
# torch.Size([16, 16, 4, 3])
# torch.Size([16, 16, 8, 6])
# torch.Size([16, 16, 16, 12])
# 16 Yes (5 + Category 3) * shape 2
previous_upsampled_feature = None
outputs = []
for index, feature in enumerate(reversed(features_list)):
if previous_upsampled_feature is not None:
# Merge features extracted from large anchor distance to features extracted from small anchor distance
feature = torch.cat((feature, previous_upsampled_feature), dim=1)
# Calculate features for merging
hidden = self.yolo_detectors[index][0](feature)
# Zoom in on features (for merging on next process)
upsampled = self.yolo_detectors[index][1](hidden)
# Calculate the final predicted output
output = self.yolo_detectors[index][2](hidden)
previous_upsampled_feature = upsampled
outputs.append(output)
# Connect all outputs
# Note that the order should be consistent with Anchors
outputs_flatten = []
for output in reversed(outputs):
output = output.permute(0, 2, 3, 1)
output = output.reshape(output.shape[0], -1, MyModel.AnchorOutputs)
outputs_flatten.append(output)
outputs_all = torch.cat(outputs_flatten, dim=1)
# Whether the object center should be between 0 and 1. Use sigmoid for processing
outputs_all[:,:,:1] = self.sigmoid(outputs_all[:,:,:1])
# The classification should be between 0 and 1. Use sigmoid for processing
outputs_all[:,:,5:] = self.sigmoid(outputs_all[:,:,5:])
return outputs_all
@staticmethod
def loss_function(predicted, actual):
"""YOLO Multitasking loss calculator used"""
result_tensor, result_isobject_masks, result_nonobject_masks = actual
objectness_losses = []
offsets_losses = []
labels_losses = []
for x in range(result_tensor.shape[0]):
mask_positive = result_isobject_masks[x]
mask_negative = result_nonobject_masks[x]
# Calculate whether the loss of the object center is calculated for positive and negative samples respectively
# Because most areas do not contain the object center, the influence of the loss of negative samples on the adjustment parameters is reduced
objectness_loss_positive = nn.functional.mse_loss(
predicted[x,mask_positive,0], result_tensor[x,mask_positive,0])
objectness_loss_negative = nn.functional.mse_loss(
predicted[x,mask_negative,0], result_tensor[x,mask_negative,0]) * 0.5
objectness_losses.append(objectness_loss_positive)
objectness_losses.append(objectness_loss_negative)
# Calculate the loss of area offset, which is only calculated for positive samples
offsets_loss = nn.functional.mse_loss(
predicted[x,mask_positive,1:5], result_tensor[x,mask_positive,1:5])
offsets_losses.append(offsets_loss)
# Calculate the loss of label classification, respectively for positive and negative samples
labels_loss_positive = nn.functional.binary_cross_entropy(
predicted[x,mask_positive,5:], result_tensor[x,mask_positive,5:])
labels_loss_negative = nn.functional.binary_cross_entropy(
predicted[x,mask_negative,5:], result_tensor[x,mask_negative,5:]) * 0.5
labels_losses.append(labels_loss_positive)
labels_losses.append(labels_loss_negative)
loss = (
torch.mean(torch.stack(objectness_losses)) +
torch.mean(torch.stack(offsets_losses)) +
torch.mean(torch.stack(labels_losses)))
return loss
@staticmethod
def calc_accuracy(actual, predicted):
"""YOLO The accuracy calculator used here only calculates the accuracy of object center and label classification, and the area offset is not calculated"""
result_tensor, result_isobject_masks, result_nonobject_masks = actual
# Calculate whether the accuracy of the object center, and calculate the re average of the accuracy of positive samples and negative samples respectively
a = result_tensor[:,:,0]
p = predicted[:,:,0] > MyModel.ObjScoreThreshold
obj_acc_positive = ((a == 1) & (p == 1)).sum().item() / ((a == 1).sum().item() + 0.00001)
obj_acc_negative = ((a == 0) & (p == 0)).sum().item() / ((a == 0).sum().item() + 0.00001)
obj_acc = (obj_acc_positive + obj_acc_negative) / 2
# Calculate the accuracy of label classification
cls_total = 0
cls_correct = 0
for x in range(result_tensor.shape[0]):
mask = list(sorted(result_isobject_masks[x] + result_nonobject_masks[x]))
actual_classes = result_tensor[x,mask,5:].max(dim=1).indices
predicted_classes = predicted[x,mask,5:].max(dim=1).indices
cls_total += len(mask)
cls_correct += (actual_classes == predicted_classes).sum().item()
cls_acc = cls_correct / cls_total
return obj_acc, cls_acc
@staticmethod
def convert_predicted_result(predicted):
"""Convert forecast results to (label, region, Object center score, Label recognition score) List of overlapping areas NMS Algorithm merging"""
# Record the overlapping result area, and the result is [(label, area, RPN score, label identification score)],...]
final_result = []
for anchor, tensor in zip(MyModel.Anchors, predicted):
obj_score = tensor[0].item()
if obj_score <= MyModel.ObjScoreThreshold:
# The center score of the object is required to exceed a certain value
continue
offset = tensor[1:5].tolist()
offset[0] = max(min(offset[0], 1), 0) # The offset of center point x should be between 0 and 1
offset[1] = max(min(offset[1], 1), 0) # The offset of center point y should be between 0 and 1
box = adjust_box_by_offset(anchor, offset)
label_max = tensor[5:].max(dim=0)
cls_score = label_max.values.item()
label = label_max.indices.item()
if label == 0:
# Skip non object classification
continue
for index in range(len(final_result)):
exists_results = final_result[index]
if any(calc_iou(box, r[1]) > MyModel.IOUMergeThreshold for r in exists_results):
exists_results.append((label, box, obj_score, cls_score))
break
else:
final_result.append([(label, box, obj_score, cls_score)])
# Merge overlapping result areas (use the object center score * label to identify the area with the highest score as the result area)
for index in range(len(final_result)):
exists_results = final_result[index]
exists_results.sort(key=lambda r: r[2]*r[3])
final_result[index] = exists_results[-1]
return final_result
@staticmethod
def fix_predicted_result_from_history(cls_result, history_results):
"""Reduce misjudgment in prediction results according to historical results, which is suitable for video recognition, history_results Expected to be specified for maxlen of deque"""
# It is required that more than 50% of the historical results have similar areas, and the most classification in the historical results shall be selected
history_results.append(cls_result)
final_result = []
if len(history_results) < history_results.maxlen:
# Insufficient historical results, no recognition results will be returned
return final_result
for label, box, rpn_score, cls_score in cls_result:
# Find approximate regions in history
similar_results = []
for history_result in history_results:
history_result = [(calc_iou(r[1], box), r) for r in history_result]
history_result.sort(key = lambda r: r[0])
if history_result and history_result[-1][0] > MyModel.IOUMergeThreshold:
similar_results.append(history_result[-1][1])
# Judge whether the number of approximate areas is more than half
if len(similar_results) < history_results.maxlen // 2:
continue
# Select the most categories in the historical results
cls_groups = defaultdict(lambda: [])
for r in similar_results:
cls_groups[r[0]].append(r)
most_common = sorted(cls_groups.values(), key=len)[-1]
# Add the latest results in the most recent categories
final_result.append(most_common[-1])
return final_result
MyModel.Anchors = MyModel._generate_anchors()
def save_tensor(tensor, path):
"""preservation tensor Object to file"""
torch.save(tensor, gzip.GzipFile(path, "wb"))
def load_tensor(path):
"""Read from file tensor object"""
return torch.load(gzip.GzipFile(path, "rb"))
def calc_resize_parameters(sw, sh):
"""Calculate parameters for scaling pictures"""
sw_new, sh_new = sw, sh
dw, dh = IMAGE_SIZE
pad_w, pad_h = 0, 0
if sw / sh < dw / dh:
sw_new = int(dw / dh * sh)
pad_w = (sw_new - sw) // 2 # fill left and right
else:
sh_new = int(dh / dw * sw)
pad_h = (sh_new - sh) // 2 # filling up and down
return sw_new, sh_new, pad_w, pad_h
def resize_image(img):
"""Zoom the picture and fill in when the scale is inconsistent"""
sw, sh = img.size
sw_new, sh_new, pad_w, pad_h = calc_resize_parameters(sw, sh)
img_new = Image.new("RGB", (sw_new, sh_new))
img_new.paste(img, (pad_w, pad_h))
img_new = img_new.resize(IMAGE_SIZE)
return img_new
def image_to_tensor(img):
"""Convert picture object to tensor object"""
arr = numpy.asarray(img)
t = torch.from_numpy(arr)
t = t.transpose(0, 2) # Convert dimensions H,W,C to C,W,H
t = t / 255.0 # Normalize the value so that the range is 0 ~ 1
return t
def map_box_to_resized_image(box, sw, sh):
"""Convert the original area to the area corresponding to the scaled image"""
x, y, w, h = box
sw_new, sh_new, pad_w, pad_h = calc_resize_parameters(sw, sh)
scale = IMAGE_SIZE[0] / sw_new
x = int((x + pad_w) * scale)
y = int((y + pad_h) * scale)
w = int(w * scale)
h = int(h * scale)
if x + w > IMAGE_SIZE[0] or y + h > IMAGE_SIZE[1] or w == 0 or h == 0:
return 0, 0, 0, 0
return x, y, w, h
def map_box_to_original_image(box, sw, sh):
"""Convert the area corresponding to the zoomed image to the original area before zooming"""
x, y, w, h = box
sw_new, sh_new, pad_w, pad_h = calc_resize_parameters(sw, sh)
scale = IMAGE_SIZE[0] / sw_new
x = int(x / scale - pad_w)
y = int(y / scale - pad_h)
w = int(w / scale)
h = int(h / scale)
if x + w > sw or y + h > sh or x < 0 or y < 0 or w == 0 or h == 0:
return 0, 0, 0, 0
return x, y, w, h
def calc_iou(rect1, rect2):
"""Calculate the overlap of two areas / Ratio of consolidated parts (intersection over union)"""
x1, y1, w1, h1 = rect1
x2, y2, w2, h2 = rect2
xi = max(x1, x2)
yi = max(y1, y2)
wi = min(x1+w1, x2+w2) - xi
hi = min(y1+h1, y2+h2) - yi
if wi > 0 and hi > 0: # Overlap
area_overlap = wi*hi
area_all = w1*h1 + w2*h2 - area_overlap
iou = area_overlap / area_all
else: # No overlap
iou = 0
return iou
def calc_box_offset(candidate_box, true_box):
"""Calculate the offset value between the candidate area and the actual area. It is required that the center point of the actual area must be in the candidate area"""
# Calculate the position of the center point of the actual area in the candidate area, and the range will be between 0 and 1
x1, y1, w1, h1 = candidate_box
x2, y2, w2, h2 = true_box
x_offset = ((x2 + w2 // 2) - x1) / w1
y_offset = ((y2 + h2 // 2) - y1) / h1
# Calculate the ratio of the actual area length and width to the candidate area length and width, and use log to reduce the excessive value
w_offset = math.log(w2 / w1)
h_offset = math.log(h2 / h1)
return (x_offset, y_offset, w_offset, h_offset)
def adjust_box_by_offset(candidate_box, offset):
"""Adjust the candidate area according to the offset value"""
x1, y1, w1, h1 = candidate_box
x_offset, y_offset, w_offset, h_offset = offset
w2 = math.exp(w_offset) * w1
h2 = math.exp(h_offset) * h1
x2 = x1 + w1 * x_offset - w2 // 2
y2 = y1 + h1 * y_offset - h2 // 2
x2 = min(IMAGE_SIZE[0]-1, x2)
y2 = min(IMAGE_SIZE[1]-1, y2)
w2 = min(IMAGE_SIZE[0]-x2, w2)
h2 = min(IMAGE_SIZE[1]-y2, h2)
return (x2, y2, w2, h2)
def prepare_save_batch(batch, image_tensors, result_tensors, result_isobject_masks, result_nonobject_masks):
"""Preparation training - Batch saved individual data"""
# Functions that generate input and output tensor objects by index value list
def split_dataset(indices):
indices_list = indices.tolist()
image_tensors_splited = torch.stack([image_tensors[x] for x in indices_list])
result_tensors_splited = torch.stack([result_tensors[x] for x in indices_list])
result_isobject_masks_splited = [result_isobject_masks[x] for x in indices_list]
result_nonobject_masks_splited = [result_nonobject_masks[x] for x in indices_list]
return image_tensors_splited, (
result_tensors_splited, result_isobject_masks_splited, result_nonobject_masks_splited)
# Segmentation training set (80%), verification set (10%) and test set (10%)
random_indices = torch.randperm(len(image_tensors))
training_indices = random_indices[:int(len(random_indices)*0.8)]
validating_indices = random_indices[int(len(random_indices)*0.8):int(len(random_indices)*0.9):]
testing_indices = random_indices[int(len(random_indices)*0.9):]
training_set = split_dataset(training_indices)
validating_set = split_dataset(validating_indices)
testing_set = split_dataset(testing_indices)
# Save to hard disk
save_tensor(training_set, f"data/training_set.{batch}.pt")
save_tensor(validating_set, f"data/validating_set.{batch}.pt")
save_tensor(testing_set, f"data/testing_set.{batch}.pt")
print(f"batch {batch} saved")
def prepare():
"""Preparation training"""
# After the dataset is converted to tensor, it will be saved in the data folder
if not os.path.isdir("data"):
os.makedirs("data")
# Load the picture and the area and category list corresponding to the picture
# {(path, flip left and right): [area and classification, area and classification,..]}
# Turning the same picture left and right can generate a new data, doubling the amount of data
box_map = defaultdict(lambda: [])
for filename in os.listdir(DATASET_1_IMAGE_DIR):
# Load from first dataset
xml_path = os.path.join(DATASET_1_ANNOTATION_DIR, filename.split(".")[0] + ".xml")
if not os.path.isfile(xml_path):
continue
tree = ET.ElementTree(file=xml_path)
objects = tree.findall("object")
path = os.path.join(DATASET_1_IMAGE_DIR, filename)
for obj in objects:
class_name = obj.find("name").text
x1 = int(obj.find("bndbox/xmin").text)
x2 = int(obj.find("bndbox/xmax").text)
y1 = int(obj.find("bndbox/ymin").text)
y2 = int(obj.find("bndbox/ymax").text)
if class_name == "mask_weared_incorrect":
# The number of samples with incorrect masks is too small (only 123), and the model cannot be learned. All samples with masks are incorporated here
class_name = "with_mask"
box_map[(path, False)].append((x1, y1, x2-x1, y2-y1, CLASSES_MAPPING[class_name]))
box_map[(path, True)].append((x1, y1, x2-x1, y2-y1, CLASSES_MAPPING[class_name]))
df = pandas.read_csv(DATASET_2_BOX_CSV_PATH)
for row in df.values:
# Load from the second dataset, which contains only images without masks
filename, width, height, x1, y1, x2, y2 = row[:7]
path = os.path.join(DATASET_2_IMAGE_DIR, filename)
box_map[(path, False)].append((x1, y1, x2-x1, y2-y1, CLASSES_MAPPING["without_mask"]))
box_map[(path, True)].append((x1, y1, x2-x1, y2-y1, CLASSES_MAPPING["without_mask"]))
# Disrupt the dataset (because the second dataset only has pictures without masks)
box_list = list(box_map.items())
random.shuffle(box_list)
print(f"found {len(box_list)} images")
# Save the picture and the list of categories and areas corresponding to the picture
batch_size = 20
batch = 0
image_tensors = [] # Picture list
result_tensors = [] # The output result list corresponding to the picture, including [object center, area offset, possibility of each classification]
result_isobject_masks = [] # The index of the area containing the object of each picture in Anchors
result_nonobject_masks = [] # The index of the area of each picture that does not contain objects in Anchors (the area where the overlap rate is lower than the threshold)
for (image_path, flip), original_boxes_labels in box_list:
with Image.open(image_path) as img_original: # Load original picture
sw, sh = img_original.size # Original picture size
if flip:
img = resize_image(img_original.transpose(Image.FLIP_LEFT_RIGHT)) # Flip and zoom the picture
else:
img = resize_image(img_original) # Zoom picture
image_tensors.append(image_to_tensor(img)) # Add picture to list
# tensor for generating output results
result_tensor = torch.zeros((len(MyModel.Anchors), MyModel.AnchorOutputs), dtype=torch.float)
result_tensor[:,5] = 1 # The default classification is other
result_tensors.append(result_tensor)
# The index of the area containing the object in Anchors
result_isobject_mask = []
result_isobject_masks.append(result_isobject_mask)
# Index in Anchors of regions that do not contain objects
result_nonobject_mask = []
result_nonobject_masks.append(result_nonobject_mask)
# Locate the anchor point according to the real area, and then set the output result
negative_mapping = [1] * len(MyModel.Anchors)
for box_label in original_boxes_labels:
x, y, w, h, label = box_label
if flip: # Flip coordinates
x = sw - x - w
x, y, w, h = map_box_to_resized_image((x, y, w, h), sw, sh) # Zoom actual area
if w < 20 or h < 20:
continue # The area after zooming is too small
# Check the calculation for problems
# child_img = img.copy().crop((x, y, x+w, y+h))
# child_img.save(f"{os.path.basename(image_path)}_{x}_{y}_{w}_{h}_{label}.png")
# Locate the anchor to which you belong
# requirement:
# -The center point falls in the area corresponding to the anchor point
# -Overlap rate exceeds a certain value
x_center = x + w // 2
y_center = y + h // 2
matched_anchors = []
for index, anchor in enumerate(MyModel.Anchors):
ax, ay, aw, ah = anchor
is_center = (x_center >= ax and x_center < ax + aw and
y_center >= ay and y_center < ay + ah)
iou = calc_iou(anchor, (x, y, w, h))
if is_center and iou > IOU_POSITIVE_THRESHOLD:
matched_anchors.append((index, anchor)) # The area contains the center of the object and the overlap rate exceeds a certain value
negative_mapping[index] = 0
elif iou > IOU_NEGATIVE_THRESHOLD:
negative_mapping[index] = 0 # If the overlap rate between a region and an object exceeds a certain value, it should not be regarded as a negative sample
for matched_index, matched_box in matched_anchors:
# Calculate area offset
offset = calc_box_offset(matched_box, (x, y, w, h))
# Modify the tensor of the output result
result_tensor[matched_index] = torch.tensor((
1, # Object center
*offset, # Area offset
*[int(c == label) for c in range(len(CLASSES))] # Corresponding classification
), dtype=torch.float)
# Add index value
# Note that if two objects are positioned at the same anchor point at the same time, only one object can be recognized, where the later object will overwrite the previous object
if matched_index not in result_isobject_mask:
result_isobject_mask.append(matched_index)
# Skip pictures when no recognizable objects are found
if not result_isobject_mask:
image_tensors.pop()
result_tensors.pop()
result_isobject_masks.pop()
result_nonobject_masks.pop()
continue
# Adds the index of an area that does not contain objects in Anchors
for index, value in enumerate(negative_mapping):
if value:
result_nonobject_mask.append(index)
# Sort index list
result_isobject_mask.sort()
# Save batch
if len(image_tensors) >= batch_size:
prepare_save_batch(batch, image_tensors, result_tensors,
result_isobject_masks, result_nonobject_masks)
image_tensors.clear()
result_tensors.clear()
result_isobject_masks.clear()
result_nonobject_masks.clear()
batch += 1
# Save remaining batches
if len(image_tensors) > 10:
prepare_save_batch(batch, image_tensors, result_tensors,
result_isobject_masks, result_nonobject_masks)
def train():
"""Start training"""
# Create model instance
model = MyModel().to(device)
# Create multitasking loss calculator
loss_function = MyModel.loss_function
# Create parameter adjuster
optimizer = torch.optim.Adam(model.parameters())
# Record the change of accuracy of training set and verification set
training_obj_accuracy_history = []
training_cls_accuracy_history = []
validating_obj_accuracy_history = []
validating_cls_accuracy_history = []
# Record the highest validation set accuracy
validating_obj_accuracy_highest = -1
validating_cls_accuracy_highest = -1
validating_accuracy_highest = -1
validating_accuracy_highest_epoch = 0
# Tool functions for reading batches
def read_batches(base_path):
for batch in itertools.count():
path = f"{base_path}.{batch}.pt"
if not os.path.isfile(path):
break
x, (y, mask1, mask2) = load_tensor(path)
yield x.to(device), (y.to(device), mask1, mask2)
# Tool function for calculating accuracy
calc_accuracy = MyModel.calc_accuracy
# Start the training process
for epoch in range(1, 10000):
print(f"epoch: {epoch}")
# Train and modify the parameters according to the training set
# Switching the model to training mode will enable automatic differentiation, batchnorm and Dropout
model.train()
training_obj_accuracy_list = []
training_cls_accuracy_list = []
for batch_index, batch in enumerate(read_batches("data/training_set")):
# Divide input and output
batch_x, batch_y = batch
# Calculate predicted value
predicted = model(batch_x)
# Calculate loss
loss = loss_function(predicted, batch_y)
# Deriving function value from loss automatic differentiation
loss.backward()
# Use the parameter adjuster to adjust the parameters
optimizer.step()
# Clear leading function value
optimizer.zero_grad()
# Record the accuracy of this batch, torch no_ Grad stands for temporarily disabling the automatic differentiation function
with torch.no_grad():
training_batch_obj_accuracy, training_batch_cls_accuracy = calc_accuracy(batch_y, predicted)
# Output batch accuracy
training_obj_accuracy_list.append(training_batch_obj_accuracy)
training_cls_accuracy_list.append(training_batch_cls_accuracy)
print(f"epoch: {epoch}, batch: {batch_index}: " +
f"batch obj accuracy: {training_batch_obj_accuracy}, cls accuracy: {training_batch_cls_accuracy}")
training_obj_accuracy = sum(training_obj_accuracy_list) / len(training_obj_accuracy_list)
training_cls_accuracy = sum(training_cls_accuracy_list) / len(training_cls_accuracy_list)
training_obj_accuracy_history.append(training_obj_accuracy)
training_cls_accuracy_history.append(training_cls_accuracy)
print(f"training obj accuracy: {training_obj_accuracy}, cls accuracy: {training_cls_accuracy}")
# Check validation set
# Switching the model to validation mode will disable automatic differentiation, batchnorm and Dropout
model.eval()
validating_obj_accuracy_list = []
validating_cls_accuracy_list = []
for batch in read_batches("data/validating_set"):
batch_x, batch_y = batch
predicted = model(batch_x)
validating_batch_obj_accuracy, validating_batch_cls_accuracy = calc_accuracy(batch_y, predicted)
validating_obj_accuracy_list.append(validating_batch_obj_accuracy)
validating_cls_accuracy_list.append(validating_batch_cls_accuracy)
# Release the video memory occupied by predicted to avoid the error of insufficient video memory
predicted = None
validating_obj_accuracy = sum(validating_obj_accuracy_list) / len(validating_obj_accuracy_list)
validating_cls_accuracy = sum(validating_cls_accuracy_list) / len(validating_cls_accuracy_list)
validating_obj_accuracy_history.append(validating_obj_accuracy)
validating_cls_accuracy_history.append(validating_cls_accuracy)
print(f"validating obj accuracy: {validating_obj_accuracy}, cls accuracy: {validating_cls_accuracy}")
# Record the highest accuracy of the verification set and the current model state, and judge whether the record is still not refreshed after 20 training
validating_accuracy = validating_obj_accuracy * validating_cls_accuracy
if validating_accuracy > validating_accuracy_highest:
validating_obj_accuracy_highest = validating_obj_accuracy
validating_cls_accuracy_highest = validating_cls_accuracy
validating_accuracy_highest = validating_accuracy
validating_accuracy_highest_epoch = epoch
save_tensor(model.state_dict(), "model.pt")
print("highest validating accuracy updated")
elif epoch - validating_accuracy_highest_epoch > 20:
# After 20 training sessions, I still didn't refresh the record and ended the training
print("stop training because highest validating accuracy not updated in 20 epoches")
break
# Use the model state when the highest accuracy is achieved
print(f"highest obj validating accuracy: {validating_obj_accuracy_highest}",
f"from epoch {validating_accuracy_highest_epoch}")
print(f"highest cls validating accuracy: {validating_cls_accuracy_highest}",
f"from epoch {validating_accuracy_highest_epoch}")
model.load_state_dict(load_tensor("model.pt"))
# Check test set
testing_obj_accuracy_list = []
testing_cls_accuracy_list = []
for batch in read_batches("data/testing_set"):
batch_x, batch_y = batch
predicted = model(batch_x)
testing_batch_obj_accuracy, testing_batch_cls_accuracy = calc_accuracy(batch_y, predicted)
testing_obj_accuracy_list.append(testing_batch_obj_accuracy)
testing_cls_accuracy_list.append(testing_batch_cls_accuracy)
testing_obj_accuracy = sum(testing_obj_accuracy_list) / len(testing_obj_accuracy_list)
testing_cls_accuracy = sum(testing_cls_accuracy_list) / len(testing_cls_accuracy_list)
print(f"testing obj accuracy: {testing_obj_accuracy}, cls accuracy: {testing_cls_accuracy}")
# Display the correct rate change of training set and verification set
pyplot.plot(training_obj_accuracy_history, label="training_obj_accuracy")
pyplot.plot(training_cls_accuracy_history, label="training_cls_accuracy")
pyplot.plot(validating_obj_accuracy_history, label="validating_obj_accuracy")
pyplot.plot(validating_cls_accuracy_history, label="validating_cls_accuracy")
pyplot.ylim(0, 1)
pyplot.legend()
pyplot.show()
def eval_model():
"""Use the trained model to recognize the picture"""
# Create a model instance, load the trained state, and then switch to the verification mode
model = MyModel().to(device)
model.load_state_dict(load_tensor("model.pt"))
model.eval()
# Ask the picture path and display all possible areas of the face
while True:
try:
image_path = input("Image path: ")
if not image_path:
continue
# Build input
with Image.open(image_path) as img_original: # Load original picture
sw, sh = img_original.size # Original picture size
img = resize_image(img_original) # Zoom picture
img_output = img_original.copy() # Copy a picture to add a tag after it
tensor_in = image_to_tensor(img)
# Prediction output
predicted = model(tensor_in.unsqueeze(0).to(device))[0]
final_result = MyModel.convert_predicted_result(predicted)
# Mark on picture
draw = ImageDraw.Draw(img_output)
for label, box, obj_score, cls_score in final_result:
x, y, w, h = map_box_to_original_image(box, sw, sh)
score = obj_score * cls_score
color = "#00FF00" if CLASSES[label] == "with_mask" else "#FF0000"
draw.rectangle((x, y, x+w, y+h), outline=color)
draw.text((x, y-10), CLASSES[label], fill=color)
draw.text((x, y+h), f"{score:.2f}", fill=color)
print((x, y, w, h), CLASSES[label], obj_score, cls_score)
img_output.save("img_output.png")
print("saved to img_output.png")
print()
except Exception as e:
print("error:", e)
def eval_video():
"""Recognize video using trained models"""
# Create a model instance, load the trained state, and then switch to the verification mode
model = MyModel().to(device)
model.load_state_dict(load_tensor("model.pt"))
model.eval()
# Ask the video path, mark the area that may be the face, and save the new video
import cv2
font = ImageFont.truetype("FreeMonoBold.ttf", 20)
while True:
try:
video_path = input("Video path: ")
if not video_path:
continue
# Read input video
video = cv2.VideoCapture(video_path)
# Gets the number of frames per second
fps = int(video.get(cv2.CAP_PROP_FPS))
# Get video length and width
size = (int(video.get(cv2.CAP_PROP_FRAME_WIDTH)), int(video.get(cv2.CAP_PROP_FRAME_HEIGHT)))
# Create output video
video_output_path = os.path.join(
os.path.dirname(video_path),
os.path.splitext(os.path.basename(video_path))[0] + ".output.avi")
result = cv2.VideoWriter(video_output_path, cv2.VideoWriter_fourcc(*"XVID"), fps, size)
# Historical results used to reduce miscalculation
history_results = deque(maxlen = fps // 2)
# Frame by frame processing
count = 0
while(True):
ret, frame = video.read()
if not ret:
break
# opencv uses BGR and pilot uses RGB, so the channel order needs to be converted
frame_rgb = cv2.cvtColor(frame, cv2.COLOR_BGR2RGB)
# Build input
img_original = Image.fromarray(frame_rgb) # Load original picture
sw, sh = img_original.size # Original picture size
img = resize_image(img_original) # Zoom picture
img_output = img_original.copy() # Copy a picture to add a tag after it
tensor_in = image_to_tensor(img)
# Prediction output
predicted = model(tensor_in.unsqueeze(0).to(device))[0]
cls_result = MyModel.convert_predicted_result(predicted)
# Reduce misjudgment according to historical results
final_result = MyModel.fix_predicted_result_from_history(cls_result, history_results)
# Mark on picture
draw = ImageDraw.Draw(img_output)
for label, box, obj_score, cls_score in final_result:
x, y, w, h = map_box_to_original_image(box, sw, sh)
score = obj_score * cls_score
color = "#00FF00" if CLASSES[label] == "with_mask" else "#FF0000"
draw.rectangle((x, y, x+w, y+h), outline=color, width=3)
draw.text((x, y-20), CLASSES[label], fill=color, font=font)
draw.text((x, y+h), f"{score:.2f}", fill=color, font=font)
# Write frame to output video
frame_rgb_annotated = numpy.asarray(img_output)
frame_bgr_annotated = cv2.cvtColor(frame_rgb_annotated, cv2.COLOR_RGB2BGR)
result.write(frame_bgr_annotated)
count += 1
if count % fps == 0:
print(f"handled {count//fps}s")
video.release()
result.release()
cv2.destroyAllWindows()
print(f"saved to {video_output_path}")
print()
except Exception as e:
raise
print("error:", e)
def main():
"""Main function"""
if len(sys.argv) < 2:
print(f"Please run: {sys.argv[0]} prepare|train|eval")
exit()
# Assign an initial value to the random number generator so that each run can generate the same random number
# This is to make the process reproducible, or you can choose not to
random.seed(0)
torch.random.manual_seed(0)
# Select the operation according to the command line parameters
operation = sys.argv[1]
if operation == "prepare":
prepare()
elif operation == "train":
train()
elif operation == "eval":
eval_model()
elif operation == "eval-video":
eval_video()
else:
raise ValueError(f"Unsupported operation: {operation}")
if __name__ == "__main__":
main()
Preprocess the dataset and execute the training command:
python3 example.py prepare
python3 example.py train
Training results:
epoch: 42, batch: 555: batch obj accuracy: 0.9909388836542586, cls accuracy: 0.983006698089804
epoch: 42, batch: 556: batch obj accuracy: 0.9814650010596331, cls accuracy: 0.9774137503102507
epoch: 42, batch: 557: batch obj accuracy: 0.9878546962973783, cls accuracy: 0.9791485664639444
epoch: 42, batch: 558: batch obj accuracy: 0.9804549878809472, cls accuracy: 0.9869710882243454
epoch: 42, batch: 559: batch obj accuracy: 0.9874521037216837, cls accuracy: 0.9825083736509118
epoch: 42, batch: 560: batch obj accuracy: 0.9686452380905726, cls accuracy: 0.9792752544055597
epoch: 42, batch: 561: batch obj accuracy: 0.9850456887221628, cls accuracy: 0.981502172563625
epoch: 42, batch: 562: batch obj accuracy: 0.9667773027084426, cls accuracy: 0.979282967373775
epoch: 42, batch: 563: batch obj accuracy: 0.9744239536970148, cls accuracy: 0.9843711237906226
training obj accuracy: 0.9823339177948931, cls accuracy: 0.9797140932720472
validating obj accuracy: 0.9166056052234632, cls accuracy: 0.9772082398493264
stop training because highest validating accuracy not updated in 20 epoches
highest obj validating accuracy: 0.94078897076641 from epoch 21
highest cls validating accuracy: 0.9635325289895568 from epoch 21
testing obj accuracy: 0.9438541768431002, cls accuracy: 0.9637055484080282
It seems that the accuracy rate is good, but because YOLO only has one step, the misjudgment rate of whether to include objects is higher than that of fast RCNN 🙁.
Use the command of the trained model to recognize the picture, enter the picture path and press enter to generate the marked picture:
python3 example.py eval
Use the trained model to recognize the video command, enter the video path and press enter to generate the marked Video:
python3 example.py eval-video
The example after marking is as follows. It can be used, but the effect is a little worse than the previous one 🤒.
Write at the end
I have written several articles on recognizing the position of human face, and this is the last one. The next article will introduce the model of finding out which person is according to the face, which can be used to punch in and catch fugitives 😡.