Author home page( Silicon based workshop of slow fire rock sugar): Wenhuo rock sugar (Wang Wenbing) blog_ Silicon based workshop of slow fire rock sugar_ CSDN blog
Website of this article: https://blog.csdn.net/HiWangWenBing/article/details/122786566
catalogue
1.2 experimental architecture of k8s
1.4 K8S cluster construction mode selection
2.2 post installation inspection
Step 3: set up Docker environment (manual operation of cloud platform)
3.1 # install docker environment for each virtual server
3.2 start docker environment for each virtual server
3.3 modify docker configuration for K8S
Step 4: preparation before K8 installation
4.3. Set the static IP address of intranet (optional)
4.4 configure IPtable traffic bridging
Step 5: set up cluster K8S mananger node
5.1 add K8S repo: kubernetes repo
5.2 installing kubedm and kubelet
5.3 # build the role of mananger (join as mananger)
5.4 add K8S configuration: $home / kube/config
5.5. View the nodes of the cluster
Step 1: Cluster Planning
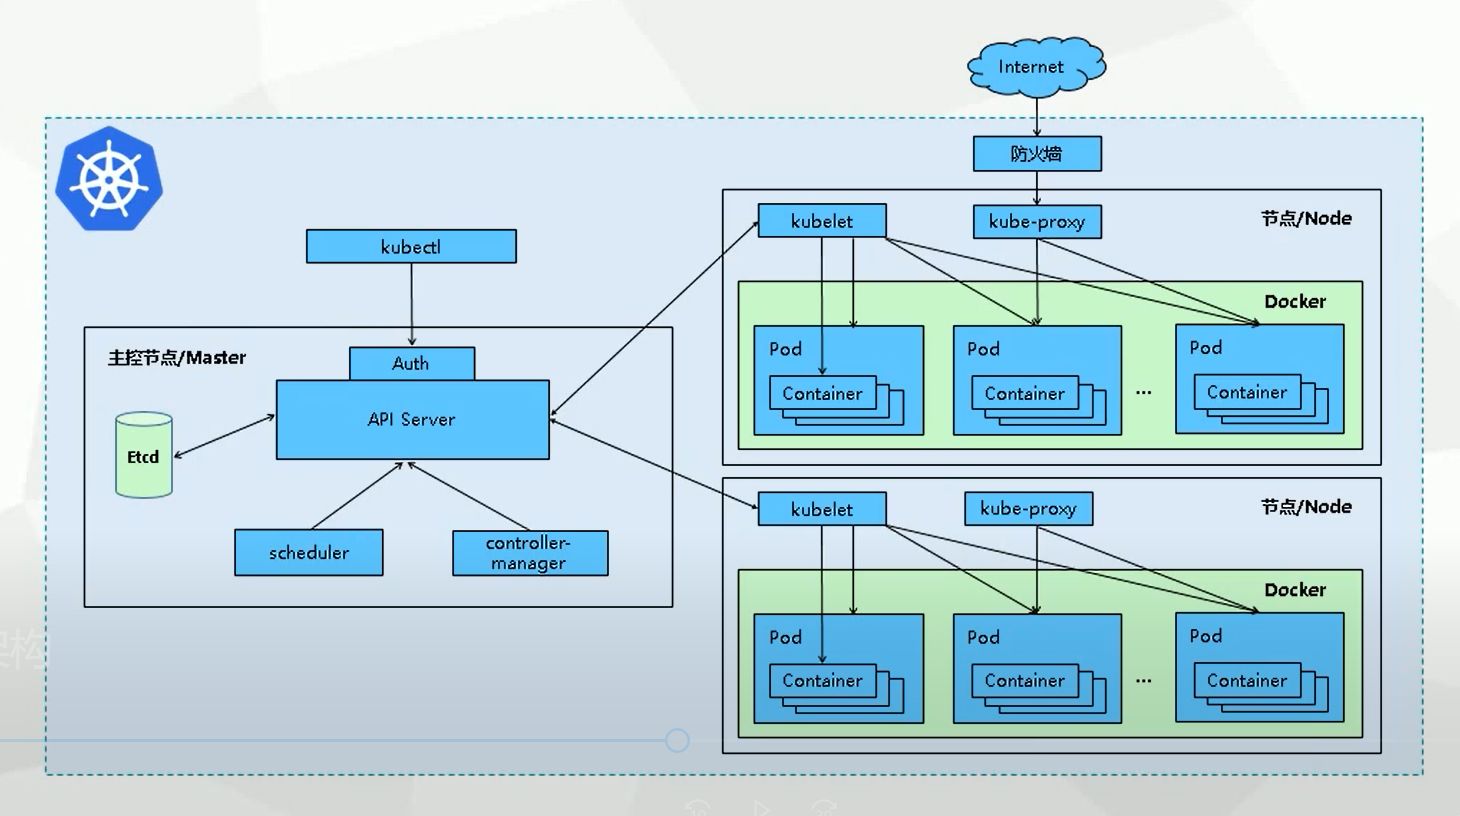
1.1 official structure of k8s
1.2 experimental architecture of k8s
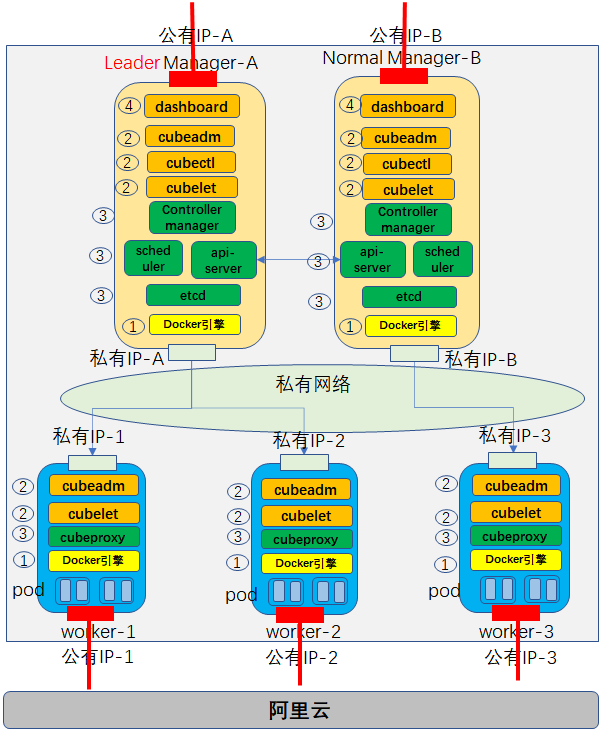
Build a cluster network with 2 mananger nodes and 3 # worker nodes.
1.3 main steps
Step 1: install the initial mananger node
Step 2: install the worker node (this chapter)
Step 3: install other mananger nodes
Step 4: installation of graphical management interface Dash Board
1.4 K8S cluster construction mode selection
Mode 1: minicube
Minicube can run Kubernetes tools locally. Minicube can run a single node Kubernetes cluster on personal computers (including Windows, macOS and Linux PC s), so that you can try Kubernetes or carry out daily development work;
Mode 2: kind
Tools like Kind and minicube allow you to run Kubernetes on your local computer. This tool needs to install and configure Docker;
Mode 3: kubedm
Kubedm is a K8s deployment tool that provides kubedm init and kubedm join commands to quickly deploy a Kubernetes cluster;
This paper chooses the third way
kubeadm is a tool launched by the official community for rapid deployment of kubernetes cluster. This tool can complete the deployment of a kubernetes cluster through two instructions;
(1) Create a Mananger leader node
$ kubeadm init
(2) Join the Node to the Master cluster
$kubedm join < IP and port of master node >
Therefore, it needs to be installed on both the Mananger node and the worker node.
Mode 4: binary package
Download the binary package of the distribution from Github, manually deploy and install each component and form a Kubernetes cluster. The steps are cumbersome, but it can make you have a clearer understanding of each component;
Mode 5: yum install
Install each component of Kubernetes through yum to form a Kubernetes cluster. However, the k8s version in yum source is relatively old, so this method is rarely used;
Mode 6: third party tools
Some great gods have encapsulated some tools, and use these tools to install the k8s environment;
Method 7: spend money to buy
Directly purchase a k8s public cloud platform like Alibaba cloud, and you can do it with one click;
1.5 official references
Installing kubeadm | Kubernetes
Step 2: build ECS
2.1 installing the server
(1) Server
- Create one server (you can also create five servers, two mananger nodes and three worker nodes at one time)
- All servers are on the same default network
- CPU: 2-core 4G (Master node has at least 2 CPUs)
- Standard shared (offset)
- Operating system: Alibaba Cloud Linux (fully compatible with CentOS, it is not recommended to install CentOS, because the official CentOS has not been supported and cannot support new functions)
(2) Network
- Assign public IP address
- Default VPC
- Use by traffic, 1M bandwidth
(3) Default security group
- Set the user name and password of the public network remote service server
- Add ports 80 and 8080 for subsequent nginx service testing.

2.2 post installation inspection
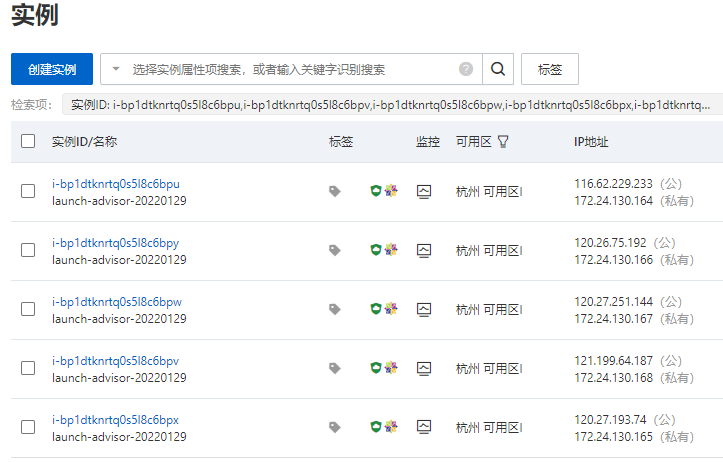
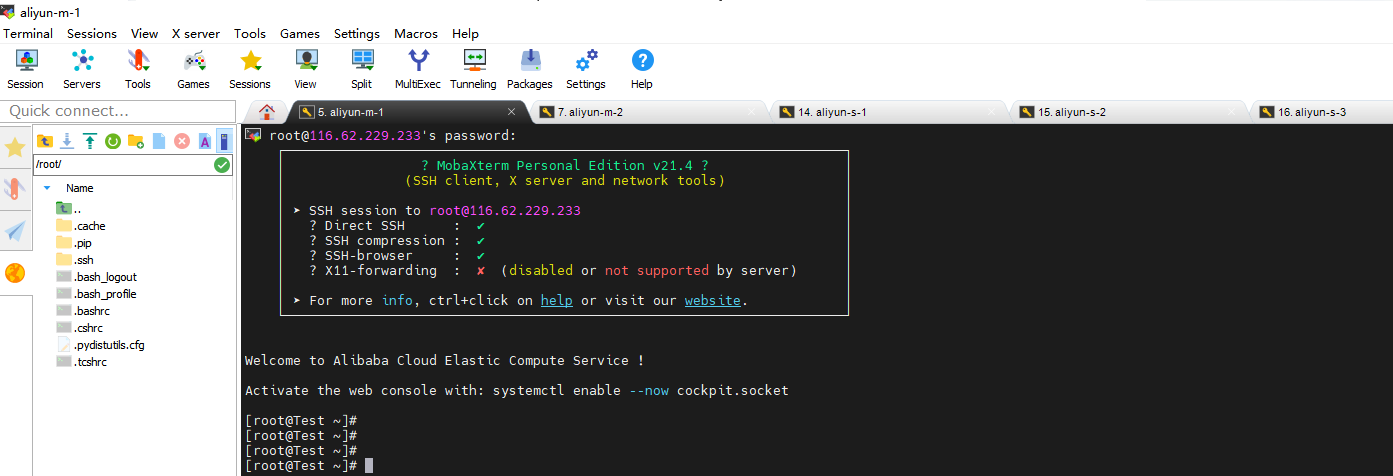
(1) Log in to each server through public IP
(2) Role the server: initial mananger
Public IP address: 121.40.221.28
Private IP address: 172.24.130.175
(3) Modify host name
The purpose of modifying the host name is to access the host through the host name later, rather than through the IP address.
Of course, if you need to access through the host name, you also need to modify the configuration to realize the mapping between the host name and IP address.
hostnamectl set-hostname k8s-master2
(4) Establish a mapping table between host name and IP address to access the host through host name
$ vim /etc/hosts
172.24.130.172 k8s-master1

172.24.130.172 etcd
172.24.130.172 registry
172.24.130.172 cluster-endpoint

172.24.130.175 k8s-master2
(5) Install ifconfig and ping tools (for hosts without ping tools)
$ yum install -y yum-utils

$ yum install iputils

$ yum install net-tools.x86_64
(6) You can ping through private IP
ping k8s-master1
ping k8s-node1
ping cluster-endpoint
Step 3: set up Docker environment (manual operation of cloud platform)
CentOS Docker installation - rookie tutorial
How nodes work | Docker Documentation
3.1 # install docker environment for each virtual server
(1) ssh to virtual server
(2) One click installation of docker environment
The yum config manager command is used to add, delete, modify and query the warehouse (/ etc/yum.repos.d /)
This command is not installed by default. It is in the yum utils package and can be installed through Yum install - y Yum utils
yum repolist all # Show all repositories
yum repolist enabled # Show all started repositories
yum repolist disabled # Show all disabled repositories
# Add Alibaba cloud image repo
$ yum-config-manager --add-repo http://mirrors.aliyun.com/docker-ce/linux/centos/docker-ce.repo

# Tsinghua mirror
$ yum-config-manager --add-repo https://mirrors.tuna.tsinghua.edu.cn/docker-ce/linux/centos/docker-ce.repo

# Official image
$ yum-config-manager --add-repo https://download.docker.com/linux/centos/docker-ce.repo
(3) Manual non one click installation
# uninstall
$ yum remove docker-ce
$ rm -rf /var/lib/docker

# Non one click installation of the latest version
yum install docker-ce docker-ce-cli containerd.io

# Non one click installation of the specified version
# Install a specific version through its complete package name, which is the package name (docker CE) plus the version string (second column),
# From the first colon (:) to the first hyphen, separated by a hyphen (-).
# For example: docker-ce-18.09.1.
yum install docker-ce-<VERSION_STRING> docker-ce-cli-<VERSION_STRING> containerd.io
3.2 start docker environment for each virtual server
$ systemctl start docker

$ docker version

$ docker ps

$ docker images

$ docker info
3.3 modify docker configuration for K8S
$ touch /etc/docker/daemon.json
$ vim /etc/docker/daemon.json
>>
{
  "registry-mirrors": ["https://obww7jh1.mirror.aliyuncs.com"],
  "exec-opts": ["native.cgroupdriver=systemd"]
}
"Exec opts": ["native. Cgroupdriver = SYSTEMd"] is required by K8S.
Limited K8S program runs in the background in the way of systemd.
# Restart docker
$ systemctl daemon-reload
$ systemctl restart docker
Step 4: preparation before K8 installation
4.1 turn off the firewall
The reason why the firewall should be closed is that the machines in the cluster need to communicate through the private network. If the firewall is not closed, the communication of the machines in the cluster may fail. When the K8S installation fails, it is difficult to locate the problem.
$ Temporarily disabled
$ systemctl stop firewalld
$ systemctl disable firewalld

# Setenforce is the selinux firewall configuration command of Linux. Executing setenforce 0 means closing the selinux firewall)
$ setenforce 0

# Permanently disabled
$ vim /etc/selinux/config
SELINUX=disabled
iptables firewall will filter and forward all network traffic. If it is an intranet machine, it will generally be closed directly, which will affect the network performance. However, k8s cannot be closed directly. K8s needs to be forwarded and modified by firewall. Of course, it also depends on the network mode used. If the network mode adopted does not need firewall, it can be closed directly.
4.2} close swap
Swap partition, in English, is swap, which means "exchange" and "physical transaction". Its function is that when the memory is insufficient, the operating system first saves the temporarily unused data in the memory into the exchange space of the hard disk to free up the memory for other programs to run, which is the same as the function of Windows virtual memory (pagefile.sys).
Store part of the memory data in the disk, which will degrade the performance. For performance consideration, it is recommended to turn off and increase the memory.
# Temporarily Closed
$ swapoff -a

# Permanent closure
$ vim /etc/fstab
>>
#/dev/mapper/centos-swap swap                    swap    defaults        0 0

# Use free -m to confirm that swap is closed. The swap part is 0
$ free -m
4.3. Set the static IP address of intranet (optional)
(1) ipconfig view network card name
(2) VIM / etc / sysconfig / network scripts / ifcfg - network card name
Modify the IP address according to the actual situation of your system.
master to configure:
BOOTPROTO="static" #
IPADDR="172.24.130.170" # IP
NETMASK="255.255.248.0" # mask
#GATEWAY="172.24.130.1" # Gateway address (using route -n, the first line is the default gateway)
#DNS1="8.8.8.8" # DNS server (cat /etc/resolv.conf view)
4.4 # configure IPtable traffic bridge
Method 1 (recommended)
$ cd /etc/sysctl.d
$ touch k8s.conf

$ vim k8s.conf

net.bridge.bridge-nf-call-ip6tables = 1
net.bridge.bridge-nf-call-iptables = 1
net.ipv4.ip_forward = 1
vm.swappiness=0

# Make the configuration file effective
$ modprobe br_netfilter
$ sysctl --system -p /etc/sysctl.d/k8s.conf
Method 2:
For RHEL/CentOS 7 , systems, network requests can be routed incorrectly because , iptables , are bypassed. Therefore, you also need to execute the following command to ensure that # net is in # sysctl # configuration bridge. Bridge NF call iptables is set to 1.
$ vi /etc/sysctl.conf

# Add the following
net.bridge.bridge-nf-call-ip6tables = 1
net.bridge.bridge-nf-call-iptables = 1
net.ipv4.ip_forward = 1

$ sysctl --system
Step 5: set up cluster K8S mananger node
Install docker kubelet kubedm on each work node
kubectl operates the cluster. You only need to configure the master.
# If there is a problem in the initialization process, use the following command to reset
$ kubeadm reset
$ rm -rf /var/lib/cni/
$ rm -f $HOME/.kube/config
$ systemctl daemon-reload && systemctl restart kubelet
5.1 add K8S repo: kubernetes repo
$ cat <<EOF > /etc/yum.repos.d/kubernetes.repo
[kubernetes]
name=Kubernetes
baseurl=https://mirrors.aliyun.com/kubernetes/yum/repos/kubernetes-el7-x86_64/
enabled=1
gpgcheck=1
repo_gpgcheck=1
gpgkey=https://mirrors.aliyun.com/kubernetes/yum/doc/yum-key.gpg https://mirrors.aliyun.com/kubernetes/yum/doc/rpm-package-key.gpg
EOF
cat /etc/yum.repos.d/kubernetes.repo
5.2 installing kubedm and kubelet
[root@iZbp16ikro46xndxi7u9pjZ sysctl.d]# docker images
REPOSITORY   TAG       IMAGE ID   CREATED   SIZE

[root@iZbp16ikro46xndxi7u9pjZ sysctl.d]# docker ps
CONTAINER ID   IMAGE     COMMAND   CREATED   STATUS    PORTS     NAMES
$ yum install -y kubelet kubeadm kubectl --disableexcludes=kubernetes

$ systemctl enable kubelet && systemctl start kubelet
- kubeadm: used to initialize the Cluster
- kubelet: installed on the node where pod and container need to be deployed, including mananger node.
- kubectl: This is the Kubernetes command line tool. kubectl allows you to deploy and manage applications, view various resources, and create, delete, and update various components.
5.3 # build the role of mananger (join as mananger)
(1) Get the token of the initial master node
Execute the following command on the leader mananger node
# Check the kubedm token on the master
$ kubeadm token list

TOKEN                     TTL         EXPIRES                USAGES                   DESCRIPTION                                                EXTRA GROUPS
6bq3xf.k2mdmcnitcud9hz2   1h          2022-02-04T16:10:01Z   authentication,signing   The default bootstrap token generated by 'kubeadm init'.   system:bootstrappers:kubeadm:default-node-token
jx01gc.ubt8nijtf0s059r8   12h         2022-02-05T02:47:48Z   authentication,signing   <none>                                                     system:bootstrappers:kubeadm:default-node-token
x436pa.ueo5bql4xvl3o5xx   12h         2022-02-05T02:32:40Z   authentication,signing   <none>                                                     system:bootstrappers:kubeadm:default-node-token


# If there is no result after executing kubedm token list, the token has expired
# By default, the token generated by kubedm is only valid for 24 hours. After that, you need to create a new token
$ kubeadm token create

# You can also generate a token that will never expire. Of course, there are security risks
$ kubeadm token create --ttl 0
(2) Get the certificate of master node connection
Execute the following commands on the master node:
# Check the discovery token CA cert hash on the master
$ openssl x509 -pubkey -in /etc/kubernetes/pki/ca.crt | openssl rsa -pubin -outform der 2>/dev/null | openssl dgst -sha256 -hex | sed 's/^.* //'


dfef78a1d7faf2411c0e5f5389cf39a73e27dc0afbea4cb0ab0a6945763c415e
(3) Directly follow the command below to generate the command to join the cluster
[root@k8s-master1 ~]# kubeadm token create --print-join-command
kubeadm join cluster-endpoint:6443 --token rml99d.0xpplmg1n6aiwg4h --discovery-token-ca-cert-hash sha256:dfef78a1d7faf2411c0e5f5389cf39a73e27dc0afbea4cb0ab0a6945763c415e
[root@k8s-master1 ~]#
(4) Key: obtain the control plane Certificate (this step is required only when the manager node is joined)
[root@k8s-master1 ~]# kubeadm init phase upload-certs --upload-certs
[upload-certs] Storing the certificates in Secret "kubeadm-certs" in the "kube-system" Namespace
[upload-certs] Using certificate key:
d6012d2739f3f6198653ed6ea726e826e93a80a26ab75c1c6068dcb24791176d
(5) Join the cluster as mananger
Execute the following commands on each mananger machine:
Different from ordinary nodes:
--control-plane --certificate-key d6012d2739f3f6198653ed6ea726e826e93a80a26ab75c1c6068dcb24791176d
# Execute the join command on the node
kubeadm join cluster-endpoint:6443 --token rml99d.0xpplmg1n6aiwg4h --discovery-token-ca-cert-hash sha256:dfef78a1d7faf2411c0e5f5389cf39a73e27dc0afbea4cb0ab0a6945763c415e --control-plane --certificate-key d6012d2739f3f6198653ed6ea726e826e93a80a26ab75c1c6068dcb24791176d
This node has joined the cluster and a new control plane instance was created:
* Certificate signing request was sent to apiserver and approval was received.
* The Kubelet was informed of the new secure connection details.
* Control plane (master) label and taint were applied to the new node.
* The Kubernetes control plane instances scaled up.
* A new etcd member was added to the local/stacked etcd cluster.
To start administering your cluster from this node, you need to run the following as a regular user:
mkdir -p $HOME/.kube
sudo cp -i /etc/kubernetes/admin.conf $HOME/.kube/config
sudo chown $(id -u):$(id -g) $HOME/.kube/config
Run 'kubectl get nodes' to see this node join the cluster.
5.4 add K8S configuration: $home / kube/config
(1) Method 1: file transfer
# On the master, set admin. In the master Conf is copied to node. Here is the scp method. It is also possible to upload manually by using the client
$ scp /etc/kubernetes/admin.conf root@10.11.90.5:/root/
$ sudo cp -i /root/admin.conf /root/.kube/config

(2)Method 2: copy the file content
# On mananger:
$ cat /root/.kube/config

# On node
$ mkdir -p /root/.kube
# touch /root/.kube/config
# vi /root/.kube/config
# paste

(3)Public part
$ sudo chown $(id -u):$(id -g) /root/.kube/config
5.5. View the nodes of the cluster
(1) View the docker image on the master2 machine
[root@k8s-master2 ~]# docker images
REPOSITORY                                                        TAG       IMAGE ID       CREATED        SIZE
calico/cni                                                        v3.22.0   f86797de8afd   6 days ago     235MB
calico/pod2daemon-flexvol                                         v3.22.0   59daef946c8c   6 days ago     21.4MB
calico/node                                                       v3.22.0   f109b1742d34   6 days ago     213MB
registry.aliyuncs.com/google_containers/kube-apiserver            v1.23.3   f40be0088a83   10 days ago    135MB
registry.aliyuncs.com/google_containers/kube-controller-manager   v1.23.3   b07520cd7ab7   10 days ago    125MB
registry.aliyuncs.com/google_containers/kube-scheduler            v1.23.3   99a3486be4f2   10 days ago    53.5MB
registry.aliyuncs.com/google_containers/kube-proxy                v1.23.3   9b7cc9982109   10 days ago    112MB
registry.aliyuncs.com/google_containers/etcd                      3.5.1-0   25f8c7f3da61   3 months ago   293MB
registry.aliyuncs.com/google_containers/coredns                   v1.8.6    a4ca41631cc7   4 months ago   46.8MB
registry.aliyuncs.com/google_containers/pause                     3.6       6270bb605e12   5
The key images here are:
- kube-apiserver
- kube-controller-manager
- kube-scheduler
- kube-proxy
- etcd
- coredns
remarks:
- kubelet, kubectl and kubedm do not exist in the form of docker image.
(2) View the running docker image on the master2 machine
[root@k8s-master2 ~]# docker ps
CONTAINER ID   IMAGE                                               COMMAND                  CREATED          STATUS          PORTS     NAMES
9ffe2142cf67   25f8c7f3da61                                        "etcd --advertise-cl Holmium 11 minutes ago   Up 11 minutes             k8s_etcd_etcd-k8s-master2_kube-system_706d75dbed33b74a9eb2a257c70ec8ca_0
bc94135d6e4e   registry.aliyuncs.com/google_containers/pause:3.6   "/pause"                 11 minutes ago   Up 11 minutes             k8s_POD_etcd-k8s-master2_kube-system_706d75dbed33b74a9eb2a257c70ec8ca_0
de65344e432f   f109b1742d34                                        "start_runit"            11 minutes ago   Up 11 minutes             k8s_calico-node_calico-node-788s9_kube-system_5f47e93c-d7ba-4f03-8492-16789ad63f5f_0
884909eda425   9b7cc9982109                                        "/usr/local/bin/kube Holmium 11 minutes ago   Up 11 minutes             k8s_kube-proxy_kube-proxy-lzk68_kube-system_d7c77067-caf7-49ac-b583-0bfc1f78a570_0
8254ff287759   registry.aliyuncs.com/google_containers/pause:3.6   "/pause"                 11 minutes ago   Up 11 minutes             k8s_POD_calico-node-788s9_kube-system_5f47e93c-d7ba-4f03-8492-16789ad63f5f_0
f30d014de71d   registry.aliyuncs.com/google_containers/pause:3.6   "/pause"                 11 minutes ago   Up 11 minutes             k8s_POD_kube-proxy-lzk68_kube-system_d7c77067-caf7-49ac-b583-0bfc1f78a570_0
5707a12084b6   99a3486be4f2                                        "kube-scheduler --au Holmium 11 minutes ago   Up 11 minutes             k8s_kube-scheduler_kube-scheduler-k8s-master2_kube-system_5808d7a2cc75abb3c980285a10a583a2_0
711fc3bb1684   registry.aliyuncs.com/google_containers/pause:3.6   "/pause"                 11 minutes ago   Up 11 minutes             k8s_POD_kube-scheduler-k8s-master2_kube-system_5808d7a2cc75abb3c980285a10a583a2_0
6494d274ee5a   b07520cd7ab7                                        "kube-controller-man Holmium 11 minutes ago   Up 11 minutes             k8s_kube-controller-manager_kube-controller-manager-k8s-master2_kube-system_f15dd52d7c99023d31ae7ecc988f1839_0
a81a458e22f8   f40be0088a83                                        "kube-apiserver --ad Holmium 11 minutes ago   Up 11 minutes             k8s_kube-apiserver_kube-apiserver-k8s-master2_kube-system_b6cd24ae8b5e810ea00d42fbebf0786c_0
8a3ef16155f3   registry.aliyuncs.com/google_containers/pause:3.6   "/pause"                 11 minutes ago   Up 11 minutes             k8s_POD_kube-controller-manager-k8s-master2_kube-system_f15dd52d7c99023d31ae7ecc988f1839_0
fef2527a8849   registry.aliyuncs.com/google_containers/pause:3.6   "/pause"                 11 minutes ago   Up 11 minutes             k8s_POD_kube-apiserver-k8s-master2_kube-system_b6cd24ae8b5e810ea00d42fbebf0786c_0
[root@k8s-master2 ~]#
The key images here are:
- kube-apiserver
- kube-controller-manager
- kube-scheduler
- kube-proxy
- etcd
- coredns
(3) On the master node, see the cluster node
[root@k8s-master1 ~]# kubectl get nodes
NAME          STATUS     ROLES                  AGE   VERSION
k8s-master1   Ready      control-plane,master   34h   v1.23.3
k8s-master2   Ready      control-plane,master   26s   v1.23.3
k8s-node1     NotReady   <none>                 23h   v1.23.3
k8s-node2     NotReady   <none>                 12h   v1.23.3
k8s-master1 Ready control-plane,master 34h v1.23.3
k8s-master2 Ready control-plane,master 26s v1.23.3
# View services in the cluster
$ kubectl get pods -A
[root@k8s-master1 ~]# kubectl get pods -A
NAMESPACE              NAME                                         READY   STATUS    RESTARTS      AGE
kube-system            calico-kube-controllers-566dc76669-2pkhv     1/1     Running   3 (11h ago)   34h
kube-system            calico-node-788s9                            1/1     Running   0             12m
kube-system            calico-node-cc8sp                            1/1     Running   3 (11h ago)   34h
kube-system            calico-node-sp6kl                            1/1     Running   1 (22h ago)   23h
kube-system            calico-node-z4bt5                            1/1     Running   0             12h
kube-system            coredns-6d8c4cb4d-mcjv8                      1/1     Running   3 (11h ago)   34h
kube-system            coredns-6d8c4cb4d-rxjh9                      1/1     Running   3 (11h ago)   34h
kube-system            etcd-k8s-master1                             1/1     Running   8 (11h ago)   34h
kube-system            etcd-k8s-master2                             1/1     Running   0             12m
kube-system            kube-apiserver-k8s-master1                   1/1     Running   7 (11h ago)   34h
kube-system            kube-apiserver-k8s-master2                   1/1     Running   0             12m
kube-system            kube-controller-manager-k8s-master1          1/1     Running   6 (12m ago)   34h
kube-system            kube-controller-manager-k8s-master2          1/1     Running   0             12m
kube-system            kube-proxy-9z2bm                             1/1     Running   3 (11h ago)   34h
kube-system            kube-proxy-k8q7w                             1/1     Running   0             12h
kube-system            kube-proxy-lzk68                             1/1     Running   0             12m
kube-system            kube-proxy-vh5hc                             1/1     Running   1 (22h ago)   23h
kube-system            kube-scheduler-k8s-master1                   1/1     Running   8 (12m ago)   34h
kube-system            kube-scheduler-k8s-master2                   1/1     Running   0             12m
kubernetes-dashboard   dashboard-metrics-scraper-799d786dbf-dkm47   1/1     Running   2 (11h ago)   34h
kubernetes-dashboard   kubernetes-dashboard-546cbc58cd-c55gt        1/1     Running   2 (11h ago)   34h

# Periodic view
$ watch -n 1 kubectl get pods -A
Appendix: other orders
# Delete a node:
$ kubectl delete node k8s-master2


# If there is a problem in the initialization process, use the following command to reset
$ kubeadm reset
$ rm -rf /var/lib/cni/
$ rm -f $HOME/.kube/config
$ systemctl daemon-reload && systemctl restart kubelet
Author home page( Silicon based workshop of slow fire rock sugar): Wenhuo rock sugar (Wang Wenbing) blog_ Silicon based workshop of slow fire rock sugar_ CSDN blog
Website of this article: https://blog.csdn.net/HiWangWenBing/article/details/122786566