Basic concepts of React
1, React originated from Facebook
React is a JS library developed by Facebook. Facebook believes that MVC cannot meet their expansion needs
2, Characteristics
1. react impractical template
2. react is not an MVC framework
3. Responsive
4. react is a lightweight js library
3, Principle
- Virtual DOM - in react, the DOM is abstracted into a JS object, which is used to update the real DOM, and the virtual DOM ensures that only the parts of the interface that are really changed are actually DOM operated
- diff algorithm -- compare the nodes level by level. As long as you traverse the tree once, you can update the whole DOM tree
4, react history
- 2013
Construction of React development environment
1, Main documents
- react.js core file
- react-dom.js renders the DOM in the page. The current file depends on the react core file
- babel.js ES6 is converted to ES5, and JSX syntax is converted to JavaScript, which is convenient for code compatibility of modern browsers
2, Introduction mode
It can be imported by downloading the code package or by CDN, usually using npm installation
The following describes how to install through npm command
- React core package - npm i react --save
- react-dom- npm i react-dom --save
- babel- npm i babel-standalone --save
The order of introducing these three packages is: react - > react DOM - > Babel
3, Create the first react application
1. Preparation project
npm init
npm i react --save
npm i react-dom --save
npm i babel-standalone --save
2. Project directory

3. Project code
<!--
 * @Author: Coan
 * @Date: 2021-05-13 18:01:33
 * @LastEditors: Coan
 * @LastEditTime: 2021-05-13 22:36:54
 * @FilePath: /React/helloReact.html
 * @Description:
-->
<!DOCTYPE html>
<html lang="en">
  <head>
    <meta charset="UTF-8" />
    <meta name="viewport" content="width=device-width, initial-scale=1.0" />
    <title>HelloReact</title>
    <script src="./node_modules/react/umd/react.development.js"></script>
    <script src="./node_modules/react-dom/umd/react-dom.development.js"></script>
    <script src="./node_modules/babel-standalone/babel.min.js"></script>
  </head>
  <body>
    <!-- To create a root node, a page needs to have a root node, and the content under this node will be deleted react Managed -->
    <div id="demoReact"></div>
    <script type="text/babel">
      // jsx syntax = = extended syntax of JavaScript XML
      // Advantages: 1 More efficient implementation; 2.jsx is type safe, and errors can be found in time during compilation; 3. It will be easier and faster to write templates when using jsx
      // [note] the HTML tag in jsx must be written according to w3c specification, and the tag must be closed
      let myDom = <h1>hello react</h1>;
      ReactDOM.render(myDom, document.getElementById('demoReact'));
    </script>
  </body>
</html>
Basic usage of JSX syntax
Definition: jsx syntax = = extended syntax of JavaScript XML
advantage:
1. Higher efficiency of implementation;
2. jsx is type safe, and errors can be found in time during compilation;
3. It will be easier and faster to write templates when using jsx
[note] the HTML tag in jsx must be written according to w3c specification, and the tag must be closed
1, Notes
{/ * here is the comment content * /}
let MyDom = <div>hello,We need to make a comment here. The content is'react',Here we go{/*react*/}</div>
2, Multiline label
You need a parent element to wrap multiple lines of labels
let MyDom = (
	<div>
    <p>hello</p>
    <p>We need to use multiline labels here</p>
    <p>Here we go</p>
  </div>
)
Advanced use of JSX syntax
1, Expressions used in jsx
If we want to use expressions in jsx, we need to put the expressions into a pair of {}
let text = 'Hello'
let num = 9527
let myDom = (
  <div>
  	<div>{text}</div>
    <div>{num}</div>
    {/* calculation */}
    <div>{num + 1}</div>
  </div>
)
2, Functions used in jsx
Functions used in jsx can be used in {}
function fun(obj){
  return `name is ${obj.name}, and age is {obj.age}`
}
let user = {
  name: "coan",
  age: 18
}
let myDom = (
  <div>{fun(user)}</div>
)
3, Encapsulate jsx files separately
You can separately package a js file about jsx in the project directory to beautify the code and distinguish logic
1. Project directory

2,helloReact.html
<!--
 * @Author: Coan
 * @Date: 2021-05-13 18:01:33
 * @LastEditors: Coan
 * @LastEditTime: 2021-05-13 22:36:54
 * @FilePath: /React/helloReact.html
 * @Description:
-->
<!DOCTYPE html>
<html lang="en">
  <head>
    <meta charset="UTF-8" />
    <meta name="viewport" content="width=device-width, initial-scale=1.0" />
    <title>HelloReact</title>
    <script src="./node_modules/react/umd/react.development.js"></script>
    <script src="./node_modules/react-dom/umd/react-dom.development.js"></script>
    <script src="./node_modules/babel-standalone/babel.min.js"></script>
  </head>
  <body>
    <div id="demoReact"></div>
    <script src="./jsx.js" type="text/babel"></script>
  </body>
</html>
3,jsx.js
/*
 * @Author: Coan
 * @Date: 2021-05-14 10:29:43
 * @LastEditors: Coan
 * @LastEditTime: 2021-05-14 10:33:48
 * @FilePath: /React/jsx.js
 * @Description:
 */
let myDom = (<h1>hello react</h1>);
ReactDOM.render(myDom, document.getElementById('demoReact'));
4, Use in ternary (jsx) operators
let answer = "can't"
let myDom = (<div>You will react Well?{answer}!!!{answer==="can't"?"That's not good collection attention!!":"You lie!"}</div>)
5, Rendering arrays in jsx
let arr = [
	<p>arr1</p>,
  <p>arr2</p>,
  <p>arr3</p>
]
let myDom = (<div>{arr}</div>)
6, How to set html tag attribute in jsx
let text = 'This is a hyperlink literally'
let linkUrl = "http://www.baidu.com"
let domStyle = {
  marginTop: '50px',
  color: 'red',
  fontSize: '28px',
}
let myDom = <a href={linkUrl} style={domStyle}>{text}</a>
7, Set html tag class properties in jsx
[note] the attribute class cannot be used directly in jsx, because class is a js keyword. If necessary, you can use className instead
let myDom = (<div className="demoStyle">stay jsx Medium setting html Class properties of tags</div>)
.demoStyle {
  color: red;
  background-color: blue
}
React list
1, map method traversal
map method to render the list needs to bind a unique key value during each traversal, so that react can be more convenient and efficient when traversing the list using diff algorithm
let arr = ['eat', 'sleep', 'play']
let myDom = arr.map((item, index) => {
  return <p key={index}>{item}</p>
})
In the traversal process, if there is too much content after retuen and it needs to be written on a new line, it needs to be wrapped with ()
let arr = ['eat', 'sleep', 'play']
let myDom = arr.map((item, index) => {
  return (
  	<p key={index}>{item}</p>
  )
})
2, for in method loop traversal
for in method loop traversal
let arr = [1,2,3]
function fun(){
  let newArr = []
  for(let index in arr){
    newArr.push(<p key={index}>{arr.index}</p>)
  }
  return newArr
}

ReactDOM.render(fun(),document.getElementById('demoReact'))
3, Similarly, forEach and for loops
Similarly, forEach and for loops can also traverse the loop list, but the map method is simpler
4, Case
Add a click event to the list rendering, change the color of the click item, and call the render function again
let arr = ['eat', 'sleep', 'play']
let index = -1

function fun(){
  let myDom = arr.map((v, i) => {
    return <p key={i} style={{color: index == i ? 'red' : ''}} onClick={() => {index = i; render()}}>{v}</p>
  })
  return myDom
}

function render(){
  ReactDOM.render(fun(),document.getElementById('demoReact'))
}
render()
React traversal object
1, Value taking operation of objects in native JavaScript
let obj = {
  name: 'coan',
  age: 18
}

console.log(obj.name) // Passing point value
console.log(obj[age]) // Value through []
// If the key value of an object is a variable, it cannot be obtained in point mode

console.log(Object.keys(obj)) // Return array type data, with the content of the key of the object
console.log(Object.values(obj)) // Returns array type data, with the content of the value of the object
2, React traversal object
let obj = {
  name: 'coan',
  age: 18
}
let myDom = (<div>
  {Object.keys(obj).map((v, i) => {
    return <p>key:{v}----value:{obj[v]}</p>
  })}
</div>)
Fundamentals of React component oriented programming
React component is a very important concept. Through components, the ui part of the page can be divided into independent and highly reusable parts, so that each developer can focus more on individual parts.
1, What is a component
Component and componentization:
Component: it is the code set used to realize the local functions of the page, simplify the complexity of the page and improve the operation efficiency
Componentization: if the current program is completed using components, we can say that it is a componentized application
1. High coupling and low cohesion
High coupling: put the logically close content in one component
Low cohesion: weaken the dependency of different components as much as possible, and make each component as independent as possible
2. Important contents of components
Construction mode
Properties of components
life cycle
3. Evolution process
Traditional components have several obvious characteristics:
1. Simple packaging
2. Simple life cycle
3. Significant data flow
When a project is complex, the traditional componentization can not combine the structure style and behavior well, which makes the project difficult to maintain
4. Three parts of react component
1. Attribute props
2. Status state
3. Life cycle
2, Creation of components
1. Function component / stateless component
function MyCom(){
  return (
    <div>This is a stateless component</div>
  )
}
// Call component [component is a custom label]
let com = (
  <div>
  	<MyCom/>
  	<MyCom></MyCom>
	</div>
)
ReactDOM.render(com, document.getElementById('demoReact'))
2. Parent child component
// Define subcomponents
function MyComA(){
  return(
    <h1>This is a subcomponent A</h1>
  )
}
function MyComB(){
  return(
    <h1>This is a subcomponent B</h1>
  )
}
function MyComC(){
  return(
    <h1>This is a subcomponent C</h1>
  )
}

// Parent component call
function ComP(){
  return (
    <div>
    	<MyComA/>
    	<MyComB/>
    	<MyComC/>
    </div>
  )
}

ReactDOM.render(<Comp/>, document.getElementById('demoReact'))
3. Class component
class MyCom extends React.Component{
  render(){
    return(
      <div>Class component</div>
    )
  }
}
let com = <MyCom/>

ReactDOM.render(com, document.getElementById('demoReact'))
Fundamentals of React component oriented programming props
1, What is props
Props is an important attribute in react and the external interface of components. Using props, we can transfer data from the outside to the inside of the component, or from the parent component to the self component.
[note] we cannot modify our props, whether it is a stateless component or a class component
2, Stateless components use props
1. Components transfer simple data to external components
function Com(props){
  return(
    <div>This is a stateless component---External transfer data are:{props.text}</div>
  )
}
ReactDOM.render(<Com text='This is passed externally to props Data text' />,document.getElementById('demoReact'))
2. Components pass variables to external components
function Com(props){
  return(
    <div>This is a stateless component---External transfer data are: name:{props.name}---age:{props.age}</div>
  )
}
let name = 'coan'
let age = 18
ReactDOM.render(<Com name={name} age={age} />,document.getElementById('demoReact'))
If you need to pass many variables into a component, you can use ES6 to extend operator syntax to make code look more concise
function Com(props){
  return(
    <div>This is a stateless component---External transfer data are: name:{props.name}---age:{props.age}</div>
  )
}
let propsObj = {
  name : 'coan',
	age : 18
}
ReactDOM.render(<Com {...propsObj} />,document.getElementById('demoReact'))
3, Class components use props
1. Pass simple data
calss Com extends React.Component{
  render(){
    return(
      <div>This is a class component---The data transmitted externally are: name:{this.props.name}---age:{this.props.age}</div>
    )
  }
}
ReactDOM.render(<Com name='Class component props data coan' age='Class component props Data 18' />,document.getElementById('demoReact'))
2. Transfer variable
calss Com extends React.Component{
  render(){
    return(
      <div>This is a class component---The data transmitted externally are: name:{this.props.name}---age:{this.props.num}</div>
    )
  }
}
let propsObj = {
	name: 'coan',
	aga: 18
}
ReactDOM.render(<Com {...propsObj} />,document.getElementById('demoReact'))
props advanced defaults and validation
Props verification: used to verify whether the value passed in meets the expected type or requirements [Note: please cancel props verification in the online mode, because props verification will only report errors in the debugging information, but will not affect the data display]
Props default value: when we have no data to pass into the component, but have to display something, we need to set props default value to help us achieve this effect
1, Default value and verification of stateless component props
1. Setting of default value of stateless component props
The default value requires the defaultProps setting
function Com(props){
  return (
    <div>This is a stateless component---{props.text}</div>
  )
}
Com.defaultProps = {
  text: 'This is props.text Default value for'
}
// If < 15 X version of react, then we can use 𞓜 to achieve the default value
// function Com(props){
//   return (
//     < div > this is a stateless component -- {props.text | 'this is the default value definition method before version 15.x'} < / div >
//   )
// }
ReactDOM.render(<Com text='This is props.text Transfer data of'/>, document.getElementById('demoReact'))
2. Use of stateless component props verification
- Reference the prop tyoes library NPM install prop type -- save
Com.propTypes = {
	name: PropTypes.string // Verify that the data passed in by props of name must be of type string
  age: PropTypes.number.isRequired // Verify that the data passed in by age props must be of type number and cannot be empty
}
For more props verification checks, please move to the official document: use PropTypes for type checking[ https://zh-hans.reactjs.org/docs/typechecking-with-proptypes.html ]
2, props default value and validation of class components
1. Traditional writing method of default value and verification of class component props
The default value setting of props and the traditional writing method of verification of class components are the same as that of stateless components
2. Use the static keyword in the class component to set the default value of props
class Com extends React.Component{
  static defaultProps = {
    text: 'This is using static Keyword setting props Default value'
  }
	render(){
    return(
      <div>This is a class component---{this.props.text}</div>
    )
  }
}
React rendering external data and exercises
A CSGO map list exercise that can be converted from Chinese to English
<!--
 * @Author: Coan
 * @Date: 2021-05-13 18:01:33
 * @LastEditors: Coan
 * @LastEditTime: 2021-05-15 17:08:32
 * @FilePath: /React/helloReact.html
 * @Description: A copy that can be converted from Chinese to English CSGO Map list exercise
-->
<!DOCTYPE html>
<html lang="en">
  <head>
    <meta charset="UTF-8" />
    <meta name="viewport" content="width=device-width, initial-scale=1.0" />
    <title>HelloReact</title>
    <script src="./node_modules/react/umd/react.development.js"></script>
    <script src="./node_modules/react-dom/umd/react-dom.development.js"></script>
    <script src="./node_modules/babel-standalone/babel.min.js"></script>
  </head>
  <body>
    <div id="demoReact"></div>
    <script type="text/babel">
      let btnV = 'en'; // Variables used to control whether Chinese or English is displayed
      let ComC = (props) => { // Define the sub component to display the map list, and props is the value passed from the parent component
        return (
          <div>
            <div style={{ display: btnV === 'en' ? 'block' : 'none' }}>
              {props.arrE.map((v, i) => {
                return <p key={i}>{v}</p>;
              })}
            </div>
            <div style={{ display: btnV === 'ch' ? 'block' : 'none' }}>
              {props.arrC.map((v, i) => {
                return <p key={i}>{v}</p>;
              })}
            </div>
          </div>
        );
      };

      let arrE = [ // English map list
        'de_inferno',
        'de_train',
        'de_mirage',
        'de_nuke',
        'de_dust2',
        'de_overpass',
        'de_vertigo',
      ];
      let arrC = [ // Chinese map list
        'Purgatory town',
        'Train parking station',
        'Desert maze',
        'Nuclear Crisis ',
        'Hot sand cityⅡ',
        'Death amusement park',
        'Death building',
      ];

      let ComP = () => { // Define the parent component, write the title and control buttons, and introduce the sub components of the map list
        return (
          <div>
            <h1>CSGO Map name in</h1>
            <button
              onClick={() => {
                btnV === 'en' ? (btnV = 'ch') : (btnV = 'en');
                render();
              }}
            >
              en/ch
            </button>
            <ComC arrE={arrE} arrC={arrC} />
          </div>
        );
      };

      function render() { // Encapsulate the render method into a function. When the page changes, we can call this function to re render react, so as to change the data content bound in the page
        ReactDOM.render(ComP(), document.getElementById('demoReact'));
      }
      render();
    </script>
  </body>
</html>
state Foundation of React
1, What is state
state -- status
The essential difference between state and props: props is the external interface of the component, and state is the interface within the component team
Props: other components can be referenced within the component, and the references between components form a tree interface. If the lower component needs to use the data of the upper component, the upper component can transfer the data through the props attribute in the lower component. Therefore, props is the external interface of the component
State: in addition to using the data transmitted by the upper components, the component may also have data to be managed. The attribute of the internal management data is state
2, Why use state
Let's recall the case we did in the previous chapter - the case of Chinese English switching of CSGO map. When the data changes, we encapsulated the render function to manually modify the content of page data. This is not ideal. We want to realize automatic monitoring and change, which is also a major focus in react design.
In the react project with state, we only need to pay attention to the data. When the data changes, the page will change automatically, and the state is equal to the data. That is, when the state / data changes, the data binding content in the corresponding page will be changed automatically by react.
This is also called declarative rendering - that is, we don't need to pay attention to all data change operations. As long as we declare the data, react will automatically change the data accordingly
3, Main differences between state and props
state is variable
Props is read-only relative to the current component. If we want to modify the data in props, we can only modify the data passed to the parent component of the current component data
4, Use of state
[note] if we want to use state, we can't use stateless components but class components
class Com extends React.Component{
  // In ES6, whether subclasses write constructors or not, constructors are automatically added to classes when new instances are created
  // Of course, we can not write constructor, but if we do, we must write super() in it
  // super() is the constructor that points to the parent class
  // If we want to use props in the constructor, we must write props
  constructor(props){
    super(props)

    // Define state
    this.state = {
      naem: 'coan'
    }
  }
  render(){
    return(
    	<div>
        <p>This class is a component---state The value of is:{this.state.name}</p>
      </div>
    )
  }
}
5, Modification of state data
It cannot be modified directly. You need to call this Setstate ({key: newvalue}) method
this.setState() method is an asynchronous method. When this method is called, react will automatically trigger render to re render the page
So let's modify the above case
class Com extends React.Component{
  // In ES6, whether subclasses write constructors or not, constructors are automatically added to classes when new instances are created
  // Of course, we can not write constructor, but if we do, we must write super() in it
  // super() is the constructor that points to the parent class
  // If we want to use props in the constructor, we must write props
  constructor(props){
    super(props)

    // Define state
    this.state = {
      naem: 'coan'
    }
  }
  render(){
    return(
    	<div>
        <p>This is a class component---state The value of is:{this.state.name}</p>
        <button onClick={() => {
        	this.state.name === 'Cohen'
          	? this.setState({ name: 'coan' })
        		: this.setState({ name: 'Cohen' });
     			}}
        >
          Cohen/coan
      	</button>
  		</div>
    )
  }
}
Advanced state of React
1, Asynchronous operation of state
this.setState() is asynchronous
class Com extends React.Component{
  constructor(props){
    super(props)
    this.state = {
      name: 'coan'
    }
  }
  fun = () => {
    this.setState({
      name: 'Coan'
    })
    console.log(this.state.name) // 'coan' will be printed here because of this Setstate is asynchronous
  }
  render(){
    return (
    	<div>
        <button onClick={this.fun}>modify</button>
        {this.state.name}
      </div>
    )
  }
}
As shown in the above example, we found in the print after the click event is modified, because this The setstate () method is an asynchronous operation, so the subsequent printing is still the initial data value. If we want to get the modified value, we can use this The second parameter of the setstate () method, which is a callback function
// For example, we modify the code in the fun() function to
this.setState({
	name: 'Coan'
}, () => {
  console.log(this.state.name) // The result printed here is the modified name value: coon
})
2, Insert string labels using state
To insert a string tag, you need to use dangerouslysetinnerhtml = {_html: the string you want to insert}}
class Com extends React.Component{
  constructor(props){
    super(props)
    this.state = {
      name: 'coan',
      newHtmlAge: '<h1>18</h1>'
    }
  }
  render(){
    return(
      <div>
        <div>{this.state.newHtmlAge}</div>
        <div dangerouslySetInnerHTML={{__html:this.state.newHtmlAge}}></div>
      </div>
    )
  }
}
React lifecycle
The life cycle of a component can be divided into three states:
- Mounting: real DOM inserted
- Updating: being re rendered
- Unmounting: removed from real DOM
Life cycle methods include:
- componentWillMount is invoked before rendering and the client is also on the server side.
- componentDidMount: call after the first rendering, only on the client side. After that, the component has generated the corresponding DOM structure, which can be accessed through this Getdomnode(). If you want to work with other JavaScript frameworks, you can invoke setTimeout, setInterval, or send AJAX requests in this method (to prevent asynchronous operations blocking UI).
- componentWillReceiveProps is called when the component receives a new prop (Updated). This method will not be called when initializing render.
- shouldComponentUpdate returns a Boolean value. Called when the component receives a new props or state. Not called during initialization or when using forceUpdate.
It can be used when you confirm that you do not need to update the component. - componentWillUpdate is called when the component receives a new props or state but has not yet render ed. Not called during initialization.
- componentDidUpdate is called immediately after the component completes updating. Not called during initialization.
- componentWillUnmount is called immediately before the component is removed from the DOM.
For a detailed description of these methods, please refer to Official documents.
mount
When a component instance is created and inserted into the DOM, its life cycle call sequence is as follows:
to update
The update is triggered when the props or state of the component changes. The life cycle calling sequence of component update is as follows:
- static getDerivedStateFromProps()
- shouldComponentUpdate()
- render()
- getSnapshotBeforeUpdate()
- componentDidUpdate()
uninstall
When a component is removed from the DOM, the following method is called:
error handling
When an error is thrown in the constructor of the rendering process, lifecycle, or subcomponent, the following method will be called:
ref forwarding of React
1, What is refs forwarding
A ref data is provided in react (it cannot be used in stateless components because stateless components have no instances)
Represents the reference of the real instance of the current component, and it returns the element bound to the current attribute
Identify the elements inside the component -- easy for us to find
2, Use of ref
1. String mode
2. Callback function (recommended)
3,React.createRef()_ (a new method provided by react16.3)
3, Use ref in string mode
class Com extends React.Component{
  fun = () => {
    console.log(this.refs.demoInput.value)
  }
  render(){
    return(
      <div>
      	This class is a component
        <input type="text" ref="demoInput" placeholder="Please enter" />
        <button onClick={this.fun}>Click to get the value of the input box</button>
      </div>
    )
  }
}
4, Using ref as callback function
The function is mounted on the dom node or component. The input parameter (line parameter) of the function is the dom node. Its effect is the same as that of the string method, which is a reference to obtain the value
class Com extends React.Component{
  fun = () => {
    console.log(this.inputText.value)
  }
  render(){
    return(
      <div>
      	This class is a component
        <input type="text" ref={(input)=>{this.inputText=input}} placeholder="Please enter" />
        <button onClick={this.fun}>Click to get the value of the input box</button>
      </div>
    )
  }
}
5, React Use ref in createref() mode
Assign the value to a variable, mount it on the node or component through ref, and use the current attribute of ref to get the node
class Com extends React.Component{
  constructor(props){
    super(props)
    this.myRef = React.createRef()
  }
  fun = () => {
    console.log(this.myRef.current.value)
  }
  render(){
    return(
      <div>
      	<input type="text" ref={this.myRef} placeholder="Please enter" />
        <button onClick={this.fun}>Click to get the value of the input box</button>
      </div>
    )
  }
}
6, Officials suggest that in the project, do not use refs excessively to process logic, and give priority to state
React event and this
1, react event Foundation
The event is handled in react. The binding event uses the small hump naming method. When binding the function, you can't add () - > if you add () function, it will be executed immediately
2, Modify this point
1. bind in place
2. The function is created through the shear function
3. Binding in advance in constructor
4. Write the call of the event as the call method of the arrow function
class Com extends React.Component{
  constructor(props){
    super(props)
    this.fun3 = this.fun3.bind(this)
  }
  fun1(){
    console.log(this)
  }
  fun2 = () => {
    console.log(this)
  }
  fun3(){
    console.log(this)
  }
  fun4(){
    console.log(this)
  }
  render(){
    return(
      <div>
        <button onClick={this.fun1.bind(this)}>bind Mode binding</button>
        <button onClick={this.fun2}>Create binding with arrow function</button>
        <button onClick={this.fun3}>constructor Early binding</button>
        <button onClick={()=>{this.fun4()}}>Arrow function call binding</button>
      </div>
    )
  }
}
3, react event parameters
1. bind mode parameter transfer
2. Arrow function call pass parameter
class Com extends React.Component{
  fun = (arg) => {
    console.log(arg)
  }
  render(){
    return(
      <div>
        <button onClick={this.fun.bind(this,'This is bind Parameters passed')}>bind Mode transmission parameter</button>
        <button onClick={()=>{this.fun('This is the argument passed by the arrow function')}}>Call arrow function parameter</button>
      </div>
    )
  }
}
3. The arrow function call passes the event object
class Com extends React.Component{
  fun = (arg, e) => {
    console.log(arg)
    console.log(e)
  }
  render(){
    return(
      <div>
        <button onClick={(e)=>{this.fun('This is the argument passed by the arrow function',e)}}>Arrow function call pass parameter</button>
      </div>
    )
  }
}
React conditional rendering
1, What is conditional rendering
Render only part of it according to the change of state
2, if statement
if is not allowed in jsx
class Com extends React.Component{
  constructor(props){
    super(props)
    this.state = {
      bool: true
    }
  }
  fun(){
    this.setState({
      bool: !this.state.bool
    })
  }
  render(){
    let text
    if(this.state.bool){
      text = 'bool is true'
    }else{
      text = 'bool is false'
    }
    return(
    	<div>
        <button onClick={this.fun.bind(this)}>Click to modify the rendering conditions</button>{text}
      </div>
    )
  }
}
3, Ternary operator
class Com extends React.Component{
  constructor(props){
    super(props)
    this.state = {
      bool: true
    }
  }
  fun(){
    this.setState({
      bool: !this.state.bool
    })
  }
  render(){
    return(
    	<div>
        <button onClick={this.fun.bind(this)}>Click to modify the rendering conditions</button>{this.state.bool?'bool is true':'bool is false'}
      </div>
    )
  }
}
4, bind mode
React status promotion
1, What is state improvement
In react, if multiple components need to reflect the same change data, we need to promote their state to their nearest parent component
That is, when multiple sub components need to use each other's state, we need to use state promotion
2, Use of state promotion
class Demo1 extends React.Component{
  constructor(props){
    super(props)
  }
  render(){
    return(
      <div>this is demo1---{this.props.text}</div>
    )
  }
}
class Demo2 extends React.Component{
  constructor(props){
    super(props)
  }
  render(){
    return(
      <div>this is demo2---{this.props.text}</div>
    )
  }
}
class DemoP extends React.Component{
  constructor(props){
    super(props)
    this.state = {
      demoCText: 'this is a text,and all of demoCs can use it'
    }
  }
  fun = () => {
    this.setState({
      demoCText: 'this is the revused demoCText'
    })
  }
  render(){
    return(
      <div>
        this is demoP
      	<Demo1 text={this.state.demoCText} />
        <Demo2 text={this.state.demoCText} />
        <button onClick={this.fun}>click to change the demoCText</button>
      </div>
    )
  }
}
ReactDOM.render(<demoP />, document.getElementById('demoReact'))
create react app (React scaffold) of React is basically created
Create react app is a react scaffold tool officially launched by FaceBook
To use react scaffolding tools, you must rely on the node environment
1, Installation (npm installation)
NPM install create react app - G global install react scaffolding tool
2, View scaffold version
create-react-app --version
[episode] (for macOS)
If your terminal spits out this to you:
-bash: create-react-app: command not found
You are able to apply the following solution:
$ npm config set prefix /usr/local
$ sudo npm install -g create-react-app
$ create-react-app my-app
3, Create project
cd to the directory where the project needs to be created
- Create react app my app
- npx create-react-app my-app(npx From npm 5.2 + or later, see Description of npm old version)
- NPM init react app my app (NPM init < initializer > is available in npm 6 +)
- Yarn create react app my app (yarn create is available in Yarn 0.25 +)
Official description:
If you use npm 5.1 or earlier, you can't use npx. Instead, install create-react-app globally:
npm install -g create-react-app
Now you can run:
create-react-app my-app
If you use npm 5.1 or earlier, you cannot use npx. Instead, install create react app globally:
npm install -g create-react-app
Now you can run:
create-react-app my-app
4, Start project
cd my-app
You can also use start yam if you install start yam

5, Project directory
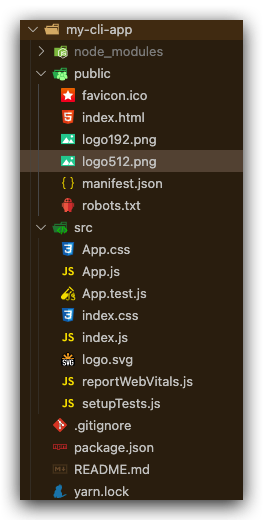
1. public static resource folder
2. Where src writes code
App root component
index global master profile
Use of React scaffold components
1. Create folder under src – Components
2. Create Components under Components – firstcom JS or firstcom jsx
3. Then we can use the component firstcom JS (vs codek code block – rcc)
import React, { Component } from 'react'

export default class FirstCom extends Component {
  render() {
    return (
      <div>
        this is the FirstCom.{parseInt(Math.random() * 10)}
      </div>
    )
  }
}
4. Introduce component FirstCom where components need to be used, such as app js
import FirstCom from './components/FirstCom';
5. Using components
function App() {
  return (
    <div className='App'>
      <header className='App-header'>
        <FirstCom />
        <img src={logo} className='App-logo' alt='logo' />
        <p>
          Edit <code>src/App.js</code> and save to reload.
        </p>
        <a
          className='App-link'
          href='https://reactjs.org'
          target='_blank'
          rel='noopener noreferrer'
        >
          Learn React
        </a>
      </header>
    </div>
  );
}
6. Running project effect

7. Reference of pictures in react project
On app JS, we can see that react references pictures by importing them first and then referencing them, that is:
// Import
import logo from './logo.svg';
// quote
<img src={logo} className='App-logo' alt='logo' />
This is a processing method when the picture is in the src directory. In addition, we can use another method to process the picture, so that it is not necessary to import each picture in advance:
<img src={require('../assets/logo192.png')} />
When the require d reference picture is not displayed, you can try the following methods:
<img src={require('../assets/logo192.png').default} />
[only strings, not variables can be placed in require]
If the picture is in the public directory, you can directly reference the file name without a path, such as:
<img src='logo512.png' />
React scaffolding props and state
Environmental preparation:
One parent component ComP and one child component ComC
Reference child components in parent components
1, props used in React scaffold
/*
 * @Author: Coan
 * @Date: 2021-05-18 15:24:39
 * @LastEditors: Coan
 * @LastEditTime: 2021-05-18 15:34:19
 * @FilePath: /React/my-cli-app/src/components/ComP.js
 * @Description: ComP
 */
import React, { Component } from 'react';

import ComC from './ComC';

export default class ComP extends Component {
  render() {
    return (
      <div>
        ComP
        <ComC text='This is a text from ComP to ComC' />
      </div>
    );
  }
}
/*
 * @Author: Coan
 * @Date: 2021-05-18 15:25:02
 * @LastEditors: Coan
 * @LastEditTime: 2021-05-18 15:37:55
 * @FilePath: /React/my-cli-app/src/components/ComC.js
 * @Description: ComC
 */
import React, { Component } from 'react';
import PropTypes from 'prop-types';

export default class ComC extends Component {
  static propTypes = {
    text: PropTypes.number,
  };

  render() {
    return <div>ComC---{this.props.text}</div>;
  }
}
2, Use state in React scaffold
Using state in scaffolding environment is the same as using state in local mode
/*
 * @Author: Coan
 * @Date: 2021-05-18 15:25:02
 * @LastEditors: Coan
 * @LastEditTime: 2021-05-18 15:48:21
 * @FilePath: /React/my-cli-app/src/components/ComC.js
 * @Description:
 */
import React, { Component } from 'react';

export default class ComC extends Component {
  constructor(props) {
    super(props);
    this.state = {
      name: 'coan',
    };
  }
  render() {
    return (
      <div>
        ComC---{this.props.text}---by:{this.state.name}
        <br />
        <button
          onClick={() => {
            this.setState({
              name: 'Coan',
            });
          }}
        >
          updata_state_to_Coan
        </button>
      </div>
    );
  }
}
Value transfer of React component
1, Forward value transfer (parent to child)
The parent component passes directly to the child component through custom attributes
Subcomponents receive through props
2, Reverse value transfer (child to parent)
The parent component passes a defined custom method to the child component through custom attributes
The subcomponent receives the method through props
Data is passed in as a parameter when the method is triggered
In this way, the parent component can obtain the data passed by the child component in the previous custom method
/*
 * @Author: Coan
 * @Date: 2021-05-18 15:24:39
 * @LastEditors: Coan
 * @LastEditTime: 2021-05-18 16:13:28
 * @FilePath: /React/my-cli-app/src/components/ComP.js
 * @Description: ComP
 */
import React, { Component } from 'react';

import ComC from './ComC';

export default class ComP extends Component {
  constructor(props) {
    super(props);
    this.state = {
      text: 'This is defaultText of ComP',
    };
  }
  receiveFromComC = (textFromComC) => { // This method is used to receive and save the data transmitted by sub components
    console.log(textFromComC);
    this.setState({
      text: textFromComC,
    });
  };
  render() {
    return (
      <div>
        ComP---{this.state.text}
        <ComC
          textP='This is a text from ComP to ComC'
          sendToComP={this.receiveFromComC}
        />
      </div>
    );
  }
}
/*
 * @Author: Coan
 * @Date: 2021-05-18 15:25:02
 * @LastEditors: Coan
 * @LastEditTime: 2021-05-18 15:59:52
 * @FilePath: /React/my-cli-app/src/components/ComC.js
 * @Description: ComC
 */
import React, { Component } from 'react';

export default class ComC extends Component {
  constructor(props) {
    super(props);
    this.state = {
      name: 'coan',
      textC: 'This is a text from ComC to ComP',
    };
  }
  render() {
    return (
      <div>
        ComC---{this.props.textP}---by:{this.state.name}
        <br />
        <button
          onClick={() => {
            this.setState({
              name: 'Coan',
            });
          }}
        >
          updata_state_to_Coan
        </button>
        <button onClick={this.props.sendToComP.bind(this, this.state.textC)}>
          send_textC_to_ComP
          {/* Here, the user-defined method passed by the parent component is triggered and the data is passed in reverse */}
        </button>
      </div>
    );
  }
}
3, Sibling value transfer (sibling value transfer)
The first ancient method: combining forward value transfer and reverse value transfer to realize brother component value transfer
That is, sub component A transmits the value to parent component P, and then parent component P transmits the value to sub component B
Sub component B realizes rendering
Value passing method without parent component
To realize the value transfer of compatriots, we need to use PubSub js
npm install --save pubsub-js
Create two sub components ComC and ComC2
Reference PubSub JS in the component that initiates value transmission and receives data
import PubSub from 'pubsub-js'
Use PubSub in the component ComC that initiates value transfer Publish () method for data transfer
PubSub.publish('sendToComC2', this.state.textC2) // The first parameter is the user-defined function name, and the second parameter is the data to be passed
PubSub is used in the component ComC2 that receives data Subscribe () method to receive data
PubSub.subscribe('sendToComC2', (eventName, data) => {
  console.log(eventName);
  console.log(data);
}); // The first parameter is the listening function (it needs to match the function that initiates the value transfer), and the second parameter is the callback function (the first parameter in the callback function is the function name of the listening function, and we can get the accepted data in the second parameter of the callback function)
React data request and json server
1, JSON server
Jason server simulation data
Installation: NPM install JSON server - G
Prepare data:
1. Create a mock folder under the project root path to store simulation data
2. Create simulation data json file:
{
  "arr": [
    {"id":1,"name":"coan1"},
    {"id":2,"name":"coan2"},
    {"id":3,"name":"coan3"},
    {"id":4,"name":"coan4"}
  ]
}
Start JSON server
1. cd to mock folder
2. JSON server JSON data file name -- port 4000 [the default port of JSON server is 3000, which is modified to 4000 here]
After successful startup, you will see:
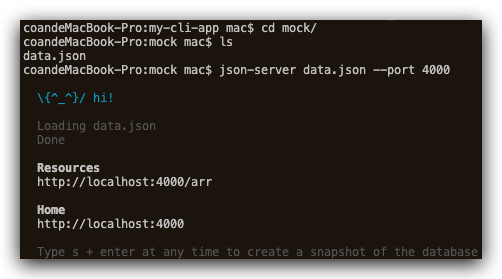
At this point, when we directly visit localhost:4000 in the browser, we will see the home page of the local JSON server service

(here we only need to briefly quote JSON server, and I will supplement the detailed tutorial records of JSON server if necessary later)
2, axios
Data request
Installation: npm install axios --save
Reference: introduce axios into the file that needs to initiate the request
For example, we create a new component Axios to demonstrate that Axios requests local mock data
Usage: we use axios to initiate the request in the hook function of the component
/*
 * @Author: Coan
 * @Date: 2021-05-21 16:39:21
 * @LastEditors: Coan
 * @LastEditTime: 2021-05-21 17:09:53
 * @FilePath: /React/my-cli-app/src/components/Axios.js
 * @Description: axios use
 */
import React, { Component } from 'react';
import axios from 'axios';

export default class Axios extends Component {
  constructor(props) {
    super(props);
    this.state = {
      label: 'data The data returned by the request will be stored here',
      data: [],
    };
  }
  componentDidMount() {
    // Component mounted hook function
    this.axiosFun();
  }
  axiosFun = () => {
    axios.get('http://localhost:4000/arr').then((res) => {
      // axios initiates get to request local mock data
      console.log(res.data);
      this.setState({
        label: 'res is ok,Request returned data',
        data: res.data,
      });
    });
  };
  render() {
    return (
      <div>
        <div>{this.state.label}</div>
        <div>
          {this.state.data.map((v, i) => {
            return <p key={v.id}>{v.name}</p>;
          })}
        </div>
      </div>
    );
  }
}
(here we just need to briefly quote and demonstrate the use of axios in react project. If necessary later, I will supplement the detailed tutorial records of axios)
React cross domain request
1, Forward agent - development environment
A proxy server is located between the client and the target server. In order to get the content of the target server, the client sends a request to the proxy server. The proxy server helps us get the data from the target server and returns it to us
1. Modify package json
// The latest create react app version above 2.0 can only be configured with string type
"proxy": "http://m.kugo.com",
// When the create react app scaffold is lower than version 2.0, the object type can be used, otherwise an error will be reported
// The last two items (path rewrite, secure) can not be written
"proxy":{
  "/api":{
    target: "http://www.baidu.com ", / / destination address - address of cross domain request
    changeOrigin: true, // The default is false. Do you need to change the original host header to the target URL
    "pathRewrite": {
      "^/api":"/"
    }, // Rewrite the request. For example, if our source accesses the api, the request will be resolved to/
    "secure": false, // If it is an https interface, you need to configure this parameter to true
  }
},
2. Modify webpackdevserver config. js
Configuration file directory: node_ modules > react-scripts > confuse > webpackDevServer. config. js
// You can write the following 2 items
proxy:{
  "/api":{
    target: "http://www.baidu.com ", / / destination address - address of cross domain request
    changeOrigin: true, // The default is false. Do you need to change the original host header to the target URL
    "pathRewrite": {
      "^/api":"/"
    }, // Rewrite the request. For example, if our source accesses the api, the request will be resolved to/
    "secure": false, // If it is an https interface, you need to configure this parameter to true
  }
},
3. Using middleware (recommended method on the official website of Creact React App scaffold, multiple agents can be configured)
1. Install HTTP proxy Middleware
npm install http-proxy-middleware --save
2. Create setupproxy in src directory JS file
3. Set proxy (contents of setupProxy.js file)
const proxy = require('http-proxy-middleware')
module.exports = function(app) {
  app.use(
    proxy.createProxyMiddleware('/api', {
      target: 'http://localhost:5000 ', / / destination address - address of cross domain request
      changeOrigin: true,
    	"pathRewrite": {
     		"^/api":"/"
    	}, // Rewrite the request. For example, if our source accesses the api, the request will be resolved to/
    })
  )
}
4. Official information
https://www.html.cn/create-react-app/docs/proxying-api-requests-in-development/#configuring-the-proxy-manually
2, Reverse proxy – production environment
You can receive the request link on the network through the proxy server, then forward the request to the internal network server, and return the data obtained from the server to the client initiating the network request. At this time, the external performance of the proxy server is a reverse proxy
React router dom routing Foundation
1, What is routing
The routing system can switch the corresponding components according to different URLs, so that spa (single page application) does not refresh during page switching, making the react project closer to the native experience.
- React router only realizes the core function of routing
- React router DOM, based on react router, adds some functions in the browser running environment, such as Link component, which will render an a tag. BrowserRouter and HashRouter components. The former uses pushState and popState events to build routes, while the latter uses window location. Hash and hashchange events build routes.
- React router native, based on react router and similar to react router DOM, adds some functions under the react native operating environment.
Portal: detailed explanation of the difference between react router and react router DOM
2, Download route (react router DOM)
npm install --save react-router-dom
3, Routing mode in react router DOM
Hash mode – HashRouter (hash mode, url address with # number, will not be lost when refreshing the page)
browser mode -- BrowserRouter (History mode - history, url without # number, route switching through history api, production environment refresh will be lost, not in local mode)
4, Use routing
1. In the global index Route referenced in JS file
import { BrowserRouter } from 'react-router-dom'; // browser mode
// or
import { HashRouter } from 'react-router-dom'; // hash mode
2. Routing package root component
ReactDOM.render( // browser mode
  <BrowserRouter>
    <App />
  </BrowserRouter>,
  document.getElementById('root')
);
// or
ReactDOM.render( // hash mode
  <HashRouter>
    <App />
  </HashRouter>,
  document.getElementById('root')
);
3. Reference routes in components
import { Route } from 'react-router-dom';
4. Configure route
<Route path='/firstCom' component={FirstCom} />
5, Route navigation (declarative navigation)
1. Link – < link to = "/ firstcom" / > link route navigation < / link >
1. Quote
import { Link } from 'react-router-dom';
2. Use
<Link to='/firstCom'>GoToFirstCom</Link>
2. NavLink – < NavLink to = "/ firstcom" / > NavLink routing navigation < / NavLink >
1. Quote
import { NavLink } from 'react-router-dom';
2. Use
<NavLink to='/firstCom'>GoToFirstCom</NavLink>
3. The difference between Link and NavLink
Link route navigation only realizes the navigation jump of route
NavLink route navigation not only realizes the navigation jump of route, but also automatically adds a dynamic active class to the navigation label. This makes it easier for us to modify the style when writing navigation labels
4. Accurate matching
The exact matching rule can be set by using the exact attribute in the routing component, that is, the routing component will be rendered only if the routing address is fully met
<Route path='/firstCom' exact component={FirstCom} />
5. Unique rendering
When we accidentally write duplicate routes when using the routing component, we only need to wrap the routes with < Switch > < / Switch > tags outside the routes, so that the react routing system will help us achieve unique rendering
import { Route, Link, NavLink, Switch } from 'react-router-dom';

<Switch>
  <Route path='/firstCom' exact component={FirstCom} />
  <Route path='/firstCom' exact component={FirstCom} />
</Switch>
6. Route redirection
The < redirect > < / redirect > tag can redirect the current matching path to another new path
import { Route, Link, NavLink, Switch, Redirect } from 'react-router-dom';

<Redirect from='/' to='/firstCom' exact />
7. Secondary routing
The use of secondary routing in react is similar to that of primary routing. It only needs to be used in the primary routing component
Advanced and high-order components of React routing
1, withRouter
As a high-level component of react, components that are not route switching can also have three attributes of route switching components (location, match and history)
Purpose: monitor routing changes
*[high-level component]: * HOC - the parameter is a component and the returned component is also a component. This kind of component is called high-level component
When we do not use withRouter, we print props in the App component, and the output value is {}
import { Route, NavLink } from 'react-router-dom';
function App(props) {
  console.log(props); // The output here is 	 {}
  return (
    <div className='App'>
      <header className='App-header'>
        <NavLink to='/firstCom'>GoToFirstCom</NavLink>
        <Route path='/firstCom' exact component={FirstCom} />
      </header>
    </div>
  );
}

export default App;
When we wrap the App component with withRouter, props has three properties (location, match and history) of the route switching component
import { Route, NavLink, withRouter } from 'react-router-dom';
function App(props) {
  console.log(props);
  return (
    <div className='App'>
      <header className='App-header'>
        <NavLink to='/firstCom'>GoToFirstCom</NavLink>
        <Route path='/firstCom' exact component={FirstCom} />
      </header>
    </div>
  );
}

export default withRouter(App);
props print results:
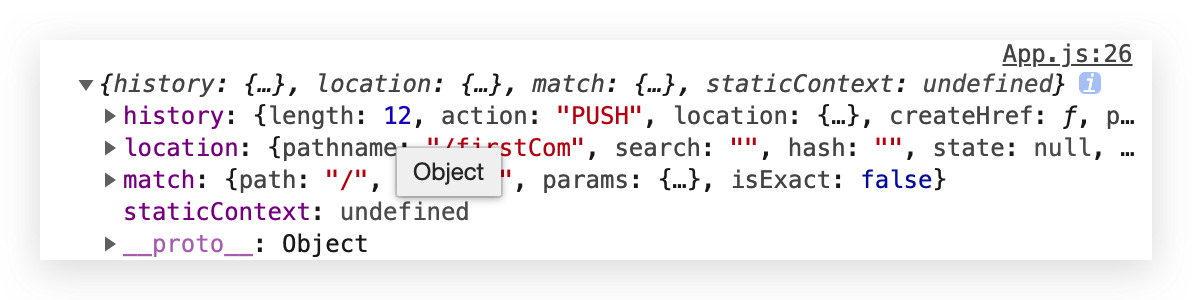
Here, we use withRouter to make the root component App have the props attribute value
2, Monitor routing changes
We use history in the props attribute of App Listen () method to listen for route changes
props.history.listen((link) => {
  console.log(link);
});
When the route changes, the print result is:

- pathname: target path after jump
3, Programming navigation
props.history.push('/PathName')
<button onClick={() => {props.history.push('./firstCom');}}>Programming navigation GoToFirstCom</button>
4, Routing parameters
1. params pass parameter
1. You need to configure the receiving parameter of the transmission in the routing rule: xxx
<Route path='/firstCom/:args' exact component={FirstCom} />
2. The sending parameters are spliced directly after the route jumps the path
<NavLink to='/firstCom/this_is_params_args'>GoToFirstCom</NavLink>
3. Receive parameter this props. match. params. Parameter name
componentDidMount() {
	console.log(this.props.match.params.args);
}
Advantages: refresh the address, and the parameters still exist
Disadvantages: only strings can be passed, and the url will become ugly when there are too many parameters
2. query parameters
1. There is no need to configure the received parameters of the transmission in the routing rules
2. Send parameters send data directly
<Link to={{ pathname: '/firstCom', query: { args: 'this_is_query_args' } }}>
  GoToFirstCom
</Link>
3. Receive parameter this props. location. query. xxx
componentDidMount() {
  console.log('query:' + this.props.location.query.args);
}
Use State Hook
React16. A new feature in 8 is mainly used to enable stateless components to use state
In the development of react, state management is essential. In versions before 16.7, we need to use class components or redux for state management operations
We can use useState in Hook in react to realize the use of state in stateless components
useState is used to define a state. Unlike the state in a class component, the state of a function component can be an object or a basic data type
useState returns an array. The first value is the current state value, and the second value is an object, which is used to indicate the function of changing the state (similar to setState)
*Official Hook example
 1:  import React, { useState } from 'react';
 2:
 3:  function Example() {
 4:    const [count, setCount] = useState(0);
 5:
 6:    return (
 7:      <div>
 8:        <p>You clicked {count} times</p>
 9:        <button onClick={() => setCount(count + 1)}>
10:          Click me
11:        </button>
12:      </div>
13:    );
14:  }
- Line 1: introduce useState Hook in React. It lets us store the internal state in the function component.
- Line 4: inside the Example component, we declare a new state variable by calling useState Hook. It returns a pair of values to our named variable. We named the variable count because it stores the number of hits. We initialize useState to 0 by passing 0 as the only parameter. The second returned value is itself a function. It allows us to update the value of count, so we call it setCount.
- Line 9: when the user clicks the button, we pass a new value to setCount. React will re render the Example component and pass the latest count to it.
1, Introduce
import React, { useState } from 'react';
2, Initialize
let [val, setVal] = useState(0);
3, Use
<div>
  useState: val={val}
  <button onClick={() => {setVal(val + 1)}}>
    setValOfUseState(++1)
  </button>
</div>
4, Use of multiple states
1. Declare the state of the object type
initialization
let [obj, setObj] = useState({
  obj1val:1,
  obj2val:2
})
use
useState: obj1val={obj.obj1val}---obj2val={obj.obj2val}
As for modification, if the useState has multiple states, it needs to be modified in other ways
2. Declare the status of basic data type multiple times (recommended)
let [val1, setVal1] = useState(0);
let [val2, setVal2] = useState(1);
let [val3, setVal3] = useState(2);
useState: val1={val1}---val2={val2}---val3={val3}