
preface:
Previously, I wrote an article about using opencv on nano. By default, the library of opencv is installed on nano. In addition to nano, we also want to use opencv to do some usual image processing verification on our own computers.
Originally, I read some materials and installed them. I don't think it's necessary to write them. However, there are still many problems in the actual installation, so share the records.
Environmental Science:
The system is Ubuntu 20 04
cv version is 4.5
Author: conscience still exists
REAUTHORIZING authorization and onlookers: welcome to WeChat official account: Yu Linjun
Or add the author's personal wechat: become_me
oepncv introduction:
The full name of OpenCV is Open Source Computer Vision Library, which is a cross platform computer vision library. Opencv is initiated and developed by Intel Corporation and distributed under BSD license. It can be used free of charge in commercial and research fields. Opencv can be used to develop real-time image processing, computer vision and pattern recognition programs.
OpenCV is written in C + + language (basically, the new development and algorithms now use C + + interface). Its main interface is also c + + language, but it still retains a large number of C language interfaces. The library also has a large number of interfaces for Python, Java and MATLAB/OCTAVE (version 2.5). The API interface functions of these languages can be obtained through online documents. Support for C #, CH, and ruby is now available.
OpenCV can run on Windows, Android, Maemo, FreeBSD, OpenBSD, iOS, Linux and Mac OS. Users can get the official version from Github or the development version from Git. OpenCV also uses CMake
Installation:
When it comes to installation, first install a pile of dependency packages.
sudo apt-get install build-essential libgtk2.0-dev libavcodec-dev libavformat-dev libjpeg-dev libswscale-dev libtiff5-dev pkg-config
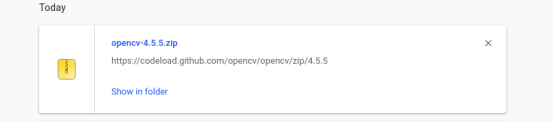
Download opencv at: https://opencv.org/releases/ , you can click Sources to download the version you need.
At the beginning, after selecting 4.1 for installation error, select 4.5 and install it all the way according to the experience of 4.1, so it is recommended to install the latest one.
After downloading, we started compiling and installing,
General operation:
cd opencv-4.5.5
mkdir build
cmake ../
make
However, things do not develop in accordance with orders. There are few orders and there are many problems to be solved.
When compiling cmake, it is very convenient to recommend a graphical tool for cmake.
sudo apt install cmake-qt-gui

cmake-gui ../
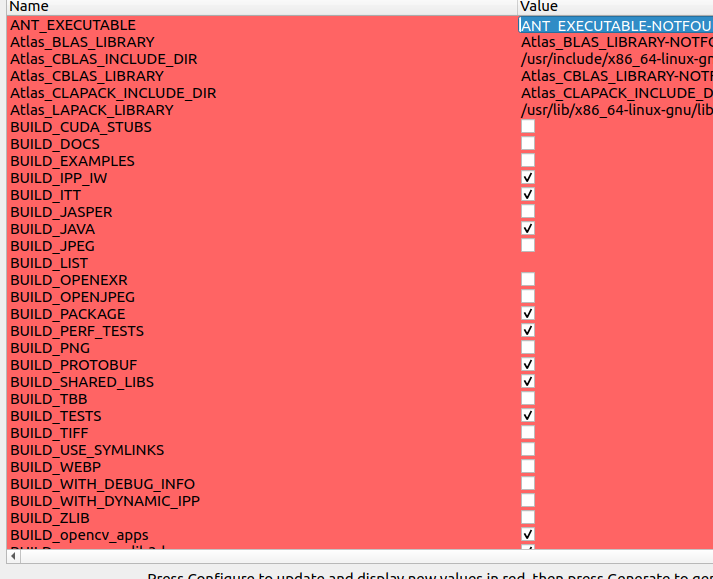
In the Search column, select the cmake option we want to configure, and then select generate.

c make ../ Then start making:
make -j8
eigen library not installed
Fatal error encountered: eight / core: no such file or directory:
Method 1:
Execute the command: sudo apt get install libeigen3 dev to install.
Method 2:
Because I installed it once, I checked my Eigen and used locate to query, locate eigen3,
/usr/include/eigen3
/usr/include/eigen3/Eigen
Found my Eigen in the eigen3 directory.
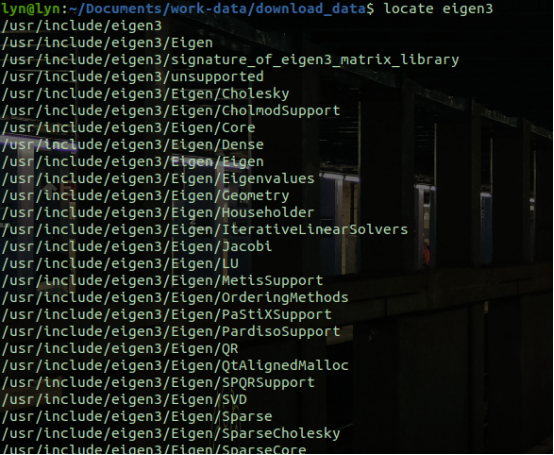
So I wrote a soft chain to link
sudo ln -s /usr/include/eigen3/Eigen /usr/include/Eigen


Continue compiling ` make -j8
internal compiler error:Segmentation fault occurs when compiling opencv, and it always appears.
The reason for the error is that the (virtual machine) is running out of memory, and a large number of template extensions need enough memory.

Here is a way to solve this error. I choose to ignore it and continue compiling.
You can solve this problem by temporarily using swap partitions:
sudo dd if=/dev/zero of=/swapfile bs=64M count=16
#The size of count is the size of the increased swap space. 64M is the block size, so the space size is bs*count=1024MB
sudo mkswap /swapfile
#Format the space into swap format
sudo swapon /swapfile
#Use the swap space you just created
After compilation, it is best to close (free) swap space
sudo swapoff /swapfile
sudo rm /swapfile
The above exchange partition method refers to fragments from other bloggers
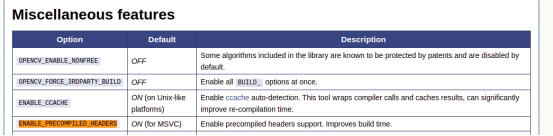
When compiling, set the cmake option {ENABLE_PRECOMPILED_HEADERS=OFF, enable precompiled header support. Reduce build time.
sudo cmake -D CMAKE_BUILD_TYPE=Release -D CMAKE_INSTALL_PREFIX=/usr/local ENABLE_PRECOMPILED_HEADERS=OFF
Continue to make -j8

Finally, the compilation is completed and the installation phase is entered. make install
sudo make install
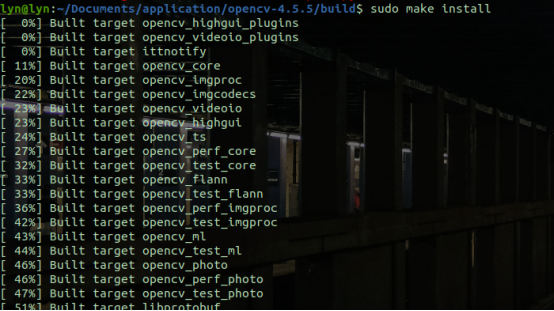
You can see that the installed dynamic libraries and files are in the / usr/local / directory

Configure global environment
OpenCV4 does not generate by default pc file, so we need to set it ourselves. Some people suggest adding - D opencv after cmake_ GENERATE_ Pkgconfig = on. This compilation option enables the generation of OpenCV4 pc files support PKG config function. You can try this part by yourself. I used the method of adding manually. It's stupid, but it can be used.
cd /usr/local/lib
sudo mkdir pkgconfig && cd pkgconfig
sudo vi opencv.pc
The contents of the file are as follows: the corresponding Version is modified according to your own Version. The libs content needs to be fine tuned. I'll give it to myself later.
prefix=/usr/local
exec_prefix=${prefix}
includedir=/usr/local/include
libdir=/usr/local/lib

Name: OpenCV
Description: Open Source Computer Vision Library
Version: 4.5.5
Libs: -L${exec_prefix}/lib -lopencv_stitching -lopencv_superres -lopencv_videostab -lopencv_aruco -lopencv_bgsegm -lopencv_bioinspired -lopencv_ccalib -lopencv_dnn_objdetect -lopencv_dpm -lopencv_face -lopencv_photo -lopencv_freetype -lopencv_fuzzy -lopencv_hdf -lopencv_hfs -lopencv_img_hash -lopencv_line_descriptor -lopencv_optflow -lopencv_reg -lopencv_rgbd -lopencv_saliency -lopencv_stereo -lopencv_structured_light -lopencv_phase_unwrapping -lopencv_surface_matching -lopencv_tracking -lopencv_datasets -lopencv_text -lopencv_dnn -lopencv_plot -lopencv_xfeatures2d -lopencv_shape -lopencv_video -lopencv_ml -lopencv_ximgproc -lopencv_calib3d -lopencv_features2d -lopencv_highgui -lopencv_videoio -lopencv_flann -lopencv_xobjdetect -lopencv_imgcodecs -lopencv_objdetect -lopencv_xphoto -lopencv_imgproc -lopencv_core
Libs.private: -ldl -lm -lpthread -lrt
Cflags: -I${includedir}
Later, when using the makefile -L link, I found - lopencv on this machine_ Xfeatures2d does not have this dynamic library, so it is removed. You can also test it by yourself. Some versions are a little different. For the operation of Makefile, you can move to my previous article: Basic use of Jetson nano opencv

sudo vi /etc/bash.bashrc
Modify bash Bashrc file, add the following file
export PKG_CONFIG_PATH=/usr/local/lib/pkgconfig:$PKG_CONFIG_PATH
Then execute source / etc / bash bashrc
After that, we can query the installed opencv information by PKG config
pkg-config --modversion opencv

pkg-config --libs opencv

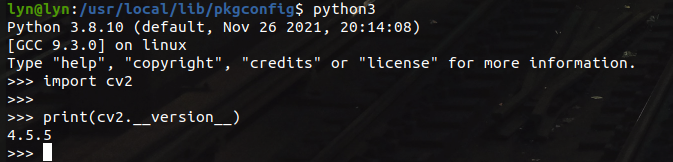
In addition, we can also query whether opencv is successfully installed by using the method of Python 3 import CV2
lyn@lyn:/usr/local/lib/pkgconfig$ python3
Python 3.8.10 (default, Nov 26 2021, 20:14:08)
[GCC 9.3.0] on linux
Type "help", "copyright", "credits" or "license" for more information.
>>> import cv2
>>> print(cv2.__version__)
4.5.5
>>>
Corresponding screenshot:
More than ten lines of C + + code to realize a human face recognition
#include <stdio.h>
#include <iostream>
#include <vector>
#include<opencv2/opencv.hpp>
using namespace cv;
using namespace std;
void face_detection_demo()
{
std::string root_dir = "/home/lyn/Documents/opencv/learn_code/face_detector/";
dnn::Net net = dnn::readNetFromTensorflow(root_dir+ "opencv_face_detector_uint8.pb", root_dir+"opencv_face_detector.pbtxt");
VideoCapture capture(0);
Mat frame;
while (true) {
capture.read(frame);
if (frame.empty()) {
break;
}
flip(frame, frame, 1);//Flip left and right y symmetry
Mat blob = dnn::blobFromImage(frame, 1.0, Size(300, 300), Scalar(104, 177, 123), false, false);
net.setInput(blob);// NCHW
Mat probs = net.forward(); //
Mat detectionMat(probs.size[2], probs.size[3], CV_32F, probs.ptr<float>());
// Analytical results
for (int i = 0; i < detectionMat.rows; i++) {
float confidence = detectionMat.at<float>(i, 2);
if (confidence > 0.5) {
int x1 = static_cast<int>(detectionMat.at<float>(i, 3)*frame.cols);
int y1 = static_cast<int>(detectionMat.at<float>(i, 4)*frame.rows);
int x2 = static_cast<int>(detectionMat.at<float>(i, 5)*frame.cols);
int y2 = static_cast<int>(detectionMat.at<float>(i, 6)*frame.rows);
Rect box(x1, y1, x2 - x1, y2 - y1);
rectangle(frame, box, Scalar(0, 0, 255), 2, 8, 0);
}
}
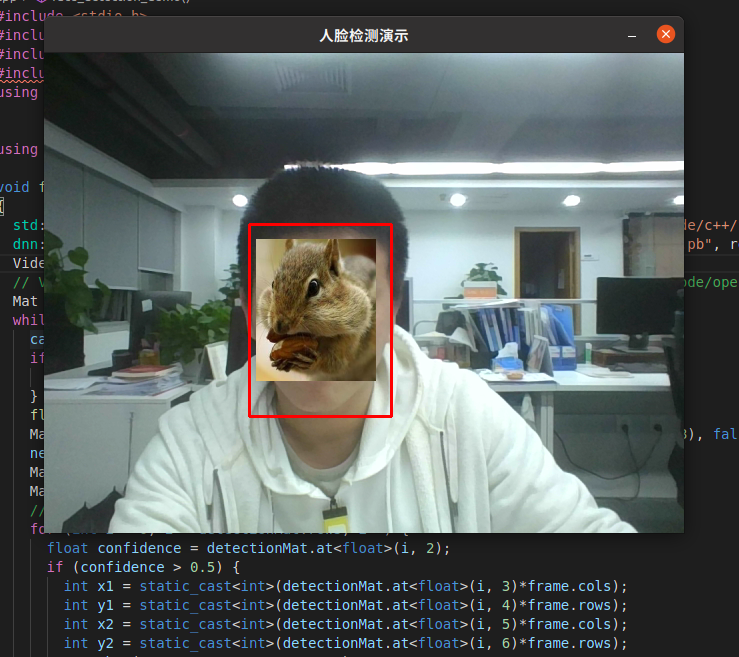
imshow("Face detection Demonstration", frame);
int c = waitKey(1);
if (c == 27) { // sign out
break;
}
}
}
int main(int argc,char **argv) {
face_detection_demo();
return 0;
}
CMakeLists.txt file
cmake_minimum_required( VERSION 2.8 )
project(opencv_test)
set(CMAKE_CXX_FLAGS  "-std=c++14 ${CMAKE_CXX_FLAGS} -Wall -Wformat -Wformat-security -Werror=format-security -Wunreachable-code")
find_package(OpenCV REQUIRED)
include_directories(${OpenCV_INCLUDE_DIRS})
add_executable(opencv_test main.cpp )
target_link_libraries(opencv_test  ${OpenCV_LIBS})
Corresponding cmakelists Txt files and Basic use of Jetson nano opencv Basically the same. You can read this article step by step.
The above two files are examples of calling dnn in opencv. The corresponding file acquisition methods are as follows:
If the pb file needs to be downloaded, it may fail to download. If you need this file, you can also add my wechat and I will send it to friends who need it privately.
Opencv_ face_ detector. The pbtxt file is in samples/dnn/face_detector / directory
cd opencv-4.5.5/samples/dnn/face_detector/
ls

opencv_face_detector_uint8.pb is more troublesome and needs to be downloaded. The method is as follows:
cd opencv-4.5.5/samples/dnn

python3 download_models.py
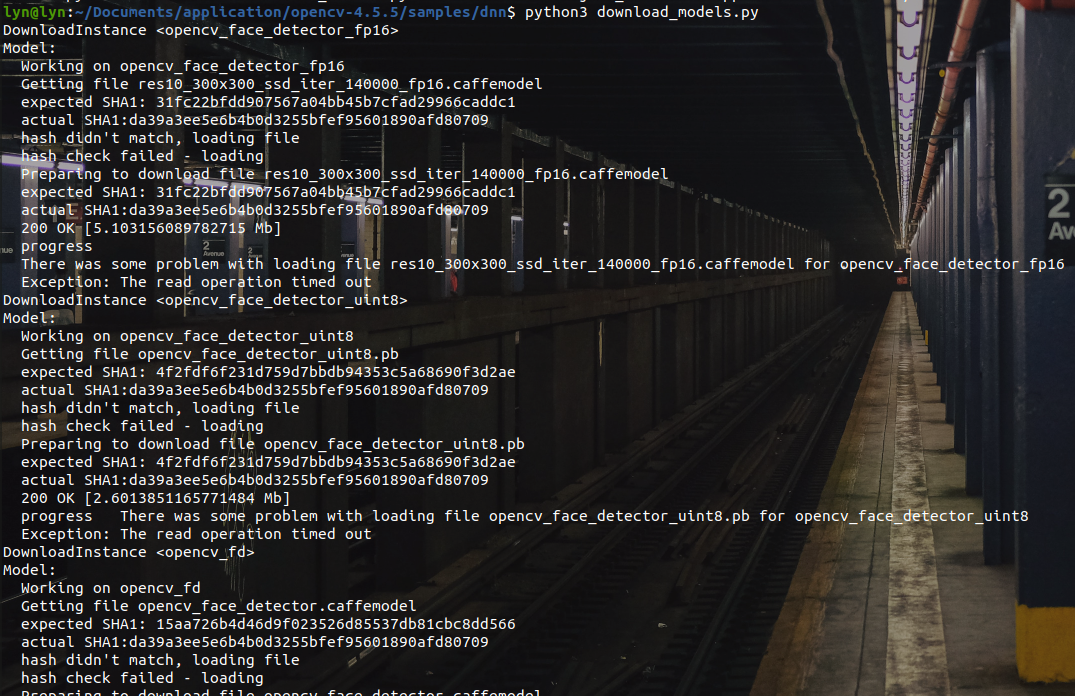
There are Caffe model and tensorflow model. We use the tensorflow model, opencv_face_detector_uint8.pb files come from here.
Scalar(104, 177, 123) is the corresponding parameter in / opencv-4.5.5/samples/dnn, models It's in the YML file.
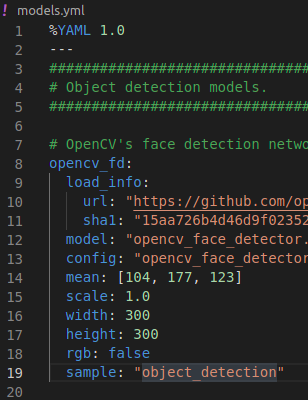
As shown above, I also use it directly.
The final results are as follows:
epilogue
This is the process of installing opencv myself. If you have better ideas and needs, you are also welcome to add my friends to communicate and share.
Author: conscience still exists, hard work during the day, original public number owner at night. In addition to technology, there are some life insights in official account. A serious driver who drives the contents of the workplace is also a rich person living outside technology. And basketball is a photo and music. Follow me and walk with me.
‧‧‧‧‧‧‧‧‧‧‧‧‧‧‧‧ END ‧‧‧‧‧‧‧‧‧‧‧‧‧‧‧‧
Recommended reading
[1]The foundation for the development and use of jetson nano is shared in detail
[2]Linux development coredump file analysis and actual combat sharing
[3]How does the program in the CPU run Required reading
[4]cartographer environment establishment and mapping test
[5]Comparison of simple factory mode, factory mode and abstract factory mode of design mode
All the original dry cargo of the official account has been organized into a catalogue, and the reply is made available.