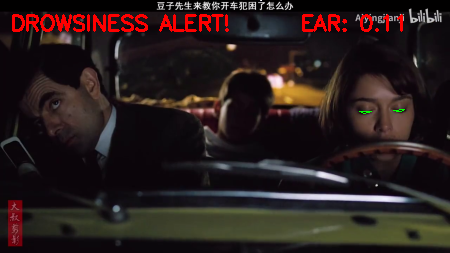
Today we implement sleepiness detection. If the eyes have been closed for some time, we think they start to doze off and give an alarm to wake them up and attract their attention. We test a video to show the effect. At the same time, the code for turning on the camera is reserved in the code, which can be used after canceling the comment.
Building a sleepy detector using OpenCV
To start our implementation, open a new file and name it detect_drowsiness.py and insert the following code:
# import the necessary packages
from scipy.spatial import distance as dist
from imutils.video import VideoStream
from imutils import face_utils
from threading import Thread
import numpy as np
import playsound
import argparse
import imutils
import time
import dlib
import cv2
Import the Python package you need.
We also need the imutils package, my series of computer vision and image processing functions, to make it easier to use OpenCV.
If imutils is not already installed on your system, you can install / upgrade imutils in the following ways:
pip install --upgrade imutils
The Thread class will also be imported so that we can play our alerts in a different Thread from the main Thread to ensure that our scripts do not pause when the alert sounds.
In order to really play our WAV/MP3 alarm clock, we need the playsound library, which is a pure Python cross platform implementation for playing simple sounds.
playsound libraries can be easily installed via pip:
pip install playsound
However, if you are using macOS (as I did for this project), you also need to install pyobjc, otherwise you will receive an AppKit related error when you actually try to play sound:
pip install pyobjc
Next, we need to define sound_alarm function, which plays audio files:
def sound_alarm(path):
	# play an alarm sound
	playsound.playsound(path)
Define eye_aspect_ratio function, which is used to calculate the ratio of the distance between vertical eye landmarks to the distance between horizontal eye landmarks:
def eye_aspect_ratio(eye):
	# compute the euclidean distances between the two sets of
	# vertical eye landmarks (x, y)-coordinates
	A = dist.euclidean(eye[1], eye[5])
	B = dist.euclidean(eye[2], eye[4])
	# compute the euclidean distance between the horizontal
	# eye landmark (x, y)-coordinates
	C = dist.euclidean(eye[0], eye[3])
	# compute the eye aspect ratio
	ear = (A + B) / (2.0 * C)
	# return the eye aspect ratio
	return ear
Since OpenCV cannot draw Chinese directly, we also need to define the method of drawing Chinese:
def cv2ImgAddText(img, text, left, top, textColor=(0, 255, 0), textSize=20):
    if (isinstance(img, np.ndarray)):  # Determine whether OpenCV picture type
        img = Image.fromarray(cv2.cvtColor(img, cv2.COLOR_BGR2RGB))
    # Creates an object that can be drawn on a given image
    draw = ImageDraw.Draw(img)
    # Font format
    fontStyle = ImageFont.truetype(
        "font/simsun.ttc", textSize, encoding="utf-8")
    # Draw text
    draw.text((left, top), text, textColor, font=fontStyle,stroke_width=2)
    # Convert back to OpenCV format
    return cv2.cvtColor(np.asarray(img), cv2.COLOR_RGB2BGR)
Next, define the command line parameters:
# construct the argument parse and parse the arguments
ap = argparse.ArgumentParser()
ap.add_argument("-p", "--shape-predictor", required=True,
	help="path to facial landmark predictor")
ap.add_argument("-v", "--video", type=str, default="",
                help="path to input video file")
ap.add_argument("-a", "--alarm", type=str, default="",
	help="path alarm .WAV file")
ap.add_argument("-w", "--webcam", type=int, default=0,
	help="index of webcam on system")
args = vars(ap.parse_args())
The sleepy detector needs a command line parameter followed by two optional parameters. The details of each parameter are as follows:
– shape Predictor: This is the path of dlib's pre trained facial marker detector. You can use the "download" section at the bottom of this blog post to download the detector together with the source code of this tutorial.
– Video: video file. This paper uses video files to test.
– alarm: Here you can choose to specify the path of the input audio file to be used as an alarm.
– webcam: this integer controls the index of the built-in webcam / USB camera.
After defining the command line parameters, we also need to define several important variables:
# define two constants, one for the eye aspect ratio to indicate
# blink and then a second constant for the number of consecutive
# frames the eye must be below the threshold for to set off the
# alarm
EYE_AR_THRESH = 0.3
EYE_AR_CONSEC_FRAMES = 48
# initialize the frame counter as well as a boolean used to
# indicate if the alarm is going off
COUNTER = 0
ALARM_ON = False
Eye is defined_ AR_ THRESH. If the eye aspect ratio is below this threshold, we will start calculating the number of frames a person closes his eyes.
If the person closes his eyes for more than eye frames_ AR_ CONSEC_ Frames, we will issue an alarm.
In the experiment, I found an eye of 0.3_ AR_ Thresh works well in all situations (although you may need to adjust it for your own application).
I will also EYE_AR_CONSEC_FRAMES is set to 48, which means that if a person closes his eyes for 48 consecutive frames, we will play the alarm sound.
You can reduce eye by_ AR_ CONSEC_ Frames makes the drowsiness detector more sensitive -- similarly, you can reduce the sensitivity of the drowsiness detector by increasing it.
COUNTER is defined, that is, the aspect ratio of the eye is lower than eye_ AR_ The total number of consecutive frames of thresh.
If COUNTER exceeds EYE_AR_CONSEC_FRAMES, then we will update the Boolean ALARM_ON.
The dlib library comes with a histogram of face detector based on directional gradient and a human face landmark predictor - we instantiate these two in the following code block:
# initialize dlib's face detector (HOG-based) and then create
# the facial landmark predictor
print("[INFO] loading facial landmark predictor...")
detector = dlib.get_frontal_face_detector()
predictor = dlib.shape_predictor(args["shape_predictor"])
The facial signs generated by dlib are an indexable list, as shown in the figure below:
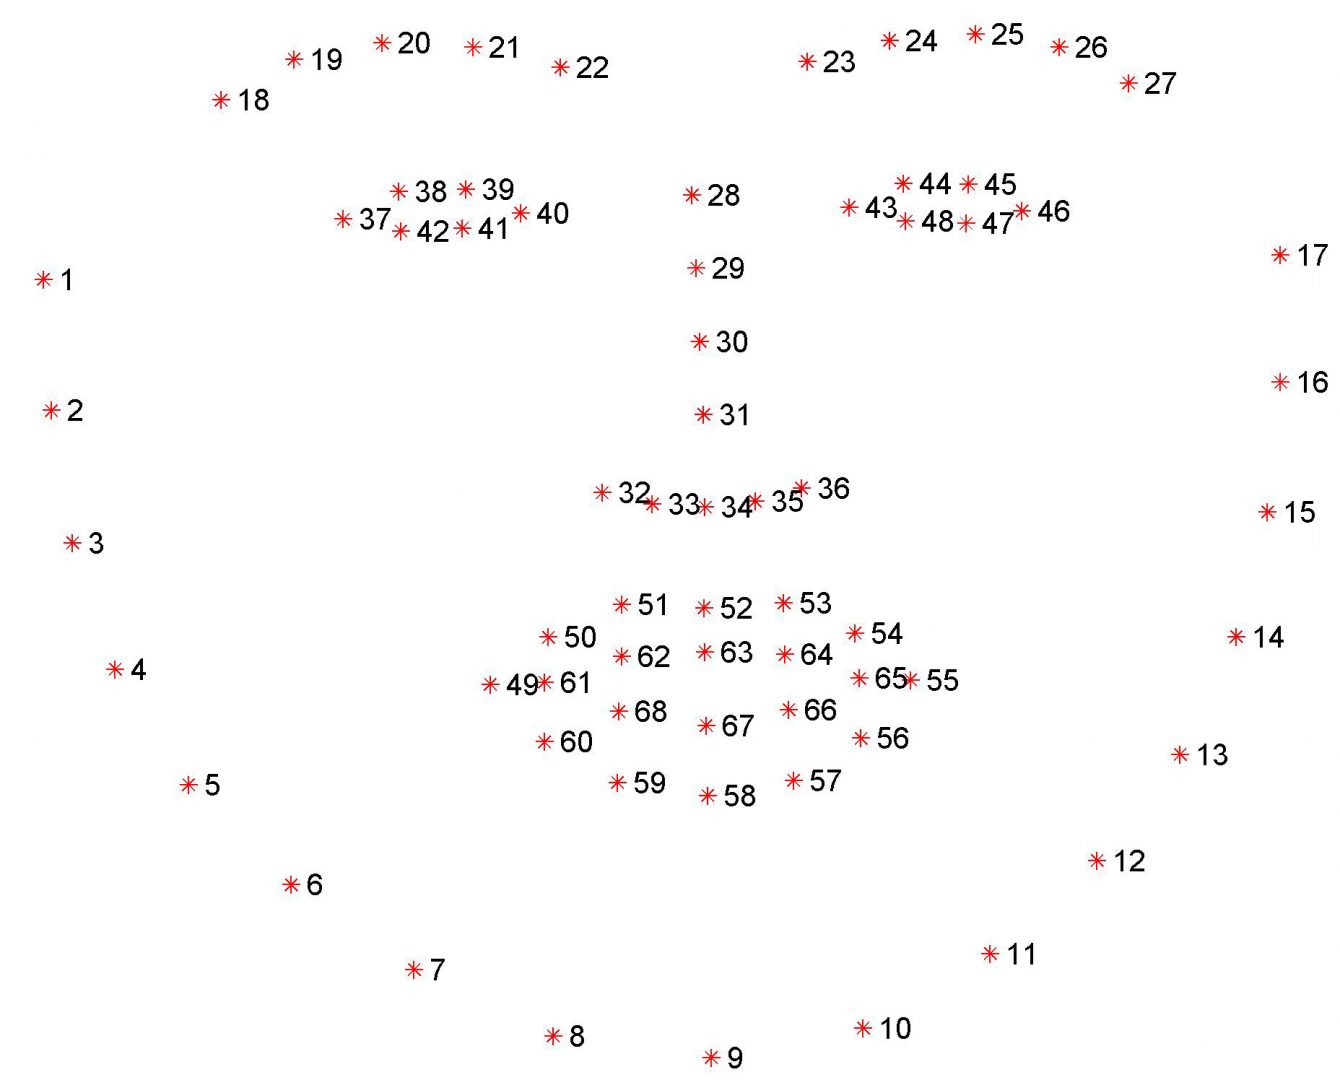
Therefore, to extract the eye region from a set of facial signs, we only need to know the correct array slice index:
# grab the indexes of the facial landmarks for the left and
# right eye, respectively
(lStart, lEnd) = face_utils.FACIAL_LANDMARKS_IDXS["left_eye"]
(rStart, rEnd) = face_utils.FACIAL_LANDMARKS_IDXS["right_eye"]
Using these indexes, we will be able to easily extract eye regions from array slices.
We are now ready to activate the core of our drowsiness detector:
# start the video stream thread
print("[INFO] starting video stream thread...")
vs = VideoStream(src=args["webcam"]).start()
time.sleep(1.0)
# loop over frames from the video stream
while True:
	# grab the frame from the threaded video file stream, resize
	# it, and convert it to grayscale
	# channels)
	frame = vs.read()
	frame = imutils.resize(frame, width=450)
	gray = cv2.cvtColor(frame, cv2.COLOR_BGR2GRAY)
	# detect faces in the grayscale frame
	rects = detector(gray, 0)
Instantiate VideoStream.
Pause for one second to allow the camera sensor to warm up.
Start traversing frames in the video stream.
The next frame is read, and then we preprocess it by resizing it to a width of 450 pixels and converting it to gray.
The face detector of dlib is used to find and locate the face in the image.
The next step is to apply face marker detection to locate each important area of the face:
	# loop over the face detections
	for rect in rects:
		# determine the facial landmarks for the face region, then
		# convert the facial landmark (x, y)-coordinates to a NumPy
		# array
		shape = predictor(gray, rect)
		shape = face_utils.shape_to_np(shape)
		# extract the left and right eye coordinates, then use the
		# coordinates to compute the eye aspect ratio for both eyes
		leftEye = shape[lStart:lEnd]
		rightEye = shape[rStart:rEnd]
		leftEAR = eye_aspect_ratio(leftEye)
		rightEAR = eye_aspect_ratio(rightEye)
		# average the eye aspect ratio together for both eyes
		ear = (leftEAR + rightEAR) / 2.0
Loop through each face detected - in our implementation (especially related to the driver's drowsiness), we assume that there is only one face - the driver - but I leave this for loop here in case you want to apply the technology of multiple face video.
For each detected face, we apply dlib's face marker detector and convert the results into NumPy array.
Using NumPy array slice, we can extract the (x, y) coordinates of the left eye and the right eye respectively.
Given the (x, y) coordinates of both eyes, we then calculate their eye aspect ratio.
Soukupov á and Č ech suggests averaging the aspect ratios of the two eyes together for better estimation.
Then, we can use the following cv2.drawContours function to visualize each eye area on the framework - which is usually helpful when we try to debug the script and want to ensure that the eyes are detected and located correctly:
		# compute the convex hull for the left and right eye, then
		# visualize each of the eyes
		leftEyeHull = cv2.convexHull(leftEye)
		rightEyeHull = cv2.convexHull(rightEye)
		cv2.drawContours(frame, [leftEyeHull], -1, (0, 255, 0), 1)
		cv2.drawContours(frame, [rightEyeHull], -1, (0, 255, 0), 1)
Finally, we are now ready to check whether people in the video stream have symptoms of sleepiness:
		# check to see if the eye aspect ratio is below the blink
		# threshold, and if so, increment the blink frame counter
		if ear < EYE_AR_THRESH:
			COUNTER += 1
			# if the eyes were closed for a sufficient number of
			# then sound the alarm
			if COUNTER >= EYE_AR_CONSEC_FRAMES:
				# if the alarm is not on, turn it on
				if not ALARM_ON:
					ALARM_ON = True
					# check to see if an alarm file was supplied,
					# and if so, start a thread to have the alarm
					# sound played in the background
					if args["alarm"] != "":
						t = Thread(target=sound_alarm,
							args=(args["alarm"],))
						t.deamon = True
						t.start()
				# draw an alarm on the frame
                frame=cv2ImgAddText(frame,"Wake up, don't sleep!",10,30,(255, 0, 0),30)
		# otherwise, the eye aspect ratio is not below the blink
		# threshold, so reset the counter and alarm
		else:
			COUNTER = 0
			ALARM_ON = False
Check that the eye aspect ratio is below the blink / close eye threshold EYE_AR_THRESH .
If yes, we increase COUNTER, that is, the total number of consecutive frames with the person's eyes closed.
If COUNTER exceeds EYE_AR_CONSEC_FRAMES, then let's assume that this person begins to doze off.
Another check was made to see if the alarm was turned on - if not, we turned it on.
Handle the playback alarm sound, provided that the -- alarm path is provided when executing the script. We pay particular attention to creating a separate thread responsible for calling sound_alarm to ensure that our main program will not be blocked until the sound is played.
Draw text drawliness alert! On our framework -- again, this is often helpful for debugging, especially when you don't use the playsound library.
Finally, lines 136-138 deal with an eye aspect ratio greater than EYE_AR_THRESH indicates that the eyes are open. If the eyes are open, we reset the counter and make sure the alarm is off.
The last block of code processing in our drowsiness detector displays the output frame on our screen:
		# draw the computed eye aspect ratio on the frame to help
		# with debugging and setting the correct eye aspect ratio
		# thresholds and frame counters
		cv2.putText(frame, "EAR: {:.2f}".format(ear), (300, 30),
			cv2.FONT_HERSHEY_SIMPLEX, 0.7, (0, 0, 255), 2)

	# show the frame
	cv2.imshow("Frame", frame)
	key = cv2.waitKey(1) & 0xFF

	# if the `q` key was pressed, break from the loop
	if key == ord("q"):
		break
# do a bit of cleanup
cv2.destroyAllWindows()
vs.stop()
Code here!!!
Test sleepiness detector
Operation instruction:
python detect_drowsiness.py --shape-predictor shape_predictor_68_face_landmarks.dat --video 12.mp4 --alarm alarm.mp3
Operation results:
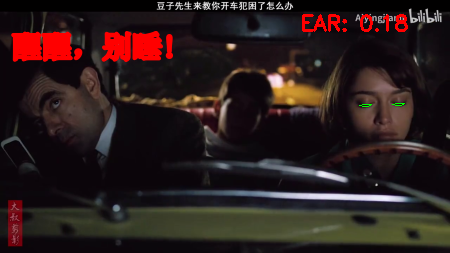
If sleepiness is detected, a prompt will be issued and printed on the video