Personal notes sorting
Activity activity
Activity basic usage
Registration activities
Need to be in androidmanifest Register the activity in the application node in XML
<activity android:name=".FirstActivity"/>
If primary Activity
<activity android:name=".FirstActivity"
    android:label="This is FirstActivity">

    <intent-filter>
        <action android:name="android.intent.action.MAIN" />
        <category android:name="android.intent.category.LAUNCHER" />
    </intent-filter>
</activity>
Destruction activities
Call the finish() method
Using Intent
Explicit Intent
button1.setOnClickListener(new View.OnClickListener() {
    @Override
    public void onClick(View v) {
        Intent intent = new Intent(FirstActivity.this, SecondActivity.class);
        startActivity(intent);
    }
});
Implicit Intent
In the < action > tag, we indicate that the current activity can respond to an action, while the < category > tag contains some additional information to more accurately indicate the possible categories in the Intent that the current activity can respond to. This activity can respond to Intent only if the contents in < action > and < category > can match the action and category specified in Intent at the same time.
When creating an Intent, you can directly pass in the action string
Only one action can be specified in each Intent, but multiple categories can be specified.
You can use intent Addcategory (string category) to specify the category. If there is no matching activity, the app will report an error
Configure another < data > tag in the < intent Filter > tag to more accurately specify what type of data the current activity can respond to.
// Open Baidu with system browser
@Override
public void onClick(View v) {
    Intent intent = new Intent(Intent.ACTION_VIEW);
    intent.setData(Uri.parse("http://www.baidu.com"));
    startActivity(intent);
}
We can also configure another < data > tag in the < intent Filter > tag to more accurately specify what type of data the current activity can respond to< The following attributes can be configured in the data > tab.
- android:scheme . The protocol part used to specify the data, such as the http part in the above example.
- android:host . It is used to specify the host name part of the data, such as www.baidu.com in the above example Com section.
- android:port . Used to specify the port part of the data, usually immediately after the host name.
- android:path . Used to specify the part after the host name and port, such as the content following the domain name in a web address.
- android:mimeType . Used to specify the data types that can be processed. Wildcards are allowed.
Only when the content specified in the < Data > tag is completely consistent with the Data carried in the Intent can the current activity respond to the Intent.
Pass data to the next activity
button1.setOnClickListener(new View.OnClickListener() {
    @Override
    public void onClick(View v) {
        String data = "Hello SecondActivity";
        Intent intent = new Intent(FirstActivity.this, SecondActivity.class);
        intent.putExtra("extra_data", data);
        startActivity(intent);
    }
});
public class SecondActivity extends AppCompatActivity {
    @Override
    protected void onCreate(Bundle savedInstanceState) {
        super.onCreate(savedInstanceState);

        setContentView(R.layout.second_layout);
        Intent intent = getIntent();
        String data = intent.getStringExtra("extra_data");
        Log.d("SecondActivity", data);
    }
}
Returns data to the previous activity
Start a new activity
button1.setOnClickListener(new View.OnClickListener() {
    @Override
    public void onClick(View v) {
        Intent intent = new Intent(FirstActivity.this, SecondActivity.class);
        startActivityForResult(intent, 1);
    }
});
The new activity returns data
public void onClick(View v) {
    Intent intent = new Intent();
    intent.putExtra("data_return", "Hello FirstActivity");
    setResult(RESULT_OK, intent);
    finish();
}
The old activity receives data
@Override
protected void onActivityResult(int requestCode, int resultCode, Intent data) {

    switch (requestCode) {
        case 1:
            if (resultCode == RESULT_OK) {
                String returnedData = data.getStringExtra("data_return");
                Log.d("FirstActivity", returnedData);
            }
            break;
        default:
    }
}
The onActivityResult() method takes three parameters. The first parameter is requestCode, which is the request code passed in when we start the activity. The second parameter, resultCode, is the processing result passed in when we return data. The third parameter, data, is the Intent that carries the returned data. Since it is possible to call the startActivityForResult() method in an activity to start many different activities, and the data returned by each activity will be recalled to the onActivityResult() method, the first thing we need to do is to determine the data source by checking the value of requestCode. After confirming that the data is returned from SecondActivity, we can judge whether the processing result is successful through the value of resultCode. Finally, take the value from the data and print it out, so as to complete the work of returning data to the previous activity.
Generally, the onBackPressed() method is overridden to return data and end the activity
@Override
public void onBackPressed() {
    Intent intent = new Intent();
    intent.putExtra("data_return", "Hello FirstActivity");
    setResult(RESULT_OK, intent);
    finish();
}
Activity lifecycle
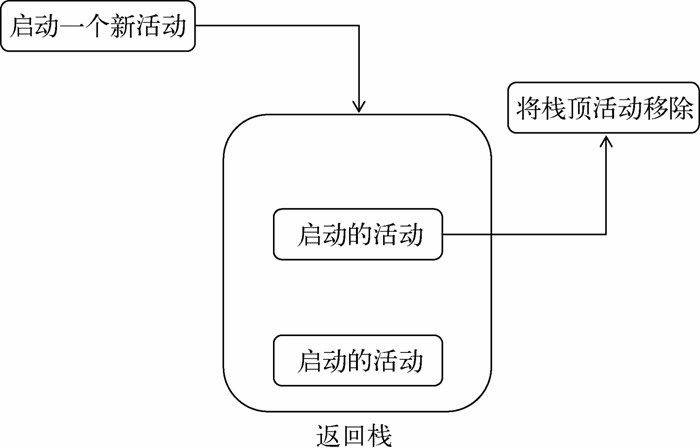
Return stack
Activities in Android can be stacked. Every time we start a new activity, it will overwrite the original activity, and then click the Back key to destroy the top activity, and the next activity will be displayed again.
Android uses tasks to manage activities. A Task is a collection of activities stored in the stack, which is also called the Back Stack
Active state
-
running state
When an activity is at the top of the return stack, the activity is running. The last thing the system wants to recycle is the running activity, because it will bring a very poor user experience.
-
Pause state
When an activity is no longer at the top of the stack but is still visible, the activity enters a suspended state. You may think that since the activity is no longer at the top of the stack, how can it be visible? This is because not every activity will occupy the whole screen. For example, activities in the form of dialog box will only occupy some areas in the middle of the screen. You will soon see this activity in the back. The suspended activity is still alive, and the system is unwilling to recycle this activity (because it is still visible, recycling visible things will have a bad impact on the user experience). The system will consider recycling this activity only when the memory is very low.
-
Stop status
When an activity is no longer at the top of the stack and is completely invisible, it enters the stop state. The system will still save the corresponding state and member variables for this activity, but this is not completely reliable. When memory is needed elsewhere, activities in the stopped state may be recycled by the system.
-
Destroy State
When an activity is removed from the return stack, it becomes destroyed. The system will most tend to recycle activities in this state, so as to ensure that the phone has enough memory.
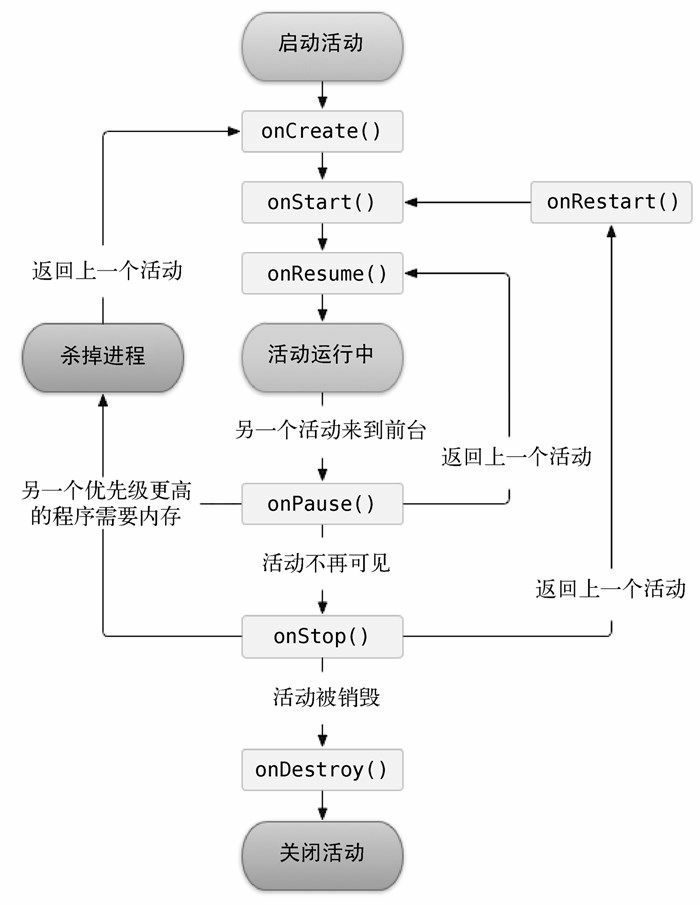
Activity lifecycle
- onCreate(): you have seen this method many times. We have rewritten this method in each activity. It will be called when the activity is created for the first time. You should initialize activities in this method, such as loading layout, binding events, etc.
- onStart(): this method is called when the activity changes from invisible to visible.
- onResume(): this method is called when the activity is ready to interact with the user. The activity at this time must be at the top of the return stack and in running state.
- onPause(): this method is called when the system is ready to start or resume another activity. We usually release some CPU consuming resources and save some key data in this method, but the execution speed of this method must be fast, otherwise it will affect the use of new stack top activities.
- onStop(): this method is called when the activity is completely invisible. The main difference between it and the onPause() method is that if the new activity started is a dialog activity, the onPause() method will be executed, while the onStop() method will not.
- onDestroy(): this method is called before the activity is destroyed, and then the state of the activity will be destroyed.
- onRestart(): this method is called before the activity changes from stop state to running state, that is, the activity is restarted.
Full cycle of activity:
Initialization of activities, such as layout and binding events: oncreate() - > make activities visible: onstart() - > make activities interactive with users: onresume() - > make activities invisible and release related resources: onpause() - > release resources by activities: onstop() - > Destroy activities: onDestory()
What if the activity is recycled
The onSaveInstanceState() method will carry a Bundle
preservation
@Override
protected void onSaveInstanceState(Bundle outState) {
    super.onSaveInstanceState(outState);
    String tempData = "Something you just typed";
    outState.putString("data_key", tempData);
}
recovery
@Override
protected void onCreate(Bundle savedInstanceState) {
    super.onCreate(savedInstanceState);
    Log.d(TAG, "onCreate");
    setContentView(R.layout.activity_main);
    if (savedInstanceState != null) {
        String tempData = savedInstanceState.getString("data_key");
        Log.d(TAG, tempData);
    }
    ...
}
Active startup mode
Specify the attribute android:launchMode = "" in the < activity > node
-
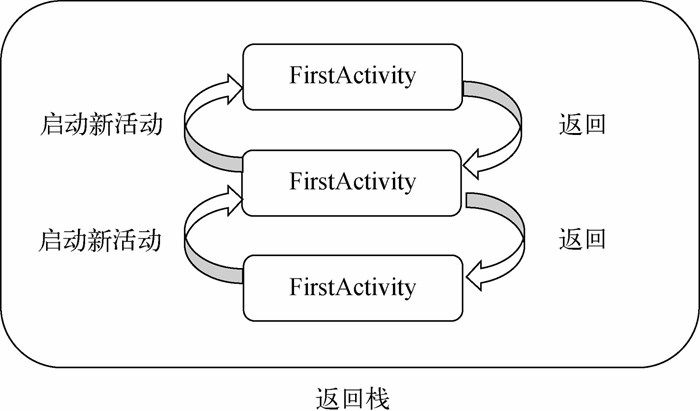
standard: default startup mode
Standard is the default startup mode of activities. Without explicit specification, all activities will automatically use this startup mode. Therefore, all the activities we have written so far use the standard pattern. After learning from the previous section, you already know that Android uses the return stack to manage activities,
In standard mode (that is, by default), whenever a new activity is started, it will be put on the return stack and at the top of the stack. For an activity using standard mode, the system does not care whether the activity already exists in the return stack. A new instance of the activity will be created every time it is started.
-
singleTop: the top is not repeated
Use singleTop mode. When the startup mode of an activity is specified as singleTop, when starting an activity, if it is found that the top of the returned stack is already the activity, it is considered that it can be used directly and no new activity instance will be created.

-
Single task: not repeated in the task stack
When the startup mode of an activity is specified as singleTask, each time the activity is started, the system will first check whether there is an instance of the activity in the return stack. If it is found that it already exists, the instance will be used directly, and all activities above the activity will be out of the stack. If it is not found, a new activity instance will be created.

-
singleInstance: separate task stack
In this mode, there will be a separate return stack to manage
Manage this activity, no matter which application accesses it
Move and all share the same return stack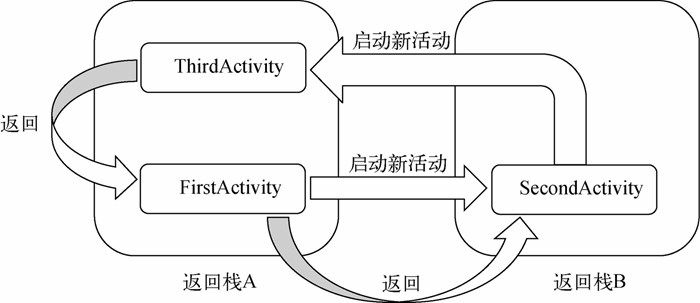
Launch Activity across applications
Intent intent = new Intent();
ComponentName comName = new ComponentName([PackageName],[PackageName/ActivityName]);
intent.setFlags(Intent.FLAG_ACTIVITY_NEW_TASK);
intent.setComponent(comName);
startActivity(intent);
Activity management
Understand the corresponding activities of the current interface
Create your own activity base class BaseActivity; And let all activities inherit this class
public class BaseActivity extends AppCompatActivity {
    @Override
    protected void onCreate(Bundle savedInstanceState) {
        super.onCreate(savedInstanceState);
        Log.d("BaseActivity", getClass().getSimpleName());
    }
}
When entering a new activity, the class name of the current activity is printed
Activity manager
ActivityCollector
public class ActivityCollector {

    public static List<Activity> activities = new ArrayList<>();
    public static void addActivity(Activity activity) {
        activities.add(activity);
    }
    public static void removeActivity(Activity activity) {
        activities.remove(activity);
    }
    public static void finishAll() {
        for (Activity activity : activities) {
            if (!activity.isFinishing()) {
                activity.finish();
            }
        }
        activities.clear();
    }
}
BaseActivity
public class BaseActivity extends AppCompatActivity {
    @Override
    protected void onCreate(Bundle savedInstanceState) {
        super.onCreate(savedInstanceState);
        Log.d("BaseActivity", getClass().getSimpleName());
        ActivityCollector.addActivity(this);
    }
    @Override
    protected void onDestroy() {
        super.onDestroy();

        ActivityCollector.removeActivity(this);
    }
}
In the onCreate() method of BaseActivity, the addActivity() method of ActivityCollector is invoked to indicate that the activities currently being created are added to the activity manager. Then override the onDestroy() method in the baseactivity and call the removeaactivity () method of the activitycollector, indicating that an activity to be destroyed immediately is removed from the activity manager.
Exit program
No matter where you want to exit the program, you just need to call activitycollector The finishall () method is fine
After exiting, you can also kill and tune the current process
android.os.Process.killProcess(android.os.Process.myPid());
Start Activity
public static void actionStart(Context context, String data1, String data2) {
        Intent intent = new Intent(context, [current_activity.class]);
        intent.putExtra("param1", data1);
        intent.putExtra("param2", data2);
        context.startActivity(intent);
    }
You can quickly call the Activity that contains the method