Persistence technology
Data persistence refers to saving those instantaneous data in memory to the storage device to ensure that these data will not be lost even when the mobile phone or computer is turned off. The data stored in memory is in transient state, while the data stored in storage device is in persistent state. Persistence technology provides a mechanism to convert the data between transient state and persistent state.
The Android system mainly provides three ways to simply realize the data persistence function, namely file storage, shared Preference Storage and database storage. Of course, in addition to these three methods, you can also save data in the SD card of the mobile phone, but it will be easier to save data using file, SharedPreference or database, and it will be safer than saving data in the SD card.
file store
File storage is the most basic data storage method in Android. It does not format the stored content. All data is saved intact in the file, so it is more suitable for storing some simple text data or binary data. If you want to use file storage to save some complex text data, you need to define your own format specification, so that you can easily re parse the data from the file later.
Store data in a file
The Context class provides an openfile0output () method, which can be used to store data in the specified file. This method receives two parameters. The first parameter is the file name, which is used when creating a file. Note that the file name specified here cannot contain a path, because all files are stored in the / data / data / < packagename > / files / directory by default. The second parameter is the operation mode of the file. There are two modes available: MODE_ PRIVATE and MODE APPEND. MODE PRIVATE is the default operation mode, which means that when the same file name is specified, the written content will overwrite the content in the original file, while MODE APPEND means that if the file already exists, content will be added to the file, and a new file will be created if it does not exist.
The openfile0output () method returns a File0utputStream object. After obtaining this object, you can write data to the file in the way of Java stream. The following is a simple code example showing how to save a piece of text content to a file:
public void save() throws IOException {
        String data = "Data to save";
        FileOutputStream out = null;
        BufferedWriter writer = null;
        try {
            out = openFileOutput("data", Context.MOOE_PRIVATE);
            writer = new BufferedWriter(new OutputStreamWriter(out));
            writer.write(data);
        } catch (IOException e) {
            e.printStackTrace();
        }finally {
            try {
                if(writer != null) {
                    writer.close();
                }
            } catch (IOException e) {
                e.printStackTrace();
            }
        }
    }
Here, you can get a FileOutputStream object through the openfile0output () method, and then use it to build an OutputStreamWriter object, and then use the OutputStreamWriter to build a BufferedWriter object, so that you can write the text content to the file through the BufferedWriter.
activity_main.xml
<LinearLayout xmlns:android="http://schemas.android.com/apk/res/android"
    android:orientation="vertical"
    android:layout_width="match_parent"
    android:layout_height="match_parent">

    <EditText
        android:layout_width="match_parent"
        android:layout_height="wrap_content"
        android:id="@+id/edit"
        android:hint="Type Something..."/>
</LinearLayout>
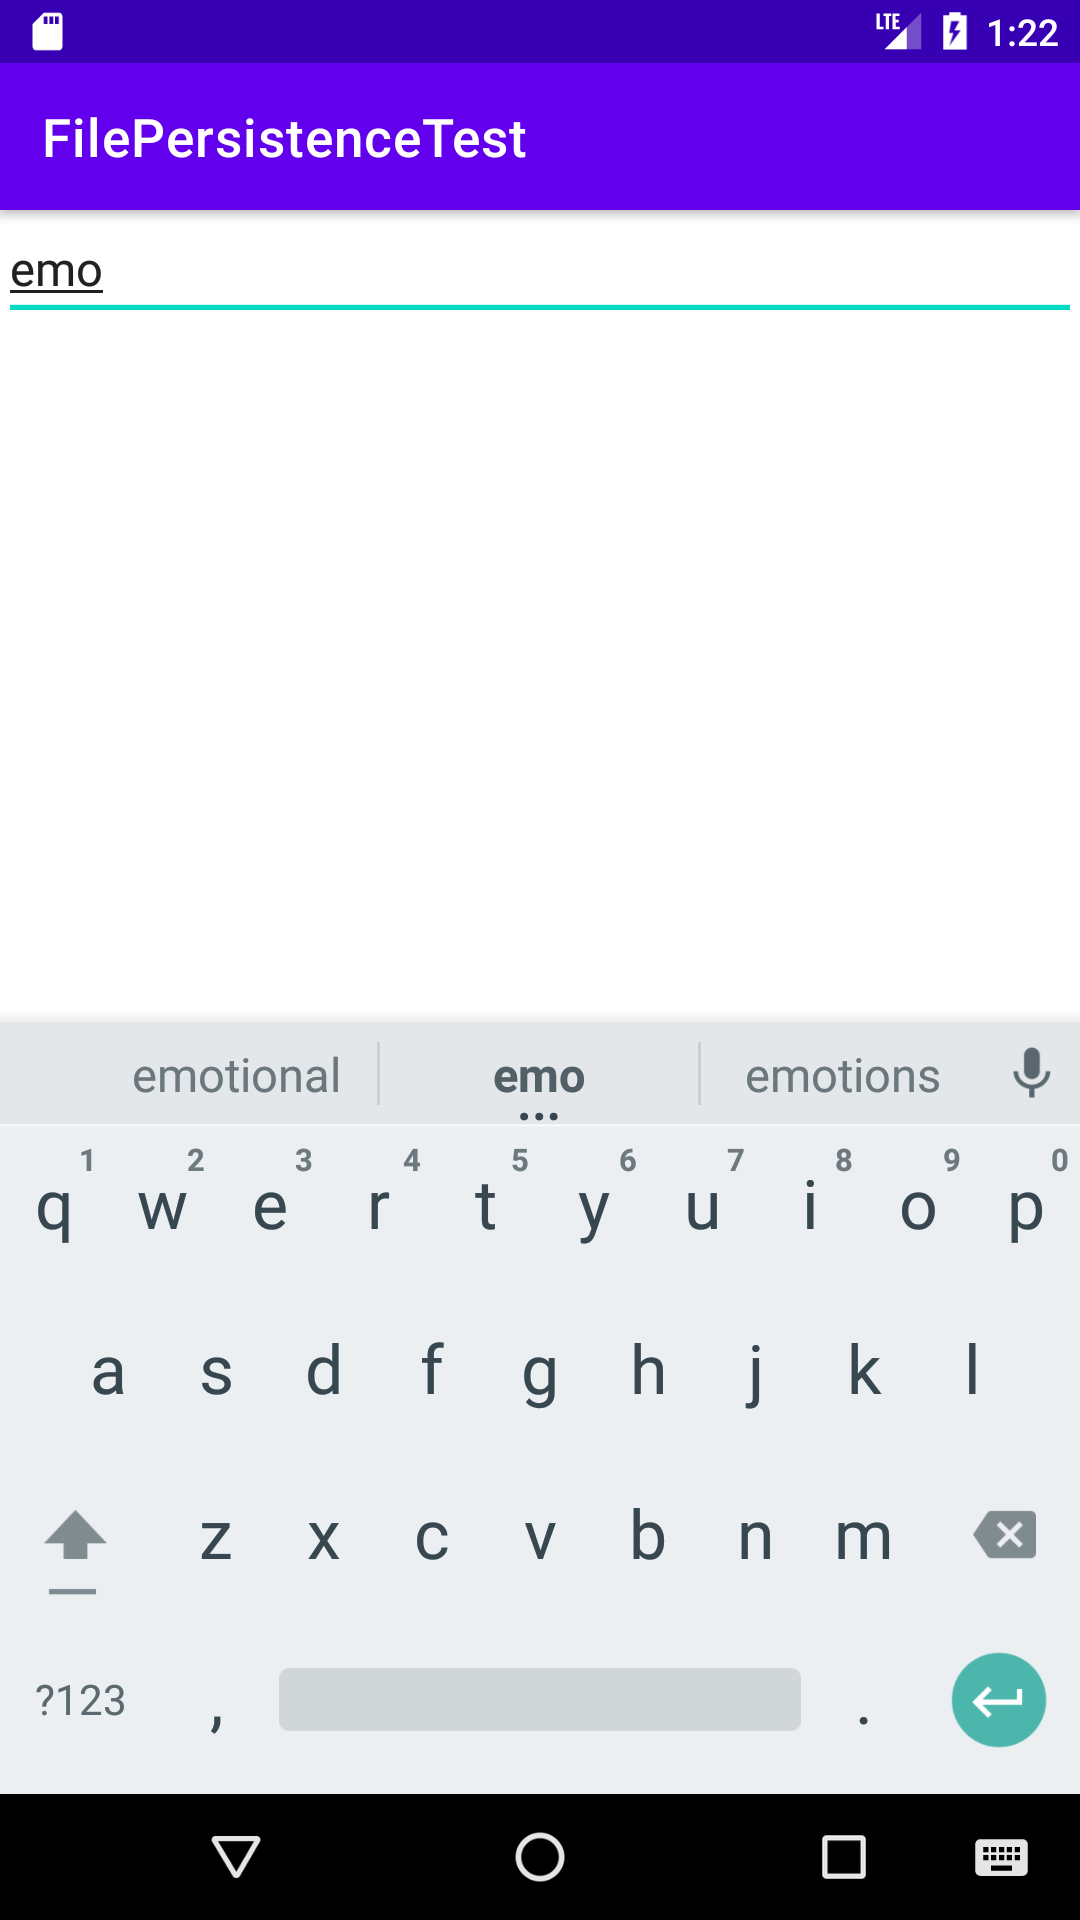
At this time, enter any content in the text input box, and then press the Back key. At this time, the input content must have been lost, because it is only instantaneous data and will be recycled after the activity is destroyed. What we need to do here is to store the data in a file before it is recycled. Modify the code in MainActivity as follows:
public class MainActivity extends AppCompatActivity {
    private EditText edit;


    @Override
    protected void onCreate(Bundle savedInstanceState) {
        super.onCreate(savedInstanceState);
        setContentView(R.layout.activity_main);
        edit = (EditText) findViewById(R.id.edit);
    }

    //Rewrite the method of destruction
    @Override
    protected void onDestroy() {
        super.onDestroy();
        //Gets the contents of the input box
        String inputText = edit.getText().toString();
        //Passed into save
        save(inputText);
    }
	//Store content in a file
    private void save(String inputText) {
        FileOutputStream out = null;
        BufferedWriter writer = null;
        try {
            //If the name file does not exist, create a new and associate the stream object
            //Context.MODE_PRIVATE is application private
            //MODE_WORLD_READABLE is accessible to all applications
            //MODE_WORLD_WRITEABLE so all applications can write
            //mode_APPEND means that if the file to be created exists, the newly written data will not overwrite the previous data.
            out = openFileOutput("data", Context.MODE_PRIVATE);
            writer = new BufferedWriter(new OutputStreamWriter(out));
            writer.write(inputText);
        } catch (IOException e) {
            e.printStackTrace();
        } finally {
            try {
                if(writer != null) {
                    //Closed flow
                    writer.close();
                }
            } catch (IOException e) {
                e.printStackTrace();
            }
        }
    }
}
Save the data through the openFileOutput() method
OutputStream os=Activity.this.openFileOutput("txtme.txt",MODE_PRIVATE); —> Txtme will be created in the directory of data / package name / files / Txt file if the file does not exist, mode_ The private file is private to the application, MODE_WORLD_READABLE is the mode that all applications can access_ WORLD_ Writeable so all applications can write, MODE_APPEND means that if the file to be created exists, the newly written data will not overwrite the previous data.
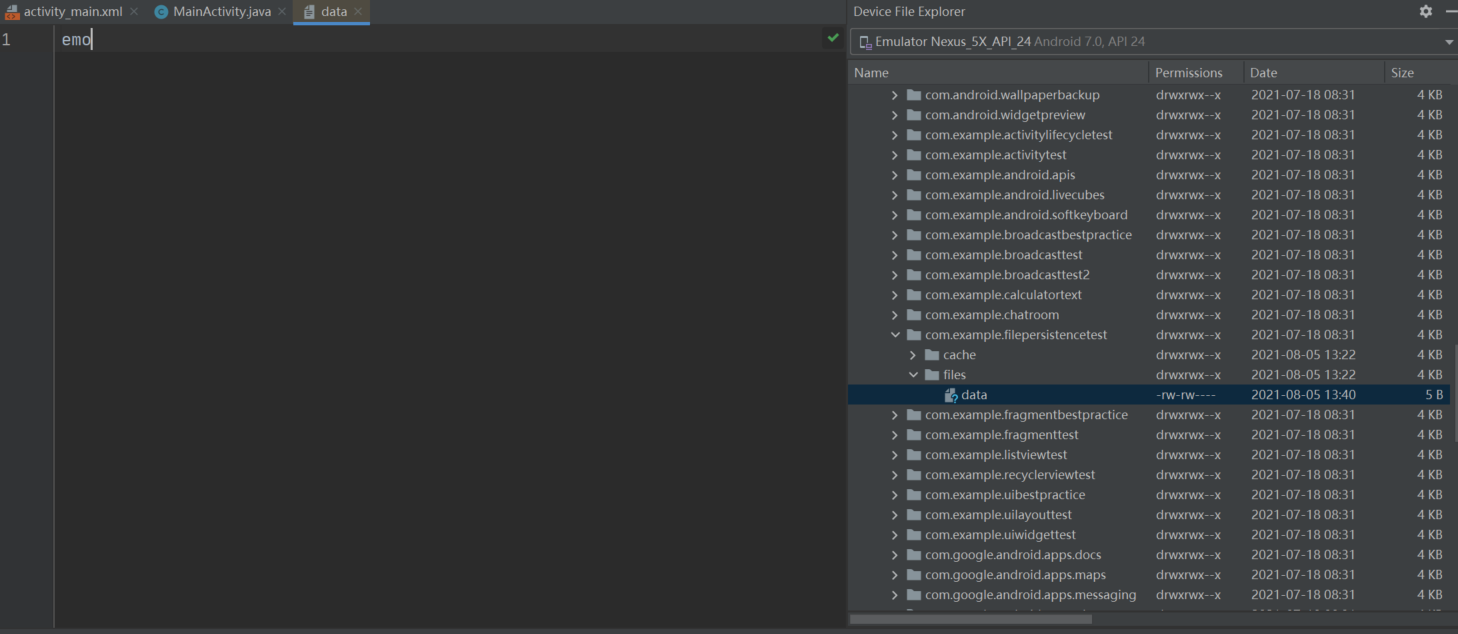
Start the program, enter the message in the input box and click the back key to return
To view where the file is saved, click the Device File Explorer in the lower right corner when opening the virtual machine, and find / data / package name / Files. The file we wrote is stored here
Read data from file
Similar to storing data in a file, the Context class also provides an openFileInput() method to read data from the file. This method is simpler than openfile0output(). It only receives one parameter, that is, the file name to be read. Then the system will automatically load the file in the / data/data//files / directory and return a FileInputStream object. After obtaining the object, you can read the data through Java streaming.
The following is a simple code example showing how to read text data from a file:
    //Read file operation
    private String load() throws IOException {
        FileInputStream in = null;
        BufferedReader reader = null;
        StringBuilder stringBuilder = new StringBuilder();
        try {
            //Get a FileInputStream object through openFileInput
            in = openFileInput("data");
            //Build an InputStreamReader with the help of in, and construct a BufferedReader with the help of InputStreamReader
            reader = new BufferedReader(new InputStreamReader(in));
            //Initializes a string used to read the contents of the file
            String line = "";
            while((line = reader.readLine()) != null) {
                //After appending this content to StringBuilder
                stringBuilder.append(line);
            }
        }  catch (IOException e) {
            e.printStackTrace();
        } finally {
            if(reader != null) {
                try {
                    reader.close();
                }catch (IOException e) {
                    e.printStackTrace();
                }

            }
        }
        return stringBuilder.toString();
    }
The core technology used in file storage is the openFileInput() and openfile0output () methods provided in the Context class, followed by reading and writing operations using various streams of Java.
File storage is not suitable for storing some complex text data
SharedPreferences store
Unlike file storage, shared preferences uses key value pairs to store data. In other words, when saving a piece of data, you need to provide a corresponding key for the data, so that you can get the corresponding value through this key when reading the data. Moreover, SharedPreferences also supports a variety of different data types. If the stored data type is integer, the read data is also integer; If the stored data is a string, the read data is still a string.
Store data in SharedPreferences
To use SharedPreferences to store data, you first need to get the SharedPreferences object. Android mainly provides three methods to get SharedPreferences objects.
- getSharedPreferences() method in Context class
This method receives two parameters. The first parameter is used to specify the name of the SharedPreferences file. If the specified file does not exist, one will be created. The SharedPreferences files are stored in / data / data / < package name: > / shared_ In the prefs / directory. The second parameter is used to specify the operation mode. At present, only MODE PRIVATE is available. It is the default operation mode. The effect is the same as that of direct transfer to 0. It means that only the current application can read and write this SharedPreferences file. Several other operating modes have been abandoned,
- getPreferences () method in Activity class
This method is very similar to the getSharedPreferences () method in Context, but it only receives an operation mode parameter, because when using this method, the currently active class name will be automatically used as the file name of SharedPreferences.
- getDefaultSharedPreferences() method in the PreferenceManager class
This is a static method that receives a Context parameter and automatically names the SharedPreferences file with the package name of the current application as a prefix. After you get the SharedPreferences object, you can start storing data in the shared preferences file, which can be implemented in three steps.
(1) Call the edit() method of the SharedPreferences object to get a SharedPreferences Editor object.
(2) To SharedPreferences To add data to the editor object, for example, to add a Boolean data, use the putBoolean() method, to add a string, use the putString() method, and so on.
(3) Call the apply() method to submit the added data to complete the data storage operation.
public class MainActivity extends AppCompatActivity {

    @Override
    protected void onCreate(Bundle savedInstanceState) {
        super.onCreate(savedInstanceState);
        setContentView(R.layout.activity_main);
        Button button = (Button)findViewById(R.id.save_data);
        button.setOnClickListener(new View.OnClickListener() {
            @Override
            public void onClick(View view) {
                //Get the SharedPreferences object through getSharedPreferences()
                //Get a SharedPreferences Editor object
                SharedPreferences.Editor editor = getSharedPreferences("data", MODE_PRIVATE).edit();
                //Store data
                editor.putString("name", "Judicious");
                editor.putInt("age", 19);
                editor.putBoolean("married", false);
                //Submit the data and complete the data storage operation
                editor.apply();
            }
        });
    }
}

The shared preferences file uses XML format to manage data.
Read data from SharedPreferences
A series of get methods are provided in the SharedPreferences object to read the stored data. Each get method corresponds to SharedPreferences A put side in the editor. These get methods all receive two parameters. The first parameter is the key. The corresponding value can be obtained by passing the key used to store data; The second parameter is the default value, which indicates what default value will be returned when the key passed on cannot find the corresponding value.
		public void onClick(View view) {
               //Get SharedPreferences object
                SharedPreferences sharedPreferences = getSharedPreferences("data", MODE_PRIVATE);
                //Get previously stored content
                String name = sharedPreferences.getString("name", "");
                int age = sharedPreferences.getInt("age", 0);
                boolean married = sharedPreferences.getBoolean("married", false);
                MainActivity Is the label easy to find and print logs
                Log.d("MainActivity", "name is " + name);
                Log.d("MainActivity", "age is " + age);
                Log.d("MainActivity", "married is " + married);
            }
Realize the function of remembering password
CheckBox this is a check box control. Users can select and cancel it by clicking.
public class LoginActivity extends BaseActivity{
    private SharedPreferences sharedPreferences;
    private SharedPreferences.Editor editor;
    private CheckBox remeberpass;
    private EditText accountEdit;
    private EditText passwordEdit;
    private Button login;

    @Override
    protected void onCreate(Bundle savedInstanceState) {
        super.onCreate(savedInstanceState);
        setContentView(R.layout.activity_login);
        //Get instance to create sharedPreferences object
        sharedPreferences = PreferenceManager.getDefaultSharedPreferences(this);
        remeberpass = (CheckBox) findViewById(R.id.remember_pass);
        accountEdit = (EditText) findViewById(R.id.account);
        passwordEdit = (EditText) findViewById(R.id.password);
        //Get the stored remember password object. Remember does not exist at first_ Password is the default object
        Boolean isRemember = sharedPreferences.getBoolean("remember_password", false);
        login = (Button) findViewById(R.id.login);
        //If you choose to remember, take out the password and display it
        if(isRemember) {
            String account = sharedPreferences.getString("account", "");
            String password = sharedPreferences.getString("password", "");
            accountEdit.setText(account);
            passwordEdit.setText(password);
            //Set the check box to selected
            remeberpass.setChecked(true);
        }
        login.setOnClickListener(new View.OnClickListener() {
            @Override
            public void onClick(View view) {
                //Get the entered account and password
                String account = accountEdit.getText().toString();
                String password = passwordEdit.getText().toString();
                //If the account is admin and the password is 123456, the login is considered successful
                if(account.equals("admin") && password.equals("123456")) {
                    editor = sharedPreferences.edit();
                    //Check that the check box is selected
                    if(remeberpass.isChecked()) {
                        editor.putBoolean("remember_password", true);
                        editor.putString("account",account);
                        editor.putString("password", password);

                    }else {
                        editor.clear();
                    }
                    editor.apply();
                    //Connect login page and post login page
                    Intent intent = new Intent(LoginActivity.this, MainActivity.class);
                    startActivity(intent);
                    finish();
                }else {
                    //Prompt of unsuccessful login
                    Toast.makeText(LoginActivity.this, "account or password is invalid", Toast.LENGTH_SHORT).show();
                }
            }
        });
    }
}
After successful login, the isChecked() method of the CheckBox will be called to check whether the check box is selected. If it is selected, it means that the user wants to remember the password. At this time, the user will remember_ Set password to true, then save the values corresponding to account and password into the SharedPreferences file and submit. If it is not selected, simply call the clear() method to clear all the data in the SharedPreferences file. After the user selects the remember password check box and successfully logs in once, remember_ The value corresponding to the password key is true. If you restart the login interface at this time, you will read the saved account and password from the SharedPreferences file, fill them in the text input box, and then select the remember password check box to complete the function of remembering the password.
However, it should be noted that it is very unsafe to store the password in the SharedPreferences file in clear text, and it is easy to be stolen by others. Therefore, in the formal project, it is necessary to protect the password in combination with a certain encryption algorithm.
SQLite database storage
SQLite is a lightweight relational database. Its operation speed is very fast and takes up very little resources. It usually only needs a few hundred KB of memory, so it is especially suitable for mobile devices. SQLite not only supports the standard SQL syntax, but also follows the ACID transaction of the database. SQLite is much simpler than a general database. It can be used without even setting a user name and password.
Create database
In order to make it easier for us to manage the database, Android provides a SQLiteOpenHelper help class. With this class, we can easily create and upgrade the database.
First of all, you should know that SQLiteOpenHelper is an abstract class, which means that if we want to use it, we need to create our own help class to inherit it. SQLiteOpenHelper has two abstract methods, onCreate() and onUpgrade(). We must rewrite these two methods in our help class, and then implement the logic of creating and upgrading databases in these two methods.
There are also two very important instance methods in SQLiteOpenHelper: getReadableDatabase() and getWritableDatabase(). Both methods can create or open an existing database (if the database already exists, open it directly, otherwise create a new database) and return an object that can read and write to the database. The difference is that when the database is not writable (for example, the disk space is full), The object returned by the getreadabledatabase () method will open the database in a read-only manner, while the getwritabledatabase () method will have an exception.
There are two constructors in SQLiteOpenHelper that can be rewritten. Generally, the constructor with fewer parameters can be used. This construction method receives four parameters. The first parameter is Context, which must be present to operate the database. The second parameter is the database name. The name specified here is used when creating the database. The third parameter allows us to return a custom Cursor when querying data, usually null. The fourth parameter represents the version number of the current database, which can be used to upgrade the database. After building an instance of SQLiteOpenHelper, you can call its getReadableDatabase() or getWritableDatabase() method to create a database. The database file will be stored in the / data / data / < package name > / databases / directory. At this point, override the onCreate() method
It will also be executed, so it is usually here to deal with some logic for creating tables.
Here we want to create a file called bookstore DB database, and then create a new Book table in this database, which has columns such as ID (primary key), author, price, number of pages and Book title. Of course, you still need to use the statement to create a database table
- Create your own help class
public class MyDatabaseHelper extends SQLiteOpenHelper {
    //Define the table creation statement as a string constant
    public static final String CREATE_BOOK = "create table Book ("
            //Automatic growth
            + "id integer primary key autoincrement, "
            //Text type
            + "author text, "
            //Floating Point Types
            + "price real, "
            //Integer type
            + "pages integer, "
            + "name text)";


    private Context mcontext;
    //Get the context passed in to facilitate the subsequent Toast

    public MyDatabaseHelper(Context context, String name, SQLiteDatabase.CursorFactory factory, int version) {
        super(context, name, factory, version);
        mcontext = context;
    }

    @Override
    public void onCreate(SQLiteDatabase sqLiteDatabase) {
        //Build table
        sqLiteDatabase.execSQL(CREATE_BOOK);
        Toast.makeText(mcontext, "Create succeeded", Toast.LENGTH_SHORT).show();
    }

    @Override
    public void onUpgrade(SQLiteDatabase sqLiteDatabase, int i, int i1) {

    }
}
- Create database
public class MainActivity extends AppCompatActivity {
    private MyDatabaseHelper databaseHelper;

    @Override
    protected void onCreate(Bundle savedInstanceState) {
        super.onCreate(savedInstanceState);
        setContentView(R.layout.activity_main);
        //Create the MyDatabaseHelper object and specify the database name as Bookstore through the construction parameters db
        databaseHelper = new MyDatabaseHelper(this, "BookStore.db", null, 1);
        Button createDatabase = (Button) findViewById(R.id.create_database);
        createDatabase.setOnClickListener(new View.OnClickListener() {
            @Override
            public void onClick(View view) {
                //It will detect whether the database exists in the program. If not, it will create the database and call the onCreate() method in MyDatabaseHelper
                //The Book table is created and prompted to complete
                databaseHelper.getWritableDatabase();
            }
        });
    }
}
Upgrade database
onUpgrade() is used to upgrade the database. It plays a very important role in the management of the whole database,
At present, there is already a Book table in the DatabaseTest project to store various detailed data of books. If we want to add another Category table to record the classification of books. You need the onUpgrade () method
databaseHelper = new MyDatabaseHelper(this, "BookStore.db", null, 2);
public class MyDatabaseHelper extends SQLiteOpenHelper {
    //Define the table creation statement as a string constant
    public static final String CREATE_BOOK = "create table Book ("
            //Automatic growth
            + "id integer primary key autoincrement, "
            //Text type
            + "author text, "
            //Floating Point Types
            + "price real, "
            //Integer type
            + "pages integer, "
            + "name text)";

    public static final String CREATE_CATEGORY = "create table Cetegory ("
            + "id integer primary key autoincrement, "
            + "category_name text, "
            + "category_code integer)";


    private Context mcontext;
    //Get the context passed in to facilitate the subsequent Toast

    public MyDatabaseHelper(Context context, String name, SQLiteDatabase.CursorFactory factory, int version) {
        super(context, name, factory, version);
        mcontext = context;
    }

    @Override
    public void onCreate(SQLiteDatabase sqLiteDatabase) {
        //Build table
        sqLiteDatabase.execSQL(CREATE_BOOK);
        sqLiteDatabase.execSQL(CREATE_CATEGORY);
        Toast.makeText(mcontext, "Create succeeded", Toast.LENGTH_SHORT).show();
    }

    //To make the method execute, the fourth parameter is passed in a number greater than 1 during construction
    @Override
    public void onUpgrade(SQLiteDatabase sqLiteDatabase, int i, int i1) {
        //If the table is found in the database, it will be deleted
        sqLiteDatabase.execSQL("drop table if exists Book");
        sqLiteDatabase.execSQL("drop table if exists Category");
        //Recreate
        onCreate(sqLiteDatabase);

    }
}
In addition to the above methods, you can uninstall the program and reinstall it, so that the original files will disappear together. Then re run the program and add the table creation statement.
Add data
There are four kinds of data operations, namely crud. Where C represents create, R represents retrieve, u represents update, and D represents delete. Each operation corresponds to an SQL command. insert is used when adding data, select is used when querying data, update is used when updating data, and delete is used when deleting data. Android also provides a series of auxiliary methods to easily complete all CRUD operations without writing SQL statements in Android.
Calling getReadableDatabase() or getWritableDatabase() methods of SQLiteOpenHelper can be used to create and upgrade databases. In addition, both methods will return a SQLiteDatabase object, which can be used to CRUD data.
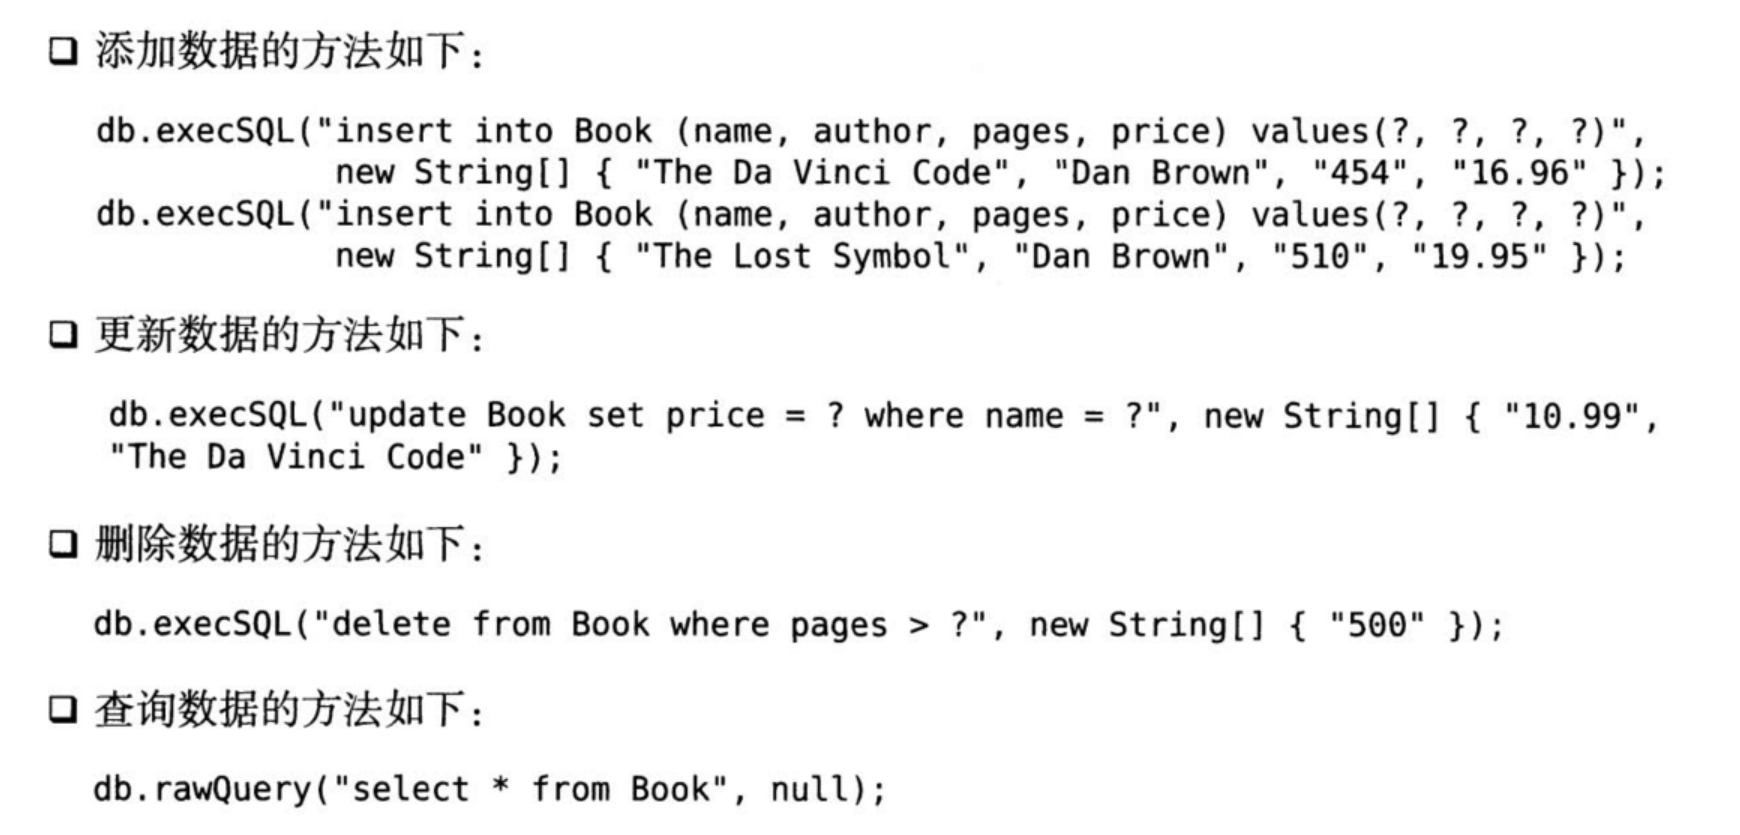
insert is provided in SQLiteDatabase () method, which is used to add data. It receives three parameters. The first parameter is the table name. The name of the table will be passed in when data is added to the table. The second parameter is used to automatically assign null to some nullable columns without specifying data. Generally, null is passed in. The third parameter is the ContentValues object, which provides a series of P The UT () method overload is used to add data to ContentValues. You only need to pass in each column name in the table and the corresponding data to be added.
public class MainActivity extends AppCompatActivity {
    private MyDatabaseHelper databaseHelper;

    @Override
    protected void onCreate(Bundle savedInstanceState) {
        super.onCreate(savedInstanceState);
        setContentView(R.layout.activity_main);
        //Create the MyDatabaseHelper object and specify the database name as Bookstore through the construction parameters db
        databaseHelper = new MyDatabaseHelper(this, "BookStore.db", null, 2);
        Button createDatabase = (Button) findViewById(R.id.create_database);
        createDatabase.setOnClickListener(new View.OnClickListener() {
            @Override
            public void onClick(View view) {
                //It will detect whether the database exists in the program. If not, it will create the database and call the onCreate() method in MyDatabaseHelper
                //The Book table is created and prompted to complete
                databaseHelper.getWritableDatabase();
            }
        });
        Button addData = (Button) findViewById(R.id.add_data);
        addData.setOnClickListener(new View.OnClickListener() {
            @Override
            public void onClick(View view) {
                //Get SQLiteDatabase object
                SQLiteDatabase sqLiteDatabase = databaseHelper.getWritableDatabase();
                //Use ContentValues to assemble the data to be added
                ContentValues values = new ContentValues();
                //Start assembling the first data
                values.put("name", "The Da Vinci Code");
                values.put("author", "Dan Brown");
                values.put("pages", 454);
                values.put("price", 16.96);
                //Insert first data
                sqLiteDatabase.insert("Book", null, values);
                values.clear();
                //Start assembling the second data
                values.put("name", "The Lost Symbol");
                values.put("autor", "Dan Brown");
                values.put("pages",510);
                values.put("price",19.95);
                //Insert second data
                sqLiteDatabase.insert("Book", null, values);
            }
        });
    }
}
The id column is not assigned to it. This is because when creating the table, the id column is set to self growth, and its value will be automatically generated when the database is created, so there is no need to assign it manually.
Update data
The update() method is used to update data. This method receives four parameters. The first parameter, like the insert() method, is also a table name. Here, it specifies which table data to update. The second parameter is the ContentValues object, where the updated data is assembled. The third and fourth parameters are used to restrict the updating of data in a row or rows. If not specified, all rows will be updated by default.
Button updateData = (Button) findViewById(R.id.updata_data);
        updateData.setOnClickListener(new View.OnClickListener() {
            @Override
            public void onClick(View view) {
                SQLiteDatabase sqLiteDatabase = databaseHelper.getWritableDatabase();
                ContentValues values = new ContentValues();
                values.put("price", 10.99); //Add the information to be modified to ContentValues
                //The third parameter to update data is the where part of the SQL statement, which means to update all name =? OK? Is a placeholder. You can provide the corresponding content of the placeholder through the fourth parameter
                sqLiteDatabase.update("Book", values, "name = ?", new String[] {"The Da VinciCode"});
            }
        });
Delete data
SQLiteDatabase provides a delete() method for deleting data. This method receives three parameters. The first parameter is still the table name, and the second and third parameters are used to restrict the deletion of a row or rows of data. If it is not specified, all rows are deleted by default.
Button deleteData = (Button) findViewById(R.id.delete_data);
        deleteData.setOnClickListener(new View.OnClickListener() {
            @Override
            public void onClick(View view) {
                SQLiteDatabase sqLiteDatabase = databaseHelper.getWritableDatabase();
                //Delete books with more than 50 pages
                sqLiteDatabase.delete("Book", "pages > ?",new String[] {"500"});
            }
        });
Query data
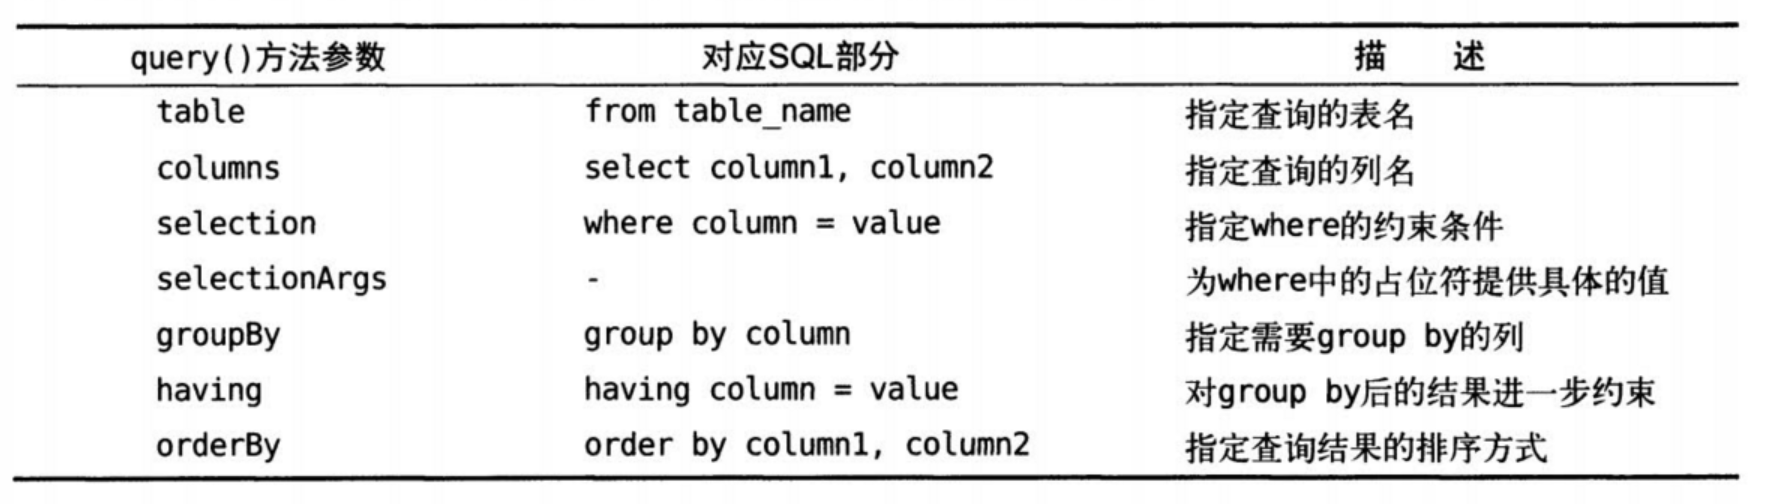
SQLiteDatabase also provides a query() method for querying data. The parameters of this method are very complex. The shortest method overload also needs to pass 7 parameters. Let's take a look at the respective meanings of these seven parameters. The first parameter is also the table name, which indicates the table in which we want to query data. The second parameter is used to specify which columns to query. If not specified, all columns will be queried by default. The third and fourth parameters are used to restrict the query of the data of a row or rows. If not specified, the data of all rows will be queried by default. The fifth parameter is used to specify the need to go to group by; If it is not specified, it means that group by operation is not performed on the query results. The sixth parameter is used to further filter the data after group by. If it is not specified, it means that no filtering will be performed. The seventh parameter is used to specify the sorting method of query results. If it is not specified, the default sorting method is used. For more details, please refer to the table below. Overloading of several other query() methods
Also similar.
Although the query() method has many parameters, we do not need to specify all parameters for each query statement. In most cases, we only need to pass a few parameters to complete the query operation. After calling the query() method, a Cursor object will be returned, and all the data queried will be taken out of this object.
Detailed description of SQL cursor and internal recycling example
Cursor is a data buffer set up by the system for users to store the execution results of SQL statements. Each cursor area has a name. Users can use SQL statements to obtain records from the cursor one by one, assign them to the main variable, and submit them to the main language for further processing.
Cursor is a mechanism for processing the result set. It can locate a row in the result set, read and write multiple data, or move the cursor to locate the row you need to operate data. Cursors appear in general complex stored procedures. They are mainly used for:
- Navigate to a row in the result set.
- Read and write the data of the current location.
- You can operate on the data in the result set separately, rather than the entire row.
- It is a bridge between set oriented database management system and row oriented programming.
Button queryData = (Button) findViewById(R.id.query_data);
        queryData.setOnClickListener(new View.OnClickListener() {
            @Override
            public void onClick(View view) {
                SQLiteDatabase sqLiteDatabase = databaseHelper.getWritableDatabase();
                //Use the query () method to query the object and return a Cursor object
                Cursor cursor = sqLiteDatabase.query("Book",null, null, null, null, null, null);
                //Call the moveFirst method to move the pointer of the data to the first row and enter a loop to traverse the data of each row
                if(cursor.moveToFirst()) {
                    do {
                        //Get the index of the corresponding position of a column in the table through the getColumnIndex () method
                        //The data can be read by passing the index into the corresponding value method
                        String name = cursor.getString(cursor.getColumnIndex("name"));
                        String author = cursor.getString(cursor.getColumnIndex("author"));
                        int pages = cursor.getInt(cursor.getColumnIndex("pages"));
                        double price = cursor.getDouble(cursor.getColumnIndex("price"));
                        Log.d("TAG", name);
                        Log.d("TAG", author);
                        Log.d("TAG", pages + "");
                        Log.d("TAG", price + "");
                    }while (cursor.moveToNext());
                }
                //Close Cursor
                cursor.close();
            }
        });
Operating databases using SQL
Complete CRUD using SQL
Using LitePal to manipulate databases
About LitePal
LitePal is an open-source Android database framework. It adopts the object relational mapping (ORM) mode and encapsulates some database functions most commonly used in our usual development, so that we can complete various operations of creating tables, adding, deleting, modifying and querying without writing one line of SQL statements.
The project home page address of litepal is: https://github.com/LitePalFramework/LitePal .
Configure LitePal
Find the latest version number on the Internet, Click here to get the latest version number . Add permissions to app / build In gradle
dependencies {
    implementation 'org.litepal.guolindev:core:3.2.3'
    }
Configure litepal XML file, create an assets directory under new - > directory in app/src/main / directory, and then create a litepal.xml file in the assets directory XML file, as follows
<litepal>
    /*
    dbname Specify the database name. list is used to specify all mapping models. Version is used to specify the database version number
    */
    <dbname value="BookStore" ></dbname>

    <version value="1"></version>
    <list></list>
</litepal>
Configure LitePalApplication and modify androidmanifest xml
    <application
        android:name="org.litepal.LitePalApplication"
        android:allowBackup="true"
        android:icon="@mipmap/ic_launcher"
        android:label="@string/app_name"
        android:roundIcon="@mipmap/ic_launcher_round"
        android:supportsRtl="true"
        android:theme="@style/Theme.DatabaseTest">
        <activity android:name=".MainActivity">
            <intent-filter>
                <action android:name="android.intent.action.MAIN" />

                <category android:name="android.intent.category.LAUNCHER" />
            </intent-filter>
        </activity>
    </application>
Configure the application of the project as org LitePal. LitePal application, so that all functions of LitePal can work normally.
Creating and upgrading databases
The programming language we use is object-oriented language, and the database we use is relational database. Then we establish a mapping relationship between object-oriented language and relational database, which is object relational mapping.
Define a Book Class
public class Book {
    private int id;
    private String author;
    private double price;
    private int pages;
    private String name;

    public int getId() {
        return id;
    }

    public void setId(int id) {
        this.id = id;
    }

    public String getAuthor() {
        return author;
    }

    public void setAuthor(String author) {
        this.author = author;
    }

    public double getPrice() {
        return price;
    }

    public void setPrice(double price) {
        this.price = price;
    }

    public int getPages() {
        return  pages;
    }

    public void setPages(int pages) {
        this.pages = pages;
    }

    public String getName() {
        return name;
    }

    public void setName(String name) {
        this.name = name;
    }

}
The Book class corresponds to the Book table of the database, and each field in the class corresponds to each column in the table. Reflect the object mapping. Next, add the Book class to the list of mapping models and modify litepal xml
<litepal>
    /*
    dbname Specify the database name. list is used to specify all mapping models. Version is used to specify the database version number
    */
    <dbname value="BookStore" ></dbname>

    <version value="1"></version>
    <list>
        <mapping class="com.example.litepaltest.Book"></mapping>
    </list>
</litepal>
Use the mapping tag to declare the mapping model class we want to configure. Be sure to use the complete class name. No matter how many model classes need mapping, use the same method to configure them under the < list > tab.
public class MainActivity extends AppCompatActivity {

    @Override
    protected void onCreate(Bundle savedInstanceState) {
        super.onCreate(savedInstanceState);
        setContentView(R.layout.activity_main);
        Button createDatabase = (Button) findViewById(R.id.create_database);
        createDatabase.setOnClickListener(new View.OnClickListener() {
            @Override
            public void onClick(View view) {
                //Create database LitePal
                LitePal.getDatabase();
            }
        });
    }
}
Upgrade the database, add fields, directly modify the added classes, or add a table. After changing what you want, you need to add the version number + 1 and start the program. LitePal will help us automatically save the previous content without worrying about data loss
<version value="2"></version>
Add data
Create an instance of the model class, set all the data, and call the save() method
LitePal does not need any inheritance structure of the model class for table management, but not for CRUD. It must inherit from the DataSupport class. Therefore, we need to add the inheritance structure first.
public class Book extends LitePalSupport {
	...
}
Add data to the Book table
Button addDate = (Button) findViewById(R.id.add_data);
        addDate.setOnClickListener(new View.OnClickListener() {
            @Override
            public void onClick(View view) {
                //Create a Book Object
                Book book = new Book();
                //Add data
                book.setName("The Da Vinci Code");
                book.setAuthor("Dan Brown");
                book.setPages(454);
                book.setPrice(16.96);
                book.setPress("Unknow");
                //Adding save() is inherited
                book.save();
            }
        });
Update data
- Reset the value of the stored object, and then call the save() method again.
For LitePal, whether the object has been stored is based on the call to model It is judged by the result of the issaved () method. If it returns true, it means it has been stored, and if it returns false, it means it has not been stored.
In fact, there are only two cases The issaved () method will return true. In one case, model has been called The save () method is used to add data. At this time, the model will be considered as a stored object. On the other hand, the model object is found through the query API provided by LitePal. Since it is an object found in the database, it will also be considered as a stored object.
This method can only operate on stored objects.
Button updateData = (Button) findViewById(R.id.updata_data);
        updateData.setOnClickListener(new View.OnClickListener() {
            @Override
            public void onClick(View view) {
                //Create a Book Object
                Book book = new Book();
                //Add data
                book.setName("The Lost Symbol");
                book.setAuthor("Dan Brown");
                book.setPages(510);
                book.setPrice(19.95);
                book.setPress("Unknow");
                book.save();
                //Use the set method to modify the value
                book.setPrice(10.99);
                //Adding save() is inherited
                book.save();
            }
        });
- The second update method
You cannot use this method if you need to set the field as the default value
Button updateData = (Button) findViewById(R.id.updata_data);
        updateData.setOnClickListener(new View.OnClickListener() {
            @Override
            public void onClick(View view) {
                //Create a Book Object
                Book book = new Book();
                //Set the value to be updated
                book.setPrice(14.59);
                book.setPress("Anchor");
                //Perform the update operation. If no condition is specified, all data will be updated by default
                book.updateAll("name = ? and author = ?", "The Lost Symbol", "Dan Brown");
            }
        });
- Update field to default
				Book book = new Book();
                //Update pages to default
                book.setToDefault("pages");
                //No default condition is specified
                book.updateAll();
Delete data
- Directly call delete() to delete
- Call deleteAll() to delete
                LitePal.delete(Book.class,id);   //Delete the corresponding id
                //Database name, constraint condition, specific condition
                LitePal.deleteAll(Book.class, "price < ?","15");
If no condition is specified, all data will be deleted by default
Query data
- find()
- findAll()
				//Query an id
                Book book = LitePal.find(Book.class, id);
                //Query Book table
                List<Book> books = LitePal.findAll(Book.class);
Query the first data
				Book firstBook = LitePal.findFirst(Book.class);
                Book lastBook = LitePal.findLast(Book.class);